Skimmer Installation and Maintenance Guide Ãcumoire Notice d ...
Skimmer Installation and Maintenance Guide Ãcumoire Notice d ...
Skimmer Installation and Maintenance Guide Ãcumoire Notice d ...

You also want an ePaper? Increase the reach of your titles
YUMPU automatically turns print PDFs into web optimized ePapers that Google loves.
As with all our pond products, the Laguna <strong>Skimmer</strong> is designed to make your water gardening experience as simple <strong>and</strong> enjoyable as<br />
possible. Proper installation of this unit will provide several benefits, including clear <strong>and</strong> healthy pond water, low maintenance, <strong>and</strong>, a<br />
pleasant water garden environment for you <strong>and</strong> your family to enjoy <strong>and</strong> be proud of.<br />
This manual will cover all aspects of installing, maintaining <strong>and</strong> storing your <strong>Skimmer</strong> (PT495); as well, it serves as a guide to<br />
recommended complementary products.<br />
Read <strong>and</strong> underst<strong>and</strong> these instructions thoroughly before beginning installation.<br />
<strong>Skimmer</strong> <strong>Installation</strong><br />
EXCAVATING AND SETTING THE SKIMMER<br />
The excavation should be a few inches (centimetres) wider <strong>and</strong> longer than the <strong>Skimmer</strong> body. The approximate depth of the hole<br />
below water level for the <strong>Skimmer</strong> (PT495) is 16 - 17” (40 – 43 cm). Do not dig too deep. The <strong>Skimmer</strong> should be set on undisturbed<br />
earth if possible. In case you over-dig, be sure to compact the soil thoroughly to prevent settling. The bottom of the hole should be<br />
level side-to-side <strong>and</strong> front-to-back.<br />
1. Place the <strong>Skimmer</strong> unit into the excavated hole.<br />
2. Check the top of the unit to make sure that it is level front-to-back <strong>and</strong><br />
side-to-side.<br />
3. Check where your pre-determined water level falls on the face of the <strong>Skimmer</strong><br />
unit. Water level needs to be between 1 ¼” <strong>and</strong> 1 ½” (3 – 4 cm) below the<br />
top of the opening for the weir door.<br />
4. Ensure that any unexcavated soil that is left in front of the <strong>Skimmer</strong> is at least<br />
10” (25 cm) below the water level. This will ensure that there is enough room for<br />
the weir door to be installed <strong>and</strong> function properly.<br />
TIP: Before you go any further into the <strong>Skimmer</strong> installation, it is a good idea to place a few stones inside the unit<br />
to weigh it down <strong>and</strong> keep it from moving.<br />
5. Install the 1 ½” (4 cm) solid support bar (A) <strong>and</strong> begin backfilling. The support bar must be in place for the unit to retain its<br />
shape during the backfilling process.<br />
6. Loosely backfill the unit on all sides, lightly compacting as you go. Do not over compact the soil! Over compacting<br />
may distort the unit <strong>and</strong> cause components to fit<br />
improperly.<br />
A<br />
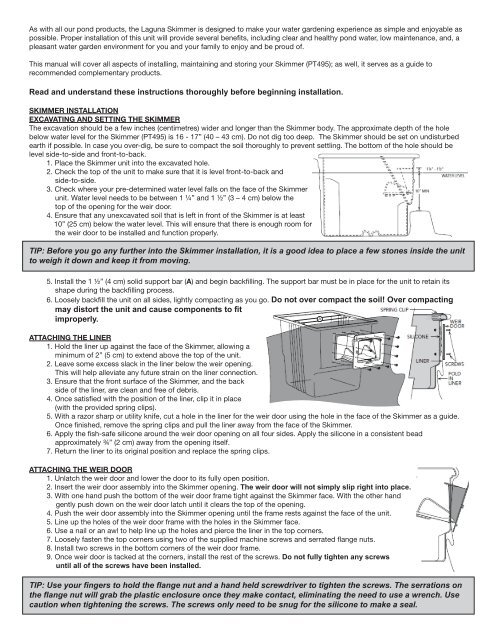
ATTACHING THE LINER<br />
1. Hold the liner up against the face of the <strong>Skimmer</strong>, allowing a<br />
minimum of 2” (5 cm) to extend above the top of the unit.<br />
2. Leave some excess slack in the liner below the weir opening.<br />
This will help alleviate any future strain on the liner connection.<br />
3. Ensure that the front surface of the <strong>Skimmer</strong>, <strong>and</strong> the back<br />
side of the liner, are clean <strong>and</strong> free of debris.<br />
4. Once satisfied with the position of the liner, clip it in place<br />
(with the provided spring clips).<br />
5. With a razor sharp or utility knife, cut a hole in the liner for the weir door using the hole in the face of the <strong>Skimmer</strong> as a guide.<br />
Once finished, remove the spring clips <strong>and</strong> pull the liner away from the face of the <strong>Skimmer</strong>.<br />
6. Apply the fish-safe silicone around the weir door opening on all four sides. Apply the silicone in a consistent bead<br />
approximately ¾” (2 cm) away from the opening itself.<br />
7. Return the liner to its original position <strong>and</strong> replace the spring clips.<br />
ATTACHING THE WEIR DOOR<br />
1. Unlatch the weir door <strong>and</strong> lower the door to its fully open position.<br />
2. Insert the weir door assembly into the <strong>Skimmer</strong> opening. The weir door will not simply slip right into place.<br />
3. With one h<strong>and</strong> push the bottom of the weir door frame tight against the <strong>Skimmer</strong> face. With the other h<strong>and</strong><br />
gently push down on the weir door latch until it clears the top of the opening.<br />
4. Push the weir door assembly into the <strong>Skimmer</strong> opening until the frame rests against the face of the unit.<br />
5. Line up the holes of the weir door frame with the holes in the <strong>Skimmer</strong> face.<br />
6. Use a nail or an awl to help line up the holes <strong>and</strong> pierce the liner in the top corners.<br />
7. Loosely fasten the top corners using two of the supplied machine screws <strong>and</strong> serrated flange nuts.<br />
8. Install two screws in the bottom corners of the weir door frame.<br />
9. Once weir door is tacked at the corners, install the rest of the screws. Do not fully tighten any screws<br />
until all of the screws have been installed.<br />
TIP: Use your fingers to hold the flange nut <strong>and</strong> a h<strong>and</strong> held screwdriver to tighten the screws. The serrations on<br />
the flange nut will grab the plastic enclosure once they make contact, eliminating the need to use a wrench. Use<br />
caution when tightening the screws. The screws only need to be snug for the silicone to make a seal.