TB-TOYOTA INSTALLATION GUIDE - Fortin Electronic Systems
TB-TOYOTA INSTALLATION GUIDE - Fortin Electronic Systems
TB-TOYOTA INSTALLATION GUIDE - Fortin Electronic Systems

You also want an ePaper? Increase the reach of your titles
YUMPU automatically turns print PDFs into web optimized ePapers that Google loves.
G<br />
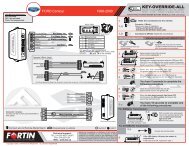
<strong>TB</strong>-<strong>TOYOTA</strong> <strong>INSTALLATION</strong> <strong>GUIDE</strong><br />
To use with | Pour utilisation avec<br />
<strong>TB</strong>-CONTROL<br />
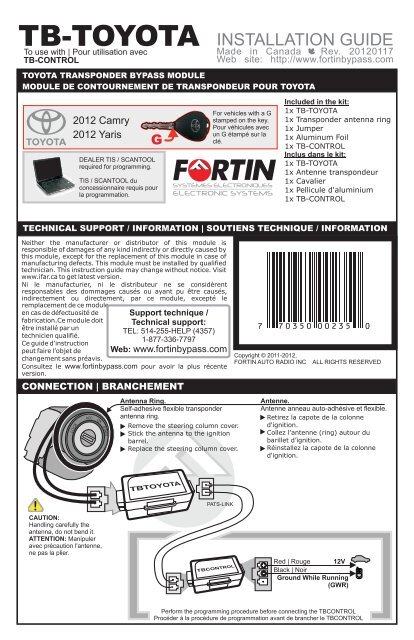
<strong>TOYOTA</strong> TRANSPONDER BYPASS MODULE<br />
MODULE DE CONTOURNEMENT DE TRANSPONDEUR POUR <strong>TOYOTA</strong><br />
2012 Camry<br />
2012 Yaris<br />
DEALER TIS / SCANTOOL<br />
required for programming.<br />
TIS / SCANTOOL du<br />
concessionnaire requis pour<br />
la programmation.<br />
Made in Canada - Rev. 20120117<br />
Web site: http://www.fortinbypass.com<br />
For vehicles with a G<br />
stamped on the key.<br />
Pour véhicules avec<br />
un G étampé sur la<br />
clé.<br />
Included in the kit:<br />
1x <strong>TB</strong>-<strong>TOYOTA</strong><br />
1x Transponder antenna ring<br />
1x Jumper<br />
1x Aluminum Foil<br />
1x <strong>TB</strong>-CONTROL<br />
Inclus dans le kit:<br />
1x <strong>TB</strong>-<strong>TOYOTA</strong><br />
1x Antenne transpondeur<br />
1x Cavalier<br />
1x Pellicule d'aluminium<br />
1x <strong>TB</strong>-CONTROL<br />
TECHNICAL SUPPORT / INFORMATION | SOUTIENS TECHNIQUE / INFORMATION<br />
Neither the manufacturer or distributor of this module is<br />
responsible of damages of any kind indirectly or directly caused by<br />
this module, except for the replacement of this module in case of<br />
manufacturing defects. This module must be installed by qualified<br />
technician. This instruction guide may change without notice. Visit<br />
www.ifar.ca to get latest version.<br />
Ni le manufacturier, ni le distributeur ne se considèrent<br />
responsables des dommages causés ou ayant pu être causés,<br />
indirectement ou directement, par ce module, excepté le<br />
remplacement de ce module<br />
en cas de défectuosité de<br />
fabrication.Ce module doit<br />
être installé par un<br />
technicien qualifié.<br />
Ce guide d'instruction<br />
peut faire l’objet de<br />
changement sans préavis.<br />
Support technique /<br />
Technical support:<br />
TEL: 514-255-HELP (4357)<br />
1-877-336-7797<br />
Web: www.fortinbypass.com<br />
Consultez le www.fortinbypass.com pour avoir la plus récente<br />
version.<br />
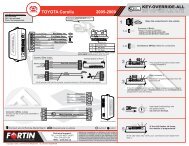
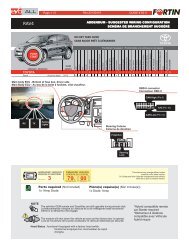
CONNECTION | BRANCHEMENT<br />
LOCK<br />
ACC<br />
ON<br />
START<br />
Antenna Ring.<br />
Self-adhesive flexible transponder<br />
antenna ring.<br />
Remove the steering column cover.<br />
Stick the antenna to the ignition<br />
barrel.<br />
Replace the steering column cover.<br />
7 7 0 3 5 0 0 0 2 3 5 0<br />
Copyright © 2011-2012,<br />
FORTIN AUTO RADIO INC<br />
ALL RIGHTS RESERVED<br />
Antenne.<br />
Antenne anneau auto-adhésive et flexible.<br />
Retirez la capote de la colonne<br />
d'ignition.<br />
Collez l’antenne (ring) autour du<br />
barillet d’ignition.<br />
Réinstallez la capote de la colonne<br />
d'ignition.<br />
PATS-LINK<br />
CAUTION:<br />
Handling carefully the<br />
antenna, do not bend it.<br />
ATTENTION: Manipuler<br />
avec précaution l'antenne,<br />
ne pas la plier.<br />
Red | Rouge 12V<br />
Black | Noir<br />
Ground While Running<br />
(GWR)<br />
Perform the programming procedure before connecting the <strong>TB</strong>CONTROL<br />
Procéder à la procédure de programmation avant de brancher le <strong>TB</strong>CONTROL
A C<br />
A C<br />
ON<br />
ON<br />
START<br />
START<br />
A C<br />
ON<br />
A C<br />
LOCK<br />
A C<br />
ON<br />
ON<br />
START<br />
<strong>TB</strong>-<strong>TOYOTA</strong><br />
KEY SHIELDING | ISOLATION DE LA CLÉ<br />
Before beginning the programming: The key must be shielded. CAUTION: The edge of the aluminum foil is sharp.<br />
Avant de débuter la programmation: le clé doit être isolée. ATTENTION: Les bords de la pellicule d'aluminium sont coupants.<br />
1 2<br />
Aluminum Foil<br />
Pellicule<br />
d'aluminium<br />
Insert the key through the<br />
middle of the aluminum foil.<br />
Insérez la clef au milieu de la<br />
pellicule d'aluminium.<br />
5<br />
G-Key<br />
Clé-G<br />
Turn the key to the<br />
START position with<br />
the aluminum foil.<br />
Tournez la clef en<br />
position START avec<br />
la pellicule<br />
d'aluminium<br />
The vehicle<br />
should not<br />
start.<br />
Le véhicule<br />
ne doit pas<br />
démarrer.<br />
PROGRAMMING | PROGRAMMATION<br />
LOCK<br />
If the vehicle<br />
starts and<br />
runs adjust<br />
the aluminum<br />
foil and try<br />
again.<br />
Si le véhicule<br />
démarre,<br />
ajustez la<br />
pellicule<br />
d'aluminium et<br />
réessayez.<br />
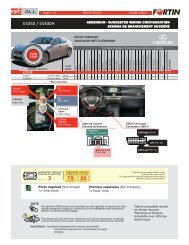
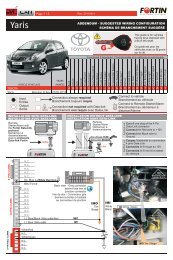
TIS / SCANTOOL REQUIRED | TIS/ SCANTOOL REQUIS<br />
The following steps should be performed by a qualified technician:<br />
La procédure suivante doit être effectuée par un technicien qualitfié:<br />
6 8<br />
3<br />
Remove the key<br />
from the aluminum<br />
foil carefully.<br />
Retirez la clé de la<br />
pellicule d'aluminium<br />
délicatement.<br />
9 20 sec.<br />
10<br />
4<br />
Keep the aluminum<br />
foil close.<br />
Gardez la pellicule<br />
d'aluminium à<br />
proximité.<br />
Turn the Ignition to<br />
the ON/RUN<br />
position.<br />
Tournez la clef en<br />
position ignition<br />
(ON).<br />
LOCK<br />
IGN<br />
Connect the TIS Branchez le TIS<br />
/ SCAN TOOL. / SCAN TOOL.<br />
Go to:<br />
Allez à:<br />
<br />
System Select<br />
<br />
All ECUs<br />
<br />
Immobiliser<br />
<br />
Utlility<br />
<br />
Key Registration to proceed.<br />
Follow the TIS /<br />
SCAN TOOL key<br />
registration wizard.<br />
Suivre les<br />
instructions de<br />
l'assistant<br />
d'enregistrement du<br />
TIS / SCAN TOOL.<br />
At Step 2 of 3<br />
Turn the key OFF and<br />
remove it.<br />
À l'étape 2 de 3<br />
Tournez la clé à OFF<br />
et retirez-la.<br />
Insert the temporary<br />
jumper.<br />
Insérez le cavalier<br />
temporaire.<br />
11<br />
12<br />
13 10 sec. 14<br />
Aluminum Foil<br />
Pellicule<br />
d'aluminium<br />
Click: Next<br />
LOCK<br />
START<br />
Click: Next<br />
If “ Key Registration<br />
has failed”<br />
go back<br />
to the beginning of the<br />
programming step 5.<br />
G-Key<br />
Clé-G<br />
Insert the key through the middle<br />
of the aluminum foil.<br />
Insérez la clef au<br />
milieu de la pellicule d'aluminium.<br />
Appuyez sur :<br />
suivant (Next).<br />
At Step 3 of 3 Insert the key<br />
with the aluminum foil.<br />
À l'étape 3 de 3 Insérez la<br />
clef avec la pellicule<br />
d'aluminium.<br />
Appuyez sur :<br />
suivant (Next)<br />
Si “ Key Registration<br />
has failed”<br />
recommencez à<br />
l'étape de<br />
programmation 5.<br />
15 16<br />
When the key<br />
registration is<br />
complete.<br />
Press Exit to exit the<br />
key registration<br />
wizard.<br />
17 18<br />
LOCK<br />
START<br />
Lorsque<br />
l'enregistrement de la<br />
clé est terminé.<br />
Appuyez sur Quitter<br />
(Exit ) pour quitter<br />
l'assistant<br />
d'enregistrement de<br />
clé.<br />
Disconnect the<br />
jumper.<br />
Débranchez le<br />
cavalier.<br />
Connect the<br />
<strong>TB</strong>-<strong>TOYOTA</strong> to the<br />
<strong>TB</strong>-CONTROL<br />
Branchez le<br />
<strong>TB</strong>-<strong>TOYOTA</strong> au<br />
<strong>TB</strong>-CONTROL<br />
Remove the key from<br />
the aluminum foil.<br />
Retirez la clé de la<br />
pellicule d'aluminium.<br />
The module is<br />
now<br />
programmed.<br />
Le module est<br />
programmé.