MMC5250 MM6 6.5" System - Polk Audio
MMC5250 MM6 6.5" System - Polk Audio
MMC5250 MM6 6.5" System - Polk Audio

Create successful ePaper yourself
Turn your PDF publications into a flip-book with our unique Google optimized e-Paper software.
The <strong>Polk</strong> MM tweeter offers two mounting<br />
options for installation flexibility.<br />
Mounting Option #1—Surface mounting<br />
the MM Tweeter<br />
1. Using the base of the surface mount cup as a template,<br />
mark the screw hole and drill it using a 1/8 inch drill bit.<br />
Mark the wire holes (for the tweeter wires), drill using<br />
the 1/4-inch drill bit.<br />
2. Attach the surface mount cup to the panel<br />
using supplied #4 screw.<br />
3. Cut the supplied tweeter wire (the lighter gauge wire) in half.<br />
4. Strip 1/8-1/4" (4-6 mm) of plastic insulation from the cut<br />
ends of the tweeter wire. Connect this end of the wire to<br />
the tweeter terminals of the crossover. Connect the whitestriped<br />
wire strand to the positive (+) terminal of the<br />
crossover tweeter output and the un-striped wire to<br />
the negative (-) tweeter terminal.<br />
5. Route the tweeter wire from the crossover through grommets<br />
to the tweeter location. Push the red and black<br />
tweeter wires through the holes in the bottom of the<br />
tweeter cup and though the panel.<br />
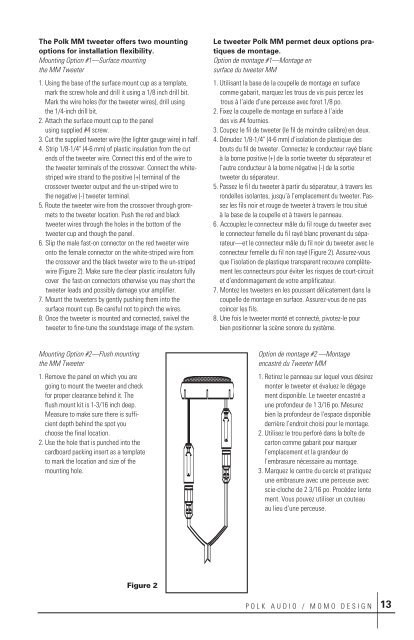
6. Slip the male fast-on connector on the red tweeter wire<br />
onto the female connector on the white-striped wire from<br />
the crossover and the black tweeter wire to the un-striped<br />
wire (Figure 2). Make sure the clear plastic insulators fully<br />
cover the fast-on connectors otherwise you may short the<br />
tweeter leads and possibly damage your amplifier.<br />
7. Mount the tweeters by gently pushing them into the<br />
surface mount cup. Be careful not to pinch the wires.<br />
8. Once the tweeter is mounted and connected, swivel the<br />
tweeter to fine-tune the soundstage image of the system.<br />
Le tweeter <strong>Polk</strong> MM permet deux options pratiques<br />
de montage.<br />
Option de montage #1—Montage en<br />
surface du tweeter MM<br />
1. Utilisant la base de la coupelle de montage en surface<br />
comme gabarit, marquez les trous de vis puis percez les<br />
trous à l’aide d’une perceuse avec foret 1/8 po.<br />
2. Fixez la coupelle de montage en surface à l’aide<br />
des vis #4 fournies.<br />
3. Coupez le fil de tweeter (le fil de moindre calibre) en deux.<br />
4. Dénudez 1/8-1/4" (4-6 mm) d’isolation de plastique des<br />
bouts du fil de tweeter. Connectez le conducteur rayé blanc<br />
à la borne positive (+) de la sortie tweeter du séparateur et<br />
l’autre conducteur à la borne négative (-) de la sortie<br />
tweeter du séparateur.<br />
5. Passez le fil du tweeter à partir du séparateur, à travers les<br />
rondelles isolantes, jusqu’à l’emplacement du tweeter. Passez<br />
les fils noir et rouge de tweeter à travers le trou situé<br />
à la base de la coupelle et à travers le panneau.<br />
6. Accouplez le connecteur mâle du fil rouge du tweeter avec<br />
le connecteur femelle du fil rayé blanc provenant du séparateur—et<br />
le connecteur mâle du fil noir du tweeter avec le<br />
connecteur femelle du fil non rayé (Figure 2). Assurez-vous<br />
que l’isolation de plastique transparent recouvre complètement<br />
les connecteurs pour éviter les risques de court-circuit<br />
et d’endommagement de votre amplificateur.<br />
7. Montez les tweeters en les poussant délicatement dans la<br />
coupelle de montage en surface. Assurez-vous de ne pas<br />
coincer les fils.<br />
8. Une fois le tweeter monté et connecté, pivotez-le pour<br />
bien positionner la scène sonore du système.<br />
Mounting Option #2—Flush mounting<br />
the MM Tweeter<br />
1. Remove the panel on which you are<br />
going to mount the tweeter and check<br />
for proper clearance behind it. The<br />
flush mount kit is 1-3/16 inch deep.<br />
Measure to make sure there is sufficient<br />
depth behind the spot you<br />
choose the final location.<br />
2. Use the hole that is punched into the<br />
cardboard packing insert as a template<br />
to mark the location and size of the<br />
mounting hole.<br />
Option de montage #2 —Montage<br />
encastré du Tweeter MM<br />
1. Retirez le panneau sur lequel vous désirez<br />
monter le tweeter et évaluez le dégage<br />
ment disponible. Le tweeter encastré a<br />
une profondeur de 1 3/16 po. Mesurez<br />
bien la profondeur de l'espace disponible<br />
derrière l’endroit choisi pour le montage.<br />
2. Utilisez le trou perforé dans la boîte de<br />
carton comme gabarit pour marquer<br />
l’emplacement et la grandeur de<br />
l’embrasure nécessaire au montage.<br />
3. Marquez le centre du cercle et pratiquez<br />
une embrasure avec une perceuse avec<br />
scie-cloche de 2 3/16 po. Procédez lente<br />
ment. Vous pouvez utiliser un couteau<br />
au lieu d’une perceuse.<br />
Figure 2<br />
POLK AUDIO / MOMO DESIGN<br />
13