4 - SURFERS ISLAND
4 - SURFERS ISLAND
4 - SURFERS ISLAND

You also want an ePaper? Increase the reach of your titles
YUMPU automatically turns print PDFs into web optimized ePapers that Google loves.
2-Notice CO ANG.qxd 13/09/10 9:12 Page 16<br />
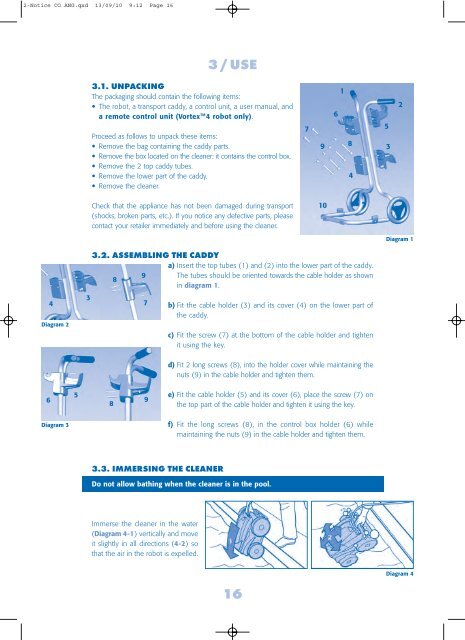
3 / USE<br />
3.1. UNPACKING<br />
The packaging should contain the following items:<br />
• The robot, a transport caddy, a control unit, a user manual, and<br />
a remote control unit (Vortex TM 4 robot only).<br />
Proceed as follows to unpack these items:<br />
• Remove the bag containing the caddy parts.<br />
• Remove the box located on the cleaner: it contains the control box.<br />
• Remove the 2 top caddy tubes.<br />
• Remove the lower part of the caddy.<br />
• Remove the cleaner.<br />
7<br />
9<br />
6<br />
1<br />
8<br />
4<br />
5<br />
3<br />
2<br />
Check that the appliance has not been damaged during transport<br />
(shocks, broken parts, etc.). If you notice any defective parts, please<br />
contact your retailer immediately and before using the cleaner.<br />
10<br />
Diagram 1<br />
4<br />
Diagram 2<br />
3<br />
3.2. ASSEMBLING THE CADDY<br />
a) Insert the top tubes (1) and (2) into the lower part of the caddy.<br />
9 The tubes should be oriented towards the cable holder as shown<br />
8<br />
in diagram 1.<br />
7<br />
b) Fit the cable holder (3) and its cover (4) on the lower part of<br />
the caddy.<br />
c) Fit the screw (7) at the bottom of the cable holder and tighten<br />
it using the key.<br />
d) Fit 2 long screws (8), into the holder cover while maintaining the<br />
nuts (9) in the cable holder and tighten them.<br />
6<br />
5<br />
8<br />
9<br />
e) Fit the cable holder (5) and its cover (6), place the screw (7) on<br />
the top part of the cable holder and tighten it using the key.<br />
Diagram 3<br />
f) Fit the long screws (8), in the control box holder (6) while<br />
maintaining the nuts (9) in the cable holder and tighten them.<br />
3.3. IMMERSING THE CLEANER<br />
Do not allow bathing when the cleaner is in the pool.<br />
Immerse the cleaner in the water<br />
(Diagram 4-1) vertically and move<br />
it slightly in all directions (4-2) so<br />
that the air in the robot is expelled.<br />
Diagram 4<br />
16