T10 clip - Switel.com
T10 clip - Switel.com
T10 clip - Switel.com

You also want an ePaper? Increase the reach of your titles
YUMPU automatically turns print PDFs into web optimized ePapers that Google loves.
Telefon<br />
Téléphone<br />
Telefono<br />
Telephone<br />
<strong>T10</strong> <strong>clip</strong><br />
Bedienungsanleitung<br />
Mode d’emploi<br />
Istruzioni per l’uso<br />
Operating Instructions
<strong>T10</strong> <strong>clip</strong><br />
Bedienungsanleitung . . . . . . . . . . . 3<br />
Mode d’emploi . . . . . . . . . . . . . . . . 17<br />
Istruzioni per l’uso . . . . . . . . . . . . . 31<br />
Operating Instructions . . . . . . . . . . 45<br />
Declaration of Conformity . . . . . . . 60<br />
2
− Inhaltsverzeichnis −<br />
1 Allgemeine Hinweise . . . . . . . . . . . . . . . 5<br />
1.1 Bestimmungsgemäße Verwendung . . . . . . . . . 5<br />
1.2 Aufstellungsort . . . . . . . . . . . . . . . . . . . . . . . . . . 5<br />
1.3 Nebenstellenanlagen . . . . . . . . . . . . . . . . . . . . . 5<br />
1.4 Hinweise zur Entsorgung . . . . . . . . . . . . . . . . . . 6<br />
1.5 Temperatur und Umgebungsbedingungen . . . 6<br />
1.6 Reinigung und Pflege . . . . . . . . . . . . . . . . . . . . . 6<br />
2 Bedienelemente . . . . . . . . . . . . . . . . . . . . 7<br />
2.1 Hörer Innenseite . . . . . . . . . . . . . . . . . . . . . . . . . 7<br />
2.2 Hörer Oberseite . . . . . . . . . . . . . . . . . . . . . . . . . 7<br />
2.3 Unterseite Basisgerät . . . . . . . . . . . . . . . . . . . . . 8<br />
2.4 Innenseite Basisgerät . . . . . . . . . . . . . . . . . . . . 8<br />
3 Inbetriebnahme . . . . . . . . . . . . . . . . . . . . 9<br />
3.1 Allgemeine Hinweise . . . . . . . . . . . . . . . . . . . . . 9<br />
3.2 Verpackungsinhalt prüfen . . . . . . . . . . . . . . . . . 9<br />
3.3 Telefonhörer anschließen . . . . . . . . . . . . . . . . . 9<br />
3.4 Batterien einsetzen . . . . . . . . . . . . . . . . . . . . . . . 9<br />
3.5 Telefon anschließen . . . . . . . . . . . . . . . . . . . . . . 10<br />
3.6 Wandmontage . . . . . . . . . . . . . . . . . . . . . . . . . . . 10<br />
3.7 Datum und Uhrzeit einstellen . . . . . . . . . . . . . . 10<br />
4 Bedienung . . . . . . . . . . . . . . . . . . . . . . . . . 11<br />
4.1 Telefonieren . . . . . . . . . . . . . . . . . . . . . . . . . . . . . 11<br />
4.2 Anrufe entgegennehmen . . . . . . . . . . . . . . . . . . 11<br />
4.3 Anzeige der Gesprächsdauer . . . . . . . . . . . . . . 11<br />
4.4 Einstellen der Hörerlautstärke . . . . . . . . . . . . . . 11<br />
4.5 Wahlwiederholung . . . . . . . . . . . . . . . . . . . . . . . 11<br />
4.6 Einstellbarer Tonruf . . . . . . . . . . . . . . . . . . . . . . 12<br />
4.7 Kurzwahlnummern speichern . . . . . . . . . . . . . . 12<br />
4.8 Kurzwahlnummern abrufen . . . . . . . . . . . . . . . . 12<br />
5 Rufnummernanzeige (CLIP) . . . . . . . . . 13<br />
5.1 Anruferliste einsehen . . . . . . . . . . . . . . . . . . . . . 13<br />
5.2 Telefonnummer aus der Anruferliste direkt<br />
anwählen . . . . . . . . . . . . . . . . . . . . . . . . . . . . . . . 14<br />
5.3 Telefonnummer aus der Anruferliste löschen . 14<br />
5.4 Komplette Anruferliste löschen . . . . . . . . . . . . . 14<br />
3
− Inhaltsverzeichnis −<br />
6 Nebenstellenanlagen / Zusatzdienste 15<br />
6.1 R−Taste an Nebenstellenanlagen . . . . . . . . . . . 15<br />
6.2 R−Taste und die Zusatzdienste Ihres<br />
Netzbetreibers . . . . . . . . . . . . . . . . . . . . . . . . . . . 15<br />
6.3 Wahlpause . . . . . . . . . . . . . . . . . . . . . . . . . . . . . . 15<br />
7 Wichtige Informationen . . . . . . . . . . . . . 16<br />
7.1 Fehlersuche . . . . . . . . . . . . . . . . . . . . . . . . . . . . 16<br />
7.2 Garantie . . . . . . . . . . . . . . . . . . . . . . . . . . . . . . . . 16<br />
4
− Allgemeine Hinweise −<br />
1 Allgemeine Hinweise<br />
Bitte lesen Sie diese Bedienungsanleitung sorgfältig durch.<br />
Öffnen Sie das Gerät in keinem Fall selbst und führen Sie<br />
keine eigenen Reparaturversuche durch. Bei<br />
Gewährleistungsansprüchen wenden Sie sich bitte an Ihren<br />
Fachhändler. Im Zuge von Projektverbesserungen behalten<br />
wir uns technische und optische Veränderungen am Artikel<br />
vor.<br />
1.1 Bestimmungsgemäße Verwendung<br />
Dieses Telefon ist für den Betrieb an einem analogen<br />
Telefonanschluss (PSTN) innerhalb der Schweiz entwickelt<br />
worden. Allerdings kann, wegen der Unterschiede zwischen<br />
den verschiedenen Telekommunikations−Netzbetreibern,<br />
keine Garantie für einwandfreie Funktion an jedem<br />
Telekommunikations−Endgeräteanschluss übernommen<br />
werden. Schließen Sie das Anschlusskabel des Telefons nur<br />
an eine dafür bestimmte Telefonsteckdose an. Wechseln Sie<br />
den Stecker des Anschlusskabels nicht aus.<br />
1.2 Aufstellungsort<br />
Stellen Sie das Gerät auf eine ebene und rutschfeste<br />
Fläche. Normalerweise hinterlassen die Füße des Gerätes<br />
keine Spuren auf der Aufstellfläche. Wegen der Vielzahl der<br />
verwendeten Lacke und Oberflächen kann es jedoch nicht<br />
ausgeschlossen werden, dass durch die Gerätefüße Spuren<br />
auf der Abstellfläche entstehen.<br />
1.3 Nebenstellenanlagen<br />
Das Telefon kann auch an einer Nebenstellenanlage<br />
angeschlossen werden. Ob Ihr Telefon an Ihrer<br />
Nebenstellenanlage einwandfrei funktioniert, erfahren Sie<br />
bei dem Händler, bei dem die Nebenstellenanlage gekauft<br />
wurde. Es kann nicht garantiert werden, dass das Telefon<br />
an jeder Nebenstellenanlage funktioniert.<br />
5
− Allgemeine Hinweise −<br />
1.4 Hinweise zur Entsorgung<br />
Die Umsetzung europäischen Rechtes in nationale Gesetze<br />
und Verordnungen verpflichtet Sie zur sachgerechten<br />
Entsorgung von Gebrauchsgütern. Dies dient dem Schutz<br />
von Personen und Umwelt.<br />
Das nebenstehende Symbol bedeutet,<br />
dass elektrische und elektronische Altgeräte<br />
und Batterien getrennt vom Hausmüll zu<br />
entsorgen sind.<br />
Alte oder ausgediente Geräte entsorgen<br />
Sie bei einer Sammelstelle eines<br />
geeigneten Entsorgungsträgers.<br />
Batterien und Akkumulatoren entsorgen Sie beim<br />
batterievertreibenden Handel sowie zuständigen<br />
Sammelstellen, die entsprechende Behälter bereitstellen.<br />
Verpackungsmaterialien entsorgen Sie entsprechend den<br />
lokalen Vorschriften.<br />
1.5 Temperatur und Umgebungsbedingungen<br />
Das Telefon ist für den Betrieb in geschützten Räumen mit<br />
einem Temperaturbereich von 10 °C bis 30 °C ausgelegt.<br />
Das Gerät darf nicht in Feuchträumen wie Bad oder<br />
Waschküche aufgestellt werden. Vermeiden Sie die Nähe zu<br />
Wärmequellen wie Heizkörpern und setzen Sie das Gerät<br />
keiner direkten Sonnenbestrahlung aus.<br />
Vermeiden Sie Belastungen durch Rauch, Staub,<br />
Erschütterungen, Chemikalien, Feuchtigkeit, Hitze oder<br />
direkte Sonneneinstrahlung.<br />
1.6 Reinigung und Pflege<br />
Reinigen Sie die Gehäuseoberflächen mit einem trockenen,<br />
weichen und fusselfreien Tuch. Verwenden Sie keine<br />
Reinigungsmittel oder aggressiven Lösungsmittel. Außer<br />
einer gelegentlichen Gehäusereinigung ist keine weitere<br />
Pflege erforderlich. Die Gummifüße des Telefons sind nicht<br />
gegen alle Reinigungsmittel beständig. Der Hersteller kann<br />
daher nicht für evtl. Schäden an Möbeln o. Ä. haftbar<br />
gemacht werden.<br />
6
2 Bedienelemente<br />
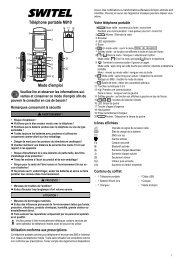
2.1 Hörer Innenseite<br />
− Bedienelemente −<br />
1. Trenntaste / Hörergabel<br />
7<br />
2. Kurzwahltaste<br />
3. Speichertaste<br />
4. Verbindung zum<br />
Basisgerät<br />
5. R−Signaltaste<br />
6. Wahlwiederholung /<br />
Pause<br />
7. Einstellung der<br />
Hörerlautstärke<br />
6<br />
5<br />
1<br />
2<br />
3<br />
4<br />
2.2 Hörer Oberseite<br />
8. Kontrollleuchte bei<br />
neuen Anrufen<br />
9. Auswahltaste abwärts<br />
10. Auswahltaste aufwärts<br />
11. Löschtaste<br />
12. Wählen aus der<br />
Anruferliste<br />
12<br />
8<br />
9<br />
11<br />
10<br />
7
− Bedienelemente −<br />
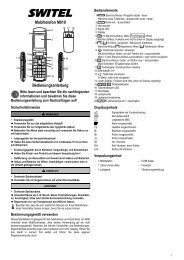
2.3 Unterseite Basisgerät<br />
1. Befestigung für<br />
Wandmontage<br />
2. Anschluss Telefonkabel<br />
3. Befestigung für<br />
Wandmontage<br />
4. Anschluss Spiralkabel<br />
5. Einstellung der 5<br />
Ruftonlautstärke<br />
1<br />
2<br />
3<br />
4<br />
2.4 Innenseite Basisgerät<br />
6. Batteriefach<br />
6<br />
8
− Inbetriebnahme −<br />
3 Inbetriebnahme<br />
3.1 Allgemeine Hinweise<br />
Achtung: Lesen Sie vor der Inbetriebnahme unbedingt<br />
die allgemeinen Hinweise am Anfang dieser<br />
Bedienungsanleitung.<br />
3.2 Verpackungsinhalt prüfen<br />
Zum Lieferumfang gehören:<br />
eine Telefonbasis<br />
ein Telefonanschlusskabel<br />
eine Bedienungsanleitung<br />
ein Telefonhörer<br />
ein Spiralkabel<br />
drei Batterien Typ AA<br />
3.3 Telefonhörer anschließen<br />
Nachdem Sie Ihr Telefon ausgepackt haben, müssen Sie<br />
zuerst den Telefonhörer mit der Telefonbasis verbinden.<br />
Nehmen Sie nun das kurze Ende des Spiralkabels und<br />
stecken Sie es in die Buchse am unteren Ende des Hörers.<br />
Drehen Sie die Telefonbasis um und stecken Sie das andere<br />
Ende in die untere Buchse (siehe Kapitel 2, Abschnitt<br />
Unterseite Basisgerät Punkt 4.). Klemmen Sie das Kabel in<br />
den Kabelkanal nach außen.<br />
3.4 Batterien einsetzen<br />
Bevor Sie Ihr neues Telefon mit dem Telefonnetz verbinden,<br />
sollten die Batterien eingebaut werden. Bitte benutzen Sie<br />
immer qualitativ gute Batterien des Typs AA. Die Batterien<br />
werden für die Displayanzeigen bei aufgelegtem Hörer<br />
benötigt. Bevor Sie die Batterien einbauen oder wechseln,<br />
achten Sie darauf, dass das Telefon nicht mit dem<br />
Telefonnetz verbunden ist.<br />
1. Das Batteriefach befindet sich in der Innenseite<br />
der Telefonbasis.<br />
2. Öffnen Sie das Batteriefach mit einem kleinen<br />
Schraubenzieher oder einem spitzen Gegenstand.<br />
3. Legen Sie die Batterien ein. Achten Sie dabei auf<br />
die richtige Polung.<br />
4. Schließen Sie das Batteriefach.<br />
Die Batterien sollten ausgetauscht werden, wenn im Display<br />
das Symbol angezeigt wird. Alle drei Batterien müssen<br />
dann ersetzt werden. Bei entladenen Batterien bleibt das<br />
Display dunkel.<br />
9
10<br />
− Inbetriebnahme −<br />
3.5 Telefon anschließen<br />
Verbinden Sie das beiliegende Telefonkabel mit der<br />
Telefonsteckdose und der Telefonbuchse (siehe Kapitel 2,<br />
Abschnitt Unterseite Basisgerät Punkt 2.) auf der Unterseite<br />
der Telefonbasis. Führen Sie dann das Kabel durch die<br />
Kabelführung entweder nach oben oder nach unten aus<br />
dem Telefongehäuse heraus. Klemmen Sie das Kabel fest in<br />
den Kabelkanal.<br />
Das Telefon arbeitet mit dem MFV−Wählverfahren (Tonwahl).<br />
3.6 Wandmontage<br />
Ihr Telefon ist auch zur Wandmontage geeignet. Benutzen<br />
Sie zur Befestigung zwei Schrauben, bohren Sie zwei<br />
Löcher im Abstand von 85 mm senkrecht untereinander und<br />
lassen Sie die Schrauben 5 mm aus der Wand<br />
herausstehen. Stecken Sie nun die Telefonbasis auf die<br />
Schrauben und schieben Sie es etwas nach unten. Ist das<br />
Telefon an einer Wand montiert, können Sie den Hörer an<br />
das Telefon hängen, ohne dass die Verbindung<br />
unterbrochen wird. Dazu befindet sich am oberen Ende der<br />
Hörerablage ein kleiner Einhängehaken.<br />
3.7 Datum und Uhrzeit einstellen<br />
1. Drücken Sie für 4 Sekunden die Taste .<br />
2. Durch mehrmaliges Drücken der und <br />
Tasten geben Sie die aktuelle Stunde ein.<br />
3. Bestätigen Sie mit der Taste . Der Cursor<br />
springt zur Minutenanzeige.<br />
4. Durch mehrmaliges Drücken der und <br />
Tasten geben Sie die aktuellen Minuten ein.<br />
5. Bestätigen Sie mit der Taste . Der Cursor<br />
springt zur Datumseingabe.<br />
6. Durch mehrmaliges Drücken der<br />
und Tasten geben Sie den aktuellen<br />
Tag ein.<br />
7. Bestätigen Sie mit der Taste . Der Cursor<br />
springt zur Monatsangabe.<br />
8. Durch mehrmaliges Drücken der und <br />
Tasten geben Sie den aktuellen Monat ein.<br />
9. Bestätigen Sie mit der Taste . Die Eingabe ist<br />
nun beendet und die aktuellen Daten werden im<br />
Display angezeigt.<br />
Hinweis: Sind die Batterien vollständig entladen, müssen<br />
die Uhrzeit und das Datum erneut eingeben<br />
werden.
− Bedienung −<br />
4 Bedienung<br />
4.1 Telefonieren<br />
Ihr Telefon kann wie jedes konventionelle Telefon benutzt<br />
werden.<br />
1. Nehmen Sie den Telefonhörer ab und warten Sie<br />
auf das Freizeichen.<br />
2. Wählen Sie nun die gewünschte Telefonnummer.<br />
Die gewählte Rufnummer wird im Display<br />
angezeigt. Das Display zeigt maximal eine<br />
Telefonnummer mit 14 Zahlen an. Ist die gewählte<br />
Telefonnummer länger, werden nur die letzten 14<br />
Zahlen angezeigt.<br />
3. Um das Gespräch zu beenden, legen Sie den<br />
Hörer wieder auf die Ablage zurück. Mit der<br />
Trenntaste können Sie das laufende Gespräch<br />
beenden und Sie erhalten direkt eine neue<br />
Amtsleitung.<br />
4.2 Anrufe entgegennehmen<br />
Sobald Sie ein Anruf erreicht, hören Sie das Rufsignal. Das<br />
Gespräch kann nun über den Hörer entgegengenommen<br />
werden.<br />
4.3 Anzeige der Gesprächsdauer<br />
Während eines Gesprächs wird die Gesprächszeit im<br />
Display in Minuten und Sekunden angezeigt. Die Anzeige<br />
wird, nach dem Sie die Rufnummer gewählt haben, im<br />
Display eingeblendet. Nach Beendigung des Gesprächs<br />
bleibt die Anzeige noch für einige Sekunden im Display<br />
erhalten.<br />
4.4 Einstellen der Hörerlautstärke<br />
Ist Ihnen die Hörerlautstärke zu leise oder zu laut, können<br />
Sie diese Ihren Bedürfnissen anpassen.<br />
Mit dem Schiebeschalter VOL. am Hörer können Sie die<br />
Lautstärke von leise auf laut anpassen.<br />
4.5 Wahlwiederholung<br />
Ist ein Anschluss, den Sie gewählt haben, besetzt oder<br />
konnten Sie niemanden erreichen, legen Sie den<br />
Telefonhörer einfach wieder auf. Die zuletzt gewählte<br />
Rufnummer bleibt automatisch im Telefon gespeichert. Um<br />
die Wahlwiederholung zu nutzen, gehen Sie wie folgt vor:<br />
Heben Sie den Hörer ab und drücken Sie die<br />
Wahlwiederholungstaste . Die gespeicherte Rufnummer<br />
der Wahlwiederholung wird nun gewählt.<br />
11
− Bedienung −<br />
4.6 Einstellbarer Tonruf<br />
Mit dem Schiebeschalter auf der rechten Seite der<br />
Telefonbasis können Sie die Stellungen (laut) oder<br />
(leise) auswählen, um die Lautstärke des Tonrufes Ihren<br />
Bedürfnissen anzupassen. Möchten Sie einmal nicht gestört<br />
werden, benutzen Sie die Stellung (aus).<br />
4.7 Kurzwahlnummern speichern<br />
Mit Ihrem Telefon können Sie 10 Rufnummern zur Kurzwahl<br />
speichern. Als Speicherplätze dienen die Zahlen 0 bis 9 des<br />
Zahlenfeldes.<br />
1. Nehmen Sie den Telefonhörer ab.<br />
2. Drücken Sie die Taste , Das Display zeigt<br />
SAVE ?.<br />
3. Drücken Sie erneut die Taste . Der Cursor<br />
blinkt und das Display zeigt MEMORY.<br />
4. Drücken Sie den gewünschten Speicherplatz auf<br />
dem Zahlenfeld zwischen 0 und 9.<br />
Sollte der Speicherplatz bereits belegt sein, zeigt<br />
das Display den Hinweis OVERWRITE ?.<br />
Möchten Sie den Speicherplatz überschreiben,<br />
drücken Sie erneut die Taste .<br />
Möchten Sie den Speicherplatz nicht<br />
überschreiben, drücken Sie einmal die Trenntaste<br />
und wiederholen die komplette Eingabe.<br />
5. Geben Sie nun die gewünschte Rufnummer mit<br />
max. 22 Stellen ein.<br />
6. Speichern Sie mit der Taste . Das Display<br />
zeigt SAVED !!.<br />
4.8 Kurzwahlnummern abrufen<br />
Um eine gespeicherte Kurzwahlnummer anzurufen, gehen<br />
Sie wie folgt vor:<br />
1. Nehmen Sie den Telefonhörer ab.<br />
2. Drücken Sie die Taste und den gewünschten<br />
Speicherplatz zwischen 0 und 9. Die gespeicherte<br />
Rufnummer wird direkt angewählt.<br />
12
− Rufnummernanzeige (CLIP) −<br />
5 Rufnummernanzeige (CLIP)<br />
Mit der Rufnummernanzeige können Sie bei eingehenden<br />
Gesprächen erkennen, wer Sie anruft. Wenn diese Funktion<br />
an Ihrer Telefonleitung zur Verfügung steht, zeigt Ihnen das<br />
Display bereits während des Klingelns die Rufnummer im<br />
Display an. Das Display meldet folgende Information, wenn<br />
keine Rufnummer zur Verfügung steht.<br />
Erscheint im Display die Meldung UNAVAILABLE oder<br />
ERROR wurde die Rufnummer nur teilweise oder fehlerhaft<br />
empfangen.<br />
Erscheint im Display die Meldung LONG DISTANCE, ist die<br />
Information der Rufnummer nicht verfügbar. Es könnte sich<br />
um ein internationales Gespräch handeln.<br />
Erscheint im Display die Meldung PRIVATE, hat der Anrufer<br />
das Senden seiner Rufnummer unterdrückt oder die<br />
Nummer konnte nicht übermittelt werden.<br />
Während Ihrer Abwesenheit werden alle Anrufe in der<br />
Anruferliste mit Datum und Uhrzeit gespeichert. Bis zu 99<br />
Rufnummern werden in der Anruferliste gespeichert. Sobald<br />
die Liste voll ist, wird immer die älteste Rufnummer aus der<br />
Liste gelöscht.<br />
Wurden während Ihrer Abwesenheit Anrufe registriert, wird<br />
dies im Display mit der Anzeige NEW angezeigt und die<br />
Kontrollleuchte für neue Anrufe blinkt.<br />
5.1 Anruferliste einsehen<br />
Mit der Taste gelangen Sie zur zuletzt registrierten<br />
Rufnummern. Mit und können Sie dann in der<br />
Anruferliste blättern. Alle registrierten Anrufe werden wie<br />
folgt dargestellt:<br />
Der Anruf ist neu<br />
Uhrzeit und Datum<br />
Speicherplatz innerhalb<br />
der Anruferliste<br />
REPEAT<br />
Rufnummer<br />
des Anrufers<br />
Der Anrufer<br />
hat mehrmals<br />
angerufen<br />
Haben Sie den letzten Speicherplatz der Liste erreicht, zeigt<br />
das Display die Meldung END OF LIST.<br />
Hinweis: Werden alle neu aufgezeichneten Rufnummern<br />
kontrolliert, erlischt die Kontrollleuchte für neue<br />
Anrufe und die Anzeige "NEW" im Display zeigt<br />
"00".<br />
Hinweis: Wird innerhalb von 30 Sekunden keine Taste<br />
gedrückt, wird die Anruferliste verlassen und das<br />
13
− Rufnummernanzeige (CLIP) −<br />
Display zeigt wieder die aktuelle Uhrzeit und das<br />
Datum sowie die Anzahl der in der Anruferliste<br />
gespeicherten Telefonnummern und die Anzahl<br />
der neu gespeicherten Rufnummern an.<br />
5.2 Telefonnummer aus der Anruferliste direkt<br />
anwählen<br />
Sie können Telefonnummern aus der Anruferliste direkt<br />
anwählen:<br />
1. Wählen Sie mit den Tasten und die<br />
gewünschte Telefonnummer aus.<br />
2. Um die Rufnummer zu wählen, drücken Sie die<br />
Taste .<br />
3. Haben Sie den Hörer bereits abgenommen, wird<br />
die Rufnummer direkt angewählt. Bei aufgelegtem<br />
Hörer erscheint die Displaymeldung PICK UP<br />
HANDSET.<br />
4. Heben Sie nun den Hörer ab. Das Display zeigt<br />
DIALING ... und die Verbindung wird hergestellt.<br />
5.3 Telefonnummer aus der Anruferliste löschen<br />
1. Wählen Sie mit den Tasten und die<br />
Rufnummer aus der Anruferliste, die Sie löschen<br />
möchten.<br />
2. Drücken Sie einmal die Taste . Das Display<br />
zeigt die Meldung DELETE ?".<br />
3. Halten Sie nun sofort die Taste für<br />
2 Sekunden gedrückt. Die Rufnummer ist gelöscht<br />
und das Display zeigt nun eine weitere<br />
Rufnummer aus der Anruferliste an.<br />
5.4 Komplette Anruferliste löschen<br />
1. Wählen Sie eine beliebige Rufnummer aus der<br />
Anruferliste.<br />
2. Halten Sie nun die Taste solange gedrückt,<br />
bis im Display die Meldung DELETE ALL ?"<br />
erscheint.<br />
3. Halten Sie nun sofort die Taste für<br />
2 Sekunden gedrückt, bis im Display die Meldung<br />
NO CALLS" erscheint.<br />
14
− Nebenstellenanlagen / Zusatzdienste −<br />
6 Nebenstellenanlagen / Zusatzdienste<br />
Die Taste Ihres Telefons können Sie an<br />
Nebenstellenanlagen und bei der Verwendung von<br />
Zusatzdiensten Ihres Netzbetreibers nutzen.<br />
6.1 R−Taste an Nebenstellenanlagen<br />
Ist Ihr Telefon über eine Nebenstellenanlage angeschlossen,<br />
können Sie über die Taste alle Möglichkeiten, wie z. B.<br />
Anrufe weiterleiten, automatischen Rückruf usw., nutzen. An<br />
einer Nebenstellenanlage wird eine Flash−Zeit von 100 ms<br />
benötigt (Einstellung siehe Kapitel Grundeinstellungen"). Ob<br />
Ihr Telefon an Ihrer Nebenstellenanlage einwandfrei<br />
funktioniert, erfahren Sie bei dem Händler, bei dem die<br />
Anlage gekauft wurde.<br />
6.2 −Taste und die Zusatzdienste Ihres<br />
Netzbetreibers<br />
Ihr SWITEL−Telefon unterstützt die wichtigsten<br />
Zusatzdienste Ihres Netzbetreibers (z. B. Makeln, Anklopfen,<br />
Dreier−Konferenz). Zur Freischaltung der Zusatzdienste<br />
wenden Sie sich bitte an Ihren Netzbetreiber.<br />
6.3 Wahlpause<br />
Bei Nebenstellenanlagen ist es erforderlich, eine bestimmte<br />
Nummer zu wählen (z. B. 9" oder 0), um ein Freizeichen<br />
für eine Amtsleitung zu bekommen. Bei wenigen, älteren<br />
Nebenstellenanlagen dauert es einige Zeit, bis das<br />
Freizeichen zu hören ist. Speziell für diese<br />
Nebenstellenanlagen kann nach der Amtsholung eine<br />
automatische Pause eingefügt werden, so dass Sie direkt<br />
weiter wählen können, ohne das Freizeichen abzuwarten.<br />
Drücken Sie zwischen der Amtskennziffer und der<br />
Rufnummer einmal die Taste . Nach der Amtsholung<br />
wartet Ihr Telefon für 3 Sekunden mit dem Wählen der<br />
eigentlichen Telefonnummer.<br />
15
− Wichtige Informationen −<br />
7 Wichtige Informationen<br />
7.1 Fehlersuche<br />
Entfernen Sie alle zusätzlichen Telefonapparate und<br />
verbinden Sie nur das Telefon direkt mit der Telefonbuchse.<br />
Sollte der Fehler immer noch auftreten, verbinden Sie ein<br />
anderes Telefon (wenn vorhanden) mit der Telefonbuchse.<br />
Die Ergebnisse zeigen Ihnen, ob der Fehler am Gerät oder<br />
der Telefonleitung liegt.<br />
7.2 Garantie<br />
SWITEL − Geräte werden nach den modernsten<br />
Produktionsverfahren hergestellt und geprüft. Ausgesuchte<br />
Materialien und hoch entwickelte Technologien sorgen für<br />
einwandfreie Funktion und lange Lebensdauer. Ein<br />
Garantiefall liegt nicht vor, wenn die Ursache einer<br />
Fehlfunktion des Gerätes bei dem Telefonnetzbetreiber oder<br />
einer eventuell zwischengeschalteten Nebenstellenanlage<br />
liegt. Die Garantie gilt nicht für die in den Produkten<br />
verwendeten Standard−Akkus oder Akkupacks. Die<br />
Garantiezeit beträgt 24 Monate, gerechnet vom Tage des<br />
Kaufs.<br />
Innerhalb der Garantiezeit werden alle Mängel, die auf<br />
Material− oder Herstellungsfehler zurückzuführen sind,<br />
kostenlos beseitigt. Der Garantieanspruch erlischt bei<br />
Eingriffen durch den Käufer oder durch Dritte. Schäden, die<br />
durch unsachgemäße Behandlung oder Bedienung, durch<br />
falsches Aufstellen oder Aufbewahren, durch<br />
unsachgemäßen Anschluss oder Installation sowie durch<br />
höhere Gewalt oder sonstige äußere Einflüsse entstehen,<br />
fallen nicht unter die Garantieleistung. Wir behalten uns vor,<br />
bei Reklamationen die defekten Teile auszubessern oder zu<br />
ersetzen oder das Gerät auszutauschen. Ausgetauschte<br />
Teile oder ausgetauschte Geräte gehen in unser Eigentum<br />
über. Schadenersatzansprüche sind ausgeschlossen,<br />
soweit sie nicht auf Vorsatz oder grober Fahrlässigkeit des<br />
Herstellers beruhen.<br />
Sollte Ihr Gerät dennoch einen Defekt innerhalb der<br />
Garantiezeit aufweisen, wenden Sie sich bitte unter Vorlage<br />
Ihrer Kaufquittung ausschließlich an das Geschäft, in dem<br />
Sie Ihr SWITEL − Gerät gekauft haben. Alle<br />
Gewährleistungsansprüche nach diesen Bestimmungen<br />
sind ausschließlich gegenüber Ihrem Fachhändler geltend<br />
zu machen. Nach Ablauf von zwei Jahren nach Kauf und<br />
Übergabe unserer Produkte können Gewährleistungsrechte<br />
nicht mehr geltend gemacht werden.<br />
16
− Table des matières −<br />
1 Généralités . . . . . . . . . . . . . . . . . . . . . . . . 19<br />
1.1 Utilisation conforme aux prescriptions . . . . . . . 19<br />
1.2 Lieu d’installation . . . . . . . . . . . . . . . . . . . . . . . . 19<br />
1.3 Installations à postes supplémentaires . . . . . . 19<br />
1.4 Remarques concernant l’élimination<br />
des appareils . . . . . . . . . . . . . . . . . . . . . . . . . . . . 20<br />
1.5 Température et conditions d’environnement . . 20<br />
1.6 Nettoyage et entretien . . . . . . . . . . . . . . . . . . . . 20<br />
2 Eléments de manipulation . . . . . . . . . . 21<br />
2.1 Écouteur face interne . . . . . . . . . . . . . . . . . . . . . 21<br />
2.2 Écouteur face externe . . . . . . . . . . . . . . . . . . . . 21<br />
2.3 Face inférieure de la base . . . . . . . . . . . . . . . . . 22<br />
2.4 Face interne de la base . . . . . . . . . . . . . . . . . . . 22<br />
3 Mise en service . . . . . . . . . . . . . . . . . . . . 23<br />
3.1 Généralités . . . . . . . . . . . . . . . . . . . . . . . . . . . . . 23<br />
3.2 Contrôle du contenu du paquet . . . . . . . . . . . . 23<br />
3.3 Raccordement du <strong>com</strong>biné . . . . . . . . . . . . . . . . 23<br />
3.4 Insérer les piles . . . . . . . . . . . . . . . . . . . . . . . . . . 23<br />
3.5 Raccorder le téléphone . . . . . . . . . . . . . . . . . . . 24<br />
3.6 Montage mural . . . . . . . . . . . . . . . . . . . . . . . . . . 24<br />
3.7 Ajuster la date et l’heure . . . . . . . . . . . . . . . . . . 24<br />
4 Manipulation . . . . . . . . . . . . . . . . . . . . . . . 25<br />
4.1 Comment téléphoner . . . . . . . . . . . . . . . . . . . . . 25<br />
4.2 Comment prendre des appels . . . . . . . . . . . . . 25<br />
4.3 Affichage de la durée de la <strong>com</strong>munication . . 25<br />
4.4 Réglage du volume sonore du <strong>com</strong>biné . . . . . 25<br />
4.5 Réglage automatique des derniers numéros . 25<br />
4.6 Sonnerie d’appel réglable . . . . . . . . . . . . . . . . . 26<br />
4.7 Enregistrer des numéros abrégés . . . . . . . . . . 26<br />
4.8 Appeler des numéros abrégés . . . . . . . . . . . . . 26<br />
5 Affichage du numéro d’appel (CLIP) . 27<br />
5.1 Visualiser la liste d’appels . . . . . . . . . . . . . . . . . 27<br />
5.2 Composition du numéro directement à partir<br />
de la liste d’appels . . . . . . . . . . . . . . . . . . . . . . . 28<br />
5.3 Effacer un numéro de la liste d’appels . . . . . . . 28<br />
5.4 Effacer toute la liste d’appels . . . . . . . . . . . . . . 28<br />
17
− Table des matières −<br />
6 Installations à postes supplémentaires /<br />
services supplémentaires . . . . . . . . . . . 29<br />
6.1 Touche R avec les installations à postes<br />
supplémentaires . . . . . . . . . . . . . . . . . . . . . . . . . 29<br />
6.2 Touche R et les services confort de votre<br />
exploitant de réseau. . . . . . . . . . . . . . . . . . . . . . 29<br />
6.3 Pause de numérotation . . . . . . . . . . . . . . . . . . . 29<br />
7 Informations importantes . . . . . . . . . . . 30<br />
7.1 Recherche d’erreurs . . . . . . . . . . . . . . . . . . . . . . 30<br />
7.2 Garantie . . . . . . . . . . . . . . . . . . . . . . . . . . . . . . . . 30<br />
18
− Généralités −<br />
1 Généralités<br />
Veuillez lire ce mode d’emploi attentivement et<br />
<strong>com</strong>plètement. N’ouvrez en aucun cas l’appareil et<br />
n’effectuez aucun essai de réparation vous−même. En ce qui<br />
concerne le droit à la garantie, adressez−vous à votre<br />
revendeur. Dans le cadre des améliorations de produit, nous<br />
nous réservons le droit d’apporter à l’article des<br />
modifications techniques et d’optique.<br />
1.1 Utilisation conforme aux prescriptions<br />
Ce téléphone est conçu pour fonctionner avec un<br />
raccordement téléphonique analogique (PSTN) à l’intérieur<br />
de la Suisse. Toutefois, en raison des différences entre les<br />
divers exploitants de réseaux de télé<strong>com</strong>munication, on ne<br />
peut pas garantir un fonctionnement impeccable avec<br />
chaque raccordement de périphérique de<br />
télé<strong>com</strong>munication. Ne branchez le câble de raccordement<br />
du téléphone que dans une prise téléphonique prévue à cet<br />
effet. Ne remplacez pas la fiche du câble de raccordement.<br />
1.2 Lieu d’installation<br />
Posez le téléphone sur une surface plane et antidérapante.<br />
Normalement, les pieds de l’appareil n’y laissent pas de<br />
traces. Toutefois, en raison de la diversité des laques et des<br />
surfaces utilisées, il n’est pas exclu que les pieds de<br />
l’appareil puissent malgré tout en laisser.<br />
1.3 Installations à postes supplémentaires<br />
On peut également raccorder le téléphone à une installation<br />
à postes supplémentaires. Votre revendeur, chez lequel<br />
vous avez acheté l’installation, vous dira si votre téléphone<br />
fonctionne impeccablement avec celle−ci. Il ne peut pas être<br />
garanti que le téléphone fonctionne avec chaque installation<br />
de ce genre.<br />
19
− Généralités −<br />
1.4 Remarques concernant l’élimination des<br />
appareils<br />
L’application du droit européen dans les lois et décrets<br />
nationaux vous obligent à éliminer <strong>com</strong>me il se doit les biens<br />
de consommation. Ce respect sert à la protection des<br />
personnes et de l’environnement.<br />
L’icône ci−contre signifie que les appareils<br />
électriques et électroniques usagés ainsi<br />
que les batteries doivent être éliminés<br />
séparément des ordures ménagères.<br />
Veuillez éliminer vos appareils usagés<br />
ou ne servant plus dans le centre de<br />
collecte d’un organisme approprié<br />
d’évacuation des déchets.<br />
Veuillez éliminer les piles et piles rechargeables chez un<br />
revendeur de piles ainsi que dans les centres de collecte<br />
responsables qui mettent des collecteurs appropriés à votre<br />
disposition.<br />
Éliminez les matériaux d’emballage conformément au<br />
règlement local.<br />
1.5 Température et conditions d’environnement<br />
Le téléphone est conçu pour fonctionner dans des pièces<br />
abritées d’une température de 10 °C à 30 °C. Le téléphone<br />
ne doit pas être placée dans des pièces humides <strong>com</strong>me la<br />
salle de bains ou la buanderie. Evitez le contact avec des<br />
sources de chaleur <strong>com</strong>me les radiateurs et n’exposez pas<br />
l’appareil à l’ensoleillement direct.<br />
Evitez toute nuisance par la fumée, la poussière, les<br />
tremblements, les produits chimiques, l’humidité, la grande<br />
chaleur ou l’ensoleillement direct.<br />
1.6 Nettoyage et entretien<br />
Nettoyez les surfaces du boîtier avec un chiffon sec, doux et<br />
non pelucheux. N’utilisez pas de produits d’entretien ou de<br />
solvants agressifs. Mis à part un nettoyage occasionnel du<br />
boîtier, aucun entretien n’est nécessaire. Les pieds en<br />
caoutchouc de le téléphone ne résistent pas à tous les<br />
produits d’entretien. Le fabricant ne peut donc être tenu<br />
responsable d’éventuels dommages causés sur des<br />
meubles ou autre chose de ce genre.<br />
20
− Eléments de manipulation −<br />
2 Eléments de<br />
manipulation<br />
2.1 Écouteur face interne<br />
7<br />
1. Touche de coupure /<br />
Fourche du téléphone<br />
2. Touche de sélection<br />
abrégée<br />
3. Touche de mémoire<br />
4. Raccordement à la base<br />
5. Touche de signal R<br />
6. Répétition automatique<br />
des derniers numéros /<br />
Pause<br />
7. Réglage du volume 6<br />
sonore du <strong>com</strong>biné<br />
5<br />
4<br />
1<br />
2<br />
3<br />
2.2 Écouteur face externe<br />
8. Voyant de contrôle pour<br />
nouveaux appels<br />
9. Touche de sélection<br />
vers le bas<br />
10. Touche de sélection<br />
vers le haut<br />
11. Touche de suppression<br />
12. Composer un numéro<br />
12<br />
de la liste d’appels<br />
8<br />
9<br />
11<br />
10<br />
21
− Eléments de manipulation −<br />
2.3 Face inférieure de la base<br />
1. Fixation pour<br />
montage mural<br />
2. Raccordement du<br />
câble téléphonique<br />
3. Fixation pour<br />
montage mural<br />
4. Raccordement 5<br />
câble spiralé<br />
5. Réglage du<br />
volume de la sonnerie<br />
1<br />
2<br />
3<br />
4<br />
2.4 Face interne de la base<br />
6. Compartiment à piles<br />
6<br />
22
− Mise en service −<br />
3 Mise en service<br />
3.1 Généralités<br />
Attention : Avant la mise en service, veuillez lire<br />
les généralités se trouvant au début de ce mode<br />
d’emploi.<br />
3.2 Contrôle du contenu du paquet<br />
Les éléments suivants font partie de la livraison :<br />
une base<br />
un câble de raccordement<br />
téléphonique<br />
un mode d’emploi<br />
un écouteur<br />
un câble spiralé<br />
trois piles de type AA<br />
3.3 Raccordement du <strong>com</strong>biné<br />
Après avoir déballé votre téléphone, vous devez tout<br />
d’abord raccorder le <strong>com</strong>biné à la base. Prenez la partie<br />
courte du câble spiralé et introduisez−la dans la prise située<br />
à l’extrémité inférieure du <strong>com</strong>biné. Retournez la base et<br />
introduisez l’autre extrémité dans la prise inférieure (voir<br />
chapitre 2, section Face interne de la base point 4.).<br />
Coincez le câble vers l’extérieur dans le canal pour câble.<br />
3.4 Insérer les piles<br />
Avant de raccorder votre nouveau téléphone au réseau<br />
téléphonique, insérez les piles. Veuillez toujours utiliser des<br />
piles de bonne qualité de type AA. Elles sont nécessaires<br />
pour les affichages à l’écran lorsque le <strong>com</strong>biné est<br />
raccroché. Avant de les placer ou de les remplacer, veillez à<br />
ce que le téléphone ne soit pas relié au réseau<br />
téléphonique.<br />
1. Le <strong>com</strong>partiment à piles est situé sur la face<br />
intérieure de la base.<br />
2. Ouvrez le <strong>com</strong>partiment à piles avec un petit<br />
tournevis ou un objet pointu.<br />
3. Insérez les piles. Tenez <strong>com</strong>pte de la polarisation.<br />
4. Fermez le <strong>com</strong>partiment à piles.<br />
Nous vous re<strong>com</strong>mandons de remplacer les piles lorsque<br />
l’icône est affiché. Vous devez les remplacer toutes les<br />
trois. Lorsque les piles sont vides, l’écran n’est pas éclairé.<br />
23
− Mise en service −<br />
3.5 Raccorder le téléphone<br />
Raccordez le câble téléphonique joint à la prise<br />
téléphonique et à la douille téléphonique (voir chapitre 2,<br />
section Face inférieure de la base point 2.) situées sur la<br />
face inférieure de la base. Conduisez ensuite le câble par le<br />
guidage de câble, soit vers le haut, soit vers le bas, en<br />
dehors du boîtier du téléphone. Coincez le câble fermement<br />
dans le canal pour câble.<br />
Le téléphone travaille en numérotation à multifréquences<br />
(par tonalité).<br />
3.6 Montage mural<br />
Votre téléphone est également conçu pour le montage<br />
mural. Servez−vous de deux vis pour la fixation, forez deux<br />
trous à une distance verticale de 85 mm l’un de l’autre et<br />
laissez les vis ressortir de 5 mm du mur. Accrochez<br />
maintenant la base sur les vis et tirez−la légèrement vers le<br />
bas. Si le téléphone est monté au mur, vous pouvez<br />
suspendre le <strong>com</strong>biné à celui−ci sans que la ligne soit<br />
interrompue. Un petit crochet de suspension se trouve à cet<br />
effet à l’extrémitié supérieure du récepteur du <strong>com</strong>biné.<br />
3.7 Ajuster la date et l’heure<br />
1. Appuyez pendant 4 secondes sur la touche .<br />
2. En appuyant plusieurs fois sur les touches et<br />
, vous entrez l’heure.<br />
3. Confirmez avec la touche . Le curseur passe<br />
à l’affichage des minutes.<br />
4. En appuyant plusieurs fois sur les touches et<br />
, vous entrez les minutes.<br />
5. Confirmez avec la touche . Le curseur saute<br />
à l’introduction de la date.<br />
6. En appuyant plusieurs fois sur les touches et<br />
, vous entrez le jour.<br />
7. Confirmez avec la touche . Le curseur passe<br />
à l’affichage du mois.<br />
8. En appuyant plusieurs fois sur les touches et<br />
, vous entrez le mois.<br />
9. Confirmez avec la touche . La saisie est<br />
maintenant terminée et les données actuelles sont<br />
affichées à l’écran.<br />
Remarque : Si le piles sont <strong>com</strong>plètement vides, vous<br />
devez à nouveau entrer la date et l’heure.<br />
24
− Manipulation −<br />
4 Manipulation<br />
4.1 Comment téléphoner<br />
Vous pouvez utiliser votre téléphone <strong>com</strong>me tout téléphone<br />
conventionnel.<br />
1. Décrochez le <strong>com</strong>biné et attendez la tonalité.<br />
2. Composez maintenant le numéro de téléphone<br />
désiré. Le numéro d’appel <strong>com</strong>posé apparaît à<br />
l’écran. L’écran indique au maximum un numéro<br />
de 14 chiffres. Si ce numéro est plus long, seuls<br />
les 14 derniers chiffres sont affichés.<br />
3. Pour terminer la <strong>com</strong>munication, posez le <strong>com</strong>biné<br />
sur sa base. Vous pouvez terminer la<br />
<strong>com</strong>munication en cours avec la touche de<br />
coupure et vous obtenez immédiatement une<br />
nouvelle ligne principale.<br />
4.2 Comment prendre des appels<br />
Dès que vous recevez un appel, vous entendez la sonnerie.<br />
Vous pouvez prendre la <strong>com</strong>munication avec le <strong>com</strong>biné.<br />
4.3 Affichage de la durée de la <strong>com</strong>munication<br />
La durée de la <strong>com</strong>munication est affichée à l’écran en<br />
minutes et secondes pendant la <strong>com</strong>munication. L’affichage<br />
apparaît à l’écran après que vous avec <strong>com</strong>posé le numéro.<br />
A la fin de la <strong>com</strong>munication, l’affichage reste encore<br />
pendant quelques secondes.<br />
4.4 Réglage du volume sonore du <strong>com</strong>biné<br />
Si le volume sonore du <strong>com</strong>biné est trop faible ou trop fort,<br />
vous pouvez adapter celui−ci en fonction de vos désirs.<br />
Avec l’interrupteur à coulisse VOL. situé sur le <strong>com</strong>biné,<br />
vous pouvez régler le volume de faible à fort .<br />
4.5 Réglage automatique des derniers numéros<br />
Si un numéro que vous avez <strong>com</strong>posé est occupé, ou si<br />
vous n’avez pu atteindre personne, reposez simplement le<br />
<strong>com</strong>biné. Le dernier numéro <strong>com</strong>posé reste<br />
automatiquement enregistré. Pour utiliser la répétition<br />
automatique des derniers numéros, procédez <strong>com</strong>me suit :<br />
Décrochez le <strong>com</strong>biné et appuyez sur la touche de<br />
répétition automatique des derniers numéros . Le<br />
numéro d’appel enregistré dans le système de répétition des<br />
derniers numéros est maintenant <strong>com</strong>posé.<br />
25
− Manipulation −<br />
4.6 Sonnerie d’appel réglable<br />
Avec l’interrupteur à coulisse placé sur le côté droit<br />
de la base, vous pouvez sélectionner les positions (fort)<br />
ou (faible) pour adapter le volume de la sonnerie à vos<br />
besoins. Si vous n’avez pas envie d’être dérangé, utilisez la<br />
position (désactivé).<br />
4.7 Enregistrer des numéros abrégés<br />
Votre téléphone vous permet d’enregistrer jusqu’à 10<br />
numéros abrégés. Les chiffres de 0 à 9 du pavé numérique<br />
servent de places de mémoire.<br />
1. Décrochez le <strong>com</strong>biné.<br />
2. Appuyez sur la touche , l’écran affiche<br />
SAVE ?.<br />
3. Appuyez de nouveau sur la touche . Le<br />
curseur clignote et l’écran affiche MEMORY.<br />
4. Appuyez sur les chiffres désirés <strong>com</strong>pris entre 0<br />
et 9.<br />
Si la place de mémoire est déjà occupée, l’écran<br />
affiche la remarque OVERWRITE ?.<br />
Si vous désirez écraser cette place de mémoire,<br />
appuyez à nouveau sur la touche .<br />
Si vous ne désirez pas l’écraser, appuyez une fois<br />
sur la touche de coupure et répétez toute la saisie.<br />
5. Introduisez maintenant le numéro désiré <strong>com</strong>posé<br />
de 22 chiffres max.<br />
6. Enregistrez avec la touche . L’écran affiche<br />
SAVED !!.<br />
4.8 Appeler des numéros abrégés<br />
Procéder <strong>com</strong>me suit pour appeler un numéro abrégé<br />
enregistré :<br />
1. Décrochez le <strong>com</strong>biné.<br />
2. Appuyez sur la touche et sur la place de<br />
mémoire désirée entre 0 et 9. Le numéro<br />
enregistré est <strong>com</strong>posé directement.<br />
26
− Affichage du numéro d’appel (CLIP) −<br />
5 Affichage du numéro d’appel (CLIP)<br />
L’affichage du numéro d’appel vous permet de savoir qui<br />
vous téléphone. Si cette fonction est à votre disposition dans<br />
votre ligne téléphonique, l’écran affiche le numéro dès que<br />
le téléphone sonne. L’écran donne l’information suivante<br />
quand aucun numéro d’appel n’est disponible.<br />
Si le message UNAVAILABLE ou ERROR est affiché, le<br />
numéro n’a été reçu que partiellement ou incorrectement.<br />
Si le message LONG DISTANCE est affiché, l’information<br />
sur le numéro n’est pas disponible. Il pourrait s’agir d’une<br />
<strong>com</strong>munication internationale.<br />
Si le message PRIVATE est affiché, le correspondant a<br />
bloqué l’envoi de son numéro ou le numéro n’a pas pu être<br />
identifié.<br />
Pendant votre absence, tous les appels sont enregistrés<br />
avec la date et l’heure dans la liste d’appels. Jusqu’à 99<br />
numéros sont enregistrés dans cette liste. Dès que la liste<br />
est pleine, le numéro d’appel le plus ancien est effacé de la<br />
liste.<br />
Si des appels ont été enregistrés pendant votre absence,<br />
vous pouvez le visualiser par NEW et le voyant de contrôle<br />
des nouveaux appels clignote.<br />
5.1 Visualiser la liste d’appels<br />
La touche vous permet d’accéder aux derniers<br />
numéros enregistrés. Avec et , vous pouvez faire<br />
défiler la liste. Tous les appels enregistrés sont représentés<br />
<strong>com</strong>me suit :<br />
L’appel est<br />
nouveau<br />
Heure et date<br />
Place de mémoire dans<br />
la liste d’appels<br />
REPEAT<br />
Numéro du<br />
correspondant<br />
Le correspondant<br />
a appelé<br />
plusieurs fois.<br />
Lorsque vous avez atteint la dernière place de mémoire de<br />
la liste, le message END OF LIST s’affiche.<br />
Remarque : Quand vous avez contrôlé tous les numéros<br />
enregistrés, le voyant s’éteint et l’affichage "NEW"<br />
se trouve sur "00".<br />
Remarque : Si vous appuyez sur aucune touche pendant<br />
30 secondes, vous quittez la liste d’appels et<br />
l’écran indique à nouveau l’heure actuelle et la<br />
date ainsi que le nombre des numéros de<br />
téléphone enregistrés dans la liste d’appel et le<br />
27
− Affichage du numéro d’appel (CLIP) −<br />
nombre des numéros qui viennent d’être<br />
enregistrés.<br />
5.2 Composition du numéro directement à partir<br />
de la liste d’appels<br />
Vous pouvez <strong>com</strong>poser directement des numéros de la liste<br />
d’appels :<br />
1. Avec les touches et , sélectionnez le<br />
numéro de téléphone de votre choix.<br />
2. Pour <strong>com</strong>poser le numéro, appuyez sur la touche<br />
.<br />
3. Si vous avez décroché le <strong>com</strong>biné, le numéro est<br />
<strong>com</strong>posé directement. Si vous ne décrochez pas,<br />
le message PICK UP HANDSET est affiché.<br />
4. Décrochez le <strong>com</strong>biné. L’écran affiche DIALING ...<br />
et la <strong>com</strong>munication est établie.<br />
5.3 Effacer un numéro de la liste d’appels<br />
1. Avec les touches et , Sélectionnez les<br />
numéros de la liste que vous désirez effacer.<br />
2. Appuyez une fois sur la touche . L’écran<br />
affiche le message DELETE ?".<br />
3. Appuyez immédiatement sur la touche <br />
pendant<br />
2 secondes. Le numéro d’appel est effacé et<br />
l’écran affiche maintenant un autre numéro de la<br />
liste d’appels.<br />
5.4 Effacer toute la liste d’appels<br />
1. Composez un numéro quelconque de la liste.<br />
2. Appuyez maintenant sur la touche jusqu‘à ce<br />
que le message DELETE ALL ?" s’affiche sur<br />
l’écran.<br />
3. Appuyez immédiatement sur la touche <br />
pendant 2 secondes jusqu‘à ce que le message<br />
NO CALLS" s’affiche sur l’écran.<br />
28
− Install. à postes suppl./services suppl. −<br />
6 Installations à postes supplémentaires /<br />
services supplémentaires<br />
Vous pouvez utiliser la touche de votre téléphone sur<br />
des installations à postes supplémentaires et à l’utilisation<br />
de services confort de votre exploitant.<br />
6.1 Touche R avec les installations à postes<br />
supplémentaires<br />
Si votre téléphone est raccordé à une installation à postes<br />
supplémentaires, vous pouvez utiliser via la touche <br />
toutes les possibilités telles que transfert d’appels, rappel<br />
automatique, etc.... Un temps de flash de 100 ms est<br />
nécessaire avec une installation à postes supplémentaires<br />
(Réglage, voir chapitre Réglages de base"). Votre<br />
revendeur, auprès duquel vous avez acheté l’installation,<br />
vous informera si votre téléphone fonctionne parfaitement<br />
sur ce genre d’installation.<br />
6.2 Touche et les services confort de votre<br />
exploitant de réseau.<br />
Votre téléphone SWITEL suppporte les services<br />
supplémentaires les plus importants de votre exploitant de<br />
réseau (par ex. le va−et−vient, la signalisation d’appel en<br />
instance, la conférence à trois). En ce qui concerne<br />
l’activation des services supplémentaires, adressez−vous à<br />
votre exploitant de réseau.<br />
6.3 Pause de numérotation<br />
Dans le cas d’installations à postes supplémentaires, il est<br />
nécessaire de <strong>com</strong>poser un certain numéro (par ex. le 9" ou<br />
le 0) pour obtenir la tonalité de ligne principale. Sur les<br />
quelques installations à postes supplémentaires plus<br />
anciennes, cela dure quelques instants jusqu’à ce la tonalité<br />
se fasse entendre. Spécialement pour ces installations,<br />
après la prise de ligne, on peut introduire une pause<br />
automatique afin de pouvoir continuer à <strong>com</strong>poser<br />
directement le numéro sans devoir attendre la tonalité.<br />
Entre le chiffre de la ligne principale et le numéro, appuyez<br />
une fois sur la touche . Après la prise de ligne, votre<br />
téléphone attend 3 secondes avant de <strong>com</strong>poser le véritable<br />
numéro.<br />
29
− Informations importantes −<br />
7 Informations importantes<br />
7.1 Recherche d’erreurs<br />
Enlevez tous les appareils téléphoniques supplémentaires et<br />
reliez seulement le téléphone directement avec la prise<br />
téléphonique. Si des erreurs devaient encore se produire,<br />
raccordez un autre téléphone (si vous en avez un) avec la<br />
prise téléphonique. Les résultats vous montrent si l’erreur<br />
provient de l’appareil ou de la ligne téléphonique.<br />
7.2 Garantie<br />
Les appareils SWITEL sont fabriqués et testés selon les<br />
procédés de production les plus modernes. Les matériaux<br />
choisis et la haute technologie assure un fonctionnement<br />
parfait et une longue durée de vie. La garantie ne rentre pas<br />
en jeu si l’exploitant du réseau téléphonique ou une<br />
installation à postes supplémentaires éventuellement<br />
intercalée est responsable du dysfonctionnement de<br />
l’appareil. La garantie ne s’applique pas aux piles<br />
rechargeables standard ou aux packs de piles<br />
rechargeables utilisés dans le produit. La durée de garantie<br />
est de 24 mois à partir de la date d’achat.<br />
Pendant la période de garantie, tous les défauts dus à des<br />
erreurs de matériel et de fabrication sont réparés<br />
gratuitement. La garantie expire en cas d’interventions de<br />
l’acheteur ou d’un tiers. Les dommages engendrés par une<br />
manipulation ou une utilisation inadéquates, par un mauvais<br />
emplacement ou rangement, par un raccordement ou une<br />
installation inadéquate ainsi que par un cas de force<br />
majeure ou d’autres influences extérieures ne sont pas<br />
inclus dans la prestation de la garantie. En cas de<br />
réclamations, nous nous réservons le droit de réparer ou de<br />
remplacer les pièces défectueuses ou d’échanger l’appareil.<br />
Les pièces ou appareils échangés passent en notre<br />
propriété. Le droit de prétention à des dédommagements est<br />
exclu, sauf si ce dommage est basé sur une préméditation<br />
ou une négligence grave du fabricant.<br />
Si votre appareil <strong>com</strong>porte cependant un défaut pendant la<br />
période de garantie, veuillez vous adresser exclusivement<br />
au magasin dans lequel vous l’avez acheté en présentant<br />
votre bon d’achat. Tous les droits de garantie basés sur ces<br />
dispositions ne peuvent être revendiqués qu’auprès de votre<br />
revendeur. A l’échéance des deux ans après l’achat et le<br />
transfert de nosproduits, les législations en matière de<br />
garantie ne sont plus applicables.<br />
30
− Contenuto −<br />
1 Indicazioni generali . . . . . . . . . . . . . . . . 33<br />
1.1 Impiego conforme agli usi previsti . . . . . . . . . . 33<br />
1.2 Luogo di installazione . . . . . . . . . . . . . . . . . . . . 33<br />
1.3 Impianti telefonici interni . . . . . . . . . . . . . . . . . . 33<br />
1.4 Avvertenze riguardo lo smaltimento . . . . . . . . . 34<br />
1.5 Temperatura e ambiente circostante . . . . . . . . 34<br />
1.6 Pulizia e cura . . . . . . . . . . . . . . . . . . . . . . . . . . . . 34<br />
2 Elementi di <strong>com</strong>ando . . . . . . . . . . . . . . . 35<br />
2.1 Lato interno ricevitore . . . . . . . . . . . . . . . . . . . . . 35<br />
2.2 Lato superiore ricevitore . . . . . . . . . . . . . . . . . . 35<br />
2.3 Lato inferiore apparecchio base . . . . . . . . . . . . 36<br />
2.4 Lato interno apparecchio base . . . . . . . . . . . . . 36<br />
3 Messa in funzione . . . . . . . . . . . . . . . . . . 37<br />
3.1 Indicazioni generali . . . . . . . . . . . . . . . . . . . . . . . 37<br />
3.2 Verificare il contenuto della confezione . . . . . . 37<br />
3.3 Collegare il ricevitore . . . . . . . . . . . . . . . . . . . . . 37<br />
3.4 Inserire le batterie . . . . . . . . . . . . . . . . . . . . . . . . 37<br />
3.5 Collegare il telefono . . . . . . . . . . . . . . . . . . . . . . 38<br />
3.6 Montaggio a parete . . . . . . . . . . . . . . . . . . . . . . . 38<br />
3.7 Aggiustare la data e l’orario . . . . . . . . . . . . . . . . 38<br />
4 Esercizio . . . . . . . . . . . . . . . . . . . . . . . . . . 39<br />
4.1 Compiere telefonate . . . . . . . . . . . . . . . . . . . . . . 39<br />
4.2 Ricevere chiamate . . . . . . . . . . . . . . . . . . . . . . . 39<br />
4.3 Visualizzare la durata di chiamata . . . . . . . . . . 39<br />
4.4 Impostare il volume del ricevitore . . . . . . . . . . . 39<br />
4.5 Ripetizione di chiamata . . . . . . . . . . . . . . . . . . . 39<br />
4.6 Impostazione della suoneria . . . . . . . . . . . . . . . 40<br />
4.7 Memorizzare numeri di selezione abbreviata . 40<br />
4.8 Richiamare numeri di selezione abbreviata . . 40<br />
5 Visualizzazione numero (CLIP) . . . . . . 41<br />
5.1 Visualizzare l’elenco chiamate . . . . . . . . . . . . . 41<br />
5.2 Selezionare un numero telefonico direttamente<br />
dall’elenco chiamate . . . . . . . . . . . . . . . . . . . . . . 42<br />
5.3 Cancellare un numero telefonico dall’elenco<br />
chiamate . . . . . . . . . . . . . . . . . . . . . . . . . . . . . . . 42<br />
5.4 Cancellare l’elenco chiamate <strong>com</strong>pleto . . . . . . 42<br />
31
− Contenuto −<br />
6 Impianti telefonici interni / Servizi<br />
addizionali . . . . . . . . . . . . . . . . . . . . . . . . . 43<br />
6.1 Tasto R in impianti telefonici interni . . . . . . . . . 43<br />
6.2 Tasto R e servizi addizionali del proprio<br />
gestore di rete . . . . . . . . . . . . . . . . . . . . . . . . . . . 43<br />
6.3 Pausa di selezione . . . . . . . . . . . . . . . . . . . . . . . 43<br />
7 Informazioni importanti . . . . . . . . . . . . . 44<br />
7.1 Ricerca di errori . . . . . . . . . . . . . . . . . . . . . . . . . . 44<br />
7.2 Garanzia . . . . . . . . . . . . . . . . . . . . . . . . . . . . . . . 44<br />
32
− Indicazioni generali −<br />
1 Indicazioni generali<br />
Si prega di leggere attentamente le presenti istruzioni per<br />
l’uso. Non aprire per nessuna ragione l’apparecchio<br />
autonomamente e svolgere riparazioni di propria iniziativa.<br />
Rivolgersi al rivenditore autorizzato in caso di reclami entro il<br />
periodo di garanzia. Con riserva di modifiche tecniche ed<br />
ottiche dell’articolo dovute a migliorie di sviluppo.<br />
1.1 Impiego conforme agli usi previsti<br />
Il presente telefono è stato sviluppato per l’esercizio con un<br />
allacciamento telefonico di accesso analogico (PSTN) entro<br />
la Svizzera. Ciò nonostante, in particolare a causa di<br />
possibili differenze tra i vari gestori di reti telefoniche, non è<br />
possibile assumere alcuna garanzia riguardo il perfetto<br />
funzionamento dell’apparecchio terminale per tutti gli<br />
allacciamenti di tele<strong>com</strong>unicazione. Collegare il cavo di<br />
allacciamento del telefono soltanto in un’apposita presa<br />
telefonica. Non sostituire il connettore del cavo di<br />
allacciamento.<br />
1.2 Luogo di installazione<br />
Posizionare il telefono su una superficie piana e antiscivolo.<br />
In linea di massima i piedini dell’apparecchio non lasciano<br />
tracce sulla superficie di posizionamento. A causa del<br />
numero crescente di vernici e superfici diverse non è<br />
<strong>com</strong>unque possibile escludere che i piedini dell’apparecchio<br />
possano lasciare delle tracce sulla superficie di appoggio.<br />
1.3 Impianti telefonici interni<br />
Il telefono è altresì collegabile ad un impianto telefonico<br />
interno. Il rivenditore specializzato è in grado di indicare se il<br />
telefono acquistato funzionerà senza alcun problema nel<br />
proprio impianto telefonico interno. Non è possibile garantire<br />
che il telefono acquistato funzioni in ogni caso con qualsiasi<br />
tipo di impianto telefonico interno.<br />
33
− Indicazioni generali −<br />
1.4 Avvertenze riguardo lo smaltimento<br />
La conversione della legislazione europea in leggi e direttive<br />
nazionali impone il corretto smaltimento di beni di consumo.<br />
Questo avviene all’insegna della protezione di persone e<br />
ambiente.<br />
Il simbolo raffigurato qui a lato indica che<br />
apparecchi usati elettrici ed elettronici e<br />
batterie esauste non sono da smaltire<br />
assieme ai normali rifiuti domestici.<br />
Procedere pertanto allo smaltimento di<br />
apparecchi vecchi o esausti<br />
presso un centro di raccolta incaricato con<br />
il rispettivo smaltimento.<br />
Consegnare batterie ed accumulatori per lo smaltimento<br />
presso rivenditori al dettaglio di batterie o centri di raccolta<br />
che mettono a disposizione appositi contenitori.<br />
Smaltire confezioni ed imballaggi in base a quanto<br />
indicato dalle norme in vigore a livello locale.<br />
1.5 Temperatura e ambiente circostante<br />
Il telefono è stato progettato per l’uso in ambienti chiusi e<br />
protetti con una temperatura <strong>com</strong>presa tra 10 °C e 30 °C. Si<br />
consiglia di evitare l’uso del telefono in ambienti esposti a<br />
umidità <strong>com</strong>e bagno e locali di lavaggio. Evitare peraltro<br />
anche la vicinanza a fonti di calore <strong>com</strong>e termosifoni e non<br />
esporre l’apparecchio alla diretta irradiazione solare.<br />
Evitare inoltre un’esposizione a fumo, polvere, vibrazioni,<br />
sostanze chimiche, umidità, calore e raggi solari diretti.<br />
1.6 Pulizia e cura<br />
Pulire le superfici della custodia con un panno asciutto,<br />
morbido e antipilling. Non utilizzare mai detergenti o solventi<br />
aggressivi. Al di là di una pulizia di tanto in tanto della<br />
custodia esterna, non sono necessari ulteriori interventi di<br />
pulizia e cura. I piedini in gomma del telefono non sono<br />
resistenti a qualsiasi detergente. Il costruttore non risponde<br />
di eventuali danni a mobili o simili.<br />
34
− Elementi di <strong>com</strong>ando −<br />
2 Elementi di <strong>com</strong>ando<br />
2.1 Lato interno ricevitore<br />
1. Tasto di disconnessione /<br />
Supporto a forcella<br />
2. Tasto di selezione 7<br />
abbreviata<br />
3. Tasto memoria<br />
4. Collegamento con<br />
apparecchio base<br />
5. Tasto di segnale R<br />
6. Ripetizione di chiamata /<br />
Pausa<br />
7. Impostazione del<br />
volume del ricevitore 6<br />
5<br />
1<br />
2<br />
3<br />
4<br />
2.2 Lato superiore ricevitore<br />
8. Spia di controllo per<br />
chiamate nuove<br />
9. Tasto di selezione verso<br />
sotto<br />
10. Tasto di selezione verso<br />
sopra<br />
11. Tasto di cancellazione<br />
12. Selezione dall’<br />
12<br />
elenco chiamate<br />
8<br />
9<br />
11<br />
10<br />
35
− Elementi di <strong>com</strong>ando −<br />
2.3 Lato inferiore apparecchio base<br />
1. Fissaggio per<br />
montaggio a parete<br />
2. Collegamento cavo<br />
telefonico<br />
3. Fissaggio per<br />
montaggio a parete 5<br />
4. Collegamento cavo<br />
a spirale<br />
5. Impostazione del<br />
volume della suoneria<br />
1<br />
2<br />
3<br />
4<br />
2.4 Lato interno apparecchio base<br />
6. Vano batterie<br />
6<br />
36
− Messa in funzione −<br />
3 Messa in funzione<br />
3.1 Indicazioni generali<br />
Attenzione: Leggere assolutamente prima della<br />
messa in funzione le indicazioni generali riportate<br />
all’inizio delle presenti istruzioni per l’uso.<br />
3.2 Verificare il contenuto della confezione<br />
La confezione contiene:<br />
una stazione base<br />
un cavo di collegamento<br />
telefonico<br />
un manuale di istruzioni per<br />
l’uso<br />
un ricevitore<br />
un cavo a spirale<br />
tre batterie tipo AA<br />
3.3 Collegare il ricevitore<br />
Dopo aver estratto il telefono dalla confezione, collegare<br />
innanzitutto il ricevitore con la stazione base. Afferrare<br />
l’estremità corta del cavo a spirale ed inserirla nella presa<br />
presente in basso al ricevitore. Girare la stazione base e<br />
collegare l’altra estremità alla presa inferiore (vedi capitolo 2,<br />
paragrafo Lato inferiore apparecchio base, punto 4). Fissare<br />
il cavo nella canalina orientandolo verso fuori.<br />
3.4 Inserire le batterie<br />
Prima di collegare il nuovo telefono alla rete telefonica,<br />
inserire le batterie nell’apparecchio. Si consiglia di utilizzare<br />
sempre batterie di buona qualità del tipo AA. Le batterie<br />
sono necessarie per le visualizzazioni di display con<br />
ricevitore appoggiato sulla forcella di aggancio. Prima di<br />
inserire o sostituire le batterie, sincerarsi che il telefono non<br />
sia collegato alla rete telefonica.<br />
1. Il vano batterie si trova sul lato interno della<br />
stazione base.<br />
2. Aprire il vano batterie con l’ausilio di un piccolo<br />
cacciavite o altro oggetto appuntito.<br />
3. Inserire le batterie. Osservare la corretta polarità.<br />
4. Chiudere infine il vano batterie.<br />
La visualizzazione del simbolo sul display indica che è<br />
necessario sostituire le batterie. Procedere in tal caso alla<br />
sostituzione delle tre batterie. Con batterie scariche il display<br />
è buio e non indica nulla.<br />
37
− Messa in funzione −<br />
3.5 Collegare il telefono<br />
Collegare il cavo telefonico fornito in dotazione al jack<br />
telefonico e alla presa telefonica (vedi capitolo 2, paragrafo<br />
Lato inferiore apparecchio base, punto 2) presente sul lato<br />
inferiore della stazione base. Condurre il cavo lungo la<br />
canalina in alto o in basso fino a farlo nuovamente<br />
fuoriuscire dalla custodia del telefono. Fissare saldamente il<br />
cavo nella canalina.<br />
Il telefono opera con la procedura di selezione PST<br />
(selezione a toni).<br />
3.6 Montaggio a parete<br />
Il telefono si presta altresì per il montaggio a parete.<br />
Utilizzare per il fissaggio due viti, prevedere due fori con una<br />
distanza di 85 mm in verticale l’uno sotto l’altro e lasciare<br />
fuoriuscire le viti 5 mm dal muro. Inserire a questo punto la<br />
stazione base sulle viti e spingere leggermente in basso.<br />
Avendo montato il telefono alla parete, è possibile<br />
agganciare il ricevitore al telefono senza bisogno di<br />
interrompere il collegamento. Sull’estremità superiore del<br />
supporto per ricevitore si trova a tale scopo un piccolo<br />
dispositivo di aggancio.<br />
3.7 Aggiustare la data e l’orario<br />
1. Premere per 4 secondi il tasto memoria .<br />
2. Premendo ripetutamente i tasti e si ha<br />
modo di inserire l’ora attuale.<br />
3. Confermare con il tasto . Il cursore si sposta<br />
per l’immissione dei minuti.<br />
4. Premendo ripetutamente i tasti e si ha<br />
modo di inserire i minuti attuali.<br />
5. Confermare con il tasto . Il cursore si sposta<br />
per l’immissione della data.<br />
6. Premendo ripetutamente i tasti<br />
e si ha modo di inserire il giorno attuale.<br />
7. Confermare con il tasto . Il cursore si sposta<br />
per l’immissione del mese.<br />
8. Premendo ripetutamente i tasti e si ha<br />
modo di inserire il mese attuale.<br />
9. Confermare con il tasto . A questo punto<br />
l’immissione è conclusa e i dati attuali sono<br />
visualizzati sul display.<br />
Avvertenza: Con batterie <strong>com</strong>pletamente scariche è<br />
necessario ripetere l’immissione di orario e data.<br />
38
− Esercizio −<br />
4 Esercizio<br />
4.1 Compiere telefonate<br />
Il telefono è utilizzabile <strong>com</strong>e un qualsiasi altro telefono<br />
convenzionale.<br />
1. Per effettuare una chiamata, sollevare il ricevitore<br />
del telefono ed attendere il segnale di linea libera.<br />
2. Selezionare il numero telefonico desiderato. Il<br />
numero di chiamata selezionato è indicato sul<br />
display. Il display è in grado di visualizzare numeri<br />
telefonici <strong>com</strong>posti da massimo 14 cifre. Se il<br />
numero di chiamata selezionato dovesse<br />
<strong>com</strong>unque essere più lungo, sono visualizzate<br />
solo le ultime 14 cifre del numero.<br />
3. Per concludere la telefonata è sufficiente<br />
abbassare nuovamente il ricevitore agganciandolo<br />
sulla forcella. Con il tasto di disconnessione si<br />
conclude la chiamata in corso e si ottiene<br />
direttamente un nuovo segnale di linea libera.<br />
4.2 Ricevere chiamate<br />
Non appena giunge una chiamata, si avverte la<br />
segnalazione acustica di chiamata. Per ricevere la chiamata<br />
è necessario sollevare il ricevitore.<br />
4.3 Visualizzare la durata di chiamata<br />
Durante lo svolgimento di una chiamata, sul display è<br />
indicata la durata di conversazione in minuti e secondi. In<br />
seguito alla selezione del numero di chiamata, l’indicazione<br />
è visualizzata sul display. A conclusione della chiamata, la<br />
durata rimane visualizzata sul display per alcuni secondi.<br />
4.4 Impostare il volume del ricevitore<br />
Nel caso in cui il volume del ricevitore dovesse essere<br />
troppo basso o troppo alto, questo potrà essere impostato a<br />
rispetto delle proprie esigenze.<br />
L’interruttore a scorrimento VOL. sul ricevitore consente di<br />
regolare il volume da basso ad alto .<br />
4.5 Ripetizione di chiamata<br />
Avendo selezionato un numero di chiamata che risulta<br />
occupato o non raggiungendo l’utente desiderato,<br />
abbassare nuovamente il ricevitore. Il numero di chiamata<br />
selezionato per ultimo è automaticamente memorizzato nel<br />
telefono. Per utilizzare la funzione di ripetizione di selezione,<br />
procedere <strong>com</strong>e indicato qui di seguito:<br />
Sollevare il ricevitore e premere il tasto di ripetizione di chiamata<br />
. A questo punto l’apparecchio seleziona il numero di<br />
chiamata memorizzato per la ripetizione di selezione.<br />
39
− Esercizio −<br />
4.6 Impostazione della suoneria<br />
Con l’interruttore a scorrimento presente sulla destra<br />
della stazione base si ha modo di scegliere tra le posizioni<br />
(alto) o (basso) per impostare il volume della suoneria in<br />
base alle proprie esigenze. Se non si volesse essere invece<br />
disturbati, scegliere la posizione (OFF).<br />
4.7 Memorizzare numeri di selezione abbreviata<br />
Il telefono è predisposto per la memorizzazione di 10 numeri<br />
di chiamata di selezione abbreviata. Come posizioni di<br />
memoria sono utilizzati i tasti da 0 a 9 della tastiera numerica<br />
dell’apparecchio.<br />
1. Sollevare il ricevitore del telefono.<br />
2. Premere il tasto . Sul display appare SAVE ?.<br />
3. Premere di nuovo il tasto . Il cursore<br />
lampeggia e sul display appare l’indicazione<br />
MEMORY.<br />
4. Premere quindi la posizione di memoria<br />
desiderata scegliendo uno dei tasti numerici da 0<br />
a 9.<br />
Se la posizione di memoria prescelta è già<br />
occupata, sul display appare l’indicazione<br />
OVERWRITE ?.<br />
Per sovrascrivere la posizione di memoria,<br />
premere di nuovo il tasto .<br />
Non volendo invece sovrascrivere la posizione di<br />
memoria, premere una volta il tasto di<br />
disconnessione e ripetere l’inserimento da capo.<br />
5. Immettere quindi il numero di chiamata desiderato<br />
<strong>com</strong>posto da max. 22 cifre.<br />
6. Memorizzare con il tasto . Sul display appare<br />
SAVED !!.<br />
4.8 Richiamare numeri di selezione abbreviata<br />
Per richiamare numeri di selezione abbreviata<br />
precedentemente memorizzati, procedere <strong>com</strong>e segue:<br />
1. Sollevare il ricevitore del telefono.<br />
2. Premere il tasto selezionare la posizione di<br />
memoria tra 0 e 9 desiderata. A questo punto il<br />
telefono seleziona direttamente il numero di<br />
chiamata memorizzato.<br />
40
− Visualizzazione numero (CLIP) −<br />
5 Visualizzazione numero (CLIP)<br />
Grazie alla funzione di visualizzazione del numero di<br />
chiamata è possibile individuare il chiamante con telefonata<br />
in arrivo. A condizione che la linea telefonica offra questa<br />
funzione, mentre il telefono squilla sul display LCD è<br />
visualizzato il numero del chiamante. Se il numero di<br />
chiamata non è disponibile, sul display appare quanto<br />
segue.<br />
Nel caso in cui sul display appare l’indicazione<br />
UNAVAILABLE oppure ERROR, significa che il numero di<br />
chiamata è stato ricevuto solo in parte o in maniera errata.<br />
Se sul display appare l’indicazione LONG DISTANCE,<br />
l’informazione relativa al numero di chiamata non è<br />
disponibile. Si potrebbe anche trattare di una chiamata<br />
internazionale.<br />
Se sul display appare l’indicazione PRIVATE, il chiamante<br />
ha soppresso la trasmissione del proprio numero di<br />
chiamata oppure non è stato possibile trasmettere il numero.<br />
In caso di assenza, nell’elenco chiamate sono memorizzate<br />
tutte le chiamate con informazioni riguardo a data e orario.<br />
Nell’elenco chiamate sono memorizzati fino a 99 numeri di<br />
chiamata. Non appena la lista è piena, il numero di chiamata<br />
più vecchio è cancellato dall’elenco e sostituito dal nuovo<br />
numero.<br />
Se durante la propria assenza sono state registrare chiamate,<br />
sul display appare l’indicazione NEW e la spia di controllo<br />
lampeggia per indicare la presenza di chiamate perse.<br />
5.1 Visualizzare l’elenco chiamate<br />
Con il tasto si passa ai numeri telefonici registrati per<br />
ultimo. Con e è possibile scorrere nell’elenco<br />
chiamate. Tutte le chiamate registrate sono visualizzate<br />
<strong>com</strong>e segue:<br />
Nuova chiamata Orario e data Posizione di memoria<br />
all’interno dell’elenco chiamate<br />
Il chiamante ha<br />
<strong>com</strong>piuto<br />
ripetuti tentativi<br />
di telefonata<br />
RIPETI<br />
Numero<br />
telefonico del<br />
chiamante<br />
Se si raggiunge l’ultima posizione di memoria dell’elenco, sul<br />
display appare l’indicazione END OF LIST.<br />
Avvertenza: Una volta controllati tutti i numeri di chiamata<br />
registrati, la spia di controllo indicante nuove<br />
41
− Visualizzazione numero (CLIP) −<br />
chiamate si spegne ed il messaggio "NEW"<br />
presente sul display indica "00".<br />
Avvertenza: Se entro 30 secondi non si preme alcun tasto,<br />
l’apparecchio esce dall’elenco chiamate e sul<br />
display ritorna la visualizzazione di orario e data<br />
attuali, del numero di telefonate memorizzate<br />
nell’elenco chiamate e di numeri di chiamata<br />
nuovi.<br />
5.2 Selezionare un numero telefonico direttamente<br />
dall’elenco chiamate<br />
E’ possibile <strong>com</strong>piere la selezione di numeri telefonici<br />
direttamente dall’elenco chiamate:<br />
1. Scegliere con i tasti e il numero<br />
telefonico desiderato.<br />
2. Per selezionare il numero di chiamata, premere il<br />
tasto .<br />
3. Se il ricevitore è già stato sollevato, il numero di<br />
chiamata è selezionato direttamente. Con<br />
ricevitore agganciato sul display appare invece<br />
l’indicazione PICK UP HANDSET.<br />
4. Sollevare quindi il ricevitore. Sul display appare<br />
DIALING ... ed il telefono procede ad instaurare<br />
un collegamento.<br />
5.3 Cancellare un numero telefonico dall’elenco<br />
chiamate<br />
1. Scegliere con i tasti e dall’elenco<br />
chiamate il numero telefonico che si desidera<br />
cancellare.<br />
2. Premere una volta il tasto . Sul display appare<br />
l’indicazione "DELETE?".<br />
3. Premere quindi immediatamente il tasto per<br />
2 secondi. Il numero di chiamata è cancellato ed il<br />
display visualizza il numero di chiamata<br />
successivo presente nell’elenco chiamate.<br />
5.4 Cancellare l’elenco chiamate <strong>com</strong>pleto<br />
1. Selezione di un numero di chiamata a piacere<br />
dall’elenco chiamate.<br />
2. Tenere a questo punto premuto il tasto fino a<br />
quando sul display non appare l’indicazione<br />
DELETE ALL ?".<br />
3. Premere quindi immediatamente il tasto per<br />
2 secondi fino a quando sul display è visualizzato<br />
il messaggio NO CALLS".<br />
42
− Impianti telefonici int./Serv. addiz. −<br />
6 Impianti telefonici interni / Servizi<br />
addizionali<br />
Il tasto del telefono è disponibile in presenza di impianti<br />
telefonici interni oppure utilizzando i servizi addizionali del<br />
proprio gestore di rete telefonica.<br />
6.1 Tasto R in impianti telefonici interni<br />
Avendo collegato il telefono ad un impianto telefonico<br />
interno, il tasto consente di accedere a tutte le altre<br />
funzioni disponibili <strong>com</strong>e per es. trasferimento di chiamata,<br />
funzione di richiamata automatica e così via. Un impianto<br />
telefonico interno richiede un tempo flash di 100 ms (per<br />
impostazione vedi capitolo Impostazioni di base"). Il<br />
rivenditore specializzato è in grado di indicare se il telefono<br />
acquistato funzionerà senza alcun problema nel proprio<br />
impianto telefonico interno.<br />
6.2 Tasto e servizi addizionali del proprio<br />
gestore di rete<br />
Il telefono SWITEL supporta i più importanti servizi<br />
addizionali del proprio gestore di rete telefonica (per es.<br />
funzioni di chiamata in attesa, avviso di chiamata,<br />
conferenza a tre). Rivolgersi direttamente al gestore di rete<br />
telefonica per l’abilitazione ai servizi addizionali.<br />
6.3 Pausa di selezione<br />
In presenza di impianti telefonici interni è necessario<br />
selezionare un determinato numero (per es. 9" o 0) prima<br />
di ottenere un segnale di libero che indica la disponibilità<br />
della linea di collegamento di rete. Alcuni impianti telefonici<br />
interni di vecchia data richiedono un intervallo di tempo di<br />
poco superiore prima di trasmettere un segnale di libero. In<br />
particolare, proprio per questi impianti telefonici interni è<br />
possibile prevedere, una volta ottenuta la linea di<br />
collegamento di rete, una pausa automatica che consente di<br />
<strong>com</strong>porre il numero di chiamata desiderato senza dover<br />
necessariamente attendere il segnale di libero.<br />
Premere tra la cifra da digitare per ottenere il segnale di<br />
libero ed il numero di chiamata da <strong>com</strong>porre una volta il tasto<br />
. In seguito alla disponibilità della linea di collegamento,<br />
il telefono aspetta 3 secondi prima di procedere con la<br />
selezione del numero che si desidera chiamare.<br />
43
− Informazioni importanti −<br />
7 Informazioni importanti<br />
7.1 Ricerca di errori<br />
Rimuovere tutti gli apparecchi telefonici addizionali e<br />
collegare solo il telefono direttamente con la presa<br />
telefonica. Se la disfunzione è ancora presente, collegare un<br />
altro telefono (se disponibile) con la presa telefonica. I<br />
risultati mostrano se l’errore riguarda l’apparecchio oppure la<br />
linea telefonica.<br />
7.2 Garanzia<br />
Gli apparecchi SWITEL sono costruiti e collaudati in<br />
osservanza dei processi di produzione più moderni.<br />
L’impiego di materiali selezionati e tecnologie altamente<br />
sviluppate garantiscono un perfetto funzionamento ed una<br />
lunga durata in vita. Non è possibile richiamarsi alla presente<br />
garanzia nel caso in cui la causa per il malfunzionamento<br />
dell’apparecchio risalga al gestore della rete telefonica o ad<br />
un eventuale impianto telefonico interno interposto. La<br />
garanzia non si estende alle batterie standard o <strong>com</strong>patte<br />
ricaricabili utilizzate all’interno degli apparecchi. Il periodo di<br />
garanzia ricopre 24 mesi a partire dalla data di acquisto.<br />
Entro il periodo di garanzia sarà eliminato gratuitamente<br />
qualsiasi guasto relativo a difetti di materiale o di<br />
produzione. La garanzia rilasciata cessa in caso di<br />
intervento da parte dell’acquirente o di terze persone. La<br />
presente garanzia non ricopre danni dovuti all’uso o<br />
all’esercizio non conforme a quanto previsto, ad un errato<br />
montaggio o conservazione, a collegamento o installazione<br />
impropri così <strong>com</strong>e a forza maggiore o a qualsiasi altro<br />
influsso esterno. In qualità di produttore ci riserviamo il<br />
diritto, in caso di reclami, di riparare o sostituire le parti<br />
difettose o di rimpiazzare l’apparecchio. Parti sostituite o<br />
apparecchi rimpiazzati divengono di nostra proprietà. Si<br />
escludono richieste di risarcimento danni, qualora non<br />
fondate su intenzione o colpa grave da parte del costruttore.<br />
Nel caso in cui il presente apparecchio dovesse ciò<br />
nonostante presentare un difetto durante il periodo di<br />
garanzia, si prega di rivolgersi esclusivamente al negozio di<br />
rivendita dell’apparecchio SWITEL assieme al relativo<br />
scontrino di acquisto. In base alle presenti disposizioni, tutti i<br />
diritti di garanzia dovranno essere fatti valere<br />
esclusivamente nei confronti del rivenditore autorizzato. A<br />
decorrere da due anni dalla data di acquisto e consegna dei<br />
nostri prodotti non sarà più possibile fare valere eventuali<br />
diritti a garanzia.<br />
44
− Contents −<br />
1 General Information . . . . . . . . . . . . . . . . 47<br />
1.1 Intended use . . . . . . . . . . . . . . . . . . . . . . . . . . . . 47<br />
1.2 Installation location . . . . . . . . . . . . . . . . . . . . . . . 47<br />
1.3 Private branch exchanges . . . . . . . . . . . . . . . . . 47<br />
1.4 Information on disposal . . . . . . . . . . . . . . . . . . . 48<br />
1.5 Temperature and ambient conditions . . . . . . . . 48<br />
1.6 Cleaning and upkeep . . . . . . . . . . . . . . . . . . . . . 48<br />
2 User Controls . . . . . . . . . . . . . . . . . . . . . . 49<br />
2.1 Inside the receiver . . . . . . . . . . . . . . . . . . . . . . . 49<br />
2.2 Upper side of receiver . . . . . . . . . . . . . . . . . . . . 49<br />
2.3 Underside of base unit . . . . . . . . . . . . . . . . . . . . 50<br />
2.4 Inside of base unit . . . . . . . . . . . . . . . . . . . . . . . 50<br />
3 Setting up . . . . . . . . . . . . . . . . . . . . . . . . . 51<br />
3.1 Safety Information . . . . . . . . . . . . . . . . . . . . . . . 51<br />
3.2 Check contents of pack . . . . . . . . . . . . . . . . . . . 51<br />
3.3 Connecting the receiver . . . . . . . . . . . . . . . . . . . 51<br />
3.4 Fitting the batteries . . . . . . . . . . . . . . . . . . . . . . . 51<br />
3.5 Connecting the telephone . . . . . . . . . . . . . . . . . 52<br />
3.6 Wall mounting . . . . . . . . . . . . . . . . . . . . . . . . . . . 52<br />
3.7 Adjust date and time . . . . . . . . . . . . . . . . . . . . . 52<br />
4 Operation . . . . . . . . . . . . . . . . . . . . . . . . . . 53<br />
4.1 Making a call . . . . . . . . . . . . . . . . . . . . . . . . . . . . 53<br />
4.2 Receiving calls . . . . . . . . . . . . . . . . . . . . . . . . . . 53<br />
4.3 Call Duration Display . . . . . . . . . . . . . . . . . . . . . 53<br />
4.4 Adjusting the receiver volume . . . . . . . . . . . . . . 53<br />
4.5 Redial facility . . . . . . . . . . . . . . . . . . . . . . . . . . . . 53<br />
4.6 Adjusting the receiver volume . . . . . . . . . . . . . . 53<br />
4.7 Storing speed dial numbers . . . . . . . . . . . . . . . . 54<br />
4.8 Calling up speed dial numbers . . . . . . . . . . . . . 54<br />
5 Caller display (CLIP) . . . . . . . . . . . . . . . . 55<br />
5.1 Viewing the caller list . . . . . . . . . . . . . . . . . . . . . 55<br />
5.2 Dialling a telephone number directly from the caller<br />
list . . . . . . . . . . . . . . . . . . . . . . . . . . . . . . . . . . . . . 56<br />
5.3 Deleting telephone numbers from the caller list 56<br />
5.4 Deleting the entire caller list . . . . . . . . . . . . . . . 56<br />
45
− Contents −<br />
6 Private Branch Exchanges /<br />
Supplementary Services . . . . . . . . . . . . 57<br />
6.1 R−button on Private Exchanges . . . . . . . . . . . . 57<br />
6.2 R−button and supplementary services offered by<br />
your telephone network provider . . . . . . . . . . . 57<br />
6.3 Dialling pause . . . . . . . . . . . . . . . . . . . . . . . . . . . 57<br />
7 Important information . . . . . . . . . . . . . . 58<br />
7.1 Fault finding . . . . . . . . . . . . . . . . . . . . . . . . . . . . . 58<br />
7.2 Guarantee . . . . . . . . . . . . . . . . . . . . . . . . . . . . . . 58<br />
46
− General Information −<br />
1 General Information<br />
Please read this operating instruction manual thoroughly.<br />
Under no circumstances open the device or <strong>com</strong>plete any<br />
repair work yourself. In the case of claims under the terms of<br />
guarantee, contact your sales outlet. We reserve the right to<br />
make technical and optical modifications to the product<br />
during the course of product improvement.<br />
1.1 Intended use<br />
This telephone has been developed for use when connected<br />
to an analogue telephone network connection (PSTN) within<br />
Switzerland. However, due to the different services offered<br />
by the various tele<strong>com</strong>munication network providers, there is<br />
no guarantee that the equipment will function trouble−free on<br />
every tele<strong>com</strong>munication terminal connection. Only connect<br />
the telephone line from the telephone to a telephone line<br />
socket designed for it. Never change the plug on the<br />
connection cable.<br />
1.2 Installation location<br />
Place the telephone on a level, non−slip surface. Normally,<br />
the footpads on the telephone do not leave any marks on<br />
the surface where it is located. However, due the diverse<br />
types of paints and surfaces which <strong>com</strong>e into question, it<br />
cannot be fully ruled out that the footpads will leave marks<br />
on the surface on which it is located.<br />
1.3 Private branch exchanges<br />
The telephone can also be connected to a private branch<br />
exchange. Ask the dealer where your private branch<br />
exchange was purchased whether the telephone will<br />
function properly on the private branch exchange. There is<br />
no guarantee that the telephone will work on every private<br />
branch exchange.<br />
47
− General Information −<br />
1.4 Information on disposal<br />
The implementation of European law in national laws and<br />
directives obliges you to dispose of consumable goods<br />
appropriately. This serves to protect both persons and the<br />
environment.<br />
The adjacent symbol indicates that<br />
electrical and electronic apparatus no l<br />
onger required must be disposed of s<br />
eparate from domestic waste.<br />
Equipment which is old or has outlived<br />
its service life must be disposed of at a<br />
suitable collection point provided by the<br />
public waste authorities.<br />
Batteries and power packs must be disposed of at the<br />
point of sale or at the appropriate collection<br />
points provided by the public waste authorities.<br />
Packaging materials must be disposed of according to<br />
local regulations.<br />
1.5 Temperature and ambient conditions<br />
The telephone is designed for use in protected rooms with a<br />
temperature range from 10 °C to 30 °C. The telephone<br />
should not be used in rooms exposed to moisture, such as<br />
bathrooms or laundries. Do not locate the device in the<br />
vicinity of sources of heat such as radiators, and never<br />
expose it to direct sunlight.<br />
Prevent excessive exposure to smoke, dust, vibration,<br />
chemicals, moisture, heat and direct sunlight.<br />
1.6 Cleaning and upkeep<br />
Clean the housing surfaces with a soft, dry, fluff−free cloth.<br />
Never use cleaning agents or aggressive solvents. Apart<br />
from occasionally cleaning the housing, no other upkeep is<br />
necessary. The rubber footpads on the telphone are not<br />
resistant to all cleaning agents. The manufacturer is not<br />
liable for any claims for damage to furniture or such.<br />
48
2 User Controls<br />
2.1 Inside the receiver<br />
− User controls −<br />
1. Disconnect button/<br />
receiver rest<br />
7<br />
2. Speed dial button<br />
3. Store button<br />
4. Connection to base unit<br />
5. R Signal button<br />
6. Redial / Pause<br />
7. Receiver volume<br />
adjustment<br />
1<br />
6<br />
5<br />
2<br />
3<br />
4<br />
2.2 Upper side of receiver<br />
8. Indicator light for new<br />
calls<br />
9. Selector key, down<br />
10. Selector key, up<br />
11. Delete button<br />
12. Dialling from the<br />
caller list<br />
12<br />
8<br />
9<br />
11<br />
10<br />
49
− User controls −<br />
2.3 Underside of base unit<br />
1. Fixing for wall mounting<br />
2. Connection for<br />
telephone cable<br />
3. Fixing wall mounting<br />
4. Connection for spiral<br />
receiver cable<br />
5. Ringer volume<br />
adjustment 5<br />
1<br />
2<br />
3<br />
4<br />
2.4 Inside of base unit<br />
6. Battery <strong>com</strong>partment<br />
6<br />
50
− Setting up −<br />
3 Setting up<br />
3.1 Safety Information<br />
Caution: Before setting up, it is essential that you<br />
read the General Information at the beginning of<br />
this manual.<br />
3.2 Check contents of pack<br />
The following items are supplied:<br />
one telephone base<br />
one telephone connecting<br />
cable<br />
one instruction manual<br />
one telephone receiver<br />
one spiral cable<br />
three AA batteries<br />
3.3 Connecting the receiver<br />
After unpacking your telephone, you must first connect the<br />
telephone receiver to the telephone base. First take one end<br />
of the spiral cable and plug it into the socket at the bottom of<br />
the receiver. Turn the telephone over and plug the other end<br />
into the lower socket (see Chapter 2, Section entitled<br />
Underside of base unit, Item 4.). Bring the cable out via the<br />
cable duct.<br />
3.4 Fitting the batteries<br />
Before connecting your new telephone to the telephone<br />
network, the batteries should be fitted. Please always use a<br />
good type of AA batteries. No messages will be shown in the<br />
display if the batteries are not fitted. Before installing or<br />
changing the battery, make sure that the telephone is not<br />
connected to the telephone network.<br />
1. The battery <strong>com</strong>partment is to be found on the<br />
inside of your telephone base.<br />
2. Open the battery <strong>com</strong>partment with a small<br />
screwdriver or a pointed object.<br />
3. Insert the batteries, ensuring that the polarity is<br />
correct.<br />
4. Close the battery <strong>com</strong>partment.<br />
The battery should be changed when the symbol<br />
appears in the display. All three batteries must then be<br />
changed. If the batteries be<strong>com</strong>e discharged, the display will<br />
go dark.<br />
51
− Setting up −<br />
3.5 Connecting the telephone<br />
Connect the telephone cable supplied to the telephone<br />
socket and the telephone jack on the underside of the<br />
telephone base (see Chapter 2, Section entitled Underside<br />
of base unit, Item 2.). Then feed the cable out of the<br />
telephone housing through the cable guide either towards<br />
the top or the bottom. Secure the cable firmly in the cable<br />
duct. The telephone works using the MF system (Tone<br />
Dialling).<br />
3.6 Wall mounting<br />
Your telephone is also suitable for wall mounting. Use two<br />
screws for fixing to the wall. Drill two holes 85 mm apart,<br />
vertically one above the other, and leave the screws<br />
protruding 5 mm from the wall. Now place the telephone<br />
base over the screws and push down slightly.<br />
When the telephone is mounted on a wall, you can hang the<br />
receiver on the telephone without cutting off the call. A small<br />
hook is located at the top of the receiver rest for this<br />
purpose.<br />
3.7 Adjust date and time<br />
1. Press the button for 4 seconds.<br />
2. Enter the current hour by repeatedly pressing the<br />
or buttons.<br />
3. Confirm with the button. The display jumps to<br />
the minutes display.<br />
4. Enter the current minutes by repeatedly pressing<br />
the or buttons.<br />
5. Confirm with the button. The cursor jumps to<br />
the day display.<br />
6. Enter the current day by repeatedly pressing the<br />
or buttons.<br />
7. Confirm with the button. The cursor jumps to<br />
the month display.<br />
8. Enter the current month by repeatedly pressing<br />
the or buttons.<br />
9. Confirm with the button. This <strong>com</strong>pletes the<br />
entries and the current data will now be shown in<br />
the display.<br />
Note:<br />
If the batteries are fully discharged, the time and<br />
date must be re−entered.<br />
52
− Operation −<br />
4 Operation<br />
4.1 Making a call<br />
Your telephone can be used like any conventional<br />
telephone.<br />
1. Lift the receiver and wait until you hear the dialling<br />
tone.<br />
2. Now dial the required telephone number. The<br />
display can show a telephone number with a<br />
maximum of 14 digits. If the number dialled is<br />
longer than this, only the last 14 digits will be<br />
displayed.<br />
3. To end the call, replace the receiver on the rest.<br />
You can end the current call by using the<br />
disconnect button and you will immediately obtain<br />
a new dialling tone.<br />
4.2 Receiving calls<br />
When a call <strong>com</strong>es through, you will hear the ringing tone.<br />
The call can now be accepted using the receiver.<br />
4.3 Call Duration Display<br />
The call duration is shown in the display in minutes and<br />
seconds during a call. The indication starts after the number<br />
has been dialled. The call duration still remains showing in<br />
the display for a few seconds after the call has been ended.<br />
4.4 Adjusting the receiver volume<br />
If the receiver volume is too quiet or too loud for you, you<br />
can change this to suit your requirements.<br />
You can adjust the volume from soft to loud using<br />
the VOL. slide switch on the receiver.<br />
4.5 Redial facility<br />
If a connection that you have dialled is engaged or you were<br />
unable to get through to anybody, simply replace the<br />
receiver. The last number dialled remains stored in the<br />
telephone automatically. To use the redial facility, proceed as<br />
follows:<br />
Lift the receiver and press the redial button . The stored<br />
redial number will now be dialled.<br />
4.6 Adjusting the receiver volume<br />
By means of the slide switch on the right side of the<br />
telephone base you can choose the settings (loud) or<br />
(soft) to match the volume of the ringing tone to your<br />
requirements. If at any time you do not want to be disturbed,<br />
use the (off) setting.<br />
53
− Operation −<br />
4.7 Storing speed dial numbers<br />
Your telephone allows you to store 10 numbers for speed<br />
dialling. The numbers 0 to 9 on the number pad are used as<br />
memory locations.<br />
1. Lift the receiver.<br />
2. Press the button and the display will show<br />
SAVE ?.<br />
3. Press the button again. The cursor will flash<br />
and the display will show MEMORY.<br />
4. Press the required memory location between 0<br />
and 9 on the number pad.<br />
If the memory location is already occupied, the<br />
display will show the message OVERWRITE ?.<br />
If you want to overwrite the memory location,<br />
press the button again.<br />
If you do not want to overwrite the memory<br />
location, press the disconnect button once and<br />
repeat the entire process.<br />
5. Now enter the required telephone number with a<br />
maximum of 22 digits.<br />
6. Save with the button. The display will show<br />
SAVED !!.<br />
4.8 Calling up speed dial numbers<br />
To call a saved speed dial number, proceed as follows:<br />
1. Lift the receiver.<br />
2. Press the button and the required storage<br />
location between 0 and 9. The saved telephone<br />
number will be dialled directly.<br />
54
− Caller display (CLIP) −<br />
5 Caller display (CLIP)<br />
In the case of in<strong>com</strong>ing calls, you can see who is calling you<br />
by means of the caller display facility. If this function is<br />
available on your line, the display shows you the caller’s<br />
telephone number while the telephone is ringing. The<br />
display reports the following information when there is no<br />
telephone number available.<br />
If the message UNAVAILABLE or ERROR appears in the<br />
display, the number has only been partially or incorrectly<br />
received.<br />
If the message LONG DISTANCE appears in the display,<br />
the particulars of the number are not available. This could<br />
have been an international call.<br />
If the message PRIVATE appears in the display, the caller<br />
has suppressed the transmission of his telephone number or<br />
it was not possible to transmit the number.<br />
In your absence, all calls will be saved in a caller list with<br />
date and time. Up to 99 numbers are saved in the caller list.<br />
When the list is full, the oldest number is always deleted<br />
from the list.<br />
If calls are registered during your absence, this will be<br />
indicated in the display by the message NEW and the<br />
indicator light for new calls will flash.<br />
5.1 Viewing the caller list<br />
Use the button to move to the last phone number<br />
registered. You can then page through the caller list with<br />
and . All calls registered will be shown as follows:<br />
The call is new<br />
Time and date<br />
Memory location in the<br />
caller list<br />
The caller<br />
called<br />
several times<br />
REPEAT<br />
Phone<br />
number of<br />
the caller<br />
When you reach the last storage location in the list, the<br />
display will show the message END OF LIST.<br />
Note: When all newly recorded numbers have been<br />
checked, the new call indicator light goes off and<br />
the "NEW" indicator in the display shows "00".<br />
Note: If no button is pressed within 30 seconds, the<br />
caller list is no longer displayed and the display<br />
shows the current time and date once more along<br />
with the number of telephone numbers stored in<br />
55
− Caller display (CLIP) −<br />
the caller list and the number of newly stored<br />
telephone numbers.<br />
5.2 Dialling a telephone number directly from the<br />
caller list<br />
You can dial telephone numbers directly from the caller list.<br />
1. Select the required telephone number using the<br />
and buttons.<br />
2. To dial the number, press the .button.<br />
3. If you have already lifted the receiver, the number<br />
will be dialled directly. If the receiver is in place,<br />
the message PICK UP HANDSET will appear in<br />
the display.<br />
4. Pick up the handset. The display will show the<br />
message DIALING ... and the number will be<br />
dialed.<br />
5.3 Deleting telephone numbers from the caller list<br />
1. Select the telephone number from the caller list<br />
that you want to delete with the and <br />
buttons.<br />
2. Press the delete button once. The display will<br />
show the message DELETE ?.<br />
3. Now immediately press and hold the delete<br />
button for 2 seconds. The number will be<br />
deleted and the display will now show another<br />
number from the caller list.<br />
5.4 Deleting the entire caller list<br />
1. Select any telephone number from the caller list.<br />
2. Hold the button pressed until the message<br />
DELETE ALL ? appears in the display.<br />
3. Now immediately press and hold the button<br />
again for 2 seconds until the message NO CALLS<br />
appears in the display.<br />
56
− Private Branch Exchanges −<br />
6 Private Branch Exchanges /<br />
Supplementary Services<br />
The button on the handset is used in private branch<br />
exchanges and for taking advantage of supplementary<br />
services provided by telephone network provider.<br />
6.1 R−button on Private Exchanges<br />
If the telephone is connected to a private branch exchange,<br />
all the functions associated with the button, such as<br />
transferring calls, automatic call back, etc., can be used. A<br />
private branch exchange requires a Flash time of 100 ms.<br />
The dealer where you purchased the exchange can provide<br />
information as to whether the telephone will work properly<br />
with the exchange.<br />
6.2 R−button and supplementary services offered<br />
by your telephone network provider<br />
Your SWITEL telephone supports the most important<br />
supplementary services provided by your telephone network<br />
provider (e.g. brokering, call waiting, three−way<br />
conferencing, etc.). Please contact your telephone network<br />
provider with regard to enabling the supplementary services.<br />
6.3 Dialling pause<br />
In the case of private branch exchanges, it is necessary to<br />
dial a specific number (e.g. 9" or 0") in order to obtain the<br />
dialling tone for an outside line. When using some older<br />
private branch exchanges, it takes a little time before the<br />
dialling tone be<strong>com</strong>es audible. Particularly in the case of<br />
such private branch exchanges, it is possible to insert an<br />
automatic pause after the number for the outside line so that<br />
the number can be dialled in a continuous process without<br />
having to wait for the dialling tone.<br />
Press the button once between dialling the number for<br />
the outside line and the actual phone number. After dialling<br />
the number for the outside line, the telephone waits 3<br />
seconds before dialling the actual phone number.<br />
57
− Important information −<br />
7 Important information<br />
7.1 Fault finding<br />
Remove all extra telephone equipment and connect only the<br />
telephone directly to the telephone socket.<br />
If the fault is still present, connect another telephone (if<br />
available) to the telephone socket. The results will show you<br />
whether the fault lies with the unit or with the telephone line.<br />
7.2 Guarantee<br />
SWITEL equipment is produced and tested according to the<br />
latest production methods. The implementation of carefully<br />
chosen materials and highly developed technologies ensure<br />
trouble−free functioning and a long service life. The terms of<br />
guarantee do not apply where the cause of equipment<br />
malfunction is the fault of the telephone network operator or<br />
any interposed private branch extension system. The terms<br />
of guarantee do not apply to the standard batteries or power<br />
packs used in the products. The period of guarantee is 24<br />
months from the date of purchase.<br />
All deficiencies resulting from material or production faults<br />
which occur during the period of guarantee will be eliminated<br />
free of charge. Rights to claims under the terms of guarantee<br />
are annulled following intervention by the purchaser or third<br />
parties. Damage caused as a result of improper handling or<br />
operation, incorrect positioning or storing, improper<br />
connection or installation, Acts of God or other external<br />
influence are not covered by the terms of guarantee. In the<br />
case of <strong>com</strong>plaints, we reserve the right to repair or replace<br />
defect parts or provide a replacement device. Replacement<br />
parts or devices be<strong>com</strong>e our property. Rights to<br />
<strong>com</strong>pensation in the case of damage are excluded where<br />
there is no evidence of intent or gross negligence by the<br />
manufacturer.<br />
If your device shows signs of defect during the period of<br />
guarantee, please return it to the sales outlet in which you<br />
purchased the SWITEL device together with the purchase<br />
receipt. All rights to claims under the terms of guarantee in<br />
accordance with this agreement must be asserted<br />
exclusively with regard to your sales outlet. Two years after<br />
the purchase and transfer of our products, claims under the<br />
terms of guarantee can no longer be asserted.<br />
58
− Declaration of Conformity −<br />
WE TELGO AG<br />
OF Route d’Englisberg 17<br />
CH−1763 Granges−Paccot<br />
Declare under our own responsibility that the product<br />
MODEL:<br />
<strong>T10</strong> <strong>clip</strong><br />
DESCRIPTION: Cord−connected telephone<br />
Is in conformity with directives: R&TTE Directive<br />
(1999/5/EC)<br />
COMPLIANCE IS ACHIEVED BY CONFORMITY TO<br />
THE FOLLOWING:<br />
EN 55 022 (1998 + A1) EN 55 024 (1998 + A1)<br />
EN 60950 (2000) TBR38 (1998)<br />
TEST REPORT NUMBER:<br />
0318424 0316292 ET−R0316289<br />
AUTHORISED BY:<br />
Signed:<br />
____________________<br />
Name (printed):<br />
Selim Dusi<br />
Position in <strong>com</strong>pany: Managing Director<br />
Date of issue: 24.08.2005<br />
Copies of this document will be held on file for a period<br />
of 10 years after the last production.<br />
Supplier:TELGO AG, Route d’Englisberg 17,<br />
CH−1763 Granges−Paccot<br />
Product: <strong>T10</strong> <strong>clip</strong><br />
This product is intended for connection to analogue<br />
PSTN lines within Switzerland.<br />
However, due to differences between the individual<br />
PSTNs provided in the different countries, the approval<br />
does not, of itself, give an unconditional assurance<br />
of successful operation on every PSTN network<br />
termination point.<br />
60