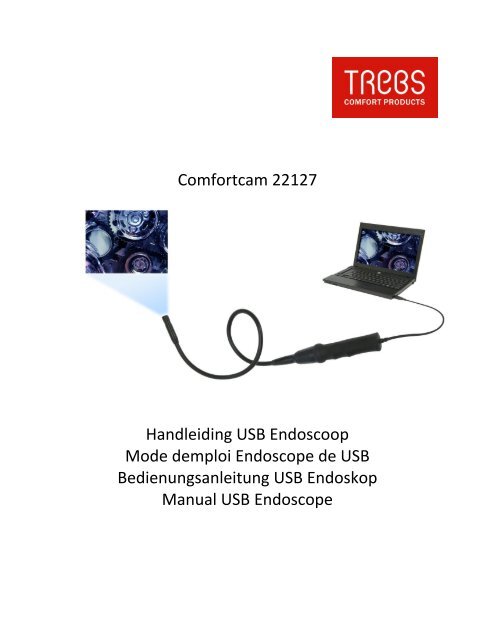
Comfortcam 22127 Handleiding USB Endoscoop Mode ... - Trebs
Comfortcam 22127 Handleiding USB Endoscoop Mode ... - Trebs
Comfortcam 22127 Handleiding USB Endoscoop Mode ... - Trebs

You also want an ePaper? Increase the reach of your titles
YUMPU automatically turns print PDFs into web optimized ePapers that Google loves.
<strong>Comfortcam</strong> <strong>22127</strong><br />
<strong>Handleiding</strong> <strong>USB</strong> <strong>Endoscoop</strong><br />
<strong>Mode</strong> demploi Endoscope de <strong>USB</strong><br />
Bedienungsanleitung <strong>USB</strong> Endoskop<br />
Manual <strong>USB</strong> Endoscope
Inhoudsopgave<br />
Voorzorgsmaatregelen en garantie..........................................6<br />
Uw nieuwe endoscoop.............................................................................. 7<br />
Functies......................................................................................................... 7<br />
Systeemvereisten.................................................................................... 7<br />
Inhoud van de verpakking................................................................................ 7<br />
Specificaties.................................................................................................. 8<br />
Installatie van de software........................................................................... 9<br />
Installatie en aansluiten van de hardware.............................................. 10<br />
Bediening........................................................................................... 11<br />
Snapshot-functie................................................................................. 11<br />
Focus-functie ........................................................................................... 12<br />
Applicatie.................................................................................. 12
Voorzorgsmaatregelen en garantie<br />
Deze handleiding helpt u om vertrouwd te raken met de functies van het product.<br />
Bewaar de handleiding op een veilige locatie voor toekomstige referentie.<br />
U ontvangt, bij juist gebruik, 2 jaar garantie op dit product. Let op de algemene voorwaarden!<br />
Gebruik het product niet voor andere doeleinden dan het beoogde gebruik.<br />
Waarschuwing: Risico van letsel of schade!<br />
Probeer het product nooit zelf te openen!<br />
Probeer het product nooit zelf te repareren!<br />
Ga voorzichtig met het product om! Stoten of vallen van het product, zelfs van lage hoogte, kan<br />
het product beschadigen.<br />
Houd het product uit de buurt van vocht en overmatige warmte.<br />
Gebruik dit product NOOIT voor medische doeleinden.<br />
Belangrijke mededeling over verwijdering<br />
Dit elektrische product mag niet worden weggegooid bij het huishoudelijk afval.<br />
Raadpleeg openbare inzamelpunten in uw omgeving om goede verwijdering te garanderen. Voor<br />
verdere informatie over de exacte locatie van deze inzamelpunten en de bestaande dagelijkse,<br />
maandelijkse of jaarlijkse limieten, alsmede de kosten die hieraan verbonden zijn, neem contact<br />
op met uw plaatselijke autoriteiten.<br />
ATTENTIE: Wij aanvaarden geen aansprakelijkheid voor schade die voortvloeit uit het gebruik van het<br />
product. Specificaties zijn onderhevig aan verandering!
Beste klant<br />
Dank u voor de aanschaf van deze digitale endoscoop met flexibele zwaanhals. De endoscoop helpt bij<br />
het maken van foto’s van moeilijk bereikbare plaatsen. U kunt de endoscoop ook gebruiken om verloren<br />
dingen terug vinden of gewoon als webcam.<br />
Lees deze instructies zorgvuldig door om ervoor te zorgen dat u de endoscoop juist gebruikt.<br />
Functies<br />
• Snapshot-functie<br />
• Magnetische houder<br />
• Waterdichte camerakop<br />
• LED voor opnamen in het donker<br />
• Voeding door <strong>USB</strong><br />
Systeemvereisten<br />
• Pentium III 200 MHz<br />
• 32 MB RAM<br />
• 40 MB vrije ruimte op HD<br />
• CD- of DVD ROM-station<br />
• Windows 98/Windows ME/Windows 2000/Windows XP/Windows Vista<br />
Inhoud van de verpakking<br />
1 x Flexibele endoscoop<br />
1 x Magnetische houder<br />
1 x CD met software en stuurprogramma‘s<br />
1 x <strong>Handleiding</strong>
Specificaties<br />
• Lengte <strong>USB</strong>-kabel (<strong>USB</strong> 1.1): 2 m<br />
• Draaiende zwaanhals: 88 cm<br />
• Resolutie: 640 x 480 pixels<br />
• Framerate: 30 fps<br />
• Bedrijfstemperatuur: 0°C - 45°C<br />
• Opslagtemperatuur: -10°C – 60°C
Installatie van de software<br />
Voordat u begint met de installatie van uw endoscoop, raden wij u aan om altijd dezelfde <strong>USB</strong>-poort op<br />
uw computer te gebruiken.<br />
1. Plaats de CD in het CD- of DVD-station van uw PC. Als de setup-wizard niet automatisch start, dan kunt<br />
u het „Telescope DRIVER“ bestand handmatig openen.<br />
2. Zorg ervoor dat de endoscoop niet is aangesloten op de computer en druk op „OK“.<br />
3. Windows toont een bericht dat de software niet voldoet aan de Windows logo-test. U kunt het<br />
installatieproces vervolgen door op “Toch doorgaan” te klikken.
4. Wacht een paar seconden tot het bericht “AIT Driver Installation finished“ op het scherm verschijnt<br />
en klik vervolgens op “Voltooien“. De software is nu geïnstalleerd op uw computer en klaar voor gebruik.<br />
Installatie en aansluiten van de hardware<br />
1. Laat de CD in het CD-of DVD-station van uw computer zitten.<br />
2. Sluit de endoscoop aan op de <strong>USB</strong>-poort van uw computer.<br />
3. Uw computer opent ‘Wizard nieuwe hardware gevonden’’. Hier wordt gevraagd om verbinding te<br />
mogen maken met Windows Update voor nieuwe software. Hier dient u te klikken op ‘‘Nee, nu niet’’.
4. Uw computer opent de “Nieuwe Hardware Wizard“.<br />
Kies “Software automatisch installeren” en klik op “Volgende”.<br />
5. Windows toont een bericht dat het programma niet voldoet aan de Windows logo-test. U kunt het<br />
installatieproces vervolgen door op “Toch doorgaan” te klikken.<br />
6. Klik op “Voltooien“ om de installatie af te ronden. Uw endoscoop is nu klaar voor gebruik.<br />
7. Start het programma Amcap op om met uw endoscoop aan de slag te gaan.<br />
8. Indien u geen beeld heeft, controleert u dan de instellingen van de software. Als u in het programma<br />
Amcap in het menu gaat kijken, dient er bij ‘devices’ de endoscoop aangevinkt te worden. Verder dient<br />
er bij ‘options’ preview te worden aangevinkt.<br />
9. Indien u een gemaakte opname niet kunt afspelen, heeft het bestand geen AVI extensie. U dient dan<br />
zelf een AVI extensie toe te voegen aan het bestand. De door u zelf opgegeven naam kunt u laten<br />
staan. U dient alleen AVI achter de bestandsnaam toe te voegen. Vervolgens kunt u uw film bekijken.
Bediening<br />
U kunt de endoscoop nu na het aansluiten op de <strong>USB</strong>-poort van uw computer gebruiken als een normale<br />
webcam. Klik op “Start” “Alle programma’s” “Telescope Driver’’ ‘’ Amcap” om een venster te<br />
openen – u kunt de opnamen in dit venster zien. Andere applicaties, zoals instant messengers herkennen<br />
de endoscoop ook.<br />
Belichtingsregeling<br />
Foto-knop<br />
Foto-knop-functie<br />
U kunt een foto nemen door op de Foto-knop op de endoscoop te drukken. Het programma „SnapShot<br />
Reader“ opent automatisch om de foto weer te geven.<br />
De “SnapShot Reader“ applicatie staat u ook toe uw foto’s te bewerken en op te slaan. Selecteer een<br />
item in de bovenste balk.<br />
• File<br />
Save<br />
Exit (X)<br />
Slaat de opgenomen foto op.<br />
Verlaat het programma.<br />
• Rotate Orientation<br />
Draai het beeld met het gegeven aantal graden.
• Help<br />
Klik op “About Snapshot Reader (A)...“ om Naam, Copyright en Serienummer van de applicatie te<br />
bekijken.<br />
Focus-functie<br />
U kunt de focus bedienen met behulp van de regelingsknop op de endoscoop. Start de applicatie voor<br />
toegang tot nog meer opties. (zie hieronder).<br />
Applicatie<br />
Start de “AMCAP“ applicatie om opties te veranderen en opnamen te maken. U zult na het voltooien van<br />
de installatie een link naar het programma aantreffen op uw bureaublad.<br />
Als er geen link is, dan kunt u het programma rechtstreeks openen door te klikken op “Start” “Alle<br />
Programma’s” “AIT Telescope Driver” “AMCap”. U kunt verschillende opties van de applicatie<br />
selecteren door op de items te klikken.<br />
• File<br />
Set Capture File…<br />
Allocate File Space…<br />
Save Captured<br />
Video…<br />
Exit<br />
• Devices<br />
Maak een AVI-videobestand om opnamen op te slaan.<br />
Kies hoeveel geheugen beschikbaar is voor het maken van opnamen.<br />
Kies waar u uw videobestand wilt opslaan.<br />
Verlaat het programma.<br />
14DEU14 DEU<br />
Kies een aangesloten apparaat voor de applicatie. Kies “Telescope Driver“, als u gebruik wilt maken van<br />
de endoscoop.
• Options<br />
Preview<br />
Audio Capture<br />
Filter…<br />
Video Capture<br />
Filter…<br />
Gebruik deze optie om binnen het applicatievenster een preview van de foto weer<br />
te geven.<br />
Gebruik deze optie om de audio-opties aan te passen.<br />
Gebruik deze optie om de helderheid, het contrast, enz. aan te passen. Klik op<br />
“Advanced Options” om speciale filters en achtergronden aan te passen.<br />
Let op: De endoscoop ondersteunt de functie“Face Tracking“ niet, hoewel de<br />
functie wel wordt getoond in het menu. Dit komt omdat de endoscoop alleen is<br />
ontworpen voor handmatige bediening.<br />
Video Capture<br />
Pin…<br />
Open een venster om de framerate, het kleurbereik en de beeldgrootte aan te<br />
passen.<br />
• Capture<br />
Start Capture<br />
Set Frame Rate<br />
Set Time Limit<br />
Start opname.<br />
Pas de framerate aan.<br />
Stel een tijdlimiet voor uw opname in.<br />
• Help<br />
Klik op “about“ om de naam, het copyright en het serienummer te tonen.
Declaration of Conformity:<br />
We, <strong>Trebs</strong> BV, declare under our sole responsibility that this product is in conformity with the essential<br />
requirements and other relevant requirements of the R&TTE Directive (1999/5/EC). The product is<br />
compliant with the following standards and/ or other normative documents:<br />
EN 55022:2006<br />
EN 55024:1998 +A1:2001+A2:2003<br />
EN 60529: 1991+A1: 2000 (IP 67)<br />
EN 60825-1:1994+A2: 2001+A1: 2002<br />
<strong>Trebs</strong> BV.<br />
The Netherlands<br />
Website: www.trebs.nl<br />
email: info@trebs.nl<br />
<strong>Trebs</strong> <strong>Comfortcam</strong> is a registered brand of <strong>Trebs</strong> BV. All other brands in this manual and/ or packaging do<br />
not belong to <strong>Trebs</strong> BV and have another justified holder.<br />
EU Environmental Protection<br />
Waste electrical products should not be disposed of with household waste. Please recycle where<br />
facilities exist. Check with your Local Authority or retailer for recycling advice
<strong>Comfortcam</strong> <strong>22127</strong><br />
<strong>Handleiding</strong> <strong>USB</strong> <strong>Endoscoop</strong><br />
<strong>Mode</strong> demploi Endoscope de <strong>USB</strong><br />
Bedienungsanleitung <strong>USB</strong> Endoskop<br />
Manual <strong>USB</strong> Endoscope
Sommaire<br />
Consignes de sécurité et recyclage................................................... 18<br />
Votre nouvelle caméra flexible......................................................... 19<br />
Caractéristiques................................................................................................ 19<br />
Système requis.................................................................................................. 19<br />
Contenu............................................................................................................... 19<br />
Données techniques....................................................................................... 20<br />
Installation logicielle.......................................................................... 21<br />
Branchement et installation matérielle........................................... 22<br />
Utilisation............................................................................................ 23<br />
Fonction capture d’écran............................................................................. 23<br />
Netteté................................................................................................................. 24<br />
Programm........................................................................................................... 24
consignes de sécurité et recyclage<br />
• Ce mode d’emploi vous permet de vous servir correctement du<br />
produit. Gardez-le précieusement afin de pouvoir le consulter à<br />
tout moment.<br />
• Ne démontez pas l‘appareil, sous peine de perdre toute garantie<br />
(excepté pour changer les piles).<br />
• N‘essayez pas de réparer l‘appareil vous-même. Ne le modifiez pas.<br />
Risque de blessure!<br />
• Faites attention lorsque vous manipulez votre produit. Une chute<br />
ou un coup peuvent l‘abîmer.<br />
• Ne l‘exposez pas à l‘humidité ni à la chaleur. Ne pas recouvrir. Ne le<br />
plongez pas dans l‘eau.<br />
• Attention: Il est interdit de violer la vie privée ou la confidentialité<br />
des paroles et des images par enregistrement vidéo ou sonore!<br />
Veillez ainsi à ce que l’enregistrement que vous allez effectuer ne<br />
viole aucune sphère privée et les droits d’un tiers.<br />
• N’utilisez JAMAIS ce produit à des fins médicales.<br />
• Maintenez hors de portée des enfants. Ce produit n’est pas un jouet.<br />
ATTENTION: N’utilisez l’appareil que comme indiqué dans la notice. Aucune garantie ne pourra être<br />
appliquée en cas de mauvaise utilisation. Nous ne sommes pas responsables des conséquences<br />
inhérentes à un dommage. Le fabricant se réserve le droit de modifier les caractéristiques techniques<br />
sans notification préalable pouvant ainsi entraîner des divergences dans ce manuel.<br />
Conseil important concernant le recyclage<br />
Cet appareil électronique ne doit PAS être jeté dans la poubelle de déchets ménagers. Pour l’enlèvement<br />
approprié des déchets, veuillez vous adresser aux points de ramassage publics de votre municipalité.
Chère cliente, Cher client,<br />
Nous vous remercions pour l’achat de cet article. Cette caméra flexible permet des enregistrements dans<br />
des endroits difficiles d’accès et peut faire office de webcam.<br />
Afin d’utiliser au mieux votre nouvel appareil, veuillez lire attentivement ce mode d’emploi et respecter<br />
les consignes et astuces suivantes.<br />
Caractéristiques<br />
• Fonction capture d’écran<br />
• Aimant<br />
• Tête étanche<br />
• Lampes LED pour enregistrements de nuit<br />
• Alimentation par <strong>USB</strong><br />
Système requis<br />
• Pentium III 200 MHz<br />
• 32 Mo de RAM<br />
• 40 Mo d’espace disque<br />
• Lecteur CD ou DVD-ROM<br />
• Windows 98/Windows ME/Windows 2000/Windows XP/Windows Vista<br />
Contenu<br />
1 x Caméra flexible<br />
1 x Aimant<br />
1 x CD logiciel<br />
1 x <strong>Mode</strong> d’emploi<br />
Données techniques<br />
• Longueur du câble <strong>USB</strong> 1.1: 2 m<br />
• Col flexible: 88 cm<br />
• Résolution: 640 x 480 Pixel<br />
• Rafraîchissement: 30 images/sec<br />
• Température de fonctionnement: 0°C à 45°C<br />
• Température de stockage: -10°C à 60°C<br />
votre nouvelle Caméra flexible
Installation logicielle<br />
Avant de démarrer l’installation de votre endoscope, nous vous conseillons d’utiliser toujours le<br />
même port <strong>USB</strong>.<br />
1. Insérez le CD fourni dans le lecteur de votre ordinateur. Si l’assistant d’installation ne démarre<br />
pas tout seul, explorez le CD et ouvrez le fichier „Telescope Driver“ en double cliquant dessus.<br />
2. Vérifiez que la caméra ne soit pas branchée à l’ordinateur et cliquez sur „OK“.<br />
3. Windows affiche un rapport indiquant que le logiciel ne passe pas le test du logo Windows. Continuez<br />
l'installation en cliquant sur « Ignorer et continuer ».
4. Attendez que le message „L’installation de AIT DRIVER est terminée.“ Apparaisse puis cliquez sur<br />
„Terminer“. Le logiciel est alors installé.<br />
Branchement et installation matérielle<br />
1. Chargez le CD dans le lecteur CD ou DVD de votre ordinateur.<br />
2. Branchez le connecteur <strong>USB</strong> de la caméra à un port libre de votre ordinateur.<br />
3. Votre ordinateur démarre l’« Assistant de nouveau matériel ». Il vous est demandé si une<br />
connexion Mise à jour Windows est autorisée pour rechercher du nouveau logiciel. Cliquez sur<br />
« Non, pas cette fois. ».<br />
4. Votre ordinateur démarre l’« Assistant de nouveau matériel ». Il vous est demandé si une connexion<br />
Mise à jour Windows est autorisée pour rechercher du nouveau logiciel. Cliquez sur « Non, pas cette<br />
fois. ».
5. Windows affiche un rapport indiquant que le logiciel ne passe pas le test du logo Windows.<br />
Continuez l'installation en cliquant sur « Ignorer et continuer ».<br />
6. Une fois l’installation terminée, cliquez sur „Terminer“. La caméra est installée et prête à<br />
l’emploi.<br />
7. Lancez le programme Amcap pour commencer à utiliser votre nouvel endoscope.<br />
8. Lorsqu'aucune image ne s'affiche, vérifiez les paramètres du logiciel. Dans le menu du logiciel<br />
Amcap, cliquez sur l'endoscope situé sous “Périphériques”. Vous pouvez aussi cliquer sur<br />
Aperçu situé sous “Options”.<br />
9. Si vous ne pouvez pas faire passer votre enregistrement, cela signifie que le fichier ne comporte pas<br />
l’extension AVI. Ajoutez manuellement l’extension AVI au fichier. Vous pouvez garder le même nom de<br />
fichier. Ajoutez simplement AVI à la fin du nom de fichier. Vous pourrez alors faire passer votre vidéo.
utilisation<br />
Branchez le connecteur <strong>USB</strong> de la caméra à un port <strong>USB</strong> libre de votre ordinateur. Vous pouvez aussi<br />
l’utiliser comme une webcam classique. Cliquez sur„Démarrer“ „Poste de travail“ „VGA SoC PC-<br />
Camera“ pour ouvrir une fenêtre affichant l’image capturée.<br />
Vous pouvez aussi utiliser la caméra avec d’autres programmes ayant détecté l’appareil comme par<br />
exemple les logiciels de messagerie instantanée.<br />
Bouton de puissance d’éclairage<br />
Touche capture d’écran<br />
Fonction capture d’écran<br />
Appuyez sur le bouton capture d’écran de la caméra pour afficher une image fixe dans le programme<br />
„SnapShot Reader“.<br />
Vous pouvez éditer et enregistrer l’image à l’aide de „SnapShot Reader“. Utilisez les menus de la barre<br />
supérieure.<br />
• File<br />
Save<br />
Exit (X)<br />
Enregistrer l’image.<br />
Quitter le programme.<br />
• Rotate Orientation<br />
Faire pivoter l’image.<br />
• Help<br />
Cliquez sur „About Snapshot Reader (A)…“ pour afficher le nom,<br />
Copyright et numéro de série du programme.
Netteté<br />
Faites tourner le bouton sur la caméra pour régler manuellement la netteté. Démarrez le programme<br />
AMCAP pour effectuer plus de réglages (voir ci-dessous).<br />
Programm<br />
Pour des réglages de précision et des enregistrements, démarrez le logiciel „AMCAP“. Un raccourci vers<br />
ce programme a été placé sur votre bureau durant l’installation. Sinon ouvrez-le via „Démarrer“ <br />
„Tous les programmes“ „Telescope Driver“ „Amcap“. Utilisez les menus de la barre supérieure<br />
pour les différentes fonctions.<br />
• File<br />
Set Capture File…<br />
Allocate File Space…<br />
Save Captured Video…<br />
Exit<br />
Créez un fichier vidéo AVI.<br />
Sélectionnez l’espace mémoire accordé aux enregistrements.<br />
Sélectionnez l’emplacement d’enregistrement du fichier vidéo.<br />
Fermer le programme.<br />
• Devices<br />
Sélectionnez quel appareil de capture vidéo afficher dans le programme. La caméra flexible s’appelle „<br />
Telescope Driver “.
• Options<br />
Preview<br />
Audio Capture<br />
Filter…<br />
Video Capture<br />
Filter…<br />
Afficher l’image de la caméra dans la fenêtre du programme.<br />
Ouvre la fenêtre des options audio.<br />
Ouvre la fenêtre des options vidéo: luminosité, contraste etc. Cliquez sur „Paramètres avancés“ pour des<br />
filtres ou arrière-plans spéciaux.<br />
La fonction „Suivi du visage“ est affichée dans le menu mais la caméra flexible ne supporte pas cette fonction.<br />
Video Capture<br />
Pin…<br />
Ouvre la fenêtre de réglage de résolution et rafraîchissement des enregistrements.<br />
• Capture<br />
Start Capture<br />
Set Frame Rate<br />
Set Time Limit<br />
Démarre un enregistrement.<br />
Réglez la vitesse de rafraîchissement.<br />
Réglez la limite de temps de l’enregistrement.<br />
• Help<br />
Cliquez sur „About..“ pour afficher le nom, Copyright et numéro de<br />
série du programme.
Declaration of Conformity:<br />
We, <strong>Trebs</strong> BV, declare under our sole responsibility that this product is in conformity with the essential<br />
requirements and other relevant requirements of the R&TTE Directive (1999/5/EC). The product is<br />
compliant with the following standards and/ or other normative documents:<br />
EN 55022:2006<br />
EN 55024:1998 +A1:2001+A2:2003<br />
EN 60529: 1991+A1: 2000 (IP 67)<br />
EN 60825-1:1994+A2: 2001+A1: 2002<br />
<strong>Trebs</strong> BV.<br />
The Netherlands<br />
Website: www.trebs.nl<br />
email: info@trebs.nl<br />
<strong>Trebs</strong> <strong>Comfortcam</strong> is a registered brand of <strong>Trebs</strong> BV. All other brands in this manual and/ or packaging do<br />
not belong to <strong>Trebs</strong> BV and have another justified holder.<br />
EU Environmental Protection<br />
Waste electrical products should not be disposed of with household waste. Please recycle where<br />
facilities exist. Check with your Local Authority or retailer for recycling advice
<strong>Comfortcam</strong> <strong>22127</strong><br />
<strong>Handleiding</strong> <strong>USB</strong> <strong>Endoscoop</strong><br />
<strong>Mode</strong> demploi Endoscope de <strong>USB</strong><br />
Bedienungsanleitung <strong>USB</strong> Endoskop<br />
Manual <strong>USB</strong> Endoscope
Inhaltsverzeichnis<br />
Sicherheitshinweise und Gewährleistung..........................................6<br />
Ihr neues Endoskop.............................................................................. 7<br />
Eigenschaften......................................................................................................... 7<br />
Systemvoraussetzungen.................................................................................... 7<br />
Lieferumfang........................................................................................................... 7<br />
Technische Daten.................................................................................................. 8<br />
Software-Installation........................................................................... 9<br />
Anschluss und Hardware-Installation.............................................. 10<br />
Bedienung........................................................................................... 11<br />
Schnappschuss-Funktion................................................................................. 11<br />
Bildschärfe-Funktion.......................................................................................... 12<br />
Anwendungs-Programm.................................................................................. 12
Sicherheitshinweise & Gewährleistung<br />
Diese Bedienungsanleitung dient dazu, Sie mit der Funktionsweise dieses Produktes vertraut zu<br />
machen. Bewahren Sie diese Anleitung daher stets gut auf, damit Sie jederzeit darauf zugreifen<br />
können.<br />
• Sie erhalten bei Kauf dieses Produktes zwei Jahre Gewährleistung auf Defekt bei sachgemäßem<br />
Gebrauch. Bitte beachten Sie auch die allgemeinen Geschäftsbedingungen!<br />
• Bitte verwenden Sie das Produkt nur in seiner bestimmungsgemäßen Art und Weise. Eine<br />
anderweitige Verwendung kann zu Beschädigungen am Produkt oder in dessen Umgebung führen.<br />
• Umbauen oder Verändern des Produktes beeinträchtigt die Produktsicherheit. Achtung<br />
Verletzungsgefahr!<br />
• Öffnen Sie das Produkt niemals eigenmächtig!<br />
• Führen Sie Reparaturen am Produkt nie selber aus!<br />
• Behandeln Sie das Produkt sorgfältig. Es kann durch Stöße, Schläge oder den Fall aus bereits geringer<br />
Höhe beschädigt werden.<br />
• Halten Sie das Produkt fern von Feuchtigkeit und extremer Hitze.<br />
• Setzen Sie dieses Produkt NIEMALS für medizinische Zwecke ein.<br />
ACHTUNG: Es wird keine Haftung für Folgeschäden übernommen. Technische Änderungen und Irrtümer<br />
vorbehalten!<br />
Wichtige Hinweise zur Entsorgung<br />
Dieses Elektrogerät gehört nicht in den Hausmüll. Für die fachgerechte Entsorgung wenden Sie sich bitte<br />
an die öffentlichen Sammelstellen in Ihrer Gemeinde. Einzelheiten zum Standort einer solchen<br />
Sammelstelle und über ggf. vorhandene Mengenbeschränkungen pro Tag/ Monat/ Jahr sowie über etwa<br />
anfallende Kosten bei Abholung entnehmen Sie bitte den Informationen der jeweiligen Gemeinde.
Sehr geehrte Kunden,<br />
wir danken Ihnen für den Kauf des digitalen Endoskop mit Schwanenhals . Dieses praktische Endoskop<br />
ermöglicht ihnen Aufnahmen an schwer zu erreichenden Orten und dient so zum Wiederfinden<br />
verlorener Gegenstände und als Webcam.<br />
Bitte lesen Sie die folgenden Anwendungshinweise aufmerksam durch, damit Sie Ihr neues Endoskop<br />
optimal einsetzen können.<br />
Eigenschaften<br />
• Schnappschuss-Funktion<br />
• Magnet-Aufsatz<br />
• Wasserdichter Kamerakopf<br />
• LED-Leuchten für Aufnahmen bei Dunkelheit<br />
• Stromversorgung über <strong>USB</strong>-Verbindung<br />
Systemvoraussetzungen<br />
• Pentium III 200 MHz<br />
• 32 MB RAM<br />
• 40 MB freier Festplattenspeicher<br />
• CD- oder DVD-ROM Laufwerk<br />
• Windows 98/Windows ME/Windows 2000/Windows XP/Windows Vista<br />
Lieferumfang<br />
1 x Endoskop mit Schwanenhals<br />
1 x Magnet-Aufsatz<br />
1 x Software- und Treiber-CD<br />
1 x Bedienungsanleitung
8DEU8 DEU<br />
Technische Daten<br />
• Länge des <strong>USB</strong> 1.1-Verbidnungskabel: 2 m<br />
• schwenkbarer Schwanenhals: 88 cm<br />
• Auflösung: 640 x 480 Pixel<br />
• Bildrate: 30 fps<br />
• Umgebungs-Temperatur: 0°C bis 45°C<br />
• Lager-Temperatur: -10°C bis 60°C
Software Installation<br />
Bevor Sie mit der Installation Ihres Endoskops beginnen, empfehlen wir die Benutzung des jeweils<br />
gleichen <strong>USB</strong>-Ports.<br />
1. Legen Sie die mitgelieferte CD in ein freies CD- oder DVD-Laufwerk Ihres Computers. Sollte der Setup-<br />
Assistent nicht von alleine starten, klicken Sie auf das Laufwerk und öffnen Sie die Datei „Telescope<br />
DRIVER“ mit einem Doppelklick.<br />
2. Versichern Sie sich, dass das Endoskop nicht an den Computer angeschlossen ist und klicken Sie auf<br />
„OK“.<br />
3. Windows zeigt einen Bericht, dass die Software nicht den Anforderungen des Windows Logo-Tests<br />
entspricht. Setzen Sie die Installation fort, indem Sie „Trotzdem weitermachen“ klicken.
4. Warten Sie einige Sekunden, bis die Meldung „Die Installation von AIT DRIVER auf Ihrem Computer ist<br />
abgeschlossen.“ erscheint und klicken Sie auf „Fertigstellen“. Die Software ist jetzt erfolgreich auf Ihrem<br />
Computer installiert.<br />
Anschluss und hardware-installation<br />
1. Laden Sie die CD in das CD- oder DVD-Laufwerk Ihres Computers.<br />
2. Schließen Sie den <strong>USB</strong>-Stecker des Endoskops an einen freien <strong>USB</strong>- Port Ihres Computers.<br />
3. Ihr Computer öffnet den „Neue Hardware“ Assistenten. Sie werden gefragt, ob eine Verbindung mit<br />
Windows Update für neue Software erlaubt werden soll. Klicken Sie „Nein, nicht dieses Mal“.
4. Ihr Computer öffnet den „Neue Hardware“ Assistenten.<br />
Wählen Sie „Software automatisch installieren“ und klicken Sie „Weiter“.<br />
5. Windows zeigt einen Bericht, dass die Software nicht den Anforderungen des Windows Logo-Tests<br />
entspricht. Setzen Sie die Installation fort, indem Sie „Trotzdem weitermachen“ klicken.<br />
6. Klicken Sie nach Abschluss der Installation auf „Fertig stellen“. Das Endoskop ist jetzt installiert und<br />
Einsatzbereit.<br />
7. Starten Sie das Programm Amcap, um Ihr neues Endoskop benutzen zu können.<br />
8. Bitte überprüfen Sie Ihre Softwareeinstellungen, falls Sie kein Bild haben. Im Menü des Amcap-<br />
Programms klicken Sie das Endoskop unter „Geräte“. Weiterhin können Sie Vorschau unter „Optionen“<br />
klicken.<br />
9. Können Sie Ihre Aufzeichnung nicht wiedergeben, so hat Ihre Datei nicht die Endung AVI. Fügen Sie die<br />
Dateiendung AVI manuell hinzu. Sie gewählten Namen können Sie beibehalten. Fügen Sie nur AVI hinter<br />
dem Dateinamen an. Sie können Ihr Video nun wiedergeben.
Bedienung<br />
Schließen Sie den <strong>USB</strong>-Stecker des Endoskops an einen freien <strong>USB</strong>-Port Ihres Computers an. Sie können<br />
das Endoskop jetzt wie eine gewöhnliche Webcam nutzen. Klicken Sie auf „Start“ „Alle Programme“<br />
“Telescope Driver‘‘„Amcap“ um ein Fenster mit dem Kamerabild zu öffnen.<br />
Andere Programme, die auf angeschlossene Kameras zugreifen können, wie z.B. Instant Messenger,<br />
erkennen das Endoskop jetzt auch..<br />
Lichtstärke-Regler<br />
Foto-Taste<br />
Foto-Taste-Funktion<br />
Wenn Sie den Foto-Taste auf dem Endoskop drücken, wird ein Bild aufgenommen und das Programm<br />
„SnapShot Reader“ geöffnet um dieses anzuzeigen.<br />
Sie können den Schnappschuss mithilfe des „SnapShot Reader“ bearbeiten und speichern. Wählen Sie<br />
die Reiter in der oberen Leiste.<br />
• File<br />
Save<br />
Exit (X)<br />
Speichern Sie das aufgenommene Bild.<br />
Verlassen Sie das Programm.<br />
• Rotate Orientation<br />
Drehen Sie das Bild um die angegebenen Gradzahlen.
• Help<br />
Klicken Sie auf „About Snapshot Reader (A)…“ um sich Namen, Copyright und Seriennummer des<br />
Programms anzeigen zu lassen.<br />
Bildschärfe-Funktion<br />
Mit dem Regler auf dem Endoskop können Sie die Bildschärfe per Hand einstellen. Starten Sie das<br />
Anwendungsprogramm um weitere Einstellungen vorzunehmen (siehe unten).<br />
Anwendungsprogramm<br />
Um Feineinstellungen vorzunehmen und Aufnahmen zu machen, starten Sie die „AMCAP“-Software. Eine<br />
Verknüpfung zu dem Programm befindet sich nach der Installation auf dem Desktop. Sollten Sie keine<br />
Verknüpfung erstellt haben, oder diese gelöscht haben, starten Sie das Programm, indem Sie auf<br />
„Start“ „Alle Programme“ „AIT Telescope Driver“ „AMcap“ klicken. Unter den Reitern oben in<br />
der Leiste können Sie die verschiedenen Funktionen des Programms einstellen.<br />
• File<br />
Set Capture File…<br />
Allocate File Space…<br />
Save Captured<br />
Video…<br />
Exit<br />
Erstellen Sie eine AVI-Videodatei, in der Aufnahmen der Kamera gespeichert<br />
werden.<br />
Wählen Sie, wie viel Speicherplatz für die Aufnahmen zur Verfügung stehen soll.<br />
Wählen Sie, wohin die Videodatei gespeichert werden soll.<br />
Schließen Sie das Programm.<br />
14DEU14 DEU
• Devices<br />
Wählen Sie hier, welches angeschlossene Video-Aufnahmegerät vom Programm angezeigt werden soll.<br />
Wählen Sie die „Telescope Driver“, um das Programm auf das Endoskop einzustellen.<br />
• Options<br />
Preview<br />
Audio Capture<br />
Filter…<br />
Video Capture<br />
Filter…<br />
Stellen Sie ein, ob das aktuelle Bild der Kamera im Fenster des Programms<br />
angezeigt werden soll.<br />
Öffnen Sie hier ein Fenster um die Audio-Eigenschaften einzustellen.<br />
Öffnen Sie hier ein Fenster für die Einstellungen für Helligkeit, Kontrast etc. Klicken<br />
Sie auf „Erweiterte Einstellungen“, um spezielle Filter oder Hintergründe<br />
festzulegen.<br />
Die Funktion „Gesichtsverfolgung“ wird im Menü angezeigt. Der Chipsatz des<br />
Endoskops unterstützt diese allerdings nicht, da das Endoskop auf optimale<br />
Handsteuerung ausgelegt ist.<br />
Video Capture<br />
Pin…<br />
Öffnen Sie hier ein Fenster um die Einzelbildrate, das Farbspektrum und die<br />
Ausgabegröße der Aufnahmen festzulegen.<br />
• Capture<br />
Start Capture<br />
Set Frame Rate<br />
Set Time Limit<br />
Starten Sie eine Aufnahme.<br />
Stellen Sie die Bildwiederholungsrate ein.<br />
Stellen Sie ein Zeitlimit für die Aufnahmen ein.<br />
• Help<br />
Klicken Sie auf „About..“ um sich Namen, Copyright und Seriennummer des Programms anzeigen zu<br />
lassen.
Declaration of Conformity:<br />
We, <strong>Trebs</strong> BV, declare under our sole responsibility that this product is in conformity with the essential<br />
requirements and other relevant requirements of the R&TTE Directive (1999/5/EC). The product is<br />
compliant with the following standards and/ or other normative documents:<br />
EN 55022:2006<br />
EN 55024:1998 +A1:2001+A2:2003<br />
EN 60529: 1991+A1: 2000 (IP 67)<br />
EN 60825-1:1994+A2: 2001+A1: 2002<br />
<strong>Trebs</strong> BV.<br />
The Netherlands<br />
Website: www.trebs.nl<br />
email: info@trebs.nl<br />
<strong>Trebs</strong> <strong>Comfortcam</strong> is a registered brand of <strong>Trebs</strong> BV. All other brands in this manual and/ or packaging do<br />
not belong to <strong>Trebs</strong> BV and have another justified holder.<br />
EU Environmental Protection<br />
Waste electrical products should not be disposed of with household waste. Please recycle where<br />
facilities exist. Check with your Local Authority or retailer for recycling advice
<strong>Comfortcam</strong> <strong>22127</strong><br />
<strong>Handleiding</strong> <strong>USB</strong> <strong>Endoscoop</strong><br />
<strong>Mode</strong> demploi Endoscope de <strong>USB</strong><br />
Bedienungsanleitung <strong>USB</strong> Endoskop<br />
Manual <strong>USB</strong> Endoscope
Contents<br />
Safety Precautions and Warranty..........................................6<br />
Your new endoscope.............................................................................. 7<br />
Features......................................................................................................... 7<br />
System Requirements.................................................................................... 7<br />
Package Contents.................................................................................................... 7<br />
Specifications.................................................................................................. 8<br />
Software Installation........................................................................... 9<br />
Connection and Hardware Installation.............................................. 10<br />
Operation........................................................................................... 11<br />
Snapshot Function................................................................................. 11<br />
Focus Function ........................................................................................... 12<br />
User Application.................................................................................. 12
Safety Precautions and Warranty<br />
This user manual helps you to familiarize with the functions of the product.<br />
Please store it in a safe location for future reference.<br />
You receive a 2 year warranty on this product at proper use. Please note the<br />
general terms and conditions!<br />
Do not use the product for any purpose other than its intended use.<br />
Warning: Risk of injury or damage!<br />
Never open the product by yourself!<br />
Never try to repair the product by yourself!<br />
Handle the product carefully! Impacts or dropping the product from even low heights can<br />
damage it.<br />
Keep this product away from moisture and excessive heat.<br />
NEVER use this product for medical purposes.<br />
ATTENTION: We assume no liability for damages resulting from the use of the product. Specifications<br />
are subject to change!<br />
Important notes to the disposal<br />
This electrical product should not be disposed of with household waste. In order to ensure proper<br />
disposal, refer to public collection points in your vicinity. For further information on the exact location of<br />
these collection points and on existing daily, monthly or yearly limits, as well as any costs that may arise,<br />
please contact local authorities.
Dear Customer<br />
Thank you for buying this digital endoscope with flexible swan's neck. It helps you to take<br />
pictures from places that are difficult to reach. You can also find lost things again or simply<br />
use it as a webcam.<br />
Please read these instructions very carefully to make sure that you use your endoscope<br />
correctly.<br />
Features<br />
• Snapshot function<br />
• Magnetic assembly<br />
• Waterproof camera head<br />
• LED light for recordings in darkness<br />
• Power supply by <strong>USB</strong><br />
System Requirements<br />
• Pentium III 200 MHz<br />
• 32 MB RAM<br />
• 40 MB free space on HD<br />
• CD or DVD ROM drive<br />
• Windows 98/Windows ME/Windows 2000/Windows XP/Windows Vista<br />
Package Contents<br />
1 x Flexible endoscope<br />
1 x Magnetic assembly<br />
1 x Software and driver CD<br />
1 x Manual
Specifications<br />
• <strong>USB</strong> cable length (<strong>USB</strong> 1.1): 2 m<br />
• Swiveling swan's neck: 88 cm<br />
• Resolution: 640 x 480 pixel<br />
s<br />
• Frame rate: 30 fps<br />
• Operating temperature: 0°C - 45°C<br />
• Storage temperature: -10°C – 60°C
Software Installation<br />
Before starting the installation of your endoscope we suggest to always use the same <strong>USB</strong> port.<br />
1. Put the CD into the CD or DVD drive of your PC. If the setup assistant does not start automatically<br />
please open the file “Telescope DRIVER“ manually.<br />
2. Ensure that the endoscope is not connected to the computer and click on “OK“.<br />
3. Windows shows a report that the software does not satisfy the Windows logo test. Continue<br />
installation by clicking “Continue anyway”.
4. Wait a few seconds until the message “AIT Driver Installation finished“ appears on the screen and click<br />
on “Finish“. The software is now installed on your computer and ready for use.<br />
Connection and Hardware Installation<br />
1. Load the CD in the CD or DVD drive of your computer.<br />
2. Connect the endoscope to the <strong>USB</strong> port of your computer.<br />
3. Your computer opens the “New hardware wizard”. You are prompted if a connection with Windows<br />
Update for new software is allowed. Click on “No, not this time”.
4. Your computer opens the “New hardware wizard”.<br />
Select “Install software automatically” and click “Next”.<br />
5. Windows shows a report that the software does not satisfy the Windows logo test. Continue<br />
installation by clicking “Continue anyway”.<br />
6. Click on “Finish“ to finish the installation. Your endoscope is now ready to use.<br />
7. Start the program Amcap to start using your new endoscope.<br />
8. Please check the software settings if you have no image. If you look in the menu of the Amcap<br />
program, click the endoscope under “devices”. Furthermore, you can click preview under “options”.<br />
9. If you cannot playback your recording, then the file has not the extension AVI. Add the extension AVI<br />
manually to the file. You can leave the given file name. Only add AVI behind the file name. You can now<br />
playback your video.
Operation<br />
After you connect the endsocope to the <strong>USB</strong> port of your computer, you can use it as a normal webcam.<br />
Click on “Start” “All Programmes” “Telescope Driver‘‘ ‘‘Amcap” to open a window – you can<br />
see the shootings within this window. Other applications like instant messengers recognise the<br />
endoscope as well.<br />
Exposure Control<br />
Photo Button<br />
Photo Function<br />
When you press the Photo Button on the endoscope, you can take a photo and the program “SnapShot<br />
Reader” opens automatically to display the photo.<br />
The “SnapShot Reader“ application also allows you to edit your photos and save them. Select a tab at the<br />
top bar.<br />
• File<br />
Save<br />
Exit (X)<br />
Saves the captured picture.<br />
Exits the program.<br />
• Rotate Orientation<br />
Rotate the picture by the given degrees.<br />
• Help<br />
Click on “About Snapshot Reader (A)...“ to see Name, Copyright and Serial of the application.
Focus Function<br />
You can control the focus with the control button on the endoscope. Start the user application to access<br />
even more options. (see below).<br />
User Application<br />
To change options and to take recordings please start the “AMCAP“ application. You will<br />
find a link to the program on your desktop after finishing the installation.<br />
If there is no link, you can directly access the programme by clicking on “Start” “All Programs” “AIT<br />
Telescope Driver” “AMCap”. By clicking on the tabs, you can access different options of the<br />
application.<br />
• File<br />
Set Capture File…<br />
Allocate File Space…<br />
Save Captured<br />
Video…<br />
Exit<br />
Create an AVI video file to store recordings.<br />
Choose how much memory is made available for recordings.<br />
Choose where you want to store your videofile.<br />
Exit the program.<br />
14DEU14 DEU
• Devices<br />
Choose a connected device for the application. Choose “ Telescope Driver“, if you intend to use the<br />
endoscope.<br />
• Options<br />
Preview<br />
Audio Capture<br />
Filter…<br />
Video Capture<br />
Filter…<br />
Video Capture<br />
Pin…<br />
Use this option to see a preview of the picture within the application window.<br />
Use this option to adjust the audio options.<br />
Use this option to adjust brightness, contrast etc. Click on “Advanced Options” to<br />
adjust special filters and backgrounds. Please note: Although the function “Face<br />
Tracking“ is shown in the menum the endoscope's chipset does not support it, as<br />
the endoscope was designed for manual operation only.<br />
Open a window to adjust frame rate, colour range and picture size.<br />
• Capture<br />
Start Capture<br />
Set Frame Rate<br />
Set Time Limit<br />
Start recording.<br />
Adjust frame rate.<br />
Set a time limit for your recording.<br />
• Help<br />
Click on “about“ to display the name, copyright and serial number.
Declaration of Conformity:<br />
We, <strong>Trebs</strong> BV, declare under our sole responsibility that this product is in conformity with the essential<br />
requirements and other relevant requirements of the R&TTE Directive (1999/5/EC). The product is<br />
compliant with the following standards and/ or other normative documents:<br />
EN 55022:2006<br />
EN 55024:1998 +A1:2001+A2:2003<br />
EN 60529: 1991+A1: 2000 (IP 67)<br />
EN 60825-1:1994+A2: 2001+A1: 2002<br />
<strong>Trebs</strong> BV.<br />
The Netherlands<br />
Website: www.trebs.nl<br />
email: info@trebs.nl<br />
<strong>Trebs</strong> <strong>Comfortcam</strong> is a registered brand of <strong>Trebs</strong> BV. All other brands in this manual and/ or packaging do<br />
not belong to <strong>Trebs</strong> BV and have another justified holder.<br />
EU Environmental Protection<br />
Waste electrical products should not be disposed of with household waste. Please recycle where<br />
facilities exist. Check with your Local Authority or retailer for recycling advice