Manual de instrucciones - Triton Tools
Manual de instrucciones - Triton Tools
Manual de instrucciones - Triton Tools

You also want an ePaper? Increase the reach of your titles
YUMPU automatically turns print PDFs into web optimized ePapers that Google loves.
Wetstone Sharpener<br />
120W / 1A<br />
TW SS10<br />
Operating and<br />
Safety Instructions<br />
Gebrauchs- und<br />
Sicherheitsanweisung<br />
Bedienings- en veiligheidsvoorschriften<br />
Istruzioni Per L'uso E La<br />
Sicurezza<br />
Instructions D’utilisation &<br />
Consignes De Sécurité<br />
Instrucciones De Funcionamiento<br />
Y Seguridad<br />
www.tritontools.com
Thank you for purchasing this <strong>Triton</strong> tool. Please read these instructions: they contain information necessary for<br />
safe and effective operation of this product. This product has a number of unique features and, even if you are<br />
familiar with similar products, reading the instructions will help you get the full benefit of its unique <strong>de</strong>sign. Keep<br />
these instructions close to hand and ensure all users of this tool have read and fully un<strong>de</strong>rstand them.<br />
CONTENTS<br />
Specifications 2<br />
Symbols 2<br />
Features 3<br />
Safety 4<br />
Unpacking 5<br />
Assembly 5<br />
Preparation 5<br />
Operation 7<br />
Maintanence 8<br />
Guarantee 8<br />
Declaration of conformity 44<br />
SPECIFICATIONS<br />
Mo<strong>de</strong>l No.<br />
Voltage:<br />
Rated power:<br />
No load speed:<br />
Sharpening stone:<br />
Honing wheel:<br />
Bore size:<br />
Max sound level:<br />
Net weight:<br />
Insulation Class<br />
TWSS10<br />
220-240V ~50Hz<br />
120W<br />
125rpm<br />
Ø 250x50mm<br />
Ø 230x30mm<br />
Ø 12mm<br />
70dB(A)<br />
14kgs<br />
Earthed<br />
GB<br />
SYMBOLS<br />
ENVIRONMENTAL PROTECTION<br />
Waste electrical products should not be<br />
disposed of with household waste. Please<br />
recycle where facilities exist. Check with your<br />
local authority or retailer for recycling advice<br />
Conforms to relevant legislation<br />
and safety standards<br />
Always wear ear, eye and respiratory<br />
protection<br />
Class I construction (Protective earth).<br />
Do not use before viewing and<br />
un<strong>de</strong>rstanding the full operating<br />
instructions<br />
2<br />
Contents / Specifications / Symbols
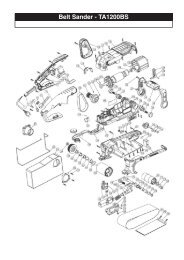
FEATURES<br />
1<br />
6<br />
2<br />
3<br />
4<br />
5<br />
9<br />
8<br />
7<br />
15<br />
14<br />
13<br />
12<br />
11<br />
10<br />
16 17<br />
1. Leather Honing Wheel<br />
2. Vertical Mounts for Support Arm<br />
3. Locking Knob<br />
4. On/Off Switch<br />
5. Water Trough<br />
6. Grindstone<br />
7. Metal Washer (x2)<br />
8. Locking Nut<br />
9. Horizontal Mounts for Support Arm<br />
10. Torque Adjustment Knob<br />
11. Support Arm<br />
12. Support Arm Height Adjuster<br />
13. Square Edge Jig<br />
14. Stone Gra<strong>de</strong>r<br />
15. Honing Compound<br />
16. Spanner<br />
17. Angle Gui<strong>de</strong><br />
GB<br />
Features<br />
3
GB<br />
SAFETY INSTRUCTIONS<br />
WARNING Read all safety warnings and all<br />
instructions. Failure to follow the warnings and<br />
instructions may result in electric shock, fire and/<br />
or serious injury.<br />
Save all warnings and instructions for future<br />
reference.<br />
The term "power tool" in the warnings refers to your<br />
mains-operated (cor<strong>de</strong>d) power tool or batteryoperated<br />
(cordless) power tool.<br />
1) Work area safety<br />
a) Keep work area clean and well lit. Cluttered or dark<br />
areas invite acci<strong>de</strong>nts.<br />
b) Do not operate power tools in explosive<br />
atmospheres, such as in the presence of<br />
flammable liquids, gases or dust. Power tools<br />
create sparks which may ignite the dust or fumes.<br />
c) Keep children and bystan<strong>de</strong>rs away while<br />
operating a power tool. Distractions can cause you<br />
to lose control.<br />
2) Electrical safety<br />
a) Power tool plugs must match the outlet. Never<br />
modify the plug in any way. Do not use any<br />
adapter plugs with earthed (groun<strong>de</strong>d) power<br />
tools. Unmodified plugs and matching outlets will<br />
reduce risk of electric shock.<br />
b) Avoid body contact with earthed or groun<strong>de</strong>d<br />
surfaces, such as pipes, radiators, ranges and<br />
refrigerators. There is an increased risk of electric<br />
shock if your body is earthed or groun<strong>de</strong>d.<br />
c) Do not expose power tools to rain or wet<br />
conditions. Water entering a power tool will increase<br />
the risk of electric shock.<br />
d) Do not abuse the cord. Never use the cord for<br />
carrying, pulling or unplugging the power tool.<br />
Keep cord away from heat, oil, sharp edges or<br />
moving parts. Damaged or entangled cords increase<br />
the risk of electric shock.<br />
e) When operating a power tool outdoors, use an<br />
extension cord suitable for outdoor use. Use of<br />
a cord suitable for outdoor use reduces the risk of<br />
electric shock.<br />
f) If operating a power tool in a damp location is<br />
unavoidable, use a residual current <strong>de</strong>vice (RCD)<br />
protected supply. Use of an RCD reduces the risk of<br />
electric shock.<br />
NOTE: The term “residual current <strong>de</strong>vice (RCD)”<br />
may be replaced by the term “ground fault circuit<br />
interrupter (GFCI)” or “earth leakage circuit breaker<br />
(ELCB)”.<br />
3) Personal safety<br />
a) Stay alert, watch what you are doing and use<br />
common sense when operating a power tool. Do<br />
not use a power tool while you are tired or un<strong>de</strong>r<br />
the influence of drugs, alcohol or medication. A<br />
moment of inattention while operating power tools<br />
may result in serious personal injury.<br />
b) Use personal protective equipment. Always wear<br />
eye protection. Protective equipment such as dust<br />
mask, non-skid safety shoes, hard hat, or hearing<br />
protection used for appropriate conditions will reduce<br />
personal injuries.<br />
c) Prevent unintentional starting. Ensure the switch<br />
is in the off-position before connecting to power<br />
source and/or battery pack, picking up or carrying<br />
the tool. Carrying power tools with your finger on the<br />
switch or energising power tools that have the switch<br />
on invites acci<strong>de</strong>nts.<br />
d) Remove any adjusting key or wrench before<br />
turning the power tool on. A wrench or a key left<br />
attached to a rotating part of the power tool may result<br />
in personal injury.<br />
e) Do not overreach. Keep proper footing and balance<br />
at all times. This enables better control of the power<br />
tool in unexpected situations.<br />
f) Dress properly. Do not wear loose clothing or<br />
jewellery. Keep your hair, clothing and gloves<br />
away from moving parts. Loose clothes, jewellery or<br />
long hair can be caught in moving parts.<br />
g) If <strong>de</strong>vices are provi<strong>de</strong>d for the connection of dust<br />
extraction and collection facilities, ensure these<br />
are connected and properly used. Use of dust<br />
collection can reduce dust-related hazards.<br />
4) Power tool use and care<br />
a) Do not force the power tool. Use the correct power<br />
tool for your application. The correct power tool will<br />
do the job better and safer at the rate for which it was<br />
<strong>de</strong>signed.<br />
b) Do not use the power tool if the switch does not<br />
turn it on and off. Any power tool that cannot be<br />
controlled with the switch is dangerous and must be<br />
repaired.<br />
c) Disconnect the plug from the power source and/<br />
or the battery pack from the power tool before<br />
making any adjustments, changing accessories,<br />
or storing power tools. Such preventive safety<br />
measures reduce the risk of starting the power tool<br />
acci<strong>de</strong>ntally.<br />
d) Store idle power tools out of the reach of children<br />
and do not allow persons unfamiliar with the<br />
power tool or these instructions to operate the<br />
power tool.Power tools are dangerous in the hands of<br />
untrained users.<br />
4<br />
Safety Instructions
e) Maintain power tools. Check for misalignment or<br />
binding of moving parts, breakage of parts and<br />
any other condition that may affect the power<br />
tool’s operation. If damaged, have the power tool<br />
repaired before use. Many acci<strong>de</strong>nts are caused by<br />
poorly maintained power tools.<br />
f) Keep cutting tools sharp and clean. Properly<br />
maintained cutting tools with sharp cutting edges are<br />
less likely to bind and are easier to control.<br />
UNPACKING<br />
• Carefully unpack and inspect your tool. Familiarise<br />
yourself with all its features and functions.<br />
• Ensure that all parts of the tool are present and in<br />
good condition. If any parts are missing or damaged,<br />
have such parts replaced before attempting to use this<br />
tool.<br />
g) Use the power tool, accessories and tool bits etc.<br />
in accordance with these instructions, taking into<br />
account the working conditions and the work to<br />
be performed. Use of the power tool for operations<br />
different from those inten<strong>de</strong>d could result in a<br />
hazardous situation.<br />
5) Service<br />
a) Have your power tool serviced by a qualified repair<br />
person using only i<strong>de</strong>ntical replacement parts.<br />
This will ensure that the safety of the power tool is<br />
maintained.<br />
IMPORTANT: Remove protective packing around the<br />
motor before assembly<br />
1. Ensure the unit is not connected to power<br />
2. Carefully lay the machine on its si<strong>de</strong> to gain access to<br />
the motor cavity<br />
3. Remove protective packing in and around the motor<br />
4. Carefully return unit to the upright position<br />
ASSEMBLY<br />
Fit the grindstone and water trough<br />
1. Place a Metal Washer (7) onto the spindle, profile<br />
facing away from the body of the machine<br />
2. Place the Grindstone (6) loosely onto the spindle, with<br />
the <strong>de</strong>pressed centre of the grindstone facing away<br />
from the body of the machine (as shown in image)<br />
3. Clip the Water Trough (5) into position. Use the<br />
appropriate fixing position to suit the size of grindstone<br />
to ensure stone is free to rotate yet reaches below the<br />
max water level (as marked on trough)<br />
4. Place the other Metal Washer (7) onto the spindle,<br />
profile facing the grindstone<br />
5. Fasten with the Locking Nut (8). Use spanner supplied<br />
to secure tightly.<br />
PREPARATION<br />
Siting the unit<br />
• Position the unit on a solid work surface, with all four<br />
feet securely planted on the surface<br />
• Ensure there is a<strong>de</strong>quate light to see the work clearly<br />
and sufficient space around the unit so that there are<br />
no obstructions<br />
Filling the water trough<br />
1. Fill the Water Trough (5) with cold water up to the MAX<br />
WATER LEVEL mark on the si<strong>de</strong> of the water trough<br />
NOTE: This spindle has a reverse thread, turn nut anticlockwise<br />
to fasten<br />
6. Rotate the grindstone by hand a few turns to ensure<br />
that it moves freely and accurately<br />
Leather honing wheel<br />
1. The unit is supplied with the Leather Honing Wheel (1)<br />
fitted<br />
2. Before use, check that the honing wheel is securely<br />
fastened in place<br />
3. Turn the Locking Knob (3) clockwise to tighten.<br />
NOTE: Tighten by hand only.<br />
2. When in use, ensure the water level is always<br />
sufficient to keep the grinding surface of the<br />
Grindstone (6) wet<br />
Engaging the drive system<br />
1. Tighten the Torque Adjustment Knob (10) by turning<br />
it clockwise until it is tight up against the body of the<br />
machine. This will engage the drive system<br />
2. After use, always loosen the toque adjustment knob.<br />
This will help to ensure the drive wheel retains its<br />
correct shape<br />
GB<br />
Safety Instructions / Unpacking / Assembly / Preparation<br />
5
GB<br />
Using the stone gra<strong>de</strong>r<br />
Use the Stone Gra<strong>de</strong>r (14) to dress the surface of the<br />
grindstone for fine or coarse grinding:<br />
For coarse grinding, to remove a large amount of material<br />
quickly (for example, to shape a bla<strong>de</strong>):<br />
• Apply the coarse si<strong>de</strong> of the stone gra<strong>de</strong>r to the<br />
grindstone to roughen the grinding surface<br />
For fine grinding, to sharpen the bla<strong>de</strong>:<br />
• Apply the smooth si<strong>de</strong> of the stone gra<strong>de</strong>r to the<br />
grindstone to provi<strong>de</strong> a finer grit surface, approx. 1000<br />
grit, i<strong>de</strong>al for sharpening the bla<strong>de</strong> in preparation final<br />
polishing of the cutting edge on the leather honing<br />
wheel<br />
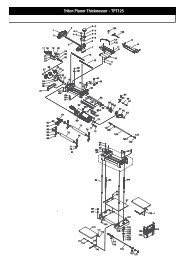
Using the square edge jig<br />
Fig.1<br />
For use with the<br />
Support Arm (11) and<br />
Angle Gui<strong>de</strong> (17) to set<br />
the bla<strong>de</strong> at exactly<br />
the correct angle for<br />
sharpening<br />
1. Loosen the knobs on<br />
the Square Edge Jig<br />
(13)<br />
2. Place the bla<strong>de</strong> in the<br />
jig so that one edge of the bla<strong>de</strong> is positioned against<br />
the end stops See Fig 1<br />
3. Tighten the knobs to fasten the bla<strong>de</strong> in position<br />
Using the support arm<br />
• The Support Arm (11) can be attached for grinding with<br />
or against the direction of rotation of the grindstone<br />
• Honing should ONLY be carried out WITH the direction<br />
of rotation<br />
Fig.2<br />
For grinding against the<br />
direction of rotation:<br />
1. Place the Support Arm<br />
(11) in the Vertical<br />
Mounts (2)<br />
For grinding and honing<br />
with the direction of<br />
rotation:<br />
1. Place the Support Arm<br />
(11) in the Horizontal<br />
Fig.3<br />
Mounts (9)<br />
• Working against the<br />
direction of rotation<br />
removes larger<br />
amounts of material<br />
more quickly than<br />
working with the<br />
direction of rotation.<br />
• Working with the direction of rotation can be used for<br />
very precise sharpening of a bla<strong>de</strong> for finer tools and is<br />
used for honing<br />
• Take your time and practise the set up with various<br />
types and sizes of bla<strong>de</strong>s so that you can achieve<br />
the correct sharpening angle and ensure the bla<strong>de</strong><br />
to be sharpened is square across the surface of the<br />
grindstone<br />
• In general, for sharpening, position the support arm in<br />
the vertical mounts and sharpen against the direction<br />
of rotation<br />
• NEVER place the support arm in the vertical mounts<br />
when using the leather honing wheel. Attempting to<br />
hone the bla<strong>de</strong> against the direction of rotation will<br />
cause severe damage to the honing wheel<br />
Using the angle gui<strong>de</strong><br />
• Use the Angle Gui<strong>de</strong> (17) to set the bla<strong>de</strong> at exactly the<br />
correct angle for sharpening<br />
1. Mount the bla<strong>de</strong> in the<br />
Fig.4<br />
Square Edge Jig (13) and<br />
place the support arm in<br />
the mount<br />
2. Use the gauge on the<br />
outsi<strong>de</strong> of the angle<br />
gui<strong>de</strong> to measure the<br />
bevel angle of the bla<strong>de</strong>.<br />
3. Loosen the locking<br />
knob on the angle gui<strong>de</strong><br />
Fig.5<br />
and adjust the protractor so that the black arrows are<br />
Bla<strong>de</strong> Bevel<br />
aligned with the correct<br />
Angle<br />
grindstone diameter<br />
marking. See Fig 5<br />
4. Then set the pointer to<br />
the required bevel angle<br />
on the bla<strong>de</strong><br />
(as<br />
Grindstone<br />
measured in Step 2,<br />
Diameter above) and<br />
tighten the locking<br />
collar to lock in<br />
position. See Fig 5<br />
5. Thread the square edge<br />
Fig.6<br />
jig onto the support arm<br />
so that the bla<strong>de</strong> rests<br />
against the grindstone<br />
6. Position the curved foot<br />
of the angle gui<strong>de</strong> on the<br />
grindstone and the flat<br />
section of the pointer on<br />
the bla<strong>de</strong> to be<br />
sharpened. See Fig 6<br />
7. Use the Support Arm Height Adjuster (12) to adjust the<br />
height of the support arm until the flat section on the<br />
angle gui<strong>de</strong> pointer lies perfectly flat on the bla<strong>de</strong><br />
8. The grinding angle will now be correct<br />
6<br />
Preparation
OPERATION<br />
Important safety notes<br />
• Never use this unit without wearing all necessary<br />
safety equipment, including approved safety glasses<br />
and face or dust mask<br />
• Wear gloves and handle bla<strong>de</strong>s with care at all times<br />
• DO NOT test the sharpness of a bla<strong>de</strong> on your finger<br />
(or other part of the body)<br />
• Check that the grindstone rotates freely each time<br />
before start up<br />
• Always allow a new wheel to run for a minutes before<br />
using it. Stand to one si<strong>de</strong> at start up<br />
• The grindstone and honing wheel rotate in the<br />
direction as marked by the arrow on the top of the unit<br />
adjacent to the horizontal mounts<br />
Set up<br />
1. Set up the unit and mount the bla<strong>de</strong> at the correct<br />
angle for sharpening, in accordance with guidance in<br />
‘Preparation’<br />
2. Dress the grindstone as necessary<br />
3. Check the water trough is correctly fitted and filled<br />
with water<br />
Fig.7<br />
4. IMPORTANT: Check the<br />
water level at regular<br />
intervals and top up<br />
as necessary. NEVER<br />
attempt to sharpen<br />
a bla<strong>de</strong> when the<br />
stone is dry; it may be<br />
dangerous to do so<br />
Connect to power<br />
1. Ensure On/Off Switch (4) is in the OFF (O) position<br />
2. Connect the unit to mains power<br />
3. To switch on, press the on/off switch to ON position (I)<br />
4. To switch off, press the on/off switch to OFF position<br />
(O)<br />
Sharpening a bla<strong>de</strong><br />
• Apply bla<strong>de</strong> to the grindstone with an even pressure<br />
• Sli<strong>de</strong> the square edge jig back and forth along the<br />
support arm to ensure even grinding on the bla<strong>de</strong> and<br />
even wear on the stone<br />
• Do not press hard. Light pressure is all that is required<br />
for sharpening<br />
Sharpening without the square edge jig<br />
• If the workpiece is too large to mount in the jig, you<br />
can fit the Support Arm (11) and rest the workpiece<br />
on the support, with the edge pointing away from you.<br />
This will help you keep the bla<strong>de</strong> steady at the angle<br />
required<br />
• Move the bla<strong>de</strong> back and forth across the stone to<br />
ensure even grinding on the bla<strong>de</strong> and even wear on<br />
the stone<br />
Honing a bla<strong>de</strong><br />
• After sharpening, using the leather honing wheel will<br />
remove any burr and give a smooth sharp edge to the<br />
bla<strong>de</strong><br />
• Always hone a bla<strong>de</strong> in the direction of wheel rotation.<br />
NEVER hone against the direction of the wheel<br />
1. Ensure the machine is disconnected from power<br />
during set up<br />
2. Set up the support arm and jig as shown in Fig 3. Use<br />
the angle gui<strong>de</strong> to check the bla<strong>de</strong> angle is correct<br />
3. Apply a generous squeeze of Honing Compound (15)<br />
directly to the Leather Honing Wheel (1). Honing will<br />
distribute the compound across the wheel<br />
4. Switch on the machine and move the bla<strong>de</strong> across the<br />
face of the honing wheel, ensuring that at least half of<br />
the width of the honing wheel is always in contact with<br />
the bla<strong>de</strong><br />
5. Allow the honing wheel to do the work. Do not apply<br />
excessive force to the wheel<br />
6. As with sharpening, move the jig back and forth along<br />
the support arm to ensure even honing of the bla<strong>de</strong><br />
7. Do not hone without honing compound on the wheel.<br />
If honing a number of bla<strong>de</strong>s, it may be necessary<br />
to apply more compound. Switch off machine and<br />
remove bla<strong>de</strong> before applying compound<br />
Honing without the square edge jig<br />
• If the workpiece is too large to mount in the jig, you<br />
can fit the Support Arm (11) and rest the workpiece<br />
on the support, with the edge pointing away from you.<br />
This will help you keep the bla<strong>de</strong> steady at the angle<br />
required<br />
• Move the bla<strong>de</strong> back and forth across the wheel to<br />
ensure even polishing across the bla<strong>de</strong><br />
Removing engineering marks<br />
• The manufacturing process sometimes leaves bla<strong>de</strong>s<br />
with engineering marks on the surface of the cross<br />
section (or ‘face’) of the bla<strong>de</strong><br />
• You can remove these by applying the damaged face<br />
GB<br />
Operation<br />
7
of the bla<strong>de</strong> to the si<strong>de</strong> face of the stone<br />
• Move the face of the bla<strong>de</strong> slowly over the face of the<br />
stone. Do not apply excessive force, and avoid fingers<br />
coming into contact with the stone<br />
• Carry out this procedure first, before you sharpen the<br />
bla<strong>de</strong><br />
After use<br />
1. Disengage the drive system by loosening the Torque<br />
Adjustment Knob (10) This will help to ensure the drive<br />
wheel retains perfect shape<br />
2. Empty the water trough. Do not leave the grindstone<br />
standing in water<br />
MAINTENANCE<br />
• Disconnect the machine from mains power before<br />
carrying out any maintenance work<br />
• Keep the unit clean and free from dust and <strong>de</strong>bris.<br />
Clean the outsi<strong>de</strong> of the unit with a damp cloth. Never<br />
immerse the unit in water<br />
• Check that all moving parts move freely and are in<br />
good working condition<br />
• Check that all nuts and bolts, especially those<br />
retaining the honing wheel and grindstone, are<br />
correctly fastened and free from wear<br />
• Check the plug and power cable for signs of wear<br />
or damage. If damaged, have them replaced by a<br />
certified electrician<br />
Replacing the leather honing wheel<br />
If the Leather Honing Wheel (1) becomes worn or torn, it<br />
should be replaced:<br />
1. Unscrew and set asi<strong>de</strong> the Torque Adjustment Knob<br />
(10)<br />
2. Remove the worn honing wheel from the spindle, and<br />
position new wheel in its place<br />
3. Re-fit the locking knob and tighten.<br />
NOTE: Tighten by hand only<br />
Grindstone<br />
• Do not use a grindstone that has received a blow,<br />
especially to the si<strong>de</strong> of the stone<br />
• Replace a cracked or suspect stone<br />
• See ‘Assembly’ for guidance on fitting a stone. Note<br />
that the spindle is reverse thread: turn clockwise to<br />
loosen, anti-clockwise to tighten<br />
GB<br />
WARRANTY<br />
To register your guarantee visit our web site at<br />
www.tritontools.com* and enter your <strong>de</strong>tails.<br />
Your <strong>de</strong>tails will be inclu<strong>de</strong>d on our mailing list (unless<br />
indicated otherwise) for information on future releases.<br />
Details provi<strong>de</strong>d will not be ma<strong>de</strong> available to any third party.<br />
PURCHASE RECORD<br />
Date of Purchase: ___ / ___ / ____<br />
Mo<strong>de</strong>l: TWSS10<br />
Serial Number: __________________<br />
Retain your receipt as proof of purchase<br />
<strong>Triton</strong> Precision Power <strong>Tools</strong> guarantees to the<br />
purchaser of this product that if any part proves to<br />
be <strong>de</strong>fective due to faulty materials or workmanship<br />
within 12 MONTHS from the date of original<br />
purchase, <strong>Triton</strong> will repair, or at its discretion<br />
replace, the faulty part free of charge.<br />
This guarantee does not apply to commercial use<br />
nor does it extend to normal wear and tear or<br />
damage as a result of acci<strong>de</strong>nt, abuse or misuse.<br />
* Register online within 30 days.<br />
Terms & conditions apply.<br />
This does not affect your statutory rights<br />
8 Operation / Warranty
Hartelijk dank voor <strong>de</strong> aanschaf van dit <strong>Triton</strong>-gereedschap. Deze instructies bevatten informatie die u nodig hebt<br />
voor een veilige en doeltreffen<strong>de</strong> bediening van dit product.<br />
Dit product heeft een aantal unieke eigenschappen. Lees daarom <strong>de</strong>ze handleiding altijd door, ook als u al<br />
bekend bent met bandschuurmachine, zodat u alle voor<strong>de</strong>len van dit unieke ontwerp kunt benutten<br />
Houd <strong>de</strong>ze handleiding bij <strong>de</strong> hand en zorg ervoor dat alle gebruikers van dit gereedschap <strong>de</strong> handleiding<br />
hebben gelezen en volledig hebben begrepen.<br />
INHOUD<br />
Specificaties 9<br />
On<strong>de</strong>r<strong>de</strong>lenlijst 9<br />
Veiligheidsinstructies 10<br />
Symbolen 11<br />
Uitpakken 11<br />
Montage 11<br />
Voorbereiding 12<br />
Bediening 13<br />
Service en on<strong>de</strong>rhoud 14<br />
Garantie 15<br />
EG-verklaring van overeenstemming 44<br />
SPECIFICATIES<br />
Artikel nr.:<br />
Spanning:<br />
Opgenomen vermogen:<br />
TWSS10<br />
220–240 V~ 50 Hz<br />
120 W<br />
Onbelaste snelheid 120 min -1<br />
Slijpsteen:<br />
Polijstschijf:<br />
Geluidsniveau:<br />
Gewicht:<br />
Isolatie:<br />
250 x 50 mm<br />
230 x 30 mm<br />
70 dB(A)<br />
14 kg<br />
beschermen<strong>de</strong> aarding<br />
On<strong>de</strong>r<strong>de</strong>lenlijst<br />
1. Leren polijstwiel<br />
2. Verticale bevestigingspunten voor steunarm<br />
3. Vergren<strong>de</strong>lknop<br />
4. Aan-/uitschakelaar<br />
5. Water bak<br />
6. Slijpsteen<br />
7. Metalen sluitringen (x 2)<br />
8. Borgmoer<br />
9. Horizontale bevestigingspunten voor steunarm<br />
10. Rotatieschakel knop<br />
11. Steunarm<br />
12. Steunarm hoogte verstelling<br />
13. Mesklem<br />
14. Schuursteen<br />
15. Polijstwiel pasta<br />
16. Moersleutel<br />
17. Hoek gra<strong>de</strong>nmeter<br />
NL<br />
Inhoud / Specificaties / On<strong>de</strong>r<strong>de</strong>lenlijst 9
Algemene veiligheid voor elektrisch gereedschap<br />
NL<br />
WAARSCHUWING Lees alle bediening- en<br />
veiligheidsvoorschriften. Het niet opvolgen van<br />
alle voorschriften die hieron<strong>de</strong>r vermeld staan,<br />
kan resulteren in een elektrische schok, brand en/of<br />
ernstig letsel.<br />
Bewaar <strong>de</strong>ze voorschriften voor toekomstig<br />
gebruik. De term “elektrisch gereedschap” in alle<br />
hieron<strong>de</strong>r vermel<strong>de</strong> waarschuwingen heeft betrekking<br />
op uw elektrische gereedschap dat op <strong>de</strong> stroom is<br />
aangesloten (met een snoer) of met een accu wordt<br />
gevoed (snoerloos).<br />
1) Veiligheid in <strong>de</strong> werkruimte<br />
a) Houd <strong>de</strong> werkruimte schoon en zorg voor een<br />
goe<strong>de</strong> verlichting. Rommelige en donkere ruimtes<br />
lei<strong>de</strong>n vaak tot ongelukken.<br />
b) Werk niet met elektrisch gereedschap in<br />
explosieve omgevingen, bijvoorbeeld in <strong>de</strong><br />
aanwezigheid van ontvlambare vloeistoffen,<br />
gassen of stof. Elektrisch gereedschap brengt vonken<br />
teweeg die stof of dampen kunnen doen ontbran<strong>de</strong>n.<br />
c) Houd kin<strong>de</strong>ren en omstan<strong>de</strong>rs uit <strong>de</strong> buurt<br />
wanneer u elektrisch gereedschap bedient. Door<br />
afleiding kunt u <strong>de</strong> controle over het gereedschap<br />
verliezen.<br />
2) Elektrische veiligheid<br />
a) De stekkers van het elektrische gereedschap<br />
moeten passen bij het stopcontact. Pas <strong>de</strong><br />
stekker niet aan. Gebruik geen adapterstekkers<br />
bij geaard elektrisch gereedschap. Het gebruik van<br />
ongewijzig<strong>de</strong> stekkers en passen<strong>de</strong> stopcontacten<br />
vermin<strong>de</strong>rt het risico op een elektrische schok.<br />
b) Vermijd lichamelijk contact met geaar<strong>de</strong><br />
oppervlakken zoals pijpen, radiatoren, fornuizen<br />
en koelkasten. Het risico op een elektrische schok<br />
neemt toe als uw lichaam geaard wordt.<br />
c) Laat elektrisch gereedschap niet nat wor<strong>de</strong>n.<br />
Wanneer elektrisch gereedschap nat wordt, neemt het<br />
risico op een elektrische schok toe.<br />
d) Beschadig het snoer niet. Gebruik het snoer<br />
nooit om het elektrisch gereedschap te dragen,<br />
te trekken of om <strong>de</strong> stekker uit het stopcontact<br />
te trekken. Houd het snoer uit <strong>de</strong> buurt van hitte,<br />
olie, scherpe ran<strong>de</strong>n of bewegen<strong>de</strong> <strong>de</strong>len. Een<br />
beschadigd of in <strong>de</strong> knoop geraakt snoeren verhoogt<br />
het risico op een elektrische schok toe.<br />
e) Wanneer u elektrisch gereedschap buiten<br />
gebruikt, maak dan gebruik van een verlengsnoer<br />
dat geschikt is voor gebruik buitenshuis. Gebruik<br />
een verlengsnoer dat geschikt is voor gebruik<br />
buitenshuis om het risico op een elektrische schok te<br />
vermin<strong>de</strong>ren.<br />
f) Indien het onvermij<strong>de</strong>lijk is elektrisch gereedschap<br />
te gebruiken in een vochtige omgeving, gebruik<br />
10 Algemene veiligheid voor elektrisch gereedschap<br />
dan een energiebron met een aardlek beveiliging<br />
(Residual Currency Device). Het gebruik van een<br />
RCD vermin<strong>de</strong>rt het risico op een elektrische schok.<br />
3) Persoonlijke veiligheid<br />
a) Blijf alert en gebruik uw gezon<strong>de</strong> verstand<br />
wanneer u elektrisch gereedschap bedient.<br />
Gebruik het elektrisch gereedschap niet wanneer<br />
u vermoeid bent of on<strong>de</strong>r invloed van drugs,<br />
alcohol of medicijnen. Onoplettendheid tij<strong>de</strong>ns het<br />
bedienen van elektrisch gereedschap kan lei<strong>de</strong>n tot<br />
ernstig letsel.<br />
b) Maak gebruik van persoonlijke bescherming.<br />
Draag altijd een veiligheidsbril. Passen<strong>de</strong><br />
bescherming voor <strong>de</strong> omstandighe<strong>de</strong>n, zoals een<br />
stofmasker, niet-slippen<strong>de</strong> veiligheidsschoenen een<br />
helm of gehoorbescherming, vermin<strong>de</strong>rt het risico op<br />
persoonlijk letsel.<br />
c) Zorg ervoor dat het apparaat niet per ongeluk<br />
wordt gestart. Controleer of <strong>de</strong> schakelaar in<br />
<strong>de</strong> ‘uit’ stand staat voordat u <strong>de</strong> stekker in het<br />
stopcontact steekt. Het dragen van elektrisch<br />
gereedschap met uw vinger op <strong>de</strong> schakelaar of het<br />
aansluiten op <strong>de</strong> stroom van elektrisch gereedschap<br />
met <strong>de</strong> schakelaar ingeschakeld kan tot ongelukken<br />
lei<strong>de</strong>n.<br />
d) Verwij<strong>de</strong>r alle stel- of moersleutels voordat u het<br />
elektrische gereedschap inschakelt. Een moer- of<br />
stelsleutel die zich op een draaiend on<strong>de</strong>r<strong>de</strong>el van het<br />
elektrische gereedschap bevindt, kan lei<strong>de</strong>n tot letsel.<br />
e) Reik niet te ver. Blijf altijd stevig en in balans<br />
staan. Zo houdt u meer controle over het elektrische<br />
gereedschap in onverwachte situaties.<br />
f) Draag geschikte kleding. Draag geen loshangen<strong>de</strong><br />
kleding of siera<strong>de</strong>n. Houd haren, kleding en<br />
handschoenen uit <strong>de</strong> buurt van bewegen<strong>de</strong> <strong>de</strong>len.<br />
Loshangen<strong>de</strong> kleding, siera<strong>de</strong>n en los hangen<strong>de</strong> haren<br />
kunnen vast komen te zitten in bewegen<strong>de</strong> <strong>de</strong>len.<br />
g) Als er on<strong>de</strong>r<strong>de</strong>len voor stofafvoer- en<br />
stofverzameling wor<strong>de</strong>n meegeleverd, sluit<br />
<strong>de</strong>ze dan aan en gebruik <strong>de</strong>ze op <strong>de</strong> juiste wijze.<br />
Het gebruik van <strong>de</strong>ze on<strong>de</strong>r<strong>de</strong>len kan het risico op<br />
stofgerelateer<strong>de</strong> ongelukken vermin<strong>de</strong>ren.<br />
4) Gebruik en verzorging van elektrisch gereedschap<br />
a) Forceer elektrisch gereedschap niet. Gebruik<br />
elektrisch gereedschap dat geschikt is voor het<br />
werk dat u wilt uitvoeren. Geschikt elektrisch<br />
gereedschap werkt beter en veiliger op een passen<strong>de</strong><br />
snelheid.<br />
b) Gebruik het elektrische gereedschap niet als <strong>de</strong><br />
schakelaar het apparaat niet in- en uitschakelt.<br />
Elektrisch gereedschap dat niet bediend kan wor<strong>de</strong>n<br />
met <strong>de</strong> schakelaar is gevaarlijk en moet gerepareerd<br />
wor<strong>de</strong>n.
c) Haal <strong>de</strong> stekker uit het stopcontact voordat u<br />
instellingen aanpast, toebehoren verwisselt of<br />
het elektrische gereedschap opbergt. Dergelijke<br />
voorzorgsmaatregelen vermin<strong>de</strong>ren het risico op het<br />
per ongeluk starten van het elektrische gereedschap.<br />
d) Berg elektrisch gereedschap dat niet in gebruik is<br />
op buiten bereik van kin<strong>de</strong>ren en laat mensen die<br />
niet bekend zijn met het elektrische gereedschap<br />
of met <strong>de</strong>ze instructies het elektrische<br />
gereedschap niet bedienen. Elektrisch gereedschap<br />
is gevaarlijk in <strong>de</strong> han<strong>de</strong>n van onervaren gebruikers.<br />
e) On<strong>de</strong>rhoud uw elektrisch gereedschap. Controleer<br />
op foutieve uitlijning of het vastslaan van<br />
bewegen<strong>de</strong> <strong>de</strong>len, gebroken on<strong>de</strong>r<strong>de</strong>len en<br />
elke an<strong>de</strong>re afwijking die <strong>de</strong> werking van het<br />
elektrische gereedschap zou kunnen beïnvloe<strong>de</strong>n.<br />
Indien het elektrische gereedschap beschadigd<br />
is, moet u het laten repareren voordat u het weer<br />
gebruikt. Veel ongelukken wor<strong>de</strong>n veroorzaakt door<br />
slecht on<strong>de</strong>rhou<strong>de</strong>n elektrisch gereedschap.<br />
f) Houd snijwerktuigen scherp en schoon. Goed<br />
on<strong>de</strong>rhou<strong>de</strong>n snijwerktuigen met scherpe messen<br />
slaan min<strong>de</strong>r snel vast en zijn gemakkelijker te<br />
bedienen.<br />
g) Gebruik het elektrische gereedschap, toebehoren<br />
en on<strong>de</strong>r<strong>de</strong>len, etc. volgens <strong>de</strong>ze instructies en<br />
volgens bestemming voor het specifieke type<br />
elektrisch gereedschap, en houd daarbij rekening<br />
met <strong>de</strong> werkomstandighe<strong>de</strong>n en het uit te voeren<br />
werk. Gebruik van elektrisch gereedschap voor<br />
werkzaamhe<strong>de</strong>n die verschillen van die waarvoor<br />
het apparaat bestemd is, kan lei<strong>de</strong>n tot gevaarlijke<br />
situaties.<br />
5) On<strong>de</strong>rhoud<br />
a) Laat uw elektrische gereedschap on<strong>de</strong>rhou<strong>de</strong>n<br />
door een gekwalificeer<strong>de</strong> vakman en gebruik<br />
alleen i<strong>de</strong>ntieke vervangstukken. Zo bent u er zeker<br />
van dat <strong>de</strong> veiligheid van het elektrische gereedschap<br />
gewaarborgd blijft.<br />
SYMBOLEN<br />
BESCHERMING VAN HET MILIEU<br />
Elektrische producten mogen niet wor<strong>de</strong>n<br />
afgevoerd met het normale huisvuil. Indien<br />
<strong>de</strong> mogelijkheid bestaat, dient u het product<br />
te recyclen. Vraag <strong>de</strong> plaatselijke autoriteiten<br />
of winkelier om advies betreffen<strong>de</strong> recyclen.<br />
Voldoet aan <strong>de</strong> relevante wetgeving en<br />
veiligheidsstandaards<br />
Lees <strong>de</strong> handleiding voor gebruik<br />
geheel door Geaard<br />
Draag altijd gehoor-, oog- en<br />
luchtwegenbescherming<br />
Klasse I samenstelling<br />
(beschermen<strong>de</strong> aarding).<br />
Het uitpakken van uw gereedschap<br />
• Pak uw toestel/gereedschap uit. Inspecteer het en zorg<br />
dat u met alle kenmerken en functies vertrouwd raakt<br />
• Controleer of alle on<strong>de</strong>r<strong>de</strong>len aanwezig zijn en in<br />
goe<strong>de</strong> staat verkeren. Als er on<strong>de</strong>r<strong>de</strong>len ontbreken of<br />
beschadigd zijn, zorg dan dat <strong>de</strong>ze vervangen wor<strong>de</strong>n<br />
voor u dit toestel/gereedschap gebruikt<br />
BELANGRIJK: Verwij<strong>de</strong>r <strong>de</strong> bescherm verpakking rond<br />
<strong>de</strong> motor voor montage<br />
1. De machine mag niet aangesloten zijn op een<br />
stroombron<br />
2. Plaats <strong>de</strong> machine voorzichtig op <strong>de</strong> zijkant zodat u<br />
toegang heeft tot <strong>de</strong> motor<br />
3. Verwij<strong>de</strong>r alle beschermen<strong>de</strong> verpakking in en rondom<br />
<strong>de</strong> motor<br />
4. Plaats <strong>de</strong> machine weer voorzichtig terug in <strong>de</strong><br />
normale positie<br />
MONTAGE<br />
Het plaatsen van <strong>de</strong> slijpsteen en <strong>de</strong><br />
waterbak<br />
1. Plaats een sluitring (7) op <strong>de</strong> as met <strong>de</strong> glad<strong>de</strong> zij<strong>de</strong><br />
naar <strong>de</strong> machine wijzend<br />
2. Plaats <strong>de</strong> slijpsteen op <strong>de</strong> as met <strong>de</strong> ingezonken zij<strong>de</strong>,<br />
van <strong>de</strong> machine af wijzend zoals afgebeeld in <strong>de</strong> foto<br />
3. Klik <strong>de</strong> waterbak (5) in positie. Zorg ervoor dat <strong>de</strong><br />
slijpsteen on<strong>de</strong>r <strong>de</strong> maximale waterlijn markering<br />
reikt, en aan bei<strong>de</strong> zij<strong>de</strong> ruimte heeft om vrij te roteren<br />
4. Plaats <strong>de</strong> an<strong>de</strong>re sluitring op <strong>de</strong> as met <strong>de</strong> glad<strong>de</strong> zij<strong>de</strong><br />
van <strong>de</strong> slijpsteen af wijzend<br />
5. Plaats <strong>de</strong> borgmoer en draai <strong>de</strong>ze met behulp van <strong>de</strong><br />
bijgelever<strong>de</strong> moersleutel vast.<br />
NL<br />
Symbolen / Uitpakken / Montage 11
LET OP: Het schroefdraad op <strong>de</strong> as is in tegenoverstel<strong>de</strong><br />
richting als normaal. Draai <strong>de</strong> moer tegen <strong>de</strong> richting van<br />
<strong>de</strong> wijzers van <strong>de</strong> klok in vast<br />
6. Draai <strong>de</strong> slijpsteen een aantal keer met <strong>de</strong> hand rond<br />
om te zien of <strong>de</strong> het vrij en correct roteert<br />
Het leren polijstwiel<br />
1. De eenheid wordt bevestigd met <strong>de</strong> polijstschijf voor<br />
gemonteerd<br />
2. Controleer, voor het gebruik van <strong>de</strong> machine, of <strong>de</strong><br />
schijf goed vast zit<br />
3. Draai <strong>de</strong> vergren<strong>de</strong>lknop (4) in <strong>de</strong> richting van <strong>de</strong><br />
wijzers van <strong>de</strong> klok in om <strong>de</strong> polijstschijf vaster te<br />
draaien<br />
LET OP: Draai <strong>de</strong> knop alleen met <strong>de</strong> hand vast<br />
Voorbereiding<br />
Plaatsbepaling<br />
• Plaats <strong>de</strong> eenheid op een vaste werkon<strong>de</strong>rgrond,<br />
waarbij alle poten stevig op <strong>de</strong> on<strong>de</strong>rgrond staan<br />
• Zorg ervoor dat u een goe<strong>de</strong> zichtbaarheid heeft<br />
op het werk. Tevens is genoeg beweegruimte erg<br />
belangrijk<br />
Het vullen van <strong>de</strong> waterbak<br />
1. Vul <strong>de</strong> waterbak (5) tot op <strong>de</strong> maximale waterlijn<br />
markering met koud water<br />
2. Zorg er bij het gebruik van <strong>de</strong> machine voor dat het<br />
water niveau hoog genoeg is, zodat het slijpvlak van<br />
<strong>de</strong> slijpsteen (7) te allen tij<strong>de</strong> nat blijft<br />
Het gebruiken van <strong>de</strong> mesklem<br />
Gebruik <strong>de</strong> mesklem<br />
Fig.1<br />
in combinatie met <strong>de</strong><br />
steunarm (11) en <strong>de</strong><br />
gra<strong>de</strong>n meter (17) zodat<br />
u het mesblad in <strong>de</strong> juiste<br />
hoek kunt stellen<br />
1. Draai <strong>de</strong> knoppen op<br />
<strong>de</strong> achterzij<strong>de</strong> van <strong>de</strong><br />
klem los<br />
2. Plaats het mesblad in <strong>de</strong> klem. Zorg ervoor dat één<br />
zij<strong>de</strong> van het blad tegen <strong>de</strong> stops geplaatst is. Zie<br />
figuur 1<br />
3. Draai <strong>de</strong> knoppen vast om het blad in positie te hou<strong>de</strong>n<br />
NL<br />
Het rotatiesysteem inschakelen<br />
1. Draai <strong>de</strong> rotatieschakel knop (10) in <strong>de</strong> richting van<br />
<strong>de</strong> wijzers van <strong>de</strong> klok totdat <strong>de</strong> knop dicht tegen <strong>de</strong><br />
behuizing zit. Dit schakelt het rotatiesysteem in.<br />
2. Draai <strong>de</strong> knop, na elk gebruik van <strong>de</strong> machine, los. Zo<br />
behoudt het aandrijfwiel <strong>de</strong> juiste vorm<br />
Het gebruiken van <strong>de</strong> schuursteen<br />
Gebruik <strong>de</strong> schuursteen (17) voor het bewerken van het<br />
slijpoppervlak van <strong>de</strong> slijpsteen.<br />
Voor grof slijpen, en het snel verwij<strong>de</strong>ren van grote<br />
hoeveelhe<strong>de</strong>n materiaal (vormen/scherp slijpen van een<br />
mesblad):<br />
• Plaats <strong>de</strong> grove zij<strong>de</strong> van <strong>de</strong> schuursteen op <strong>de</strong><br />
slijpsteen zodat het oppervlak opgeruwd wordt<br />
Voor het scherp slijpen van mesbla<strong>de</strong>n:<br />
• Plaats <strong>de</strong> glad<strong>de</strong>re zij<strong>de</strong> van <strong>de</strong> schuursteen op <strong>de</strong><br />
slijpsteen zodat het oppervlak glad<strong>de</strong>r wordt. I<strong>de</strong>aal<br />
voor het scherp slijpen van mesbla<strong>de</strong>n waarna u ze<br />
kunt polijsten op <strong>de</strong> polijstschijf<br />
Het gebruiken van <strong>de</strong> steunarm<br />
• De steunarm (11) kan gemonteerd wor<strong>de</strong>n voor<br />
zowel: met <strong>de</strong> rotatierichting mee slijpen, als tegen <strong>de</strong><br />
rotatierichting in slijpen<br />
• Het polijsten van een mesblad kan alleen gedaan<br />
wor<strong>de</strong>n met <strong>de</strong> rotatierichting mee<br />
Het slijpen tegen <strong>de</strong> rotatierichting in:<br />
1. Plaats <strong>de</strong> steunarm<br />
Fig.2<br />
(11) in <strong>de</strong> verticale<br />
bevestigingspunten (2)<br />
Het slijpen met <strong>de</strong><br />
rotatierichting mee:<br />
1. Plaats <strong>de</strong> steunarm<br />
(11) in <strong>de</strong> horizontale<br />
bevestigingspunten (9)<br />
• Bij het slijpen tegen<br />
<strong>de</strong> rotatierichting in<br />
Fig.3<br />
verwij<strong>de</strong>rt u sneller,<br />
grotere hoeveelhe<strong>de</strong>n<br />
dan wanneer u met <strong>de</strong><br />
rotatierichting mee slijpt<br />
• Het slijpen met <strong>de</strong><br />
rotatierichting mee<br />
wordt gebruikt voor het<br />
precieze slijpwerk en<br />
het polijsten van<br />
12<br />
Montage / Voorbereiding
messen.<br />
• Neem uw tijd om het slijpen met verschillen<strong>de</strong><br />
materialen en afmetingen on<strong>de</strong>r <strong>de</strong> knie te krijgen<br />
• In het algemeen, bij scherp slijpen, plaatst u <strong>de</strong><br />
steunarm in <strong>de</strong> verticale bevestigingspunten en slijpt u<br />
tegen <strong>de</strong> rotatierichting in<br />
• Plaats <strong>de</strong> steunarm nooit in <strong>de</strong> verticale<br />
bevestigingspunten wanneer u voorwerpen gaat<br />
polijsten met <strong>de</strong> polijstschijf.<br />
Het gebruiken van <strong>de</strong> hoek gra<strong>de</strong>nmeter<br />
• Gebruik <strong>de</strong> hoek gra<strong>de</strong>nmeter (17) om het mes in <strong>de</strong><br />
juiste hoek te bevestigen<br />
1. Plaats het mesblad in <strong>de</strong> klem (15) en bevestig <strong>de</strong><br />
steunarm<br />
2. Gebruik <strong>de</strong> metingen/inkepingen aan <strong>de</strong> rand van <strong>de</strong><br />
meter voor het meten van <strong>de</strong> hoek waarin het mesblad<br />
geslepen is<br />
Fig.4<br />
3. Draai <strong>de</strong> vergren<strong>de</strong>lknop<br />
op <strong>de</strong> meter los<br />
en verstel <strong>de</strong> witte<br />
gra<strong>de</strong>nboog zo, dat <strong>de</strong><br />
zwarte pijltjes uitgelijnd<br />
zijn met <strong>de</strong> juiste<br />
slijpsteen diameter<br />
markering. Zie figuur 5<br />
4. Zet nu <strong>de</strong> wijzer op <strong>de</strong><br />
benodig<strong>de</strong> hoek (als<br />
gemeten in stap 2), en draai <strong>de</strong> vergren<strong>de</strong>lknop vast.<br />
Zie figuur 5<br />
5. Schroef <strong>de</strong> mesklem in<br />
<strong>de</strong> steunarm en laat het<br />
mesblad op <strong>de</strong><br />
slijpsteen steunen<br />
6. Plaats <strong>de</strong> afgeron<strong>de</strong><br />
voet van <strong>de</strong><br />
gra<strong>de</strong>nmeter op <strong>de</strong><br />
slijpsteen, en plaats<br />
platte <strong>de</strong>el van<br />
<strong>de</strong> wijzer op het te<br />
slijpen mesblad. Zie figuur 6<br />
7. Stel <strong>de</strong> hoogte van <strong>de</strong><br />
steunarm in, met behulp<br />
van <strong>de</strong> hoogte verstelarm<br />
(12). Het platte <strong>de</strong>el van<br />
gra<strong>de</strong>nmeter hoort plat<br />
op het mesblad te liggen<br />
8. De slijphoek is nu juist<br />
Grindstone<br />
Diameter<br />
het<br />
Bla<strong>de</strong> Bevel<br />
Angle<br />
Fig.5<br />
Fig.6<br />
Bediening<br />
Belangrijke veiligheidspunten<br />
• Gebruik <strong>de</strong> slijpmachine niet zon<strong>de</strong>r het dragen van <strong>de</strong><br />
juiste/benodig<strong>de</strong> bescherming, inclusief veiligheidsbril<br />
en stofmasker<br />
• Draag te allen tij<strong>de</strong> handschoenen en ben voorzichtig<br />
bij het werken met messen<br />
• Test <strong>de</strong> scherpheid van een mes niet op uw vingers (of<br />
an<strong>de</strong>re <strong>de</strong>len van uw lichaam)<br />
• Controleer of <strong>de</strong> slijpsteen vrij kan roteren voor elk<br />
gebruik van <strong>de</strong> machine<br />
• Laat een nieuw wiel, voor gebruik, ongeveer een<br />
minuut onbelast draaien. Sta aan <strong>de</strong> zijkant van <strong>de</strong><br />
machine bij het opstarten<br />
• De slijp- en polijstschijf draaien bei<strong>de</strong> in <strong>de</strong> richting,<br />
aangegeven op <strong>de</strong> bovenzij<strong>de</strong> van <strong>de</strong> behuizing<br />
Opzet<br />
1. Maak <strong>de</strong> machine klaar voor gebruik. Plaats het<br />
mesblad in <strong>de</strong> juiste hoek als wordt uitgelegd in “Het<br />
gebruiken van <strong>de</strong> hoek gra<strong>de</strong>nmeter”<br />
2. Schuur <strong>de</strong> slijpsteen wanneer nodig bij<br />
3. Controleer het waterniveau in <strong>de</strong> waterbak<br />
4. BELANGRIJK:<br />
Controleer het<br />
waterniveau regelmatig<br />
tij<strong>de</strong>ns het gebruiken<br />
van <strong>de</strong> machine. Gebruik<br />
<strong>de</strong> machine nooit<br />
wanneer <strong>de</strong> slijpsteen<br />
droog is waar dit<br />
uitermate gevaarlijk is<br />
Aansluiten op een stroombron<br />
1. Zorg ervoor dat <strong>de</strong> aan-/uitschakelaar (4) op <strong>de</strong> UITstand<br />
(0) staat<br />
2. Verbindt <strong>de</strong> machine met <strong>de</strong> stroombron<br />
3. Zet <strong>de</strong> aan-/uitschakelaar op <strong>de</strong> AAN-stand (I)<br />
4. Om <strong>de</strong> machine uit te schakelen zet u <strong>de</strong> aan-/<br />
uitschakelaar op <strong>de</strong> UIT-stand (0)<br />
Een mesblad scherp slijpen<br />
• Oefen een even druk op het mes uit<br />
Fig.7<br />
NL<br />
Voorbereiding / Bediening 13
NL<br />
• Schuif <strong>de</strong> mesklem heen en weer over <strong>de</strong> steunarm<br />
zodat het mes gelijk geslepen wordt<br />
• Druk niet te hard op het mesblad. Een lichte druk is<br />
genoeg<br />
Slijpen zon<strong>de</strong>r <strong>de</strong> mesklem<br />
• Wanneer het werkstuk te groot is voor <strong>de</strong> mesklem<br />
kunt u <strong>de</strong> steunarm (11) monteren en het werkstuk op<br />
<strong>de</strong> arm laten rusten. Dit help u bij het stabiel hou<strong>de</strong>n<br />
van het werkstuk<br />
• Schuif het mes heen en weer over <strong>de</strong> slijpsteen zodat<br />
het mes gelijk geslepen wordt en <strong>de</strong> slijpsteen gelijk<br />
slijt<br />
Het polijsten van een mesblad<br />
• Na het scherp slijpen van een mesblad gebruikt u het<br />
leren polijstwiel voor het verwij<strong>de</strong>ren van bramen. Zo<br />
geeft u het mesblad een fijne scherpe rand<br />
• Polijst altijd met <strong>de</strong> rotatierichting mee<br />
1. Zorg ervoor dat <strong>de</strong> machine niet is aangesloten op een<br />
stroombron<br />
2. Maak <strong>de</strong> steunarm en klem klaar voor gebruik, zie<br />
figuur 3. Gebruik <strong>de</strong> hoek gra<strong>de</strong>nmeter en controleer of<br />
<strong>de</strong> hoek van het mesblad juist is<br />
3. Breng polijstpasta (15) op het leren polijstwiel (1) aan.<br />
Het polijsten verspreidt <strong>de</strong> pasta over <strong>de</strong> gehele band<br />
4. Zet <strong>de</strong> machine aan en beweeg het mesblad over <strong>de</strong><br />
band waarbij minimaal <strong>de</strong> halve breedte van het wiel in<br />
contact staat met het mes<br />
5. Oefen geen hoge druk uit op het wiel maar laat het wiel<br />
zelf het werk doen<br />
On<strong>de</strong>rhoud<br />
• Verwij<strong>de</strong>r <strong>de</strong> machine van <strong>de</strong> stroombron voordat u<br />
enig on<strong>de</strong>rhoud uitvoert<br />
• Houdt <strong>de</strong> machine vrij van stof en bramen. Maak <strong>de</strong><br />
behuizing met een vochtige doek schoon. Dompel <strong>de</strong><br />
eenheid nooit in water<br />
• Controleer of alle bewegen<strong>de</strong> on<strong>de</strong>r<strong>de</strong>len vrij kunnen<br />
bewegen en in een goe<strong>de</strong> staat verkeren<br />
• Controleer of alle bouten en moeren (vooral die van <strong>de</strong><br />
slijpsteen en het polijst wiel) goed vast zitten<br />
• Controleer <strong>de</strong> plug en kabel op breuken, en vervang<br />
<strong>de</strong>ze wanneer nodig<br />
Slijpsteen<br />
• Gebruik geen beschadig<strong>de</strong> slijpstenen. Een slijpsteen<br />
met scheuren of breuken, vooral aan <strong>de</strong> rand van <strong>de</strong><br />
steen, moeten vervangen wor<strong>de</strong>n<br />
• Zie “Montage” voor het monteren van een<br />
slijpsteen. LET OP: het schroefdraad van <strong>de</strong> as is in<br />
14 Bediening / On<strong>de</strong>rhoud<br />
6. Beweeg <strong>de</strong> klem heen en weer zodat het mes gelijk<br />
gepolijst wordt<br />
7. Polijst geen mesbla<strong>de</strong>n zon<strong>de</strong>r <strong>de</strong> pasta. Bij het<br />
polijsten van meer<strong>de</strong>re mesbla<strong>de</strong>n kan het mogelijk zijn<br />
dat u na het slijpen van een aantal bla<strong>de</strong>n, meer pasta<br />
zult moeten aanbrengen op het wiel<br />
Polijsten zon<strong>de</strong>r <strong>de</strong> mesklem<br />
• Wanneer het werkstuk te groot is voor <strong>de</strong> mesklem<br />
kunt u <strong>de</strong> steunarm (11) monteren en het werkstuk op<br />
<strong>de</strong> arm laten rusten. Dit help u bij het stabiel hou<strong>de</strong>n<br />
van het werkstuk<br />
• Schuif het mes heen en weer over <strong>de</strong> steunarm zodat<br />
het mes gelijk gepolijst wordt<br />
Het verwij<strong>de</strong>ren van <strong>de</strong> productie markeringen<br />
• Het productieproces laat af en toe markeringen achter<br />
op het zijoppervlak van mesbla<strong>de</strong>n<br />
• U kunt <strong>de</strong>ze markeringen verwij<strong>de</strong>ren door het<br />
oppervlak op <strong>de</strong> zijkant van <strong>de</strong> slijpsteen te slijpen<br />
• Oefen bij het slijpen van het mes geen extreme druk uit.<br />
Voorkom het contact tussen uw vingers en <strong>de</strong> slijpsteen<br />
• Voer <strong>de</strong>ze procedure uit voordat u mesbla<strong>de</strong>n scherp<br />
slijpt<br />
Na gebruik<br />
1. Schakel het rotatiesysteem uit door <strong>de</strong> rotatieschakel<br />
knop (10) los te draaien. Zo behoudt het aandrijfwiel <strong>de</strong><br />
juiste vorm<br />
2. Maak <strong>de</strong> waterbak leeg. De slijpsteen mag nooit in<br />
water gedompeld blijven<br />
tegenovergestel<strong>de</strong> richting getapt: linksom is vast,<br />
rechtsom is los<br />
Het vervangen van het polijst wiel<br />
Wanneer het polijstwiel versleten raakt hoort <strong>de</strong>ze<br />
vervangen te wor<strong>de</strong>n:<br />
1. Schroef <strong>de</strong> vergren<strong>de</strong>lknop (4) los en verwij<strong>de</strong>r <strong>de</strong>ze<br />
van as<br />
2. Verwij<strong>de</strong>r het versleten polijstwiel van <strong>de</strong> as, en plaats<br />
het nieuwe wiel in positie<br />
3. Draai <strong>de</strong> vergren<strong>de</strong>lknop terug vast op <strong>de</strong> as.<br />
LET OP: Draai <strong>de</strong> vergren<strong>de</strong>lknop alleen met <strong>de</strong> hand aan
GARANTIE<br />
Om uw garantie te registreren, gaat u naar onze website op<br />
www.tritontools.com* en voert u uw gegevens in.<br />
Uw gegevens wor<strong>de</strong>n opgeslagen in onze mailinglist (tenzij u<br />
an<strong>de</strong>rs aangeeft) voor informatie over nieuwe producten. De<br />
ingevul<strong>de</strong> gegevens wor<strong>de</strong>n aan geen enkele an<strong>de</strong>re partij<br />
beschikbaar gesteld<br />
AANKOOPGEGEVENS<br />
Datum van aankoop: ___ / ___ / ____<br />
Mo<strong>de</strong>l: TWSS10<br />
Bewaar uw ontvangstbewijs als bewijs van aankoop<br />
<strong>Triton</strong> Precision Power <strong>Tools</strong> garan<strong>de</strong>ert <strong>de</strong> koper<br />
van dit product dat indien een on<strong>de</strong>r<strong>de</strong>el binnen<br />
12 MAANDEN na <strong>de</strong> datum van <strong>de</strong> oorspronkelijke<br />
aankoop materiaal- of fabricagefouten vertoont,<br />
<strong>Triton</strong> het <strong>de</strong>fecte on<strong>de</strong>r<strong>de</strong>el gratis repareert of, naar<br />
eigen goedvin<strong>de</strong>n, vervangt.<br />
Deze garantie heeft geen betrekking op<br />
commercieel gebruik en strekt zich niet uit tot<br />
normale slijtage of scha<strong>de</strong> ten gevolge van een<br />
ongeluk, verkeerd gebruik of misbruik.<br />
* Registreer online binnen 30 dagen.<br />
Algemene voorwaar<strong>de</strong>n van toepassing.<br />
Dit heeft geen invloed op uw statutaire rechten<br />
NL<br />
Garantie 15
Nous vous remercions d’avoir choisi cet équipement <strong>Triton</strong>. Ces instructions contiennent les informations<br />
nécessaires au fonctionnement efficace et sûr <strong>de</strong> ce produit.<br />
Veuillez lire attentivement ce manuel pour vous assurer <strong>de</strong> tirer pleinement avantage <strong>de</strong>s caractéristiques<br />
uniques <strong>de</strong> votre nouvel équipement.<br />
Gar<strong>de</strong>z ce manuel à portée <strong>de</strong> main et assurez-vous que tous les utilisateurs l’aient lu et bien compris avant<br />
toute utilisation.<br />
TABLE DES MATIERES<br />
Caractéristiques techniques 16<br />
Nomenclature 16<br />
Consignes <strong>de</strong> sécurité 17<br />
Symboles 18<br />
Déballage 19<br />
Assemblage 19<br />
Préparation 19<br />
Mo<strong>de</strong> d’emploi 21<br />
Entretien 22<br />
Garantie 22<br />
Déclaration <strong>de</strong> conformité 44<br />
CARACTÉRISTIQUES TECHNIQUES<br />
Numéro <strong>de</strong> produit :<br />
Tension :<br />
Puissance d’entrée :<br />
TWSS10<br />
220–240 V~ 50 Hz<br />
120 W<br />
Vitesse à vi<strong>de</strong> : 125 min -1<br />
Meule :<br />
Disque <strong>de</strong> démorfilage :<br />
Alésage :<br />
Niveau sonore maxi. :<br />
Poids net :<br />
Isolation :<br />
Ø250 x 50 mm<br />
Ø230 x 30 mm<br />
Ø12 mm<br />
70 dB(A)<br />
14 kg<br />
Protection par terre<br />
F<br />
NOMENCLATURE<br />
1. Disque <strong>de</strong> démorfilage en cuir<br />
2. Plots <strong>de</strong> fixation à la verticale du bras <strong>de</strong> support<br />
3. Bouton <strong>de</strong> serrage<br />
4. Interrupteur<br />
5. Bac à eau<br />
6. Meule<br />
7. Ron<strong>de</strong>lle métallique (x 2)<br />
8. Ecrou <strong>de</strong> serrage<br />
9. Plots <strong>de</strong> fixation à l’horizontale du bras <strong>de</strong> support<br />
10. Bouton <strong>de</strong> couplage <strong>de</strong> la meule<br />
11. Bras <strong>de</strong> support<br />
12. Régulateur <strong>de</strong> hauteur du bras <strong>de</strong> support<br />
13. Bâti d’affûtage<br />
14. Prépare-meule<br />
15. Pâte d’affilage<br />
16. Clé<br />
17. Gui<strong>de</strong> d’angle<br />
16 Table <strong>de</strong>s matieres / caractéristiques techniques / Nomenclature
CONSIGNES DE SECURITE<br />
AVERTISSEMENT Veuillez lire l’intégralité <strong>de</strong>s<br />
consignes <strong>de</strong> sécurité et <strong>de</strong>s instructions. Le<br />
non-respect <strong>de</strong> ces consignes et instructions peut<br />
entraîner un risque <strong>de</strong> choc électrique, d’incendie et/<br />
ou se traduire par <strong>de</strong>s blessures graves.<br />
Veuillez conserver ces instructions et consignes<br />
<strong>de</strong> sécurité pour référence ultérieure. L’expression<br />
« appareil électrique » employée dans les présentes<br />
consignes recouvre aussi bien les appareils filaires<br />
à brancher sur le secteur que les appareils sans fils<br />
fonctionnant sous batterie.<br />
1) Sécurité sur la zone <strong>de</strong> travail<br />
a) Maintenir une zone <strong>de</strong> travail propre et bien<br />
éclairée. Des zones encombrées et mal éclairées sont<br />
sources d’acci<strong>de</strong>nts.<br />
b) Ne pas utiliser d’outils électriques dans <strong>de</strong>s<br />
environnements explosifs, tels qu’à proximité <strong>de</strong><br />
liqui<strong>de</strong>s, <strong>de</strong> gaz ou <strong>de</strong> poussières inflammables.<br />
Les appareils électriques produisent <strong>de</strong>s étincelles<br />
susceptibles d’enflammer la poussière ou les vapeurs<br />
présentes.<br />
c) Eloigner les enfants et les passants pendant<br />
l’utilisation d’un appareil électrique. Ceux-ci<br />
peuvent provoquer une perte d’attention et faire<br />
perdre la maîtrise <strong>de</strong> l’appareil.<br />
2) Sécurité électrique<br />
a) La prise d’un appareil électrique doit être adaptée<br />
à la prise du secteur. Ne jamais modifier la prise<br />
en aucune façon. Ne jamais utiliser d’adaptateur<br />
sur la prise électrique d’appareil mis à la terre.<br />
Des prises non modifiées, adaptées aux boîtiers <strong>de</strong><br />
prise <strong>de</strong> courant, réduiront le risque <strong>de</strong> décharge<br />
électrique.<br />
b) Eviter le contact corporel avec les surfaces mises<br />
à la terre telles que tuyaux, radiateurs, cuisinières<br />
et réfrigérateurs. Le risque <strong>de</strong> décharge électrique<br />
est plus important si le corps est mis à la terre.<br />
c) Ne pas exposer l’appareil électrique à la pluie ou<br />
à l’humidité. L’infiltration d’eau dans un appareil<br />
électrique accroît le risque <strong>de</strong> décharge électrique.<br />
d) Ne pas maltraiter le cordon électrique. Ne<br />
jamais utiliser le cordon électrique pour porter,<br />
tirer ou débrancher l’appareil. Protéger le<br />
cordon électrique <strong>de</strong> la chaleur, du contact<br />
avec l’essence, <strong>de</strong>s bords tranchants et pièces<br />
rotatives. Un cordon électrique endommagé ou<br />
entortillé accroît le risque <strong>de</strong> décharge électrique.<br />
e) Lors d’une utilisation <strong>de</strong> l’appareil électrique en<br />
extérieur, se servir d’une rallonge appropriée à<br />
une utilisation en extérieur. Cela réduit le risque <strong>de</strong><br />
décharge électrique.<br />
f) Si une utilisation <strong>de</strong> l’appareil électrique dans un<br />
environnement humi<strong>de</strong> ne peut être évitée, utiliser<br />
une alimentation protégée par un disjoncteur<br />
différentiel. L’utilisation d’un disjoncteur différentiel<br />
réduit le risque <strong>de</strong> décharge électrique.<br />
3) Sécurité <strong>de</strong>s personnes<br />
a) Rester vigilent et faire preuve <strong>de</strong> bon sens lors<br />
<strong>de</strong> la manipulation <strong>de</strong> l’appareil. Ne pas utiliser<br />
un appareil électrique lorsque l’on se trouve<br />
dans un état <strong>de</strong> fatigue, ou sous l’influence <strong>de</strong><br />
drogues, d’alcool ou <strong>de</strong> médicaments. Un moment<br />
d’inattention pendant l’utilisation d’un outil électrique<br />
peut se traduire par <strong>de</strong>s blessures graves.<br />
b) Porter un équipement <strong>de</strong> protection approprié.<br />
Toujours porter une protection oculaire. Le port<br />
<strong>de</strong> masque à poussières, chaussures <strong>de</strong> sécurité<br />
antidérapantes, casque <strong>de</strong> sécurité et protections<br />
antibruit adaptés aux différentes conditions <strong>de</strong> travail<br />
réduit le risque <strong>de</strong> blessures corporelles.<br />
c) Eviter tout démarrage acci<strong>de</strong>ntel. S’assurer que<br />
l’interrupteur marche-arrêt soit en position d’arrêt<br />
avant <strong>de</strong> brancher l’appareil sur l’alimentation<br />
secteur ou d’installer la batterie, <strong>de</strong> prendre<br />
l’appareil ou <strong>de</strong> le transporter. Porter un appareil<br />
électrique tout en maintenant le doigt posé sur<br />
l’interrupteur ou brancher un appareil électrique dont<br />
l’interrupteur est sur la position <strong>de</strong> marche est source<br />
d’acci<strong>de</strong>nts.<br />
d) Enlever toute clé et tout instrument <strong>de</strong> réglage<br />
avant <strong>de</strong> mettre l’appareil électrique en marche.<br />
Une clé ou un instrument <strong>de</strong> réglage laissé fixé à<br />
un élément en rotation <strong>de</strong> l’appareil électrique peut<br />
entraîner <strong>de</strong>s blessures physiques.<br />
e) Ne pas essayer d’atteindre une zone hors <strong>de</strong><br />
portée. Se tenir toujours en position stable<br />
permettant <strong>de</strong> conserver l’équilibre. Cela permet<br />
<strong>de</strong> mieux contrôler l’appareil électrique dans <strong>de</strong>s<br />
situations inattendues.<br />
f) Porter <strong>de</strong>s vêtements appropriés. Ne pas porter<br />
<strong>de</strong> vêtements amples ou <strong>de</strong>s bijoux pendants.<br />
Eloigner cheveux, vêtements et gants <strong>de</strong>s pièces<br />
en mouvement. Les vêtements amples, les bijoux<br />
pendants et cheveux longs peuvent être happés par<br />
les pièces en rotation<br />
g) Si l’appareil est pourvu <strong>de</strong> dispositifs <strong>de</strong>stinés<br />
au raccord d’équipements d’extraction et <strong>de</strong><br />
récupération <strong>de</strong> la poussière/sciure, s’assurer<br />
qu’ils soient bien fixés et utilisés correctement.<br />
L’utilisation <strong>de</strong> ces dispositifs peut réduire les risques<br />
dus à la poussière.<br />
F<br />
Consignes <strong>de</strong> securite 17
4) Utilisation et entretien <strong>de</strong>s appareils électrique<br />
a) Ne pas forcer sur l’appareil électrique. Utiliser<br />
l’appareil électrique approprié au travail à<br />
effectuer. Un appareil électrique adapté et employé au<br />
rythme pour lequel il a été conçu permettra <strong>de</strong> réaliser<br />
un travail <strong>de</strong> meilleure qualité et dans <strong>de</strong> meilleures<br />
conditions <strong>de</strong> sécurité.<br />
b) Ne pas utiliser un appareil électrique dont<br />
l’interrupteur marche-arrêt est hors service. Tout<br />
appareil électrique dont la comman<strong>de</strong> ne s’effectue<br />
plus par l’interrupteur marche-arrêt est dangereux et<br />
doit être réparé.<br />
c) Débrancher l’appareil électrique ou démonter<br />
sa batterie avant d’effectuer tout réglage ou<br />
changement d’accessoire et avant <strong>de</strong> le ranger.<br />
De telles mesures préventives réduiront les risques <strong>de</strong><br />
démarrage acci<strong>de</strong>ntel.<br />
d) Ranger les appareils électriques inutilisés hors <strong>de</strong><br />
portée <strong>de</strong>s enfants et ne pas permettre l’utilisation<br />
<strong>de</strong> cet appareil aux personnes non habituées à<br />
son maniement ou n’ayant pas lu les présentes<br />
instructions. Les appareils électriques sont dangereux<br />
dans les mains d’utilisateurs inexpérimentés.<br />
e) Veiller à l’entretien <strong>de</strong>s appareils électriques.<br />
Vérifier que les éléments rotatifs soient bien<br />
alignés et non grippés. S’assurer <strong>de</strong> l’absence <strong>de</strong><br />
pièces cassées ou endommagées susceptibles<br />
<strong>de</strong> nuire au bon fonctionnement <strong>de</strong> l'appareil.<br />
Si l’appareil électrique est endommagé, le faire<br />
réparer avant toute utilisation. De nombreux<br />
acci<strong>de</strong>nts sont dus à l’utilisation d’appareils électriques<br />
mal entretenus.<br />
f) Veiller à ce que les outils <strong>de</strong> coupe soient tenus<br />
affûtés et propres. Des outils <strong>de</strong> coupe bien<br />
entretenus, aux tranchants bien affûtés, sont moins<br />
susceptibles <strong>de</strong> se gripper et sont plus faciles à<br />
contrôler.<br />
g) Utiliser l’appareil électrique, les accessoires et<br />
outils à monter conformément à ces instructions,<br />
en tenant compte <strong>de</strong>s conditions <strong>de</strong> travail et <strong>de</strong><br />
la tâche à réaliser. Toute utilisation d’un appareil<br />
électrique autre que celle pour laquelle il a été conçu<br />
peut entraîner <strong>de</strong>s situations à risque.<br />
5) Révision<br />
a) Ne faire réparer votre appareil électrique que<br />
par un réparateur qualifié utilisant uniquement<br />
<strong>de</strong>s pièces <strong>de</strong> rechange i<strong>de</strong>ntiques. Cela permet<br />
<strong>de</strong> maintenir la sécurité d’utilisation <strong>de</strong> l’appareil<br />
électrique.<br />
F<br />
SYMBOLES<br />
PROTECTION DE L’ENVIRONNEMENT<br />
Les produits électriques usagés ne doivent<br />
pas être jetés avec les ordures ménagères.<br />
Veuillez les recycler dans les centres prévus<br />
à cet effet. Consultez les autorités locales<br />
ou votre reven<strong>de</strong>ur pour <strong>de</strong> plus amples<br />
informations.<br />
Assurez-vous <strong>de</strong> toujours porter lunettes<br />
<strong>de</strong> protection, masque respiratoire et<br />
protections antibruit<br />
Conforme à la législation et aux<br />
normes <strong>de</strong> sécurité en vigueur<br />
Ne pas utiliser avant d’avoir pris<br />
pleinement connaissance <strong>de</strong>s<br />
instructions d’utilisation.<br />
Construction <strong>de</strong> classe I<br />
(Protection par terre).<br />
18 Consignes <strong>de</strong> securite / Symboles
DEBALLAGE<br />
• Déballez le produit avec soin. Veillez à retirer tout le<br />
matériau d’emballage et familiarisez-vous avec toutes<br />
les caractéristiques du produit.<br />
• Si <strong>de</strong>s pièces sont endommagées ou manquantes,<br />
faites-les réparer ou remplacer avant d’utiliser<br />
l’appareil.<br />
IMPORTANT : retirez bien tout l’emballage protégeant le<br />
moteur avant <strong>de</strong> procé<strong>de</strong>r à l’assemblage<br />
ASSEMBLAGE<br />
MONTAGE DE LA MEULE ET DU BAC A EAU<br />
1. Insérez une ron<strong>de</strong>lle métallique (7) sur l’arbre, en vous<br />
assurant que sa collerette soit détournée du corps <strong>de</strong><br />
la machine.<br />
2. Placez la meule (6) sur l’arbre, son centre en creux<br />
étant détourné du corps <strong>de</strong> la machine (voir image).<br />
3. Installez le bac à eau (5) en l’enclipsant. Servez-vous<br />
<strong>de</strong>s points <strong>de</strong> fixation les plus appropriés par rapport<br />
à la taille <strong>de</strong> la meule pour permettre à celle-ci <strong>de</strong><br />
toujours rester sous le niveau maximum <strong>de</strong> l’eau<br />
(indiqué sur le bac : MAX WATER LEVEL).<br />
4. Insérez l’autre ron<strong>de</strong>lle métallique (7) sur l’arbre, en<br />
vous assurant que sa collerette soit tournée vers la<br />
meule.<br />
5. Serrez l’ensemble au moyen <strong>de</strong> l’écrou <strong>de</strong> serrage (8).<br />
Utilisez la clé fournie (16) pour bien serrer.<br />
1. Vérifiez que la machine ne soit pas branchée.<br />
2. Placez délicatement la machine sur le côté pour<br />
pouvoir accé<strong>de</strong>r au bloc moteur.<br />
3. Retirez tout l’emballage <strong>de</strong> l’intérieur et <strong>de</strong> l’extérieur<br />
du moteur.<br />
4. Replacez l’appareil en position verticale.<br />
REMARQUE : l’arbre présente un filetage inverse, il vous<br />
faudra donc tourner l’écrou dans le sens contraire <strong>de</strong>s<br />
aiguilles d’une montre.<br />
6. Faites tourner la meule à la main quelques fois pour<br />
vous assurer qu’elle tourne sans entrave et sans<br />
osciller.<br />
DISQUE DE DEMORFILAGE EN CUIR<br />
1. La machine présente un disque <strong>de</strong> démorfilage en cuir<br />
(1) préalablement installé.<br />
2. Avant utilisation, vérifiez que le montage du disque <strong>de</strong><br />
démorfilage soit sûr.<br />
3. Au besoin, tournez le bouton <strong>de</strong> serrage (3) dans le<br />
sens <strong>de</strong>s aiguilles d’une montre afin <strong>de</strong> le resserrer.<br />
REMARQUE : Serrez uniquement à la main.<br />
PREPARATION<br />
MISE EN PLACE DE LA MACHINE<br />
• Placez la machine sur un plan <strong>de</strong> travail soli<strong>de</strong> en vous<br />
assurant qu’elle ne soit pas bancale.<br />
• Assurez-vous <strong>de</strong> travailler dans un endroit bien éclairé<br />
et <strong>de</strong> disposer <strong>de</strong> suffisamment d’espace autour <strong>de</strong><br />
vous.<br />
REMPLISSAGE DU BAC A EAU<br />
1. Versez dans le bac à eau (5) suffisamment d’eau froi<strong>de</strong><br />
pour atteindre le niveau maximum <strong>de</strong> remplissage<br />
(MAX WATER LEVEL indiqué sur le côté du bac à eau).<br />
2. A l’usage, assurez-vous que le niveau d’eau soit<br />
toujours suffisamment haut pour maintenir la surface<br />
<strong>de</strong> la meule (6) immergée.<br />
COUPLAGE DU SYSTEME D’ENTRAINEMENT<br />
1. Serrez le bouton <strong>de</strong> couplage <strong>de</strong> la meule (10) en<br />
le faisant tourner dans le sens <strong>de</strong>s aiguilles d’une<br />
montre jusqu’à ce qu’il vienne buter contre le corps<br />
<strong>de</strong> la machine. Cela provoque le couplage au système<br />
d’entraînement.<br />
2. Après emploi, <strong>de</strong>sserrez toujours le bouton <strong>de</strong><br />
couplage <strong>de</strong> la meule pour prévenir toute déformation<br />
<strong>de</strong> la roue d’entraînement.<br />
UTILISATION DU PREPARE-MEULE<br />
Le prépare-meule (14) sert à dresser la meule pour<br />
obtenir <strong>de</strong>s grains fins ou grossiers :<br />
Pour un meulage grossier, permettant un enlèvement<br />
rapi<strong>de</strong> du métal (par exemple, pour façonner rapi<strong>de</strong>ment<br />
une lame) :<br />
• Appliquez le côté le plus grossier du prépare-meule<br />
sur la meule afin <strong>de</strong> fortement dépolir la surface <strong>de</strong> la<br />
meule.<br />
Pour un meulage fin, permettant d’affiler la lame :<br />
• Appliquez le côté lisse du prépare-meule sur la meule<br />
pour produire une surface aux grains plus fins, (grain<br />
1000), idéale pour aiguiser la lame avant <strong>de</strong> procé<strong>de</strong>r<br />
au polissage final du tranchant sur le disque <strong>de</strong><br />
démorfilage en cuir.<br />
F<br />
Deballage / Assemblage / Preparation 19
F<br />
UTILISATION DU BATI D’AFFUTAGE<br />
Fig.1<br />
Le bâti d’affûtage s’utilise<br />
conjointement au bras <strong>de</strong><br />
support (11) et au gui<strong>de</strong><br />
d’angle (17) pour disposer<br />
précisément la lame à<br />
l’angle requis au moment<br />
<strong>de</strong> l’affûtage.<br />
1. Desserrez les boutons<br />
du bâti d’affûtage (13).<br />
2. Placez la lame dans le<br />
bâti <strong>de</strong> sorte qu’un bord <strong>de</strong> la lame repose contre les<br />
butées terminales. Voir Fig. 1.<br />
3. Resserrez les boutons pour fixer la lame en place.<br />
UTILISATION DU BRAS DE SUPPORT<br />
• Il est possible d’installer le bras <strong>de</strong> support (11) pour<br />
procé<strong>de</strong>r à un meulage dans le sens <strong>de</strong> rotation <strong>de</strong> la<br />
meule, ou dans le sens inverse.<br />
• Le démorfilage doit s’effectuer UNIQUEMENT dans le<br />
sens <strong>de</strong> rotation <strong>de</strong> la meule.<br />
Pour affûter contre le sens <strong>de</strong> rotation :<br />
Fig.2<br />
1. Installez le bras <strong>de</strong><br />
support (11) dans les<br />
plots <strong>de</strong> fixation à la<br />
verticale (2).<br />
Pour affûter et démorfiler<br />
dans le sens <strong>de</strong> rotation :<br />
1. Installez le bras <strong>de</strong><br />
support (11) dans les<br />
plots <strong>de</strong> fixation à<br />
l’horizontale (9).<br />
Fig.3<br />
• Un affûtage contre<br />
le sens <strong>de</strong> rotation<br />
permet d’éliminer plus<br />
rapi<strong>de</strong>ment <strong>de</strong> gran<strong>de</strong>s<br />
quantités <strong>de</strong> matériau<br />
qu’il n’est possible en<br />
procédant dans le sens<br />
<strong>de</strong> rotation.<br />
• Un affûtage dans le<br />
sens <strong>de</strong> rotation permet un affilage très précis et<br />
est recommandé pour les outils plus affinés et au<br />
démorfilage.<br />
• Donnez-vous le temps <strong>de</strong> vous exercer et d’essayer<br />
les diverses techniques avec <strong>de</strong>s lames <strong>de</strong> différents<br />
types et différentes dimensions pour réaliser l’angle<br />
d’affûtage idéal et pour parvenir à un affûtage<br />
d’équerre par rapport à la surface <strong>de</strong> la meule.<br />
• En règle générale, pour effectuer un affûtage, placez le<br />
bras <strong>de</strong> support dans les plots <strong>de</strong> fixation à la verticale<br />
et procé<strong>de</strong>z contre le sens <strong>de</strong> rotation.<br />
• Ne placez JAMAIS le bras <strong>de</strong> support dans les plots <strong>de</strong><br />
fixation à la verticale lorsque vous utilisez le disque <strong>de</strong><br />
20<br />
Preparation<br />
démorfilage en cuir. Tout démorfilage effectué contre le<br />
sens <strong>de</strong> rotation endommagera gravement le disque <strong>de</strong><br />
démorfilage.<br />
UTILISATION DU GUIDE D’ANGLE<br />
• Le gui<strong>de</strong> d’angle (17) permet <strong>de</strong> régler la lame à l’angle<br />
d’affûtage précis.<br />
1. Montez la lame dans le bâti d’affûtage (13) et installez<br />
le bras <strong>de</strong> support dans les plots <strong>de</strong> fixation.<br />
2. Servez-vous <strong>de</strong> la jauge<br />
Fig.4<br />
angulaire située sur<br />
l’extérieur du gui<strong>de</strong><br />
d’angle pour mesurer<br />
l’angle d’inclinaison <strong>de</strong><br />
la lame.<br />
3. Desserrez le bouton<br />
<strong>de</strong> serrage situé sur le<br />
gui<strong>de</strong> d’angle et réglez<br />
le rapporteur <strong>de</strong> manière<br />
que les flèches noires soient positionnées sur la<br />
mesure indiquant le diamètre correct <strong>de</strong> la meule. Voir<br />
Fig. 5.<br />
4. Réglez ensuite l’indicateur pointu sur l’angle<br />
d’inclinaison requis <strong>de</strong> la lame (mesuré lors <strong>de</strong> l’étape<br />
2, décrite ci-<strong>de</strong>ssus) et resserrez le bouton <strong>de</strong> serrage.<br />
Voir Fig. 5.<br />
Fig.5<br />
5. Enfilez le bâti d’affûtage<br />
Bla<strong>de</strong> Bevel<br />
sur le bras <strong>de</strong> support <strong>de</strong><br />
Angle<br />
manière que la lame<br />
repose contre la meule.<br />
6. Placez la base incurvée<br />
du gui<strong>de</strong> d’angle sur la<br />
meule et la section<br />
Grindstone plate <strong>de</strong><br />
Diameter<br />
l’indicateur pointu sur<br />
la lame à<br />
affûter.<br />
7. A l’ai<strong>de</strong> du régulateur<br />
Fig.6<br />
<strong>de</strong> hauteur du bras <strong>de</strong><br />
support (12), réglez<br />
la hauteur du bras<br />
<strong>de</strong> support pour que<br />
la section plate <strong>de</strong><br />
l’indicateur pointu du<br />
gui<strong>de</strong> d’angle repose<br />
parfaitement à plat sur<br />
la lame.<br />
8. L’angle d’affûtage sera à présent correct.
MODE D’EMPLOI<br />
CONSIGNES DE SECURITE IMPORTANTES<br />
• N’employez jamais cet appareil sans porter<br />
d’équipement <strong>de</strong> sécurité complet, dont <strong>de</strong>s lunettes <strong>de</strong><br />
sécurité homologuées et une protection faciale.<br />
• Portez <strong>de</strong>s gants et manipulez toujours les lames avec<br />
soin.<br />
• Ne testez PAS l’affilage d’une lame sur votre doigt (ou<br />
toute autre partie du corps).<br />
• Vérifiez que la meule tourne sans entrave avant toute<br />
première opération.<br />
• Laissez toujours une roue neuve tourner une minute<br />
avant <strong>de</strong> l’utiliser. Placez-vous sur le côté <strong>de</strong> l’appareil<br />
au moment du démarrage.<br />
• La meule et le disque <strong>de</strong> démorfilage tournent dans<br />
le sens indiqué par la flèche située sur le <strong>de</strong>ssus<br />
<strong>de</strong> la machine, à proximité <strong>de</strong>s plots <strong>de</strong> fixation à<br />
l’horizontale.<br />
PREPARATIFS<br />
1. Préparez la machine et montez la lame à l’angle<br />
d’affûtage correct, conformément aux indications<br />
données dans la section « Préparation ».<br />
2. Dressez la meule si nécessaire.<br />
3. Vérifiez que le bac à eau soit correctement installé et<br />
bien rempli d’eau.<br />
Fig.7<br />
4. IMPORTANT : vérifiez<br />
fréquemment le niveau<br />
d’eau et rajouter <strong>de</strong><br />
l’eau si nécessaire. Ne<br />
procé<strong>de</strong>z JAMAIS à<br />
un affûtage lorsque la<br />
meule est sèche car ceci<br />
peut s’avérer dangereux.<br />
MISE SOUS TENSION<br />
1. Assurez-vous que l’interrupteur (4) soit dans la position<br />
éteinte (O).<br />
2. Branchez la machine sur le secteur.<br />
3. Pour allumer l’appareil, faites passer l’interrupteur en<br />
position (I)<br />
4. Pour l’éteindre, faites passer l’interrupteur en position<br />
(O)<br />
AFFUTAGE D’UNE LAME<br />
• Appliquez la lame sur la meule en exerçant une<br />
pression uniforme.<br />
• Faites coulisser le bâti d’affûtage d’un côté et <strong>de</strong><br />
l’autre sur le bras <strong>de</strong> support pour assurer un affûtage<br />
uniforme <strong>de</strong> la lame et une usure uniforme <strong>de</strong> la meule.<br />
• N’appuyez pas trop fort. Une légère pression suffit pour<br />
obtenir un affûtage <strong>de</strong> bonne qualité.<br />
AFFUTAGE SANS L’AIDE DU BATI D’AFFUTAGE<br />
• Si la pièce à affûter est trop grosse pour permettre<br />
l’utilisation du bâti, il est possible d’installer le bras<br />
<strong>de</strong> support (11) sur l’appareil et <strong>de</strong> s’en servir comme<br />
support pour la pièce à affûter. Placez-vous <strong>de</strong>rrière<br />
la lame. Cela vous ai<strong>de</strong>ra à mieux tenir la lame et à<br />
conserver le bon angle d’affûtage.<br />
• Déplacez la lame d’un côté et <strong>de</strong> l’autre sur la largeur<br />
<strong>de</strong> la meule pour assurer une usure uniforme <strong>de</strong> celleci<br />
et un affûtage uniforme <strong>de</strong> la lame.<br />
DEMORFILER UNE LAME<br />
• Une fois l’affûtage réalisé, utilisez le disque <strong>de</strong><br />
démorfilage en cuir pour éliminer toute bavure<br />
métallique encore présente sur la lame et pour lui<br />
donner un tranchant net.<br />
• Procé<strong>de</strong>z toujours au démorfilage d’une lame dans le<br />
sens <strong>de</strong> la rotation du disque. Ne procé<strong>de</strong>z JAMAIS<br />
contre le sens <strong>de</strong> rotation.<br />
1. Vérifiez que la machine soit débranchée avant<br />
d’entreprendre tout réglage.<br />
2. Montez le bras <strong>de</strong> support et le bâti <strong>de</strong> la manière<br />
indiquée dans la Fig. 3. Au moyen du gui<strong>de</strong> d’angle,<br />
vérifiez que l’angle <strong>de</strong> la lame est correct.<br />
3. Appliquez une quantité généreuse <strong>de</strong> pâte d’affilage<br />
(15) directement sur le disque <strong>de</strong> démorfilage en<br />
cuir (1). La pâte s’étalera sur le disque au cours du<br />
démorfilage.<br />
4. Allumez la machine et déplacez la lame sur la largeur<br />
du disque <strong>de</strong> démorfilage, en vous assurant que la<br />
lame reste en contact avec le disque sur au moins la<br />
moitié <strong>de</strong> la largeur du disque.<br />
5. Laissez le disque <strong>de</strong> démorfilage faire le plus gros du<br />
travail. N’appliquez pas <strong>de</strong> force excessive.<br />
6. De même que pour l’affûtage, déplacez le bâti d’un<br />
côté et <strong>de</strong> l’autre sur le bras <strong>de</strong> support pour garantir<br />
un démorfilage uniforme <strong>de</strong> la lame.<br />
7. Ne procé<strong>de</strong>z pas sans avoir préalablement appliqué <strong>de</strong><br />
la pâte sur le disque. Faites plusieurs applications <strong>de</strong><br />
pâte lors du démorfilage <strong>de</strong> plusieurs lames. Eteignez<br />
la machine et retirez la lame avant chaque application.<br />
DEMORFILAGE SANS L’AIDE DU BATI D’AFFUTAGE<br />
• Si la pièce à affûter est trop grosse pour permettre<br />
l’utilisation du bâti, il est possible d’installer le bras<br />
<strong>de</strong> support (11) sur l’appareil et <strong>de</strong> s’en servir comme<br />
support pour la pièce à affûter. Placez-vous <strong>de</strong>rrière<br />
la lame. Cela vous ai<strong>de</strong>ra à mieux tenir la lame et à<br />
F<br />
Mo<strong>de</strong> d'emploi 21
conserver le bon angle d’affûtage.<br />
• Déplacez la lame d’un côté et <strong>de</strong> l’autre sur la largeur<br />
du disque pour assurer un polissage uniforme.<br />
et veillez à éviter tout contact <strong>de</strong>s doigts avec la meule.<br />
• Effectuez cette étape préalablement à l’affûtage<br />
proprement dit.<br />
Enlever les imperfections <strong>de</strong> fabrication<br />
• Le processus <strong>de</strong> fabrication peut parfois laisser <strong>de</strong>s<br />
imperfections sur la section transversale <strong>de</strong> la lame.<br />
• Celles-ci peuvent s’enlever en appliquant la lame sur le<br />
pan latéral <strong>de</strong> la meule.<br />
• Déplacez lentement la section transversale <strong>de</strong> la lame<br />
à un angle approprié et confortable sur la face <strong>de</strong> la<br />
meule. N’exercez pas <strong>de</strong> pression excessive sur la lame<br />
APRES UTILISATION<br />
1. Découplez le système d’entraînement en <strong>de</strong>sserrant le<br />
bouton <strong>de</strong> couplage <strong>de</strong> la meule (10). Cela permet <strong>de</strong><br />
ne pas déformer la roue d’entraînement.<br />
2. Vi<strong>de</strong>z le bac à eau. Ne laissez pas la meule baigner<br />
dans l’eau.<br />
ENTRETIEN<br />
• Débranchez la machine <strong>de</strong> l’alimentation secteur avant<br />
toute intervention.<br />
• Gar<strong>de</strong>z la machine propre et exempte <strong>de</strong> toute<br />
accumulation <strong>de</strong> poussière et <strong>de</strong> saletés. Nettoyez<br />
l’extérieur <strong>de</strong> la machine à l’ai<strong>de</strong> d’un chiffon humi<strong>de</strong>.<br />
N’immergez jamais la machine dans <strong>de</strong> l’eau.<br />
• Vérifiez que toutes les pièces rotatives tournent sans<br />
entrave et soient en bon état.<br />
• Vérifiez que tous les écrous et boulons, notamment<br />
ceux servant au montage du disque <strong>de</strong> démorfilage<br />
et <strong>de</strong> la meule, soient bien serrés et exempts <strong>de</strong> toute<br />
usure.<br />
• Vérifiez la prise et le câble électrique pour déceler toute<br />
trace d’usure ou d’endommagement. S’ils sont abîmés,<br />
faites-les remplacer par un électricien qualifié.<br />
MEULE<br />
• Cessez d’utiliser une meule ayant reçu un coup,<br />
notamment un coup porté sur le côté <strong>de</strong> la meule.<br />
• Remplacez la meule si elle présente une fissure ou si<br />
suspectez qu’elle pourrait soudainement se fissurer.<br />
• Consultez la section « Assemblage » relativement au<br />
montage d’une nouvelle meule.<br />
L’arbre présente un filetage inversé : tournez dans le sens<br />
<strong>de</strong>s aiguilles d’une montre pour le dévisser, dans le sens<br />
contraire <strong>de</strong>s aiguilles d’une montre pour le serrer.<br />
REMPLACEMENT DU DISQUE DE DEMORFILAGE EN<br />
CUIR<br />
Le disque <strong>de</strong> démorfilage en cuir (1) doit être remplacé<br />
une fois usé ou déchiré :<br />
1. Dévissez et mettez <strong>de</strong> côté le bouton <strong>de</strong> serrage (3) ;<br />
2. Retirez <strong>de</strong> l’arbre le disque <strong>de</strong> démorfilage usé, et<br />
remplacez-le par le disque neuf ;<br />
3. Réinstallez le bouton <strong>de</strong> serrage et resserrez-le.<br />
REMARQUE : Serrez uniquement à la main.<br />
F<br />
GARANTIE<br />
Pour vali<strong>de</strong>r votre garantie, ren<strong>de</strong>z-vous sur notre site<br />
internet www.tritontools.com* et saisissez vos coordonnées.<br />
Vos coordonnées seront introduites dans notre liste <strong>de</strong><br />
diffusion (sauf indication contraire) afin <strong>de</strong> vous informer <strong>de</strong><br />
nos prochaines nouveautés. Les informations que vous nous<br />
fournirez ne seront pas communiquées à <strong>de</strong>s tiers.<br />
PENSE-BETE<br />
Date d’achat : ___ / ___ / ____<br />
Modèle : TWSS10<br />
Numéro <strong>de</strong> série :<br />
Veuillez conserver votre ticket <strong>de</strong> caisse comme preuve<br />
d’achat.<br />
22<br />
Mo<strong>de</strong> d'emploi / Entretien / Garantie<br />
Si toute pièce <strong>de</strong> ce produit s’avérait défectueuse<br />
du fait d’un vice <strong>de</strong> fabrication ou <strong>de</strong> matériau dans<br />
les 12 MOIS suivant la date d’achat, <strong>Triton</strong> Precision<br />
Power <strong>Tools</strong> s’engage auprès <strong>de</strong> l’acheteur <strong>de</strong> ce<br />
produit à réparer ou, à sa discrétion, à remplacer<br />
gratuitement la pièce défectueuse.<br />
Cette garantie ne s’applique pas à l’utilisation<br />
commerciale et ne s’étend pas non plus à<br />
l’usure normale ou aux dommages causés par<br />
<strong>de</strong>s acci<strong>de</strong>nts, <strong>de</strong>s mauvais traitements ou une<br />
utilisation impropre.<br />
* Enregistrez votre produit en ligne dans les 30<br />
jours suivant la date d’achat.<br />
Offre soumise à conditions.<br />
Ceci n’affecte pas vos droits statutaires
Vielen Dank, dass Sie sich für dieses <strong>Triton</strong>-Werkzeug entschie<strong>de</strong>n haben. Diese Anleitung enthält wichtige<br />
Informationen für das sichere und effektive Arbeiten mit diesem Produkt.<br />
Bitte lesen Sie diese Anleitung sorgfältig durch, um <strong>de</strong>n größtmöglichen Nutzen aus <strong>de</strong>m einzigartigen Design<br />
dieses Produkts ziehen zu können.<br />
Bewahren Sie diese Anleitung griffbereit auf und sorgen Sie dafür, dass alle Benutzer dieses Geräts sie gelesen<br />
und verstan<strong>de</strong>n haben.<br />
Inhalt<br />
Technische Daten 23<br />
Geräteübersicht 23<br />
Sicherheitshinweise 24<br />
Symbole 25<br />
Auspacken <strong>de</strong>s Gerätes 25<br />
Montage 26<br />
Vor Inbetriebnahme 26<br />
Bedienung 27<br />
Instandhaltung 29<br />
Garantie 29<br />
Konformitätserklärung 44<br />
Technische Daten<br />
Mo<strong>de</strong>llbezeichnung:<br />
Spannung:<br />
Nennleistung:<br />
TWSS10<br />
220–240 V~/50 Hz<br />
120 W<br />
Leerlaufdrehzahl: 125 min -1<br />
Schleifstein:<br />
Abziehscheibe:<br />
Bohrung:<br />
Max. Schallpegel:<br />
Gerätegewicht:<br />
Isolierung:<br />
Ø 250 mm x 50 mm<br />
Ø 230 mm x 30 mm<br />
Ø 12 mm<br />
70 dB(A)<br />
14 kg<br />
Schutzer<strong>de</strong><br />
Geräteübersicht<br />
1. Le<strong>de</strong>rabziehscheibe<br />
2. Senkrechte Tragarmhalter<br />
3. Feststellknopf<br />
4. Ein-/Ausschalter<br />
5. Wasserbehälter<br />
6. Schleifstein<br />
7. Metallunterlegscheibe (2 x)<br />
8. Sicherungsmutter<br />
9. Waagerechte Tragarmhalter<br />
10. Antriebskopplung<br />
11. Tragarm<br />
12. Tragarmhöhenverstellung<br />
13. Schleifführung<br />
14. Steinpräparierer<br />
15. Abziehpaste<br />
16. Schraubenschlüssel<br />
17. Winkellehre<br />
D<br />
Inhalt/Technische Daten/Geräteübersicht<br />
23
D<br />
Allgemeine Sicherheitshinweise<br />
WARNUNG! Lesen Sie alle Sicherheitshinweise<br />
und Anweisungen. Versäumnisse bei <strong>de</strong>r<br />
Einhaltung <strong>de</strong>r Sicherheitshinweise und<br />
Anweisungen können elektrischen Schlag, Brand und/<br />
o<strong>de</strong>r schwere Verletzungen verursachen.<br />
Bewahren Sie alle Sicherheitshinweise und<br />
Anweisungen für die Zukunft auf.<br />
Der in <strong>de</strong>n Sicherheitshinweisen verwen<strong>de</strong>te Begriff<br />
„Elektrowerkzeug“ bezieht sich auf netzbetriebene<br />
Elektrowerkzeuge (mit Netzkabel) und auf<br />
akkubetriebene Elektrowerkzeuge (ohne Netzkabel).<br />
1) Arbeitsplatzsicherheit<br />
a) Halten Sie Ihren Arbeitsbereich sauber und<br />
gut beleuchtet. Unordnung o<strong>de</strong>r unbeleuchtete<br />
Arbeitsbereiche können zu Unfällen führen.<br />
b) Arbeiten Sie mit <strong>de</strong>m Elektrowerkzeug nicht in<br />
explosionsgefähr<strong>de</strong>ter Umgebung, in <strong>de</strong>r sich<br />
brennbare Flüssigkeiten, Gase o<strong>de</strong>r Stäube<br />
befin<strong>de</strong>n. Elektrowerkzeuge erzeugen Funken, die<br />
<strong>de</strong>n Staub o<strong>de</strong>r die Dämpfe entzün<strong>de</strong>n können.<br />
c) Halten Sie Kin<strong>de</strong>r und an<strong>de</strong>re Personen während<br />
<strong>de</strong>r Benutzung <strong>de</strong>s Elektrowerkzeugs fern. Bei<br />
Ablenkung können Sie die Kontrolle über das Gerät<br />
verlieren.<br />
2) Elektrische Sicherheit<br />
a) Der Anschlussstecker <strong>de</strong>s Elektrowerkzeuges<br />
muss in die Steckdose passen. Der Stecker darf<br />
in keiner Weise verän<strong>de</strong>rt wer<strong>de</strong>n. Verwen<strong>de</strong>n<br />
Sie keine Adapterstecker gemeinsam mit<br />
schutzgeer<strong>de</strong>ten Elektrowerkzeugen. Unverän<strong>de</strong>rte<br />
Stecker und passen<strong>de</strong> Steckdosen verringern das<br />
Risiko eines elektrischen Schlages.<br />
b) Vermei<strong>de</strong>n Sie Körperkontakt mit geer<strong>de</strong>ten<br />
Oberflächen wie von Rohren, Heizungen, Her<strong>de</strong>n<br />
und Kühlschränken. Es besteht ein erhöhtes Risiko<br />
durch elektrischen Schlag, wenn Ihr Körper geer<strong>de</strong>t<br />
ist.<br />
c) Halten Sie Elektrowerkzeuge von Regen o<strong>de</strong>r<br />
Nässe fern. Das Eindringen von Wasser in ein<br />
Elektrowerkzeug erhöht das Risiko eines elektrischen<br />
Schlages.<br />
d) Zweckentfrem<strong>de</strong>n Sie das Kabel nicht, um das<br />
Elektrowerkzeug zu tragen, aufzuhängen o<strong>de</strong>r um<br />
<strong>de</strong>n Stecker aus <strong>de</strong>r Steckdose zu ziehen. Halten<br />
Sie das Kabel fern von Hitze, Öl, scharfen Kanten<br />
o<strong>de</strong>r sich bewegen<strong>de</strong>n Geräteteilen. Beschädigte<br />
o<strong>de</strong>r verwickelte Kabel erhöhen das Risiko eines<br />
elektrischen Schlages.<br />
e) Wenn Sie mit einem Elektrowerkzeug im Freien<br />
arbeiten, verwen<strong>de</strong>n Sie nur Verlängerungskabel,<br />
die auch für <strong>de</strong>n Außenbereich geeignet sind. Die<br />
Anwendung eines für <strong>de</strong>n Außenbereich geeigneten<br />
24 Sicherheitshinweise<br />
Verlängerungskabels verringert das Risiko eines<br />
elektrischen Schlages.<br />
f) Wenn <strong>de</strong>r Betrieb <strong>de</strong>s Elektrowerkzeuges in<br />
feuchter Umgebung nicht vermeidbar ist,<br />
verwen<strong>de</strong>n Sie einen Fehlerstromschutzschalter.<br />
Der Einsatz eines Fehlerstromschutzschalters<br />
vermin<strong>de</strong>rt das Risiko eines elektrischen Schlages.<br />
Hinweis: Der Begriff „Fehlerstromschutzschalter”<br />
wird synonym mit <strong>de</strong>n Begriffen „FI-Schutzschalter”<br />
und „FI-Schalter” verwen<strong>de</strong>t.<br />
3) Sicherheit von Personen<br />
a) Seien Sie aufmerksam, achten Sie darauf, was<br />
Sie tun, und gehen Sie mit Vernunft an die<br />
Arbeit mit einem Elektrowerkzeug. Benutzen<br />
Sie kein Elektrowerkzeug, wenn Sie mü<strong>de</strong> sind<br />
o<strong>de</strong>r unter <strong>de</strong>m Einfluss von Drogen, Alkohol<br />
o<strong>de</strong>r Medikamenten stehen. Ein Moment <strong>de</strong>r<br />
Unachtsamkeit beim Gebrauch <strong>de</strong>s Elektrowerkzeuges<br />
kann zu ernsthaften Verletzungen führen.<br />
b) Tragen Sie persönliche Schutzausrüstung und<br />
immer eine Schutzbrille. Das Tragen persönlicher<br />
Schutzausrüstung, wie Staubmaske, rutschfeste<br />
Sicherheitsschuhe, Schutzhelm o<strong>de</strong>r Gehörschutz,<br />
je nach Art und Einsatz <strong>de</strong>s Elektrowerkzeuges,<br />
verringert das Risiko von Verletzungen.<br />
c) Vermei<strong>de</strong>n Sie eine unbeabsichtigte<br />
Inbetriebnahme. Vergewissern Sie sich, dass das<br />
Elektrowerkzeug ausgeschaltet ist, bevor Sie<br />
es an die Stromversorgung und/o<strong>de</strong>r <strong>de</strong>n Akku<br />
anschließen, es aufnehmen o<strong>de</strong>r tragen. Wenn Sie<br />
beim Tragen <strong>de</strong>s Elektrowerkzeuges <strong>de</strong>n Finger am<br />
Schalter haben o<strong>de</strong>r das Gerät eingeschaltet an die<br />
Stromversorgung anschließen, kann dies zu Unfällen<br />
führen.<br />
d) Entfernen Sie Einstellwerkzeuge o<strong>de</strong>r<br />
Schraubenschlüssel, bevor Sie das<br />
Elektrowerkzeug einschalten. Ein Werkzeug o<strong>de</strong>r<br />
Schlüssel, <strong>de</strong>r sich in einem drehen<strong>de</strong>n Geräteteil<br />
befin<strong>de</strong>t, kann zu Verletzungen führen.<br />
e) Vermei<strong>de</strong>n Sie eine unnatürliche Körperhaltung.<br />
Sorgen Sie für einen sicheren Stand und halten Sie<br />
je<strong>de</strong>rzeit das Gleichgewicht. Auf diese Weise lässt<br />
sich das Elektrowerkzeug in unerwarteten Situationen<br />
besser kontrollieren.<br />
f) Tragen Sie geeignete Kleidung. Tragen Sie<br />
keine weite Kleidung o<strong>de</strong>r Schmuck. Halten Sie<br />
Haare, Kleidung und Handschuhe fern von sich<br />
bewegen<strong>de</strong>n Teilen. Lockere Kleidung, Schmuck<br />
o<strong>de</strong>r lange Haare können von sich bewegen<strong>de</strong>n Teilen<br />
erfasst wer<strong>de</strong>n.<br />
g) Wenn Staubabsaug- und -auffangeinrichtungen<br />
montiert wer<strong>de</strong>n können, vergewissern Sie<br />
sich, dass diese angeschlossen sind und<br />
richtig verwen<strong>de</strong>t wer<strong>de</strong>n. Verwendung einer
Staubabsaugung kann Gefährdungen durch Staub<br />
verringern.<br />
4) Verwendung und Behandlung <strong>de</strong>s<br />
Elektrowerkzeuges<br />
a) Überlasten Sie das Gerät nicht. Verwen<strong>de</strong>n Sie für<br />
Ihre Arbeit das dafür bestimmte Elektrowerkzeug.<br />
Mit <strong>de</strong>m passen<strong>de</strong>n Elektrowerkzeug arbeiten Sie<br />
besser und sicherer im angegebenen Leistungsbereich.<br />
b) Benutzen Sie kein Elektrowerkzeug, <strong>de</strong>ssen<br />
Schalter <strong>de</strong>fekt ist. Ein Elektrowerkzeug, das sich<br />
nicht mehr ein- o<strong>de</strong>r ausschalten lässt, ist gefährlich<br />
und muss repariert wer<strong>de</strong>n.<br />
c) Ziehen Sie <strong>de</strong>n Stecker aus <strong>de</strong>r Steckdose<br />
und/o<strong>de</strong>r entfernen Sie <strong>de</strong>n Akku, bevor Sie<br />
Geräteeinstellungen vornehmen, Zubehörteile<br />
wechseln o<strong>de</strong>r das Gerät weglegen. Diese<br />
Vorsichtsmaßnahme verhin<strong>de</strong>rt <strong>de</strong>n unbeabsichtigten<br />
Start <strong>de</strong>s Elektrowerkzeuges.<br />
d) Bewahren Sie unbenutzte Elektrowerkzeuge<br />
außerhalb <strong>de</strong>r Reichweite von Kin<strong>de</strong>rn auf. Lassen<br />
Sie Personen das Gerät nicht benutzen, die mit<br />
diesem nicht vertraut sind o<strong>de</strong>r diese Anweisungen<br />
nicht gelesen haben. Elektrowerkzeuge sind<br />
gefährlich, wenn sie von unerfahrenen Personen<br />
benutzt wer<strong>de</strong>n.<br />
e) Pflegen Sie Elektrowerkzeuge mit Sorgfalt.<br />
Kontrollieren Sie, ob bewegliche Teile einwandfrei<br />
funktionieren und nicht klemmen, ob Teile<br />
gebrochen o<strong>de</strong>r so beschädigt sind, dass die<br />
Funktion <strong>de</strong>s Elektrowerkzeuges beeinträchtigt<br />
ist. Lassen Sie beschädigte Teile vor <strong>de</strong>m Einsatz <strong>de</strong>s<br />
Gerätes reparieren. Viele Unfälle haben ihre Ursache in<br />
schlecht gewarteten Elektrowerkzeugen.<br />
f) Halten Sie Schneidwerkzeuge scharf und sauber.<br />
Sorgfältig gepflegte Schneidwerkzeuge mit scharfen<br />
Schneidkanten verklemmen sich weniger und sind<br />
leichter zu führen.<br />
g) Verwen<strong>de</strong>n Sie Elektrowerkzeug, Zubehör,<br />
Einsatzwerkzeuge usw. entsprechend diesen<br />
Anweisungen. Berücksichtigen Sie dabei die<br />
Arbeitsbedingungen und die auszuführen<strong>de</strong><br />
Tätigkeit. Der Gebrauch von Elektrowerkzeugen für<br />
an<strong>de</strong>re als die vorgesehenen Anwendungen kann zu<br />
gefährlichen Situationen führen.<br />
5) Service<br />
a) Lassen Sie Ihr Elektrowerkzeug nur von<br />
qualifiziertem Fachpersonal und nur mit Original-<br />
Ersatzteilen reparieren. Damit wird sichergestellt,<br />
dass die Sicherheit <strong>de</strong>s Elektrowerkzeuges erhalten<br />
bleibt.<br />
Symbole<br />
UMWELTSCHUTZ<br />
Elektro-Altgeräte dürfen nicht<br />
über <strong>de</strong>n Haushaltsmüll entsorgt<br />
wer<strong>de</strong>n. Bitte nach Möglichkeit über<br />
entsprechen<strong>de</strong> Einrichtungen entsorgen.<br />
Lassen Sie sich diesbezüglich von <strong>de</strong>r<br />
zuständigen Behör<strong>de</strong> o<strong>de</strong>r <strong>de</strong>m Händler<br />
beraten.<br />
Erfüllt die entsprechen<strong>de</strong>n rechtlichen<br />
Vorschriften und Sicherheitsnormen<br />
Vor Gebrauch <strong>de</strong>s Gerätes die<br />
Gebrauchsanweisung sorgfältig lesen<br />
Immer Gehör-, Augen- und Atemschutz<br />
tragen<br />
Auslegung Klasse I (Schutzer<strong>de</strong>).<br />
Auspacken <strong>de</strong>s Gerätes<br />
• Dank mo<strong>de</strong>rner Massenfertigungsverfahren ist es<br />
unwahrscheinlich, dass Ihr <strong>Triton</strong>-Elektrowerkzeug<br />
<strong>de</strong>fekt ist o<strong>de</strong>r dass ein Teil fehlt.<br />
• Falls irgen<strong>de</strong>twas nicht in Ordnung sein sollte,<br />
betreiben Sie das Werkzeug erst, nach<strong>de</strong>m die Teile<br />
ersetzt wur<strong>de</strong>n bzw. <strong>de</strong>r Fehler behoben wur<strong>de</strong>.<br />
An<strong>de</strong>rnfalls kann es zu schweren Verletzungen<br />
kommen.<br />
WICHTIGER HINWEIS: Entfernen Sie vor <strong>de</strong>r Montage die<br />
Schutzverpackung vom Motor.<br />
1. Vergewissern Sie sich, dass das Gerät vom Stromnetz<br />
getrennt ist.<br />
2. Legen Sie das Gerät vorsichtig auf die Seite, so dass<br />
Sie Zugang zum Motorraum haben.<br />
3. Entfernen Sie die schützen<strong>de</strong> Verpackung aus <strong>de</strong>m<br />
Motorbereich.<br />
4. Stellen Sie das Gerät vorsichtig wie<strong>de</strong>r auf.<br />
D<br />
Sicherheitshinweise/Symbole/Auspacken <strong>de</strong>s Gerätes 25
D<br />
Montage<br />
Schleifstein und Wasserbehälter anbringen<br />
1. Schieben Sie eine Metallunterlegscheibe (7) auf die<br />
Spin<strong>de</strong>l, wobei <strong>de</strong>r Scheibenrand vom Gerätekörper<br />
fortweisen muss.<br />
2. Setzen Sie <strong>de</strong>n Schleifstein (6) locker auf die Spin<strong>de</strong>l.<br />
Die mittige Vertiefung <strong>de</strong>s Schleifsteins muss dabei<br />
<strong>de</strong>m Gerät abgekehrt sein, wie in <strong>de</strong>r Abbildung<br />
dargestellt.<br />
3. Bringen Sie <strong>de</strong>n Wasserbehälter (5) in Position und<br />
lassen Sie ihn einrasten. Die genaue Position <strong>de</strong>s<br />
Behälters hängt von <strong>de</strong>r Größe <strong>de</strong>s Schleifsteins ab,<br />
<strong>de</strong>nn es ist darauf zu achten, dass <strong>de</strong>r Schleifstein<br />
sich frei drehen kann, aber <strong>de</strong>nnoch bis unter <strong>de</strong>n<br />
maximalen Wasserstand reicht (siehe Markierung am<br />
Wasserbehälter).<br />
4. Schieben Sie die an<strong>de</strong>re Metallunterlegscheibe (7) auf<br />
die Spin<strong>de</strong>l, wobei <strong>de</strong>r Scheibenrand zum Schleifstein<br />
zeigen muss.<br />
Vor Inbetriebnahme<br />
Standort wählen<br />
• Stellen Sie das Gerät auf einer festen Arbeitsfläche<br />
auf. Alle vier Füße müssen ganzflächig und fest auf<br />
<strong>de</strong>r Oberfläche ruhen.<br />
• Sorgen Sie dafür, dass <strong>de</strong>r Arbeitsbereich gut<br />
ausgeleuchtet ist und dass ausreichend Platz um das<br />
Gerät besteht, damit Ihnen bei <strong>de</strong>r Arbeit nichts im<br />
Weg ist.<br />
Wasserbehälter befüllen<br />
1. Füllen Sie <strong>de</strong>n Wasserbehälter (5) bis zur Markierung<br />
„MAX WATER LEVEL“ innen am Wasserbehälter mit<br />
kaltem Wasser.<br />
2. Achten Sie während <strong>de</strong>s Betriebs darauf, dass<br />
<strong>de</strong>r Wasserstand nicht zu weit absinkt, damit die<br />
Schleiffläche <strong>de</strong>s Schleifsteins (6) nass gehalten wird.<br />
Antriebssystem ankoppeln<br />
1. Ziehen Sie die Antriebskopplung (10) durch Drehen im<br />
Uhrzeigersinn an, bis sie fest gegen <strong>de</strong>n Gerätekörper<br />
anliegt. Dadurch wird das Antriebssystem<br />
angekoppelt.<br />
2. Lösen Sie nach <strong>de</strong>m Gebrauch stets die<br />
Antriebskopplung, damit das Antriebsrad sich nicht<br />
verformt.<br />
Steinpräparierer verwen<strong>de</strong>n<br />
Benutzen Sie <strong>de</strong>n Steinpräparierer (14), um die<br />
Schleifsteinoberfläche für feines o<strong>de</strong>r grobes Schleifen<br />
zu justieren:<br />
5. Ziehen Sie sie mithilfe <strong>de</strong>r Sicherungsmutter (8) fest.<br />
Verwen<strong>de</strong>n Sie <strong>de</strong>n Schraubenschlüssel (16), um sie<br />
fest anzuziehen.<br />
HINWEIS: Diese Spin<strong>de</strong>l hat ein Linksgewin<strong>de</strong>. Ziehen Sie<br />
die Mutter daher entgegen <strong>de</strong>m Uhrzeigersinn fest.<br />
6. Drehen Sie <strong>de</strong>n Schleifstein einige Umdrehungen mit<br />
<strong>de</strong>r Hand, um zu überprüfen, dass er sich frei und rund<br />
bewegt.<br />
Le<strong>de</strong>rabziehscheibe<br />
1. Das Gerät wird mit montierter Le<strong>de</strong>rabziehscheibe (1)<br />
geliefert.<br />
2. Überprüfen Sie vor Inbetriebnahme, dass die<br />
Abziehscheibe richtig sitzt und sicher befestigt ist.<br />
3. Drehen Sie zum Anziehen <strong>de</strong>n Feststellknopf (3) im<br />
Uhrzeigersinn.<br />
HINWEIS: Ziehen Sie ihn ausschließlich von Hand an.<br />
Für grobe Schleifaufgaben, d.h. zum schnellen Abtragen<br />
großer Materialmengen (z.B. Formgebung einer Schnei<strong>de</strong>):<br />
• Halten Sie die grobe Seite <strong>de</strong>s Steinpräparierers an<br />
<strong>de</strong>n Schleifstein, um die Schleiffläche aufzurauen.<br />
Für feine Schleifaufgaben, d.h. zum Schärfen <strong>de</strong>r<br />
Schnei<strong>de</strong>:<br />
• Halten Sie die glatte Seite <strong>de</strong>s Steinpräparierers an<br />
<strong>de</strong>n Schleifstein, um die Oberfläche mit einer feineren<br />
Körnung (ca. Körnung 1000) zu versehen. Dies eignet<br />
sich insbeson<strong>de</strong>re zum Schärfen <strong>de</strong>r Schnei<strong>de</strong> vor<br />
<strong>de</strong>m abschließen<strong>de</strong>n Polieren <strong>de</strong>r Schneidkante auf<br />
<strong>de</strong>r Le<strong>de</strong>rabziehscheibe.<br />
Schleifführung verwen<strong>de</strong>n<br />
Die Schleifführung wird<br />
mit <strong>de</strong>m Tragarm (11)<br />
und <strong>de</strong>r Winkellehre<br />
(17) benutzt, um die<br />
Schnei<strong>de</strong> genau in <strong>de</strong>n<br />
richtigen Winkel für <strong>de</strong>n<br />
Schärfvorgang zu bringen.<br />
1. Lockern Sie die<br />
Drehknöpfe an <strong>de</strong>r<br />
Schleifführung (13).<br />
2. Platzieren Sie die Schnei<strong>de</strong> in <strong>de</strong>r Führung, so dass<br />
eine <strong>de</strong>r bei<strong>de</strong>n Seitenkanten an <strong>de</strong>n seitlichen<br />
Anschlägen anliegt (siehe Abb. 1).<br />
3. Ziehen Sie die Drehknöpfe fest, um die Schnei<strong>de</strong> in<br />
dieser Position einzuspannen.<br />
Abb.1<br />
26 Auspacken <strong>de</strong>s Gerätes/Vor Inbetriebnahme
Tragarm verwen<strong>de</strong>n<br />
• Zum Schleifen lässt sich <strong>de</strong>r Tragarm (11) mit <strong>de</strong>r<br />
Drehrichtung o<strong>de</strong>r gegen die Drehrichtung <strong>de</strong>s<br />
Schleifsteins anbringen.<br />
• Arbeiten Sie aber beim Abziehen immer mit <strong>de</strong>r<br />
Drehrichtung.<br />
Schleifen gegen die Drehrichtung:<br />
Abb.2<br />
1. Führen Sie <strong>de</strong>n Tragarm<br />
(11) in die senkrechten<br />
Tragarmhalter (2) ein.<br />
Schleifen und Abziehen mit<br />
<strong>de</strong>r Drehrichtung:<br />
1. Führen Sie <strong>de</strong>n Tragarm<br />
(11) in die waagerechten<br />
Tragarmhalter (9) ein.<br />
• Durch Arbeiten<br />
entgegen <strong>de</strong>r<br />
Abb.3<br />
Drehrichtung lassen<br />
sich größere<br />
Materialmengen<br />
schneller abtragen<br />
als beim Schleifen in<br />
Drehrichtung.<br />
• Das Arbeiten in<br />
Drehrichtung erlaubt<br />
äußerst präzises<br />
Schärfen einer Schnei<strong>de</strong> bei feineren Werkzeugen und<br />
wird außer<strong>de</strong>m beim Abziehen verwen<strong>de</strong>t.<br />
• Lassen Sie sich Zeit und probieren Sie unterschiedliche<br />
Einstellungen mit verschie<strong>de</strong>nen Schnei<strong>de</strong>narten<br />
und -größen aus, so dass Sie <strong>de</strong>n richtigen<br />
Schliffwinkel erzielen. Vergewissern Sie sich, dass<br />
die zu schärfen<strong>de</strong> Schneidkante rechtwinklig auf <strong>de</strong>r<br />
Schleifsteinoberfläche aufliegt.<br />
• Allgemein gilt, dass <strong>de</strong>r Tragarm zum Schärfen in<br />
die senkrechten Halter eingesetzt und gegen die<br />
Drehrichtung geschärft wer<strong>de</strong>n sollte.<br />
• Setzen Sie <strong>de</strong>n Tragarm niemals in die senkrechten<br />
Halter ein, wenn die Le<strong>de</strong>rabziehscheibe benutzt<br />
wer<strong>de</strong>n soll. Ein Abziehen <strong>de</strong>r Schnei<strong>de</strong> gegen die<br />
Drehrichtung verursacht schwere Schä<strong>de</strong>n an <strong>de</strong>r<br />
Abziehscheibe.<br />
BEDIENUNG<br />
Wichtige Sicherheitshinweise<br />
• Verwen<strong>de</strong>n Sie dieses Gerät nur, wenn Sie die<br />
notwendige Sicherheitsausrüstung tragen. Dazu<br />
zählen Schutzbrille und Gesichts- o<strong>de</strong>r Staubmaske.<br />
• Ziehen Sie Schutzhandschuhe an und lassen Sie beim<br />
Umgang mit Schneidwerkzeugen stets beson<strong>de</strong>re<br />
Vorsicht walten.<br />
• Überprüfen Sie die Schärfe einer Schnei<strong>de</strong> niemals mit<br />
<strong>de</strong>m Finger o<strong>de</strong>r einem an<strong>de</strong>ren Körperteil.<br />
Winkellehre verwen<strong>de</strong>n<br />
• Verwen<strong>de</strong>n Sie die Winkellehre (17), um die Schnei<strong>de</strong><br />
genau in <strong>de</strong>n richtigen Winkel für <strong>de</strong>n Schärfvorgang zu<br />
bringen.<br />
1. Spannen Sie die Schnei<strong>de</strong> in die Schleifführung (13) ein<br />
und setzen Sie <strong>de</strong>n Tragarm in die Halter.<br />
2. Verwen<strong>de</strong>n Sie zur Bestimmung <strong>de</strong>s<br />
Schneidkantenwinkels die Messlehre außen an <strong>de</strong>r<br />
Winkellehre<br />
3. Lösen Sie das Rad an<br />
Abb.4<br />
<strong>de</strong>r Winkellehre und<br />
stellen Sie <strong>de</strong>n weißen<br />
Winkelmesser so<br />
ein, dass die kleinen<br />
schwarzen Pfeile auf die<br />
entsprechen<strong>de</strong><br />
4. Stellen Sie dann <strong>de</strong>n<br />
großen schwarzen<br />
Zeiger auf <strong>de</strong>n oben im 2.<br />
Schritt bestimmten Schliffwinkel <strong>de</strong>r Schnei<strong>de</strong> ein und<br />
ziehen Sie das Zeigerrad in dieser Stellung an (siehe<br />
Abb. 5).<br />
Abb.5<br />
5. Schieben Sie die<br />
Bla<strong>de</strong> Bevel<br />
Schleifführung auf <strong>de</strong>n<br />
Angle<br />
Tragarm, so dass die<br />
Schnei<strong>de</strong> am<br />
Schleifstein anliegt.<br />
6. Setzen Sie die<br />
abgerun<strong>de</strong>te Kante<br />
<strong>de</strong>r<br />
Grindstone<br />
Winkellehre auf <strong>de</strong>n<br />
Diameter Schleifstein<br />
und die flache Kante <strong>de</strong>s<br />
Zeigers auf die zu schärfen<strong>de</strong> Schnei<strong>de</strong> (siehe Abb. 6).<br />
7. Passen Sie die<br />
Abb.6<br />
Tragarmhöhe mithilfe <strong>de</strong>r<br />
Tragarmhöhenverstellung<br />
(12) so weit an, dass<br />
die flache Kante <strong>de</strong>s<br />
Winkellehrenzeigers<br />
vollkommen flach und<br />
bündig auf <strong>de</strong>r Schnei<strong>de</strong><br />
ruht.<br />
8. Der Schliffwinkel ist nun<br />
eingestellt.<br />
• Vergewissern Sie sich vor je<strong>de</strong>r Inbetriebnahme, dass<br />
<strong>de</strong>r Schleifstein sich frei drehen lässt.<br />
• Lassen Sie einen neuen Schleifstein vor <strong>de</strong>m Gebrauch<br />
stets einige Minuten laufen. Stellen Sie sich während<br />
<strong>de</strong>s Anlaufens seitlich zum Gerät.<br />
Gerät aufstellen<br />
1. Stellen Sie das Gerät auf und befestigen Sie<br />
die Schnei<strong>de</strong> gemäß <strong>de</strong>r Anweisung unter „Vor<br />
D<br />
Vor Inbetriebnahme/Bedienung<br />
27
D<br />
Inbetriebnahme“ im richtigen Winkel zum Schärfen.<br />
2. Justieren Sie bei Bedarf die Schleifsteinkörnung mit<br />
<strong>de</strong>m Steinpräparierer.<br />
3. Vergewissern Sie sich, dass <strong>de</strong>r Wasserbehälter richtig<br />
angebracht und mit Wasser gefüllt ist.<br />
Abb.7<br />
4. WICHTIGER HINWEIS:<br />
Überprüfen Sie <strong>de</strong>n<br />
Wasserstand in<br />
regelmäßigen Abstän<strong>de</strong>n<br />
und füllen Sie bei<br />
Bedarf Wasser nach.<br />
Versuchen Sie niemals,<br />
eine Schnei<strong>de</strong> mit<br />
einem trockenen Stein<br />
zu schärfen, da dies<br />
äußerst gefährlich sein kann.<br />
Netzanschluss<br />
1. Stellen Sie sicher, dass <strong>de</strong>r Ein-/Ausschalter (4) auf O<br />
(„Aus“) steht.<br />
2. Schließen Sie das Gerät ans Stromnetz an.<br />
3. Stellen Sie <strong>de</strong>n Ein-/Ausschalter zum Einschalten auf I<br />
(„Ein”).<br />
4. Stellen Sie <strong>de</strong>n Ein-/Ausschalter zum Ausschalten auf O<br />
(„Aus“).<br />
Schnei<strong>de</strong> schärfen<br />
• Halten Sie die Schnei<strong>de</strong> mit stetigem Druck gegen <strong>de</strong>n<br />
Schleifstein.<br />
• Lassen Sie die Schleifführung am Tragarm hin- und<br />
hergleiten, um ein gleichmäßiges Schleifergebnis<br />
und eine einheitliche Abnutzung <strong>de</strong>s Schleifsteins zu<br />
gewährleisten.<br />
• Üben Sie nicht zu starken Druck aus. Zum Schärfen ist<br />
leichter Druck völlig ausreichend.<br />
Schärfen ohne Schleifführung<br />
• Wenn das Werkstück zum Einspannen in <strong>de</strong>r<br />
Schleifführung zu groß ist, kann <strong>de</strong>r Tragarm (11)<br />
angebracht und das Werkstück auf <strong>de</strong>m Tragarm<br />
abgestützt wer<strong>de</strong>n, wobei die Schneidkante Ihnen<br />
abgekehrt sein muss. Auf diese Weise lässt sich die<br />
Schnei<strong>de</strong> besser im gewünschten Winkel halten.<br />
• Bewegen Sie die Schnei<strong>de</strong> auf <strong>de</strong>m Schleifstein hin und<br />
her, damit ein gleichmäßiges Schleifergebnis und eine<br />
einheitliche Abnutzung <strong>de</strong>s Schleifsteins erzielt wird.<br />
Schnei<strong>de</strong> abziehen<br />
• Nach <strong>de</strong>m Schärfen lassen sich mithilfe <strong>de</strong>r<br />
Le<strong>de</strong>rabziehscheibe möglicherweise vorhan<strong>de</strong>ne Grate<br />
entfernen und die Schnei<strong>de</strong> erhält eine glatte, scharfe<br />
Kante.<br />
• Ziehen Sie die Schnei<strong>de</strong> stets in Drehrichtung <strong>de</strong>r<br />
Scheibe ab. Arbeiten Sie beim Abziehen niemals gegen<br />
die Drehrichtung <strong>de</strong>r Scheibe.<br />
1. Stellen Sie sicher, dass das Gerät während <strong>de</strong>s<br />
Aufstellens vom Stromnetz getrennt ist.<br />
2. Befestigen Sie <strong>de</strong>n Tragarm und die Schleifführung<br />
gemäß Abb. 3. Überprüfen Sie <strong>de</strong>n Schneidwinkel<br />
mithilfe <strong>de</strong>r Winkellehre.<br />
3. Bringen Sie eine großzügige Menge Abziehpaste (15)<br />
direkt auf die Le<strong>de</strong>rabziehscheibe (1) auf. Durch <strong>de</strong>n<br />
Abziehvorgang wird die Paste auf <strong>de</strong>r Scheibe verteilt.<br />
4. Schalten Sie das Gerät ein und bewegen Sie die<br />
Schnei<strong>de</strong> über die Abziehscheibe. Achten Sie<br />
dabei darauf, dass min<strong>de</strong>stens die halbe Breite <strong>de</strong>r<br />
Abziehscheibe in ständigem Kontakt mit <strong>de</strong>r Schnei<strong>de</strong><br />
ist.<br />
5. Lassen Sie die Abziehscheibe die Arbeit erledigen.<br />
Üben Sie keinen übermäßigen Druck auf die Scheibe<br />
aus!<br />
6. Bewegen Sie die Schleifführung wie beim Schärfen<br />
am Tragarm entlang, damit die Schnei<strong>de</strong> gleichmäßig<br />
abgezogen wird.<br />
7. Honen Sie nicht ohne Abziehpaste auf <strong>de</strong>r Scheibe.<br />
Wenn Sie mehrere Schnei<strong>de</strong>n abziehen, muss<br />
möglicherweise mehr Paste aufgetragen wer<strong>de</strong>n.<br />
Schalten Sie das Gerät ab und entfernen Sie die<br />
Schnei<strong>de</strong>, bevor Sie weitere Paste aufbringen.<br />
Abziehen ohne Schleifführung<br />
• Wenn das Werkstück zum Einspannen in <strong>de</strong>r<br />
Schleifführung zu groß ist, kann <strong>de</strong>r Tragarm (11)<br />
angebracht und das Werkstück auf <strong>de</strong>m Tragarm<br />
abgestützt wer<strong>de</strong>n, wobei die Schneidkante Ihnen<br />
abgekehrt sein muss. Auf diese Weise lässt sich die<br />
Schnei<strong>de</strong> besser im gewünschten Winkel halten.<br />
• Bewegen Sie die Schnei<strong>de</strong> auf <strong>de</strong>m Schleifstein hin und<br />
her, damit ein gleichmäßiges Honergebnis erzielt wird.<br />
Verarbeitungsspuren entfernen<br />
• Der Herstellungsprozess hinterlässt gelegentlich<br />
unerwünschte Spuren auf <strong>de</strong>r Oberfläche <strong>de</strong>r Schnei<strong>de</strong>.<br />
• Diese Spuren lassen sich entfernen, in<strong>de</strong>m die<br />
betroffene Schneidfläche an die Seitenfläche <strong>de</strong>s<br />
Schleifsteins gehalten wird.<br />
• Führen Sie die Schneidfläche langsam über die<br />
seitliche Schleifsteinfläche. Üben Sie keinen<br />
übermäßigen Druck aus und halten Sie Ihre Finger vom<br />
Schleifstein fern.<br />
• Entfernen Sie die Verarbeitungsspuren, bevor Sie die<br />
Schnei<strong>de</strong> schärfen.<br />
28 Bedienung
Nach <strong>de</strong>m Gebrauch<br />
1. Lösen Sie das Antriebssystem, in<strong>de</strong>m Sie die<br />
Antriebskopplung (10) lockern. Hierdurch behält das<br />
Antriebsrad seine Form.<br />
2. Leeren Sie <strong>de</strong>n Wasserbehälter, <strong>de</strong>nn <strong>de</strong>r Schleifstein<br />
darf nicht im Wasser verbleiben.<br />
Instandhaltung<br />
• Trennen Sie das Gerät vom Stromnetz, bevor Sie<br />
Wartungsarbeiten durchführen.<br />
• Halten Sie das Gerät sauber und frei von Staub und<br />
Schmutz. Reinigen Sie das Gerätegehäuse mit einem<br />
feuchten Lappen. Tauchen Sie das Gerät niemals in<br />
Wasser.<br />
• Überprüfen Sie, dass alle beweglichen Teile frei laufen<br />
und sich in ordnungsgemäßem Zustand befin<strong>de</strong>n.<br />
• Vergewissern Sie sich, dass alle Muttern und<br />
Schrauben fest sitzen und nicht verschlissen sind.<br />
Das gilt insbeson<strong>de</strong>re für solche, mit <strong>de</strong>nen die<br />
Abziehscheibe und <strong>de</strong>r Schleifstein befestigt sind.<br />
• Überprüfen Sie <strong>de</strong>n Stecker und das Netzkabel auf<br />
Verschleißerscheinungen und Schä<strong>de</strong>n. Beschädigte<br />
Stecker und Kabel müssen umgehend von einem<br />
qualifizierten Elektriker ersetzt wer<strong>de</strong>n.<br />
Schleifstein<br />
• Verwen<strong>de</strong>n Sie keinen Schleifstein, <strong>de</strong>r einen Schlag<br />
erhalten hat – insbeson<strong>de</strong>re, wenn dieser seitlich auf<br />
<strong>de</strong>n Schleifstein erfolgt ist.<br />
• Ersetzen Sie einen gesprungenen o<strong>de</strong>r an<strong>de</strong>rswie<br />
mangelverdächtigen Schleifstein.<br />
• Anweisungen zum Anbringen <strong>de</strong>s Schleifsteins<br />
fin<strong>de</strong>n Sie unter „Montage”. Beachten Sie, dass die<br />
Spin<strong>de</strong>l ein Linksgewin<strong>de</strong> hat: Drehen Sie sie zum<br />
Lösen im Uhrzeigersinn und zum Anziehen gegen <strong>de</strong>n<br />
Uhrzeigersinn.<br />
Le<strong>de</strong>rabziehscheibe ersetzen<br />
Wenn die Le<strong>de</strong>rabziehscheibe (1) abgenutzt o<strong>de</strong>r<br />
eingerissen ist, muss sie ersetzt wer<strong>de</strong>n:<br />
1. Lösen Sie <strong>de</strong>n Feststellknopf (3) und legen Sie ihn<br />
beiseite.<br />
2. Nehmen Sie die verschlissene Abziehscheibe von <strong>de</strong>r<br />
Spin<strong>de</strong>l und setzen Sie die neue Scheibe auf.<br />
3. Bringen Sie <strong>de</strong>n Feststellknopf wie<strong>de</strong>r an und ziehen<br />
Sie ihn fest. HINWEIS: Ziehen Sie ihn nur von Hand an.<br />
GARANTIE<br />
Zur Anmeldung Ihrer Garantie besuchen Sie bitte unsere<br />
Website www.tritontools.com* und tragen dort Ihre<br />
persönlichen Daten ein.<br />
Ihre Angaben wer<strong>de</strong>n (wenn nicht an<strong>de</strong>rs angewiesen) in<br />
unseren elektronischen Verteiler aufgenommen, damit Sie<br />
Information über zukünftige Produkteinführungen erhalten.<br />
Die von Ihnen bereitgestellten Angaben wer<strong>de</strong>n nicht an<br />
Dritte weitergegeben.<br />
KAUFINFORMATION<br />
Kaufdatum: ___ / ___ / ____<br />
Mo<strong>de</strong>ll: TWSS10<br />
Seriennummer: ___<br />
<strong>Triton</strong> garantiert <strong>de</strong>m Käufer dieses Produkts, dass<br />
<strong>Triton</strong>, wenn sich Teile dieses Produkts innerhalb<br />
von 12 Monaten ab Originalkaufdatum infolge<br />
fehlerhafter Materialien o<strong>de</strong>r Arbeitsausführung<br />
als <strong>de</strong>fekt erweisen, das mangelhafte Teil nach<br />
eigenem Ermessen entwe<strong>de</strong>r kostenlos reparieren<br />
o<strong>de</strong>r ersetzen wird.<br />
Diese Garantie gilt nicht für kommerzielle<br />
Verwendung und erstreckt sich nicht auf normalen<br />
Verschleiß o<strong>de</strong>r Schä<strong>de</strong>n infolge von Unfall,<br />
Missbrauch o<strong>de</strong>r unsachgemäßer Verwendung.<br />
*Bitte registrieren Sie sich innerhalb von 30 Tagen<br />
nach <strong>de</strong>m Kauf online.<br />
Es gelten die allgemeinen Geschäftsbedingungen.<br />
Ihre gesetzlich festgelegten Rechte wer<strong>de</strong>n dadurch<br />
nicht eingeschränkt.<br />
D<br />
Bedienungsanweisung / Instandhaltung / Garantie<br />
29
Grazie per aver acquistato questo utensile <strong>Triton</strong>. Queste istruzioni contengono informazioni utili<br />
per il funzionamento sicuro ed affidabile <strong>de</strong>l prodotto.<br />
Per essere sicuri di utilizzare al meglio il potenziale <strong>de</strong>ll'utensile si raccomanda pertanto di leggere a fondo<br />
questo manuale.<br />
Conservare il manuale in modo che sia sempre a portata di mano e accertarsi che l'operatore <strong>de</strong>ll'elettroutensile<br />
lo abbia letto e capito a pieno.<br />
INDICE<br />
Caratteristiche tecniche 30<br />
Familiarizzazione 30<br />
Istruzioni per la sicurezza 31<br />
Simboli 32<br />
Disimballaggio 32<br />
Montaggio 33<br />
Preparazione 33<br />
Istruzioni per l'uso 35<br />
Manutenzione 36<br />
Garantie 36<br />
Caratteristiche tecniche<br />
Numero parte:<br />
Tensione:<br />
Potenza in ingresso:<br />
TWSS10<br />
220 – 240 V ~ 50 Hz<br />
120 W<br />
Velocità a vuoto: 125 min -1<br />
Mola:<br />
Mola in cuoio:<br />
Classe di isolamento:<br />
Peso netto:<br />
Livello sonoro max.:<br />
Ø250 x 50 mm<br />
Ø230 x 30 mm<br />
terra protettiva<br />
14 kg<br />
70 dB(A)<br />
I<br />
Familiarizzazione<br />
1. Mola in cuoio<br />
2. Supporti verticali per braccio di support<br />
3. Pomello di blocco<br />
4. interruttore On / Off<br />
5. Trogolo d'acqua<br />
6. Mola<br />
7. Ron<strong>de</strong>lla in metallo (x2)<br />
8. Dado di chiusura<br />
9. Montaggio orizzontale per braccio di supporto<br />
10. Manopola d’ingaggio ruota<br />
11. braccio di supporto<br />
12. Regolatore altezza <strong>de</strong>l support braccio<br />
13. Piazza di affilatura<br />
14. Livellatrice pietra<br />
15. Composto levigatura<br />
16. Chiave<br />
17. Guida ad angolo<br />
30<br />
Indice / Caratteristiche Tecniche / Familiarizzazione
Norme generali di sicurezza<br />
AVVERTENZA: Leggere ed assimilare tutte<br />
le istruzioni. La non osservanza <strong>de</strong>lle seguenti<br />
istruzioni può causare scosse elettriche, incendi<br />
e/o lesioni gravi.<br />
Conservare tutte le avvertenze di pericolo e le<br />
istruzioni operative per ogni esigenza futura.<br />
Il termine “elettroutensile” si riferisce all’utensile a<br />
rete fissa (con filo) o un utensile a batteria (senza filo).<br />
1. Area di lavoro.<br />
a. Mantenere l’area di lavoro pulita e a<strong>de</strong>guatamente<br />
illuminata. Il disordine e le zone di lavoro non<br />
illuminate possono essere fonte di inci<strong>de</strong>nti.<br />
b. Non usare gli elettroutensili in presenza di<br />
atmosfere esplosive, come liquidi, gas e polveri<br />
infiammabili. Gli elettroutensili producono scintille<br />
che potrebbero accen<strong>de</strong>re le polveri o i fumi.<br />
c. Tenere altre persone e i bambini a distanza di<br />
sicurezza durante l’impiego <strong>de</strong>ll’utensile elettrico.<br />
Eventuali distrazioni potrebbero far per<strong>de</strong>re il controllo<br />
<strong>de</strong>ll’utensile all’operatore.<br />
2. Sicurezza elettrica<br />
a. Le spine <strong>de</strong>gli elettroutensili <strong>de</strong>vono essere<br />
compatibili con le prese di corrente.<br />
Non modificare in alcun modo la spina<br />
<strong>de</strong>ll’elettroutensile. Non usare adattatori con gli<br />
elettroutensili dotati di collegamento di messa<br />
a terra. L’uso <strong>de</strong>lle spine originali non modificate e<br />
<strong>de</strong>lle prese corrispon<strong>de</strong>nti ridurrà il rischio di scosse<br />
elettriche.<br />
b. Evitare il contatto <strong>de</strong>l corpo con le superfici<br />
collegate a massa come i tubi, i radiatori, le<br />
cucine e i frigoriferi. Se il corpo <strong>de</strong>ll’operatore è<br />
collegato alla terra o alla massa il rischio di scosse<br />
elettriche è maggiore.<br />
c. Non esporre gli elettroutensili alla pioggia e non<br />
lasciarli in ambienti umidi o bagnati. L’ingresso<br />
<strong>de</strong>ll’acqua in una macchina utensile aumenta il rischio<br />
di scosse elettriche.<br />
d. Non usare il cavo in modo improprio. Non afferrare<br />
mai il cavo per trasportare, tirare o staccare<br />
l’elettroutensile dalla presa di corrente. Tenere il<br />
cavo lontano da fonti di calore, olio, e sostanze<br />
affini, bordi appuntiti o parti in movimento. I cavi<br />
danneggiati o attorcigliati aumentano il rischio di<br />
scosse elettriche.<br />
e. Qualora si voglia usare l’utensile all’aperto, usare<br />
cavi di prolunga compatibili con l’uso in ambienti<br />
esterni. Un cavo idoneo all’uso in ambienti esterni<br />
riduce il rischio di scosse elettriche.<br />
f. Se l’utilizzo di un elettroutensile in ambiente umido<br />
è inevitabile, utilizzare una fonte di alimentazione<br />
protetta da un dispositivo differenziale. L’uso di un<br />
dispositivo differenziale riduce notevolmente il rischio<br />
di scosse elettriche.<br />
NOTA : Il termine "dispositivo di corrente residua<br />
(RCD)" può essere sostituita dal termine "circuito<br />
di guasto a terra (GFCI) "o" dispersione a terra<br />
interruttore (ELCB) ".<br />
3. Sicurezza personale<br />
a. Quando si usa un elettroutensile lavorare sempre<br />
con la massima attenzione e concentrazione,<br />
lasciandosi guidare dal buon senso. Non usare<br />
mai un elettroutensile quando si è stanchi o sotto<br />
l’effetto di medicinali e/o sostanze alcoliche o<br />
stupefacenti. Quando si usa un elettroutensile un<br />
attimo di distrazione è sufficiente a causare gravi<br />
lesioni alle persone.<br />
b. Usare dispositivi per la protezione personale.<br />
Indossare sempre protezioni per gli occhi. I<br />
dispositivi per la sicurezza personale, come le<br />
mascherine antipolvere, le calzature di sicurezza<br />
antiscivolo, il casco e la cuffia, se usati in maniera<br />
appropriata, riducono i rischi di lesioni alle persone.<br />
c. Evitare l’avviamento acci<strong>de</strong>ntale. Garantire che<br />
l’interruttore è in posizione arresto (OFF) prima<br />
di attaccare la presa. Trasportare gli elettroutensili<br />
con il dito al di sopra <strong>de</strong>ll’interruttore o attaccando<br />
l’elettroutensile con l’interruttore acceso, aumenta il<br />
rischio di acci<strong>de</strong>nti.<br />
d. Rimuovere tutte le chiavi di regolazione e le chiavi<br />
inglesi prima di accen<strong>de</strong>re l’elettroutensile. Una<br />
chiave inglese o una chiave di regolazione collegata a<br />
una parte in movimento <strong>de</strong>ll’elettroutensile potrebbe<br />
causare lesioni alle persone.<br />
e. Non andare oltre l’altezza consentita. In qualsiasi<br />
momento mantenere i piedi poggiati su superfici<br />
soli<strong>de</strong> e un punto di appoggio sicuro. Un buon<br />
equilibrio consente di avere il massimo controllo<br />
sull’elettroutensile nelle situazioni inaspettate.<br />
f. Vestirsi con abbigliamento a<strong>de</strong>guato. Non indossare<br />
abiti larghi o gioielli. Tenere i capelli, vestiti e guanti<br />
lontano da parti in movimento.<br />
g. Se il dispositivo utilizzato è dotato di bocchetta<br />
per l’aspirazione <strong>de</strong>lla polvere accertarsi che sia<br />
collegato e utilizzato correttamente. L’uso di tali<br />
dispositivi riduce i rischi correlati alle polveri.<br />
4. Maneggio ed impiego accurato di utensili elettrici<br />
a. Non forzare l’elettroutensile. Usare sempre<br />
l’elettroutensile corretto per il lavoro da eseguire.<br />
L’elettroutensile corretto sarà in grado di svolgere il<br />
lavoro in modo più efficiente e sicuro nell’ambito <strong>de</strong>lla<br />
gamma di potenza indicata.<br />
I<br />
Norme generali di sicurezza 31
. Non usare l’elettroutensile se l’interruttore<br />
di accensione non si accen<strong>de</strong> e si spegne. Gli<br />
elettroutensili con un interruttore di accensione<br />
difettoso sono pericolosi e <strong>de</strong>vono essere riparati<br />
immediatamente.<br />
c. Staccare la spina dalla presa di corrente prima<br />
di effettuare qualsiasi regolazione, sostituire gli<br />
accessori o riporre gli attrezzi a motore. Queste<br />
misure di sicurezza preventive riducono il rischio di<br />
avvio involontario.<br />
d. Conservare l’elettroutensile fuori dalla portata<br />
<strong>de</strong>i bambini e non lasciare che venga utilizzato<br />
da persone non a<strong>de</strong>guatamente ad<strong>de</strong>strate e<br />
competenti nell’uso <strong>de</strong>gli elettroutensili o che<br />
non abbiano letto questo manuale di istruzioni. Gli<br />
elettroutensili diventano estremamente pericolosi nelle<br />
mani di persone non ad<strong>de</strong>strate.<br />
e. Mantenere gli elettroutensili. Controllare per<br />
disallineamento o la legatura <strong>de</strong>lle parti in<br />
movimento, la rottura di parti e altre condizioni che<br />
possono influire il funzionamento <strong>de</strong>ll’apparecchio.<br />
In caso di danneggiamento, fare riparare prima<br />
<strong>de</strong>ll’uso. Molti inci<strong>de</strong>nti sono causati da una scarsa<br />
manutenzione <strong>de</strong>ll’utensile.<br />
f. Mantenere le lame pulite e affilate. Gli utensili da<br />
taglio tenuti in buone condizioni operative e con i bordi<br />
taglienti affilati sono meno soggetti a bloccarsi e più<br />
facili da controllare.<br />
g. Utilizzare l’elettroutensile e tutti i componenti e gli<br />
accessori in conformità con le istruzioni di questo<br />
manuale e nella maniera prevista per ciascun<br />
tipo di utensile, tenendo conto <strong>de</strong>lle condizioni<br />
lavorative e <strong>de</strong>l compito da eseguire. L’utilizzo<br />
<strong>de</strong>gli elettroutensili per fini diversi da quelli previsti<br />
rappresenta un rischio per le persone.<br />
5. Assistenza<br />
a. Qualsiasi intervento sull’elettroutensile <strong>de</strong>ve<br />
essere eseguito da personale qualificato<br />
utilizzando unicamente pezzi di ricambio<br />
compatibili e approvati. Ciò garantisce la sicurezza<br />
<strong>de</strong>ll’utensile elettrico.<br />
SIMBOLI<br />
PROTEZIONE AMBIENTALE<br />
Il simbolo <strong>de</strong>l cestino barrato<br />
indica che il prodotto, una volta<br />
diventato inservibile, non <strong>de</strong>ve essere<br />
gettato tra i rifiuti domestici ma conferito<br />
ad un centro di raccolta differenziata per<br />
apparecchi elettrici ed elettronici oppure<br />
riconsegnato al rivenditore al momento<br />
<strong>de</strong>ll’acquisto di apparecchio sostitutivo.<br />
Indossare sempre protezioni per gli occhi e per<br />
le vie respiratorie.<br />
Il prodotto è conforme alle vigenti<br />
normative e norme di sicurezza<br />
applicabili<br />
Nota nelle istruzioni.<br />
Costruzione <strong>de</strong>lla classe I (terra protettiva).<br />
I<br />
Disimballaggio<br />
• Togliere con cura l’utensile dallo scatolo. Verificare<br />
di averlo disimballato completamente. Acquisire la<br />
necessaria familiarità con tutte le parti/funzionalità<br />
<strong>de</strong>ll’utensile.<br />
• In caso di parti mancanti o danneggiate, sarà<br />
necessario far riparare o sostituire tali parti prima di<br />
utilizzare il prodotto.<br />
IMPORTANTE: Rimuovere imballaggio protettivo intorno<br />
al motore prima <strong>de</strong>l montaggio<br />
1. Assicurarsi che l'apparecchio non è collegato<br />
all'alimentazione.<br />
2. Appoggiare con cautela la macchina su un lato per<br />
ottenere l'accesso alla cavità motore.<br />
3. Rimuovere imballaggio protettivo <strong>de</strong>ntro e intorno al<br />
motore.<br />
4. Posizionare attentamente l’unità in posizione vertical.<br />
32<br />
Norme generali di sicurezza / Simboli / Disimballaggio
MONTAGGIO<br />
Montare la mola e trogolo d’acqua<br />
1. Posizionare una ron<strong>de</strong>lla di metallo (7) al di sopra il<br />
mandrino con il bordo <strong>de</strong>lla ron<strong>de</strong>lla rivolto via dalla<br />
macchina<br />
2. Posizionare la mola (6) liberamente sul perno, con il<br />
centro <strong>de</strong>presso <strong>de</strong>lla mola rivolto verso il corpo <strong>de</strong>lla<br />
macchina (come mostrato nell'immagine)<br />
3. Allega il trogolo d’acqua (5) in posizione. Utilizzare la<br />
posizione di fissaggio appropriati per adattarsi alle<br />
dimensioni di mola per garantire che la pietra è libera<br />
di ruotare ma che raggiunga ancora di sotto il livello<br />
<strong>de</strong>ll'acqua massimo (indicato sul trogolo)<br />
4. Posizionare l'altra ron<strong>de</strong>lla metallica (7) al di sopra il<br />
mandrino con il bordo <strong>de</strong>lla ron<strong>de</strong>lla contro la mola<br />
5. Fissare con il dado di bloccaggio (8). Utilizzate la<br />
chiave (16) in dotazione per fissare saldamente.<br />
NOTA: Questo mandrino ha un filo retromarcia, girare<br />
il dado in senso antiorario per fissare<br />
6. Ruotare la mola a mano pochi giri per garantire che si<br />
muove liberamente e con precisione<br />
Mola di levigatura in cuoio<br />
1. L'unità è fornita con la mola in cuoio (1) gia montata<br />
2. Prima <strong>de</strong>ll'uso, controllare che la mola è saldamente<br />
fissata in posizione<br />
3. Ruotare la manopola di bloccaggio (3) in senso orario<br />
per stringere.<br />
NOTA: Serrare solo a mano<br />
Preparazione<br />
Ubicazione <strong>de</strong>ll'unità<br />
• Posizionare l'unità su una superficie di lavoro solida,<br />
con tutti e quattro i piedi posizionati in modo sicuro e<br />
in modo uniforme sulla superficie<br />
• Assicurarsi che l'area di lavoro è a<strong>de</strong>guatamente<br />
illuminato, e che ci sia spazio sufficiente intorno l'unità<br />
e che non ci siano ostacoli<br />
Riempimento <strong>de</strong>ll'acqua<br />
1. Riempi il trogolo di acqua (5) con acqua fredda fino al<br />
segno “MAX WATER LEVEL” (Livello di acqua max) sul<br />
lato <strong>de</strong>lla vasca d'acqua<br />
2. Quando è in uso, assicurarsi che il livello <strong>de</strong>ll'acqua<br />
è sempre sufficiente per mantenere la superficie<br />
rettifica <strong>de</strong>lla mola (6) bagnata<br />
Ingaggiando il sistema di azionamento<br />
1. Stringere la manopola di ingaggio ruota (10) in senso<br />
orario fino a che non è stretto contro il corpo <strong>de</strong>lla<br />
macchina. In questo modo ingaggiare il sistema di<br />
azionamento<br />
2. Dopo l'uso, sempre allentare la manopola di ingaggio<br />
ruota. Ciò contribuirà a garantire che la ruota<br />
mantiene la sua forma corretta<br />
Utilizzando la livellatrice pietra<br />
Utilizzare la livellatrice pietra (14) per rivestire la<br />
superficie <strong>de</strong>lla mola per la macinazione fini o grossolani:<br />
Per la sgrossatura, per rimuovere una gran<strong>de</strong> quantità<br />
di materiale rapidamente (ad esempio, per formare una<br />
lama):<br />
• Applicare la parte grossa <strong>de</strong>lla livellatrice pietra sulla<br />
mola per irruvidire la superficie di rettifica<br />
Per la macinazione fine, per affilare la lama:<br />
• Applicare la parte liscia <strong>de</strong>lla livellatrice pietra alla<br />
mola per fornire una superficie grana più fina, di<br />
circa 1000 graniglia, i<strong>de</strong>ale per affilare la lama, in<br />
preparazione per la lucidatura finale <strong>de</strong>l tagliente sulla<br />
ruota di levigatura in cuoio<br />
Utilizzando la piazza di affilatura<br />
Per uso con il braccio di<br />
Fig.1<br />
supporto (11) e guida ad<br />
angolo (17) per impostare<br />
la lama esattamente<br />
all’angolo corretto per<br />
l’affilatura<br />
1. Allentare le manopole<br />
sulla piazza di affilatura<br />
(13)<br />
2. Posizionare la lama nella piazza in modo che un lato<br />
<strong>de</strong>lla lama è posizionata contro I fermi di arresto. Vedi<br />
Fig. 1<br />
3. Serrare le manopole per fissare la lama in posizione<br />
Utilizzando il braccio di supporto<br />
• Il braccio di supporto (11) può essere fissato per la<br />
rettifica con o contro il senso di rotazione <strong>de</strong>lla mola<br />
• levigatura <strong>de</strong>ve essere SOLO eseguita CON la<br />
direzione di rotazione<br />
Per la rettifica contro il senso di rotazione:<br />
1. Posizionare il braccio di supporto (11) sui supporti<br />
verticali (2)<br />
I<br />
Montaggio / Preparazione<br />
33
Fig.2<br />
Per la rettifica e la<br />
levigatura con il senso di<br />
rotazione:<br />
1. Posizionare il braccio<br />
di supporto (11) sui<br />
supporti orizzontali (9)<br />
• Lavorare contro il<br />
senso di rotazione<br />
rimuove grandi quantità<br />
di materiale più<br />
Fig.3<br />
velocemente rispetto a<br />
lavorare con<br />
il senso di rotazione.<br />
• Lavorare con il senso<br />
di rotazione può essere<br />
utilizzato per l’affilatura<br />
più precisa di una<br />
lama per gli strumenti<br />
più fini e viene<br />
utilizzato per la levigatura<br />
• Pren<strong>de</strong>te il vostro tempo e praticare il montaggio<br />
con vari tipi e dimensioni di lame in modo che si può<br />
ottenere il corretto angolo di affilatura e garantire la<br />
lama di essere affilata è quadrata su tutta la superficie<br />
<strong>de</strong>lla mola<br />
• In generale, per l'affilatura, posizionare il braccio di<br />
supporto nei supporti verticali e affinare contro il senso<br />
di rotazione<br />
• Non posizionare il braccio di supporto nei supporti<br />
verticali quando usando la ruota a levigatura in<br />
cuoio. Cercando di affinare la lama contro il senso di<br />
rotazione provoca gravi danni alla ruota di levigatura<br />
4. Poi impostare il puntatore all'angolo di smusso<br />
richiesto sulla lama (come misurata alla 2 da fase)<br />
e stringere la manopola di blocco per bloccare in<br />
posizione. Vedi Fig. 5<br />
5. Infilare la piazza<br />
d’affilatura sul braccio<br />
<strong>de</strong>l supporto in modo<br />
che la lama sia<br />
appoggiata alla mola<br />
6. Posizione il pie<strong>de</strong><br />
curvato <strong>de</strong>lla guida<br />
ad angolo sulla mola<br />
e la parte piatta <strong>de</strong>l<br />
puntatore sulla lama da<br />
affilare.<br />
Vedi Fig. 6<br />
7. Utilizzare il regolatore altezza <strong>de</strong>l support braccio (12)<br />
per regolare l'altezza <strong>de</strong>l braccio di supporto fino a<br />
quando la parte piatta sul puntatore <strong>de</strong>lla guida ad<br />
angolo si trova perfettamente piana sulla lama<br />
8. L'angolo di rettifica sarà ora corretto<br />
Fig.6<br />
I<br />
Utilizzando la guida angolo<br />
• Utilizzare la guida ad angolo (17) per impostare la lama<br />
esattamente al corretto angolo di affilatura Fig.4<br />
1. Montare la lama nella<br />
piazza di afilatura (13) e<br />
posizionare il braccio di<br />
supporto nel l’inserto di<br />
supporto<br />
2. Utilizzare l'indicatore<br />
sulla parte esterna<br />
<strong>de</strong>lla guida angolare<br />
per misurare l'angolo<br />
smusso <strong>de</strong>lla lama.<br />
Fig.5<br />
3. Allentare la manopola di<br />
bloccaggio sulla guida<br />
Bla<strong>de</strong> Bevel<br />
ad angolo e regolare il<br />
Angle<br />
goniometro in modo che<br />
le frecce nere sono<br />
allineati con la<br />
marcatura corretta sul<br />
diametro mola<br />
Grindstone<br />
(vedi Fig. 5)<br />
Diameter<br />
34<br />
Preparazione
Istruzioni per l'uso<br />
Note importanti sulla sicurezza<br />
• Non usare mai l'apparecchio senza indossare tutte le<br />
attrezzature necessarie di sicurezza, tra cui occhiali di<br />
sicurezza approvati e mascherine antipolvere<br />
• Indossare guanti e maneggiare con cura le lame in<br />
ogni momento<br />
• NON esaminare la niti<strong>de</strong>zza di una lama sul dito (o<br />
altra parte <strong>de</strong>l corpo)<br />
• Controllare che la mola ruota liberamente ogni volta<br />
prima di avviare lo strumento<br />
• Lasciare sempre una nuova ruota di correre per un<br />
minuto prima di utilizzarla. Stare da un lato all'avvio<br />
<strong>de</strong>ll’utensile<br />
Impostazione<br />
1. Impostare l'unità e montare la lama con la giusta<br />
angolazione per l'affilatura, in conformità con la guida<br />
in 'Preparazione'<br />
2. Vestire la mola, come necessario<br />
3. Controllare il trogolo di acqua sia correttamente<br />
montato e riempito con acqua<br />
Fig.7<br />
4. IMPORTANTE:<br />
Controllare il livello<br />
<strong>de</strong>ll'acqua a intervalli<br />
regolari e rabboccare<br />
se necessario. MAI<br />
cercare di affilare una<br />
lama quando la pietra<br />
è asciutta, può essere<br />
pericoloso farlo<br />
Collegare all'alimentazione<br />
1. Garantire che l’interruttore On/Off (4) è in (O) in<br />
posizione OFF<br />
2. Collegare l'unità alla rete elettrica<br />
3. Per accen<strong>de</strong>re, premere l'interruttore on/off in<br />
posizione ON (I)<br />
4. Per spegnere, premere il tasto on/off in posizione OFF<br />
(O)<br />
Affilatura senza la piazza dii affilatura a<br />
bordo quadrato<br />
• Se il pezzo è troppo gran<strong>de</strong> per montare la piazza, è<br />
possibile adattare il braccio di supporto (11) e poggiare<br />
il pezzo di lavoro sul supporto, con il bordo che punta<br />
lontano da voi. Questo vi aiuterà a tenere ferma la<br />
lama con l'angolazione richiesta<br />
• Spostare la lama avanti e indietro attraverso la pietra<br />
per assicurare una rettifica uniforme sulla lama e un<br />
usura costante <strong>de</strong>lla pietra<br />
La levigatura di una lama<br />
• Dopo l'affilatura, utilizzando la ruota di levigatura in<br />
cuoio consente di eliminare ogni bava e dare un bordo<br />
liscio tagliente <strong>de</strong>lla lama<br />
• Sempre affinare una lama nella direzione di rotazione<br />
<strong>de</strong>lla ruota. MAI affinare contro la direzione <strong>de</strong>lla ruota<br />
1. Assicurarsi che la macchina sia scollegata<br />
dall'alimentazione durante l’impostazione<br />
2. Impostare il braccio di supporto e piazza come<br />
mostrato in figura 3. Utilizzare la guida ad angolo per<br />
controllare l'angolo di lama sia corretta<br />
3. Applicare una generosa quantità <strong>de</strong>l composto di<br />
levigatura (15) direttamente alla ruota di levigatura<br />
in cuoio (1). La levigatura distribuirà il composto<br />
attraverso la ruota<br />
4. Accen<strong>de</strong>re la macchina e passare la lama sulla faccia<br />
<strong>de</strong>lla ruota di levigatura, garantendo che almeno<br />
la metà <strong>de</strong>lla larghezza <strong>de</strong>lla ruota di levigatura sia<br />
sempre in contatto con la lama<br />
5. Lasciare che la ruota di levigatura complete il suo<br />
lavoro. Non applicare una forza eccessiva alla ruota<br />
6. Come per l'affilatura, spostare la piazza avanti e<br />
indietro lungo il braccio di supporto per assicurare una<br />
levigatura costante <strong>de</strong>lla lama<br />
7. Non affinare senza il composto di levigatura sulla<br />
ruota. Se affinando un certo numero di lame, può<br />
essere necessario applicare più composto. Spegnere<br />
la macchina e rimuovere la lama prima di applicare il<br />
composto<br />
Affilare una lama<br />
• Applicare lama alla mola con una pressione uniforme<br />
• Far scorrere la piazza di affilatura avanti e indietro<br />
lungo il braccio di supporto per assicurare anche<br />
rettifica sulla lama e anche l'usura uniforme <strong>de</strong>lla<br />
pietra<br />
• Non fare pressione. Una leggera pressione è tutto ciò<br />
che è richiesto per l'affilatura<br />
Levigatura senza la piazza di affilatura<br />
• Se il pezzo è troppo gran<strong>de</strong> per montare la piazza, è<br />
possibile adattare il braccio di supporto (11) e poggiare<br />
il pezzo di lavoro sul supporto, con il bordo che punta<br />
lontano da voi. Questo vi aiuterà a tenere ferma la<br />
lama con l'angolazione richiesta<br />
• Spostare la lama avanti e indietro attraverso la ruota<br />
per garantire, una lucidatura liscia attraverso la lama<br />
I<br />
Istruzioni per L'uso<br />
35
Rimozione <strong>de</strong>i imperfezioni di ingegneria<br />
• Il processo di produzione lascia a volte le lame con<br />
imperfezioni d’ingegneria sulla superficie <strong>de</strong>lla sezione<br />
trasversale (o 'faccia') <strong>de</strong>lla lama<br />
• È possibile rimuovere questi applicando il volto<br />
danneggiato <strong>de</strong>lla lama sul viso lato <strong>de</strong>lla pietra<br />
• Spostare il volto <strong>de</strong>lla lama sulla faccia <strong>de</strong>lla pietra.<br />
Non applicare una forza eccessiva, ed evitare che le<br />
dita entrano in contatto con la mola<br />
• Eseguire questa procedura, prima di affilare la lama<br />
Dopo l'uso<br />
1. Disinserire il sistema di azionamento allentando la<br />
manopola d’ingaggio ruota (10). Ciò contribuirà a<br />
garantire che la ruota di guida mantiene forma perfetta<br />
2. Svuotare il trogolo d’acqua. Non lasciare in piedi la<br />
mola in acqua<br />
Manutenzione<br />
• Staccare la macchina dalla rete elettrica prima di<br />
effettuare qualsiasi intervento di manutenzione<br />
• Tenere l'unità pulita e libera da polvere e <strong>de</strong>triti. Pulire<br />
l'esterno <strong>de</strong>ll'apparecchio con un panno umido. Non<br />
immergere mai l'apparecchio in acqua<br />
• Verificare che tutte le parti di movimento si muovano<br />
liberamente e sono in buone condizioni<br />
• Verificare che tutti i dadi e bulloni, in particolare<br />
quelli mantenendo la ruota a levigatura e mola,<br />
siano agganciati correttamente e che sono in buone<br />
condizioni<br />
• Controllare la spina e cavo di alimentazione per segni<br />
di usura o danneggiamento. Se danneggiati, sostituirli<br />
presso un elettricista qualificato<br />
Mola<br />
• Non utilizzare una mola che ha ricevuto un duro colpo,<br />
soprattutto al lato <strong>de</strong>lla pietra<br />
• Sostituire una pietra rotta o una pietra sospetta<br />
• Ve<strong>de</strong>re 'montaggio' sulla guida <strong>de</strong>l montaggio di una<br />
pietra. Si noti che il mandrino ha il filetto al contrario:<br />
girare in senso orario per allentare, in senso antiorario<br />
per stringere<br />
Sostituzione <strong>de</strong>lla ruota in cuoio<br />
Se la ruota di levigatura in cuoio (1) si consuma o si<br />
strappa, <strong>de</strong>ve essere sostituita:<br />
1. Svitare e mettere da parte la manopola di bloccaggio<br />
(3)<br />
2. Rimuovere la ruota consumata dal mandrino e<br />
posizionare una ruota nuova al suo posto<br />
3. Rimontare la manopola di bloccaggio e stringere.<br />
NOTA: Serrare solo a mano<br />
I<br />
GARANZIA<br />
Per la registrazione <strong>de</strong>lla garanzia visitare il sito web www.<br />
tritontools.com* e inserire i propri <strong>de</strong>ttagli.<br />
A meno che il proprietario non abbia specificato<br />
diversamente, i suoi <strong>de</strong>ttagli saranno inclusi nella lista di<br />
distribuzione che sarà utilizzata per inviare regolarmente<br />
informazioni sulle novità <strong>Triton</strong>. I dati personali raccolti<br />
saranno trattati con la massima riservatezza e non saranno<br />
rilasciati a terze parti.<br />
KAUFINFORMATION<br />
Data di acquisto: ___ / ___ / ____<br />
Mo<strong>de</strong>llo N.: TWSS10<br />
Numero di serie: __________________<br />
Conservare lo scontrino come prova <strong>de</strong>ll’acquisto<br />
<strong>Triton</strong> Precision Power tools garantisce al<br />
proprietario di questo prodotto che se dovessero<br />
essere riscontrati difetti di materiali o lavorazione<br />
entro 12 MESI dalla data <strong>de</strong>ll’acquisto originale,<br />
effettuerà gratuitamente la riparazione o, a propria<br />
discrezione, la sostituzione <strong>de</strong>i componenti difettosi.<br />
Questa garanzia non è applicabile per l’uso<br />
commerciale <strong>de</strong>ll’utensile ed esclu<strong>de</strong> la normale<br />
usura o i danni causati all’utensile da inci<strong>de</strong>nti, uso<br />
improprio, abusi o alterazioni.<br />
* Registrati on-line entro 30 giorni.<br />
Condizioni di applicazione.<br />
Questa garanzia non pregiudica in alcun modo i<br />
diritti <strong>de</strong>l consumatore stabiliti dalla legge.<br />
36<br />
Istruzioni per L'uso / Manutenzione / Garanzia
Gracias por haber elegido esta herramienta <strong>Triton</strong>. Estas <strong>instrucciones</strong> contienen la información necesaria para<br />
un funcionamiento seguro y eficaz <strong>de</strong> este producto.<br />
Lea este manual atentamente para asegurarse <strong>de</strong> obtener todas las ventajas <strong>de</strong> las características únicas <strong>de</strong> su<br />
nuevo equipo.<br />
Conserve este manual a mano y asegúrese <strong>de</strong> que todos los usuarios <strong>de</strong> la herramienta lo hayan leído y<br />
entendido<br />
INDICE<br />
Características técnicas 37<br />
Nomenclatura 37<br />
Seguridad 38<br />
Símbolos 39<br />
Desembalaje 39<br />
Montaje 40<br />
Preparación 40<br />
Instrucciones <strong>de</strong> uso 42<br />
Mantenimiento 43<br />
Garantía 43<br />
Declaración <strong>de</strong> conformidad 44<br />
Características técnicas<br />
Número <strong>de</strong> producto:<br />
Tensión:<br />
Potencia <strong>de</strong> entrada:<br />
TWSS10<br />
220 – 240 V ~ 50 Hz<br />
120 W<br />
Velocidad en vacío: 125 min -1<br />
Muela <strong>de</strong> afilar:<br />
Muela <strong>de</strong> asentar:<br />
Agujero:<br />
Nivel sonoro máximo:<br />
Peso neto:<br />
Aislamiento:<br />
Ø 250 x 50 mm<br />
Ø 230 x 30 mm<br />
Ø 12 mm<br />
70 dB(A)<br />
14 kg<br />
protección a tierra<br />
Nomenclatura<br />
1. Muela <strong>de</strong> asentar <strong>de</strong> cuero<br />
2. Soportes verticales para el brazo <strong>de</strong> soporte<br />
3. Perilla <strong>de</strong> enganche<br />
4. Interruptor <strong>de</strong> encendido/apagado<br />
5. Ban<strong>de</strong>ja <strong>de</strong> agua<br />
6. Muela <strong>de</strong> afilar<br />
7. Aran<strong>de</strong>la <strong>de</strong> metal (x2)<br />
8. Tuerca <strong>de</strong> bloqueo<br />
9. Soportes horizontales para el brazo <strong>de</strong> soporte<br />
10. Perilla <strong>de</strong> bloqueo<br />
11. Brazo <strong>de</strong> soporte<br />
12. Ajustador <strong>de</strong> altura <strong>de</strong>l brazo <strong>de</strong> soporte<br />
13. Soporte para accesorios<br />
14. Rectificador <strong>de</strong> muelas abrasivas<br />
15. Pasta para afilar<br />
16. Llave<br />
17. Guía <strong>de</strong> ángulo<br />
E<br />
Indice / Caracteristicas Tecnicas / Nomenclatura<br />
37
E<br />
Seguridad<br />
ADVERTENCIA Lea todas las advertencias<br />
<strong>de</strong> seguridad e <strong>instrucciones</strong>. El no respetar<br />
estas advertencias e <strong>instrucciones</strong> pue<strong>de</strong> causar<br />
<strong>de</strong>scargas eléctricas, incendios y/o lesiones graves.<br />
Conserve estas advertencias e <strong>instrucciones</strong> para<br />
referencia futura.<br />
La expresión “herramienta eléctrica” en todas la<br />
advertencias se refiera a su herramienta eléctrica<br />
alimentada por la red eléctrica (herramienta<br />
alámbrica) o su herramienta eléctrica alimentada por<br />
baterías (herramienta inalámbrica).<br />
1) Seguridad en el área <strong>de</strong> trabajo<br />
a) Mantenga el área <strong>de</strong> trabajo limpia y bien<br />
iluminada. Las áreas <strong>de</strong>sor<strong>de</strong>nadas y oscuras invitan<br />
a que se produzcan acci<strong>de</strong>ntes.<br />
b) No maneje herramientas eléctricas en atmósferas<br />
explosivas, como por ejemplo en presencia<br />
<strong>de</strong> líquidos, gases o polvos inflamables. Las<br />
herramientas eléctricas producen chispas que pue<strong>de</strong>n<br />
incendiar el polvo o los vapores.<br />
c) Mantenga alejados a los niños y a las personas<br />
que estén presentes mientras esté trabajando<br />
con una herramienta eléctrica. Las distracciones<br />
pue<strong>de</strong>n hacerle per<strong>de</strong>r el control <strong>de</strong> la herramienta.<br />
2) Seguridad eléctrica<br />
a) El enchufe <strong>de</strong> la herramienta eléctrica <strong>de</strong>be<br />
coincidir con el tomacorriente. No modifique<br />
nunca el enchufe <strong>de</strong> ninguna manera. No utilice<br />
ningún enchufe adaptador con herramientas<br />
eléctricas puestas a tierra. Los enchufes no<br />
modificados y los tomacorrientes coinci<strong>de</strong>ntes<br />
reducirán el riesgo <strong>de</strong> <strong>de</strong>scargas eléctricas.<br />
b) Evite el contacto <strong>de</strong>l cuerpo con superficies<br />
puestas a tierra tales como tuberías, radiadores,<br />
estufas y refrigeradores. El riesgo <strong>de</strong> <strong>de</strong>scarga<br />
eléctrica se incrementa si su cuerpo está puesto a<br />
tierra.<br />
c) No exponga las herramientas eléctricas a la<br />
lluvia o la humedad. La entrada <strong>de</strong> agua en una<br />
herramienta eléctrica aumentará el riesgo <strong>de</strong><br />
<strong>de</strong>scargas eléctricas.<br />
d) No maltrate el cable <strong>de</strong> alimentación. No use<br />
nunca el cable <strong>de</strong> alimentación para transportar<br />
la herramienta eléctrica, tirar <strong>de</strong> ella o<br />
<strong>de</strong>senchufarla. Mantenga el cable <strong>de</strong> alimentación<br />
alejado <strong>de</strong> fuentes <strong>de</strong> calor, <strong>de</strong>l aceite, <strong>de</strong> los<br />
bor<strong>de</strong>s afilados o <strong>de</strong> las piezas móviles. Los cables<br />
<strong>de</strong> alimentación dañados o enredados aumentan el<br />
riesgo <strong>de</strong> <strong>de</strong>scargas eléctricas.<br />
e) Cuando utilice una herramienta eléctrica en el<br />
exterior, use un cable <strong>de</strong> extensión a<strong>de</strong>cuado<br />
para uso en exteriores. La utilización <strong>de</strong> un cable<br />
a<strong>de</strong>cuado para exteriores reduce el riesgo <strong>de</strong><br />
<strong>de</strong>scargas eléctricas.<br />
38 Seguridad<br />
f) Si es inevitable trabajar con una herramienta<br />
eléctrica en lugares húmedos, use un suministro<br />
protegido por un dispositivo <strong>de</strong> corriente residual<br />
(RCD). El uso <strong>de</strong> un RCD reduce el riesgo <strong>de</strong><br />
<strong>de</strong>scargas eléctricas.<br />
3) Seguridad personal<br />
a) Manténgase alerta, fíjese en lo que está haciendo<br />
y use el sentido común cuando esté utilizando una<br />
herramienta eléctrica. No use una herramienta<br />
eléctrica si se encuentra cansado o bajo la<br />
influencia <strong>de</strong> drogas, alcohol o medicamentos.<br />
Un momento <strong>de</strong> distracción mientras esté utilizando<br />
una herramienta eléctrica pue<strong>de</strong> provocar lesiones<br />
corporales graves.<br />
b) Use equipo <strong>de</strong> protección individual. Use siempre<br />
protección ocular. El uso <strong>de</strong> equipamientos <strong>de</strong><br />
seguridad tales como máscara antipolvo, calzado <strong>de</strong><br />
seguridad anti<strong>de</strong>slizante, casco duro y protecciones<br />
auditivas a<strong>de</strong>cuadas reducirá el riesgo <strong>de</strong> lesiones<br />
corporales.<br />
c) Evite el arranque acci<strong>de</strong>ntal. Asegúrese <strong>de</strong> que el<br />
interruptor está en la posición <strong>de</strong> apagado antes<br />
<strong>de</strong> enchufar la herramienta. Si se transportan<br />
las herramientas con el <strong>de</strong>do en el interruptor o<br />
se enchufan con el interruptor en la posición <strong>de</strong><br />
encendido, se invita a que se produzcan acci<strong>de</strong>ntes.<br />
d) Quite toda llave <strong>de</strong> ajuste o <strong>de</strong> tuercas antes <strong>de</strong><br />
encen<strong>de</strong>r la herramienta eléctrica. Una llave <strong>de</strong><br />
tuercas o <strong>de</strong> ajuste que se ha <strong>de</strong>jado colocada en una<br />
parte móvil <strong>de</strong> la herramienta eléctrica pue<strong>de</strong> causar<br />
lesiones corporales.<br />
e) No adopte posturas forzadas. Manténgase en<br />
posición firme y en equilibrio en todo momento.<br />
De este modo, podrá controlar mejor la herramienta<br />
eléctrica en situaciones inesperadas.<br />
f) Vístase a<strong>de</strong>cuadamente. No lleve ropa holgada<br />
ni joyas. Mantenga el pelo, la ropa y los guantes<br />
alejados <strong>de</strong> las piezas móviles. La ropa holgada, las<br />
joyas o el pelo largo pue<strong>de</strong>n quedar atrapados en las<br />
piezas móviles.<br />
g) Si se proporcionan dispositivos para la conexión<br />
<strong>de</strong> sistemas <strong>de</strong> extracción y recolección <strong>de</strong> polvo,<br />
asegúrese <strong>de</strong> que estén conectados y se usen<br />
correctamente. El uso <strong>de</strong> estos dispositivos pue<strong>de</strong><br />
reducir los peligros relacionados con el polvo.<br />
4) Uso y cuidado <strong>de</strong> las herramientas eléctricas<br />
a) No fuerce la herramienta eléctrica. Use la<br />
herramienta eléctrica correcta para el trabajo a<br />
realizar. La herramienta correcta funcionará mejor<br />
y con más seguridad a la velocidad para la que se ha<br />
diseñado.
) No use la herramienta eléctrica si el interruptor no<br />
la encien<strong>de</strong> ni la apaga. Toda herramienta eléctrica<br />
que no se pueda controlar con el interruptor es<br />
peligrosa y <strong>de</strong>be ser reparada.<br />
c) Desconecte el enchufe <strong>de</strong> la fuente <strong>de</strong> alimentación<br />
y/o el paquete <strong>de</strong> batería <strong>de</strong> la herramienta antes<br />
<strong>de</strong> realizar cualquier ajuste, cambio <strong>de</strong> accesorios<br />
o almacenamiento <strong>de</strong> la herramienta eléctrica.<br />
Estas medidas <strong>de</strong> seguridad preventivas reducen<br />
el riesgo <strong>de</strong> arranque acci<strong>de</strong>ntal <strong>de</strong> la herramienta<br />
eléctrica.<br />
d) Guar<strong>de</strong> las herramientas eléctricas que no esté<br />
usando fuera <strong>de</strong>l alcance <strong>de</strong> los niños y no <strong>de</strong>je que<br />
personas que no estén familiarizadas con ellas o<br />
estas <strong>instrucciones</strong> las utilicen. Las herramientas<br />
eléctricas son peligrosas en manos <strong>de</strong> usuarios que no<br />
hayan recibido capacitación.<br />
e) Mantenga sus herramientas eléctricas. Revise que<br />
no haya piezas en movimiento mal alineadas o<br />
trabadas, piezas rotas o cualquier otra condición<br />
que pueda afectar el funcionamiento <strong>de</strong> la<br />
herramienta eléctrica. Si encuentra daños, haga<br />
reparar la herramienta eléctrica antes <strong>de</strong> utilizarla.<br />
Muchos acci<strong>de</strong>ntes son causados por herramientas<br />
eléctricas que carecen <strong>de</strong> un mantenimiento a<strong>de</strong>cuado.<br />
f) Mantenga las herramientas <strong>de</strong> corte afiladas y<br />
limpias. Las herramientas <strong>de</strong> corte con bor<strong>de</strong>s <strong>de</strong><br />
corte afilados son menos propensas a trabarse y son<br />
más fáciles <strong>de</strong> controlar.<br />
g) Utilice la herramienta eléctrica, los accesorios y<br />
las brocas etc. <strong>de</strong> acuerdo con estas <strong>instrucciones</strong><br />
y <strong>de</strong> la forma prevista para el tipo específico <strong>de</strong><br />
herramienta eléctrica, teniendo en cuenta las<br />
condiciones <strong>de</strong> trabajo y el trabajo a realizar. El uso<br />
<strong>de</strong> la herramienta eléctrica para operaciones distintas<br />
<strong>de</strong> aquellas para las que fue diseñada podría causar<br />
une situación peligrosa.<br />
5) Servicio y reparaciones<br />
a) Haga que su herramienta eléctrica reciba<br />
servicio <strong>de</strong> un técnico <strong>de</strong> reparaciones calificado,<br />
utilizando únicamente piezas <strong>de</strong> recambio<br />
idénticas. Esto asegurará que se mantenga la<br />
seguridad <strong>de</strong> la herramienta eléctrica.<br />
SIMBOLOS<br />
PROTECCIÓN MEDIOAMBIENTAL<br />
Los productos eléctricos usados no se <strong>de</strong>ben<br />
mezclar con la basura casera. Están sujetos<br />
al principio <strong>de</strong> recogida selectiva. Solicite<br />
información a su ayuntamiento o distribuidor<br />
sobre las opciones <strong>de</strong> reciclaje.<br />
Siempre lleve protección auditiva, protección<br />
ocular y respiratoria.<br />
Conforme a las normas <strong>de</strong> seguridad y a la<br />
legislación correspondientes<br />
No utilizar el producto antes <strong>de</strong> haber leído y<br />
entendido el manual <strong>de</strong>l usuario.<br />
Fabricación <strong>de</strong> Clase I (protección a tierra).<br />
DESEMBALAJE<br />
• Desembale e inspeccione la herramienta con<br />
cuidado. Familiarícese con todas sus características y<br />
funciones.<br />
• Asegúrese <strong>de</strong> que el embalaje contiene todas las<br />
partes y que están en buenas condiciones. Si faltan<br />
piezas o están dañadas, solicite su sustitución antes<br />
<strong>de</strong> utilizar esta herramienta.<br />
IMPORTANTE: retire el embalaje <strong>de</strong> protección que está<br />
alre<strong>de</strong>dor <strong>de</strong>l motor antes <strong>de</strong> proce<strong>de</strong>r al montaje.<br />
1. Asegúrese <strong>de</strong> que el aparato no está conectado a la<br />
fuente <strong>de</strong> alimentación.<br />
2. Ponga la máquina <strong>de</strong> lado con cuidado para tener<br />
acceso a la cavidad <strong>de</strong>l motor.<br />
3. Retire el embalaje <strong>de</strong> protección <strong>de</strong> <strong>de</strong>ntro y alre<strong>de</strong>dor<br />
<strong>de</strong>l motor.<br />
4. Con cuidado, coloque el aparato en posición vertical.<br />
E<br />
Seguridad / Simbolos / Desembalaje 39
E<br />
MONTAJE<br />
Colocación <strong>de</strong> la muela <strong>de</strong> afilar y <strong>de</strong> la<br />
ban<strong>de</strong>ja <strong>de</strong> agua<br />
1. Coloque una aran<strong>de</strong>la <strong>de</strong> metal (7) sobre el husillo, la<br />
corona mirando al lado opuesto <strong>de</strong> la máquina.<br />
2. Coloque la muela <strong>de</strong> afilar (6) holgadamente sobre el<br />
husillo, con el centro <strong>de</strong>primido <strong>de</strong> la muela <strong>de</strong> afilar<br />
mirando al lado opuesto <strong>de</strong> la máquina (como se<br />
muestra en la imagen).<br />
3. Sujete la ban<strong>de</strong>ja <strong>de</strong> agua (5) en posición. Utilice la<br />
posición <strong>de</strong> fijación a<strong>de</strong>cuada al tamaño <strong>de</strong> la muela<br />
<strong>de</strong> afilar para asegurarse <strong>de</strong> que la muela <strong>de</strong> afilar<br />
pueda girar libremente aún llegando por <strong>de</strong>bajo <strong>de</strong>l<br />
nivel <strong>de</strong> agua máximo (según se indica en la ban<strong>de</strong>ja:<br />
MAX WATER LEVEL).<br />
4. Coloque la segunda aran<strong>de</strong>la <strong>de</strong> metal (7) sobre el<br />
husillo, su corona <strong>de</strong> cara a la muela <strong>de</strong> afilar.<br />
5. Asegure con la tuerca <strong>de</strong> bloqueo (8). Utilice la llave<br />
(16) suministrada para asegurar firmemente.<br />
PREPARACIÓN<br />
EMPLAZAMIENTO DEL APARATO<br />
• Coloque el aparato sobre una superficie sólida, con las<br />
cuatro patas firmemente y uniformemente colocadas<br />
sobre la superficie.<br />
• Asegúrese <strong>de</strong> que el área <strong>de</strong> trabajo esté<br />
a<strong>de</strong>cuadamente iluminada, y <strong>de</strong> que haya suficiente<br />
espacio alre<strong>de</strong>dor <strong>de</strong>l aparato para que no haya<br />
obstáculos.<br />
COMO LLENAR LA BANDEJA DE AGUA<br />
1. Llene la ban<strong>de</strong>ja <strong>de</strong> agua (5) con agua fría hasta la<br />
marca que indica el nivel máximo <strong>de</strong> agua (MAX<br />
WATER LEVEL) en el lado <strong>de</strong> la ban<strong>de</strong>ja <strong>de</strong> agua.<br />
2. Durante su uso, asegúrese <strong>de</strong> que el nivel <strong>de</strong> agua<br />
siempre sea suficiente para mantener la superficie <strong>de</strong><br />
la muela <strong>de</strong> afilar (7) húmeda.<br />
COMO ACCIONAR EL SISTEMA DE TRANSMISIÓN<br />
1. Apriete la perilla <strong>de</strong> bloqueo (10) girando en sentido<br />
horario hasta que que<strong>de</strong> bien apretada contra el<br />
cuerpo <strong>de</strong> la máquina. Esto activará el sistema <strong>de</strong><br />
transmisión.<br />
2. Después <strong>de</strong> su uso, siempre afloje la perilla <strong>de</strong><br />
bloqueo. Esto ayudará a asegurar que la rueda <strong>de</strong><br />
tracción conserva su forma correcta.<br />
Como utilizar el rectificador <strong>de</strong> muelas<br />
abrasivas<br />
Utilice el rectificador <strong>de</strong> muelas abrasivas (14) para<br />
preparar la superficie <strong>de</strong> la muela <strong>de</strong> afilar para una<br />
afilado suave o más profundo.<br />
NOTA: Este husillo tiene una rosca inversa, gire la<br />
tuerca en sentido en contra <strong>de</strong> las agujas <strong>de</strong>l reloj para<br />
asegurarlo.<br />
6. Girar la muela <strong>de</strong> afilar a mano un par <strong>de</strong> vueltas<br />
para asegurarse <strong>de</strong> que se mueve libremente y con<br />
precisión.<br />
MUELA DE ASENTAR DE CUERO<br />
1. El aparato se suministra equipado con una muela <strong>de</strong><br />
asentar <strong>de</strong> cuero (1).<br />
2. Antes <strong>de</strong> su uso, compruebe que la muela <strong>de</strong> asentar<br />
esté bien sujeta en su sitio.<br />
3. Gire la perilla <strong>de</strong> enganche (3) en sentido <strong>de</strong> las agujas<br />
<strong>de</strong>l reloj para apretar.<br />
NOTA: Apriete a mano solamente<br />
Para un afilado más profundo, para eliminar una gran<br />
cantidad <strong>de</strong> material <strong>de</strong> forma rápida (por ejemplo, para<br />
dar forma a una hoja):<br />
• Aplicar el lado áspero <strong>de</strong>l rectificador <strong>de</strong> muelas<br />
abrasivas a la muela <strong>de</strong> afilar para que la superficie <strong>de</strong><br />
afilado sea más áspera<br />
Si se <strong>de</strong>sea una afilado suave, para afilar la hoja:<br />
• Aplique la parte lisa <strong>de</strong>l rectificador <strong>de</strong> muelas<br />
abrasivas a la muela para proporcionar una superficie<br />
<strong>de</strong> grano <strong>de</strong> abrasividad suave, aprox. con grano <strong>de</strong><br />
1000, i<strong>de</strong>al para el afilado <strong>de</strong> la hoja en la preparación<br />
para el pulido final <strong>de</strong>l bor<strong>de</strong> cortante en la muela <strong>de</strong><br />
asentar <strong>de</strong> cuero<br />
COMO UTILIZAR EL SOPORTE PARA ACCESORIOS<br />
Para su uso con el brazo<br />
Fig.1<br />
<strong>de</strong> soporte (11) y la guía<br />
<strong>de</strong> ángulo (17) para fijar la<br />
hoja en el ángulo correcto<br />
para el afilado:<br />
1. Afloje las perillas <strong>de</strong>l<br />
soporte para accesorios<br />
(13).<br />
2. Coloque la hoja en el<br />
soporte para accesorios para que uno <strong>de</strong> los bor<strong>de</strong>s<br />
<strong>de</strong> la hoja esté colocado contra los topes. Vea la Fig. 1,<br />
abajo.<br />
3. Apretar las perillas para fijar la hoja en la posición<br />
40<br />
Montaje / Preparacion
COMO UTILIZAR EL BRAZO DE SOPORTE<br />
• Se pue<strong>de</strong> colocar el brazo <strong>de</strong> soporte (11) para un<br />
afilado con o en contra <strong>de</strong>l sentido <strong>de</strong> giro <strong>de</strong> la muela<br />
<strong>de</strong> afilar.<br />
• El asentado SÓLO <strong>de</strong>be llevarse a cabo EN la dirección<br />
<strong>de</strong> la rotación.<br />
Para realizar un afilado en contra <strong>de</strong>l sentido <strong>de</strong> giro:<br />
Fig.2<br />
1. Coloque el brazo <strong>de</strong><br />
soporte (11) sobre los<br />
soportes verticales (2)<br />
Para un afilado y asentado<br />
en la dirección <strong>de</strong> giro:<br />
1. Coloque el brazo <strong>de</strong><br />
soporte (11) en los<br />
soportes horizontales<br />
(9).<br />
• La técnica <strong>de</strong> trabajar<br />
Fig.3<br />
en contra <strong>de</strong> la<br />
dirección <strong>de</strong> rotación<br />
elimina gran<strong>de</strong>s<br />
cantida<strong>de</strong>s <strong>de</strong> material<br />
más rápidamente que<br />
cuando se trabaja con<br />
la dirección <strong>de</strong> rotación.<br />
• Se pue<strong>de</strong> utilizar la<br />
técnica <strong>de</strong> trabajar<br />
con la dirección <strong>de</strong> rotación para un afilado preciso <strong>de</strong><br />
una hoja para herramientas más <strong>de</strong>licadas, y para el<br />
asentado.<br />
• Tómese su tiempo y practique la preparación <strong>de</strong> la<br />
máquina con diversos tipos y tamaños <strong>de</strong> hojas <strong>de</strong><br />
modo que usted pueda conseguir el ángulo correcto<br />
<strong>de</strong> afilado y garantizar que la hoja a ser afilada esté<br />
encuadrada sobre la superficie <strong>de</strong> la muela <strong>de</strong> afilar.<br />
• En general, para el afilado, coloque el brazo <strong>de</strong> soporte<br />
en los soportes verticales y realice el afilado en contra<br />
<strong>de</strong>l sentido <strong>de</strong> giro.<br />
• NUNCA coloque el brazo <strong>de</strong> soporte en los soportes<br />
verticales cuando se utiliza la muela <strong>de</strong> asentar <strong>de</strong><br />
cuero. Asentar la hoja en contra <strong>de</strong> la dirección <strong>de</strong><br />
rotación pue<strong>de</strong> causar daños graves a la muela <strong>de</strong><br />
asentar.<br />
COMO UTILIZAR LA GUÍA DE ÁNGULO<br />
• Utilice la guía <strong>de</strong> ángulo (17) para fijar la hoja en el<br />
ángulo correcto para el afilado:<br />
1. Monte la hoja en el soporte para accesorios (13) y<br />
coloque el brazo <strong>de</strong> soporte en el soporte.<br />
2. Utilice el medidor en el<br />
exterior <strong>de</strong> la guía <strong>de</strong><br />
ángulo para medir el<br />
ángulo <strong>de</strong>l bisel <strong>de</strong> la<br />
hoja. Vea la Fig. 4<br />
3. Afloje la perilla <strong>de</strong><br />
bloqueo en la guía<br />
<strong>de</strong> ángulo y ajuste el<br />
transportador para que<br />
las flechas negras están<br />
alineadas con la marca <strong>de</strong> diámetro correcta <strong>de</strong> la<br />
muela <strong>de</strong> afilar (ver Fig. 5).<br />
4. A continuación,<br />
establezca el puntero en<br />
Bla<strong>de</strong> Bevel<br />
el ángulo <strong>de</strong> bisel <strong>de</strong> la<br />
Angle<br />
hoja requerido (según lo<br />
medido en el paso 2,<br />
arriba) y apriete la perilla<br />
<strong>de</strong> bloqueo para<br />
bloquear en su posición.<br />
Grindstone<br />
Vea la Fig. 5.<br />
Diameter<br />
5. Pase el soporte para accesorios a través <strong>de</strong>l brazo <strong>de</strong><br />
soporte para que la hoja se apoye contra la muela <strong>de</strong><br />
afilar<br />
6. Coloque el pie curvo <strong>de</strong><br />
la guía <strong>de</strong> ángulo sobre<br />
la muela <strong>de</strong> afilar y la<br />
parte plana <strong>de</strong>l puntero<br />
sobre la hoja a afilarse.<br />
Vea Fig. 6.<br />
7. Utilice el ajustador <strong>de</strong><br />
altura <strong>de</strong>l brazo <strong>de</strong><br />
soporte (12) para ajustar<br />
la altura <strong>de</strong>l brazo <strong>de</strong><br />
soporte hasta la parte plana en la guía <strong>de</strong> ángulo <strong>de</strong>l<br />
puntero que<strong>de</strong> totalmente plana en la hoja.<br />
8. El ángulo <strong>de</strong> afilado ahora será correcto.<br />
Fig.4<br />
Fig.5<br />
Fig.6<br />
E<br />
Preparacion<br />
41
E<br />
INSTRUCCIONES DE USO<br />
OBSERVACIONES IMPORTANTES SOBRE LA<br />
SEGURIDAD<br />
• No utilice nunca el aparato sin utilizar el equipo <strong>de</strong><br />
seguridad necesario, incluyendo gafas <strong>de</strong> seguridad<br />
homologadas y mascarilla contra el polvo.<br />
• Utilice guantes y maneje las hojas con cuidado en todo<br />
momento.<br />
• NO pruebe la precisión <strong>de</strong>l afilado <strong>de</strong> la hoja con el<br />
<strong>de</strong>do (o cualquier otra parte <strong>de</strong>l cuerpo).<br />
• Compruebe que la muela <strong>de</strong> afilar gira libremente cada<br />
vez antes <strong>de</strong> la puesta en marcha.<br />
• Permita siempre que una muela nueva gire durante un<br />
minuto antes <strong>de</strong> proce<strong>de</strong>r a usarla. Póngase <strong>de</strong> pie y a<br />
un lado al poner el aparato en marcha.<br />
• La muela <strong>de</strong> afilar y la muela <strong>de</strong> asentado giran<br />
en el sentido indicado por la flecha situada en la<br />
parte superior <strong>de</strong>l aparato, al lado <strong>de</strong> los soportes<br />
horizontales.<br />
CONFIGURACIÓN<br />
1. Configure el aparato y monte la hoja en el<br />
ángulo correcto para el afilado, <strong>de</strong> acuerdo con<br />
las indicaciones proporcionadas en la sección<br />
“Preparación”.<br />
2. Si fuera necesario, prepare la muela <strong>de</strong> afilar.<br />
3. Compruebe que la ban<strong>de</strong>ja <strong>de</strong> agua haya sido<br />
colocada correctamente y que esté llena <strong>de</strong> agua. Fig.7<br />
4. IMPORTANTE:<br />
Compruebe el nivel <strong>de</strong><br />
agua con regularidad<br />
y vaya añadiendo agua<br />
según sea necesario.<br />
NUNCA intente afilar una<br />
hoja cuando la muela <strong>de</strong><br />
afilar esté seca: podría<br />
ser peligroso<br />
CONECTAR A LA FUENTE DE ALIMENTACIÓN<br />
1. Asegúrese que el interruptor <strong>de</strong> encendido/apagado<br />
(4) se encuentra en la posición <strong>de</strong> apagado (O).<br />
2. Conecte el aparato a la fuente <strong>de</strong> alimentación.<br />
3. Para encen<strong>de</strong>rlo, pulse y mueva el interruptor a la<br />
posición <strong>de</strong> encendido (I).<br />
4. Para apagarlo, pulse y mueva el interruptor a la<br />
posición <strong>de</strong> apagado (O).<br />
AFILAR UNA HOJA<br />
• Aplicar la hoja a la muela <strong>de</strong> afilar con una presión<br />
uniforme.<br />
• Deslice el soporte para accesorios por un lado y por<br />
otro a lo largo <strong>de</strong>l brazo <strong>de</strong> soporte para asegurar un<br />
afilado uniforme en la hoja y un <strong>de</strong>sgaste uniforme <strong>de</strong><br />
la muela <strong>de</strong> afilar.<br />
• No presione con fuerza. Todo lo que se requiere para<br />
afilar es una suave presión.<br />
COMO AFILAR SIN EL SOPORTE PARA ACCESORIOS<br />
• Si la pieza es <strong>de</strong>masiado gran<strong>de</strong> para ir montada en<br />
el soporte para accesorios, pue<strong>de</strong> ajustar el brazo <strong>de</strong><br />
soporte (11) y colocar la pieza en éste, con el bor<strong>de</strong> <strong>de</strong><br />
corte en dirección opuesta a usted. Esto le ayudará a<br />
mantener estable la hoja en el ángulo <strong>de</strong>seado.<br />
• Mueva la hoja por un lado y por otro por la muela <strong>de</strong><br />
afilar para asegurar un afilado uniforme en la hoja y un<br />
<strong>de</strong>sgaste uniforme <strong>de</strong> la muela <strong>de</strong> afilar.<br />
COMO ASENTAR UNA HOJA<br />
• Después <strong>de</strong> afilar, el uso <strong>de</strong> la muela <strong>de</strong> asentar<br />
eliminará cualquier aspereza y le dará un bor<strong>de</strong> afilado<br />
liso a la hoja.<br />
• Siempre asiente una hoja en dirección <strong>de</strong> la rotación<br />
<strong>de</strong> la muela. NUNCA asiente en contra <strong>de</strong> la dirección<br />
<strong>de</strong> la muela.<br />
1. Asegúrese <strong>de</strong> que la máquina está <strong>de</strong>sconectada <strong>de</strong> la<br />
fuente <strong>de</strong> alimentación durante la configuración.<br />
2. Coloque el brazo <strong>de</strong> soporte y el soporte para<br />
accesorios, como se muestra en la Fig. 3. Utilice la<br />
guía <strong>de</strong> ángulo para comprobar que el ángulo <strong>de</strong> la<br />
hoja sea correcto.<br />
3. Aplique una cantidad generosa <strong>de</strong> pasta <strong>de</strong> afilar (15)<br />
directamente a la muela <strong>de</strong> asentar <strong>de</strong> cuero (1). El<br />
asentado distribuirá la pasta a través <strong>de</strong> la muela.<br />
4. Encienda la máquina y mueva la hoja por la muela<br />
<strong>de</strong> asentar, asegurando que al menos la mitad <strong>de</strong><br />
la anchura <strong>de</strong> la muela <strong>de</strong> asentar está siempre en<br />
contacto con la hoja.<br />
5. Deje que la muela <strong>de</strong> asentar haga el trabajo. No<br />
aplique una fuerza excesiva a la muela.<br />
6. Al igual que con el afilado, el soporte para accesorios<br />
se mueve por un lado y por otro a lo largo <strong>de</strong>l brazo<br />
<strong>de</strong> soporte para asegurar un asentado uniforme <strong>de</strong> la<br />
hoja.<br />
7. No realice el asentado sin la pasta <strong>de</strong> afilar en la<br />
muela. Si está asentando un número <strong>de</strong> hojas, pue<strong>de</strong><br />
que necesite aplicar más pasta <strong>de</strong> afilar. Apague la<br />
máquina y retire la hoja antes <strong>de</strong> aplicar la pasta antes<br />
<strong>de</strong> asentar una hoja nueva.<br />
42<br />
Instrucciones <strong>de</strong> Uso
COMO ASENTAR SIN EL SOPORTE PARA ACCESORIOS<br />
• Si la pieza es <strong>de</strong>masiado gran<strong>de</strong> para ir montada en<br />
el soporte para accesorios, pue<strong>de</strong> ajustar el brazo <strong>de</strong><br />
soporte (11) y colocar la pieza en éste, con el bor<strong>de</strong> <strong>de</strong><br />
corte en dirección opuesta a usted. Esto le ayudará a<br />
mantener estable la hoja en el ángulo <strong>de</strong>seado.<br />
• Mueva la hoja por un lado y por otro por la muela para<br />
asegurar un pulido a través <strong>de</strong> la hoja.<br />
COMO ELIMINAR LAS MARCAS DE FABRICACIÓN<br />
SOBRE LA HOJA<br />
• El proceso <strong>de</strong> fabricación a veces <strong>de</strong>ja marcas sobre<br />
las hojas en la superficie <strong>de</strong> la sección transversal (o<br />
"cara") <strong>de</strong> la hoja.<br />
• Estas marcas se pue<strong>de</strong>n eliminar al aplicar la cara<br />
dañada <strong>de</strong> la hoja sobre el lado <strong>de</strong> la muela <strong>de</strong> afilar.<br />
MANTENIMIENTO<br />
• Desconecte la máquina <strong>de</strong> la red eléctrica antes <strong>de</strong><br />
realizar cualquier trabajo <strong>de</strong> mantenimiento.<br />
• Mantener el aparato limpio y libre <strong>de</strong> polvo y<br />
escombros. Limpie el exterior <strong>de</strong>l aparato con un paño<br />
húmedo. Nunca sumerja el aparato en agua.<br />
• Compruebe que todas las partes móviles se mueven<br />
libremente y están en buenas condiciones <strong>de</strong> trabajo.<br />
• Compruebe que todas las tuercas y tornillos,<br />
especialmente aquellos que retienen la muela <strong>de</strong><br />
asentado y la muela <strong>de</strong> afilar, están conectados<br />
correctamente y no presentan <strong>de</strong>sgaste.<br />
• Compruebe el enchufe y el cable <strong>de</strong> alimentación<br />
en busca <strong>de</strong> signos <strong>de</strong> <strong>de</strong>sgaste o daño. En el caso<br />
<strong>de</strong> que estuvieran dañados, pida a un electricista<br />
cualificado que los sustituya.<br />
MUELA DE AFILAR<br />
• No utilice una muela <strong>de</strong> afilar que haya recibido un<br />
golpe, especialmente en el lateral <strong>de</strong> la muela <strong>de</strong><br />
afilar.<br />
GARANTIA<br />
Para registrar su garantía, visite nuestro sitio web en www.<br />
tritontools.com* e introduzca sus datos.<br />
Estos datos serán incluidos en nuestra lista <strong>de</strong> direcciones<br />
(salvo indicación contraria) <strong>de</strong> manera que pueda recibir<br />
información sobre nuestras noveda<strong>de</strong>s. Sus datos no serán<br />
cedidos a terceros.<br />
RECORDATORIO DE SU COMPRA<br />
Fecha <strong>de</strong> compra: ___ / ___ / ____<br />
Mo<strong>de</strong>lo: TWSS10<br />
Número <strong>de</strong> serie:---------<br />
Conserve su recibo como prueba <strong>de</strong> compra.<br />
• Mueva la cara <strong>de</strong> la hoja lentamente sobre la superficie<br />
lateral <strong>de</strong> la muela <strong>de</strong> afilar. No aplique una fuerza<br />
excesiva, y evite que los <strong>de</strong>dos entren en contacto con<br />
la muela <strong>de</strong> afilar.<br />
• Lleve a cabo este procedimiento primero, antes <strong>de</strong><br />
afilar la hoja.<br />
DESPUÉS DE SU USO<br />
1. Desconecte el sistema <strong>de</strong> transmisión aflojando la<br />
perilla <strong>de</strong> bloqueo (10). Esto ayudará a asegurar que la<br />
rueda <strong>de</strong> tracción conserva su forma correcta.<br />
2. Vacíe la ban<strong>de</strong>ja <strong>de</strong> agua. No <strong>de</strong>je que la muela <strong>de</strong><br />
afilar se que<strong>de</strong> sumergida en agua.<br />
• Sustituya una muela <strong>de</strong> afilar que sospeche esté<br />
dañada o agrietada.<br />
• Ver “Montaje” para una orientación sobre colocar<br />
una muela <strong>de</strong> afilar. Tenga en cuenta que el husillo<br />
se enrosca <strong>de</strong> forma invertida: gire en sentido <strong>de</strong> las<br />
agujas <strong>de</strong>l reloj para aflojar, y en contra para apretar.<br />
SUSTITUCIÓN DE LA MUELA DE ASENTAR DE CUERO<br />
Si la muela <strong>de</strong> asentar <strong>de</strong> cuero (1) se ha <strong>de</strong>sgastado o<br />
roto, <strong>de</strong>berá sustituirla:<br />
1. Desenrosque y ponga a un lado la perilla <strong>de</strong> enganche<br />
(3).<br />
2. Retire la muela gastada <strong>de</strong>l husillo, y coloque la nueva<br />
muela en su sitio.<br />
3. Vuelva a colocar la perilla <strong>de</strong> enganche y apriete.<br />
NOTA: Apriete a mano solamente.<br />
<strong>Triton</strong> Precision Power <strong>Tools</strong> garantiza al comprador<br />
<strong>de</strong> este producto que si alguna pieza resulta ser<br />
<strong>de</strong>fectuosa a causa <strong>de</strong> materiales o <strong>de</strong> mano<br />
<strong>de</strong> obra <strong>de</strong>ntro <strong>de</strong> los 12 MESES siguientes a la<br />
compra, <strong>Triton</strong> reparará o, a su discreción, sustituirá<br />
la pieza <strong>de</strong>fectuosa sin cargo.<br />
Está garantía no se aplica al uso comercial ni se<br />
amplia al <strong>de</strong>sgaste normal o a los daños resultantes<br />
<strong>de</strong> un acci<strong>de</strong>nte, <strong>de</strong> un abuso o <strong>de</strong> una mala<br />
utilización.<br />
* Regístrese en línea <strong>de</strong>ntro <strong>de</strong> 30 días.<br />
Se aplican los términos y condiciones.<br />
Instrucciones <strong>de</strong> Uso / Mantenimiento<br />
Esto no afecta a sus <strong>de</strong>rechos legales<br />
43<br />
E
DECLARATION OF CONFORMITY<br />
The Un<strong>de</strong>rsigned: Mr Darrell Morris as authorized by: TRITON Declare that:<br />
PRODUCT CODE: TWSS10 DESCRIPTION: Wetstone Sharpener<br />
Electric power: 120W<br />
CONFORMS TO THE FOLLOWING DIRECTIVES: • Machinery Directive 2006/42/EC • Low Voltage Directive 2006/95/EC • EMC Directive 2004/108/EC<br />
• ROHS Directive 2002/95/EC • EN61029-1:2003+A11:2010; EN61029-2-4:2011 • EN55014-1:2006+A1,2009; EN55014-2:1997+A1:2001+A2:2008<br />
• EN61000-3-2:2006+A1:2009+A2:2009; EN61000-3-3:2008<br />
THE TECHNICAL DOCUMENTATION IS KEPT BY TRITON<br />
NOTIFIED BODY: World Standardization Certification and Testing Co Ltd<br />
PLACE OF DECLARATION: Shenzhen, China<br />
EG-VERKLARING VAN OVEREENSTEMMING<br />
De On<strong>de</strong>rgeteken<strong>de</strong>: Mr Darrell Morris Gemachtigd door: TRITON Declare that:<br />
TYPE/ SERIENR: TWSS10 NAAM/MODEL: Tafelslijpmachine<br />
Stroom: 120W<br />
VOLDOET AAN DE VEREISTEN VAN DE RICHTLIJN: • Machinery Directive 2006/42/EC • Low Voltage Directive 2006/95/EC • EMC Directive 2004/108/EC<br />
• ROHS Directive 2002/95/EC • EN61029-1:2003+A11:2010; EN61029-2-4:2011 • EN55014-1:2006+A1,2009; EN55014-2:1997+A1:2001+A2:2008<br />
• EN61000-3-2:2006+A1:2009+A2:2009; EN61000-3-3:2008<br />
DE TECHNISCHE DOCUMENTATIE WORDT BEWAARD DOOR TRITON<br />
KEURINGSINSTANTIE: World Standardization Certification and Testing Co Ltd<br />
PLAATS VAN AFGIFTE: Shenzhen, China<br />
DÉCLARATION DE CONFORMITÉ CE<br />
Le soussigné: Mr Darrell Morris autorisé par: TRITON Declare that:<br />
TYPE/SÉRIE NO: TWSS10 NOM/MODÈLE: Touret d’affûtage à eau 120 W / 0,1 CV<br />
Courant électrique: 120W<br />
SE CONFORME AUX DIRECTIVES SUIVANTES: • Machinery Directive 2006/42/EC • Low Voltage Directive 2006/95/EC • EMC Directive 2004/108/EC<br />
• ROHS Directive 2002/95/EC • EN61029-1:2003+A11:2010; EN61029-2-4:2011 • EN55014-1:2006+A1,2009; EN55014-2:1997+A1:2001+A2:2008<br />
• EN61000-3-2:2006+A1:2009+A2:2009; EN61000-3-3:2008<br />
LA DOCUMENTATION TECHNIQUE EST ENREGISTRÉE PAR TRITON<br />
ORGANISMES NOTIFIÉS: World Standardization Certification and Testing Co Ltd<br />
ENDROIT DE LA DÉCLARATION: Shenzhen, China<br />
KONFORMITÄTSERKLÄRUNG<br />
Name <strong>de</strong>s Unterzeichners: Mr Darrell Morris Bevollmächtiger: TRITON Declare that:<br />
BAUART./ SERIENNUMMER: TWSS10 NAME/ DER GERÄTETYP: Nass-Schleifmaschine, 120 W/0,1 PS<br />
Elektrischer Strom: 120W<br />
PASST SICH AN DIE FOLGENDEN RICHTLINIEN AN: • Machinery Directive 2006/42/EC • Low Voltage Directive 2006/95/EC • EMC Directive 2004/108/EC<br />
• ROHS Directive 2002/95/EC • EN61029-1:2003+A11:2010; EN61029-2-4:2011 • EN55014-1:2006+A1,2009; EN55014-2:1997+A1:2001+A2:2008<br />
• EN61000-3-2:2006+A1:2009+A2:2009; EN61000-3-3:2008<br />
TECHN. UNTERLAGEN HINTERLEGT BEI TRITON<br />
BENNANTE STELLE: World Standardization Certification and Testing Co Ltd<br />
ORT: Shenzhen, China<br />
EC DECHIARAZIONE DI CONFIRMITÁ<br />
Il sottoscritto: Mr Darrell Morris Come autorizzato di: TRITON Declare that:<br />
TIPO/ NUMERO DI SERIE: TWSS10 NOME/ MODELLO: Affilatrice pietra ad acqua<br />
Energia elettrica: 120W<br />
SI CONFORMA ALL’ INDIRIZZAMENTO: • Machinery Directive 2006/42/EC • Low Voltage Directive 2006/95/EC • EMC Directive 2004/108/EC<br />
• ROHS Directive 2002/95/EC • EN61029-1:2003+A11:2010; EN61029-2-4:2011 • EN55014-1:2006+A1,2009; EN55014-2:1997+A1:2001+A2:2008<br />
• EN61000-3-2:2006+A1:2009+A2:2009; EN61000-3-3:2008<br />
IL DOCUMENTAZIONE TECNICO É MANTENUTO DI TRITON<br />
CORPO INFORMATO: World Standardization Certification and Testing Co Ltd<br />
POSTO DI DICHIARAZIONE: Shenzhen, China<br />
DECLARACIÓN “CE” DE CONFORMIDAD<br />
El abajo firmante: Mr Darrell Morris Autorizad por: TRITON Declare that:<br />
TIPO Y NO SERIE: TWSS10 MODELO/NOMBRE: Afiladora al agua 120 W / 0,1 CV<br />
Energía eléctrica: 120W<br />
SE HALLA EN CONFORMIDAD CON LA DIRECTIVA: • Machinery Directive 2006/42/EC • Low Voltage Directive 2006/95/EC • EMC Directive 2004/108/EC<br />
• ROHS Directive 2002/95/EC • EN61029-1:2003+A11:2010; EN61029-2-4:2011 • EN55014-1:2006+A1,2009; EN55014-2:1997+A1:2001+A2:2008<br />
• EN61000-3-2:2006+A1:2009+A2:2009; EN61000-3-3:2008<br />
LA DOCUMENTACIÓN TÉCNICA SE GUARDA POR TRITON<br />
ORGANISMO NOTIFICADO: World Standardization Certification and Testing Co Ltd<br />
LUGAR DE DECLARACIÓN: Shenzhen, China<br />
Date: 21/12/11<br />
Signed by:<br />
Mr Darrell Morris<br />
Managing Director