Dual Mode Precision Plunge Router - Highland Woodworking
Dual Mode Precision Plunge Router - Highland Woodworking
Dual Mode Precision Plunge Router - Highland Woodworking

Create successful ePaper yourself
Turn your PDF publications into a flip-book with our unique Google optimized e-Paper software.
SYMBOLS<br />
ENVIRONMENTAL PROTECTION<br />
Waste electrical products should not be<br />
disposed of with household waste. Please<br />
recycle where facilities exist. Check with your<br />
local authority or retailer for recycling advice.<br />
Instruction warning.<br />
Instruction note.<br />
Always wear ear, eye and respiratory<br />
protection.<br />
Double insulated for additional protection.<br />
Conforms to relevant legislation<br />
and safety standards.<br />
FUNCTIONS<br />
GB<br />
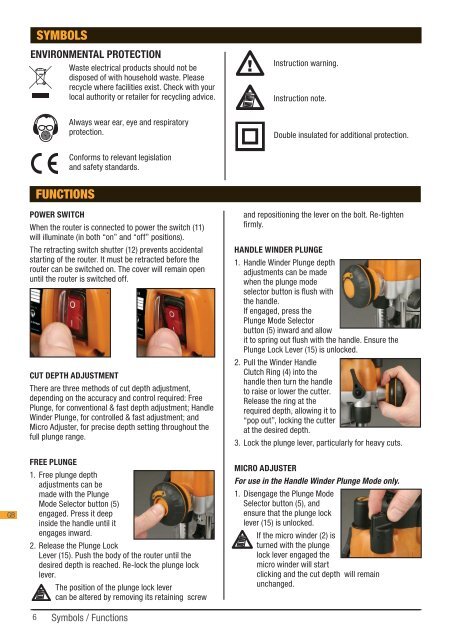
POWER SWITCH<br />
When the router is connected to power the switch (11)<br />
will illuminate (in both “on” and “off” positions).<br />
The retracting switch shutter (12) prevents accidental<br />
starting of the router. It must be retracted before the<br />
router can be switched on. The cover will remain open<br />
until the router is switched off.<br />
CUT DEPTH ADJUSTMENT<br />
There are three methods of cut depth adjustment,<br />
depending on the accuracy and control required: Free<br />
<strong>Plunge</strong>, for conventional & fast depth adjustment; Handle<br />
Winder <strong>Plunge</strong>, for controlled & fast adjustment; and<br />
Micro Adjuster, for precise depth setting throughout the<br />
full plunge range.<br />
FREE PLUNGE<br />
1. Free plunge depth<br />
adjustments can be<br />
made with the <strong>Plunge</strong><br />
<strong>Mode</strong> Selector button (5)<br />
engaged. Press it deep<br />
inside the handle until it<br />
engages inward.<br />
2. Release the <strong>Plunge</strong> Lock<br />
Lever (15). Push the body of the router until the<br />
desired depth is reached. Re-lock the plunge lock<br />
lever.<br />
The position of the plunge lock lever<br />
can be altered by removing its retaining screw<br />
and repositioning the lever on the bolt. Re-tighten<br />
firmly.<br />
HANDLE WINDER PLUNGE<br />
1. Handle Winder <strong>Plunge</strong> depth<br />
adjustments can be made<br />
when the plunge mode<br />
selector button is flush with<br />
the handle.<br />
If engaged, press the<br />
<strong>Plunge</strong> <strong>Mode</strong> Selector<br />
button (5) inward and allow<br />
it to spring out flush with the handle. Ensure the<br />
<strong>Plunge</strong> Lock Lever (15) is unlocked.<br />
2. Pull the Winder Handle<br />
Clutch Ring (4) into the<br />
handle then turn the handle<br />
to raise or lower the cutter.<br />
Release the ring at the<br />
required depth, allowing it to<br />
“pop out”, locking the cutter<br />
at the desired depth.<br />
3. Lock the plunge lever, particularly for heavy cuts.<br />
MICRO ADJUSTER<br />
For use in the Handle Winder <strong>Plunge</strong> <strong>Mode</strong> only.<br />
1. Disengage the <strong>Plunge</strong> <strong>Mode</strong><br />
Selector button (5), and<br />
ensure that the plunge lock<br />
lever (15) is unlocked.<br />
If the micro winder (2) is<br />
turned with the plunge<br />
lock lever engaged the<br />
micro winder will start<br />
clicking and the cut depth will remain<br />
unchanged.<br />
6<br />
Symbols / Functions