Rotary Sprocket Autopilot Drive Installation Guide Rotary ... - Lewmar
Rotary Sprocket Autopilot Drive Installation Guide Rotary ... - Lewmar
Rotary Sprocket Autopilot Drive Installation Guide Rotary ... - Lewmar

You also want an ePaper? Increase the reach of your titles
YUMPU automatically turns print PDFs into web optimized ePapers that Google loves.
GB<br />
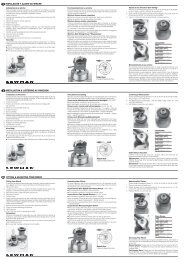
<strong>Drive</strong> orientation:<br />
• The drive can be mounted in any attitude on a vertical or<br />
horizontal surface.<br />
• Additionally, the drive may face either way as you can correct the<br />
steering direction by reversing the polarity of the motor<br />
connections at the course computer (see Figure 6).<br />
Consult the boat manufacturer if you have any doubt about the<br />
strength or suitability of the mounting location.<br />
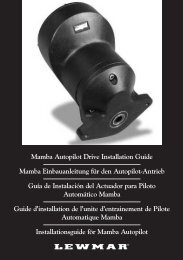
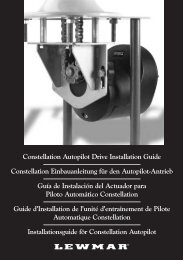
IDENTIFYING THE ROTARY SPROCKET DRIVE —<br />
FIGURE 1<br />
A. Motor Gearbox and Clutch Assembly<br />
B. <strong>Drive</strong> <strong>Sprocket</strong><br />
C. Motor Cable<br />
D. Clutch Cable<br />
E. Mounting Foot<br />
D<br />
Antriebsausrichtung:<br />
• Der Antrieb kann in jeder Position auf einer vertikalen oder<br />
horizontalen Fläche angebracht werden.<br />
• Der Antrieb kann außerdem in beiden Richtungen montiert<br />
werden, da die Steuerrichtung durch Umkehren der Polarität der<br />
Motoranschlüsse am Kursrechner korrigiert werden kann (siehe<br />
Abbildung 6).<br />
Erkundigen Sie sich beim Hersteller des Schiffes, falls Zweifel<br />
über die Festigkeit oder Eignung der Montageposition bestehen.<br />
TEILE-IDENTIFIKATION DES ROTARY-<br />
KETTENRADANTRIEBS — ABBILDUNG 1<br />
A. Motorgetriebe und -Kupplung<br />
B. Antriebskettenrad<br />
C. Motorkabel<br />
D. Kupplungskabel<br />
E. Montagefuss<br />
E<br />
Orientación del Actuador:<br />
• El Actuador se puede montar en cualquier posición en una<br />
superficie vertical u horizontal.<br />
• Además, el Actuador puede estar en cualquier orientación ya que<br />
es posible invertir su funcionamiento invirtiendo la polaridad de<br />
los cables de conexión al piloto automático. (ver fig. 6).<br />
Consulte al fabricante de la embarcación si tuviera dudas sobre<br />
la resistencia o idoneidad de la localización de instalación.<br />
IDENTIFICACIÓN DEL ACTUADOR ROTARY<br />
SPROCKET — FIGURA 1<br />
A. Conjunto de Caja Reductora, Motor y Embrague del Motor<br />
B. Piñón del Actuador<br />
C. Cable del Motor<br />
D. Cable del Embrague<br />
E. Base de Montaje<br />
F<br />
Orientation de l’unité :<br />
• Cette unité peut être montée dans n’importe quelle position sur<br />
une surface verticale ou horizontale.<br />
• De plus, l’unité peut faire face avant ou arrière car il est possible<br />
de corriger le sens de la transmission en inversant les polarités<br />
des connexions du moteur sur l’ordinateur de cap (voir Figure 6).<br />
Se reporter au fabricant du bateau en cas de doute sur la<br />
résistance ou la convenance de l’emplacement pour<br />
l’installation.<br />
IDENTIFICATION DE L’UNITÉ D’ENTRAÎNEMENT<br />
ROTARY — FIGURE 1<br />
A. Ensemble Moteur, Réducteur Et Embrayage<br />
B. Pignon d’entraînement<br />
C. Câble du Moteur<br />
D. Câble de L’embrayage<br />
E. Patte de Fixation<br />
SE<br />
Drivsystemets orientering:<br />
• Drivsystemet kan monteras i alla ställningar på en vertikal eller<br />
horisontell yta.<br />
• Drivsystemet kan dessutom vara vänt åt båda hållen, då du kan<br />
korrigera styrriktningen genom att vända polariteten på<br />
motoranslutningarna vid kursdatorn (se Figur 6).<br />
Hör med båtens tillverkare om du har några som helst tvivel<br />
angående monteringsplatsens styrka eller lämplighet.<br />
IDENTIFIERING AV AUTOPILOT — FIGUR 1<br />
A. Motorns Växellåda och Koppling<br />
B. Drivkedjekrans<br />
C. Motorkabel<br />
D. Kopplingskabel<br />
E. Monteringsfot<br />
6