Instruction Manual
Instruction Manual
Instruction Manual

Create successful ePaper yourself
Turn your PDF publications into a flip-book with our unique Google optimized e-Paper software.
www.blackanddecker.ae<br />
BS600
ENGLISH<br />
1<br />
2<br />
3<br />
4<br />
5<br />
6<br />
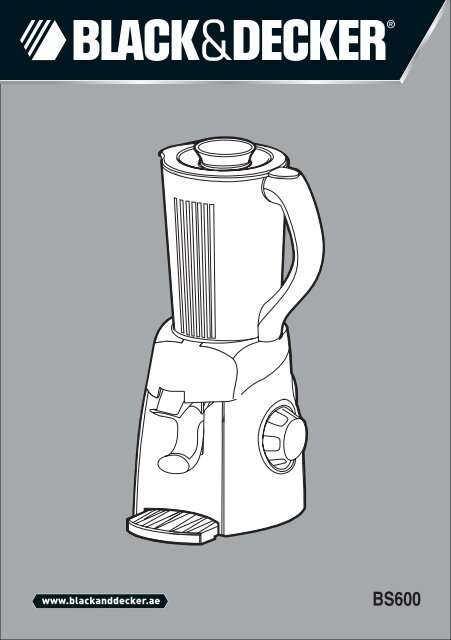
Parts Identification<br />
1. Filler cap<br />
2. Lid<br />
3. Blending jar<br />
4. Valve<br />
5. Shield<br />
6. Base<br />
7. Rotary control knob<br />
8. Dispenser<br />
9. Drip tray<br />
8 9<br />
7<br />
2
ENGLISH<br />
Intended use<br />
Your Black & Decker smoothie maker has been<br />
designed for blending fruits and vegetables and<br />
making smoothies. This product is intended for<br />
household use only.<br />
Read this entire manual carefully<br />
before using the appliance.<br />
Safety instructions<br />
• Warning! When using mains-powered<br />
appliances, basic safety precautions,<br />
including the following, should always be<br />
followed to reduce the risk of fire, electric<br />
shock and personal injury.<br />
• The intended use is described in this manual.<br />
The use of any accessory or attachment or<br />
the performance of any operation with this<br />
appliance other than those recommended in<br />
this instruction manual may present a risk of<br />
personal injury.<br />
• Retain this manual for future reference.<br />
Using your appliance<br />
• Always take care when using the appliance.<br />
• Never pull the power supply cord to<br />
disconnect the plug from the socket. Keep<br />
the power supply cord away from heat, oil<br />
and sharp edges.<br />
• Do not place the appliance on or near heat<br />
sources or in a heated oven.<br />
• Do not use the appliance outdoors.<br />
• Do not leave the appliance unattended<br />
during use.<br />
• Always allow moving parts to come to a<br />
complete stop before removing the lid.<br />
• Always protect the motor unit from water or<br />
excessive humidity.<br />
• If the power supply cord is damaged during<br />
use, disconnect the appliance from the power<br />
supply immediately. Do not touch the power<br />
supply cord before disconnecting from the<br />
power supply.<br />
• Disconnect the appliance from the power<br />
supply when not in use, before fitting or<br />
removing parts and before cleaning.<br />
• Never let the appliance operate unattended.<br />
• Never reach into the feeding tube with your<br />
fingers or an object while the appliance is<br />
running.<br />
• Take care when handling the sharp cutting<br />
blades, emptying the bowl and during<br />
cleaning.<br />
• Keep any loose clothing or long hair away<br />
from the feeding tube and any moving parts.<br />
• Warning! Misuse could cause personal injury.<br />
Safety of others<br />
• This appliance is not intended for use by<br />
persons (including children) with reduced<br />
physical sensory or mental capabilities, or<br />
lack of experience and knowledge, unless<br />
they have been given supervision or<br />
instruction concerning use of the appliance by<br />
a person responsible for their safety.<br />
• Children should be supervised to ensure that<br />
they do not play with the appliance.<br />
After use<br />
• Remove the plug from the socket before<br />
leaving the appliance unattended and before<br />
changing, cleaning or inspecting any parts of<br />
the appliance.<br />
• When not in use, the appliance should be<br />
stored in a dry place. Children should not<br />
have access to stored appliances.<br />
3
ENGLISH<br />
Inspection and repairs<br />
• Before use, check the appliance for<br />
damaged or defective parts. Check for<br />
breakage of parts, damage to switches and<br />
any other conditions that may affect its<br />
operation.<br />
• Do not use the appliance if any part is<br />
damaged or defective.<br />
• Have any damaged or defective parts<br />
repaired or replaced by an authorised repair<br />
agent.<br />
• Before use, check the power supply cord for<br />
signs of damage, ageing and wear.<br />
• Do not use the appliance if the power supply<br />
cord or mains plug is damaged or defective.<br />
• If the power supply cord or mains plug is<br />
damaged or defective it must be repaired by<br />
an authorised repair agent in order to avoid a<br />
hazard. Do not cut the power supply cord<br />
and do not attempt to repair it yourself.<br />
• Never attempt to remove or replace any<br />
parts other than those specified in this<br />
manual.<br />
Additional safety instructions<br />
for Smoothie Makers<br />
• Do not immerse the appliance, cord set or<br />
plug in liquids<br />
• Always leave sufficient space around the<br />
appliance for ventilation<br />
• Keep loose clothing, hair, jewellery, etc. away<br />
from moving parts.<br />
• Do not use the unit if you have wet hands<br />
• Care is needed when handling cutting<br />
blades, especially when removing the blades<br />
from the bowl, emptying the bowl and during<br />
cleaning.<br />
• “Switch off the appliance before changing<br />
accessories or approaching parts which move<br />
in use”.<br />
Electrical safety<br />
Before use, check that the mains voltage<br />
corresponds to the voltage on the rating plate.<br />
This appliance is double insulated in<br />
accordance with EN 60335-2-14;<br />
therefore no earth wire is required.<br />
• To avoid the risk of electric shock, do not<br />
immerse the cord, plug or motor unit in water<br />
or other liquid.<br />
• Check that the supply voltage shown on the<br />
rating plate of the appliance matches that of<br />
your electrical system. Any connection error<br />
will invalidate the guarantee.<br />
Mains plug replacement<br />
If a new mains plug needs to be fitted:<br />
• Safely dispose of the old plug.<br />
• Connect the brown lead to the live terminal of<br />
the new plug.<br />
• Connect the blue lead to the neutral terminal.<br />
• If the product is class l (earthed), connect the<br />
green / yellow lead to the earth terminal.<br />
Warning! If your product is class ll double<br />
insulated (only 2 wires in the cord set), no<br />
connection is to be made to the earth terminal.<br />
Follow the fitting instructions supplied with good<br />
quality plugs<br />
Any replacement fuse must be of the same rating<br />
as the original fuse supplied with the product.<br />
4
ENGLISH<br />
Assembly<br />
• This appliance requires parts to be cleaned<br />
before use. See “Maintenance and Cleaning”<br />
for details.<br />
Installing the jug<br />
• Place the jug onto the motor unit, positioning<br />
the line moulded into the base of the handle<br />
with the unlocked padlock symbol on the<br />
motor base.<br />
• Turn the jug clockwise until the line is<br />
positioned opposite the locked padlock<br />
symbol. Ensure that the motor unit and the<br />
jug are correctly assembled and securely<br />
locked in position.<br />
Installing the lid and filler cap<br />
• Line up the circle symbol on the lid with the<br />
unlocked padlock symbol on the jug.<br />
• Lower the lid onto the jug, keeping the two<br />
symbols aligned,<br />
• Turn the lid clockwise until the circle symbol<br />
lines up with the locked padlock symbol.<br />
Ensure that the lid and the jug are securely<br />
locked in position.<br />
• To fit the filler cap, lower it onto the lid. Make<br />
sure the lugs on the filler cap fit between the<br />
two cut-out slots on the lid.<br />
• Push the filler cap down to lock into position.<br />
Installing the drip tray<br />
• Slide the drip tray into the grooves on the<br />
motor base.<br />
Use<br />
• Remove the jug lid and place the ingredients<br />
inside the jug. For best results, ingredients<br />
should be cut into smaller pieces. Cut dry<br />
ingredients into smaller pieces before<br />
processing.<br />
• Replace the jug lid ensuring that the filler cap<br />
is installed.<br />
• Fit the jug onto the motor base. Ensure the<br />
jug and the lid are fitted correctly, otherwise<br />
the smoothie maker will not work.<br />
Warning! Make sure that the speed<br />
control dial is set to the off position ‘0’<br />
before plugging the smoothie maker<br />
into the mains supply.<br />
• Plug the motor unit into a suitable mains<br />
supply and switch on at the socket.<br />
• To start, set the speed control dial to setting<br />
‘1’. To increase the speed, turn the speed<br />
control dial clockwise.<br />
Note: ‘1’ is the slowest speed setting and ‘3’ is<br />
the fastest.<br />
• Alternatively, blend the ingredients in short<br />
bursts by turning and holding the speed<br />
control switch to the PULSE setting. Release<br />
it to stop.<br />
Caution! Do not operate the unit<br />
continuously for more than one minute<br />
without a rest period of two minutes.<br />
The filler cap can be carefully removed to feed<br />
ingredients into the jug during processing if<br />
required.<br />
Warning! Do not place your fingers<br />
inside the jug when adding ingredients.<br />
• Allow the ingredients to blend until smooth.<br />
When processing is complete, set the speed<br />
control dial to the off ‘0’ position. Switch off<br />
and unplug the blender from the mains<br />
supply.<br />
5
ENGLISH<br />
Note: Always keep the filler cap secured in<br />
position, unless ingredients are being added to<br />
the Blender.<br />
Warning! Wait until all moving parts<br />
have stopped before removing the lid<br />
or jug.<br />
• To serve a smoothie, simply press your glass<br />
against the dispensing lever on the motor<br />
base.<br />
• When the glass is full, release the lever.<br />
Note: To help dispense the last amount of a<br />
thick smoothie drink, add a few tablespoons of<br />
liquid to increase the flow.<br />
Note: Always wash immediately after use. Do<br />
not let food dry onto the jug, valve or dispensing<br />
assembly as this will make cleaning difficult.<br />
Using the smoothie maker to<br />
crush ice<br />
Note: For best results defrost ice cubes slightly<br />
before crushing. To crush home made (small)<br />
ice cubes fill the jug to 750ml and add 200mls<br />
water. To crush shop bought (large) ice cubes<br />
add 15 ice cubes to the blender jug and add<br />
200ml of water.<br />
• Remove the jug lid and place recommended<br />
ice cube and water quantity inside the jug.<br />
• Replace the jug lid ensuring the filler cap is<br />
in place. Make sure that the speed control<br />
dial is set to the off position ‘0’ before<br />
plugging the smoothie maker into the mains<br />
supply.<br />
• Plug in and switch the smoothie maker on at<br />
the mains socket.<br />
• Blend in short bursts by holding and<br />
releasing the speed control dial to the<br />
PULSE setting.<br />
• If you want to crush ice cubes, put not more<br />
than 6 ice cubes (of approx. 25x35x25mm) in<br />
the blender jar and turn the control knob to<br />
pulse position a few times.<br />
• Do not process a large quantity of solid<br />
ingredients at the same time. To get good<br />
results, we advise you to process these<br />
ingredients in a series of small batches.<br />
Caution! Do not operate the unit<br />
continuously for more than one minute<br />
without a rest period of two minutes.<br />
• When blending is complete, switch off and<br />
unplug the unit from the mains supply.<br />
Useful advice<br />
• The best results will be obtained if you blend<br />
fresh food, as food that have been stored for<br />
any length of time will be dry in nature.<br />
• Prepare your fruit and vegetables in advance<br />
and place the cut pieces in a dish ready for<br />
blending. Cut your fruit and vegetables into<br />
pieces that will fit easily through the lid hole,<br />
but do not make them too small.<br />
• Never attempt to force large pieces of fruit or<br />
vegetables through the lid hole, cut them into<br />
smaller pieces first.<br />
• As a general guideline, you do not need to<br />
peel any fruits and vegetables whose skin<br />
you would normally eat. However, we do<br />
recommend washing all produce before it is<br />
blended.<br />
• Certified organic vegetables are guaranteed<br />
not to contain chemical residues but should<br />
still be washed, as they have been handled<br />
prior to sale.<br />
6
ENGLISH<br />
• Remove skin from thick skinned fruits, such<br />
as melon and pineapple.<br />
• Pull out as shown. Do not force the valve.<br />
• Remove stones from cherries, peaches,<br />
nectarines etc.<br />
• Remove the core from apples and pears.<br />
Maintenance & cleaning<br />
• The appliance is easier to clean if you do so<br />
immediately after use.<br />
• Do not use abrasive cleaning agents,<br />
scourers, acetone, alcohol etc. to clean the<br />
appliance.<br />
• Clean the motor unit with a damp cloth.<br />
• Never immerse the motor unit in water nor<br />
rinse it under the tap.<br />
To remove the dispenser<br />
• Pull up shield.<br />
• Lift up the dispenser.<br />
Note: To reassemble, reverse the above<br />
procedures and make sure the valve is locked in<br />
place before blending again.The small arrow on<br />
the valve front will line up with the small arrow<br />
on the jar bottom where the locked padlock<br />
picture is shown. If the valve is not properly<br />
locked in place, ingredients will leak from the<br />
drain hole in the bottom of the jar.<br />
Technical data<br />
Voltage 220-240V ~<br />
Supply<br />
50/60Hz<br />
Power consumption<br />
450W<br />
Product Weight<br />
2.5 kgs<br />
Cord Length<br />
1.2 meter<br />
• Move the dispenser forward and out.<br />
To remove the valve from<br />
the jug<br />
• Turn the jar on an angle so you can grasp<br />
the valve easily.<br />
• Turn the valve to the unlock position (toward<br />
the unlocked padlock picture).<br />
7
ENGLISH<br />
Protecting the environment<br />
Separate collection. This product must<br />
not be disposed of with normal<br />
household waste.<br />
Should you find one day that your Black &<br />
Decker product needs replacement, or if it is of<br />
no further use to you, do not dispose of it with<br />
other household waste. Make this product<br />
available for separate collection.<br />
• Black & Decker provides a facility for<br />
recycling Black & Decker products once they<br />
have reached the end of their working life.<br />
This service is provided free of charge. To<br />
take advantage of this service please return<br />
your product to any authorised repair agent<br />
who will collect them on our behalf.<br />
• You can check the location of your nearest<br />
authorised repair agent by contacting your<br />
local Black & Decker office at the address<br />
indicated in this manual. Alternatively, a list of<br />
authorized Black & Decker repair agents and<br />
full details of our after-sales service and<br />
contact are available on the Internet at:<br />
www.2helpU.com.<br />
Warranty<br />
Black & Decker is confident of the quality of its<br />
products and offers an outstanding warranty.<br />
This warranty statement is in addition to and in<br />
no way prejudices your statutory rights.<br />
The warranty is valid within the territories of the<br />
Member States of the European Union and the<br />
European Free Trade Area.<br />
If a Black & Decker product becomes defective<br />
due to faulty materials, workmanship or lack of<br />
conformity, within 24 months from the date of<br />
purchase, Black & Decker warranty to replace<br />
defective parts, repair products subjected to fair<br />
wear and tear or replace such products to ensure<br />
minimum inconvenience to the customer unless:<br />
The product has been used for trade,<br />
professional or hire purposes;<br />
The product has been subjected to misuse<br />
or neglect;<br />
The product has sustained damage<br />
through foreign objects, substances or<br />
accidents;<br />
Repairs have been attempted by persons<br />
other than authorised repair agents or<br />
Black & Decker service staff.<br />
To claim on the warranty, you will need to submit<br />
proof of purchase to the seller or an authorised<br />
repair agent. You can check the location of your<br />
nearest authorised repair agent by contacting<br />
your local Black & Decker office at the address<br />
indicated in this manual.<br />
Alternatively, a list of authorised Black & Decker<br />
repair agents and full details of our after-sales<br />
service and contacts are available on the Internet<br />
at: www.2helpU.com.<br />
8
ARABIC<br />
1<br />
2<br />
3<br />
4<br />
5<br />
8 9<br />
6<br />
7<br />
تعريف الأجزاء<br />
1. غطاء فتهة التعبئة<br />
2. الغطاء<br />
3. إبريق الخلاط<br />
الصمام<br />
4. غطاء<br />
5. القاعدة<br />
6. 7. مقبض تحكم دوار<br />
8. موزع<br />
9. صينية التقطير<br />
9
ARABIC<br />
غرض الاستخدام<br />
ُصممت ماكينة إعداد شراب السموثي بلاك آند ديكر<br />
خصيصاً لمزج الفواكه والخضروات وإعداد شراب<br />
السموثي؛ علماً بأن هذا المنتج مصمم للاستخدام المنزلي<br />
فقط.<br />
ينبغي قراءة هذا الدليل بعناية قبل استخدام<br />
الماكينة.<br />
تعليمات السلامة<br />
• تحذير! عند استخدام الأجهزة المتصلة بمصدر التيار<br />
الرءيسي، يتعين داءماً مراعاة احتياطات السلامة<br />
الأساسية بما في ذلك الاحتياطات المذكورة أدناه<br />
للهد من مخاطر اندلاع الهريق والتعرض لصدمة<br />
كهرباءية وإصابات شخصية.<br />
• يهدد هذا الدليل الغرض من استخدام هذه الماكينة<br />
مع مراعاة أن استخدام أية ملهقات أو وحدات مرفقة<br />
أو تنفيذ أية عملية باستخدام هذه الماكينة غير تلك<br />
الموصى بها في هذا الدليل قد تنطوي على خطورة<br />
التعرض لإصابة بدنية.<br />
• يرجى الاحتفاظ بهذا الدليل للرجوع إليه مستقبلاً.<br />
استخدام الماكينة<br />
• توخ الهذر داءماً عند استخدام الماكينة.<br />
• لا تحاول مطلقاً شد سلك التيار الكهرباءي لفصل<br />
القابس عن المقبس. احتفظ بسلك التيار الكهرباءي<br />
بعيداً عن الهرارة والزيت والهواف الهادة.<br />
• لا تضع الماكينة على مصادر الهرارة أو فرن ساخن<br />
أو بالقرب منهما.<br />
• لا تستخدم الماكينة خارج المنزل.<br />
• لا تترك الماكينة دون مراقبة أو إشراف أثناء<br />
الاستخدام.<br />
• انتظر داءماً حتى توقف الأجزاء المتهركة بالكامل<br />
قبل إزالة الغطاء.<br />
• قم داءماً بهماية وحدة المهرك من المياه أو الرطوبة<br />
العالية.<br />
• في حالة تلف سلك التيار الكهرباءي أثناء الاستخدام،<br />
افصل على الفور الماكينة عن مصدر التيار الكهرباءي.<br />
وينبغي تجنب لمس سلك التيار الكهرباءي قبل فصله<br />
عن مصدر التيار الكهرباءي.<br />
• قم بفصل الماكينة عن التيار الكهرباءي في حالة عدم<br />
استخدامها وقبل تركيب أي أجزاء بها أو إزالتها عنها<br />
وقبل التنظيف.<br />
• لا تترك الماكينة دون مراقبة أثناء تشغيلها.<br />
• لا تحاول الوصول إلى أنبوب التغذية بواسطة أصعابك<br />
أو أية مادة أثناء تشغيل الماكينة.<br />
• توخي الهذر عند التعامل مع شفرات القطع الهادة<br />
وكذلك عند تفريغ الإناء والتنظيف.<br />
• قم بإبقاء أي ملابس فضفاضة أو شعر طويل بعيداً عن<br />
أنبوب التغذية وأية أجزاء متهركة.<br />
تحذير! قد يوءدي سوء استخدام الماكينة إلى التعرض<br />
لإصابة شخصية.<br />
سلامة الآخرين<br />
• هذا الجهاز غير مصمم ليستخدمه الأشخاص ذوو<br />
القدرات الجسدية والذهنية والهسية والعقلية المتدنية<br />
والخبرة والمعرفة القليلتين (بما في ذلك الأطفال) إلا في<br />
ظل الإشراف عليهم أو إعطاءهم التعليمات المتعلقة<br />
باستخدام الجهاز من قبل الشخص المسوءول عن<br />
سلامتهم.<br />
• يلزم الإشراف على الأطفال لضمان عدم عبشهم<br />
بالجهاز.<br />
بعد الاستخدام<br />
• قم بإيقاف تشغيل الجهاز وانزع القابس من مأخذ<br />
الكهرباء عند عدم استخدام الجهاز وكذلك قبل تغيير أو<br />
تنظيف أو صيانة أي من أجزاءه.<br />
• في حالة عدم استخدام الجهاز، يجب تخزينه في مكان<br />
جاف. ويجب عدم تمكين الأطفال من الوصول إلى<br />
الأجهزة المخزنة.<br />
10
ARABIC<br />
الفهص والإصلاه<br />
• افهص الماكينة قبل الاستخدام لاستكشاف أية أجزاء<br />
تالفة أو معيبة والتأكد من عدم وجود أية أجزاء<br />
مكسورة وعدم تلف المفاتيه أو أية ظروف أخرى قد<br />
توءثر على كفاءة تشغيلها.<br />
• لا تستخدم الجهاز في حالة تلف أي من أجزاءه أو<br />
وجود عيب به.<br />
• في حالة وجود أية أجزاء تالفة أو معيبة، يجب<br />
إصلاحها أو استبدالها بمعرفة وكيل صيانة معتمد.<br />
• قبل الاستخدام، افهص سلك الكهرباء للتعرف على<br />
علامات التلف والقدم البالغ والتآكل.<br />
• لا تستخدم الجهاز في حالة تلف سلك الكهرباء أو<br />
القابس الرءيسي أو وجود عيب بأي منهما.<br />
• في حالة تلف سلك الكهرباء أو القابس الرءيسي، يجب<br />
استبدالهما بمعرفة وكيل صيانة معتمد لتجنب<br />
المخاطر. لا تقطع سلك الكهرباء ولا تحاول إصلاحه<br />
بنفسك.<br />
• لا تحاول مطلقًا إزالة أو استبدال أية أجزاء غير تلك<br />
المشار إليها في هذا الدليل.<br />
تعليمات السلامة الإضافية لماكينات إعداد<br />
شراب سموثي<br />
• لا تغمر الماكينة أو مجموعة الأسلاك أو القابس في<br />
السواءل.<br />
• حافظ داءماً على وجود حيز كافي حول الماكينة<br />
لتسهيل تهويتها.<br />
• قم بإبقاء الملابس الفضفاضة أو الشعر أو المجوهرات<br />
بعيدًا عن الأجزاء المتهركة.<br />
• لا تستخدم الوحدة ويداك مبتلتين.<br />
• يجب توخي الهيطة والهذر أثناء التعامل مع شفرات<br />
قاطعة ً وخصوصا عند إزالة الشفرات من الإناء<br />
وتفريغ الإناء وأثناء إجراء عملية التنظيف.<br />
• "قم بغلق الماكينة قبل تغيير الملهقات أو الاقتراب<br />
من الأجزاء التي تتهرك أثناء التشغيل."<br />
السلامة الكهرباءية<br />
تحقق قبل استخدام الماكينة من توافق فولطية المأخذ<br />
الرءيسي مع الفولطية المهددة على لوحة التصنيف.<br />
تتوافق هذه الماكينة مع المعيار العالمي للمواد<br />
الكهربية رقم 60335-2-14، كما أنها من<br />
نوع العزل المزدوج؛ ومن ثم، لا يلزم تأريض<br />
هذه الماكينة.<br />
• لا تقوم بغمر السلك أو القابس أو وحدة المهرك في<br />
المياه أو أي ساءل أخر تفاديًا لمخاطر الإصابة<br />
بالصدمات الكهربية.<br />
• يلزم التأكد من توافق الفولطية الموضهة على لوحة<br />
التصنيف الخاصة بالجهاز مع النظام الكهرباءي؛ علماً<br />
بأن القيام بأي خطأ في عملية التوصيل سيوءدي إلى<br />
إلغاء الضمان.<br />
استبدال قابس المأخذ الرءيسي<br />
في حالة الهاجة لتركيب قابس جديد للمأخذ الرءيسي، يلزم<br />
اتباع ما يلي:<br />
• التخلص من القابس القديم على نهو آمن.<br />
• توصيل السلك البني اللون بالطرف المتصل بالتيار في<br />
القابس الجديد.<br />
• توصيل السلك الأزرق اللون بالطرف المهايد.<br />
• في حال كون المنتج من الفئة 1 (سلك تأريض)، فهينئذ<br />
يتعين توصيل السلك الأخضر/ الأصفر اللون بالطرف<br />
الأرضي.<br />
تحذير! في حالة كون المنتج من الفئة 2 الأسلاك مزدوجة<br />
العزل (التي يوجد بها سلكان فقط في مجموعة الأسلاك)،<br />
فعندءذ لا ينبغي التوصيل بالطرف الأرضي.<br />
11
ARABIC<br />
12<br />
اتبع تعليمات التركيب والتوصيل المرفقة مع القوابس<br />
عالية الجودة.<br />
يجب أن تتوافق أية قطع بديلة لقاطع التيار مع نفس فئة<br />
قاطع التيار الأصلي المزود بالمنتج.<br />
التجميع<br />
• يلزم تنظيف أجزاء الماكينة قبل استخدامها؛ كما<br />
يرجى الإطلاع على قسم "الصيانة والتنظيف"<br />
للهصول على المزيد من التفاصيل.<br />
تركيب الإبريق<br />
• قم بوضع الإبريق على وحدة المهرك، بهيش يكون<br />
الخط الموجود في قاعدة المقبض متوافقاً مع رمز<br />
القفل غير المغلق الموجود على قاعدة المهرك.<br />
• قم بإدارة الإبريق باتجاه عقارب الساعة إلى أن<br />
يتمركز الخط في اتجاه متقابل مع رمز القفل المغلق؛<br />
مع التأكد من تجميع الإبريق ووحدة المهرك بالشكل<br />
الصهيه وإحكام غلقهما في موضعهما.<br />
تركيب الغطاء وغطاء فتهة التعبئة<br />
• قم بمهاذاة رمز الداءرة الموجود على الغطاء برمز<br />
القفل غير المغلق الموجود على الإبريق.<br />
• قم بخفض الغطاء على الإبريق، مع الهفاظ على<br />
محاذاة كلا الرمزين،<br />
• قم بإدارة الإبريق باتجاه عقارب الساعة إلى أن<br />
يتمركز رمز الداءرة في اتجاه محاذي مع رمز القفل<br />
غير المغلق؛ مع التأكد من إحكام غلق الإبريق والغطاء<br />
في موضعهما.<br />
• يجب، بغية تركيب غطاء فتهة التعبئة، خفضه على<br />
الغطاء؛ مع التأكد من توافق ألسنه غطاء فتهة التعبئة<br />
بين فتهتي القطع المتواجدتين على الغطاء.<br />
• قم بدفع غطاء فتهة الهشو للأسفل لغلقه في موضعه.<br />
تركيب صينية التقطير<br />
• قم بوضع صينية التقطير على المسارات الموجودة<br />
على قاعدة المهرك.<br />
الاستخدام<br />
• قم بإزالة غطاء الإبريق ووضع المكونات داخل الإبريق؛<br />
وينبغي للهصول على أفضل النتاءج تقطيع المكونات<br />
إلى قطع صغيرة. قم بتقطيع المكونات الجافة إلى قطع<br />
صغيرة قبل مزجها في الماكينة.<br />
• قم بإعادة غطاء الإبريق لضمان تركيب غطاء فتهة<br />
التعبئة.<br />
• قم بتركيب الإبريق على قاعدة المهرك؛ وتأكد من<br />
تركيب الإبريق والغطاء بالشكل الصهيه، وإلا فلن<br />
تعمل ماكينة إعداد شراب السموثي.<br />
تحذير! تأكد من ضبط القرص الدوار الخاص<br />
بالتهكم في السرعة عند وضع الإغلاق عند الرقم<br />
"0" قبل توصيل قابس ماكينة إعداد شراب<br />
السموثي بمصدر التيار الرءيسي.<br />
• قم بتوصيل قابس وحدة المهرك في مقبس مصدر<br />
التيار الرءيسي المناسب وقم بتشغيله.<br />
• لتشغيل الماكينة، قم بضبط القرص الدوار الخاص<br />
بالتهكم في السرعة عند الرقم "1"، أما لزيادة السرعة،<br />
فإنه يتعين إدارة القرص الدوار في اتجاه عقارب<br />
الساعة.<br />
ملهوظة: الرقم "1" يشير إلى السرعة الأقل، في حين يشير<br />
الرقم "3" إلى السرعة القصوى.<br />
• يمكن بدلاً من ذلك مزج المكونات في دورات قصيرة عن<br />
طريق الإدارة واستمرار الضغط على مفتاه التهكم في<br />
السرعة عند وضع النبض؛ أما للتوقف، فإنه يتعين ترك<br />
المفتاه.<br />
تنبيه! لا تقم بتشغيل الوحدة تشغيلاً مستمرًا<br />
لأكثر من دقيقة واحدة دون فترة راحة تستغرق<br />
دقيقتين.<br />
يمكن إزالة غطاء فتهة التعبئة بعناية لتزويد الإبريق<br />
بالمكونات أثناء عملية المعالجة عند الضرورة.<br />
تحذير! لا تقم بوضع أصابعك داخل الإبريق عند<br />
إضافة المكونات.
ARABIC<br />
• قم بمزج المكونات حتى الهصول على ساءل سلس؛<br />
ويجب عند اكتمال عملية المعالجة، ضبط القرص<br />
الدوار الخاص بالتهكم في السرعة عند وضع الإغلاق<br />
عند الرقم "0"؛ ثم قم بغلق الخلاط وإزالة القابس من<br />
مصدر التيار الرءيسي.<br />
ملهوظة: حافظ داءماً على إحكام غلق غطاء فتهة<br />
التعبئة، ما لم يتم إضافة المكونات إلى الخلاط.<br />
تحذير! انتظر حتى توقف كافة الأجزاء<br />
المتهركة قبل إزالة الغطاء أو الإبريق.<br />
• لتقديم شراب السموثي، قم بضغط الكوب برفق على<br />
ذراع التوزيع الموجود على قاعدة المهرك.<br />
• قم بترك الذراع عند امتلاء الكوب.<br />
ملهوظة: لتسهيل عملية توزيع أخر كمية من شراب<br />
السموثي السميك، فإنه يتعين إضافة مقدار ملاعق صغيرة<br />
من السواءل لتسهيل جريان الشراب.<br />
ملهوظة: قم داءماً بغسل الإبريق بعد الاستخدام، ولا تترك<br />
الأطعمة لتتجفف في الإبريق أو الصمام أو مجموعة<br />
التوزيع حيش قد يوءدي تجفيفهم إلى تصعيب عملية<br />
التنظيف.<br />
استخدام ماكينة إعداد شراب السموثي<br />
لجرش الشلج<br />
ملهوظة: لتهقيق أفضل النتاءج، قم بترك مكعبات الشلج<br />
لتذوب قليلاً قبل جرشها. لجرش مكعبات ثلج منزلية<br />
(صغيرة)، فإنه يتعين ملأ الإبريق بها حتى 750مل<br />
وإضافة 200 مل من المياه؛ أما لجرش مكعبات ثلج<br />
(كبيرة) لبيعها في المتاجر، فإنه يتعين إضافة 15 مكعب<br />
ثلج في إبريق الخلاط وإضافة 200 مل من المياه.<br />
• قم بإزالة غطاء الإبريق ووضع كمية المياه ومكعبات<br />
الشلج الموصى بها داخل الإبريق.<br />
• قم بإعادة غطاء الإبريق لضمان تمركز غطاء فتهة<br />
التعبئة في موضعها؛ وتأكد من ضبط القرص الدوار<br />
الخاص بالتهكم في السرعة عند وضع الإغلاق عند<br />
الرقم "0" قبل توصيل قابس ماكينة إعداد شراب<br />
السموثي بمصدر التيار الرءيسي.<br />
• قم بتوصيل قابس ماكينة إعداد شراب السموثي في<br />
مقبس مصدر التيار الرءيسي المناسب وقم بتشغيلها.<br />
• قم بمزج الخليط في دورات قصيرة بواسطة الاستمرار<br />
في الضغط على مفتاه التهكم في السرعة عند وضع<br />
النبض والتوقف عن الضغط.<br />
• عند الرغبة في جرش مكعبات الشلج، فإنه لا ينبغي<br />
وضع ما يزيد عن 6 مكعبات ثلج (ذات أحجام تعادل<br />
25×35×25مم تقريبًا) في إبريق الخلاط وإدارة<br />
مقبض التهكم وصولاً إلى وضع النبض لمرات قليلة.<br />
• لا تقم بمزج كميات كبيرة من المكونات الصلبة في<br />
نفس الوقت. ولتهقيق نتاءج جيدة، فإننا ننصه بمزج<br />
هذه المكونات على مراحل تتألف من مجموعات<br />
صغيرة.<br />
تنبيه! لا تقم بتشغيل الوحدة تشغيلاً مستمرًا<br />
لأكثر من دقيقة واحدة دون فترة راحة تستغرق<br />
دقيقتين.<br />
• قم، عند اكتمال عملية المزج، بغلق الوحدة وإزالة<br />
القابس من مصدر التيار الرءيسي.<br />
نصاءه مفيدة<br />
• يتم تحقيق أفضل النتاءج عند مزج الأطعمة الطازجة،<br />
حيش تتجفف الأطعمة طبيعياً عند تخزينها لأية فترة<br />
زمنية.<br />
• قم بإعداد الفواكه والخضروات مسبقاً وقم بوضع القطع<br />
التي تم تقطيعها في وعاء معد لعملية المزج؛ وقم<br />
بتقطيع الفواكه والخضروات إلى قطع صغيرة تتناسب<br />
مع فتهة الغطاء، ولكن لا تبالغ في تقطيعها إلى قطع<br />
متناهية الصغير.<br />
• لا تحاول إدخال قطع كبيرة من الفواكه والخضروات<br />
في فتهة الغطاء، حيش يتعين تقطيعها إلى قطع صغيرة<br />
أولاً.<br />
• لا تحتاج، كقاعدة عامة، إلى تقشير أي فواكه<br />
وخضروات يوءكل قشرتها في العادة؛ إلا إننا نوصي<br />
بغسل كافة المنتجات قبل مزجها.<br />
13
ARABIC<br />
• يُضمن عدم احتواء الخضروات العضوية المعتمدة على<br />
أي مخلفات كيماءية، إلا أنه يوصى بغسلها حيش قد تم<br />
معالجتها باليد قبل بيعها.<br />
• قم بإزالة القشور من الفواكه سميكة القشرة مشل<br />
الشمام والأناناس.<br />
• قم بإزالة نواة الكرز والخوخ والدراق، إلى ما غير ذلك.<br />
• قم بإزالة النواة من التفاه والأجاص.<br />
التنظيف والصيانة<br />
• يسهل تنظيف الماكينة بعد الاستخدام مباشرة.<br />
• لا تستخدم الكهول أو الأستون أو أي عناصر أو مواد<br />
تنظيف كاشطة في تنظيف الماكينة.<br />
• قم بتنظيف وحدة المهرك باستخدام قطعة قماش<br />
مبللة.<br />
• لا تقم بغمر وحدة المهرك في المياه ولا تقوم بشطفها<br />
تحت صنبور المياه.<br />
لإزالة الموزع<br />
• قم بسهب الغطاء<br />
• ارفع الموزع<br />
• قم بتهريك الموزع للأمام وللخارج.<br />
• قم بجذب الصمام كما هو موضه أدناه في الصورة،<br />
ولا تقم بدفع الصمام بقوة.<br />
ملهوظة:يجب لإعادة التجميع، عكس الخطوات السابقة<br />
والتهقق من إحكام غلق الصمام في موضعه قبل إجراء<br />
عملية المزج مرة أخرى؛ ويجب أن يتهاذى السهم الصغير<br />
الموجود على واجهة الصمام مع السهم الصغير الموجود<br />
أسفل الإبريق حيش تبرز صورة القفل المغلق؛ وفي حالة<br />
عدم إحكام غلق الصمام بالشكل المناسب، فهينئذ سوف<br />
تتسرب المكونات من فتهة الصرف الموجودة في أسفل<br />
الإبريق.<br />
المعطيات الفنية<br />
الفولطية 220-240 ف ~<br />
50/60 هرتز<br />
التيار الكهربي 450 وات<br />
استهلاك الطاقة 2.5 كيلوجرام<br />
وزن المنتج 1.2 متر<br />
طول السلك لإزالة الصمام من الإبريق<br />
• قم بإدارة الإبريق بزاوية بهيش يمكن إمساك الصمام<br />
بسهولة.<br />
• قم بإدارة الصمام إلى وضع غير الإغلاق (باتجاه<br />
صورة القفل غير المغلق).<br />
14
ARABIC<br />
¿Éª°†dG<br />
انطلاقًا من اعتزاز بلاك آند ديكر بجودة منتجاتها، فإنها<br />
تعرض ضمان مميز.<br />
يعد بيان الضمان هذا إضافة إلى حقوقكم القانونية ولا<br />
يخل بها بأي حال من الأحوال.<br />
يسرى هذا الضمان داخل إقليم الدول الأعضاء في الاتحاد<br />
الأوربي ومنطقة التجارة الهرة الأوربية.<br />
إذا ما أصبه منتج بلاك آند ديكر معيبًا بسبب وجود أي<br />
عيوب في الصناعة أو المواد أو عدم توافق المنتج مع<br />
المعايير المهددة خلال 24 شهراً من تاريخ الشراء، فهينئذ<br />
تضمن بلاك آند ديكر تبديل الأجزاء المعيبة أو إصلاه<br />
المنتجات وفقًا لنسبة الإهلاك بالاستخدام العادي أو<br />
تبديل هذه المنتجات لضمان توفير الراحة للعميل ما لم:<br />
يتم استخدام المنتج لأغراض تجارية أو مهنية أو<br />
للتأجير؛<br />
يتم إساءة استخدام المنتج أو إهماله؛<br />
يتعرض المنتج لأي ضرر نتيجة لوجود عناصر أو<br />
مواد خارجية بها أو تعرضها لهادش؛<br />
يتم محاوله إصلاحها من قبل أشخاص من غير<br />
الوكلاء المصره لهم أو فريق صيانة التابع لشركة<br />
بلاك آند ديكر.<br />
يجب تقديم ما يشبت عملية الشراء إلى الباءع أو وكيل<br />
الصيانة المصره له لتتمكن من المطالبة بالهصول على<br />
المزايا الممنوحة بموجب هذا الضمان؛ ويمكنكم التهقق<br />
من مكان أقرب وكيل صيانة مصره له بالنسبة لكم عن<br />
طريق الاتصال بمكتب بلاك آند ديكر المهلي على العنوان<br />
المشار إليه في هذا الدليل.<br />
كما يتوفر بدلاً من ذلك الهصول على قاءمة بوكلاء<br />
الصيانة المصره لهم التابعين لشركة بلاك آند ديكر<br />
والتعرف على التفاصيل الكاملة المتعلقة بخدمات ما بعد<br />
البيع عن طريق الموقع الإلكتروني:<br />
www.2helpU.com<br />
áÄ«ÑdG ájɪM<br />
الجمع المنفصل. يلزم عدم التخلص من هذا<br />
المنتج مع القمامة المنزلية العادية.<br />
إذا لزم في يوم من الأيام استبدال منتج بلاك آند ديكر<br />
الخاص بك، أو إذا لم تعد تستخدمه، فلا تتخلص منه مع<br />
القمامة المنزلية الأخرى، بل تأكد من إتاحة هذا المنتج<br />
للجمع المنفصل.<br />
• توفر شركة بلاك آند ديكر مرفق لإعادة تدوير<br />
منتجات بلاك آند ديكر بمجرد وصولها إلى نهاية<br />
عمرها وعدم صلاحيتها للعمل. ويتم تقديم هذه<br />
الخدمة مجانًا. للاستفادة من هذه الخدمة، يرجى<br />
إعادة المنتج إلى أي وكيل صيانة معتمد والذي سوف<br />
يتولى بدوره جمع المنتجات نيابة عنا.<br />
• يمكنك التعرف على موقع أقرب وكيل صيانة معتمد<br />
من خلال الاتصال على مكتب بلاك آند ديكر المهلي<br />
في العنوان الموضه في هذا الدليل. وبدلاً من ذلك،<br />
توجد قاءمة بوكلاء الصيانة المعتمدين التابعين<br />
لشركة بلاك آند ديكر والتفاصيل الكاملة لخدمات ما<br />
بعد البيع ووساءل الاتصال الخاصة بنا على الإنترنت<br />
على الموقع الإلكتروني: .www.2helpU.com<br />
15
FRENCH<br />
1<br />
2<br />
3<br />
4<br />
Identification des pièces<br />
1. Bouchon de remplissage<br />
2. Couvercle<br />
3. Bol mélangeur<br />
4. Valve<br />
5. Protection<br />
6. Socle<br />
7. Bouton de commande rotatif<br />
8. Distributeur<br />
9. Bac de récupération<br />
5<br />
8 9<br />
6<br />
7<br />
16
Utilisation prévue<br />
Votre machine à smoothie Black & Decker a été<br />
conçue pour mélanger des fruits et des légumes<br />
et faire des smoothies. Cet appareil est destiné<br />
uniquement à un usage domestique.<br />
Lire attentivement ce mode d’emploi<br />
avant d’utiliser l’appareil.<br />
Consignes de sécurité<br />
• Avertissement! Lorsqu’on utilise un appareil<br />
électrique, il faut toujours respecter certaines<br />
règles de sécurité fondamentales,<br />
notamment les suivantes, afin de prévenir<br />
les risques d’incendie, de décharges<br />
électriques, de blessures corporelles ou de<br />
dégâts matériels.<br />
• L’utilisation est décrite dans ce mode<br />
d’emploi. L’utilisation d’un accessoire ou<br />
d’une pièce, ou l’exécution de toute<br />
opération avec cet appareil autres que celles<br />
recommandées dans ce mode d’emploi peut<br />
présenter un risque de blessures corporelles.<br />
• Conserver ce mode d’emploi pour le<br />
consulter ultérieurement.<br />
Utilisation de votre appareil<br />
• Prenez toujours des précautions pendant<br />
l’utilisation de l’appareil.<br />
• Ne tirez jamais sur le cordon d’alimentation<br />
pour débrancher la fiche de la prise. Gardez<br />
le cordon d’alimentation éloigné de la<br />
chaleur, des graisses et des arêtes vives.<br />
• Ne placez pas l’appareil sur ou près de<br />
sources de chaleur ou dans un four chauffé.<br />
• N’utilisez pas l’appareil à l’extérieur.<br />
• Ne laissez pas l’appareil fonctionner sans<br />
surveillance.<br />
• Attendez toujours l’arrêt complet des pièces<br />
en mouvement avant d’enlever le couvercle.<br />
• Protégez toujours le bloc moteur de l’eau ou<br />
d’une humidité excessive.<br />
FRENCH<br />
• Si le cordon d’alimentation est endommagé<br />
pendant le fonctionnement de l’appareil,<br />
débranchez l’appareil immédiatement. Ne<br />
touchez pas le cordon d’alimentation avant de<br />
l’avoir débranché de la prise électrique.<br />
• Débranchez l’appareil de l’alimentation<br />
électrique lorsqu’il n’est pas utilisé, avant de<br />
monter ou de démonter des pièces et avant<br />
de le nettoyer.<br />
• Ne mettez jamais vos doigts ou tout autre<br />
objet dans le tube d’alimentation lorsque<br />
l’appareil est en cours de fonctionnement.<br />
• Faites attention quand vous manipulez les<br />
lames coupantes, quand vous videz le bol et<br />
pendant le nettoyage.<br />
• Tenez le tube d’alimentation et les parties<br />
mouvantes à l’écart des vêtements amples ou<br />
des cheveux longs.<br />
• Avertissement! Une mauvaise utilisation<br />
peut causer des blessures.<br />
Sécurité d’autrui<br />
• Cet appareil n’est pas destiné à être utilisé<br />
par des personnes (y compris les enfants)<br />
dont les capacités physiques, sensorielles ou<br />
mentales sont réduites, ou dénuées<br />
d’expérience ou de connaissances, sauf si<br />
elles sont supervisées ou ont reçu des<br />
instructions concernant l’utilisation de<br />
l’appareil par une personne responsable de<br />
leur sécurité.<br />
• Les enfants doivent être surveillés pour<br />
s’assurer qu’ils ne jouent pas avec l’appareil.<br />
Après utilisation<br />
• Retirer la fiche de la prise et laisser l’appareil<br />
refroidir avant de le laisser sans surveillance<br />
et de changer, nettoyer ou inspecter les<br />
pièces de l’appareil.<br />
• Lorsqu’il n’est pas utilisé, l’appareil doit être<br />
rangé dans un endroit sec. Les enfants ne<br />
doivent pas avoir accès aux appareils rangés.<br />
17
FRENCH<br />
Inspection et réparations<br />
• Avant d’utiliser l’appareil, vérifiez qu’aucune<br />
pièce ne soit endommagée ou défectueuse.<br />
Vérifiez la présence de pièces cassées,<br />
d’interrupteurs endommagés ou toute autre<br />
condition qui pourraient affecter son<br />
fonctionnement.<br />
• Ne pas utiliser l’appareil si une pièce est<br />
endommagée ou défectueuse.<br />
• Faites réparer ou remplacer les parties<br />
endommagées ou défectueuses par un<br />
réparateur agréé.<br />
• Avant utilisation, vérifier l’état du cordon<br />
d’alimentation pour des signes de<br />
dommages, de vieillissement ou d’usure.<br />
• Ne pas utiliser l’appareil si le cordon<br />
d’alimentation ou la fiche secteur est<br />
endommagée ou défectueuse.<br />
• Si le cordon d’alimentation ou la prise est<br />
endommagée ou défectueuse, il doit être<br />
réparé par un réparateur agréé afin d’éviter<br />
tout danger. Ne coupez pas le cordon<br />
d’alimentation et n’essayez pas de le réparer<br />
vous-même.<br />
• Ne jamais essayer d’enlever ou de remplacer<br />
des pièces autres que celles mentionnées<br />
dans ce mode d’emploi.<br />
Consignes de sécurité<br />
supplémentaire pour les<br />
machines à smoothie<br />
• Ne plongez pas l’appareil, le cordon ou la<br />
fiche dans un liquide<br />
• Laissez toujours un espace suffisant autour<br />
de l’appareil pour la ventilation<br />
• Tenez les vêtements, les cheveux, les bijoux,<br />
etc. à l’écart des parties mouvantes.<br />
• N’utilisez pas l’appareil avec les mains<br />
humides.<br />
• Il faut être prudent lors de la manipulation<br />
des lames coupantes, en particulier lorsque<br />
vous retirez les lames du bol, videz le bol et<br />
pendant le nettoyage.<br />
• “Eteindre l’appareil avant de changer<br />
d’accessoire ou avant d’approcher les pièces<br />
en mouvement”.<br />
Sécurité électrique<br />
Avant d’utiliser l’appareil, vérifiez que la tension<br />
électrique correspond à celle indiquée sur<br />
l’étiquette signalétique.<br />
Cet appareil possède une double<br />
insolation conformément à la norme<br />
EN 60335-2-14; de ce fait un fil de<br />
terre n’est pas nécessaire.<br />
• Pour éviter les risques de décharges<br />
électriques, ne plongez pas le cordon, la<br />
fiche ou le bloc moteur dans l’eau ou tout<br />
autre liquide.<br />
• Vérifiez que la tension d’alimentation<br />
indiquée sur l’étiquette signalétique de<br />
l’appareil correspond bien à celle de votre<br />
installation électrique. Toute erreur de<br />
branchement annulerait la garantie.<br />
Remplacement d’une prise<br />
électrique<br />
En cas d’installation d’une nouvelle prise:<br />
• Jetez l’ancienne prise avec prudence.<br />
• Connectez le fil marron sur la borne sous<br />
tension de la nouvelle prise.<br />
• Connectez le fil bleu sur la borne neutre.<br />
• Si l’appareil est de classe l (mis à la terre),<br />
connectez le fil vert / jaune sur la borne.<br />
Avertissement! Si votre appareil est de classe ll<br />
double isolation (seulement 2 fils dans le<br />
cordon), aucune connexion n’est à faire sur la<br />
borne terre.<br />
18
FRENCH<br />
Suivez les instructions de montage fournies<br />
avec les prises de bonne qualité.<br />
Tout fusible remplacé doit être du même calibre<br />
que le fusible d’origine fourni avec l’appareil.<br />
Assemblage<br />
• Les pièces de l’appareil doivent être<br />
nettoyées avant son utilisation. Voir<br />
“Entretien et nettoyage” pour plus<br />
d’informations.<br />
Mise en place du bol<br />
• Posez le bol sur le bloc moteur en alignant le<br />
trait sculpté à la base de la poignée avec le<br />
symbole cadenas ouvert du socle moteur.<br />
• Faites pivoter le bol dans le sens des<br />
aiguilles d’une montre de façon à aligner le<br />
trait avec le symbole cadenas fermé.<br />
Assurez-vous que le bloc moteur et le bol<br />
sont correctement assemblés et verrouillés<br />
en position.<br />
Installation du couvercle et du<br />
bouchon de remplissage<br />
• Alignez le symbole cercle sur le couvercle<br />
avec le symbole cadenas ouvert sur le bol.<br />
• Abaissez le couvercle sur le bol en gardant<br />
les deux symboles alignés.<br />
• Faites pivoter le couvercle dans le sens des<br />
aiguilles d’une montre jusqu’à l’alignement<br />
du symbole cercle avec le symbole cadenas<br />
fermé. Assurez-vous que le couvercle et le<br />
bol sont bien verrouillés en position.<br />
• Pour placer le bouchon de remplissage,<br />
abaissez-le sur le couvercle. Alignez les<br />
pattes du bouchon de remplissage avec les<br />
deux encoches sur le couvercle.<br />
• Appuyez sur le bouchon de remplissage pour<br />
le verrouiller en position.<br />
Installation du bac de<br />
récupération<br />
• Faites glisser le bac de récupération dans les<br />
rainures du socle moteur.<br />
Utilisation<br />
• Retirez le couvercle du bol et placez les<br />
ingrédients dans le bol. Pour de meilleurs<br />
résultats, les ingrédients doivent être coupés<br />
en petits morceaux. Coupez les ingrédients<br />
secs en petits morceaux avant le mixage.<br />
• Remettez le couvercle sur le bol avec le<br />
bouchon de remplissage bien ajusté.<br />
• Enclenchez le bol sur le socle moteur.<br />
Assurez-vous que le bol et le couvercle sont<br />
correctement ajustés, sinon la machine à<br />
smoothie ne pourra pas fonctionner.<br />
Avertissement! Assurez-vous que la<br />
molette de commande de vitesse est<br />
réglée sur la position off ‘0’ avant de<br />
brancher la machine à smoothie au réseau<br />
électrique.<br />
• Branchez le bloc moteur sur une prise<br />
adéquate et enclenchez l’interrupteur de la<br />
prise.<br />
• Pour commencer, réglez la molette de<br />
contrôle de vitesse sur la position ‘1’. Pour<br />
augmenter la vitesse, faites tourner la<br />
molette de contrôle de vitesse dans le sens<br />
des aiguilles d’une montre.<br />
Remarque: La vitesse ‘1’ est la plus lente, la ‘3’<br />
la plus rapide.<br />
• Vous pouvez aussi mélanger les ingrédients<br />
par de courtes impulsions en faisant tourner<br />
et en tenant la molette de contrôle de vitesse<br />
sur la position PULSE. Relâchez-la pour<br />
arrêter.<br />
Attention! Ne faites pas fonctionner<br />
l’appareil sans interruption pendant<br />
plus d’une minute sans une période de<br />
repos de deux minutes.<br />
19
FRENCH<br />
Le bouchon de remplissage peut être enlevé<br />
avec précaution pour ajouter des ingrédients<br />
dans le bol pendant le mixage.<br />
Avertissement! Ne mettez pas vos<br />
doigts dans le bol lorsque vous<br />
ajoutez les ingrédients.<br />
• Laissez les ingrédients se mélanger jusqu’à<br />
obtenir une consistance homogène. Une fois<br />
le mixage terminé, réglez la molette de<br />
contrôle de vitesse sur la position off ‘0’.<br />
Eteignez et débranchez le blender de<br />
l’alimentation secteur.<br />
Remarque: Gardez toujours le bouchon de<br />
remplissage enclenché en position, sauf si vous<br />
ajoutez des ingrédients dans le blender.<br />
Avertissement! Attendez jusqu’à<br />
l’arrêt complet de toutes les pièces<br />
mouvantes avant de retirer le<br />
couvercle ou le bol.<br />
• Pour servir un smoothie, il suffit d’appuyer<br />
votre verre contre le levier du distributeur sur<br />
le socle moteur.<br />
• Quand le verre est rempli, relâchez le levier.<br />
Remarque: Pour vous aider à verser le reste<br />
d’un smoothie épais, ajoutez quelques cuillerées<br />
à soupe de liquide pour un meilleur débit.<br />
Remarque: Lavez toujours immédiatement<br />
après utilisation. Ne laissez pas de nourriture<br />
sécher dans le bol, la valve ou le distributeur,<br />
car cela rendrait le nettoyage difficile.<br />
Utilisation de la machine à<br />
smoothie pour broyer de la<br />
glace<br />
Remarque: Pour de meilleurs résultats laissez<br />
les glaçons dégivrer légèrement avant le<br />
broyage. Pour broyer des (petits) glaçons faits<br />
maison remplissez le bol jusqu’à 750ml et<br />
ajoutez 200ml d’eau. Pour broyer des (gros)<br />
glaçons achetés en supermarché, mettez 15<br />
glaçons dans le bol mélangeur et ajoutez 200ml<br />
d’eau.<br />
20<br />
• Enlevez le couvercle du bol et mettez les<br />
glaçons puis l’eau dans le bol.<br />
• Remettez le couvercle du bol en s’assurant<br />
que le bouchon de remplissage est bien en<br />
place. Vérifiez que la molette de contrôle de<br />
vitesse est réglée sur la position off ‘0’ avant<br />
de brancher la machine à smoothie au<br />
réseau d’alimentation.<br />
• Branchez la fiche et allumez la machine à<br />
smoothie sur la prise secteur.<br />
• Mélangez par de courtes impulsions en<br />
tenant et en relâchant la molette de contrôle<br />
de vitesse sur la position PULSE.<br />
• Si vous voulez broyer des glaçons, ne mettez<br />
pas plus de 6 glaçons (environ<br />
25x35x25mm) dans le bol mélangeur et<br />
tournez la molette de contrôle de vitesse sur<br />
la position pulse à quelques reprises.<br />
• Ne mélanger pas une grande quantité<br />
d’ingrédients solides à la fois. Pour obtenir<br />
de bons résultats, nous vous conseillons de<br />
mélanger ces ingrédients par plusieurs<br />
petites quantités.<br />
Attention! Ne faites pas fonctionner<br />
l’appareil sans interruption pendant<br />
plus d’une minute sans une période<br />
d’arrêt de deux minutes.<br />
• Lorsque le mélange est terminé, éteignez et<br />
débranchez l’appareil de l’alimentation<br />
secteur.<br />
Conseils utiles<br />
• Vous obtiendrez de meilleurs résultats avec<br />
des produits frais, car les produits qui ont été<br />
stockés pendant quelque temps seront secs<br />
par nature.<br />
• Préparez vos fruits et légumes à l’avance et<br />
placez les morceaux dans un plat prêts pour<br />
le mélange. Coupez vos fruits et légumes en<br />
morceaux suffisamment petits pour qu’ils<br />
passent facilement par le trou du couvercle,<br />
mais ne les coupez pas trop petits.
FRENCH<br />
• N’essayez jamais de forcer des gros<br />
morceaux de fruits ou de légumes par le trou<br />
du couvercle, coupez-les en petits morceaux<br />
dès le départ.<br />
• En règle générale, vous n’avez pas besoin<br />
de peler les fruits ou les légumes dont vous<br />
consommer la peau normalement.<br />
Cependant nous vous conseillons de laver<br />
tous les produits avant de les mélanger.<br />
• Les légumes certifiés biologiques sont<br />
garantis ne pas contenir de résidus de<br />
produits chimiques mais ils doivent toujours<br />
être lavés, car ils ont été manipulés avant la<br />
vente.<br />
Pour enlever la valve du bol<br />
• Tournez le bol sur un angle afin de pouvoir<br />
saisir la valve facilement.<br />
• Tournez la valve en position déverrouillée<br />
(vers le symbole cadenas ouvert).<br />
• Sortez-la comme indiqué. Ne forcez pas la<br />
valve.<br />
• Enlevez la peau des fruits à peau épaisse,<br />
comme le melon et l’ananas.<br />
• Enlevez les noyaux des cerises, des pêches,<br />
des nectarines etc.<br />
• Enlevez les pépins des pommes et des<br />
poires.<br />
Entretien et nettoyage<br />
• Il est plus facile de nettoyer l’appareil<br />
immédiatement après son utilisation.<br />
• N’utilisez pas de produits abrasifs, tampons à<br />
récurer, acétone, alcool etc. pour nettoyer<br />
l’appareil.<br />
• Nettoyez le bloc moteur avec un chiffon<br />
humide.<br />
• Ne jamais plonger le bloc moteur dans l’eau<br />
ni le rincer sous le robinet.<br />
Pour enlever le distributeur<br />
• Remontez la protection.<br />
• Soulevez le distributeur.<br />
Remarque: Pour remonter l’appareil, inversez la<br />
procédure ci-dessus et vérifiez que la valve est<br />
bien verrouillée en place avant de recommencer<br />
à mélanger. La petite flèche sur l’avant de la<br />
valve sera alignée avec la petite flèche sur le<br />
bas du bol où est affiché le symbole cadenas<br />
fermé. Si la valve n’est pas correctement<br />
verrouillée en place, le contenu va fuir par le trou<br />
de vidange au fond du bol.<br />
Données techniques<br />
Tension 220-240V ~<br />
Courant d’alimentation 50/60Hz<br />
Puissance nominale 450W<br />
Poids de l’appareil 2,5 kg<br />
Longueur du cordon 1,2 mètre<br />
• Déplacez le distributeur vers l’avant et<br />
sortez-le.<br />
21
FRENCH<br />
Protection de l'environnement<br />
Collecte séparée. Ce produit ne doit<br />
pas être jeté avec les déchets<br />
domestiques normaux.<br />
Si vous décidez de remplacer ce produit Black &<br />
Decker, ou si vous n'en avez plus l'utilité, ne le<br />
jetez pas avec vos déchets domestiques<br />
Rendez-le disponible pour une collecte séparée.<br />
• Black & Decker fournit un dispositif<br />
permettant de collecter et de recycler les<br />
produits Black & Decker lorsqu'ils ont atteint<br />
la fin de leur cycle de vie. Pour pouvoir<br />
profiter de ce service, veuillez retourner votre<br />
produit à un réparateur agréé qui se chargera<br />
de le collecter pour nous.<br />
• Pour connaître l'adresse du réparateur agréé<br />
le plus proche de chez vous, contactez le<br />
bureau Black & Decker à l'adresse indiquée<br />
dans ce manuel. Vous pourrez aussi trouvez<br />
un liste des réparateurs agréés de Black &<br />
Decker et de plus amples détails sur notre<br />
service après-vente sur le site Internet à<br />
l'adresse suivante : www.2helpU.com<br />
22
FRENCH<br />
Garantie<br />
Black & Decker est confiant dans la qualité de<br />
ses appareils et accorde une garantie<br />
exceptionnelle.<br />
Ce certificat de garantie est un document<br />
supplémentaire et ne peut en aucun cas se<br />
substituer à vos droits légaux.<br />
La garantie est valable sur tout le territoire des<br />
Etats Membres de l’Union Européenne et de la<br />
Zone de Libre Echange Européenne.<br />
Lorsqu’un appareil Black & Decker s’avère<br />
défectueux en raison d’un défaut matériel, d’un<br />
défaut de fabrication ou d’un manque de<br />
conformité dans les 24 mois à compter de la date<br />
d’achat, Black & Decker garantit le<br />
remplacement des pièces défectueuses, la<br />
réparation ou le remplacement des appareils<br />
soumis à une usure normale à la convenance du<br />
client, sauf dans les circonstances suivantes:<br />
Utilisation de l’appareil à des fins<br />
commerciales, professionnelles ou en<br />
location;<br />
Mauvaise utilisation de l’appareil ou<br />
appareil endommagé à cause de<br />
négligence;<br />
Appareil endommagé par d’autres<br />
appareils, des substances ou par accident;<br />
Réparations tentées par des personnes<br />
autres qu’un réparateur agréé ou le service<br />
technique de Black & Decker.<br />
Pour avoir recours à la garantie, il est nécessaire<br />
de fournir une preuve d’achat à votre revendeur<br />
ou à un réparateur agréé. Pour connaitre<br />
l’adresse du réparateur agréé le plus proche,<br />
contactez le bureau Black & Decker à l’adresse<br />
indiquée dans ce manuel.<br />
Vous pouvez aussi trouver une liste des<br />
réparateurs agréés Black & Decker et de plus<br />
amples détails sur notre service après-vente en<br />
visitant notre site: www.2helpU.com.<br />
23
Names & Addresses for Black & Decker Service Concessionaries<br />
ALGERIA: SARL Outillage Corporation, After Sale Service Center-08, Rue Mohamed Boudiaf - Cheraga, Algiers, Algeria, Tel:<br />
+213 21 375131, Fax: +213-0-369667. AZERBAIJAN: Kontakt - NN LLC, M.Qashqay 43, Baku, Azerbaijan Az1000. Tel:<br />
+994 12 4082050, Fax: +994 12 4117090. BAHRAIN: Alfouz Services Co. WLL., P.O. Box 26562, Tubli, Manama, Tel: +973-17783562/<br />
17879987, Fax: +973-17783479. Kewalram & Sons Co. WLL P.O. Box 84, Manama, Kingdom of Bahrain, Tel: +973-17213110/ 17210617/<br />
17210619, Fax: +973-17213211/ 17210627. BANGLADESH: Ultra Corporation, 8, Kushol Centre, Uttara, Dhaka 1230. Tel:<br />
+880-2-8922144, Fax: +880-2-8951339. EGYPT: Anasia Egypt for Trading S.A.E, P.O. Box 2443, 9, Mostafa Refaat Street,<br />
Sheraton Heliopolis 11361, Cairo, Tel: +202-22684159, Fax: +202-22684169. ETHIOPIA: Seif Sherif Trade PLC -Arada Sub City,<br />
Kebele 01-02, Global Insurance Bldg., 2nd Flr. Room 43, P.O.Box 2525, Addis Ababa, Ethiopia, Tel: 00-251-11-1563968/ 1563969, Fax:<br />
00-251-11-1558009. INDIA: Gryphon Appliances Ltd., D-6/4, Okhla Industrial Area, Phase-I, New Delhi-110020, Tel: +91-11-46731111,<br />
Fax: +91-11-46731111. JORDAN: Bashiti Hardware, 93 King Abdullah 2nd St., Opp ELBA House, P.O. Box 3005, Tel: +962-6-5349098<br />
ext.11, Fax: +962-6-5330731. KENYA: Leading Concepts, P.O. Box: 40877-00100, Nairobi, Kenya. Tel: +254 20 690 5000, Fax:<br />
+254 20 690 5111. KUWAIT: Al Omar Technical Co., P.O. Box 4062, Safat 13041, Kuwait, Tel: 00965-24848595/ 24840039, Fax:<br />
00965-24845652. The Sultan Centre, P.O. Box 26567-13126 Safat, Kuwait, Tel: 00965-24343155 Etn. 432, Fax: 00965-24319071.<br />
LEBANON: Aces Service Centre, P.O. Box 90-102, Nahr El Mot, Seaside Highway, Pharaon Building, Beirut. Tel: 00961-1-898989, Fax:<br />
00961-1-245880. LIBYA: Homeworld Co., Building No.5, Senidal St., Amr Ibn Elaas Road, Benghazi, Libya. Tel: 00218-61-9094183.<br />
Service Center1 - Benghazi: Tel: +218-061-3383994, Fax: +218-092-7640688, Service Center2 - Tripoli: Tel: +218-021-3606430, Fax:<br />
+218-092-6514813. MALTA: John G Cassar Ltd. 36-Victory Street, Qormi QRM 06, Malta. Tel: +356-21493251, Fax: +356-21483231.<br />
MAURITIUS: J.M. Goupille & Co. Ltd., Rogers Industrial Park 1, Riche Terre, Mauritius, Tel: +230 206 9450/ +230 207 1700, Fax:<br />
+230 206 9474/ +230 248 3188. MOROCCO: UATS 26 Rue Ennarjisse, Hay Erraihan, Beausejour - Hay Hassani-Casablanca, Morocco.<br />
Tel: +212 522945114, Fax: +212 522942442. NEPAL: Universal Electrocom, Tripureshwor, Kathmandu, Nepal. Tel:+977-1-4265191.<br />
NIGERIA: Dana Electronics Ltd. (Lagos) 116/ 120, Apapa Oshodi Express Way, Isolo, Lagos, Nigeria. Tel: +234-17431818/<br />
+234-8037767774/ +234-8057445477. (Abuja) 18, A.E. Ekukinam Street, Off Obsfemi Awolowo Road, Utako, Abuja, Nigeria. Tel:<br />
+234-8032276101/ +234-8037767774. (Kano) 9A - Mai Malari Road, Bompai, Kano, Nigeria. Tel: +234-8053294947/ +234-8037767774.<br />
OMAN: Oman Marketing & Service Co. (Omasco), P.O. Box 2734, Behind Honda Showroom, Wattayah, Oman, Tel: +968-24560232/<br />
24560255, Fax: +968-24560993. Oman Marketing & Service Co. (Omasco), Al Ohi, Sohar, Oman, Tel: +968-26846379, Fax:<br />
+968-26846379. Oman Marketing & Service Co. (Omasco) - Sanaya, Salalah, Oman, Tel: 00968-23212290, Fax: +968-23210936.<br />
PAKISTAN: Ammar Service & Spares - 60-Bank Arcade, Serai Road, Karachi, Pakistan, Tel: 0092-21-32426905, Fax: 0092-21-32427214.<br />
PHILIPPINES: 476 J. P. Rizal St., cor Kakarong St. Brgy Olympia, Makati City, Tel: +632 403-5698. QATAR: Al Muftah Service Centre -<br />
Al Wakrah Road, P.O. Box 875, Doha, Qatar. Tel: 00974-4650880/ 4650110/ 4446868, Fax: 00974-4441415/ 4662599. SAUDI ARABIA:<br />
(Al Khobar) Al-Suwaiket Catering & Trading Co., P.O.Box 4228, King A.Aziz Street, Al Khobar, Tel: +966-3-8591088, Fax:<br />
+966-3-8595648. Fawaz Ebrahim Al Zayani Trading Est. P.O. Box 76026, Al Khobar #31952, Tel: +966-3-8140914, Fax: +966-3-8140824.<br />
(Jeddah) Banaja Trading Co. Ltd, P.O. Box 366, Jeddah-21411, Tel: +966-2-6511111, Fax: +966-2-6503668. (Riyadh) Banaja Trading Co.<br />
Ltd, P.O. Box 566, Riyadh-11421, Tel: 00966-1-4124444, Fax: +966-1-4033378. SOUTH AFRICA: Trevco Power Tool Service 14<br />
Steenbok Street, Koedoespoort, 0186, Pretoria, South Africa, Tel: +27-86-1873826, Fax: +27-86-5001771. SRI LANKA: Delmege<br />
Construction Products (Pvt) Ltd., No 101 Vinayalankara Mawatha, Colombo-10, Sri Lanka, Tel: +94-11-2693361-7, Service hotline:<br />
+94-77-2211111. TUNISIA: Société Tunisienne De Manutention - Rue de la Physique, Nouvelle Zone Industrielle de Ben Arous-2013<br />
Tunisie, Tel: +216-71-386102/ 380620, Fax: +216-71380412 ext 216. UGANDA: Anisuma Investment and Services Ltd., J R complex,<br />
Ware House No.5, Plot No 101, 3rd Street Industrial Area, Jinja Road, Kampala, Tel: +256-414237106. UAE: (Abu Dhabi)<br />
Light House Electrical, P.O. Box 120, Abu Dhabi, Tel: +971-2-6726131, Fax: +971-2-6720667. (Al Ain) Zillion Equipment and Spare Parts<br />
Trading LLC, P.O. Box 19740, Opp. Bin Sadal/Trimix Redymix Sanaiya, Al Ain. Tel: +971-3-7216690, Fax:+971-3-7216103 (Dubai)<br />
Black & Decker (Overseas) GmbH, P.O. Box 5420, Dubai, Tel: +971-4-8127400/ 8127406, Fax: +971-4-2822765. (Musaffah) Light House<br />
Electrical, P.O. Box 120, Abu Dhabi, Tel: +971-2-5548315, Fax: +971-2-5540461. (Sharjah) Mc Coy Middle East LLC, P.O. Box 25793,<br />
Sharjah, Tel: +971-6-5395931, Fax: +971-6-5395932. (Ras Al Khaimah) Mc Coy Middle East LLC, P.O.Box 10584, Ras Al Khaimah, Tel:<br />
+971-7-2277095, Fax: +971-7-2277096. YEMEN: (Aden) Muala St., Tel: +967 2 222670, Fax: +967 2 222670. (Sana'a) Middle East Trad.<br />
Co. Ltd., P.O. Box 12363, Hayel Street, Sana'a. Tel: +967-1-204201, Fax: +967-1-204204. (Taiz) Middle East Trading Co. (METCO),<br />
5th Flr.Hayel Saeed Anam Bldg, Al-Mugamma St. Taiz, Yemen, Tel: +967-4-213455, Fax: +967-4-219869.
≈ßr Ë ´Mu«Ê «∞∂Uzl<br />
¢U¸¥a «∞Ad«¡<br />
«∞d±e «∞∂d¥bÍ<br />
«∞FMu«Ê<br />
«ùßr<br />
WARRANTY REGISTRATION CARD<br />
YOUR NAME/<br />
YOUR ADDRESS<br />
POSTCODE<br />
DATE OF PURCHASE<br />
DEALER'S NAME & ADDRESS/<br />
PRODUCT MODEL NO. BS600