Télécharger la notice - Terraillon
Télécharger la notice - Terraillon
Télécharger la notice - Terraillon

You also want an ePaper? Increase the reach of your titles
YUMPU automatically turns print PDFs into web optimized ePapers that Google loves.
<strong>Terraillon</strong> France & Headquarters<br />
B.P. 73 - 78 403 Chatou Cedex - France<br />
Service consommateurs : 0 826 88 1789<br />
serviceconsommateurs@terraillon.fr<br />
Service après vente :<br />
<strong>Terraillon</strong> chez MGF logistique<br />
ZI d’Epluches - Rue des Préaux<br />
95310 St Ouen - l’Aumône<br />
<strong>Terraillon</strong> UK Ltd<br />
2 The Waterhouse<br />
Waterhouse Street - Hemel Hempstead<br />
Herts HP1 1ES - UK<br />
Tel: +44 (0)1442 270444 - sales@terraillon.co.uk<br />
<strong>Terraillon</strong> Deutsch<strong>la</strong>nd GmbH<br />
Gehlengraben 2<br />
D-22415 Hamburg - Deutsch<strong>la</strong>nd<br />
Tel: + 49 (0)40 53 300 600 - info@terraillon.de<br />
<strong>Terraillon</strong> SRL<br />
Via Ercole Oldofredi, 39<br />
Mi<strong>la</strong>no - Italia<br />
Tel: +39 (0)2 66114199<br />
<strong>Terraillon</strong> Asia Pacific Ltd<br />
4/f, Eastern Centre<br />
1065 King’s Road<br />
Quarry Bay - Hong Kong<br />
Tel: +852 (0)2960 7288<br />
<strong>Terraillon</strong> Corp<br />
3737 Glenwood Ave, Ste 100<br />
Raleigh, NC, USA 27612<br />
Tel: 1-919-573-6039 - customerserviceusa@terraillon.com<br />
www.petit-terraillon.com<br />
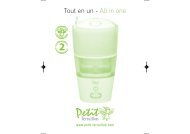
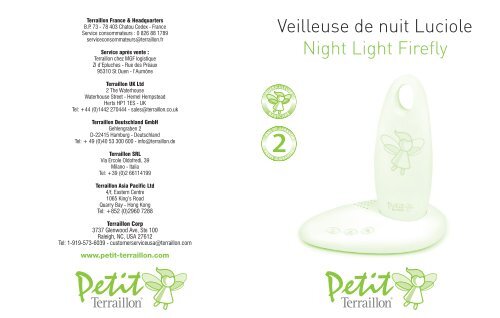
Veilleuse de nuit Luciole<br />
Night Light Firefly
Veilleuse de nuit Luciole .............................................................. p 1<br />
Night Light Firefly ........................................................................ p 6<br />
Glimwormnacht<strong>la</strong>mpje................................................................ p 11<br />
Glühwürmchen-Nachtleuchte .................................................... p 16<br />
Lumino da notte Luccio<strong>la</strong> ............................................................p 21<br />
Lámpara Luciérnaga....................................................................p 26<br />
Luz de presença Piri<strong>la</strong>mpo.......................................................... p 31
VEILLEUSE DE NUIT LUCIOLE<br />
Cher(e) client(e),<br />
Vous venez d’acquérir ce produit et nous vous en remercions.<br />
Nous vous en souhaitons un excellent usage et afin d’en obtenir entière satisfaction<br />
nous vous recommandons de lire attentivement cette <strong>notice</strong> d’utilisation.<br />
Cette veilleuse de nuit Petit <strong>Terraillon</strong> est une veilleuse lumineuse et musicale programmable.<br />
Elle possède 2 lumières rose ou bleue et 3 types de mélodies pour aider votre bébé à passer une<br />
bonne nuit. Vous pouvez <strong>la</strong> programmer afin qu’elle se déclenche automatiquement aux pleurs<br />
de votre bébé. Plus tard, sa poignée arrondie permettra à votre enfant de l'emmener avec lui<br />
pour être rassuré.<br />
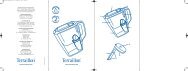
DESCRIPTION PRODUIT<br />
VEILLEUSE DE NUIT LUCIOLE<br />
a. Poignée de transport<br />
b. Luciole<br />
c. Adaptateur secteur / transformateur<br />
d. Socle de chargement<br />
e. Témoin lumineux<br />
f. Bouton “Mode automatique”<br />
g. Bouton “Musique”<br />
h. Bouton “Lumière”<br />
i. Haut-parleur<br />
j. Bouton de volume<br />
k. Connecteurs<br />
j<br />
i<br />
f<br />
g<br />
h<br />
k<br />
e<br />
d<br />
b<br />
a<br />
c<br />
DESSOUS DE LA VEILLEUSE LUCIOLE DESSOUS DU SOCLE DE CHARGEMENT<br />
a. Bouton “marche/arrêt”<br />
b. Bouton de sélection de <strong>la</strong> couleur<br />
(rose ou bleue)<br />
a. Bouton de sélection “Lumière seule”<br />
ou “Lumière et musique”<br />
b. Bouton de sélection du temps<br />
c. Bouton de sélection : “type de musique”<br />
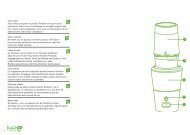
CHARGEMENT DE LA VEILLEUSE LUCIOLE<br />
• Connectez l’adaptateur secteur au socle de chargement et branchez-le sur une prise secteur.<br />
• Déposez <strong>la</strong> Luciole sur son socle de chargement.<br />
• Veillez à <strong>la</strong> bonne connexion entre les connecteurs du socle de chargement et ceux<br />
de <strong>la</strong> Luciole. Le témoin lumineux doit clignoter en rouge durant le temps de charge.<br />
• A <strong>la</strong> fin du chargement le témoin de couleur rouge reste allumé en continu.<br />
Vous pouvez alors sortir <strong>la</strong> veilleuse Luciole de son socle.<br />
• La première utilisation nécessite un chargement de 10 à 12 heures.<br />
• Le temps de charge normal est d’environ 10 heures.<br />
• La veilleuse Luciole peut rester allumée en continue, en dehors de son socle, pendant une période<br />
d’environ 7 heures.<br />
• Suite à quelques jours de non utilisation <strong>la</strong> veilleuse peut se décharger même si elle n’est pas utilisée.<br />
Pensez à <strong>la</strong> recharger régulièrement sur son socle de chargement.<br />
CONNEXION<br />
DES CONNECTEURS<br />
NON<br />
OK<br />
1 2<br />
a<br />
b<br />
a<br />
b c
3<br />
FONCTION VEILLEUSE (LUMIÈRE)<br />
Choix de <strong>la</strong> couleur de <strong>la</strong> lumière :<br />
• La veilleuse peut diffuser 2 lumières douces au choix. Une lumière rose ou une lumière bleue.<br />
• Le bouton de sélection de <strong>la</strong> couleur est situé sous <strong>la</strong> veilleuse. Sortir <strong>la</strong> veilleuse de son socle<br />
de chargement pour changer <strong>la</strong> couleur.<br />
• Positionnez le bouton de sélection de <strong>la</strong> lumière face au picto de couleur rose ou bleu au choix.<br />
Allumer <strong>la</strong> lumière de <strong>la</strong> veilleuse :<br />
• Si <strong>la</strong> veilleuse est pausée sur son socle de chargement, appuyez sur le bouton “lumière” du socle<br />
pour l’allumer ou l’éteindre.<br />
• Si <strong>la</strong> veilleuse est sortie de son socle, appuyez sur le bouton “marche/arrêt” de <strong>la</strong> veilleuse<br />
pour l’allumer ou l’éteindre.<br />
• Si <strong>la</strong> veilleuse est allumée et en dehors de son socle, et que vous <strong>la</strong> reposez sur son socle, <strong>la</strong> lumière<br />
s’éteint automatiquement. Appuyer sur le bouton “lumière” ou “mode automatique” du socle<br />
pour rallumer <strong>la</strong> lumière.<br />
• Si vous n’avez pas éteint <strong>la</strong> lumière avec le bouton “marche arrêt” avant de reposer <strong>la</strong> veilleuse<br />
sur son socle, elle s’allumera automatiquement si vous <strong>la</strong> ressortez de son socle.<br />
FONCTION MUSIQUE<br />
• Pour choisir le type de musique que vous souhaitez, positionnez le bouton de sélection “type de musique”<br />
situé sous le socle de chargement, face au numéro correspondant :<br />
1 - les battements du cœur (rappe<strong>la</strong>nt ceux de maman)<br />
2 - une mélodie douce<br />
3 - les sons de <strong>la</strong> nature<br />
• Puis, pour allumer <strong>la</strong> musique, appuyer sur le bouton “musique” du socle.<br />
• La musique s’éteint automatiquement au bout de 5 minutes, de manière progressive.<br />
• Vous pouvez régler le niveau sonore du haut parleur à l’aide du bouton de volume situé sur le côté du socle.<br />
FONCTION MODE AUTOMATIQUE<br />
• Appuyez sur le bouton “Mode automatique” pour activer cette fonction.<br />
La veilleuse Luciole se déclenche alors automatiquement à <strong>la</strong> voix et aux bruits.<br />
• Appuyer de nouveau sur le bouton “Mode automatique” pour désactiver cette fonction.<br />
• Vérifiez au préa<strong>la</strong>ble que les options sélectionnées au dos de <strong>la</strong> veilleuse et du socle de chargement<br />
vous conviennent.<br />
• Au dos de <strong>la</strong> veilleuse, sélectionnez <strong>la</strong> couleur de <strong>la</strong> veilleuse (rose ou bleue).<br />
• Au dos du socle de chargement, sélectionnez “lumière seule” ou “lumière et musique”,<br />
le temps de programmation et le type de mélodie (cf paragraphe “FONCTION MUSIQUE” ci-dessus).<br />
• Au delà du temps sélectionné, <strong>la</strong> veilleuse s’éteint automatiquement et de manière progressive.<br />
• Le temps programmé s’applique exclusivement à <strong>la</strong> lumière de <strong>la</strong> veilleuse. Si vous avez sélectionné<br />
le mode “Lumière et musique”, <strong>la</strong> musique s’éteint systématiquement au bout de 5 minutes.<br />
Modes “Lumière seule” “Lumière et musique”<br />
15 mn 15 minutes 15 minutes pour <strong>la</strong> lumière et 5 minutes pour <strong>la</strong> musique<br />
30 mn 30 minutes 30 minutes pour <strong>la</strong> lumière et 5 minutes pour <strong>la</strong> musique<br />
Temps<br />
∞ (Infini)<br />
Lumière allumée<br />
en continue jusqu’à<br />
Lumière allumée en continue<br />
jusqu’à interruption manuelle<br />
interruption manuelle<br />
& 5 minutes pour <strong>la</strong> musique<br />
• Le mode automatique ne fonctionne pour <strong>la</strong> lumière que si <strong>la</strong> veilleuse est dans son socle<br />
de chargement. Si <strong>la</strong> veilleuse n’est pas dans son socle et si le mode “Lumière et musique”<br />
a été sélectionné, seule <strong>la</strong> musique se déclenche automatiquement à <strong>la</strong> voix ou aux bruits,<br />
pendant une durée de 5 minutes.<br />
CONSEILS D’UTILISATION<br />
• Dans le cas d’un usage quotidien et afin de préserver <strong>la</strong> capacité de <strong>la</strong> batterie, il est conseillé de <strong>la</strong>isser<br />
<strong>la</strong> Luciole en charge sur le socle.<br />
• Si vous n’utilisez pas <strong>la</strong> veilleuse Luciole de manière quotidienne, il est conseillé de débrancher<br />
l’adaptateur secteur.<br />
• La veilleuse ne doit être utilisée qu’avec l’adaptateur secteur fourni.<br />
• Ne jamais toucher les connecteurs du socle de chargement et de <strong>la</strong> Luciole avec un outil métallique, car<br />
ce<strong>la</strong> risquerait d’endommager <strong>la</strong> veilleuse.<br />
• Ne tentez jamais de démonter l’appareil si le câble d’alimentation est endommagé ou pour tout autre<br />
problème. Toutes les réparations doivent être effectuées par le fabricant, le service après-vente de votre<br />
fournisseur ou un professionnel agréé.<br />
• Le transformateur n’est pas un jouet. Toujours le tenir éloigné de l’enfant.<br />
• Ne pas exposer <strong>la</strong> veilleuse au rayonnement du soleil, à un environnement humide, chaud<br />
ou poussiéreux.<br />
• Ne jamais démonter ni immerger <strong>la</strong> Luciole ou son socle de chargement.<br />
• La veilleuse Luciole est uniquement adaptée à un usage intérieur.<br />
• Disposer l’appareil loin d’une source de chaleur ou de projection d’eau.<br />
ENTRETIEN<br />
• Veillez à toujours débrancher <strong>la</strong> veilleuse lors du nettoyage. Vous pouvez ensuite nettoyer prudemment <strong>la</strong><br />
Luciole et le socle de chargement avec un linge humide en évitant soigneusement les 3 connecteurs.<br />
• Vérifiez que toutes les zones soient parfaitement sèches avant de rebrancher l’adaptateur secteur ou de<br />
remettre en tension <strong>la</strong> Luciole.<br />
4
5<br />
CARACTÉRISTIQUES TECHNIQUES<br />
Socle de chargement : Adaptateur secteur - 5V, 200mA<br />
Veilleuse : 3 piles rechargeables 1,2V 300mAH<br />
Déclenchement du mode automatique à partir de 70 dB si le socle de chargement est situé<br />
à environ 1 mètre de l’enfant.<br />
PROTECTION DE L’ENVIRONNEMENT<br />
Déposer les piles usagées dans un container prévu à cet effet pour qu’elles soient collectées<br />
et recyclées. Ne pas mé<strong>la</strong>nger différents types de piles. En fin de vie, confier ce produit à un point<br />
de collecte pour le recyc<strong>la</strong>ge des déchets d’équipements électriques et électroniques.<br />
GARANTIE<br />
Ce produit est garanti contre les défauts de matériaux et de fabrication. Pendant <strong>la</strong> période de garantie, de tels<br />
défauts seront réparés gratuitement (<strong>la</strong> preuve d’achat devra être présentée en cas de réc<strong>la</strong>mation sous<br />
garantie). Cette garantie ne couvre pas les dommages résultant d’accidents, de mauvaise utilisation ou de<br />
négligence. En cas de réc<strong>la</strong>mation, contacter en premier lieu le magasin où vous avez effectué votre achat.<br />
Conserver soigneusement ces instructions pour toute consultation ultérieure.<br />
NIGHT LIGHT FIREFLY<br />
Dear Customer,<br />
Thank you for purchasing this <strong>Terraillon</strong> product. We hope you enjoy using the product. In order<br />
to be completely satisfied, we recommend you read these instructions carefully.<br />
This Petit <strong>Terraillon</strong> product is a programmable and musical night light. Its 2 lights (pink or blue)<br />
and 3 types of melodies help your baby pass a peaceful night. The night light can be programmed<br />
to start automatically whenever your baby cries. When older, its rounded handle allows your<br />
child to carry it around and be comforted by it.<br />
PRODUCT DESCRIPTION<br />
FIREFLY NIGHT LIGHT<br />
a. Carrying handle<br />
b. Firefly<br />
c. Mains adapter / transformer<br />
d. Charger stand<br />
e. Indicator light<br />
f. “Automatic mode” button<br />
g. “Music” button<br />
h. “Light” button<br />
i. Loud-speaker<br />
j. Volume button<br />
k. Connectors<br />
j<br />
i<br />
f<br />
g<br />
h<br />
k<br />
e<br />
d<br />
b<br />
a<br />
c<br />
6
7<br />
FIREFLY NIGHT LIGHT – UNDERNEATH CHARGER STAND – UNDERNEATH<br />
a. “On/off” button<br />
b. Night light colour selection button<br />
(pink or blue)<br />
CHARGING THE FIREFLY NIGHT LIGHT<br />
• Connect the mains adapter to the charger stand and then connect the plug to the mains.<br />
• P<strong>la</strong>ce the Firefly night light on the charger stand.<br />
• Check that the connectors on the charger stand and the Firefly night light are correctly inserted.<br />
The LED indicator must show a red f<strong>la</strong>shing light whilst it is charging.<br />
• When it is fully charged, the red light will stop f<strong>la</strong>shing but remain on. You can then remove the Firefly<br />
night light from its stand.<br />
• When using the night light for the first time, charging will take 10 to 12 hours.<br />
• The normal charging time is approximately 10 hours.<br />
• When not p<strong>la</strong>ced on its stand, the Firefly night light can remain on for approximately 7 hours.<br />
• If the night light is not used for several days, it can lose power, even when it has not been used.<br />
The light should be charged regu<strong>la</strong>rly using its charger stand.<br />
CONNECTION<br />
OF CONNECTORS<br />
NO<br />
a<br />
b<br />
a. Selection button: “Only light” or “Light and music”<br />
b. Time selection button<br />
c. “Type of music” selection button<br />
YES<br />
a<br />
b c<br />
OPERATION<br />
NIGHT LIGHT FUNCTION<br />
Selecting the colour of the light<br />
• The night light offers a choice of two muted colours: a pink light or a blue light.<br />
• The button to select the colour of the light is located underneath the night light. To change the colour,<br />
remove the night light from its charger stand.<br />
• Select the light colour you prefer by moving the button so it is p<strong>la</strong>ced against either the pink<br />
or blue picture.<br />
Switching the night light on<br />
• If the night light is kept on its charger stand, press the “light” button on the stand to switch it on or off.<br />
• If the night light is not kept on its stand, press the “on/off” button on the night light to switch it on or off.<br />
• If the night light is switched on and is not on its stand, when you rep<strong>la</strong>ce it on the stand, the light will automatically<br />
switch off. Press the “light” or “automatic mode” button on the stand to switch the light back on.<br />
• If you do not switch off the light using the “on/off” button before p<strong>la</strong>cing the night light on its stand, it<br />
will automatically switch on when you remove it from the stand.<br />
MUSIC FUNCTION<br />
• To select your preferred type of music, move the “type of music” selection button (located underneath the<br />
charger stand) to the corresponding number:<br />
1 - heartbeat (mimics a mother's heartbeat)<br />
2 - a gentle melody<br />
3 - nature sounds<br />
• After this, to switch the music on, just press the “music” button on the stand.<br />
• The music will automatically switch off after 5 minutes in a gradual fashion.<br />
• You can adjust the sound level of the speaker using the volume button located on the side of the stand.<br />
AUTOMATIC FUNCTION MODE<br />
• Press the “Automatic mode” button to activate this function. The Firefly night light is triggered<br />
automatically in the presence of voices or noise.<br />
• Press the “Automatic mode” button again to deactivate this function.<br />
• First check that the options selected on the back of the night light and the charger stand are those you require.<br />
• At the back of the night light, select the light colour required (pink or blue).<br />
• On the back of the charger stand, select “only light” or “light and music”, and the programming time<br />
and type of melody (see the “Music function” paragraph above).<br />
• At the end of the time selected, the night light will gradually and automatically switch off.<br />
The programmed time exclusively applies to the light on the night light. If the “Light and music” mode<br />
is on, the music will systematically switch off after 5 minutes.<br />
8
9<br />
Modes “Light only” “Light and music”<br />
15 mn 15 minutes 15 minutes for the light and 5 minutes for the music<br />
30 mn 30 minutes 30 minutes for the light and 5 minutes for the music<br />
Time<br />
∞ (Infinity)<br />
Light remains continuously<br />
on until switched<br />
off manually<br />
Light remains continuously on until switched<br />
off manually & music remains on for 5 minutes<br />
• The automatic mode only works for the light when the night light is on its charger stand. If the<br />
night light is not p<strong>la</strong>ced in its stand and if the “Light and music” mode has been selected, only the<br />
music will be triggered automatically in the presence of voices or noises, for a period of 5 minutes.<br />
DIRECTIONS FOR USE<br />
• If used daily and in order to preserve the capacity of the battery, we recommend that the Firefly night light<br />
should remain on its charger stand.<br />
• If you do not use the Firefly night light every day, it is recommended that you disconnect the mains adapter.<br />
• The night light should only be used with the mains adapter supplied.<br />
• Never use a metal implement on the connectors of the charger stand or the Firefly night light, as this may<br />
damage the night light.<br />
• Do not attempt to dismantle the device if the power lead is damaged or if any other problems are<br />
encountered. Only the manufacturer, your supplier's after-sales service or an approved technician should<br />
carry out any repairs required.<br />
• The transformer is not a toy. Always keep away from children.<br />
• Do not expose the night light to sunlight, humidity, heat or dust.<br />
• Never dismantle the Firefly night light or its charger stand or immerse them in water.<br />
• The Firefly night light is only suitable for indoor use.<br />
• Use the device away from a heat source or water.<br />
MAINTENANCE<br />
• Always disconnect the device when cleaning it. The Firefly night light and its charger can then be<br />
cleaned with a damp cloth, carefully avoiding the 3 connectors.<br />
• Check that it is completely dry before reconnecting the mains adapter or connecting the Firefly night<br />
light to a power source.<br />
SPECIFICATIONS<br />
Charger stand: Mains adapter - 5 V, 200 mA<br />
Night light: 3 rechargeable batteries (1.2 V, 300 mAH)<br />
Automatic mode triggered from 70 dB, and when the charger stand is located approximately 1 metre away<br />
from the child.<br />
ENVIRONMENTAL PROTECTION<br />
Deposit empty batteries in a container designed for this purpose so they may be collected and<br />
recycled. Do not mix different battery types. At the end of the product's serviceable life, take it<br />
to an electrical and electronic equipment recycling collection point.<br />
WARRANTY<br />
This product offers a warranty against defective material and workmanship. During this period, such defects<br />
shall be repaired free of charge (proof of purchase should be presented whenever you have a comp<strong>la</strong>int<br />
during the warranty period).<br />
This warranty does not cover damage caused by accidents, misuse or negligence. In case of comp<strong>la</strong>int, please<br />
contact the shop from which you bought the device before contacting anyone else.<br />
Keep these instructions in a safe p<strong>la</strong>ce for future consultation.<br />
10
11<br />
GLIMWORMNACHTLAMPJE<br />
Geachte k<strong>la</strong>nt,<br />
Wij danken u hartelijk voor de aankoop van dit product.<br />
Wij hopen dat u veel plezier zult hebben van dit product. Wij raden u aan om de gebruiksaanwijzing<br />
aandachtig te lezen, zodat u het product naar volle tevredenheid kunt gebruiken.<br />
Dit nacht<strong>la</strong>mpje van Petit <strong>Terraillon</strong> is een programmeerbaar nacht<strong>la</strong>mpje met muziek. Het heeft<br />
twee roze of b<strong>la</strong>uwe <strong>la</strong>mpjes en 3 melodietjes die ervoor zorgen dat uw baby een goede nachtrust<br />
heeft. U kunt het zo programmeren dat het automatisch inschakelt wanneer uw baby huilt.<br />
Wanneer uw kindje wat ouder is, kan hij of zij het nacht<strong>la</strong>mpje gemakkelijk dragen dankzij de<br />
afgeronde handgreep. Dat geeft uw kind een veilig gevoel.<br />
BESCHRIJVING VAN HET APPARAAT<br />
GLIMWORMNACHTLAMPJE<br />
a. Handgreep<br />
b. Glimworm<br />
c. Netstroomadapter / transformator<br />
d. Laadstation<br />
e. Controle<strong>la</strong>mpje<br />
f. Knop “automatische modus”<br />
g. Knop “muziek”<br />
h. Knop “licht”<br />
i. Luidspreker<br />
j. Volumeknop<br />
k. Connectoren<br />
j<br />
i<br />
f<br />
g<br />
h<br />
k<br />
e<br />
d<br />
b<br />
a<br />
c<br />
ONDERZIJDE GLIMWORMNACHTLAMPJE ONDERZIJDE LAADSTATION<br />
a. Aan/uit-knop<br />
b. Knop om de kleur van het nacht<strong>la</strong>mpje<br />
te kiezen (roze of b<strong>la</strong>uw)<br />
HET GLIMWORMNACHTLAMPJE OPLADEN<br />
• Sluit de netstroomadapter aan op het <strong>la</strong>adstation en steek de adapter in het stopcontact.<br />
• P<strong>la</strong>ats de Glimworm in het <strong>la</strong>adstation.<br />
• Zorg ervoor dat de connectoren van de Glimworm goed in die van het <strong>la</strong>adstation zitten.<br />
Het rode controle<strong>la</strong>mpje moet knipperen tijdens het <strong>la</strong>den.<br />
• Als het nacht<strong>la</strong>mpje opge<strong>la</strong>den is, brandt het rode controle<strong>la</strong>mpje continu.<br />
Nu kunt u het Glimwormnacht<strong>la</strong>mpje van het <strong>la</strong>adstation halen.<br />
• Voor het eerste gebruik moet het nacht<strong>la</strong>mpje 10 à 12 uur opge<strong>la</strong>den zijn.<br />
• De normale <strong>la</strong>adtijd is ongeveer 10 uur.<br />
• Het Glimwormnacht<strong>la</strong>mpje blijft ongeveer 7 uur continu branden buiten het <strong>la</strong>adstation.<br />
• Indien het nacht<strong>la</strong>mpje enkele dagen niet gebruikt wordt, kan het automatisch leeglopen.<br />
Vergeet niet om het nacht<strong>la</strong>mpje regelmatig op te <strong>la</strong>den op het <strong>la</strong>adstation.<br />
AANSLUITING<br />
VAN DE CONNECTOREN<br />
NEE<br />
FONCTIONNEMENT<br />
a<br />
b<br />
a<br />
b c<br />
a. Keuzeknop: “alleen licht” of “licht en muziek”<br />
b. Keuzeknop voor de tijd<br />
c. Keuzeknop “soort muziek”<br />
OK<br />
12
13<br />
WERKING<br />
LICHTFUNCTIE<br />
De kleur van het licht kiezen<br />
• Het nacht<strong>la</strong>mpje kan naar keuze 2 zachte kleuren licht verspreiden. Roze of b<strong>la</strong>uw licht.<br />
• De knop om de kleur te kiezen bevindt zich onder het nacht<strong>la</strong>mpje. Verwijder het nacht<strong>la</strong>mpje uit het<br />
<strong>la</strong>adstation om de kleur te wijzigen.<br />
• P<strong>la</strong>ats de keuzeknop voor de kleur tegenover het pictogram voor de roze of b<strong>la</strong>uwe kleur.<br />
Het licht van het nacht<strong>la</strong>mpje aandoen<br />
• Als het nacht<strong>la</strong>mpje op het <strong>la</strong>atstation staat, drukt u op de knop “licht” van het <strong>la</strong>adstation om de <strong>la</strong>mp<br />
in- of uit te schakelen.<br />
• Als het nacht<strong>la</strong>mpje niet op het <strong>la</strong>adstation staat, drukt u op de aan/uit-knop van het nacht<strong>la</strong>mpje om het<br />
licht aan of uit te doen.<br />
• Als het nacht<strong>la</strong>mpje aan is en niet in het <strong>la</strong>adstation staat, gaat het licht automatisch uit wanneer u het<br />
nacht<strong>la</strong>mpje in het <strong>la</strong>adstation p<strong>la</strong>atst. Druk op de knop “licht” of “automatische modus” van het<br />
<strong>la</strong>adstation om het licht weer aan te doen.<br />
• Als u het licht niet uitgedaan hebt met de aan/uit-knop voordat u het nacht<strong>la</strong>mpje in het <strong>la</strong>adstation<br />
p<strong>la</strong>atst, gaat het licht automatisch branden wanneer u het nacht<strong>la</strong>mpje uit het <strong>la</strong>adstation neemt.<br />
MUZIEKFUNCTIE<br />
• Om het type muziek te kiezen dat u graag wilt horen, p<strong>la</strong>atst u de keuzeknop “soort muziek” aan de<br />
onderzijde van het <strong>la</strong>adstation tegenover een van de volgende nummers:<br />
1 - de harts<strong>la</strong>g (doet denken aan de harts<strong>la</strong>g van de moeder)<br />
2 - een zachte melodie<br />
3 - geluiden uit de natuur<br />
• Om de muziek aan te zetten, drukt u gewoon op de knop “muziek” op het <strong>la</strong>adstation.<br />
• De muziek stopt op geleidelijke wijze automatisch na 5 minuten.<br />
• U kunt het geluidsniveau van de luidspreker met de volumeknop aan de zijkant van het <strong>la</strong>adstation regelen.<br />
FUNCTIE AUTOMATISCHE MODUS<br />
• Druk op de knop “automatische modus” om deze functie te activeren. Het Glimwormnacht<strong>la</strong>mpje<br />
reageert op stemmen en geluiden waardoor het automatisch begint te werken.<br />
• Druk nogmaals op de knop “automatische modus” om deze functie uit te schakelen.<br />
• Controleer van tevoren of de opties op de onderzijde van het nacht<strong>la</strong>mpje en op het <strong>la</strong>adstation<br />
ingesteld zijn volgens uw wensen.<br />
• Selecteer de kleur van het licht op de onderzijde van het nacht<strong>la</strong>mpje (roze of b<strong>la</strong>uw).<br />
• Selecteer op de onderzijde van het <strong>la</strong>adstation “alleen licht” of “licht en muziek”, de programmeertijd<br />
en de melodie (zie punt “Muziekfunctie” hierboven).<br />
• Als de geselecteerde tijd voorbij is, gaat het nacht<strong>la</strong>mpje automatisch en geleidelijk uit.<br />
De geprogrammeerde tijd geldt alleen voor het licht van het nacht<strong>la</strong>mpje.<br />
• Als u de modus “licht en muziek” hebt geselecteerd, wordt de muziek<br />
altijd na 5 mintuten uitgeschakeld.<br />
Tidj<br />
Modi “Alleen licht ” “Licht en muziek ”<br />
15 mn 15 minuten 15 minuten voor het licht en 5 minuten voor de muziek<br />
30 mn 30 minuten 30 minuten voor het licht en 5 minuten voor de muziek<br />
∞ (oneindig)<br />
Licht blijft continu branden<br />
tot het handmatig<br />
uitgeschakeld wordt<br />
Licht blijft continu branden tot het handmatig<br />
uitgeschakeld wordt en de muziek<br />
blijft 5 minuten aan<br />
• De automatische modus werkt alleen voor het licht wanneer het nacht<strong>la</strong>mpje in het <strong>la</strong>adstation zit.<br />
Als het nacht<strong>la</strong>mpje niet in het <strong>la</strong>adstation zit en de modus “licht en muziek” geselecteerd is, begint<br />
alleen de muziek automatisch te werken als reactie op stemmen en geluiden gedurende 5 minuten.<br />
GEBRUIKSADVIEZEN<br />
• Indien het Glimwormnacht<strong>la</strong>mpje dagelijks gebruikt wordt, raden we aan om het nacht<strong>la</strong>mpje in het<br />
<strong>la</strong>adstation te <strong>la</strong>ten zitten, zodat de batterij altijd opge<strong>la</strong>den is.<br />
• Indien u het Glimworm<strong>la</strong>mpje niet dagelijks gebruikt, raden we aan om de netstroomadapter uit het<br />
stopcontact te halen.<br />
• Het nacht<strong>la</strong>mpje mag alleen gebruikt worden met de meegeleverde netstroomadapter.<br />
• Raak de connectoren van het <strong>la</strong>adstation en de Glimworm nooit aan met een metalen voorwerp.<br />
Hierdoor kan het nacht<strong>la</strong>mpje beschadigd raken.<br />
• Probeer het toestel niet te demonteren als het snoer beschadigd is of als er andere problemen zijn.<br />
Alle reparaties moeten worden uitgevoerd door de fabrikant, de k<strong>la</strong>ntenservice van uw leverancier of een<br />
erkend vakman.<br />
• De transformator is geen speelgoed. Houd hem buiten het bereik van kinderen.<br />
• Stel het nacht<strong>la</strong>mpje niet bloot aan direct zonlicht of aan een vochtige, warme of stoffige omgeving.<br />
• Demonteer of dompel de Glimworm of het <strong>la</strong>adstation niet onder in water of een andere vloeistof.<br />
• Het Glimwormnacht<strong>la</strong>mpje is alleen geschikt voor gebruik binnenshuis.<br />
• P<strong>la</strong>ats het toestel nooit dicht bij een warmtebron of opspattend water.<br />
ONDERHOUD<br />
•Verwijder de stekker van het nacht<strong>la</strong>mpje uit het stopcontact voor het reinigen. Daarna kunt u de<br />
Glimworm en het <strong>la</strong>adstation voorzichtig reinigen met een vochtige doek. Zorg ervoor dat u<br />
de 3 connectoren niet raakt.<br />
• Controleer of alle onderdelen volledig droog zijn voordat u de netstroomadapter weer in het stopcontact<br />
steekt of de Glimworm inschakelt.<br />
14
15<br />
TECHNISCHE GEGEVENS<br />
Laadstation: netstroomadapter – 5 V, 200 mA<br />
Nacht<strong>la</strong>mpje: 3 op<strong>la</strong>adbare batterijen 1,2 V 300 mAH<br />
De automatische modus start bij 70 dB als het <strong>la</strong>adstation zich op ongeveer 1 meter van het kind bevindt.<br />
ZORG VOOR HET MILIEU<br />
Lever lege batterijen bij een speciaal inzamelpunt in zodat ze ingezameld en gerecycleerd kunnen worden.<br />
Gebruik geen verschillende soorten batterijen bij elkaar. Gebruik geen nieuwe en oude batterijen<br />
samen. Lever dit product aan het einde van zijn levenscyclus in bij een inzamelpunt voor<br />
afgedankte elektrische en elektronische apparatuur zodat het gerecycleerd kan worden.<br />
GARANTIE<br />
Voor dit product geldt een garantie voor materiaal- en productiefouten. Tijdens de garantieperiode worden<br />
dergelijke gebreken gratis gerepareerd (als u een beroep doet op de garantie, moet u het aankoopbewijs<br />
overleggen).<br />
Schade ten gevolge van ongelukken, verkeerd gebruik of na<strong>la</strong>tigheid valt niet onder de garantie. Neem bij<br />
k<strong>la</strong>chten eerst contact op met de winkel waar u dit product hebt gekocht.<br />
Bewaar deze instructies zorgvuldig voor <strong>la</strong>ter gebruik.<br />
GLÜHWÜRMCHEN-NACHTLEUCHTE<br />
Sehr geehrte Kundin, sehr geehrter Kunde,<br />
wir danken Ihnen für das Vertrauen, das Sie uns mit dem Kauf dieses Produkts entgegengebracht<br />
haben.Damit der Betrieb dieses Produkts zu Ihrer vollen Zufriedenheit erfolgt, empfehlen wir Ihnen,<br />
diese Bedienungsanleitung aufmerksam zu lesen.<br />
Dieses Nachtlicht von Petit <strong>Terraillon</strong> ist ein programmierbares Nachtlicht mit Musik. Mit 2 rosa<br />
oder b<strong>la</strong>uen Leuchten und 3 verschiedenen Melodien verbringt Ihr Baby eine gute Nacht. Sie<br />
können es so programmieren, dass es automatisch angeht, wenn Ihr Baby zu weinen beginnt.<br />
Später kann Ihr Kind es am runden Griff greifen und nachts zur Beruhigung mitnehmen.<br />
PRODUKTBESCHREIBUNG<br />
GLÜHWÜRMCHEN-NACHTLEUCHTE<br />
a. Tragegriff<br />
b. Glühwürmchen<br />
c. Netzadapter/Transformator<br />
d. Ladesockel<br />
e. Kontrollleuchte<br />
f. Taste „Automatischer Modus“<br />
g. Taste „Musik“<br />
h. Taste „Licht“<br />
i. Lautsprecher<br />
j. Lautstärkesteller<br />
k. Steckverbinder<br />
j<br />
i<br />
f<br />
g<br />
h<br />
k<br />
e<br />
d<br />
b<br />
a<br />
c<br />
16
17<br />
UNTERSEITE DER GLÜHWÜRMCHEN<br />
-NACHTLEUCHTE<br />
a. Taste „Ein/Aus“<br />
b. Wahl der Farbe der Nachtleuchte<br />
(rosa oder b<strong>la</strong>u)<br />
LADEN DES GLÜHWÜRMCHEN-NACHTLICHTS<br />
• Den Netzadapter mit dem Ladesockel verbinden und ans Netz anschließen.<br />
• Das Glühwürmchen auf den Ladesockel stellen.<br />
• Auf die einwandfreie Verbindung zwischen Steckverbinder des Ladesockels und denen<br />
des Glühwürmchens acht geben.<br />
Während des Ladevorgangs muss die Kontrollleuchte rot blinken.<br />
• Nach Abschluss des Ladevorgangs leuchtet die Kontrollleuchte ununterbrochen. Dann können Sie die<br />
Glühwürmchen-Nachtleuchte vom Sockel nehmen.<br />
• Eine Ladezeit von 10 bis 12 Stunden ist vor der Erstnutzung erforderlich.<br />
• Der normale Ladevorgang dauert ca. 10 Stunden.<br />
• Die Glühwürmchen-Nachtleuchte bleibt außerhalb des Sockels ca. 7 Stunden <strong>la</strong>ng ununterbrochen in Betrieb.<br />
• Wurde die Nachtleuchte einige Tage nicht benutzt, kann sie sich von selbst ent<strong>la</strong>den. Vergessen Sie<br />
nicht, sie regelmäßig auf ihrem Ladesockel aufzu<strong>la</strong>den.<br />
VERBINDUNG<br />
DER STECKVERBINDER<br />
NEIN<br />
FONCTIONNEMENT<br />
a<br />
b<br />
UNTERSEITE DES LADESOCKELS<br />
a. Wähltaste: „Nur Licht“ oder „Licht und Musik“<br />
b. Wähltasten Dauer<br />
c. Wähltaste „Art Musik“<br />
OK<br />
a<br />
b c<br />
BETRIEB<br />
NACHTLICHTFUNKTION (LICHT)<br />
Wahl der Lichtfarbe<br />
• Das Nachtlicht hat zwei sanfte Leuchten zur Wahl. Entweder rosafarbenes Licht oder b<strong>la</strong>ues.<br />
• Die Farbwähltaste befindet sich unter der Nachtleuchte. Zum Ändern der Farbe ist die Nachtleuchte aus<br />
dem Sockel zu nehmen.<br />
• Die Farbwähltaste wahlweise zur Abbildung der Farbe rosa oder b<strong>la</strong>u hin stellen.<br />
Das Licht der Nachtleuchte einschalten<br />
• Steht die Nachtleuchte auf ihrem Ladesockel, drücken Sie am Sockel die Taste „Licht“, um sie ein- oder<br />
auszuschalten.<br />
• Steht die Nachtleuchte nicht auf ihrem Sockel, drücken Sie die Taste „Ein/Aus“, um die Nachtleuchte<br />
ein- bzw. auszuschalten.<br />
• Ist die Nachtleuchte eingeschaltet und außerhalb ihres Sockels, schaltet sie sich automatisch aus, sobald<br />
Sie sie auf den Sockel zurückstellen. Drücken Sie am Sockel die Taste „Licht“ oder „Automatischer<br />
Modus“, um das Licht wieder einzuschalten.<br />
• Haben Sie das Licht nicht mit der Taste „Betrieb Aus“ abgeschaltet, bevor Sie die Nachtleuchte auf ihren<br />
Sockel zurückstellten, schaltet sie sich automatisch wieder ein, sobald Sie sie wieder von ihrem Sockel<br />
nehmen.<br />
MUSIKFUNKTION<br />
• Zur Wahl der gewünschten Musik, stellen Sie die Wähltaste „Musikart“ unter dem Ladesockel zur<br />
entsprechenden Zahl hin:<br />
1 - Herzschläge (erinnern an die der Mutter)<br />
2 - eine sanfte Melodie<br />
3 - Klänge der Natur<br />
• Zum Einschalten der Musik, nur am Sockel die Tast „Musik“ drücken.<br />
• Nach 5 Minuten schaltet sich die Musik allmählich aus.<br />
• Die Lautstärke des Lautsprechers stellen Sie mit dem Lautstärkesteller auf der Sockelseite ein.<br />
AUTOMATISCHE MODUSFUNKTION<br />
• Zur Aktivierung dieser Funktion die Taste „Automatischer Modus“ drücken. Die Glühwürmchen-Nachtleuchte<br />
schaltet sich dann automatisch bei Stimmen oder Geräuschen ein.<br />
• Zur Deaktivierung dieser Funktion die Taste „Automatischer Modus“ erneut drücken.<br />
• Prüfen Sie im Vorfeld, ob Ihnen die auf der Rückseite der Nachtleuchte und am Ladesockel gewählten<br />
Optionen zusagen<br />
• Auf der Rückseite der Nachtleuchte wählen Sie die Farbe der Nachtleuchte (rosa oder b<strong>la</strong>u).<br />
• Auf der Rückseite des Ladesockels wählen Sie „Nur Licht“ oder „Licht und Musik“, die Programmierungsdauer<br />
und die Melodie (s. obigen Absatz „Musikfunktion“).<br />
• Nach Ab<strong>la</strong>uf der programmierten Dauer schaltet sich die Nachtleuchte allmählich automatisch aus.<br />
Die programmierte Zeit gilt nur für das Licht der Nachtleuchte. Haben Sie den Modus „Licht und Musik“<br />
ausgewählt, schaltet sich die Musik automatisch nach 5 Minuten ab.<br />
18
19<br />
Zeit<br />
Modi “Nur Licht” “Licht und Musik”<br />
15 mn 15 Minuten 15 Minuten Licht und 5 Minuten Musik<br />
30 mn 30 Minuten 330 Minuten Licht und 5 Minuten Musik<br />
∞ (Unendlich)<br />
Bis zum manuellen<br />
Ausschalten ununterbrochen<br />
eingeschaltetes Licht<br />
Bis zum manuellen Ausschalten ununterbrochen<br />
eingeschaltetes Licht & 5 Minuten Musik<br />
• Der automatische Modus Licht funktioniert nur, wenn die Nachleuchte auf ihrem Ladesockel steht.<br />
Befindet sich die Nachtleuchte nicht auf ihrem Sockel und wurde der Modus „Licht und Musik“ ausgewählt,<br />
schaltet sich bei Stimmen oder Geräuschen nur die Musik 5 Minuten <strong>la</strong>ng automatisch ein.<br />
NUTZUNGSEMPFEHLUNGEN<br />
• Bei tagtäglicher Benutzung und zum Erhalt der Batterieleistung wird empfohlen, das Glühwürmchen auf<br />
dem Sockel zu be<strong>la</strong>ssen.<br />
• Wird die Glühwürmchen-Nachtleuchte nicht tagtäglich benutzt, ist es ratsam, den Netzadapter<br />
herauszuziehen.<br />
• Die Nachtleuchte nur zusammen mit dem mitgelieferten Netzadapter benutzen.<br />
• Die Steckverbinder des Ladesockels und des Glühwürmchens nie mit einem Werkzeug aus Metall<br />
berühren, da dies die Nachleuchte beschädigen könnte.<br />
• Nie versuchen, das Gerät bei beschädigtem Kabel oder anderen Problemen auseinanderzunehmen.<br />
Alle Reparaturen sind vom Hersteller, dem Kundendienst Ihres Lieferanten oder einem anerkannten<br />
Fachmann auszuführen.<br />
• Der Transformator ist kein Spielzeug. Er ist immer außerhalb der Reichweite von Kindern aufzubewahren.<br />
• Die Nachtleuchte nicht direkter Sonneneinstrahlung, einer feuchten, warmen oder staubigen Umgebung<br />
aussetzen.<br />
• Weder das Glühwürmchen noch seinen Ladesockel auseinandernehmen oder in Flüssigkeit tauchen.<br />
• Die Glühwürmchen-Nachtleuchte ist ausschließlich für die Benutzung in geschlossenen<br />
Räumen geeignet.<br />
• Das Gerät in ausreichender Entfernung einer Wärmequelle oder eventueller Wasserspritzer aufstellen.<br />
PFLEGE<br />
•Bei Reinigung der Nachtleuchte ist der Stecker herauszuziehen. Das Glühwürmchen und den Ladesockel<br />
anschließend vorsichtig mit einem feuchten Tuch reinigen und darauf achten, die drei Steckverbinder<br />
tunlichst zu vermeiden.<br />
• Darauf achten, dass alle Bereiche rundum trocken sind, bevor der Netzadapter wieder in die Steckdose<br />
gesteckt wird oder das Glühwürmchen Strom bekommt.<br />
TECHNISCHE DATEN<br />
Ladesockel: Netzadapter - 5V, 200mA<br />
Nachtleuchte: 3 wiederauf<strong>la</strong>dbare Batterien 1,2V 300mAH<br />
Auslösen des automatischen Modus ab 70 dB, wenn der Ladesockel ca. 1 Meter vom Kind entfernt steht.<br />
UMWELTSCHUTZ<br />
Entsorgen Sie gebrauchte Batterien an einer Sammelstelle für Recyclingzwecke. Verwenden Sie keine<br />
unterschiedlichen Batterietypen. Verwenden Sie keine gebrauchten Batterien zusammen mit neuen<br />
Batterien. Entsorgen Sie dieses Produkt am Ende des Lebenszyklus an einer Sammelstelle<br />
zum Recycling elektrischer und elektronischer Altgeräte.<br />
GARANTIE<br />
Für dieses Produkt wird eine Garantie auf Material- und Herstellungsfehler gewährt. In der Garantiezeit<br />
werden derartige Mängel kostenlos behoben (der Kaufbeleg muss bei einer Rek<strong>la</strong>mation im Rahmen der<br />
Garantie vorgelegt werden).<br />
Beschädigungen, die durch Unfälle, unsachgemäße Verwendung oder Nachlässigkeit verursacht wurden, sind<br />
von dieser Garantie ausgeschlossen. Bei Rek<strong>la</strong>mationen setzen Sie sich bitte zunächst mit dem Geschäft in<br />
Verbindung, in dem Sie das Produkt gekauft haben.<br />
Heben Sie diese Gebrauchsanleitung sorgfältig auf.<br />
20
21<br />
LUMINO DA NOTTE LUCCIOLA<br />
Egregio cliente,<br />
<strong>la</strong> ringraziamo per avere acquistato questo prodotto.<br />
Al fine di poter utilizzare al meglio questo articolo e di poterne essere pienamente soddisfatto,<br />
Le consigliamo di leggere attentamente questa nota d'uso.<br />
Il lumino da notte programmabile Petit <strong>Terraillon</strong> è dotato di effetti luminosi e sonori. Dispone di<br />
2 luci (rosa o azzurra) e di 3 diverse melodie che aiutano il neonato a trascorrere una notte serena.<br />
Può essere programmato per attivarsi automaticamente al pianto del neonato. In seguito,<br />
il manico arrotondato permetterà al bambino di portarlo con sé per sentirsi rassicurato.<br />
DESCRIZIONE DEL PRODOTT<br />
LUMINO DA NOTTE LUCCIOLA<br />
a. Maniglia da trasporto<br />
b. Luccio<strong>la</strong><br />
c. Adattatore/Trasformatore<br />
d. Base di carica<br />
e. Spia luminosa<br />
f. Pulsante “Modo automatico”<br />
g. Pulsante “Musica”<br />
h. Pulsante “Luce”<br />
i. Altopar<strong>la</strong>nte<br />
j. Pulsante del volume<br />
k. Connettori<br />
j<br />
i<br />
f<br />
g<br />
h<br />
k<br />
e<br />
d<br />
b<br />
a<br />
c<br />
SOTTO IL LUMINO DA NOTTE LUCCIOLA SOTTO LA BASE DI CARICA<br />
a. Pulsante “Accendi/Spegni”<br />
b. Scegliere il colore del lumino da notte<br />
(rosa o azzurro)<br />
CARICAMENTO DEL LUMINO DA NOTTE LUCCIOLA<br />
• Collegare l'adattatore al<strong>la</strong> base di carica e inserirlo in una presa di corrente.<br />
• Appoggiare Luccio<strong>la</strong> sul<strong>la</strong> base di carica.<br />
• Verificare il collegamento tra i connettori del<strong>la</strong> base di carica e quelli di Luccio<strong>la</strong>.<br />
Durante <strong>la</strong> fase di carica <strong>la</strong> spia luminosa <strong>la</strong>mpeggia in rosso.<br />
• Al termine del caricamento, <strong>la</strong> spia rossa rimane accesa fissa. A questo punto è possibile sollevare<br />
il lumino da notte Luccio<strong>la</strong> dal<strong>la</strong> base.<br />
• Per il primo utilizzo è necessaria una carica di 10-12 ore.<br />
• Il tempo di carica normale è di circa 10 ore.<br />
• Il lumino da notte Luccio<strong>la</strong> può rimanere acceso in modo continuo, fuori dal<strong>la</strong> base, per circa 7 ore.<br />
• Dopo qualche giorno di non utilizzo, il lumino da notte può scaricarsi anche se non viene utilizzato.<br />
Ricordarsi di ricaricarlo rego<strong>la</strong>rmente sul<strong>la</strong> base di carica.<br />
COLLEGAMENTO<br />
DEI CONNETTORI<br />
NO<br />
FONCTIONNEMENT<br />
a<br />
b<br />
a<br />
b c<br />
a. Pulsante di selezione: “Solo luce” o “Luce e musica”<br />
b. Pulsante di selezione del tempo<br />
c. Pulsante di selezione “Tipo di musica”<br />
OK<br />
22
23<br />
FUNZIONAMENTO<br />
FUNZIONE LUMINO DA NOTTE (LUCE)<br />
Scelta del colore del<strong>la</strong> luce<br />
• Il lumino da notte può diffondere 2 luci morbide a scelta. Una luce rosa o una luce azzurra.<br />
• Il pulsante di selezione del colore è situato sotto il lumino da notte. Sollevare il lumino da notte dal<strong>la</strong><br />
base di carica per cambiare il colore.<br />
• Posizionare il pulsante di selezione del<strong>la</strong> luce sul simbolo di colore rosa o azzurro.<br />
Accendere <strong>la</strong> luce del lumino da notte<br />
• Se il lumino da notte è in pausa sul<strong>la</strong> base di carica, premere il pulsante “Luce” sul<strong>la</strong> base per<br />
accenderlo o spegnerlo.<br />
• Se il lumino da notte è fuori dal<strong>la</strong> base, premere il pulsante “Accendi/Spegni” per accenderlo<br />
o spegnerlo.<br />
• Se il lumino da notte è acceso fuori dal<strong>la</strong> base e viene riappoggiato sul<strong>la</strong> base, <strong>la</strong> luce si spegne<br />
automaticamente. Premere il pulsante “Luce” o “Modo automatico” sul<strong>la</strong> base per riaccendere <strong>la</strong> luce.<br />
• Se non si è spenta <strong>la</strong> luce con il pulsante "Accendi/Spegni" prima di riappoggiare il lumino da notte<br />
sul<strong>la</strong> base, questo si accenderà automaticamente quando viene risollevato dal<strong>la</strong> base.<br />
FUNZIONE MUSICA<br />
• Per scegliere il tipo di musica desiderato, posizionare sul numero corrispondente il pulsante di selezione<br />
“Tipo di musica” situato sul<strong>la</strong> base di carica:<br />
1 - i battiti del cuore (che ricordano quelli del<strong>la</strong> mamma)<br />
2 - una melodia dolce<br />
3 - i suoni del<strong>la</strong> natura<br />
• Per accendere <strong>la</strong> musica, è sufficiente premere il pulsante “Musica” sul<strong>la</strong> base.<br />
• La musica si spegne automaticamente dopo 5 minuti in modo progressivo.<br />
• È possibile rego<strong>la</strong>re il livello sonoro dell'altopar<strong>la</strong>nte servendosi del pulsante del volume situato sul fianco<br />
del<strong>la</strong> base.<br />
FUNZIONE MODO AUTOMATICO<br />
• Premere il pulsante “Modo automatico” per attivare questa funzione. Il lumino da notte Luccio<strong>la</strong> si attiva<br />
automaticamente con le voci e i rumori.<br />
• Premere nuovamente il pulsante “Modo automatico” per disattivare questa funzione.<br />
• Verificare prima che le opzioni selezionate sul retro del lumino da notte e del<strong>la</strong> base di carica siano corrette.<br />
• Sul retro del lumino da notte selezionare il colore del<strong>la</strong> luce (rosa o azzurro).<br />
• Sul retro del<strong>la</strong> base di carica selezionare “Solo luce” o “Luce e musica”, il tempo di programmazione e<br />
il tipo di melodia (vedi paragrafo “Funzione musica” qui sopra).<br />
• Una volta raggiunto il tempo selezionato, il lumino da notte si spegne automaticamente in modo progressivo.<br />
Il tempo programmato si applica solo al<strong>la</strong> luce del lumino da notte. Se è stato selezionato il modo “Luce<br />
e musica”, <strong>la</strong> musica si spegne sistematicamente dopo 5 minuti.<br />
Modi “Solo luce” “Luce e musica”<br />
15 mn 15 minuti 15 minuti per <strong>la</strong> luce e 5 minuti. per <strong>la</strong> musica<br />
30 mn 30 minuti 30 minuti per <strong>la</strong> luce e 5 minuti per <strong>la</strong> musica<br />
Tempo<br />
∞ (Infinito)<br />
Luce accesa fissa fino<br />
a interruzione manuale<br />
Luce accesa fissa fino a interruzione<br />
manuale e 5 minuti per <strong>la</strong> musica<br />
• Il modo automatico funziona per <strong>la</strong> luce solo se il lumino da notte è sul<strong>la</strong> base di carica.<br />
Se il lumino da notte non è sul<strong>la</strong> base ed è stato selezionato il modo "Luce e musica", solo <strong>la</strong> musica si<br />
attiva automaticamente per 5 minuti con le voci e i rumori.<br />
CONSIGLI D'UTILIZZO<br />
• Al fine di preservare <strong>la</strong> capacità del<strong>la</strong> batteria, in caso d'uso quotidiano si consiglia di <strong>la</strong>sciare Luccio<strong>la</strong> in<br />
carica sul<strong>la</strong> base.<br />
• Se il lumino da notte Luccio<strong>la</strong> non viene usato tutti i giorni, si consiglia di staccare l'adattatore dal<strong>la</strong> spina.<br />
• Il lumino da notte deve essere utilizzato solo con l'adattatore fornito.<br />
• Non toccare mai i connettori del<strong>la</strong> base di carica e di Luccio<strong>la</strong> con utensili metallici, in quanto il lumino<br />
da notte potrebbe risultarne danneggiato.<br />
• Non smontare l'apparecchio se il cavo di alimentazione è danneggiato o per altri problemi. Tutte le<br />
riparazioni devono essere effettuate dal fabbricante, dal servizio post-vendita del vostro fornitore o da un<br />
tecnico qualificato.<br />
• Il trasformatore non è un giocattolo. Tenerlo sempre fuori dal<strong>la</strong> portata dei bambini.<br />
• Non esporre il lumino da notte ai raggi del sole, a un ambiente umido, caldo o polveroso.<br />
• Non smontare né immergere Luccio<strong>la</strong> o <strong>la</strong> base di carica.<br />
• Il lumino da notte Luccio<strong>la</strong> non è adatto per l'uso all'aperto.<br />
• Posizionare l'apparato lontano da una fonte di calore o da schizzi d'acqua.<br />
MANUTENZIONE<br />
• Prima di procedere al<strong>la</strong> pulizia, staccare sempre <strong>la</strong> spina del lumino da notte. Pulire Luccio<strong>la</strong> e <strong>la</strong> base di<br />
carica con un panno umido, evitando accuratamente i 3 connettori.<br />
• Verificare che tutti i componenti siano perfettamente asciutti prima di ricollegare l'adattatore o di rimettere<br />
sotto tensione Luccio<strong>la</strong>.<br />
24
25<br />
CARATTERISTICHE TECNICHE<br />
Base di carica: Adattatore - 5 V, 200 mA<br />
Lumino da notte: 3 pile ricaricabili da 1,2 V, 300 mAH<br />
Attivazione del modo automatico a partire da 70 dB se <strong>la</strong> base di carica è situata a circa 1 metro dal bambino.<br />
PROTEZIONE AMBIENTALE<br />
Smaltire le batterie esaurite in un apposito contenitore per consentirne <strong>la</strong> raccolta e il riciclo. Non mischiare<br />
tipi diversi di batterie. Non mischiare le batterie esaurite con quelle nuove. Quando il prodotto<br />
non funziona più, affidarlo ad un centro di raccolta autorizzato per il riciclo dei rifiuti di<br />
apparecchiature elettriche ed elettroniche.<br />
GARANZIA<br />
Questo prodotto è garantito contro i difetti di fabbricazione e dei materiali. Durante il periodo di garanzia, tali<br />
difetti saranno riparati gratuitamente (in caso di rec<strong>la</strong>mo, <strong>la</strong> prova di acquisto dovrà essere esibita in garanzia).<br />
Tale garanzia non copre i danni provocati da incidenti, dall'uso incorretto dell'apparecchio o da negligenza.<br />
In caso di rec<strong>la</strong>mo, contattare prima il rivenditore presso cui è stato effettuato l'acquisto.<br />
Conservare queste istruzioni per future consultazioni.<br />
LÁMPARA LUCIÉRNAGA<br />
Estimado/a cliente:<br />
Gracias por adquirir este producto. Esperamos que haga un excelente uso de este<br />
producto y, para garantizarle una plena satisfacción, le aconsejamos que lea atentamente<br />
estas instrucciones de uso.<br />
Esta lámpara de noche de Petit <strong>Terraillon</strong> es una lámpara luminosa y musical programable. Dispone<br />
de dos luces, en color rosa o azul, y tres melodías diferentes para que su bebé pase una<br />
noche tranqui<strong>la</strong>. Puede programar<strong>la</strong> para que se active automáticamente cuando su bebé llore.<br />
Más ade<strong>la</strong>nte, gracias al asa redondeada, su hijo podrá llevar<strong>la</strong> consigo para sentirse seguro.<br />
DESCRIPCIÓN DEL PRODUCTO<br />
LÁMPARA LUCIÉRNAGA<br />
a. Asa de transporte<br />
b. Luciérnaga<br />
c. Adaptador de corriente / transformador<br />
d. Base de carga<br />
e. Indicador luminoso<br />
f. Botón de «modo automático»<br />
g. Botón de «música»<br />
h. Botón de «luz»<br />
i. Altavoz<br />
j. Botón de volumen<br />
k. Conectores<br />
j<br />
i<br />
f<br />
g<br />
h<br />
k<br />
e<br />
d<br />
b<br />
a<br />
c<br />
26
27<br />
PARTE INFERIOR DE LA LÁMPARA LUCIÉRNAGA PARTE INFERIOR DE LA BASE DE CARGA<br />
a. Botón de «encendido / apagado»<br />
b. Selección del color de <strong>la</strong> lámpara (rosa o azul)<br />
a<br />
b<br />
a<br />
b c<br />
a. Botón de selección de «solo luz» o «luz y música»<br />
b. Botón de selección del tiempo<br />
c. Botón de selección de «tipo de música»<br />
CARGA DE LA LÁMPARA LUCIÉRNAGA<br />
• Conecte el adaptador de corriente a <strong>la</strong> base de carga y enchúfelo a una toma de corriente.<br />
• Coloque <strong>la</strong> Luciérnaga sobre <strong>la</strong> base de carga.<br />
• Compruebe que los conectores de <strong>la</strong> base de carga y de <strong>la</strong> Luciérnaga están bien conectados.<br />
El indicador luminoso debe parpadear de color rojo mientras se esté cargando.<br />
• Cuando acabe de cargar, el indicador de color rojo permanecerá iluminado de forma continua.<br />
Ya puede retirar <strong>la</strong> lámpara Luciérnaga de <strong>la</strong> base.<br />
• Antes del primer uso, es necesario cargar<strong>la</strong> entre 10 y 12 horas.<br />
• El tiempo de carga normal es de aproximadamente 10 horas.<br />
• La lámpara Luciérnaga puede permanecer iluminada de forma continua, sin estar colocada en su base,<br />
durante unas 7 horas.<br />
• Si no se utiliza durante varios días, <strong>la</strong> lámpara puede descargarse, aunque no se haya utilizado. Recuerde<br />
cargar<strong>la</strong> regu<strong>la</strong>rmente en su base de carga.<br />
CONEXIÓN<br />
DE LOS CONECTORES<br />
INCORRECTO<br />
FONCTIONNEMENT<br />
CORRECTO<br />
FUNCIONAMIENTO<br />
FUNCIÓN DE LÁMPARA (LUZ)<br />
Selección del color de <strong>la</strong> luz<br />
• La lámpara puede emitir dos luces suaves, a saber: una luz rosa o una luz azul.<br />
• El botón de selección del color se sitúa bajo <strong>la</strong> lámpara. Retire <strong>la</strong> lámpara de <strong>la</strong> base de carga para<br />
cambiar el color.<br />
• Coloque el botón de selección de <strong>la</strong> luz en <strong>la</strong> imagen de color rosa o azul, según prefiera.<br />
Activación de <strong>la</strong> luz de <strong>la</strong> lámpara<br />
• Si <strong>la</strong> lámpara se encuentra sobre <strong>la</strong> base de carga, pulse el botón de «luz» de <strong>la</strong> base para encender<strong>la</strong><br />
o apagar<strong>la</strong>.<br />
• Si <strong>la</strong> lámpara no se encuentra sobre <strong>la</strong> base, pulse el botón de «encendido / apagado» de <strong>la</strong> lámpara<br />
para encender<strong>la</strong> o apagar<strong>la</strong>.<br />
• Si <strong>la</strong> lámpara está encendida y no se encuentra sobre <strong>la</strong> base, cuando <strong>la</strong> coloque sobre <strong>la</strong> base, <strong>la</strong> luz<br />
se apagará automáticamente. Pulse el botón de «luz» o «modo automático» de <strong>la</strong> base para volver<br />
a encender <strong>la</strong> luz.<br />
• Si no ha apagado <strong>la</strong> luz con el botón de «encendido / apagado» antes de colocar <strong>la</strong> lámpara sobre <strong>la</strong><br />
base, se volverá a encender automáticamente en cuanto <strong>la</strong> retire de <strong>la</strong> base.<br />
FUNCIÓN DE MÚSICA<br />
• Para seleccionar el tipo de música, coloque el botón de selección de «tipo de música» situado bajo <strong>la</strong> base<br />
de carga en el número correspondiente:<br />
1 - <strong>la</strong>tidos de corazón (imitan a los de <strong>la</strong> madre)<br />
2 - melodía suave<br />
3 - sonidos de <strong>la</strong> naturaleza<br />
• A continuación, para encender <strong>la</strong> música, solo tiene que pulsar el botón de «música» de <strong>la</strong> base.<br />
• La música se apaga automáticamente tras 5 minutos, de manera progresiva.<br />
• Puede regu<strong>la</strong>r <strong>la</strong> intensidad del sonido del altavoz con el botón de volumen situado a un <strong>la</strong>do de <strong>la</strong> base.<br />
FUNCIÓN DE MODO AUTOMÁTICO<br />
• Pulse el botón de «modo automático» para activar esta función. La lámpara Luciérnaga se activará<br />
automáticamente cuando se oigan voces o ruidos.<br />
• Pulse de nuevo el botón de «modo automático» para desactivar esta función.<br />
• Asegúrese primero de que <strong>la</strong>s opciones seleccionadas en <strong>la</strong> parte posterior de <strong>la</strong> lámpara y en <strong>la</strong> base<br />
de carga le convienen.<br />
• Seleccione el color de <strong>la</strong> lámpara en <strong>la</strong> parte posterior (rosa o azul).<br />
• Seleccione en <strong>la</strong> parte posterior de <strong>la</strong> base de carga «solo luz» o «luz y música», el tiempo de<br />
programación y el tipo de melodía (véase el anterior párrafo «Función de música»).<br />
• Una vez transcurrido el tiempo seleccionado, <strong>la</strong> lámpara se apaga automáticamente y de forma progresiva.<br />
• El tiempo programado solo se aplica a <strong>la</strong> luz de <strong>la</strong> lámpara. Si ha seleccionado el modo de<br />
«luz y música», <strong>la</strong> música se apagará automáticamente tras 5 minutos.<br />
28
29<br />
Modos “Solo luz” “Luz y música”<br />
15 mn 15 minutos 15 minutos para <strong>la</strong> luz y 5 minutos para <strong>la</strong> música<br />
30 mn 30 minutos 30 minutos para <strong>la</strong> luz y 5 minutos para <strong>la</strong> música<br />
Tiempo<br />
∞ (infinito)<br />
Luz encendida de<br />
forma continua hasta <strong>la</strong><br />
Luz encendida de forma continua<br />
hasta <strong>la</strong> interrupción manual<br />
interrupción manual<br />
y 5 minutos para <strong>la</strong> música<br />
• El modo automático solo funciona para <strong>la</strong> luz si <strong>la</strong> lámpara está colocada sobre <strong>la</strong> base de<br />
carga. Si <strong>la</strong> lámpara no está colocada sobre <strong>la</strong> base y se ha seleccionado el modo de «luz y música», solo<br />
se activará automáticamente <strong>la</strong> música cuando se oigan voces o ruidos, durante un período de 5 minutos.<br />
CONSEJOS DE USO<br />
• En caso de que utilice <strong>la</strong> lámpara todos los días, se aconseja dejar <strong>la</strong> Luciérnaga cargando sobre <strong>la</strong> base<br />
para conservar <strong>la</strong> capacidad de <strong>la</strong> batería.<br />
• Si no utiliza <strong>la</strong> lámpara Luciérnaga todos los días, se aconseja desenchufar el adaptador de corriente.<br />
• La lámpara debe utilizarse únicamente con el adaptador de corriente suministrado.<br />
• Nunca toque los conectores de <strong>la</strong> base de carga y de <strong>la</strong> Luciérnaga con un objeto metálico, ya que<br />
podría dañar <strong>la</strong> lámpara.<br />
• Nunca desmonte el aparato si el cable está dañado o por cualquier otro motivo. Todas <strong>la</strong>s reparaciones<br />
deben ser llevadas a cabo por el fabricante, el servicio posventa del proveedor o un profesional cualificado.<br />
• El transformador no es un juguete. Manténgalo fuera del alcance de los niños.<br />
• No exponga <strong>la</strong> lámpara a los rayos del sol, <strong>la</strong> humedad, el calor o el polvo.<br />
• Nunca desmonte ni sumerja <strong>la</strong> Luciérnaga o <strong>la</strong> base de carga.<br />
• La lámpara Luciérnaga solo es adecuada para su uso en interiores.<br />
• Mantenga el aparato alejado de <strong>la</strong>s fuentes de calor y de posibles salpicaduras de agua.<br />
MANTENIMIENTO<br />
• Desenchufe siempre <strong>la</strong> lámpara cuando vaya a limpiar<strong>la</strong>. A continuación, limpie con cuidado <strong>la</strong><br />
Luciérnaga y <strong>la</strong> base de carga con un trapo húmedo, evitando los tres conectores.<br />
• Compruebe que todas <strong>la</strong>s partes estén perfectamente secas antes de volver a conectar el adaptador 0de<br />
corriente o de activar <strong>la</strong> Luciérnaga.<br />
CARACTERÍSTICAS TÉCNICAS<br />
Base de carga: adaptador de corriente de 5 V, 200 mA<br />
Lámpara: 3 pi<strong>la</strong>s recargables de 1,2 V, 300 mAh<br />
El modo automático se activa a partir de 70 dB si <strong>la</strong> base de carga está situada a aproximadamente 1 m del niño.<br />
PROTECCIÓN DEL MEDIO AMBIENTE<br />
Deposite <strong>la</strong>s pi<strong>la</strong>s gastadas en los contenedores específicos, para que se puedan recic<strong>la</strong>r. No utilice<br />
diferentes tipos de pi<strong>la</strong>s para un mismo aparato. No mezcle <strong>la</strong>s pi<strong>la</strong>s usadas con pi<strong>la</strong>s nuevas. Cuando<br />
se agote <strong>la</strong> vida útil del aparato, deposítelo en un punto de recogida para el recic<strong>la</strong>je de residuos de<br />
equipos eléctricos y electrónicos.<br />
GARANTÍA<br />
Este producto está garantizado frente a defectos de materiales y fabricación. Durante el período de garantía,<br />
este tipo de defectos se repararán gratuitamente (deberá presentar un comprobante de compra, en caso de<br />
rec<strong>la</strong>mación dentro de <strong>la</strong> garantía).<br />
La garantía no cubre los daños ocasionados de manera accidental, por un uso indebido o por negligencia.<br />
En caso de rec<strong>la</strong>mación, diríjase al punto de venta donde lo haya comprado.<br />
Conserve estas instrucciones para su consulta futura.<br />
30
31<br />
LUZ DE PRESENÇA PIRILAMPO<br />
Estimado(a) cliente,<br />
Obrigado por ter adquirido este produto.<br />
Desejamos-lhe uma excelente utilização e, para o aproveitar ao máximo, recomendamos que leia<br />
atentamente estas instruções de utilização.<br />
Esta luz de presença Petit <strong>Terraillon</strong> é uma luz de presença musical e programável. Possui<br />
2 lâmpadas, uma cor-de-rosa outra azul, e 3 tipos de melodia para ajudar o seu bebé a passar<br />
uma noite descansada. Poderá programá-<strong>la</strong> para ligar-se automaticamente quando o bebé chora.<br />
Mais tarde, a sua pega de contornos arredondados permitirá à criança transportá-<strong>la</strong> consigo,<br />
para se sentir tranqui<strong>la</strong>.<br />
DESCRIÇÃO DO PRODUTO<br />
LUZ DE PRESENÇA PIRILAMPO<br />
a. Pega de transporte<br />
b. Piri<strong>la</strong>mpo<br />
c. Adaptador de corrente / transformador<br />
d. Base de carregamento<br />
e. Luz indicadora de carregamento<br />
f. Botão «Modo automático»<br />
g. Botão «melodia»<br />
h. Botão «luz»<br />
i. Altifa<strong>la</strong>nte<br />
j. Botão de volume<br />
k. Contactos<br />
j<br />
i<br />
f<br />
g<br />
h<br />
k<br />
e<br />
d<br />
b<br />
a<br />
c<br />
POR BAIXO DA LUZ DE PRESENÇA PIRILAMPO POR BAIXO DA BASE DE CARREGAMENTO<br />
a. Botão «ligar/desligar»<br />
b. Selecção da cor da luz de presença<br />
(cor-de-rosa ou azul)<br />
CARREGAMENTO DA LUZ DE PRESENÇA PIRILAMPO<br />
• Ligue adaptador de corrente à base de carregamento e ligue-o a uma tomada eléctrica.<br />
• Coloque o Piri<strong>la</strong>mpo na base de carregamento.<br />
• Certifique-se da boa ligação dos contactos da base de carregamento com os contactos do Piri<strong>la</strong>mpo.<br />
A luz indicadora de carregamento deve ficar a piscar a vermelho durante o tempo de carregamento.<br />
• No final do ciclo de carregamento a luz indicadora de carregamento fica acesa em contínuo.<br />
Poderá nesta altura retirar a luz de presença Piri<strong>la</strong>mpo da base de carregamento.<br />
• Antes de utilizar pe<strong>la</strong> primeira vez, carregue o dispositivo durante 10 a 12 horas.<br />
• O tempo de carregamento normal é de cerca de 10 horas.<br />
• A luz de presença Piri<strong>la</strong>mpo pode ficar acesa em contínuo, sem estar colocada na base,<br />
durante cerca de 7 horas.<br />
• Na sequência de alguns dias sem utilização, a luz de presença pode ficar descarregada mesmo sem ter<br />
sido utilizada. Tenha o cuidado de a recarregar regu<strong>la</strong>rmente na base de carregamento.<br />
LIGAÇÃO<br />
DOS CONTACTOS<br />
NÃO<br />
OK<br />
FONCTIONNEMENT<br />
a<br />
b<br />
b c<br />
a. Botão de selecção: «Apenas luz»<br />
ou «Luz e melodia»<br />
b. Botão de selecção do tempo<br />
c. Botão de selecção «tipo de melodia»<br />
a<br />
32
33<br />
FUNCIONAMENTO<br />
FUNÇÃO LUZ DE PRESENÇA (LUZ)<br />
Escolha da cor da luz<br />
• A luz de presença pode emitir 2 luzes de cor suave à escolha. Uma luz cor-de-rosa ou uma luz azul.<br />
• O botão de selecção da cor encontra-se sobre a luz de presença. Retire a luz de presença da base de<br />
carregamento para mudar a cor da luz.<br />
• Desloque o botão de selecção da cor da luz para a marca cor-de-rosa ou azul, conforme a sua preferência.<br />
Ligar a luz de presença<br />
• Quando a luz de presença se encontra na base de carregamento, prima o botão «luz» na base para<br />
acender ou apagar a luz de presença.<br />
• Se a luz de presença estiver fora da base, prima o botão «ligar/desligar» sobre a luz de presença para<br />
acender ou apagar a luz.<br />
• Se a luz de presença se encontra ligada e não está colocada na base de carregamento, colocá-<strong>la</strong> na base<br />
faz com que a luz se apague automaticamente. Prima o botão «luz» ou «modo automático» na base para<br />
voltar a ligar a luz.<br />
• Se não tiver apagado a luz com o botão «ligar/desligar» antes de colocar a luz de presença na base de<br />
carregamento, esta acende-se automaticamente quando é retirada da base.<br />
FUNÇÃO MUSICAL<br />
• Para seleccionar o tipo de melodia pretendido, desloque o botão de selecção «tipo de melodia», localizado<br />
na base de carregamento, para o número correspondente:<br />
1 - batimento cardíaco (para recordar o coração da mamã)<br />
2 - uma melodia suave<br />
3 - sons da natureza<br />
• De seguida, para tocar a melodia, prima simplesmente o botão «melodia» sobre a base.<br />
• A melodia desliga-se automaticamente passados 5 minutos, de modo progressivo.<br />
• É possível regu<strong>la</strong>r o nível sonoro do altifa<strong>la</strong>nte por meio do botão de volume localizado na <strong>la</strong>teral da base.<br />
FUNÇÃO MODO AUTOMÁTICO<br />
• Prima o botão «Modo automático» para activar esta função. A luz de presença Piri<strong>la</strong>mpo liga-se automaticamente<br />
na presença de vozes e ruídos.<br />
• Prima novamente o botão «Modo automático» para desactivar esta função.<br />
• Antes de utilizar, verifique que as opções seleccionadas na parte traseira da luz de presença e da base<br />
são as que pretende.<br />
• Na parte de trás da luz de presença, seleccione a cor da luz (cor-de-rosa ou azul).<br />
• Na parte de trás da base de carregamento, seleccione «apenas luz» ou «luz e melodia», o tempo<br />
de programação e o tipo de melodia (cf. parágrafo «Função musical» em cima).<br />
• Quando o tempo seleccionado de funcionamento se tiver esgotado, a luz de presença apaga-se<br />
automaticamente de modo progressivo. O tempo programado aplica-se exclusivamente à luz da luz de<br />
presença.<br />
• Se tiver seleccionado o modo «Luz e melodia», a melodia desliga-se sistematicamente<br />
ao fim de 5 minutos.<br />
Modos “Apenas luz” “Luz e melodia”<br />
15 mn 15 minutos 15 minutos para a luz e 5 minutos para a melodia<br />
30 mn 30 minutos 30 minutos para a luz e 5 minutos para a melodia<br />
Tempo<br />
∞ (infinito)<br />
A luz continua acesa até ser<br />
desligada manualmente<br />
Luz acesa em contínuo até ser desligada<br />
manualmente e 5 minutos para a melodia<br />
• O modo automático não funciona com a luz se esta não se encontrar colocada na base de<br />
carregamento. Se a luz de presença não estiver colocada na base e se o modo «Luz e melodia» tiver<br />
sido seleccionado, apenas a música arranca automaticamente ao som de vozes ou ruídos, durante<br />
5 minutos.<br />
CONSELHOS DE UTILIZAÇÃO<br />
• Em caso de utilização quotidiana, e de modo a preservar a capacidade das pilhas, aconselha-se a que<br />
deixe o Piri<strong>la</strong>mpo colocado na base de carregamento.<br />
• Se não utilizar o Piri<strong>la</strong>mpo quotidianamente, aconselha-se a que desligue o adaptador de corrente.<br />
• A luz de presença apenas deve ser utilizada com o adaptador de corrente fornecido.<br />
• Nunca toque nos contactos da base de carregamento ou do Piri<strong>la</strong>mpo com objectos metálicos, pois<br />
corre o risco de danificar o dispositivo.<br />
• Nunca tente desmontar o aparelho se o cabo de alimentação estiver danificado ou qualquer outro<br />
problema. Todas as reparações devem ser realizadas pelo fabricante, pelo serviço de assistência<br />
pós-venda do seu fornecedor ou por um profissional qualificado.<br />
• O transformador não é um brinquedo. Mantenha-o sempre longe do alcance da criança.<br />
• Não exponha a luz de presença à luz so<strong>la</strong>r directa, nem a ambientes húmidos, quentes ou com poeiras.<br />
• Nunca desmonte nem submerja o Piri<strong>la</strong>mpo ou a base de carregamento.<br />
• A luz de presença Piri<strong>la</strong>mpo apenas está adaptada para utilização em interiores.<br />
• Coloque o aparelho longe de fontes de calor ou de projecção de água.<br />
MANUTENÇÃO<br />
• Desligue sempre o dispositivo da corrente antes de o limpar. De seguida, pode limpar prudentemente<br />
o Piri<strong>la</strong>mpo e a base de carregamento com um pano humedecido, evitando cuidadosamente tocar<br />
nos 3 contactos.<br />
• Certifique-se de que todas as áreas se encontram perfeitamente secas antes de voltar a ligar o adaptador<br />
de corrente à corrente ou ligar o Piri<strong>la</strong>mpo.<br />
34
35<br />
ESPECIFICAÇÕES TÉCNICAS<br />
Base de carregamento: adaptador de corrente - 5V, 200mA<br />
Luz de presença: 3 pilhas recarregáveis 1,2V, 300mAH<br />
Accionamento automático a partir de 70 dB se a base de carregamento estiver situada a cerca de 1 metro<br />
da criança.<br />
PROTECÇÃO DO AMBIENTE<br />
Coloque as pilhas usadas num contentor apropriado para que sejam recolhidas e recic<strong>la</strong>das.<br />
Não misture tipos de pilhas diferentes. Não misture as pilhas usadas com pilhas novas. No final da<br />
respectiva vida útil, entregue o produto num ponto de recolha para recic<strong>la</strong>gem de restos<br />
de equipamentos eléctricos e electrónicos.<br />
GARANTIA<br />
Este produto está garantido contra defeitos de material e de fabrico. Durante o período de garantia, estes<br />
defeitos serão reparados gratuitamente (é obrigatória a apresentação da prova de compra em caso de<br />
rec<strong>la</strong>mação abrangida pe<strong>la</strong> garantia).<br />
Esta garantia não cobre danos resultantes de acidentes, utilização incorrecta ou negligência. Em caso de<br />
rec<strong>la</strong>mação, contacte primeiro a loja onde comprou o dispositivo.<br />
Conservar cuidadosamente estas instruções, para consultas posteriores.