Precision Power Saw 235mm / 9 ¼" TSA 001 - Triton Tools | Home
Precision Power Saw 235mm / 9 ¼" TSA 001 - Triton Tools | Home
Precision Power Saw 235mm / 9 ¼" TSA 001 - Triton Tools | Home

You also want an ePaper? Increase the reach of your titles
YUMPU automatically turns print PDFs into web optimized ePapers that Google loves.
the power tool. If damaged, have the power tool<br />
repaired before use. Accidents are caused by<br />
poorly maintained power tools.<br />
f. Keep cutting tools sharp and clean. Properly<br />
maintained cutting tools with sharp cutting<br />
edges are less likely to bind and are easier to<br />
control.<br />
g. Use the power tool, accessories and tool bits in<br />
accordance with these instructions and in the<br />
manner intended for the particular type of power<br />
tool, taking into account the working conditions<br />
and the work to be performed. Failure to use<br />
the tool for its intended purposes could result<br />
in a hazardous situation and may invalidate the<br />
warranty.<br />
5. SERVICE<br />
a. Servicing of your power tool must be carried out<br />
by a qualified technician, using only identical<br />
replacement parts, ensuring that safety of the<br />
power tool is maintained.<br />
ASSEMBLY<br />
FITTING THE SAW BLADE<br />
• Only use <strong>235mm</strong> blades, with a kerf between<br />
2.2 and 3.5mm, designed for circular saws with<br />
a no load speed rating of at least 4500min -1 . Do<br />
not fit high speed steel blades or abrasive discs<br />
to this tool. The use of incorrect accessories may<br />
invalidate the warranty.<br />
• Do not fit inferior blades. Regularly check the<br />
blade is flat, sharp and free of cracks or defects.<br />
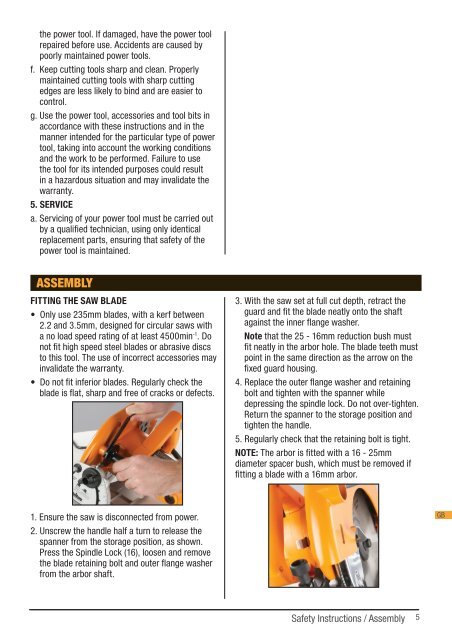
1. Ensure the saw is disconnected from power.<br />
2. Unscrew the handle half a turn to release the<br />
spanner from the storage position, as shown.<br />
Press the Spindle Lock (16), loosen and remove<br />
the blade retaining bolt and outer flange washer<br />
from the arbor shaft.<br />
3. With the saw set at full cut depth, retract the<br />
guard and fit the blade neatly onto the shaft<br />
against the inner flange washer.<br />
Note that the 25 - 16mm reduction bush must<br />
fit neatly in the arbor hole. The blade teeth must<br />
point in the same direction as the arrow on the<br />
fixed guard housing.<br />
4. Replace the outer flange washer and retaining<br />
bolt and tighten with the spanner while<br />
depressing the spindle lock. Do not over-tighten.<br />
Return the spanner to the storage position and<br />
tighten the handle.<br />
5. Regularly check that the retaining bolt is tight.<br />
NOTE: The arbor is fitted with a 16 - 25mm<br />
diameter spacer bush, which must be removed if<br />
fitting a blade with a 16mm arbor.<br />
Safety Instructions / Assembly<br />
5<br />
GB