Wii Lens Cleaning Kit Ensemble de nettoyage pour lentille Wii Kit de ...
Wii Lens Cleaning Kit Ensemble de nettoyage pour lentille Wii Kit de ...
Wii Lens Cleaning Kit Ensemble de nettoyage pour lentille Wii Kit de ...

You also want an ePaper? Increase the reach of your titles
YUMPU automatically turns print PDFs into web optimized ePapers that Google loves.
2<br />
PRINTED IN CHINA<br />
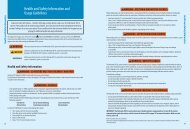
The <strong>Wii</strong> <strong>Lens</strong> <strong>Cleaning</strong> <strong>Kit</strong> cleans the <strong>Wii</strong> console disc rea<strong>de</strong>r lens, which reduces disc read errors caused<br />
by lens contamination. Please read and follow these instructions carefully.<br />
IMPORTANT: For use with <strong>Wii</strong> consoles ONLY.<br />
• For use by adults only – store out of reach of children.<br />
• The cleaning fluid contains chemicals – avoid contact with skin or eyes. In the event of skin or eye<br />
contact, flush with water, and consult your doctor if discomfort persists.<br />
• Do not use the lens cleaner if it is damaged in any way.<br />
• Use only the cleaning fluid that is supplied with this cleaning kit.<br />
• If the lens cleaner gets dirty or dusty, clean it with a soft cloth before use. Store it in the packaging<br />
box when not in use.<br />
• To avoid damage to the <strong>Wii</strong> console or the <strong>Wii</strong> lens cleaner, carefully follow the instructions in this<br />
manual.<br />
TM, ® , and the <strong>Wii</strong> logo are tra<strong>de</strong>marks of Nintendo. © 2008 Nintendo<br />
<strong>Cleaning</strong> Procedure<br />
NEED HELP WITH INSTALLATION,<br />
MAINTENANCE OR SERVICE?<br />
Nintendo Customer Service<br />
SUPPORT.NINTENDO.COM<br />
or call 1-800-255-3700<br />
BESOIN D’AIDE POUR L’INSTALLATION,<br />
L’ENTRETIEN OU LA RÉPARATION?<br />
Service à la clientèle <strong>de</strong> Nintendo<br />
SUPPORT.NINTENDO.COM<br />
ou appelez le 1 800 255-3700<br />
¿NECESITAS AYUDA DE INSTALACION,<br />
MANTENIMIENTO O SERVICIO?<br />
Servicio al Cliente <strong>de</strong> Nintendo<br />
SUPPORT.NINTENDO.COM<br />
o llame al 1-800-255-3700<br />
NINTENDO OF AMERICA INC.<br />
P.O. BOX 957, REDMOND, WA<br />
98073-0957 U.S.A. 66637A<br />
WARNING - Chemical Irritant<br />
CAUTION - Damage to the <strong>Wii</strong> Console<br />
1. Make sure the <strong>Wii</strong> console is plugged into a standard<br />
household wall outlet. Press the EJECT Button on the<br />
front of the <strong>Wii</strong> console to remove any disc that might be<br />
loa<strong>de</strong>d into the console.<br />
2. Apply 2-3 drops of cleaning fluid to the exposed portion<br />
of the cleaning pad. Be sure to replace the cap on the<br />
cleaning fluid bottle after use.<br />
Do not use more than the recommen<strong>de</strong>d amount of fluid;<br />
doing so will not improve the cleaner’s effectiveness and<br />
could cause the cleaning pad to <strong>de</strong>tach insi<strong>de</strong> the <strong>Wii</strong><br />
console.<br />
3. Insert the lens cleaner straight into the <strong>Wii</strong> console disc<br />
slot. The blue lines should be parellel to the disc<br />
slot. Do not force the cleaner into the console – it should<br />
sli<strong>de</strong> into the disc slot easily.<br />
NOTE: A “?” symbol will appear in the disc Channel icon on<br />
the <strong>Wii</strong> Menu screen. This is normal.<br />
If the console is in a vertical (or upright) position, insert<br />
the lens cleaner with the top facing towards the right si<strong>de</strong><br />
of the console and the cleaning pad facing to the left (see<br />
illustration).<br />
Apply 2-3<br />
drops of<br />
cleaning fluid<br />
to white area.<br />
If the console is in a horizontal (laying flat) position, insert the lens cleaner with the top facing up and the cleaning<br />
pad facing down.<br />
<strong>Wii</strong> <strong>Lens</strong> <strong>Cleaning</strong> <strong>Kit</strong> Operations manual<br />
<strong>Ensemble</strong> <strong>de</strong> <strong>nettoyage</strong> <strong>pour</strong> <strong>lentille</strong> <strong>Wii</strong> Mo<strong>de</strong> d’emploi - p. 6<br />
<strong>Kit</strong> <strong>de</strong> limpieza para lentes <strong>de</strong> <strong>Wii</strong> Manual <strong>de</strong> Operaciones - p. 12<br />
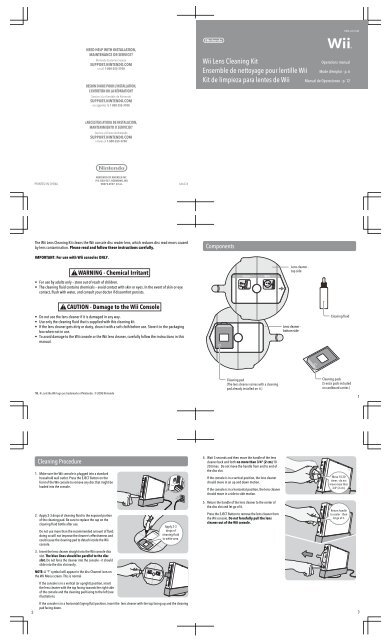
Components<br />
<strong>Cleaning</strong> pad<br />
(The lens cleaner comes with a cleaning<br />
pad already installed on it.)<br />
4. Wait 5 seconds and then move the handle of the lens<br />
cleaner back and forth no more than 3/4" (2 cm) 10 -<br />
20 times. Do not move the handle from end to end of<br />
the disc slot.<br />
If the console is in a vertical position, the lens cleaner<br />
should move in an up and down motion.<br />
If the console is in a horizontal position, the lens cleaner<br />
should move in a si<strong>de</strong> to si<strong>de</strong> motion.<br />
5. Return the handle of the lens cleaner to the center of<br />
the disc slot and let go of it.<br />
Press the EJECT Button to remove the lens cleaner from<br />
the <strong>Wii</strong> console. Do not forcefully pull the lens<br />
cleaner out of the <strong>Wii</strong> console.<br />
<strong>Lens</strong> cleaner -<br />
top si<strong>de</strong><br />
<strong>Lens</strong> cleaner -<br />
bottom si<strong>de</strong><br />
<strong>Cleaning</strong> fluid<br />
C/RVL–A–LS–USZ<br />
<strong>Cleaning</strong> pads<br />
(5 extra pads inclu<strong>de</strong>d<br />
on cardboard carrier.)<br />
Move 10-20<br />
times - do not<br />
move more than<br />
3/4” (2 cm).<br />
Return handle<br />
to center - then<br />
let go of it.<br />
1<br />
3
4<br />
6<br />
8<br />
Replacing the cleaning pad<br />
Examine the cleaning pad regularly for noticeable accumulation of dirt or other contaminants. If the pad becomes<br />
dirty, replace it. If the cleaning pad begins to peel away from the lens cleaner and does not stay attached to the<br />
plastic, replace it with a new pad.<br />
1. Remove and discard the dirty cleaning pad by peeling it<br />
away from the lens cleaner.<br />
2. Peel a new cleaning pad off of its card. Avoid touching<br />
the adhesive surface as much as possible.<br />
3. Apply the new cleaning pad to the lens cleaner,<br />
aligning the angled corners to the shape of the frame.<br />
Make sure the edges of the cleaning pad adhere<br />
securely to the lens cleaner.<br />
Français<br />
IMPORTANT: Do not remove the<br />
white foam rubber pad attached<br />
to the lens cleaner.<br />
Be sure to<br />
correctly align<br />
cleaning pad<br />
with the<br />
frame.<br />
L'ensemble <strong>de</strong> <strong>nettoyage</strong> <strong>pour</strong> <strong>lentille</strong> <strong>Wii</strong> nettoie la <strong>lentille</strong> du lecteur <strong>de</strong> disque <strong>de</strong> la console <strong>Wii</strong>,<br />
ce qui réduit le nombre d'erreurs <strong>de</strong> lecture causées par la contamination <strong>de</strong> la <strong>lentille</strong>. Veuillez<br />
lire et suivre soigneusement les instructions suivantes.<br />
IMPORTANT : Utiliser avec les consoles <strong>Wii</strong> SEULEMENT.<br />
AVERTISSEMENT - Irritant chimique<br />
• Utilisation réservée aux adultes seulement. Gar<strong>de</strong>z hors <strong>de</strong> la portée <strong>de</strong>s enfants.<br />
• Le liqui<strong>de</strong> <strong>de</strong> <strong>nettoyage</strong> contient <strong>de</strong>s produits chimiques. Évitez tout contact avec la peau ou les<br />
yeux. Si le liqui<strong>de</strong> entre en contact avec la peau ou les yeux, rincez à gran<strong>de</strong> eau. Consultez un<br />
mé<strong>de</strong>cin si le malaise persiste.<br />
ATTENTION - Endommagement <strong>de</strong> la console <strong>Wii</strong><br />
• N'utilisez pas le nettoyeur <strong>de</strong> <strong>lentille</strong> s'il est endommagé d'une quelconque façon.<br />
• Utilisez seulement le liqui<strong>de</strong> <strong>de</strong> <strong>nettoyage</strong> inclus dans cet ensemble <strong>de</strong> <strong>nettoyage</strong>.<br />
• Si le nettoyeur <strong>de</strong> <strong>lentille</strong> <strong>de</strong>vient sale ou poussiéreux, nettoyez-le avec un chiffon doux avant <strong>de</strong><br />
l'utiliser. Gar<strong>de</strong>z-le dans la boîte d'emballage lorsque vous ne l'utilisez pas.<br />
• Pour éviter d'endommager la console <strong>Wii</strong> ou le nettoyeur <strong>de</strong> <strong>lentille</strong>, suivez attentivement les<br />
instructions dans ce mo<strong>de</strong> d'emploi.<br />
Procédé <strong>de</strong> <strong>nettoyage</strong><br />
1. Assurez-vous que la console <strong>Wii</strong> est branchée dans une<br />
prise <strong>de</strong> courant standard. Appuyez sur le bouton EJECT<br />
sur le <strong>de</strong>vant <strong>de</strong> la console <strong>Wii</strong> <strong>pour</strong> retirer tout disque<br />
qui se trouve dans la console.<br />
2. Appliquez 2 ou 3 gouttes <strong>de</strong> liqui<strong>de</strong> nettoyant sur la<br />
partie exposée du tampon <strong>de</strong> <strong>nettoyage</strong>. Assurez-vous <strong>de</strong><br />
bien replacer le bouchon sur la bouteille <strong>de</strong> liqui<strong>de</strong> <strong>de</strong><br />
<strong>nettoyage</strong> après l'avoir utilisée.<br />
N'utilisez pas plus <strong>de</strong> liqui<strong>de</strong> que la quantité<br />
recommandée. En utiliser plus n'améliorera pas<br />
l'efficacité du nettoyant et risque <strong>de</strong> provoquer le<br />
décollage du tampon <strong>de</strong> <strong>nettoyage</strong> alors qu'il se trouve à<br />
l'intérieur <strong>de</strong> la console <strong>Wii</strong>.<br />
3. Insérez le nettoyeur <strong>de</strong> <strong>lentille</strong> tout droit dans la fente <strong>de</strong><br />
chargement <strong>de</strong> la console <strong>Wii</strong>. Les lignes bleues<br />
<strong>de</strong>vraient être parallèles à la fente <strong>de</strong> chargement.<br />
Ne forcez pas le nettoyeur dans la console : il <strong>de</strong>vrait<br />
glisser facilement dans la fente <strong>de</strong> disque.<br />
NOTE : Un symbole « ? » apparaîtra sur l'icône <strong>de</strong> la Chaîne<br />
Disques <strong>de</strong> l'écran <strong>de</strong> Menu <strong>Wii</strong>. Cette réaction est normale.<br />
Si la console est placée à la verticale (<strong>de</strong>bout), insérez le<br />
nettoyeur <strong>de</strong> <strong>lentille</strong> en orientant le <strong>de</strong>ssus vers le côté<br />
droit <strong>de</strong> la console et le tampon <strong>de</strong> <strong>nettoyage</strong> vers la<br />
gauche (voir l'illustration).<br />
Appliquez 2<br />
ou 3 trois gouttes<br />
<strong>de</strong> liqui<strong>de</strong> nettoyant<br />
sur le rectangle<br />
blanc.<br />
Si la console est placée à l'horizontale (couchée), insérez le nettoyeur <strong>de</strong> <strong>lentille</strong> en orientant le <strong>de</strong>ssus vers le haut<br />
et le tampon <strong>de</strong> <strong>nettoyage</strong> vers le bas.<br />
Troubleshooting<br />
Before seeking assistance, review the following problems and solutions.<br />
1. The lens cleaner won’t insert into the <strong>Wii</strong> console disc slot.<br />
• Press the EJECT Button to be sure there is not a disc already loa<strong>de</strong>d into the <strong>Wii</strong> console<br />
• Make sure the lens cleaner is oriented the correct way – review step 3 in the <strong>Cleaning</strong> Procedure.<br />
• Be sure to insert the lens cleaner straight into the disc slot – the handle should be perpendicular to the slot, not<br />
angled to one si<strong>de</strong> or the other.<br />
NOTE: If the lens cleaner is inserted into the <strong>Wii</strong> console disc slot facing the wrong way (see page 2, step 3, for the<br />
correct procedure), the <strong>Wii</strong> console will load and eject the lens cleaner several times and then eject it a final time.<br />
2. The lens cleaner won’t come out of the <strong>Wii</strong> console.<br />
• Do not remove the lens cleaner by pulling on the handle. Return the handle of the lens cleaner to the center of<br />
the disc slot and let go of it. Press the EJECT Button to remove.<br />
3. The <strong>Wii</strong> console still won’t read a disc correctly after the cleaning procedure.<br />
• If the disc rea<strong>de</strong>r lens is very dirty, you may need to perform the cleaning procedure a second time.<br />
• Check the condition of the cleaning pad and replace if it appears dirty and perform the cleaning procedure again.<br />
If your <strong>Wii</strong> system does not operate correctly after trying the troubleshooting steps, DO NOT return the console to the<br />
store. You will lose saved game data and all <strong>Wii</strong> Shop Channel downloads and <strong>Wii</strong> Points. Visit support.nintendo.com<br />
for assistance and additional troubleshooting and repair options or call 1-800-255-3700.<br />
<strong>Cleaning</strong> fluid ingredients<br />
Purified water, ethanol, cation AB, surfactant, sodium salicylate.<br />
Composantes<br />
Tampon <strong>de</strong> <strong>nettoyage</strong><br />
(Le nettoyeur <strong>de</strong> <strong>lentille</strong> comprend un<br />
tampon <strong>de</strong> <strong>nettoyage</strong> déjà installé.)<br />
4. Atten<strong>de</strong>z 5 secon<strong>de</strong>s, puis remuez le manche du<br />
nettoyeur <strong>de</strong> <strong>lentille</strong> <strong>de</strong> 10 à 20 fois en un mouvement<br />
<strong>de</strong> va-et-vient qui ne dépasse pas 2 cm (3/4") <strong>de</strong><br />
largeur. Ne déplacez pas le manche d'une extrémité à<br />
l'autre <strong>de</strong> la fente <strong>de</strong> chargement.<br />
Si la console est placée à la verticale (<strong>de</strong>bout), le<br />
nettoyeur <strong>de</strong> <strong>lentille</strong> doit être remué <strong>de</strong> haut en bas.<br />
Si la console est placée à l'horizontale (couchée), le<br />
nettoyeur <strong>de</strong> <strong>lentille</strong> doit être remué <strong>de</strong> gauche à<br />
droite.<br />
5. Replacez le manche du nettoyeur <strong>de</strong> <strong>lentille</strong> au centre<br />
<strong>de</strong> la fente <strong>de</strong> chargement et relâchez-le.<br />
Appuyez sur le bouton EJECT <strong>pour</strong> retirer le nettoyeur<br />
<strong>de</strong> la console <strong>Wii</strong>. Ne tirez pas sur le nettoyeur <strong>de</strong><br />
<strong>lentille</strong> <strong>pour</strong> le forcer à sortir <strong>de</strong> la console <strong>Wii</strong>.<br />
Nettoyeur <strong>de</strong> <strong>lentille</strong> -<br />
<strong>de</strong>ssus<br />
Nettoyeur <strong>de</strong> <strong>lentille</strong> -<br />
<strong>de</strong>ssous<br />
Liqui<strong>de</strong> <strong>de</strong><br />
<strong>nettoyage</strong><br />
Tampons <strong>de</strong> <strong>nettoyage</strong><br />
(5 tampons supplémentaires<br />
inclus sur le porteur en carton)<br />
Remuez<br />
10 à 20 fois.<br />
Ne dépassez pas<br />
2 cm (3/4") <strong>de</strong><br />
largeur.<br />
Replacez<br />
le manche au<br />
centre <strong>de</strong> la<br />
fente, puis<br />
relâchez-le.<br />
5<br />
7<br />
9
10<br />
12<br />
14<br />
Remplacer le tampon <strong>de</strong> <strong>nettoyage</strong> Problèmes et solutions<br />
Examinez le tampon <strong>de</strong> <strong>nettoyage</strong> régulièrement <strong>pour</strong> vérifier s'il y a une accumulation <strong>de</strong> saletés ou d'autres<br />
contaminants. Si le tampon <strong>de</strong>vient sale, remplacez-le. Si le tampon commence à se décoller du nettoyeur <strong>de</strong> <strong>lentille</strong><br />
et ne reste pas attaché au plastique, remplacez-le avec un<br />
nouveau tampon.<br />
1. Enlevez et jetez le tampon <strong>de</strong> <strong>nettoyage</strong> sale en le<br />
décollant du nettoyeur <strong>de</strong> <strong>lentille</strong>.<br />
2. Décollez un nouveau tampon <strong>de</strong> <strong>nettoyage</strong> <strong>de</strong> son<br />
carton. Évitez autant que possible <strong>de</strong> toucher la surface<br />
adhésive.<br />
3. Appliquez le nouveau tampon <strong>de</strong> <strong>nettoyage</strong> au<br />
nettoyeur <strong>de</strong> <strong>lentille</strong> en alignant les coins à la forme du<br />
cadre. Vérifiez que les coins du tampon <strong>de</strong> <strong>nettoyage</strong><br />
adhèrent soli<strong>de</strong>ment au nettoyeur <strong>de</strong> <strong>lentille</strong>.<br />
IMPORTANT : N'enlevez pas le tampon<br />
en caoutchouc mousse blanc qui est<br />
attaché au nettoyeur <strong>de</strong> <strong>lentille</strong>.<br />
Assurez-vous<br />
d'aligner le<br />
tampon <strong>de</strong><br />
<strong>nettoyage</strong><br />
au cadre.<br />
Español Componentes<br />
El <strong>Kit</strong> <strong>de</strong> limpieza para lentes <strong>de</strong> <strong>Wii</strong> limpia el lente lector <strong>de</strong> discos, lo que reduce los errores al leer el<br />
disco causados por contaminación en el lente. Por favor, lee y sigue estas instrucciones<br />
cuidadosamente.<br />
IMPORTANTE: Para uso SOLAMENTE con la consola <strong>Wii</strong>.<br />
• Solo para adultos. Mantener fuera <strong>de</strong>l alcance <strong>de</strong> los niños.<br />
• El líquido limpiador contiene productos químicos. Evita el contacto con la piel o los ojos. Si se<br />
produce el contacto con la piel o los ojos, enjuaga la zona con agua y consulta con tu médico si<br />
continúas sintiendo molestias.<br />
• No uses el limpiador <strong>de</strong> lente si está dañado.<br />
• Solamente usa el líquido limpiador que se incluye en este kit <strong>de</strong> limpieza.<br />
• Si el limpiador <strong>de</strong> lente se ensucia o tiene polvo, límpialo con una tela suave antes <strong>de</strong> usarlo.<br />
Guárdalo en su estuche cuando no lo estés usando.<br />
• Para evitar daños a la consola <strong>Wii</strong> o al limpiador <strong>de</strong> lente <strong>de</strong> <strong>Wii</strong>, sigue las instrucciones <strong>de</strong> este<br />
manual cuidadosamente.<br />
Procedimiento <strong>de</strong> limpieza<br />
AVISO: Producto químico irritante<br />
1. Asegúrate <strong>de</strong> que la consola <strong>Wii</strong> esté conectada al<br />
enchufe <strong>de</strong> la pared. Oprime el Botón EJECT ubicado en<br />
la parte <strong>de</strong>lantera <strong>de</strong> la consola <strong>Wii</strong> para sacar cualquier<br />
disco que pueda estar <strong>de</strong>ntro <strong>de</strong> la consola.<br />
2. Aplica 2-3 gotas <strong>de</strong> líquido limpiador a la parte expuesta<br />
<strong>de</strong> la almohadilla limpiadora. Asegúrate <strong>de</strong> volver a<br />
colocar la tapa <strong>de</strong> la botella <strong>de</strong>l líquido limpiador<br />
<strong>de</strong>spués <strong>de</strong> usarlo.<br />
No uses más líquido limpiador <strong>de</strong>l recomendado. Hacerlo<br />
no mejorará la efectividad <strong>de</strong>l limpiador y pue<strong>de</strong> causar<br />
que la almohadilla limpiadora se <strong>de</strong>spegue <strong>de</strong>ntro <strong>de</strong> la<br />
consola <strong>Wii</strong>.<br />
3. Inserta el limpiador <strong>de</strong> lente directamente en la ranura<br />
para discos en la consola <strong>Wii</strong>. Las líneas azules tienen<br />
que estar paralelas a la ranura para discos. No<br />
fuerces el limpiador <strong>de</strong>ntro <strong>de</strong> la consola; tiene que<br />
<strong>de</strong>slizarse fácilmente <strong>de</strong>ntro <strong>de</strong> la ranura para discos.<br />
NOTA: Un símbolo “?” aparecerá en el ícono <strong>de</strong>l Canal Disco<br />
en la pantalla <strong>de</strong>l Menú <strong>de</strong> <strong>Wii</strong>. Esto es normal.<br />
ATENCIÓN: Daño a la consola <strong>Wii</strong><br />
Si la consola está en posición vertical (o parada), inserta el<br />
limpiador con la parte superior apuntando al lado<br />
<strong>de</strong>recho <strong>de</strong> la consola y la almohadilla apuntando hacia la<br />
izquierda (ve ilustración).<br />
Aplica 2-3<br />
gotas <strong>de</strong> líquido<br />
limpiador sobre<br />
la zona blanca.<br />
Si la consola está en posición horizontal (acostada), inserta el limpiador <strong>de</strong> lente con la parte superior apuntando<br />
hacia arriba y la almohadilla apuntando hacia abajo.<br />
Avant <strong>de</strong> contacter le service à la clientèle, veuillez consulter les problèmes et solutions suivants.<br />
1. Le nettoyeur <strong>pour</strong> <strong>lentille</strong> ne s'insère pas dans la fente <strong>de</strong> chargement <strong>de</strong> la console <strong>Wii</strong>.<br />
• Appuyez sur le bouton EJECT <strong>pour</strong> vous assurer qu'aucun disque n'est inséré dans la console <strong>Wii</strong>.<br />
• Vérifiez que le nettoyeur <strong>de</strong> <strong>lentille</strong> est orienté dans la bonne direction. Veuillez consulter l'étape 3 du procédé <strong>de</strong> <strong>nettoyage</strong>.<br />
• Assurez-vous d'insérer le nettoyeur <strong>de</strong> <strong>lentille</strong> tout droit dans la fente <strong>de</strong> chargement. Le manche <strong>de</strong>vrait être<br />
perpendiculaire à la fente, et non orienté d'un côté ou <strong>de</strong> l'autre.<br />
NOTE : Si le nettoyeur <strong>de</strong> <strong>lentille</strong> est inséré dans la fente <strong>de</strong> chargement alors qu'il est orienté dans la mauvaise<br />
direction (consultez l'étape 3 <strong>de</strong> la page 8 <strong>pour</strong> les bonnes étapes à suivre), la console chargera et éjectera le<br />
nettoyeur plusieurs fois avant <strong>de</strong> l'éjecter une <strong>de</strong>rnière fois.<br />
2. Le nettoyeur <strong>de</strong> <strong>lentille</strong> ne s'éjecte pas <strong>de</strong> la console <strong>Wii</strong>.<br />
• N'enlevez pas le nettoyeur <strong>de</strong> <strong>lentille</strong> en tirant sur le manche. Replacez le manche du nettoyeur <strong>de</strong> <strong>lentille</strong> au<br />
centre <strong>de</strong> la fente <strong>de</strong> chargement et relâchez-le. Appuyez plutôt sur le bouton EJECT <strong>pour</strong> le retirer.<br />
3. La console <strong>Wii</strong> ne lit toujours pas un disque correctement après le procédé <strong>de</strong> <strong>nettoyage</strong>.<br />
• Si la <strong>lentille</strong> du lecteur est vraiment sale, vous aurez peut-être besoin <strong>de</strong> suivre les étapes <strong>de</strong> <strong>nettoyage</strong> une<br />
<strong>de</strong>uxième fois.<br />
• Vérifiez l'état du tampon <strong>de</strong> <strong>nettoyage</strong> et remplacez-le s'il semble être sale, puis recommencez le procédé <strong>de</strong> <strong>nettoyage</strong>.<br />
Si votre système <strong>Wii</strong> ne fonctionne pas correctement après avoir suivi les étapes <strong>de</strong> dépannage, NE RETOURNEZ PAS la<br />
console au détaillant. Vous perdrez toutes vos données <strong>de</strong> sauvegar<strong>de</strong>, vos téléchargements <strong>de</strong> la Chaîne Boutique<br />
<strong>Wii</strong> ainsi que vos <strong>Wii</strong> Points. Visitez support.nintendo.com <strong>pour</strong> plus d'assistance et <strong>de</strong>s options supplémentaires <strong>de</strong><br />
dépannage et <strong>de</strong> réparation, ou composez le 1 800 255-3700.<br />
Ingrédients du liqui<strong>de</strong> <strong>de</strong> <strong>nettoyage</strong> :<br />
Eau purifiée, éthanol, cation AB, surfactant, salicylate <strong>de</strong> sodium.<br />
Almohadilla limpiadora<br />
(El limpiador <strong>de</strong> lente viene con una<br />
almohadilla limpiadora ya colocada)<br />
4. Espera 5 segundos y mueve la agarra<strong>de</strong>ra <strong>de</strong>l limpiador<br />
<strong>de</strong> lente hacia <strong>de</strong>lante y atrás no más <strong>de</strong> ¾” (2 cm)<br />
unas 10-20 veces. No muevas la agarra<strong>de</strong>ra <strong>de</strong> extremo<br />
a extremo <strong>de</strong> la ranura para discos.<br />
Si la consola está colocada <strong>de</strong> manera vertical, tendrás<br />
que usar el limpiador <strong>de</strong> lente moviéndolo hacia arriba<br />
y abajo.<br />
Si la consola está colocada <strong>de</strong> manera horizontal,<br />
tendrás que usar el limpiador <strong>de</strong> lente moviéndolo <strong>de</strong><br />
lado a lado.<br />
5. Regresa la agarra<strong>de</strong>ra <strong>de</strong>l limpiador <strong>de</strong> lente hacia el<br />
centro <strong>de</strong> la ranura para discos y suéltala.<br />
Oprime el Botón <strong>de</strong> EJECT para sacar el limpiador <strong>de</strong> la<br />
consola <strong>Wii</strong>. No trates <strong>de</strong> sacar el limpiador <strong>de</strong> lente<br />
<strong>de</strong> la consola <strong>Wii</strong> a la fuerza.<br />
Limpiador <strong>de</strong> lente,<br />
parte superior<br />
Limpiador <strong>de</strong> lente,<br />
parte inferior<br />
Líquido limpiador<br />
Almohadillas limpiadoras<br />
(5 almohadillas adicionales<br />
incluidas en el estuche <strong>de</strong><br />
cartón)<br />
Muévelo<br />
10-20 veces.<br />
No lo muevas<br />
más <strong>de</strong> ¾”<br />
(2 cm).<br />
Regresa la<br />
agarra<strong>de</strong>ra <strong>de</strong>l<br />
limpiador <strong>de</strong> lente<br />
hacia el centro y<br />
suéltala.<br />
11<br />
13<br />
15
16<br />
Reemplazar la almohadilla limpiadora Localización <strong>de</strong> averias<br />
Examina la almohadilla limpiadora frecuentemente para ver si ha acumulado polvo u otros contaminantes. Si la<br />
almohadilla se ensucia, reemplázala. Si la almohadilla limpiadora comienza a <strong>de</strong>spegarse <strong>de</strong>l limpiador <strong>de</strong><br />
lente y no se mantiene pegada al plástico, reemplázala con<br />
una nueva almohadilla.<br />
1. Quita y tira la almohadilla sucia <strong>de</strong>spegándola <strong>de</strong>l<br />
limpiador <strong>de</strong> lente.<br />
2. Despega una nueva almohadilla limpiadora. Evita tocar<br />
la superficie adhesiva cuanto sea posible.<br />
3. Coloca la nueva almohadilla limpiadora sobre el<br />
limpiador <strong>de</strong> lente, alineando las esquinas angulares<br />
con la forma <strong>de</strong> la estructura. Asegúrate <strong>de</strong> que las<br />
esquinas <strong>de</strong> la almohadilla limpiadora se adhieran al<br />
limpiador <strong>de</strong> lente <strong>de</strong> forma segura.<br />
IMPORTANTE: No quites la<br />
almohadilla <strong>de</strong> esponja blanca que<br />
está pegada al limpiador <strong>de</strong> lente.<br />
Asegúrate<br />
<strong>de</strong> alinear la<br />
almohadilla<br />
limpiadora con<br />
la estructura.<br />
Antes <strong>de</strong> buscar asistencia, revisa las siguientes soluciones a algunos problemas.<br />
1. No es posible insertar el limpiador <strong>de</strong> lentes en la ranura para discos <strong>de</strong> la consola <strong>Wii</strong>.<br />
• Oprime el Botón EJECT para asegurarte que no haya un disco ya insertado <strong>de</strong>ntro <strong>de</strong> la consola <strong>Wii</strong>.<br />
• Asegúrate que el limpiador <strong>de</strong> lente esté orientado <strong>de</strong> la manera correcta. Revisa el paso 3 en la sección<br />
"Procedimiento <strong>de</strong> limpieza".<br />
• Asegúrate <strong>de</strong> insertar el limpiador <strong>de</strong> lente directamente <strong>de</strong>ntro <strong>de</strong> la ranura para discos. La agarra<strong>de</strong>ra tendrá que<br />
estar perpendicular a la ranura y no inclinada hacia un lado u otro.<br />
NOTA: Si insertas el limpiador <strong>de</strong> lente para la consola <strong>Wii</strong> <strong>de</strong>ntro <strong>de</strong> la ranura para discos <strong>Wii</strong> incorrectamente (ve la<br />
página 14, paso 3, para ver el procedimiento correcto), la consola lo cargará, lo expulsará varias veces y luego lo expulsará<br />
por última vez.<br />
2. El limpiador <strong>de</strong> lente no pue<strong>de</strong> salir <strong>de</strong> la consola <strong>Wii</strong>.<br />
• No trates <strong>de</strong> sacar el limpiado <strong>de</strong> lente jalándolo <strong>de</strong> la agarra<strong>de</strong>ra. Regresa la agarra<strong>de</strong>ra <strong>de</strong>l limpiador <strong>de</strong> lente<br />
hacia el centro <strong>de</strong> la ranura para discos y suéltala. Oprime el Botón EJECT para sacarlo.<br />
3. La consola <strong>Wii</strong> sigue sin leer los discos correctamente <strong>de</strong>spués <strong>de</strong> limpiar el lente.<br />
• Si el lente lector <strong>de</strong> discos está muy sucio, pue<strong>de</strong> que tengas que efectuar el procedimiento <strong>de</strong> limpieza una segunda vez.<br />
• Revisa el estado <strong>de</strong> la almohadilla limpiadora y reemplázala si parecer estar sucia. Después efectúa el<br />
procedimiento <strong>de</strong> limpieza <strong>de</strong> nuevo.<br />
Si tu sistema <strong>Wii</strong> no funciona correctamente <strong>de</strong>spués <strong>de</strong> tratar los pasos <strong>de</strong> localización <strong>de</strong> averias, NO regreses la consola<br />
a la tienda. Per<strong>de</strong>rás datos <strong>de</strong> guardado <strong>de</strong> tus juegos y todas las <strong>de</strong>scargas <strong>de</strong>l Canal Tienda <strong>Wii</strong> y <strong>Wii</strong> Points. Visita<br />
support.nintendo.com para recibir asistencia y ver pasos adicionales <strong>de</strong> localización <strong>de</strong> averías y opciones <strong>de</strong> reparación o<br />
llama al 1-800-255-3700.<br />
Ingredientes <strong>de</strong>l líquido limpiador<br />
Agua <strong>de</strong>stilada, etanol, catión AB, surfactante, salicilato sódico.<br />
17