Ice>Link Gateway 500 D2B Mercedes - iPodYourCar.dk
Ice>Link Gateway 500 D2B Mercedes - iPodYourCar.dk
Ice>Link Gateway 500 D2B Mercedes - iPodYourCar.dk

You also want an ePaper? Increase the reach of your titles
YUMPU automatically turns print PDFs into web optimized ePapers that Google loves.
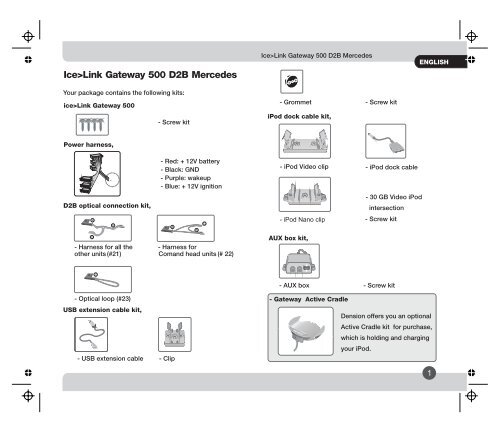
Ice><strong>Link</strong> <strong>Gateway</strong> <strong>500</strong> <strong>D2B</strong> <strong>Mercedes</strong><br />
Your package contains the following kits:<br />
ice><strong>Link</strong> <strong>Gateway</strong> <strong>500</strong><br />
Power harness,<br />
<strong>D2B</strong> optical connection kit,<br />
a<br />
c<br />
- Harness for all the<br />
other units (#21)<br />
c<br />
USB extension cable kit,<br />
- USB extension cable<br />
b<br />
- Screw kit<br />
- Red: + 12V battery<br />
- Black: GND<br />
- Purple: wakeup<br />
- Blue: + 12V ignition<br />
a<br />
- Harness for<br />
Comand head units (# 22)<br />
- Clip<br />
b<br />
c<br />
Ice><strong>Link</strong> <strong>Gateway</strong> <strong>500</strong> <strong>D2B</strong> <strong>Mercedes</strong><br />
- Grommet - Screw kit<br />
iPod dock cable kit,<br />
- iPod Video clip<br />
- iPod Nano clip<br />
AUX box kit,<br />
- iPod dock cable<br />
- 30 GB Video iPod<br />
intersection<br />
- Screw kit<br />
- AUX box - Screw kit<br />
- Optical loop (#23) - <strong>Gateway</strong> Active Cradle<br />
Dension offers you an optional<br />
Active Cradle kit for purchase,<br />
which is holding and charging<br />
your iPod.<br />
ENGLISH<br />
1
ENGLISH<br />
Note: the optical fibers need to handle with care. Prevent the<br />
connectors getting dirty and do not bend the cables<br />
execeeding radius 2,5 cm.<br />
Please teke time to read this installation guide through<br />
carefully and keep it handy in case you need to refer to it<br />
again.<br />
The Ice><strong>Link</strong> <strong>Gateway</strong> <strong>500</strong> transforms the iPod and the mass<br />
storage devices or any AUX audio signal to your car's audio<br />
system.<br />
1.<br />
1. Power<br />
2. Fibre optic connector<br />
3. USB Port<br />
4. iPod Input<br />
5. Aux Input<br />
6. Video Aut<br />
2<br />
c<br />
Fibre optic harness #21<br />
a<br />
a<br />
b<br />
b<br />
Fibre optic harness<br />
#22<br />
c<br />
b<br />
c<br />
a<br />
Fibre optic loop<br />
c<br />
#1<br />
Power<br />
#2<br />
Fibre<br />
optic<br />
connector<br />
#23<br />
#3<br />
USB<br />
Port<br />
#4<br />
iPod<br />
input<br />
Not in<br />
use<br />
#5<br />
Aux<br />
input<br />
#6<br />
Video<br />
out<br />
Ice><strong>Link</strong> <strong>Gateway</strong> <strong>500</strong> <strong>D2B</strong> <strong>Mercedes</strong><br />
INSTALLATION<br />
The best place to install the ice><strong>Link</strong> <strong>Gateway</strong> <strong>500</strong> maybe<br />
somewhere behind<br />
the dashboard/head unit.<br />
Remove the car's head unit from the dashboard according to<br />
car manufacturer instructions. If you do not have a CD<br />
changer in your car please make sure that the head unit can<br />
control a CD changer (e.g. products light at optical output<br />
socket of the head unit.) If not, please refer to an official<br />
<strong>Mercedes</strong> service, where they can easily reprogram the head<br />
unit to enable the optical network for <strong>Gateway</strong> <strong>500</strong>.<br />
If you finished this step or you made sure that the car’s <strong>D2B</strong><br />
NETWORK can accept a CD changer or a CD Changer exists<br />
in your car please do the following:<br />
(2., and 3.,) Disconnect the power harness of the factory head<br />
unit.<br />
2. 3.<br />
4.<br />
C1<br />
B<br />
A<br />
Wakeup<br />
04 03 02 01<br />
10 11 12 13 14 15 16 17 18<br />
08 07 06 05 01 02 03 04 05 06 07 08 09<br />
1 3 5 7<br />
2 4 6 8<br />
1 3 5 7<br />
2 4 6 8<br />
Batt ( +12V)<br />
GND<br />
C2<br />
Comand socket
(5., and 6.,) Join it to the <strong>Gateway</strong> <strong>500</strong>'s power harness female<br />
end #1B and connect it to the radio.<br />
5. 6.<br />
7.<br />
The allocation of the #1C<br />
cable is the following:<br />
(7.) Plug the power<br />
cable lead #1C to the Red: + 12V battery<br />
ice><strong>Link</strong> <strong>Gateway</strong> Black: GND<br />
<strong>500</strong> input.<br />
Purple: wakeup<br />
Blue: + 12V ignition<br />
<strong>Mercedes</strong> cars can<br />
have two different<br />
layouts of optical<br />
network. That is why the <strong>D2B</strong> optical kit contains two<br />
different optical harnesses (labels on them will help). The<br />
#22 belongs to the cars with Comand (made by Bosch) head<br />
units and #21 to the others.<br />
(8. and 9.) Unplug the connector of the optical harness from<br />
the head unit and connect it to the #21/22B socket of the<br />
optical harness of the Ice><strong>Link</strong> <strong>Gateway</strong> <strong>500</strong>.<br />
#1<br />
Power<br />
Ice><strong>Link</strong> <strong>Gateway</strong> <strong>500</strong> <strong>D2B</strong> <strong>Mercedes</strong><br />
8.<br />
(10.) Connect the #21/22 A connector to the back of head<br />
unit.<br />
10.<br />
(11.) Plug the last flying connector of your optical harness to<br />
the <strong>Gateway</strong> <strong>500</strong> interface, with this step you are connected<br />
to the <strong>D2B</strong> optical ring.<br />
11.<br />
9.<br />
1<br />
Power<br />
2<br />
Fibre optic<br />
harness<br />
ENGLISH<br />
3
ENGLISH<br />
Finally connect each cable according to the numbers in the<br />
first picture. Lead away the cables where the devices will be<br />
placed. (E.g the glove compartment or the center console).<br />
(12. and 13.) Use the grommet when you are leading the<br />
cables through on the plastic parts.<br />
(14.) The AUX box is definitely needed for usage as it serves<br />
both as the reset button and the mode selector switch.<br />
Please NOTE<br />
When your have your car serviced you must set the mode<br />
selector switch to service mode (bypass, CD changer)<br />
position otherwise the service computer may detect an<br />
unknown device in the fiber optic system, which can lead to<br />
errors reported.<br />
4<br />
12.<br />
13.<br />
Ice><strong>Link</strong> <strong>Gateway</strong> <strong>500</strong> <strong>D2B</strong> <strong>Mercedes</strong><br />
For change become effective the <strong>D2B</strong> system must shut<br />
down and restart again. The time needed for it depends on<br />
the car type. Please refer to the car manufacturer for exact<br />
information.<br />
14.<br />
15.<br />
Reset<br />
Bypass, CD changer<br />
/ service mode<br />
<strong>Gateway</strong> <strong>500</strong><br />
Device selector<br />
The USB and the iPod dock cable kit contains clips in case of<br />
fixing the USB connector or your iPod Video/Nano.<br />
The clips can be assembled to the AUX box as per the<br />
following drawing, or you can use some of them separately.<br />
16.
Ice><strong>Link</strong> <strong>Gateway</strong> <strong>500</strong> <strong>D2B</strong> <strong>Mercedes</strong><br />
Ihr Paket beinhaltet die folgenden Teile:<br />
ice><strong>Link</strong> <strong>Gateway</strong> <strong>500</strong><br />
Schraubenzieher<br />
Stromkabel,<br />
<strong>D2B</strong> optisches Anschluß Set,<br />
a<br />
c<br />
- Anschluss für command<br />
head units (#21)<br />
c<br />
- Optische schlaufe (#23)<br />
b<br />
- Rot: Batterie 12 V<br />
- Schwarz: Masse<br />
- Purpur: Wakeup<br />
- Blau: 12V Zündung<br />
a<br />
- Anschluss für alle<br />
anderen head units (# 22)<br />
b<br />
c<br />
Ice><strong>Link</strong> <strong>Gateway</strong> <strong>500</strong> <strong>D2B</strong> <strong>Mercedes</strong><br />
USB erweiterungskabel Set,<br />
- USB erweiterungskabel<br />
AUX box set,<br />
- Clip<br />
- Grommet - Schraubenzieher<br />
iPod dock cable kit,<br />
- iPod Video clip<br />
- iPod Nano clip<br />
- iPod dock kable<br />
- 30 GB Video iPod<br />
schnittstelle<br />
- Schraubenzieher<br />
- AUX box - Schraubenzieher<br />
DEUTSCH<br />
5
DEUTSCH<br />
Bemerkung: die optischen Kabel müssen sorgfältig<br />
behandelt werden. Die Anschlüsse dürfen weder schmutzig<br />
werden, noch in einem Radius von weniger als 2,5 cm<br />
gekrümmt werden.<br />
Lesen Sie, bitte, dieses Bedienungshandbuch sorgfältig um<br />
und halten Sie es bitte immer bei Hand.<br />
Der Ice><strong>Link</strong> <strong>Gateway</strong> <strong>500</strong> überträgt die Signale des iPod<br />
und des Massenspeichers oder andere AUX Audio Signale<br />
auf das Audiosystem Ihres Fahrzeugs.<br />
1.<br />
1. Strom<br />
6. Video Ausgang<br />
2. Optischer Schalter 21. Optisches Kabel<br />
3. USB Port<br />
22. Optisches Kabel<br />
4. iPod-Eingang<br />
5. Aux-Eingang<br />
23. optische Schlaufe<br />
6<br />
a<br />
b<br />
b<br />
c<br />
Optisches Kabel<br />
a<br />
#21<br />
#22<br />
c<br />
b<br />
Optisches Kabel<br />
c<br />
a<br />
#1<br />
Strom<br />
Optische Schlaufe<br />
c<br />
#2<br />
Optischer<br />
Schalter<br />
#23<br />
#3<br />
USB<br />
Port<br />
#4<br />
iPod-<br />
Eingang<br />
#6<br />
Video<br />
Ausgang<br />
Unge-<br />
bräuch #5<br />
lich<br />
Aux-<br />
Eingang<br />
Ice><strong>Link</strong> <strong>Gateway</strong> <strong>500</strong> <strong>D2B</strong> <strong>Mercedes</strong><br />
Installation<br />
Der beste Platz für die Installation des ice><strong>Link</strong> <strong>Gateway</strong><br />
<strong>500</strong> ist hinter dem Armaturenbrett / Autoradio.<br />
Entfernen Sie die Head Unit des Fahrzeuges nach Anweisung<br />
des Fahrzeugherstellers.Wenn Sie keinen CD Wechsler in<br />
Ihrem Fahrzeug haben, wenden Sie sich bitte an einen<br />
offiziellen <strong>Mercedes</strong> Servicepunkt, wo die Head Unit für den<br />
<strong>Gateway</strong> <strong>500</strong> umgestellt wird.Nachdem dies erfolgt ist, und<br />
Sie sichergestellt haben, dass das <strong>D2B</strong> einen CD Wechsler<br />
erkennen kann, oder ein CD Wechsler in Ihrem Fahrzeug<br />
vorhanden ist, führen Sie bitte die folgenden Schritte durch:<br />
(2., 3.,) Trennen Sie die Stromanschlüsse von der Head Unit.<br />
2. 3.<br />
4.<br />
C1<br />
B<br />
A<br />
Wakeup<br />
04 03 02 01<br />
10 11 12 13 14 15 16 17 18<br />
08 07 06 05 01 02 03 04 05 06 07 08 09<br />
1 3 5 7<br />
2 4 6 8<br />
1 3 5 7<br />
2 4 6 8<br />
Batt ( +12V)<br />
GND<br />
C2<br />
Comand bunchse
(5., 6.,) Schließen Sie die Kabel an die Stromversorgung des<br />
<strong>500</strong> an (Abbildung 1B) und verbinden Sie sie mit dem Radio.<br />
5. 6.<br />
7.<br />
(7.,)Stecken Sie das<br />
Stromkabel(Abbildung 1C)<br />
in den Eingangdes ice><strong>Link</strong><br />
<strong>Gateway</strong> <strong>500</strong> wie abgebildet.<br />
Für <strong>Mercedes</strong> Fahrzeuge gibt<br />
es zwei verschiedene<br />
optische Geräte. Das liegt daran, dass das <strong>D2B</strong> optische Kit<br />
über zwei verschiedene optische Anschlüsse verfügt (siehe<br />
Label). Die Abbildung 22 bezieht sich auf die Fahrzeuge mit<br />
Comand (von Bosch) Head Units und die Abbildung 21 auf<br />
die anderen Fahrzeuge.<br />
(8., 9.,)Wenn Sie keine anderen optischen Geräte installiert<br />
haben, müssen Sie in beiden Fällen stattdessen die<br />
optische Öse #21, 22B nutzen.<br />
#1<br />
Power<br />
Belegung des Kabels<br />
ist 1C wie folgt<br />
(Abbildung 1C):<br />
Rot: Batterie 12 V<br />
Schwarz: Masse<br />
Purpur: Wakeup<br />
Blau: 12V Zündung<br />
Ice><strong>Link</strong> <strong>Gateway</strong> <strong>500</strong> <strong>D2B</strong> <strong>Mercedes</strong><br />
DEUTSCH<br />
Trennen Sie den Stecker des optischen Anschlusses von<br />
der Head Unit und verbinden Sie sie mit dem Sockel des<br />
optischen Anschlusses des<br />
8.<br />
ice><strong>Link</strong> <strong>Gateway</strong> <strong>500</strong> (siehe<br />
Abbildung # 21/22 A)<br />
(10.,) Stecken Sie den Anschluss in die Rückseite der Head<br />
Unit (in der Abbildung: #21/22)<br />
10.<br />
(11.,) Stecken Sie den letzten freien Stecker Ihres optischen<br />
Anschlusses in das <strong>Gateway</strong> <strong>500</strong> Interface, dadurch ist die<br />
Verbindung zum optischen Ring <strong>D2B</strong> hergestellt.<br />
11.<br />
9.<br />
1<br />
Power<br />
2<br />
Fibre optic<br />
harness<br />
7
DEUTSCH<br />
Zum Schluß stecken Sie jedes Kabel der Nummern der ersten<br />
Abbildung entsprechend. Führen Sie die Kabel von da ab, wo<br />
die Geräte platziert werden (zum Beispiel auf die Zentralkonsole<br />
oder ins Handschuhfach).<br />
(12., 13.,) Für das Durchführen der Kabel durch die Kunststoffteile<br />
nutzen Sie bitte eine Durchführungstülle.<br />
12.<br />
ACHTUNG!<br />
Zur Service Ihres Autos stellen Sie den Betriebsartwähler in<br />
die Stellung Service Betriebsart / Bypass, CD-Wechsler /<br />
Position. Im entgegengesetzten Fall erkennt der<br />
Servicecomputer ein unbekanntes Gerät im optischen<br />
Fibersystem, was die Erscheinung einer Fehleranzeige<br />
auslöst.<br />
8<br />
13.<br />
Ice><strong>Link</strong> <strong>Gateway</strong> <strong>500</strong> <strong>D2B</strong> <strong>Mercedes</strong><br />
Das System <strong>D2B</strong> soll abgeschaltet werden um den Wechsler<br />
wirksam zu werden. Für genaue Informationen besuchen Sie<br />
den Hersteller des Wagens<br />
14.<br />
15.<br />
Betriebswahlschalter<br />
Bypass, CD-Wechsler<br />
/ Betriebsart Servicev<br />
<strong>Gateway</strong> <strong>500</strong><br />
Device selector<br />
Sowohl das USB Set als auch das iPod Dockkabel Set<br />
beinhalten USB Anschluss oder Ihren iPod Video/Nano zu<br />
befestigen.<br />
Die Clips können an eine AUX Box angeschlossen werden,<br />
wie auf der nachfolgenden Zeichnung, oder Sie können<br />
einige von ihnen separat benutzen.<br />
16.
Ice><strong>Link</strong> <strong>Gateway</strong> <strong>500</strong> <strong>D2B</strong> <strong>Mercedes</strong><br />
Votre paquet contient les suivants :<br />
ice><strong>Link</strong> <strong>Gateway</strong> <strong>500</strong><br />
Set de vis<br />
Câble d'alimentation,<br />
Ensemble <strong>D2B</strong> de connection optique,<br />
a<br />
c<br />
- Câble de l'unité<br />
centrale Comand(#21)<br />
c<br />
- Boucle optique (#23)<br />
b<br />
- Rouge: +12V batterie<br />
- Noire: GND<br />
- Violet: wakeup<br />
- Bleue: +12V allumage<br />
a<br />
- Câble pour toutes les<br />
autres unités centrales<br />
(# 22)<br />
b<br />
c<br />
Ice><strong>Link</strong> <strong>Gateway</strong> <strong>500</strong> <strong>D2B</strong> <strong>Mercedes</strong><br />
Ensemble de rallonge câble USB,<br />
- Rallonge de câble USB<br />
AUX box kit,<br />
- Clip<br />
- Bague de serrage - set de vis<br />
Ensemble de dock câble iPod,<br />
- Clip iPod vidéo<br />
- Clip iPod Nano<br />
- Dock câble iPod<br />
- Insertion iPod<br />
Vidéo 30 GB<br />
- Set de vis<br />
- Boîtier AUX - Set de vis<br />
FRANÇAIS<br />
F<br />
9
FRANÇAIS<br />
ice><strong>Link</strong> <strong>Gateway</strong> <strong>500</strong> <strong>D2B</strong> <strong>Mercedes</strong><br />
Note : Les fibres optiques doivent être manipulées avec<br />
précaution. Evitez que les connecteurs deviennent sales et<br />
ne courbez pas les fibres au delà d'un rayon de 2. 5 cm.<br />
Lisez ce guide d'emploi attentivement et tenezle à la portée<br />
de votre main pour pouvoir le consulter en cas de questions<br />
éventuelles dans le future.<br />
Ice><strong>Link</strong> <strong>Gateway</strong> <strong>500</strong> transforme l'iPod et les<br />
équipements de reproduction ou n'importe quel signal audio<br />
AUX existant sur le système audio de votre voiture.<br />
1.<br />
c<br />
Câble de fibre optique #21<br />
1. Alimentation 6. sortie video<br />
2. connecteur de fibre optique 21. câble de fibre optique<br />
3. Port USB 22. câble de fibre optique<br />
4. entré iPod 23. fibre optique<br />
5. entrée AUX<br />
10<br />
a<br />
a<br />
b<br />
b<br />
#22<br />
c<br />
b<br />
Câble de fibre optique<br />
c<br />
Fibre optique<br />
a<br />
c<br />
#1<br />
Alimentation<br />
#2<br />
Connecteur<br />
de fibre<br />
optique<br />
#23<br />
#3<br />
Port<br />
USB<br />
Étrange<br />
#4<br />
Entré<br />
iPod<br />
#5<br />
Entrée<br />
AUX<br />
#6<br />
Sortie<br />
video<br />
Ice><strong>Link</strong> <strong>Gateway</strong> <strong>500</strong> <strong>D2B</strong> <strong>Mercedes</strong><br />
Installation<br />
La meilleure place pour installer l'Ice><strong>Link</strong> <strong>Gateway</strong> <strong>500</strong><br />
peut être derrière le tableau de bord / le poste de radio.<br />
Démontez l'unité centrale du tableau de bord, selon les<br />
instruction du fabricant de la voiture.Si vous n'avez pas de<br />
lecteur CD dans la voiture, contactez s.v.p. le service officiel<br />
de <strong>Mercedes</strong> qui feront les modifications nécessaires pour<br />
l'usage de <strong>Gateway</strong> <strong>500</strong>. Après cette intervention ou si vous<br />
étes certain que le <strong>D2B</strong> peut contrôler le changeur CD ou s'il y<br />
a un changeur dans votre voiture, faites les suivants :<br />
(2., 3.,)Débranchez l'alimentation de l'unité centrale.<br />
2. 3.<br />
4.<br />
C1<br />
B<br />
A<br />
Wakeup<br />
04 03 02 01<br />
10 11 12 13 14 15 16 17 18<br />
08 07 06 05 01 02 03 04 05 06 07 08 09<br />
1 3 5 7<br />
2 4 6 8<br />
1 3 5 7<br />
2 4 6 8<br />
Batt ( +12V)<br />
GND<br />
C2<br />
Command graque
(5., 6.,)Branchez-la à la prise femelle de <strong>Gateway</strong> <strong>500</strong> 1B et<br />
connectez-la à la radio.<br />
5. 6.<br />
7.<br />
(7.,) L'attribution du câble<br />
1C est la suivante<br />
Sur les voitures <strong>Mercedes</strong><br />
on peut rencontrer 2<br />
configurations différentes<br />
des circuits optiques. Pour cette raison dans le kit optique<br />
<strong>D2B</strong> vous trouverez 2 différents câbles (se référer aux<br />
étiquettes sur les câbles). Le #22 est pour les voitures<br />
équipées d'unité centrale Comand (fait par Bosch) et #21<br />
pour d'autres voitures.<br />
(8., 9.,) Si vous n'avez pas d'appareils optiques installés<br />
dans la voiture vous devez utiliser la boucle optique #21,<br />
22B dans les deux cas.<br />
#1<br />
Power<br />
L'attribution du câble 1C<br />
est la suivante:<br />
Rouge: +12V batterie<br />
Noire: GND<br />
Violet: wakeup<br />
Bleue: +12V allumage<br />
Ice><strong>Link</strong> <strong>Gateway</strong> <strong>500</strong> <strong>D2B</strong> <strong>Mercedes</strong><br />
Débranchez le connecteur du câble optique de l'unité<br />
centrale, et connectez-le aux #21/22B connecteurs du câble<br />
optique de l' Ice><strong>Link</strong> <strong>Gateway</strong> <strong>500</strong>.<br />
8.<br />
(10.,) Branchez le connecteur #21/22A sur la partie arrière<br />
de l'unité centrale.<br />
10.<br />
FRANÇAIS<br />
(11.,) Connectez le dernier contact libre du câble optique à<br />
Ice><strong>Link</strong> <strong>Gateway</strong> <strong>500</strong> interface, et avec ce pas vous êtes<br />
connecté au circuit optique <strong>D2B</strong>.<br />
11.<br />
9.<br />
1<br />
Power<br />
2<br />
Fibre optic<br />
harness<br />
11
FRANÇAIS<br />
Pour finir, connectez chacun des câbles selon les chiffres sur<br />
la figure 1. Conduisez les câbles à l'endroit où les<br />
équipements seront montés (par ex. boîte à gants ou la<br />
console centrale). Utilisez la bague de serrage pour conduire<br />
les câbles sur les parties en plastique.<br />
12.<br />
A noter :<br />
13.<br />
Quand vous apportez la véhicule au service vous devez<br />
positionner le selecteur de mode à mode de<br />
fonctionnement/bypass, changeur CD/ position si non,<br />
l'ordinateur du service peut trouver un appareil inconnu<br />
dans le système de fibre optique ce qui peut donner des<br />
défauts reportés..<br />
12<br />
Ice><strong>Link</strong> <strong>Gateway</strong> <strong>500</strong> <strong>D2B</strong> <strong>Mercedes</strong><br />
Si vous voulez changer entre le chargeur CD et <strong>Gateway</strong> <strong>500</strong>,<br />
positionnez le selecteur de mode dans la position droite, puis<br />
coupez le contact / l'unité centrale.<br />
14.<br />
15.<br />
Reset<br />
sélecteur de mode<br />
Bypass ; lecteur CD<br />
/ Mode de fonctionnement<br />
<strong>Gateway</strong> <strong>500</strong><br />
L'USB et le iPod dock câble set contiennent des clips pour<br />
fixer le connecteur USB ou l'iPod Vidéo/Nano.<br />
Vous pouvez fixer les clips sur la boîte AUX selon le dessin cidessous<br />
ou les utiliser séparemment.<br />
16.
Ice><strong>Link</strong> <strong>Gateway</strong> <strong>500</strong> para <strong>Mercedes</strong> <strong>D2B</strong><br />
El contenido del embalaje:<br />
ice><strong>Link</strong> <strong>Gateway</strong> <strong>500</strong><br />
Kit de tornillo<br />
Mazo de conductores de alimentación,<br />
Kit de conexión óptica <strong>D2B</strong>,<br />
a<br />
c<br />
- Mazo de conductores<br />
para equipo de control<br />
Comand (#21)<br />
c<br />
- Lazo óptico (#23)<br />
b<br />
- Rojo: +12V batería<br />
- Negro: GND<br />
- Morado: wakeup<br />
- Azul: +12V encendido<br />
a<br />
- Mazo de conductores<br />
para todos los otros equipos<br />
de control (#22)<br />
b<br />
c<br />
Ice><strong>Link</strong> <strong>Gateway</strong> <strong>500</strong> <strong>D2B</strong> <strong>Mercedes</strong><br />
Kit de cable de extensión USB,<br />
- Cable de extensión USB<br />
- iPod Nano clip<br />
- Clip<br />
- Ojal de fijación - Kit de tornillo<br />
Kit de cable iPot dock,<br />
- iPod Video clip<br />
Kit caja AUX,<br />
- Cable iPod dock<br />
- 30 GB Video iPod<br />
intersección<br />
- Kit de tornillo<br />
- Caja AUX - Kit de tornillo<br />
ESPANOL<br />
13
ESPANOL<br />
Nota: Los hilos ópticos deben ser manejados con cura. Evite<br />
el ensuciamiento de los conectores y no doble los cables<br />
sobrepasando el rayo de 2.5 cms.<br />
Por favor, tome su tiempo para leer atentamente esta guía de<br />
instalación y manténgala a la mano por si necesitara<br />
consultarla otra vez.<br />
El ice><strong>Link</strong> <strong>Gateway</strong> <strong>500</strong> transforma el iPod y la masa de<br />
periférico de almacenamiento o cualquier señal AUX audio<br />
para el sistema audio de su coche.<br />
1.<br />
1. Alimentación<br />
2. Conexión de hilo óptico<br />
3. Puerto USB<br />
4. Entrada cable dock<br />
5. Entrada Aux<br />
6. Salida video<br />
14<br />
a<br />
c<br />
Hilo óptico: mazo de<br />
conductores<br />
a<br />
Hilo óptico: mazo de<br />
conductores<br />
b<br />
b<br />
#21<br />
#22<br />
c<br />
b<br />
c<br />
Hilo óptico: lazo<br />
a<br />
c<br />
#1<br />
Alimentación<br />
#2<br />
Conexión<br />
de hilo óptico<br />
#23<br />
#3<br />
Puerto<br />
USB<br />
Desusado<br />
#4<br />
Entrada<br />
cable<br />
dock<br />
#5<br />
Entrada<br />
Aux<br />
#6<br />
Salida<br />
video<br />
21. Hilo óptico: mazo de<br />
conductores<br />
22. Hilo óptico: mazo de<br />
conductores<br />
23. Hilo óptico: lazo<br />
Ice><strong>Link</strong> <strong>Gateway</strong> <strong>500</strong> <strong>D2B</strong> <strong>Mercedes</strong><br />
Instalacion<br />
El mejor lugar para instalar el Ice><strong>Link</strong> <strong>Gateway</strong> <strong>500</strong> es<br />
algún lugar detrás del salpicadero/la autorradio.<br />
Remueva del salpicadero el equipo de control, de acuerdo a<br />
las instrucciones del fabricante Si no tiene un conmutador de<br />
CD en su coche, por favor, contacte un servicio oficial de<br />
<strong>Mercedes</strong>, donde pueden cambiarle fácilmente el equipo de<br />
control para que éste sea conforme para aceptar<br />
<strong>Gateway</strong><strong>500</strong>. Cuando haya terminado este paso o se haya<br />
asegurado de que el <strong>D2B</strong> del coche pueda aceptar un<br />
conmutador de CD o ya hay un conmutador de CD en su<br />
coche, por favor, haga lo siguiente:<br />
(2., 3.,) Desconecte el mazo de conductores de alimentación<br />
del equipo de control.<br />
2. 3.<br />
4.<br />
C1<br />
B<br />
A<br />
Wakeup<br />
04 03 02 01<br />
10 11 12 13 14 15 16 17 18<br />
08 07 06 05 01 02 03 04 05 06 07 08 09<br />
1 3 5 7<br />
2 4 6 8<br />
1 3 5 7<br />
2 4 6 8<br />
Batt ( +12V)<br />
GND<br />
C2<br />
Comand enchufe
(5., 6.,) Conéctelo al conector hembra No. 1B del mazo de<br />
conductores de alimentación del <strong>Gateway</strong> <strong>500</strong> y conéctelo a<br />
la radio.<br />
5. 6.<br />
7.<br />
(7.,) Enchufe el cable prin-cipal<br />
No. 1C de alimentación a<br />
entrada de Ice><strong>Link</strong> <strong>Gateway</strong><br />
<strong>500</strong>, de acuerdo al primerdibujo.<br />
Los automóviles <strong>Mercedes</strong><br />
pueden tener dos tipos<br />
diferentes de dispositivos ópticos. Es por eso que el kit<br />
óptico <strong>D2B</strong> contiene dos diferentes mazos de conductores<br />
ópticos (las etiquetas puestas sobre éstos le pueden ayudar).<br />
El No. 22 pertenece a los coches con equipo de control<br />
Comand (hecho por Bosch) y el No. 21 a los demás tipos.<br />
(8., 9.,) Si no tiene otros dispositivos ópticos instalados en el<br />
circuito, tiene que usar el lazo óptico No. #21, 22B en lugar de<br />
los dos tipos arriba mencionados.<br />
#1<br />
Power<br />
La distribución del<br />
cable No. 1C es la<br />
siguiente:<br />
Rojo: +12V batería<br />
Negro: GND<br />
Morado: wakeup<br />
Azul: +12V encendido<br />
Ice><strong>Link</strong> <strong>Gateway</strong> <strong>500</strong> <strong>D2B</strong> <strong>Mercedes</strong><br />
ESPANOL<br />
Desconecte del equipo de control el conector del mazo de<br />
conductores ópticos y conéctelo al enchufe No. 21/22A del<br />
mazo de conectores ópticos de<br />
8.<br />
ice><strong>Link</strong> <strong>Gateway</strong> <strong>500</strong>.<br />
(10.,) Conecte el conector #21/22A a la parte trasera del<br />
equipo de control.<br />
10.<br />
(11.,) Conecte el último conector libre de su mazo de<br />
conductores ópticos a la interfaz de <strong>Gateway</strong> <strong>500</strong>. Con este<br />
último paso ya está conectado al circuito óptico <strong>D2B</strong>.<br />
11.<br />
9.<br />
1<br />
Power<br />
2<br />
Fibre optic<br />
harness<br />
15
ESPANOL<br />
Al final, enchufe cada cable según los números indicados en<br />
el primer dibujo. Lleve los cables desde donde los<br />
dispositivos van a ser puestos. (p.ej. en la guantera o en el<br />
consol central).<br />
(12., 13.,) Use ojal de fijación si está llevando los cables a<br />
través de partes en plástico.<br />
12.<br />
Atención<br />
Si usted tiene su automóvil revisado, tiene que poner el<br />
interruptor de selección de modo en la posición “service”<br />
/bypass, cambiador de CD/, de otra manera el ordenador del<br />
servicio puede detectar un dispositivo desconocido en el<br />
sistema de fibra óptica, que puede causar posibles errores.<br />
16<br />
13.<br />
Ice><strong>Link</strong> <strong>Gateway</strong> <strong>500</strong> <strong>D2B</strong> <strong>Mercedes</strong><br />
Para que el cambio se efectúe, el sistema <strong>D2B</strong> debe ser<br />
apagado. El tiempo necesario para esto depende del tipo de<br />
automóvil. Por información más precisa, por favor, diríjase al<br />
fabricante del automóvil.<br />
14.<br />
15.<br />
Reinicializar<br />
Selector de modo<br />
Bypass, conmutador<br />
de CD / modo de servicio<br />
<strong>Gateway</strong> <strong>500</strong><br />
El USB y el kit de cable iPod dock contiene clips para el caso<br />
de tener que fijar el conector USB o su iPod Video/Nano.<br />
Los clips pueden ser instalados a un puerto de conector<br />
según lo demuestra el siguiente dibujo, o pueden ser<br />
utilizados separadamente también.<br />
16.
Ice><strong>Link</strong> <strong>Gateway</strong> <strong>500</strong> <strong>D2B</strong> <strong>Mercedes</strong><br />
Vostro pacchetto contiene:<br />
ice><strong>Link</strong> <strong>Gateway</strong> <strong>500</strong><br />
Set viti<br />
Cavo di alimentazione,<br />
<strong>D2B</strong> set di cablaggio ottico,<br />
a<br />
c<br />
- Cavo dell'unità<br />
di commando Comand<br />
(#21)<br />
c<br />
- Circuito ottico (#23)<br />
b<br />
- Rosso: +12V batteria<br />
- Nero: GND massa<br />
- Viola: wakeup<br />
- Blu: +12 V accensione<br />
a<br />
- Cavo per altre<br />
unità di commando<br />
(#22)<br />
b<br />
c<br />
Ice><strong>Link</strong> <strong>Gateway</strong> <strong>500</strong> <strong>D2B</strong> <strong>Mercedes</strong><br />
Set di prolunga cavo USB,<br />
- prolunga del cavo USB<br />
- anello di fissazione<br />
Set cavo dock iPod,<br />
- fissaggio iPod video<br />
Scatola AUX,<br />
- clip<br />
- set viti<br />
- clip fissaggio iPod Nano - set viti<br />
- scatola AUX<br />
- cavo dock iPod<br />
- adattatore iPod Video<br />
30GB<br />
- set viti<br />
ITALIANO<br />
17
ITALIANO<br />
Nota: le fibre ottiche devono essere maneggiate con cautela.<br />
Fate attenzione che le connessioni non si sporchino e non<br />
piegare le fibre con un raggio superiore a 2,5 cm .<br />
Leggete questa guida di uso con attenzione e tenetela<br />
sempre a portata di mano per poter consultarla in caso di una<br />
eventuale domanda.<br />
Ice><strong>Link</strong> <strong>Gateway</strong> <strong>500</strong> trasforma l'iPod e gli apparecchi di<br />
registrazione o qualsiasi segnale audio AUX che si trova nel<br />
sistema audio della vostra macchina.<br />
Ice><strong>Link</strong> <strong>Gateway</strong> <strong>500</strong> si raccorda direttamente al circuito<br />
ottico <strong>D2B</strong> della vostra macchina tramite il gruppo di fibre<br />
ottiche (21, 22, 23 nella figura)<br />
1.<br />
c<br />
Cavo della fibra ottica #21<br />
1. Alimentazione<br />
2. Contatto della fibra ottica<br />
3. Porta USB<br />
4. Porta ipod<br />
5. Ingresso AUX<br />
18<br />
a<br />
a<br />
b<br />
b<br />
Cavo della fibra ottica<br />
#22<br />
c<br />
b<br />
c<br />
#1<br />
Alimentazione<br />
Circuito della fibra otticap<br />
a<br />
c<br />
#2<br />
Contatto della<br />
fibra ottica<br />
#23<br />
#3<br />
Porta<br />
USB<br />
Disadatto<br />
#4<br />
Porta<br />
iPod<br />
#5<br />
Ingresso<br />
AUX<br />
#6<br />
Uscita<br />
video<br />
6. Uscita video<br />
21. Cavo della fibra ottica<br />
22. Cavo della fibra ottica<br />
23. Circuito della fibra ottica<br />
Ice><strong>Link</strong> <strong>Gateway</strong> <strong>500</strong> <strong>D2B</strong> <strong>Mercedes</strong><br />
INSTALLAZIONE<br />
Il posto migliore per installare Ice><strong>Link</strong> <strong>Gateway</strong> <strong>500</strong> è dietro<br />
il bordo di commando / la radio della macchina.<br />
Smontare l'unità di controllo del bordo di commando<br />
secondo le istruzioni del produttore della macchina. Se non<br />
avete un caricatore CD nella macchina, rivolgere al servizio<br />
ufficiale di <strong>Mercedes</strong> dove potranno facilmente adattare la<br />
macchina all'uso di <strong>Gateway</strong> <strong>500</strong>. Fatto questo, o se vi siete<br />
assicurati che la macchina può controllare il caricatore CD o<br />
se c'è un caricatore CD nella macchina, fare i seguenti:<br />
(2.,3.,) Scollegare l'unità di controllo dall'alimentazione.<br />
2. 3.<br />
4.<br />
C1<br />
B<br />
A<br />
Wakeup<br />
04 03 02 01<br />
10 11 12 13 14 15 16 17 18<br />
08 07 06 05 01 02 03 04 05 06 07 08 09<br />
1 3 5 7<br />
2 4 6 8<br />
1 3 5 7<br />
2 4 6 8<br />
Batt ( +12V)<br />
GND<br />
C2<br />
Comand legatura
(5., e 6.,) Collegare l'unità alla presa femmina del <strong>Gateway</strong><br />
<strong>500</strong> 1B, e collegarla con la radio.<br />
5. 6.<br />
7.<br />
(7.) Collegare il cavo di<br />
alimentazione 1C con<br />
l'input d' Ice><strong>Link</strong><br />
<strong>Gateway</strong><br />
figura 1.<br />
secondo la<br />
Nelle machine <strong>Mercedes</strong> due cablaggi differenti sono<br />
possibili. Per questo nel pacchetto <strong>D2B</strong> ottico si trovano<br />
due cavi differenti (vedere l'etichetta sui cavi). Il #22 serve<br />
per le macchine corredate con l'unità di commando<br />
Comand (prodotta da Bosch) e il #21 serve per le altre<br />
macchine.<br />
(8., 9.,) Se nella vostra macchina non avete apparecchi ottici<br />
installati, dovete utilisare il circuito ottico #21,22B in<br />
ambedue casi.<br />
#1<br />
Power<br />
L'allocazione del cavo<br />
1C è la seguente:<br />
Rosso: +12V batteria<br />
Nero: GND massa<br />
Viola: wakeup<br />
Blu: +12 V accensione<br />
Ice><strong>Link</strong> <strong>Gateway</strong> <strong>500</strong> <strong>D2B</strong> <strong>Mercedes</strong><br />
8.<br />
(10.,) Collegare il connettore #21/22A alla parte dietro<br />
dell'unità di controllo.<br />
10.<br />
(11.,) Collegare l'ultimo contatto libero del cavo ottico all'<br />
Ice><strong>Link</strong> <strong>Gateway</strong> <strong>500</strong> interfaccia e con questo passo il<br />
circuito <strong>D2B</strong> é chiuso.<br />
11.<br />
9.<br />
1<br />
Power<br />
2<br />
Fibre optic<br />
harness<br />
ITALIANO<br />
19
ITALIANO<br />
Per finire, collegare i cavi secondo le ciffre sulla figura 1.<br />
Condurre i cavi al posto dove gli apparecchi saranno montati<br />
(per es. Casella guanti o console centrale).<br />
(12.,13.,) Utilizzare l'anello di serraggio per condurre i cavi<br />
sulle parti di plastica.<br />
12.<br />
Si prega di notare:<br />
Quando apportate la macchina al sevizio, bisogna<br />
posizionare il selettore di modalitá in modo di<br />
funzionamento/bypass,caricatore CD/posizione se no, il<br />
computer della stazione di servizio può identificare qualche<br />
dispositivo sconosciuto il che può causare difetti riportati.<br />
20<br />
13.<br />
Ice><strong>Link</strong> <strong>Gateway</strong> <strong>500</strong> <strong>D2B</strong> <strong>Mercedes</strong><br />
Perché il cambio diventi effettivo, il sistema ottico <strong>D2B</strong><br />
deve essere spento. Il tempo necessario dipende dal tipo<br />
della macchina. Si prega di consultare il produttore della<br />
macchina per i dettagli piú particolari.<br />
14.<br />
15.<br />
Tasto di reset (taratura)<br />
Selettore (elezione)<br />
della modalitá<br />
bypass/caricatore CD<br />
/ modalitá di funzionamento<br />
<strong>Gateway</strong> <strong>500</strong><br />
The USB and the iPod dock cable kit contains clips in case<br />
of fixing the USB connector or your iPod Video/Nano.<br />
The clips can be assembled to the AUX box as per the<br />
following drawing, or you can use some of them separately.<br />
16.
Ice><strong>Link</strong> <strong>Gateway</strong> <strong>500</strong> <strong>D2B</strong> <strong>Mercedes</strong><br />
Uw pakket bevat de volgende sets:<br />
ice><strong>Link</strong> <strong>Gateway</strong> <strong>500</strong><br />
Shroevenset,<br />
Stroomkabel,<br />
<strong>D2B</strong> optische verbindingsset,<br />
a<br />
c<br />
- Kabel voor Comand<br />
radio/navigatie systemen<br />
(#21)<br />
c<br />
- Optische lus (#23)<br />
b<br />
- Rood: + 12V batterij<br />
- Zwart: Aarde<br />
- Paars: wakeup<br />
- Blauw: + 12V ontsteking<br />
a<br />
- Kabel voor alle overige<br />
radio's (# 22)<br />
b<br />
c<br />
Ice><strong>Link</strong> <strong>Gateway</strong> <strong>500</strong> <strong>D2B</strong> <strong>Mercedes</strong><br />
USB verlengkabel set,<br />
- USB verlengkabel<br />
- Oogje<br />
iPod dock kabel set,<br />
- iPod Video clip<br />
- iPod Nano clip<br />
AUX box set,<br />
- Clip<br />
- Schroevenset<br />
- iPod dock kabel<br />
- 30 GB Video iPod<br />
connectiestuk<br />
- Schroevenset<br />
- AUX box - Schroevenset<br />
NEDERLANDS<br />
21
NEDERLANDS<br />
Ice><strong>Link</strong> <strong>Gateway</strong> <strong>500</strong> <strong>D2B</strong> <strong>Mercedes</strong><br />
Let op: De glasvezel kabels moeten voorzichtig behandeld<br />
worden. Houd de stekkers schoon en buig de kabels niet<br />
meer dan in een radius van 2,5 cm.<br />
Lees de handleiding aandachtig door en houd deze bij de<br />
hand voor het geval er later verdere vragen ontstaan.<br />
De Ice><strong>Link</strong> <strong>Gateway</strong> <strong>500</strong> zet het signaal van de iPod en<br />
massaopslag apparatuur of andere AUX audiosignalen om<br />
naar het audiosysteem van uw auto.<br />
1.<br />
Fiber Optic glasvezel kabel<br />
a<br />
b<br />
1. Stroom<br />
2. Fiber Optic glasvezelstekker<br />
3. USB poort<br />
4. iPod ingang<br />
22<br />
c<br />
a<br />
b<br />
#21<br />
#22<br />
c<br />
b<br />
Fiber Optic glasvezel kabel<br />
c<br />
#1<br />
Stroom<br />
Fiber Optic Glasvezel lus<br />
a<br />
c<br />
#2<br />
Fiber<br />
Optic<br />
glasvezelstekker<br />
#23<br />
#3<br />
USB<br />
Poort<br />
#4<br />
Not in<br />
use<br />
iPod<br />
ingang<br />
#5<br />
#6<br />
Video<br />
uitgang<br />
AUX<br />
ingang<br />
5. AUX ingang<br />
6. Video uitgang<br />
21. Fiber Optic glasvezel kabel<br />
22. Fiber Optic glasvezel kabel<br />
23. Fiber Optic glasvezel<br />
lus<br />
Ice><strong>Link</strong> <strong>Gateway</strong> <strong>500</strong> <strong>D2B</strong> <strong>Mercedes</strong><br />
Installatie<br />
De beste plek om de ice><strong>Link</strong> <strong>Gateway</strong> <strong>500</strong> te installeren<br />
is ergens achter het dashboard/de autoradio.<br />
Verwijder de hoofdeenheid van de auto uit het dashboard<br />
volgens de fabrieksvoorschriften van de auto.<br />
Als er geen Cd-wisselaar aanwezig is in uw auto, dan kunt u<br />
zich wenden tot een officiële <strong>Mercedes</strong> garage. Hier kunnen<br />
ze de radio geschikt maken voor het accepteren van de<br />
<strong>Gateway</strong> <strong>500</strong>. Nadat dit gebeurd is of wanneer u er zeker van<br />
bent dat de <strong>D2B</strong> van de auto geschikt is voor een Cdwisselaar<br />
of als er al een Cd-wisselaar aanwezig is, volgt u de<br />
volgende stappen:<br />
(2.,3.,) Koppel de stroomkabel van de radio los.<br />
2. 3.<br />
4.<br />
C1<br />
B<br />
A<br />
Wakeup<br />
04 03 02 01<br />
10 11 12 13 14 15 16 17 18<br />
08 07 06 05 01 02 03 04 05 06 07 08 09<br />
1 3 5 7<br />
2 4 6 8<br />
1 3 5 7<br />
2 4 6 8<br />
Batt ( +12V)<br />
GND<br />
C2<br />
Command spic
(5., 6.,) Verbind deze met de contrastekker #1B van de<br />
<strong>Gateway</strong> <strong>500</strong> stroomkabel en met de radio.<br />
5. 6.<br />
7.<br />
(7.,) Sluit de stroomkabel #1<br />
aan op de ice><strong>Link</strong><strong>Gateway</strong><br />
<strong>500</strong> ingang zoals op de eerste<br />
afbeelding weergegeven.<br />
Er bestaan twee verschillende manieren van indeling van de<br />
optische apparatuur in <strong>Mercedes</strong> auto's. Om deze reden heeft<br />
de <strong>D2B</strong> optische kit twee verschillende stroomkabels (labels<br />
kunnen u helpen bij het kiezen). Gebruik #22 bij auto's met<br />
Comand radio/navigatie systemen ( gefabriceerd door Bosch)<br />
en #21 bij overige modellen.<br />
(8., 9.,) Indien er geen andere optische apparatuur<br />
geïnstalleerd is in de ring, dan dient u de optische lus #21,22B<br />
te gebruiken in beide gevallen.<br />
#1<br />
Power<br />
De #1C kabel wordt<br />
als volgt verdeeld:<br />
Rood: + 12V batterij<br />
Zwart: Aarde<br />
Paars: wakeup<br />
Blauw: + 12V ontsteking<br />
Ice><strong>Link</strong> <strong>Gateway</strong> <strong>500</strong> <strong>D2B</strong> <strong>Mercedes</strong><br />
NEDERLANDS<br />
Koppel de stekker van de optische kabel los van de<br />
hoofdeenheid en verbind deze<br />
8.<br />
met ingang #21/22B van de<br />
optische kabel van de<br />
Ice><strong>Link</strong> <strong>Gateway</strong> <strong>500</strong>.<br />
(10.,) Sluit stekker #21/22A aan op de achterkant van de<br />
hoofdeenheid.<br />
10.<br />
(11.,) Sluit de laatste vrije stekker van de Optic glasvezel<br />
kabel aan op de <strong>Gateway</strong> <strong>500</strong> interface, hiermee rondt u de<br />
verbinding naar de <strong>D2B</strong> optische ring af.<br />
11.<br />
9.<br />
1<br />
Power<br />
2<br />
Fibre optic<br />
harness<br />
Verbind vervolgens alle kabels zoals op de eerste afbeelding<br />
weergegeven. Leid de kabels om waar verdere apparatuur<br />
geplaatst zal worden.<br />
23
NEDERLANDS<br />
(B.v. het handschoenenkastje of de centrale console).<br />
Gebruik het oogje wanneer u de kabels over de plastic<br />
onderdelen heen leidt.<br />
Verbind vervolgens alle kabels zoals op de eerste afbeelding<br />
weergegeven. Leid de kabels om waar verdere apparatuur<br />
geplaatst zal worden. (B.v. het handschoenenkastje of de<br />
centrale console).<br />
(12., 13.,) Gebruik het oogje wanneer u de kabels over de<br />
plastic onderdelen heen leidt.<br />
12.<br />
Let op!<br />
Wanneer u uw auto voor onderhoud naar de garage brengt,<br />
dient u de bronschakelaar in de stand bediening/bypass, cdwisselaar<br />
te zetten, om te voorkomen dat de<br />
servicecomputer een onbekend apparaat ontdekt in het<br />
optische glasvezelsysteem als gevolg waarvan storingen<br />
kunnen optreden.<br />
24<br />
13.<br />
Ice><strong>Link</strong> <strong>Gateway</strong> <strong>500</strong> <strong>D2B</strong> <strong>Mercedes</strong><br />
Om de verandering in werking te laten treden, moet het<br />
<strong>D2B</strong>-systeem afgesloten zijn. De tijd die hiervoor nodig is,<br />
is afhankelijk van het type auto. Exacte informatie hierover<br />
kunt u opvragen bij de fabrikant.<br />
14.<br />
15.<br />
Reset<br />
Bronselectie<br />
Bypass, Cd-wisselaar<br />
/ service modus<br />
<strong>Gateway</strong> <strong>500</strong><br />
In de USB en de iPod dock cable sets vindt u clips indien u de<br />
USB stekker of uw iPod Video/Nano wilt bevestigen.<br />
De clips kunt u op de AUX-box vastzetten zoals is<br />
weergegeven in onderstaande tekening, of u kunt ze apart<br />
gebruiken.<br />
16.