DUO ATEX LED 5 - Safety Lamp of Houston Inc.
DUO ATEX LED 5 - Safety Lamp of Houston Inc.
DUO ATEX LED 5 - Safety Lamp of Houston Inc.

Create successful ePaper yourself
Turn your PDF publications into a flip-book with our unique Google optimized e-Paper software.
(EN) Explosible environment<br />
(FR) Milieu explosible<br />
(DE) Explosionsgefährdete Umgebung<br />
(IT) Ambiente con rischio di esplosione<br />
(ES) Medio explosivo<br />
www.petzl.com<br />
Made in France<br />
3 year guarantee<br />
<strong>DUO</strong> <strong>ATEX</strong> <strong>LED</strong> 5<br />
E61L5 2<br />
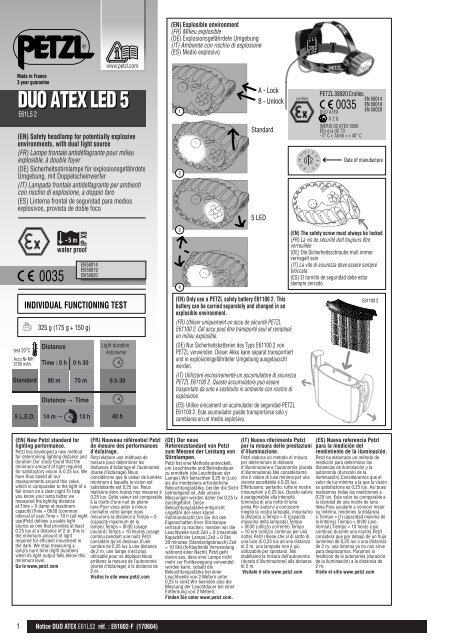
(EN) <strong>Safety</strong> headlamp for potentially explosive<br />
environments, with dual light source<br />
(FR) <strong>Lamp</strong>e frontale antidéflagrante pour milieu<br />
explosible, à double foyer<br />
(DE) Sicherheitsstirnlampe für explosionsgefährdete<br />
Umgebung, mit Doppelscheinwerfer<br />
(IT) <strong>Lamp</strong>ada frontale antideflagrante per ambienti<br />
con rischio di esplosione, a doppio faro<br />
(ES) Linterna frontal de seguridad para medios<br />
explosivos, provista de doble foco<br />
1<br />
2<br />
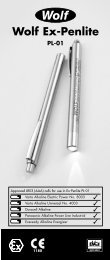
A - Lock<br />
B - Unlock<br />
Standard<br />
5 <strong>LED</strong><br />
10<br />
9<br />
1<br />
0 2<br />
11 12<br />
8<br />
7<br />
2<br />
6<br />
3<br />
4<br />
5<br />
PETZL 38920 Crolles<br />
0035<br />
certified EN 50014<br />
EN 50019<br />
<strong>DUO</strong> <strong>ATEX</strong><br />
EN 50020<br />
II 2 G<br />
INERIS 02 <strong>ATEX</strong> 0056<br />
EEx e ia IIC T3<br />
- 5 o C < Tamb < + 40 o C<br />
Date <strong>of</strong> manufacture<br />
Accu Ni-MH<br />
2700 mAh<br />
0035<br />
EN 50014<br />
EN 50019<br />
EN 50020<br />
INDIVIDUAL FUNCTIONING TEST<br />
Standard<br />
325 g (175 g + 150 g)<br />
Distance<br />
Time : 0 h<br />
80 m<br />
Distance<br />
IP X8<br />
- 5 m<br />
water pro<strong>of</strong><br />
0 h 30<br />
70 m<br />
Time<br />
5 L.E.D. 14 m 13 h<br />
Light duration<br />
Autonomie<br />
6 h 30<br />
40 h<br />
3<br />
4<br />
(EN) Only use a PETZL safety battery E61100 2. This<br />
battery can be carried separately and changed in an<br />
explosible environment.<br />
(FR) Utiliser uniquement un accu de sécurité PETZL<br />
E61100 2. Cet accu peut être transporté seul et remplacé<br />
en milieu explosible.<br />
(DE) Nur Sicherheitsbatterien des Typs E61100 2 von<br />
PETZL verwenden. Dieser Akku kann separat transportiert<br />
und in explosionsgefährdeter Umgebung ausgetauscht<br />
werden.<br />
(IT) Utilizzare esclusivamente un accumulatore di sicurezza<br />
PETZL E61100 2. Questo accumulatore può essere<br />
trasportato da solo e sostituito in ambiente con rischio di<br />
esplosione.<br />
(ES) Utilice únicament un acumulador de seguridad PETZL<br />
E61100 2. Este acumulador puede transportarse solo y<br />
cambiarse en un medio explosivo.<br />
(EN) The safety screw must always be locked<br />
(FR) La vis de sécurité doit toujours être<br />
verrouillée<br />
(DE) Die Sicherheitsschraube muß immer<br />
verriegelt sein<br />
(IT) La vite di sicurezza deve essere sempre<br />
bloccata<br />
(ES) El tornillo de seguridad debe estar<br />
siempre cerrado<br />
E61100 2<br />
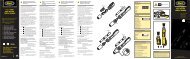
(EN) New Petzl standard for<br />
lighting performance.<br />
Petzl has developed a new method<br />
for determining lighting distance and<br />
duration.Our study found that the<br />
minimum amount <strong>of</strong> light required<br />
for satisfactory vision is 0.25 lux. We<br />
have thus based all our<br />
measurements around this value,<br />
which is comparable to the light <strong>of</strong> a<br />
full moon on a clear night.To help<br />
you know your lamp better we<br />
measured the lighting distance<br />
at:Time = 0 (lamp at maximum<br />
capacity)Time = 0h30 (common<br />
interval <strong>of</strong> use).Time = 10 h (all-night<br />
use)Petzl defines a usable light<br />
source as one that provides at least<br />
0.25 lux at a distance <strong>of</strong> 2 m; this is<br />
the minimum amount <strong>of</strong> light<br />
required for efficient movement in<br />
the dark. We stop measuring a<br />
lamp’s burn time (light duration)<br />
when its light output falls below this<br />
minimum level.<br />
Go to www.petzl.com<br />
(FR) Nouveau référentiel Petzl<br />
de mesure des performances<br />
d’éclairage.<br />
Petzl élabore une méthode de<br />
mesure pour déterminer les<br />
distances d’éclairage et l’autonomie<br />
(durée d’éclairage).Nous<br />
considérons que la valeur de lumière<br />
minimum à laquelle la vision est<br />
satisfaisante est 0,25 lux. Nous<br />
réalisons donc toutes nos mesures à<br />
0,25 lux. Cette valeur est comparable<br />
à la clarté d’une nuit de pleine<br />
lune.Pour vous aider à mieux<br />
connaître votre lampe nous<br />
mesurons la distance à:Temps = 0<br />
(capacité maximum de la<br />
lampe).Temps = 0h30 (usage<br />
courant).Temps = 10 heures (usage<br />
continu pendant une nuit).Petzl<br />
considère qu’en dessous d’une<br />
lumière de 0,25 lux à une distance<br />
de 2 m, une lampe n’est plus<br />
utilisable pour se déplacer.Nous<br />
arrêtons la mesure de l’autonomie<br />
(durée d’éclairage) à la distance de<br />
2 m.<br />
Visitez le site www.petzl.com<br />
(DE) Der neue<br />
Referenzstandard von Petzl<br />
zum Messen der Leistung von<br />
Stirnlampen.<br />
Petzl hat eine Methode entwickelt,<br />
um Leuchtweite und Betriebsdauer<br />
zu ermitteln (die Leuchtdauer der<br />
<strong>Lamp</strong>e).Wir betrachten 0,25 lx (Lux)<br />
als die mindestens erforderliche<br />
Beleuchtungsstärke, bei der die Sicht<br />
befriedigend ist. Alle unsere<br />
Messungen werden daher bei 0,25 lx<br />
durchgeführt. Diese<br />
Beleuchtungsstärke entspricht<br />
ungefähr der einer klaren<br />
Vollmondnacht.Um Sie mit den<br />
Eigenschaften Ihrer Stirnlampe<br />
vertraut zu machen, messen wir die<br />
Leuchtweite nach:Zeit = 0 (maximale<br />
Kapazität der <strong>Lamp</strong>e).Zeit = 0 Std<br />
30 minutes (Standardgebrauch).Zeit<br />
= 10 Std (fortlaufende Verwendung<br />
während einer Nacht).Petzl geht<br />
davon aus, dass eine <strong>Lamp</strong>e nicht<br />
mehr zur Fortbewegung verwendet<br />
werden kann, sobald die<br />
Beleuchtungsstärke bei einer<br />
Leuchtweite von 2 Metern unter<br />
0,25 lx sinkt.Wir beenden also die<br />
Messung der Leuchtdauer bei einer<br />
Entfernung von 2 Metern.<br />
Finden Sie unter www.petzl.com.<br />
(IT) Nuovo riferimento Petzl<br />
per la misura delle prestazioni<br />
d’illuminazione.<br />
Petzl elabora un metodo di misura<br />
per determinare le distanze<br />
d’illuminazione e l’autonomia (durata<br />
d’illuminazione).Noi consideriamo<br />
che il valore di luce minima per una<br />
visione accettabile è 0,25 lux.<br />
Effettuiamo, pertanto, tutte le nostre<br />
misurazioni a 0,25 lux. Questo valore<br />
è paragonabile alla intensità<br />
luminosa di una notte di luna<br />
piena.Per aiutarvi a conoscere<br />
meglio la vostra lampada, misuriamo<br />
la distanza a:Tempo = 0 (capacità<br />
massima della lampada).Tempo<br />
= 0h30 (utilizzo corrente).Tempo<br />
= 10 ore (utilizzo continuo per una<br />
notte).Petzl ritiene che al di sotto di<br />
una luce di 0,25 lux ad una distanza<br />
di 2 m, una lampada non è più<br />
utilizzabile per spostarsi. Noi<br />
stabiliamo la misura dell’autonomia<br />
(durata d’illuminazione) alla distanza<br />
di 2 m.<br />
Visitate il sito www.petzl.com<br />
(ES) Nueva referencia Petzl<br />
para la medición del<br />
rendimiento de la iluminación.<br />
Petzl ha elaborado un método de<br />
medición para determinar las<br />
distancias de iluminación y la<br />
autonomía (duración de la<br />
iluminación).Consideramos que el<br />
valor de luz mínima a la que la visión<br />
es satisfactoria es 0,25 lux. Así pues<br />
realizamos todas las mediciones a<br />
0,25 lux. Este valor es comparable a<br />
la claridad de una noche de luna<br />
llena.Para ayudarle a conocer mejor<br />
su linterna, medimos la distancia<br />
a:Tiempo = 0 (capacidad máxima de<br />
la linterna).Tiempo = 0h30 (uso<br />
normal).Tiempo = 10 horas (uso<br />
continuo durante una noche).Petzl<br />
considera que por debajo de un flujo<br />
luminoso de 0,25 lux a una distancia<br />
de 2 m, una linterna ya no nos sirve<br />
para desplazarnos. Paramos la<br />
medición de la autonomía (duración<br />
de la iluminación) a la distancia de<br />
2 m.<br />
Visite el sitio www.petzl.com<br />
1 Notice <strong>DUO</strong> <strong>ATEX</strong> E61L52 réf. : E61602-F (170604)
(EN) Non-explosible environment<br />
(FR) Milieu non explosible<br />
(DE) Umgebung ohne Explosionsgefahr<br />
(IT) Ambiente senza rischio di esplosione<br />
(ES) Medio no explosivo<br />
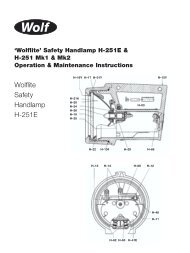
(EN) Changing a bulb<br />
(FR) Remplacer une ampoule<br />
(DE) Auswechseln der Birnen<br />
(IT) Sostituzione lampadine<br />
(ES) Cambio de bombilla<br />
5<br />
6<br />
7<br />
8<br />
9<br />
10<br />
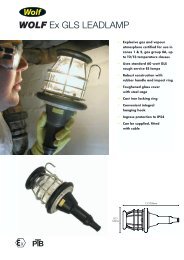
E65200 2<br />
Europe<br />
100/240 V~50-60 Hz<br />
(EN) Time for complete<br />
recharge + compatibility<br />
(FR) Durée de la recharge<br />
bilité<br />
(DE) Zeit für vollständiges<br />
Aufladen + Vereinbarkeit<br />
(IT) Durata della ricarica<br />
completa + compatibilità<br />
(ES) Duración de la carga<br />
completa + compatibilidad<br />
E65200 2 :<br />
100/240 V<br />
50/60 Hz<br />
Europe<br />
OPTION<br />
NEW<br />
NEW<br />
E65300 2 : 12 V<br />
(EN) Car charger<br />
(FR) Chargeur voiture<br />
(DE) Autoladekabel<br />
(IT) Caricatore auto<br />
(ES) Cargator coche<br />
NEW<br />
E61100 2<br />
Ni-MH<br />
2700 mAh<br />
3 h 30<br />
14 h<br />
(EN) ENGLISH<br />
Suitability<br />
The <strong>DUO</strong> <strong>ATEX</strong> headlamp may be used in the presence <strong>of</strong> gases, vapours and<br />
mists, <strong>of</strong> which the self-ignition temperature is higher than 200 °C at atmospheric<br />
pressure (200 °C maximum temperature at the surface <strong>of</strong> the lamp).<br />
This protection corresponds to almost all gases, with the exception <strong>of</strong> acetaldetyde<br />
(C 2 H 4 o)(140°), ethyl ether (C 4 H1 0 o) (170°), ethyl nitrate (C 2 H 5 No 2 ) (90 °C) and<br />
carbon disulfide (CS 2 )(102 °C), etc...<br />
The <strong>DUO</strong> <strong>ATEX</strong> must not be used in mines where firedamp may be present, or in<br />
dusty atmospheres such as grain silos.<br />
Marking<br />
The CEI international regulations (standard CEI 79.10 <strong>of</strong> 1995 and the European<br />
directive 94/9/EC ; <strong>ATEX</strong> 95) distinguish the following categories <strong>of</strong> hazardous<br />
zones.<br />
- Zone 0 : the explosive atmosphere is continuously present (tanks).<br />
- Zone 1 : the explosive atmosphere is <strong>of</strong>ten present (mixing occurring during the<br />
operation <strong>of</strong> an installation).<br />
- Zone 2 : the explosive atmosphere may be present accidentally (malfunction <strong>of</strong><br />
the operation, escape <strong>of</strong> gas).<br />
The <strong>DUO</strong> <strong>ATEX</strong> <strong>LED</strong> 5 is classed Zone 1 and Zone 2. Its use is not allowed in<br />
Zone 0.<br />
CE : CE marking<br />
Ex : use <strong>of</strong> the equipment in an explosive atmosphere.<br />
II : group <strong>of</strong> equipment for surface use.<br />
2 : device for the present Zone 1.<br />
G : gas only.<br />
EEx : device fulfilling the requirements <strong>of</strong> the CENELEC standardization (European<br />
standards).<br />
e : augmented protection = the lamp cannot give rise to an electrical arc or to<br />
heating that could cause ignition <strong>of</strong> an explosive atmosphere.<br />
ia : intrinsic protection = protection from the lamp itself, independent <strong>of</strong> exterior<br />
factors.<br />
II : above-ground industries.<br />
C : subdivision containing the most high-risk gases, including hydrogen (H 2 ),<br />
acetylene (C 2 H 2 ) and carbon disulphide (CS 2 ).<br />
T3 : maximum surface temperature 200 °C.<br />
Important : Specific training is essential before use<br />
Read this notice carefully before use. This technical notice illustrates ways <strong>of</strong> using<br />
this product. Only the techniques shown are advised, all other uses are excluded.<br />
In case <strong>of</strong> doubt or any problem understanding the use <strong>of</strong> this product, please<br />
contact PETZL.<br />
Malfunction <strong>of</strong> this lamp may leave the user in danger. Learning the techniques<br />
<strong>of</strong> use and care (cleaning, bulb changing, scraping contacts etc) are entirely the<br />
responsibility <strong>of</strong> the user.<br />
You personally assume all the risks and responsibilities for all damage, injury<br />
or death which may occur during or following wrong use <strong>of</strong> our products in any<br />
manner whatsoever. If you are not able to, or not in a position to assume this<br />
responsibility or to take this risk, do not use this equipment.<br />
It is the user’s responsibility to prepare this lamp for use.<br />
Use<br />
The switch may be locked for transporting or storage by pressing the red button<br />
(1A). To unlock, press on the other end <strong>of</strong> the red bar (1B).<br />
- Switch in upper position : main light (2).<br />
- Switch in lower position : short distance light using minimum energy (3).<br />
- The zoom button allows focussing the main light to suit the need. In the low<br />
position the beam is narrow. In the high position it is broad (4).<br />
The special rechargeable battery can be replaced in an explosive environment.<br />
Changing the rechargeable battery<br />
Open the rear box by releasing the 2 clips (5).<br />
+ Attention : never dismantle the gasket ring inside the cover. Take care to keep<br />
it in place (clean with water and a cotton bud). Lubricate the ring with a silicone<br />
based grease. If changing batteries in a damp environment, dry the inside <strong>of</strong> the<br />
box after use.<br />
Lengthy storage : remove batteries and leave box open.<br />
Changing a bulb<br />
Warning, never open the front case in an explosive environment. Loosen the safety<br />
screw without removing it completely (3 turns) (5).<br />
Open the headpiece using the left hand to unscrew the bezel (6). Remove it<br />
completely. Should it be jammed, try a penetrating fluid, or warm the front cover<br />
with a hair drier.<br />
- Standard bulb : unscrew the burned out bulb and screw in the new one<br />
tightening securely.<br />
- <strong>LED</strong> module:<br />
Pull old lamp out and insert the new one, taking care not to bend the 2 metal<br />
contacts. Check operation by switching on. If the <strong>LED</strong> module does not light up,<br />
pull it out, reverse the contacts (turn it 180°) and re-install. Close the headpiece.<br />
Replacement bulbs : do not clip old bulbs into the replacement bulb holder (risk<br />
<strong>of</strong> confusion later).<br />
Darkening bulb = loss <strong>of</strong> brightness before final failure <strong>of</strong> bulb.<br />
To close the headpiece :<br />
+ Clean the seal thoroughly, dry the case and grease the seal and the threads with<br />
a silicon-based grease,<br />
- ensure that the reflector/glass/bezel assembly is correctly oriented (7),<br />
- screw up the bezel with the right hand until the mark on the bezel is situated<br />
between the two marks on the case (8) and 9),<br />
- turn the safety screw until moderately tight (3 turns) (10).<br />
Notes<br />
If the lamp is accidentally left on in a rucsac, the heat generated by the bulb may<br />
damage the reflector (take care to lock the switch). Simultaneous use <strong>of</strong> both<br />
bulbs is not possible : this would only increase power drain without giving extra<br />
light.<br />
This lamp is ideal for wet environment, but don’t misunderstand this is not a<br />
diving light. If either <strong>of</strong> the two compartments takes in water (perished or dirty<br />
gasket, poor fitting), open both boxes, take out batteries and bulbs, rinse in clean<br />
water, then dry very slowly.<br />
Should the lamp not work<br />
Check the state <strong>of</strong> charge <strong>of</strong> the battery. Check that the bulb is not blown, or that<br />
the connections are not oxidised. Move the small bulb in and out <strong>of</strong> place several<br />
times, with the switch in the “bulb on” position. Check that the battery contacts<br />
and those <strong>of</strong> its case are not corroded (clean them if necessary). Work the switch<br />
several times.<br />
If your lamp still does not work, call your service centre.<br />
Dismantling <strong>of</strong> the lamp may only be carried out by the manufacturer for any<br />
problem other than changing a bulb or an <strong>LED</strong> module.<br />
Cleaning<br />
Wash the lamp, with the compartments closed, in clean water. Use soap for the<br />
elastics. Do not rub with an abrasive product especially on the glass. Do not wash<br />
with a high pressure hose.<br />
<strong>DUO</strong> <strong>ATEX</strong> rechargeable battery<br />
<strong>DUO</strong> charger<br />
<strong>Safety</strong> instructions<br />
This notice contains important safety instructions and operating instructions<br />
for <strong>DUO</strong> CHARGER E65200. Before using this product read all instructions and<br />
cautionary markings on battery charger, battery and product using battery. Save<br />
these instructions.<br />
Caution<br />
2 Notice <strong>DUO</strong> <strong>ATEX</strong> E61L52 réf. : E61602-F (170604)
Only use the PETZL E61100 2 <strong>DUO</strong> <strong>ATEX</strong> rechargeable battery (do not use with<br />
normal alkaline or saline batteries).<br />
The <strong>DUO</strong> <strong>ATEX</strong> E61100 2 rechargeable battery is an intrinsically safe battery : EEx<br />
e ia IIC T3.<br />
Special safety precaution: The rechargeable battery must never<br />
be recharged in an explosive environment.<br />
<strong>DUO</strong> BATTERY E61100 2<br />
Capacity: 2 700 mAh. The battery consists <strong>of</strong> 4 NiMH cells.<br />
To be used only with the Petzl <strong>DUO</strong> CHARGER.<br />
- The battery must be charged before first use.<br />
- Do not hesitate to recharge a battery that is partially discharged or has been<br />
in storage for more than two weeks. It is not necessary to fully drain the battery<br />
before recharging.<br />
- Self discharging: a charged battery stored under good conditions at 20 °C loses<br />
about 15 % <strong>of</strong> its charge after 3 days, then 1 % per day thereafter. Note that this<br />
rate <strong>of</strong> discharge is greater in higher temperatures.<br />
- Battery can be recharged 500 times.<br />
- Always use the battery in temperatures above -20 °C and below +60 °C.<br />
- Do not place the battery in a fire or dismantle it. An explosion or a release <strong>of</strong> toxic<br />
materials may result.<br />
- Do not short circuit the battery. It may cause burns.<br />
Storage<br />
To extend the life <strong>of</strong> your battery, store it in a clean, dry place between -20 °C<br />
and +35 °C.<br />
Protecting the environment<br />
Batteries should not be thrown in the regular trash. Dispose <strong>of</strong> batteries by<br />
recycling them in accordance with applicable local regulations.<br />
<strong>DUO</strong> CHARGER<br />
- Do not recharge alkaline or saline batteries due to a risk <strong>of</strong> explosion. Charging<br />
other types <strong>of</strong> rechargeable batteries may result in personal injury and/or damage<br />
to batteries and charger.<br />
- Batteries should always be charged at a temperature between 10 °C and 40 °C.<br />
- Do not expose to rain or snow. Shock hazard may result.<br />
- Do not operate the charger if it has been subjected to a significant impact or fall.<br />
- If the charger is damaged (the power cable for example), do not disassemble. It<br />
must only be repaired in Petzl workshops as special tools are required.<br />
- To reduce the risk <strong>of</strong> damage to the plug, pull the plug and not the cable when<br />
you are disconnecting the charger.<br />
- Do not use with an extension cord.<br />
- To reduce the risk <strong>of</strong> an electric shock, unplug the charger from the wall socket<br />
before attempting any maintenance or cleaning.<br />
Mains charger: E65200 2<br />
A green light is lit when the battery is charging.<br />
Time for complete recharge: 3 h 30.<br />
The green light flashes when charging is complete.<br />
You should leave the battery connected to the wall charger so it is always ready<br />
for use.<br />
This 100-240 V~, 50/60 Hz charger can be used world-wide with an appropriate<br />
adaptor plug (not supplied). It works with <strong>DUO</strong> BATTERIES E65100 (1400 mAh)<br />
and E65100 2 (2 700 mAh).<br />
Car charger : E65300 2<br />
A red light is lit when the battery is charging.<br />
Time for complete recharge : 14 hours.<br />
Use only to recharge the Petzl <strong>DUO</strong> E61100 2. This 12 V charger is not compatable<br />
with the old E61100 (1 400 mAh) battery.<br />
Do not charge in a hot car (e.g. parked in the sun); there is a risk <strong>of</strong> overheating<br />
the battery.<br />
The PETZL guarantee<br />
This product is guaranteed for 3 years against all faults in materials or<br />
manufacture. Exclusions from the guarantee: normal wear and tear, modifications<br />
or alterations, incorrect storage, damage caused by accidents, by negligence, or by<br />
use for which this product is not intended.<br />
Responsibility<br />
PETZL is not responsible for the consequences, whether direct, indirect or<br />
accidental, or for any other type <strong>of</strong> damage arising or resulting from the use <strong>of</strong><br />
its products.<br />
(FR) FRANCAIS<br />
Champ d’application<br />
La lampe frontale <strong>DUO</strong> <strong>ATEX</strong> est utilisable en présence de gaz, de vapeurs et de<br />
brouillards, dont la température d’auto-inflammation est supérieure à 200 °C en<br />
pression atmosphérique (200 °C température maximale de surface de la lampe).<br />
Cette protection correspond à la quasi-totalité des gaz sauf l’acétaldétyde<br />
(C 2 H 4 o)(140°), l’éther éthylique (C 2 H 4 o) (170°), le nitrite d’éthyle (C 2 H 5 No 2 )<br />
(90 °C) et le sulfure de carbone (CS 2 ) (102 °C), etc...<br />
La <strong>DUO</strong> <strong>ATEX</strong> ne doit pas être utilisée dans les mines grisouteuses, ni dans les<br />
atmosphères poussiéreuses comme les silos à grains.<br />
Signification du marquage<br />
La réglementation internationale CEI (norme CEI 79.10 de 1995 et la directive<br />
européenne 94/9/EC ; <strong>ATEX</strong> 95) distinguent les catégories suivantes de zones<br />
dangereuses.<br />
- Zone 0 : l’atmosphère explosive est toujours présente (réservoir).<br />
- Zone 1 : l’atmosphère explosive est souvent présente (mélange se formant<br />
pendant le fonctionnement d’une installation).<br />
- Zone 2 : l’atmosphère explosive peut-être accidentellement présente<br />
(dysfonctionnement de l’installation, fuite).<br />
La <strong>DUO</strong> <strong>ATEX</strong> <strong>LED</strong> 5 est classée Zone 1 et Zone 2. Son utilisation est interdite<br />
en Zone 0.<br />
CE : marquage CE<br />
Ex : utilisation du matériel en atmosphère explosible.<br />
II : groupe d’appareil pour la surface.<br />
2 : appareil pour la zone 1 actuelle.<br />
G : gaz uniquement.<br />
EEx : appareil qui répond aux modes de protections normalisés CENELEC (normes<br />
européennes).<br />
e : protection augmentée = la lampe ne peut engendrer ni arc ni échauffement<br />
susceptible d’enflammer une atmosphère explosible.<br />
ia : protection intrinsèque = protection de la lampe elle-même, indépendant des<br />
facteurs extérieurs.<br />
II : industries de surface.<br />
C : subdivision de gaz la plus sévère, incluant hydrogène (H 2 ), acétylène (C 2 H 2 ) et<br />
sulfure de carbone (CS 2 ).<br />
T3 : température maximale de surface 200 °C.<br />
Attention : formation adaptée indispensable avant utilisation<br />
Lire attentivement cette notice avant utilisation. Cette notice technique présente les<br />
modes de fonctionnement de ce produit. Seules les techniques présentées sont<br />
autorisées. Toute autre utilisation est à exclure. En cas de doute, ou de problème<br />
de compréhension, renseignez-vous auprès de PETZL.<br />
Un dysfonctionnement de la lampe peut entraîner des dangers. L’apprentissage<br />
des techniques d’utilisation et d’entretien (nettoyage, remplacement d’ampoule,<br />
grattage des contacts etc), ainsi que l’apprentissage des mesures de sécurité<br />
s’effectue sous votre seule responsabilité.<br />
Vous assumez personnellement tous les risques et responsabilités pour tout<br />
dommage, blessure ou mort pouvant survenir après une mauvaise utilisation<br />
de nos produits de quelque façon que ce soit. Si vous n’êtes pas en mesure<br />
d’assumer cette responsabilité ou de prendre ce risque, n’utilisez pas ce matériel.<br />
La mise en service est effectuée par l’utilisateur.<br />
Utilisation<br />
L’interrupteur peut être verrouillé pour le transport et le stockage en appuyant<br />
sur le bouton rouge (1A). Le déverrouillage est réalisé en appuyant sur l’autre<br />
extrémité du bouton rouge (1B).<br />
- Interrupteur vers le haut : éclairage principal (2).<br />
- Interrupteur vers le bas : éclairage de proximité utilisant peu d’énergie (3).<br />
- Le bouton zoom permet de régler l’éclairage principal en fonction de l’utilisation.<br />
En position basse, le faisceau est étroit. En position haute, le faisceau est large (4).<br />
L’accumulateur de sécurité peut être remplacé en milieu explosible.<br />
Remplacer l’accumulateur<br />
Ouvrir le boîtier arrière en déverrouillant les 2 crochets (5).<br />
Attention, ne jamais démonter le joint solidaire du couvercle. Veiller à ce qu’il reste<br />
toujours propre (nettoyage avec de l’eau et un coton tige). Graisser le joint avec<br />
une graisse à base de silicone. En cas de remplacement d’accu en milieu humide,<br />
faire sécher l’intérieur du boîtier après utilisation.<br />
Stockage prolongé : enlever l’accu et laisser le boîtier ouvert.<br />
Remplacer une ampoule<br />
Attention, ne jamais ouvrir le boîtier avant en milieu explosible. Débloquer la vis de<br />
sécurité sans l’enlever totalement<br />
(3 tours) (5).<br />
Ouvrir le boîtier en se servant de la main gauche pour dévisser la chenille (6).<br />
L’enlever complètement. En cas de blocage, utiliser un dégrippant pour filetage ou<br />
chauffer la chenille avec un sèche-cheveux.<br />
- Ampoule standard : dévisser l’ampoule défectueuse et revisser la nouvelle en<br />
la serrant fort.<br />
- Module <strong>LED</strong> :<br />
Tirer vers l’avant, attention à ne pas plier les pattes.<br />
Tester le fonctionnement en actionnant l’interrupteur. Si le module ne s’allume<br />
pas, le retirer et recommencer l’opération en inversant les contacts (le tourner<br />
d’un demi tour).<br />
Refermer votre lampe.<br />
Ampoules de rechange : ne pas mettre les ampoules défectueuses dans le<br />
logement de rechange (risque de confusion plus tard).<br />
Ampoule noircie = perte de luminosité.<br />
La fin de la vie de l’ampoule est proche.<br />
Pour fermer le boîtier :<br />
Bien nettoyer le joint, sécher le boîtier et graisser le joint et le filetage avec une<br />
graisse à base de silicone. Placer l’ensemble réflecteur/vitre/chenille dans le bon<br />
sens (7). Visser la chenille avec la main droite jusqu’à ce que le repère gravé sur<br />
la chenille se trouve entre les deux repères situés sur le boîtier (8 & 9). Bloquer<br />
modérément la vis de sécurité (3 tours) (10).<br />
Remarques<br />
Si la lampe reste accidentellement allumée dans un sac, la chaleur dégagée<br />
par l’ampoule peut endommager le réflecteur (prendre soin de verrouiller<br />
l’interrupteur). Il est impossible d’allumer les 2 ampoules simultanément :<br />
consommation excessive de courant sans amélioration de l’éclairage.<br />
Cette lampe est idéale en milieu humide, mais attention elle n’est pas conçue<br />
comme une lampe de plongée. Si l’un ou l’autre des deux boîtiers prend l’eau (joint<br />
détérioré ou sale, mauvaise fermeture), ouvrir l’avant et l’arrière, démonter les<br />
ampoules et les piles, rincer à l’eau douce, puis faire sécher.<br />
En cas de dysfonctionnement<br />
Vérifier la charge de l’accu. S’assurer que l’ampoule n’est pas grillée, ou que le<br />
culot n’est pas oxydé. Mettre en place et retirer plusieurs fois l’ampoule et le<br />
module, l’interrupteur étant en position “ampoule allumée”. Vérifier l’absence<br />
de corrosion sur les contacts de l’accu et du boîtier (les nettoyer si nécessaire).<br />
Manœuvrer plusieurs fois l’interrupteur.<br />
Si votre lampe ne fonctionne toujours pas, contactez PETZL.<br />
Le démontage de la lampe ne peut être réalisé que par le fabricant pour tout<br />
problème autre que le changement d’une ampoule ou d’un module <strong>LED</strong>.<br />
Nettoyage<br />
Lavez la lampe, boîtiers fermés, à l’eau. Utilisez du savon pour les élastiques. Ne<br />
frottez pas avec un produit abrasif en particulier sur la vitre. Ne lavez pas avec un<br />
nettoyeur haute pression.<br />
Accumulateur <strong>DUO</strong> <strong>ATEX</strong><br />
Chargeur <strong>DUO</strong><br />
Précautions<br />
Cette notice contient d’importantes précautions a prendre et instructions<br />
d’utilisation concernant le chargeur <strong>DUO</strong> E65200. Avant d’utiliser ce produit, lire<br />
attentivement la notice et les marquages figurant sur le chargeur, l’accumulateur et<br />
sur les produits utilisant cet accu.<br />
Conserver ces instructions.<br />
Attention<br />
Utilisez uniquement un accu de sécurité PETZL <strong>DUO</strong> <strong>ATEX</strong> E61100 2.<br />
L’accu <strong>DUO</strong> <strong>ATEX</strong> E61100 2 est un accumulateur de sécurité intrinsèque de classe<br />
de température T3.<br />
Conditions spéciales pour une utilisation sure: l’accu ne doit<br />
jamais être rechargé en milieu explosible.<br />
ACCUMULATEUR <strong>DUO</strong> <strong>ATEX</strong> E61100 2<br />
Capacité : 2 700 mAh. La batterie est composée de quatre accumulateurs NiMH.<br />
A recharger uniquement avec un CHARGEUR <strong>DUO</strong> Petzl.<br />
- Cet accumulateur doit être chargé avant la première utilisation.<br />
- N’hésitez pas à recharger un accu partiellement utilisé ou stocké plus de deux<br />
semaines. Il est inutile de décharger complètement un accu avant recharge.<br />
- Auto décharge : la décharge de l’accumulateur stocké dans de bonnes conditions,<br />
est de 15 % sur les trois premiers jours puis 1 % par jour à 20 °C. Attention cette<br />
décharge est plus rapide si la température augmente.<br />
- Il peut être rechargé 500 fois.<br />
- Toujours utiliser l’accumulateur à une température supérieure à -20 °C et<br />
inférieure à +60 °C.<br />
- Ne pas mettre au feu ou détruire, il peut exploser ou dégager des matières<br />
toxiques.<br />
- Ne pas court-circuiter, il peut provoquer des brûlures.<br />
Stockage<br />
Pour préserver votre accumulateur, veillez à le stocker dans de bonnes conditions<br />
au sec et à des températures ne dépassant pas -20 °C et +35 °C.<br />
Protection de l’environnement.<br />
Les accumulateurs usagés doivent être recyclées. Ne les jetez pas avec les ordures<br />
ménagères. Déposez-les dans les bacs de recyclage conformément aux différents<br />
règlements locaux applicables.<br />
CHARGEUR <strong>DUO</strong><br />
- Ne pas recharger des piles alcalines ou salines, risque d’explosion. L’emploi<br />
d’autres types d’accumulateurs peut engendrer des blessures et détériorer<br />
l’accumulateur ainsi que le chargeur.<br />
- La charge des accumulateurs doit être effectuée à une température supérieure à<br />
10 °C et inférieure à 40 °C.<br />
- Ne pas exposer à la pluie ou la neige, risque d’électrocution.<br />
- Ne pas utiliser les chargeurs s’ils ont reçu un grand choc ou subi une chute<br />
importante.<br />
- Si ces appareils sont endommagés (le câble d’alimentation par exemple), ne pas<br />
démonter. Ils doivent être réparés uniquement dans les ateliers PETZL, car des<br />
outils spéciaux sont nécessaires.<br />
- Pour ne pas endommager la prise, ne tirez pas sur le câble lorsque vous<br />
débranchez les chargeurs.<br />
- Ne pas utiliser de rallonge.<br />
- Pour éviter les risques d’électrocution débrancher les chargeurs avant tout<br />
entretien ou nettoyage.<br />
Chargeur secteur : E65200 2<br />
Lorsque l’accumulateur est en charge, un voyant vert est allumé.<br />
Durée de recharge complète : 3 h 30.<br />
En fin de charge, le voyant vert clignote. L’accu est maintenu en charge.<br />
Nous vous conseillons de laisser l’accumulateur branché sur son chargeur secteur.<br />
Ainsi il est toujours prêt à l’emploi.<br />
Ce chargeur 100-240 V~, 50/60 Hz peut être utilisé dans le monde entier avec<br />
une fiche adaptateur non fournie. Il est compatible avec les accumulateurs<br />
<strong>DUO</strong> E65100 (1400 mAh) et E65100 2 (2 700 mAh).<br />
Chargeur voiture : E65300 2<br />
Lorsque l’accumulateur est en charge, un voyant rouge est allumé sur le bloc<br />
support.<br />
Durée de recharge complète : 14 heures.<br />
Rechargez uniquement l’accumulateur <strong>DUO</strong> Petzl E61100 2. Ce chargeur 12 V<br />
n’est pas compatible avec l’ancien accumulateur E61100 (1 400 mAh).<br />
Ne pas mettre en charge dans une voiture exposée au soleil, risque de surchauffe.<br />
Garantie PETZL<br />
Ce produit est garanti pendant 3 ans contre tout défaut de matière ou de<br />
fabrication. Limite de la garantie : l’usure normale, les modifications ou retouches,<br />
le mauvais stockage, les dommages dus aux accidents, aux négligences, aux<br />
utilisations pour lesquelles ce produit n’est pas destiné.<br />
Responsabilité<br />
PETZL n’est pas responsable des conséquences directes, indirectes, accidentelles<br />
ou de tout autre type de dommages survenus ou résultant de l’utilisation de ce<br />
produit.<br />
(DE) DEUTSCH<br />
Eignung<br />
Die <strong>DUO</strong> <strong>ATEX</strong>-Stirnlampe kann in Anwesenheit von Gasen, Dämpfen und Nebel<br />
verwendet werden, deren Flammpunkt bei atmosphärischem Druck über 200 °C<br />
liegt (maximal 200 °C an der <strong>Lamp</strong>enoberfläche).<br />
Dies trifft auf die meisten Gase zu, außer auf z. B. Acetaldehyd (C 2 H 4 o; 140°),<br />
Ethyläther (C 4 H1 0 o; 170°), Ethylnitrit (C 2 H 5 No 2 ; 90 °C) und Schwefelkohlenst<strong>of</strong>f<br />
(CS 2 ; 102 °C) usw.<br />
Die <strong>DUO</strong> <strong>ATEX</strong> darf nicht in Minen verwendet werden, in denen Grubengas<br />
vorhanden sein kann oder in staubhaltigen Umgebungen wie Körnersilos.<br />
Markierung<br />
Gemäß der internationalen CEI-Vorschriften (Norm CEI 79.10 von 1995 und<br />
EU-Richtlinie 94/9/EC; <strong>ATEX</strong> 95) werden die folgenden Kategorien gefährlicher<br />
Umgebungen unterschieden.<br />
- Zone 0: die explosionsgefährdete Umgebung ist ständig vorhanden (Tanks).<br />
- Zone 1: die explosionsgefährdete Umgebung ist häufig vorhanden (bei einer<br />
Installation kommt es zu einer Vermischung der Umgebungen).<br />
- Zone 2: die explosionsgefährdete Umgebung kann versehentlich auftreten (Fehler<br />
während der Installation, Austreten von Gas).<br />
Die <strong>DUO</strong> <strong>ATEX</strong> <strong>LED</strong> 5 ist klassifiziert für Zone 1 und Zone 2. Ihre Verwendung in<br />
Zone 0 ist nicht gestattet.<br />
CE: CE-Markierung.<br />
Ex: Die Verwendung der Ausrüstung in einer explosionsgefährdeten Umgebung.<br />
II: Ausrüstungsgruppe für die Verwendung an der Oberfläche.<br />
2: Gerät für die vorhandene Zone 1.<br />
G: Nur Gas.<br />
EEx: Das Gerät erfüllt die Anforderungen von CENELEC (Europäische Normen).<br />
e: Erhöhter Schutz = Die <strong>Lamp</strong>e kann keinen Lichtbogen oder ausreichend<br />
Wärme erzeugen, der bzw. die in einer explosionsgefährdeten Umgebung zu einer<br />
Entflammung führen würde.<br />
ia: Eigenschutz = Schutz der <strong>Lamp</strong>e selbst, unabhängig von äußerlichen Faktoren.<br />
II: Industrie über Tag.<br />
C: Unterklasse mit den meisten hochgefährlichen Gasen, inklusive Wasserst<strong>of</strong>f<br />
(H 2 ), Acetylen (C 2 H 2 ) und Schwefelkohlenst<strong>of</strong>f (CS 2 ).<br />
T3: Maximale Oberflächentemperatur von 200 °C.<br />
Achtung: Vor der Verwendung ist eine entsprechende<br />
Ausbildung unbedingt erforderlich!<br />
Lesen Sie die Gebrauchsanweisung vor der Verwendung aufmerksam durch.<br />
Die technischen Hinweise zeigen die Funktionsarten dieses Produkts. Nur<br />
die dargestellten Vorgänge sind zulässig. Jegliche andere Verwendung ist<br />
ausgeschlossen. In Zweifelsfällen oder bei Verständnisschwierigkeiten wenden Sie<br />
sich bitte an PETZL.<br />
Eine Fehlfunktion der <strong>Lamp</strong>e kann Gefahren nach sich ziehen. Das Aneignen<br />
der Verwendungsmöglichkeiten und der Wartungsschritte (Reinigung,<br />
Glühbirnenwechsel, Säubern der Kontakte usw.) sowie das Erlernen der<br />
Sicherheitsmaßnahmen liegt in Ihrer alleinigen Verantwortung.<br />
Sie übernehmen persönlich sämtliche Risiken sowie die Haftung für jegliche<br />
Art von Schäden, Verletzungen oder Todesfällen, die aufgrund irgendeiner<br />
unsachgemäßen Verwendung unserer Produkte entstanden sind. Wenn Sie dieses<br />
Risiko bzw. diese Verantwortung nicht übernehmen können, verwenden Sie diese<br />
Ausrüstungsgegenstände nicht.<br />
Die Inbetriebnahme erfolgt durch den Benutzer.<br />
Verwendung<br />
Zum Transport und zum Verstauen kann der Ein/Aus-Schalter durch Drücken<br />
auf den roten Knopf verriegelt werden (1A). Zum Entriegeln drücken Sie auf das<br />
andere Ende des roten Knopfes (1B).<br />
- Obere Stellung des Ein/Aus-Schalters: Hauptbeleuchtung (2).<br />
- Untere Stellung des Ein/Aus-Schalters: Energiesparende Beleuchtung für den<br />
Nahbereich (3).<br />
- Der Zoom-Hebel ermöglicht die Einstellung der Hauptbeleuchtung je nach Bedarf.<br />
In der unteren Stellung wird ein Lichtstrahl mit geringem Durchmesser erzeugt. In<br />
der oberen Stellung ist der Durchmesser groß (4).<br />
Der abgesicherte Akku kann in explosionsgefährdeten Umgebungen getauscht<br />
werden.<br />
Austausch der Akkus<br />
Öffnen Sie den rückseitigen Batteriebehälter durch Entriegeln der beiden Clips (5).<br />
Achtung: Entfernen Sie niemals den durchgehenden Dichtungsring des Deckels.<br />
Achten Sie stets auf seine Sauberkeit (Reinigung mit Wasser und einem<br />
Wattestäbchen). Fetten Sie den Dichtungsring regelmäßig mit Fett auf Silikonbasis<br />
ein. Erfolgt der Austausch der Akkus in feuchter Umgebung, trocknen Sie den<br />
Batteriebehälter innen nach dem Einsatz innen. Entnehmen Sie den Akku bei<br />
längerer Lagerung und lassen Sie den Batteriebehälter <strong>of</strong>fen.<br />
Austausch der Glühbirnen<br />
Achtung: Öffnen Sie das vordere Gehäuse niemals in einer explosionsgefährdeten<br />
Umgebung. Lösen Sie die Sicherheitsschraube, jedoch nicht vollständig (3)<br />
Umdrehungen) (5).<br />
Öffnen Sie das Gehäuse durch Losschrauben des gekerbten Reflektorrings mit der<br />
linken Hand (6) und nehmen Sie ihn vollständig ab. Verwenden Sie bei Blockieren<br />
einen Rostlöser für das Gewinde oder erwärmen Sie den gekerbten Reflektorring<br />
mit einem Fön.<br />
- Standardbirne: Schrauben Sie die defekte Glühbirne heraus, setzen Sie eine neue<br />
Birne ein und ziehen Sie sie fest an.<br />
- <strong>LED</strong>-Modul: Ziehen Sie sie nach vorne ab und setzen Sie die Ersatzbirne ein,<br />
ohne dabei die Kontakte zu verbiegen. Überprüfen Sie die Funktion der Birnen,<br />
indem Sie die <strong>Lamp</strong>e einschalten.<br />
Falls das <strong>LED</strong>-Modul nicht aufleuchtet, bauen Sie es wieder aus und wiederholen<br />
den Vorgang, wobei Sie die Kontakte vertauschen (Drehen um 180°). Schließen<br />
Sie die <strong>Lamp</strong>e.<br />
3 Notice <strong>DUO</strong> <strong>ATEX</strong> E61L52 réf. : E61602-F (170604)
Ersatzbirnen: Verstauen Sie defekte Birnen nicht in der Ersatzbirnenhalterung<br />
(Gefahr der späteren Verwechslung).<br />
Geschwärzte Birne: Die Glühbirne hat das Ende ihrer Lebensdauer erreicht.<br />
So schließen Sie das Gehäuse:<br />
- Reinigen Sie die Dichtung, trocknen Sie das Gehäuse trocknen und fetten Sie<br />
Dichtung und Gewinde mit einem Fett auf Silikonbasis ein.<br />
- Setzen Sie den Reflektorring samt Glas und Reflektor seitenrichtig auf (7).<br />
- Schrauben Sie den Reflektorring mit der rechten Hand fest, bis sich die<br />
Markierung am gekerbten Reflektorring zwischen den beiden Markierungen am<br />
Gehäuse befindet (8, 9).<br />
- Ziehen Sie die Sicherheitsschraube vorsichtig fest (3 Umdrehungen) (10).<br />
Anmerkungen<br />
Bleibt die <strong>Lamp</strong>e versehentlich in der Tasche eingeschaltet, kann die durch die<br />
Glühbirne verursachte Wärmeentwicklung den Reflektor beschädigen (daher<br />
auf die Verriegelung des Ein/Aus-Schalters achten). Es ist nicht möglich, beide<br />
Glühbirnen gleichzeitig einzuschalten. Dies würde nur zu einem sehr hohen<br />
Energieverbrauch ohne Verbesserung der Beleuchtung führen.<br />
Diese <strong>Lamp</strong>e ist besonders für feuchte Umgebungen geeignet, sie wurde jedoch<br />
nicht für den Einsatz beim Tauchen entwickelt. Wird eines der beiden Gehäuse<br />
undicht (beschädigter oder verschmutzter Dichtring, unsachgemäßer Verschluss),<br />
sind beide Gehäuse zu öffnen, nach Entfernen der Glühbirnen und Batterien mit<br />
klarem Wasser auszuspülen und anschließend für längere Zeit trocknen zu lassen.<br />
Bei Fehlfunktion<br />
Überprüfen Sie den Ladezustand der Akkus. Stellen Sie sicher, dass die Glühbirne<br />
nicht durchgebrannt ist bzw. der Sockel nicht oxydiert ist. Setzen Sie die kleine<br />
Glühbirne mehrfach ein und ziehen Sie sie heraus, wobei der Ein/Aus-Schalter<br />
in der Stellung „Ein“ verbleibt. Überprüfen Sie die Kontakte der Akkus und des<br />
Batteriebehälters auf Korrosion (gegebenenfalls reinigen). Betätigen Sie den<br />
Ein/Aus-Schalter mehrfach.<br />
Sollte Ihre <strong>Lamp</strong>e immer noch nicht funktionieren, wenden Sie sich an den<br />
Kundendienst.<br />
Jede Art von Reparatur, außer der Wechsel von Birnen oder <strong>LED</strong>s, darf nur vom<br />
Hersteller durchgeführt werden.<br />
Reinigung<br />
Waschen Sie die <strong>Lamp</strong>e bei geschlossenen Gehäusen mit klarem Wasser.<br />
Verwenden Sie für das Kopfband Seife. Reiben Sie die <strong>Lamp</strong>e nicht mit<br />
Scheuermitteln ab, insbesondere nicht die Glasscheibe. Waschen Sie die <strong>Lamp</strong>e<br />
nicht mit einem Hochdruckreiniger.<br />
<strong>DUO</strong> <strong>ATEX</strong>-Akkus<br />
<strong>DUO</strong>-Ladegerät<br />
Sicherheitsvorkehrungen<br />
Dieser Hinweis enthält wichtige Sicherheitsvorkehrungen und<br />
Gebrauchsanweisungen für Ladegerät <strong>DUO</strong> E65200. Lesen Sie vor dem Einsatz<br />
des Geräts die Hinweise sowie die Beschriftungen auf dem Ladegerät, auf den<br />
Akkus und auf den Geräten, die diese Akkus verwenden, aufmerksam durch.<br />
Bewahren Sie diese Anweisungen zum späteren Nachlesen auf.<br />
Achtung<br />
Laden Sie nur Akkus des Typs PETZL <strong>DUO</strong> <strong>ATEX</strong> E61100 2 mit dem Gerät auf.<br />
Der wiederaufladbare Batterie <strong>DUO</strong> <strong>ATEX</strong> E61100 2 ist ein eigensicherer Akku der<br />
Temperaturklasse T3.<br />
Besondere Sicherheitsvorkehrung:<br />
Batterie niemals in explosions-gefährdeten Bereichen aufladen!<br />
<strong>DUO</strong> AKKUBATTERIE E61100 2<br />
Kapazität : 2 700 mAh. Diese Batterie besteht aus 4 NiMH Zellen.<br />
Nur mit dem <strong>DUO</strong> LADEGERÄT von Petzl zu verwenden.<br />
- Die Batterie muss vor der ersten Verwendung aufgeladen werden.<br />
- Zögern Sie nicht, eine Batterie aufzuladen, die nur teilweise entladen ist oder<br />
mehr als zwei Wochen lang nicht benutzt wurde. Es ist nicht erforderlich, die<br />
Batterie vor dem Aufladen vollständig zu entladen.<br />
- Selbstentladung : Eine geladene Batterie, die unter günstigen Bedingungen bei<br />
etwa 20 °C aufbewahrt wird, verliert während der ersten drei Tage etwa 15 % ihrer<br />
Ladung, danach jeden Tag ein weiteres Prozent. Beachten Sie, dass sich Batterien<br />
bei höheren Temperaturen schneller entladen.<br />
- Die Batterie kann 500 Mal aufgeladen werden.<br />
- Verwenden Sie die Batterie bei Temperaturen über - 20 °C und unter + 60 °C.<br />
- Werfen Sie die Batterie nicht ins Feuer und nehmen Sie sie nicht auseinander.<br />
Dies kann ein Explodieren oder das Austreten von giftigen St<strong>of</strong>fen zufolge haben.<br />
- Schließen Sie die Batterie nicht kurz. Dies kann zu Verbrennungen führen.<br />
Aufbewahrung<br />
Um die Batterielebensdauer zu verlängern, bewahren Sie die Batterie an einem<br />
sauberen, trockenen Ort zwischen - 20 °C und + 35 °C auf.<br />
Umweltschutz<br />
Batterien sollten niemals in den Restmüll gegeben werden. Recyceln Sie die<br />
Batterien gemäß der geltenden Richtlinien an Ihrem Wohnort.<br />
<strong>DUO</strong> LADEGERÄT<br />
- Laden Sie keine Alkali- oder sonstige nicht für Ladegeräte vorgesehene Batterien,<br />
da diese explodieren könnten. Das Laden von Akkubatterien anderer Hersteller<br />
kann zu Verletzungen und/oder Schäden an Batterien und Ladegerät führen.<br />
- Batterien sollten stets bei einer Temperatur zwischen 10 °C und 40 °C aufgeladen<br />
werden.<br />
- Setzen Sie das Ladegerät weder Regen noch Schnee aus. Sie könnten einen<br />
elektrischen Schlag erhalten.<br />
- Nehmen Sie das Ladegerät nicht in Betrieb, nachdem es weit auf den Boden<br />
gestürzt ist (oder ähnliches).<br />
- Wenn das Ladegerät beschädigt ist (z. B. das Netzkabel), bauen Sie es nicht<br />
auseinander. Es darf nur durch den Petzl-Kundendienst repariert werden, da<br />
besondere Werkzeuge erforderlich sind.<br />
- Um eine Beschädigung des Netzsteckers zu vermeiden, ziehen Sie das Kabel am<br />
Stecker aus der Steckdose und nicht am Kabel.<br />
- Verwenden Sie keine Verlängerungsschnur.<br />
- Um das Risiko eines elektrischen Schlags zu vermindern, ziehen Sie den<br />
Netzstecker, bevor Sie das Ladegerät reinigen oder sonstige Arbeiten daran<br />
ausführen.<br />
Netzstromladegerät : E65200 2<br />
Ein grünes Licht leuchtet auf, während die Batterie aufgeladen wird.<br />
Dauer für vollständiges Aufladen : 3 Std. 30 minutes.<br />
Das grüne Licht blinkt, wenn die Batterie vollständig aufgeladen ist.<br />
Lassen Sie die Batterie im Ladegerät, so dass sie stets einsatzbereit ist.<br />
Dieses 100-240 V~, 50/60 Hz-Ladegerät kann weltweit mit einem passenden<br />
Adapterstecker verwendet werden (nicht im Lieferumfang enthalten). Es arbeitet<br />
mit <strong>DUO</strong> Akkubatterien E65100 (1 400 mAh) und E65100 2 (2 700 mAh).<br />
Autoladegerät : E65300 2<br />
Ein rotes Licht leuchtet auf, während die Batterie aufgeladen wird.<br />
Dauer für vollständiges Aufladen : 14 Stunden.<br />
Laden Sie mit diesem Gerät nur die Petzl <strong>DUO</strong> Akkubatterien E61100 2 auf. Dieses<br />
12 V-Ladegerät ist nicht mit den alten E61100 (1 400 mAh) Batterien kompatibel.<br />
Verwenden Sie das Ladegerät nicht in einem heißen Auto (z. B. in der Sonne<br />
geparkt), da die Batterie überhitzen könnte.<br />
PETZL-Garantie<br />
Dieses Produkt gewährt für Material- und Herstellungsfehler eine Garantie<br />
von drei Jahren. Ausgeschlossen von der Garantie sind : Normale Abnutzung,<br />
Modifizierungen oder Änderungen, unsachgemäße Aufbewahrung sowie durch<br />
Unfälle, Vernachlässigung und Verwendung zu einem nicht produktspezifischen<br />
Zweck entstandene Schäden.<br />
Verantwortlichkeit<br />
PETZL ist nicht verantwortlich für jegliche Konsequenzen, direkt, indirekt oder<br />
unfallbedingt, sowie jegliche andere Art von Schäden, die aus der Verwendung<br />
seiner Produkte entstehen.<br />
(IT) ITALIANO<br />
Campo di applicazione<br />
La lampada frontale <strong>DUO</strong> <strong>ATEX</strong> è utilizzabile in presenza di gas, vapori e nebbie, la<br />
cui temperatura di autocombustione è superiore a 200 °C in pressione atmosferica<br />
(200 °C temperatura massima di superficie della lampada).<br />
Questa protezione corrisponde alla quasi totalità dei gas tranne l’acetaldeide<br />
(C 2 H 4 o)(140°), l’etere etilico (C 4 H1 0 o) (170°), il nitrito di etile (C 2 H 5 No 2 ) (90 °C)<br />
e il solfuro di carbonio (CS 2 )(102 °C), etc...<br />
La <strong>DUO</strong> <strong>ATEX</strong> non deve essere utilizzata in miniere grisutose, né nelle atmosfere<br />
polverose come i silos per grano.<br />
Marcatura<br />
La norma internazionale CEI 79.10 del 1995 e la direttiva europea 94/9/EC ;<br />
<strong>ATEX</strong> 95 distinguono le seguenti categorie di zone pericolose.<br />
- Zona 0: l’atmosfera esplosiva è sempre presente (gas presenti all’interno di un<br />
serbatoio).<br />
- Zona 1: l’atmosfera esplosiva è spesso presente (miscela esplosiva che si forma<br />
durante il funzionamento di un’istallazione).<br />
- Zona 2: l’atmosfera esplosiva può essere accidentalmente presente<br />
(funzionamento anomalo dell’installazione, fuga di gas).<br />
La <strong>DUO</strong> <strong>ATEX</strong> <strong>LED</strong> 5 è classificata come Zona 1 e Zona 2. Il suo utilizzo è proibito<br />
in Zona 0.<br />
CE: marcatura CE<br />
Ex: utilizzo del materiale in atmosfera esplosiva.<br />
II: gruppo di apparecchio per la superficie.<br />
2: apparecchio per la zona 1 attuale.<br />
G: solo gas.<br />
EEx: apparecchio che risponde alle modalità di protezioni normalizzate CENELEC<br />
(norme europee).<br />
e: protezione a sicurezza aumentata = la lampada non può generare né arco<br />
elettrico né riscaldamento capace d’infiammare un’atmosfera esplosiva.<br />
ia: protezione a sicurezza intrinseca = protezione della lampada stessa,<br />
indipendente da fattori esterni.<br />
II: industrie di superficie.<br />
C: la più severa suddivisione di gas, comprendente idrogeno (H 2 ), acetilene<br />
(C2H 2 ) e solfuro di carbonio (CS 2 ).<br />
T3: temperatura massima di superficie 200 °C.<br />
Attenzione: formazione specifica indispensabile prima dell’uso<br />
Leggere attentamente queste istruzioni prima dell’uso. Queste istruzioni tecniche<br />
descrivono i modi di funzionamento di questo prodotto. Sono autorizzate solo le<br />
tecniche di utilizzo presentate. Deve essere escluso ogni altro modo di utilizzo.<br />
In caso di dubbi o di problemi di comprensione, rivolgersi direttamente a PETZL.<br />
Il malfunzionamento della lampada può causare pericoli. La responsabilità<br />
dell’apprendimento delle misure di sicurezza e delle tecniche di utilizzo e<br />
manutenzione (pulizia, sostituzione lampadina, raschiatura contatti, etc), è<br />
unicamente dell’utilizzatore.<br />
L’utilizzatore deve assumersi personalmente tutti i rischi e le responsabilità per<br />
qualsiasi danno, ferita o morte che possano sopraggiungere, in qualsiasi modo,<br />
conseguentemente all’utilizzo dei nostri prodotti. La persona che non è in grado<br />
di assumersi queste responsabilità e questi rischi, non deve utilizzare questo<br />
materiale.<br />
La messa in esercizio è effettuata dall’utilizzatore.<br />
Utilizzo<br />
L’interruttore può essere bloccato per il trasporto e la conservazione premendo<br />
il pulsante rosso (1A). Lo sbloccaggio avviene premendo l’altra estremità del<br />
pulsante rosso (1B).<br />
- Interruttore verso l’alto: illuminazione principale (2).<br />
- Interruttore verso il basso: illuminazione di prossimità con basso consumo di<br />
energia (3).<br />
- La rotella zoom permette di variare il fascio principale in funzione dell’utilizzo.<br />
In posizione bassa, il fascio di luce è stretto. In posizione alta, il fascio di luce è<br />
ampio (4).<br />
L’accumulatore di sicurezza può essere sostituito in ambiente con rischio di<br />
esplosione.<br />
Sostituzione accumulatore<br />
Aprire la scatola posteriore sbloccando i 2 ganci (5). Attenzione, non smontare<br />
mai la guarnizione solidale con il coperchio. Fare attenzione a che rimanga sempre<br />
pulita (pulire con acqua e un bastoncino di cotone). Lubrificare la guaranizione con<br />
grasso al silicone. In caso di sostituzione dell’accumulatore in ambiente umido, far<br />
asciugare l’interno della scatola dopo l’utilizzo. Stocccaggio prolungato: togliere<br />
l’accumulatore e lasciare la scatola aperta.<br />
Sostituzione lampadina<br />
Attenzione, non aprire mai la parte anteriore in ambiente con rischio di esplosione.<br />
Sbloccare la vite di sicurezza senza toglierla completamente (3 giri) (5). Aprire la<br />
scatola servendosi della mano sinistra per svitare la ghiera e toglierla del tutto (6).<br />
In caso di bloccaggio, utilizzare un prodotto sblocca filetti, oppure riscaldare la<br />
ghiera con un asciugacapelli.<br />
- <strong>Lamp</strong>adina normale: svitare la lampadina non funzionante e riavvitare quella<br />
nuova, stringendola bene.<br />
- Modulo <strong>LED</strong>:<br />
Tirare in avanti, fare attenzione a non piegare i contatti. Verificare il funzionamento,<br />
azionando l’interruttore. Se il modulo non si accende, toglierlo e ricominciare<br />
l’operazione invertendo i contatti (ruotare il modulo di mezzo giro). Richiudere<br />
la lampada.<br />
<strong>Lamp</strong>adine di ricambio: non mettere le lampadine fulminate nell’alloggiamento di<br />
quelle di ricambio (si rischia poi di confonderle). <strong>Lamp</strong>adina annerita = perdita di<br />
luminosità. La lampadina è<br />
prossima ad esaurirsi. Per richiudere la scatola:<br />
- pulire bene la guarnizione, asciugare la scatola e lubrificare la guarnizione e la<br />
filettatura con grasso al silicone;<br />
- collocare l’insieme riflettore/vetro/ghiera nel verso giusto (7).<br />
- avvitare la ghiera con la mano destra fino a che il segno di riferimento sulla<br />
ghiera si trovi tra i due segni di riferimento posti sulla scatola (8 & 9).<br />
- bloccare la vite di sicurezza senza forzarla (3 giri) (10).<br />
Precisazioni<br />
Se la lampada dovesse rimanere casualmente accesa nello zaino, il calore diffuso<br />
dalla lampadina potrebbe danneggiare il riflettore, per cui è buona norma bloccare<br />
l’interruttore. È impossibile accendere le 2 lampadine contemporaneamente: si<br />
otterrebbe solo un aumento del consumo di corrente, senza alcun miglioramento<br />
dell’illuminazione.<br />
Questa lampada è ideale in ambienti umidi, ma attenzione, perché non è stata<br />
ideata come lampada subacquea. Se il corpo lampada o il portapila si allagano<br />
(guarnizione rovinata o sporca, chiusura difettosa), aprirli entrambi, smontare le<br />
lampadine e le pile, sciacquare con acqua dolce e poi farli asciugare perfettamente.<br />
Se la lampada non funziona<br />
Verificare la carica dell’accumulatore, accertarsi che la lampadina non sia bruciata,<br />
o che lo zoccolo non sia ossidato. Inserire e disinserire più volte di seguito la<br />
lampadina piccola, con l’interruttore acceso. Verificare l’assenza di corrosione<br />
sui contatti dell’accumulatore e della sua scatola (pulirli se necessario). Azionare<br />
più volte l’interruttore. Se la lampada non funziona ancora, rivolgersi al Servizio<br />
Post Vendita.<br />
Solo il fabbricante può effettuare lo smontaggio della lampada in caso di problema<br />
diverso dalla sostituzione di una lampadina o di un modulo di diodi.<br />
Pulizia<br />
Lavare la lampada con acqua pulita, assicurandosi che l’unità frontale e il portapile<br />
siano chiusi. Per gli elastici utilizzare sapone neutro. Non sfregare con prodotti<br />
abrasivi in particolare sulla plastica trasparente. Non lavare con getto a pressione.<br />
Accumulatore <strong>DUO</strong> <strong>ATEX</strong><br />
Caricatore <strong>DUO</strong><br />
Precauzioni<br />
Il presente manuale contiene le istruzioni per l’uso e importanti precauzioni da<br />
adottare relative ai caricatore <strong>DUO</strong> E65200. Prima di utilizzare questo prodotto,<br />
leggere attentamente le istruzioni e le marcature raffigurate sul caricatore,<br />
sull’accumulatore e sui prodotti che utilizzano questo kit accumulatore. Conservare<br />
queste istruzioni.<br />
Attenzione<br />
Utilizzare esclusivamente l’accumulatore di sicurezza PETZL <strong>DUO</strong> <strong>ATEX</strong> E61100 2.<br />
L’accumulatore <strong>DUO</strong> <strong>ATEX</strong> E61100 2 è un accumulatore di sicurezza intrinseca di<br />
classe di temperatura t3.<br />
Condizioni speciali per un utilizzo sicuro: l’accumulatore<br />
non deve mai essere ricaricato in ambiente con rischio di<br />
esplosione.<br />
ACCUMULATORE <strong>DUO</strong> E61100 2<br />
Capacità : 2 700 mAh. L’accumulatore è composto da quattro pile ricaricabili NiMH.<br />
Da utilizzare esclusivamente con il CARICATORE <strong>DUO</strong> Petzl.<br />
- Questo accumulatore deve essere caricato alla prima messa in funzione.<br />
- Non esitare a ricaricare regolarmente l’accumulatore se parzialmente utilizzato<br />
o se inutilizzato per più di due settimane. È inutile scaricare completamente<br />
l’accumulatore prima della ricarica.<br />
- Autoscarica : la scarica dell’accumulatore stoccato in buone condizioni è del 15 %<br />
nei primi tre giorni, poi dell’1 % al giorno alla temperatura di 20 °C. Attenzione :<br />
questa scarica è più rapida se la temperatura aumenta.<br />
- Può essere ricaricato 500 volte.<br />
- Utilizzare sempre l’accumulatore ad una temperatura superiore a -20 °C e<br />
inferiore a +60 °C.<br />
- Non gettare sul fuoco e non distruggere : può esplodere o diffondere sostanze<br />
tossiche.<br />
- Non cortocircuitare : può provocare ustioni.<br />
Stoccaggio<br />
Per conservare bene l’accumulatore, stoccarlo in buone condizioni in ambiente<br />
asciutto e a temperature comprese tra -20 °C e +35 °C.<br />
Protezione dell’ambiente.<br />
Le pile devono essere riciclate. Non gettatele nei rifiuti. Deponetele nei contenitori<br />
di riciclaggio in conformità ai diversi regolamenti locali applicabili.<br />
CARICATORE <strong>DUO</strong><br />
- Non utilizzare con pile alcaline o normali : rischio di esplosione. L’impiego di<br />
altri tipi di accumulatori può causare ferite e danneggiare sia l’accumulatore che<br />
il caricatore.<br />
- La carica degli accumulatori deve essere effettuata ad una temperatura superiore<br />
a 10 °C e inferiore a 40 °C.<br />
- Non esporre alla pioggia o alla neve : pericolo di folgorazione.<br />
- Non utilizzare il caricatore qualora abbia subito un forte urto o una grave caduta.<br />
- Se l’apparecchio viene danneggiato (per esempio il cavo di alimentazione), non<br />
lo si deve assolutamente smontare. La riparazione deve essere fatta unicamente da<br />
PETZL, poiché è necessaria un’apposita attrezzatura.<br />
- Per non danneggiare la spina, non tirare il cavo quando si stacca il caricatore<br />
dalla presa di corrente.<br />
- Non utilizzare fili di prolunga.<br />
- Per evitare i rischi di folgorazione, staccare sempre il caricatore dalla presa di<br />
corrente prima di ogni operazione di manutenzione e pulizia.<br />
Caricatore rete : E65200 2<br />
La ricarica dell’accumulatore è segnalata dall’accensione della spia verde.<br />
Durata della ricarica completa : 3 h 30.<br />
A fine ricarica, la spia verde lampeggia. L’accumulatore si mantiene in carica.<br />
Si consiglia di tenere l’accumulatore inserito nel caricatore, in modo da averlo<br />
sempre pronto per l’uso.<br />
Questo caricatore 100-240 V~, 50/60 Hz può essere utilizzato in tutto il mondo<br />
con un adattatore (non fornito). È compatibile con gli accumulatori <strong>DUO</strong> E65100<br />
(1 400 mAh) e E65100 2 (2 700 mAh).<br />
Caricatore auto : E65300 2<br />
La ricarica dell’accumulatore è segnalata dall’accensione della spia rossa sul<br />
blocco supporto.<br />
Durata di ricarica completa : 14 ore.<br />
Utilizzare esclusivamente per ricaricare l’accumulatore <strong>DUO</strong> Petzl E61100 2.<br />
Questo caricatore 12 V non è compatibile con il vecchio accumulatore E61100<br />
(1 400 mAh).<br />
Non lasciarlo in carica in un’automobile esposta al sole : rischio di<br />
surriscaldamento.<br />
Garanzia PETZL<br />
Questo prodotto ha una garanzia di 3 anni contro ogni difetto del materiale o di<br />
fabbricazione. Limitazione della garanzia : non sono coperti dalla garanzia l’usura<br />
normale, le modifiche o i ritocchi, la cattiva conservazione, i danni dovuti agli<br />
incidenti, alle negligenze, o agli utilizzi ai quali questo prodotto non è destinato.<br />
Responsabilità<br />
PETZL non è responsabile delle conseguenze dirette, indirette, accidentali o di ogni<br />
altro tipo di danno verificatosi o causato dall’utilizzo di questo prodotto.<br />
(ES) ESPAÑOL<br />
Campo de aplicación<br />
La linterna frontal <strong>DUO</strong> <strong>ATEX</strong> puede utilizarse en presencia de gas, vapores y<br />
nieblas, en que la temperatura de autoinflamación es superior a 200 °C a presión<br />
atmosférica (200 °C de temperatura máxima de superficie de la linterna).<br />
Esta protección corresponde a la casi totalidad de los gases excepto el<br />
acetaldetyde (C 2 H 4 o)(140°), ethyl ether (C 4 H1 0 o) (170°), el nitrito de etilo<br />
(C 2 H 5 No 2 ) (90 °C) y el sulfuro de carbono (CS 2 )(102 °C), etc....<br />
La <strong>DUO</strong> <strong>ATEX</strong> no debe utilizarse en las minas con presencia de grisú ni en<br />
atmósferas polvorientas como los silos de grano.<br />
Marcado<br />
La reglamentación internacional CEI (norma CEI 79.10 del 1995 y la directiva<br />
europea 94/9/EC; <strong>ATEX</strong> 95) distinguen las categorías siguientes de zonas<br />
peligrosas:<br />
- Zona 0: la atmósfera explosiva siempre está presente (depósito).<br />
- Zona 1: la atmósfera explosiva a menudo está presente (mezcla que se forma<br />
durante el funcionamiento de una instalación).<br />
- Zona 2: la atmósfera explosiva puede estar presente accidentalmente (mal<br />
funcionamiento de la instalación, escape).<br />
La <strong>DUO</strong> <strong>ATEX</strong> <strong>LED</strong> 5 está clasificada Zona 1 y Zona 2. Su utilización está prohibida<br />
en Zona 0.<br />
CE: marcado CE<br />
Ej: utilización del material en atmósfera explosiva.<br />
II: grupo de aparato para la superficie.<br />
2: aparato para la zona 1 actual.<br />
G: gas únicamente.<br />
EEx: aparato que responde a las modalidades de protecciones normalizadas<br />
CENELEC (normas europeas).<br />
e: protección aumentada = la linterna no puede generar ni arco ni calentamiento<br />
susceptible de inflamar una atmósfera explosiva.<br />
4 Notice <strong>DUO</strong> <strong>ATEX</strong> E61L52 réf. : E61602-F (170604)
ia: protección intrínseca = protección de la lámpara en sí misma, independiente de<br />
los factores exteriores.<br />
II: industrias de surperficie.<br />
C: la subdivisión de gas más severa, incluyendo hidrógeno (H 2 ), acetileno (C 2 H 2 )<br />
y sulfuro de carbono (CS 2 ).<br />
T3: temperatura máxima de superficie 200 °C.<br />
Atención : Es indispensable una formación apropiada antes de<br />
su utilización<br />
Lea atentamente esta ficha técnica antes de su utilización. Esta ficha técnica<br />
explica cómo utilizar este producto. Sólo están autorizadas las técnicas<br />
presentadas. Cualquier otra utilización debe ser excluida. En caso de duda o de<br />
problemas de comprensión, consulte a PETZL.<br />
Un mal funcionamiento de la linterna puede comportar peligro. El aprendizaje<br />
de las técnicas de utilización y de mantenimiento (limpieza, cambio de bombilla,<br />
rascado de los contactos, etc.), así como el aprendizaje de las medidas de<br />
seguridad, se efectúa bajo su única responsabilidad.<br />
Usted asume personalmente todos los riesgos y responsabilidades por todo daño,<br />
herida o muerte que pudiera ocurrir debido a una mala utilización de nuestros<br />
productos de la forma que sea. Si no está dispuesto a asumir esta responsabilidad<br />
o a correr este riesgo, no utilice este material. La puesta en funcionamiento debe<br />
ser realizada por el usuario.<br />
Utilización<br />
El interruptor puede ser bloqueado para el transporte y el almacenamiento<br />
presionando el botón rojo (1A). El desbloqueo se realiza presionando sobre el otro<br />
extremo del botón rojo (1B).<br />
- Interruptor posicionado hacia arriba: iluminación principal (2).<br />
- Interruptor posicionado hacia abajo: iluminación de proximidad utilizando poca<br />
energía (3).<br />
- El botón zoom permite regular la iluminación principal en función del uso. En<br />
posición hacia abajo, el haz de luz es estrecho. En posición hacia arriba, el haz<br />
es ancho (4).<br />
El acumulador de seguridad puede cambiarse en un medio explosivo.<br />
Cambio del acumulador<br />
Abra la caja posterior desbloqueando los dos ganchos (5).<br />
Atención: no desmonte nunca la junta solidaria de la tapa. Procure que esté<br />
siempre limpia (lavar con agua y un algodón). Lubrique la junta con grasa a<br />
base de silicona. Si tiene que cambiar el acumulador en un ambiente húmedo,<br />
seque el interior de la caja después de cada utilización.<br />
Almacenamiento prolongado: retire el acumulador y deje la caja abierta.<br />
Cambio de bombilla<br />
Atención: no abra nunca la caja delantera en un medio explosivo. Desbloquee el<br />
tornillo de seguridad sin quitarlo totalmente (tres vueltas) (5).<br />
Abra el foco con la mano izquierda para desenroscar el aro flexible (6). Retírelo<br />
completamente. En caso de bloqueo, utilice un aflojador para rosca o caliente el<br />
aro flexible con un secador de pelo.<br />
- Bombilla estándar: desenrosque la bombilla defectuosa y coloque la nueva<br />
bombilla roscándola fuerte.<br />
- Módulo <strong>LED</strong>: tire hacia delante procurando no torcer los contactos.<br />
Compruebe el funcionamiento accionando el interruptor. Si el módulo no se<br />
ilumina, retírelo e inicie de nuevo la operación invirtiendo los contactos (dar media<br />
vuelta). Vuelva a cerrar la linterna.<br />
Bombillas de recambio: no coloque las bombillas defectuosas en el lugar<br />
destinado a las de recambio (más tarde podría originar confusiones).<br />
Bombilla ennegrecida = pérdida de luminosidad. Le queda poca vida útil a la<br />
bombilla.<br />
Para cerrar el foco:<br />
Limpie cuidadosamente la junta, seque la caja y lubrique la junta y la rosca con<br />
grasa a base de silicona. Coloque el conjunto reflector/cristal/aro flexible en el<br />
sentido correcto (7).<br />
Enrosque el aro flexible con la mano derecha hasta que la señal gravada sobre el<br />
mismo se encuentre entre las dos señales situadas en la caja del foco (8 y 9).<br />
Bloquee moderadamente el tornillo de seguridad (tres vueltas) (10).<br />
Observaciones<br />
Si la linterna queda accidentalmente encendida dentro de una bolsa, el calor<br />
desprendido por la bombilla puede deteriorar el reflector (asegúrese de bloquear el<br />
interruptor). Es imposible encender las dos bombillas a la vez: consumo excesivo<br />
de corriente sin mejora de la iluminación.<br />
Esta linterna es ideal para ambientes húmedos, pero ¡atención ! no es una linterna<br />
de inmersión. Si entra agua en el foco o en la caja trasera (junta deteriorada o<br />
sucia, o por quedar mal cerrada), una vez fuera del agua, abra el foco y la caja,<br />
extraiga las bombillas y las pilas, aclare con agua dulce y deje secar.<br />
En caso de mal funcionamiento<br />
Compruebe la carga del acumulador. Asegúrese de que la bombilla no está<br />
fundida, o que el casquillo no está oxidado. Coloque y retire varias veces la<br />
bombilla pequeña, estando el interruptor en posición “bombilla encendida”.<br />
Verifique que no haya corrosión en los contactos del acumulador y de la caja<br />
(límpielos si es necesario). Accione varias veces el interruptor.<br />
Si su linterna aún no funciona, póngase en contacto con PETZL.<br />
Para cualquier problema que no sea cambiar una bombilla o un módulo de diodos,<br />
la linterna sólo puede ser desmontada por el fabricante.<br />
Limpieza<br />
Lave la linterna con agua dulce y con las cajas cerradas. Utilice jabón para las<br />
cintas elásticas. No la frote, y particularmente el cristal, con un producto abrasivo.<br />
No la lave con un limpiador de alta presión.<br />
Acumulador <strong>DUO</strong> <strong>ATEX</strong><br />
Cargador <strong>DUO</strong><br />
Precauciones<br />
Esta ficha técnica contiene importantes precauciones a tener en cuenta e<br />
instrucciones de utilización de cargador <strong>DUO</strong> E65200. Antes de utilizar este<br />
producto, lea atentamente la ficha técnica y los marcados que figuran en el<br />
cargador, el acumulador y en los productos que utilizan este acumulador. Conserve<br />
estas instrucciones.<br />
ATENCIÓN<br />
Utilice únicamente un acumulador de seguridad PETZL <strong>DUO</strong> <strong>ATEX</strong> E61100 2.<br />
El acumulador <strong>DUO</strong> <strong>ATEX</strong> E61100 2 es una acumulador de seguridad intrínseca de<br />
clase de temperatura T3.<br />
Condiciones especiales para una utilización segura: el<br />
acumulador nunca debe recargarse en un medio explosivo.<br />
ACUMULADOR <strong>DUO</strong> E61100 2<br />
Capacidad : 2 700 mAh. La batería está formada por cuatro acumuladores NiMH.<br />
Debe utilizarse únicamente con un CARGADOR <strong>DUO</strong> Petzl.<br />
- Este acumulador debe cargarse antes de la primera utilización.<br />
- No dude en recargar un acumulador utilizado parcialmente o almacenado más de<br />
dos semanas. No sirve de nada descargar completamente un acumulador antes<br />
de recargarlo.<br />
- Autodescarga : la descarga del acumulador almacenado en buenas condiciones<br />
es del 15 % durante los tres primeros días y, después, del 1 % por día, a 20 °C.<br />
Atención : esta descarga será más rápida si la temperatura aumenta.<br />
- Puede ser recargado 500 veces.<br />
- Utilice siempre el acumulador a una temperatura superior a -20 °C e inferior a<br />
+60 °C.<br />
- No lo tire al fuego ni lo destruya : puede explotar o liberar materias tóxicas.<br />
- No lo cortocircuite : puede provocar quemaduras.<br />
Almacenamiento<br />
Para proteger su acumulador, procure almacenarlo en buenas condiciones en seco<br />
y a temperaturas que no excedan los -20 °C y +35 °C.<br />
Protección del medio ambiente<br />
Las pilas deben reciclarse. No las tire junto con la basura doméstica. Deposítelas<br />
en los recipientes de reciclaje según los diferentes reglamentos locales aplicables.<br />
CARGADOR <strong>DUO</strong><br />
- No recargue pilas alcalinas o salinas : existe riesgo de explosión. El empleo de<br />
otros tipos de acumuladores puede generar heridas y dañar el acumulador así<br />
como el cargador.<br />
- La carga de los acumuladores debe realizarse a una temperatura superior a 10 °C<br />
e inferior a40 °C.<br />
- No lo exponga a la lluvia o a la nieve : existe riesgo de electrocución.<br />
- No utilice los cargadores si han recibido un fuerte impacto o sufrido una caída<br />
importante.<br />
- Si estos aparatos están dañados (por ejemplo, el cable de alimentación), no<br />
los desmonte. Deben ser reparados únicamente en los talleres PETZL, ya que es<br />
necesario usar herramientas especiales.<br />
- Para no dañar la clavija, cuando desconecte el cargador, no tire del cable.<br />
- No utilice alargadores.<br />
- Para evitar riesgos de electrocución, desconecte el cargador antes de cualquier<br />
mantenimiento o limpieza.<br />
Cargador de red : E65200 2<br />
Cuando el acumulador se está cargando, se enciende un indicador luminoso verde.<br />
Duración de la carga completa : 3 h 30.<br />
Al acabar la carga, el indicador verde parpadea. El acumulador se mantiene en<br />
carga.<br />
- Le aconsejamos dejar el acumulador conectado en el cargador. Así siempre<br />
estará a punto para ser usado.<br />
Este cargador de 100-240 V~, 50/60 Hz puede ser utilizado en todo el mundo<br />
con un adaptador que no va incluido. Es compatible con los acumuladores <strong>DUO</strong><br />
E65100 (1400 mAh) y E65100 2 (2 700 mAh).<br />
Cargador para coche : E65300 2<br />
Cuando el acumulador se está cargando, se enciende un indicador rojo en el<br />
soporte.<br />
Duración de la carga completa : 14 horas.<br />
Recargue únicamente el acumulador <strong>DUO</strong> Petzl E61100 2. Este cargador de 12 V<br />
no es compatible con el antiguo acumulador E61100 (1 400 mAh).<br />
No lo cargue en un coche expuesto al sol : existe riesgo de sobrecalentamiento.<br />
Garantía PETZL<br />
Este producto está garantizado durante tres años contra cualquier defecto en<br />
los materiales o de fabricación. Se excluye de la garantía : el desgaste normal,<br />
las modificaciones o retoques, el mal almacenamiento, los daños debidos a los<br />
accidentes, a las negligencias y a las utilizaciones para las cuales este producto<br />
no está destinado.<br />
Responsabilidad<br />
PETZL no es responsable de las consecuencias directas, indirectas, accidentales<br />
o de cualquier otro tipo de los daños ocurridos o resultantes de la utilización de<br />
este producto.<br />
5 Notice <strong>DUO</strong> <strong>ATEX</strong> E61L52 réf. : E61602-F (170604)