ALPHA SPOT 300
ALPHA SPOT 300
ALPHA SPOT 300

Create successful ePaper yourself
Turn your PDF publications into a flip-book with our unique Google optimized e-Paper software.
I<br />
MENU DELLE FUNZIONI DI TEST<br />
GB<br />
TEST FUNCTIONS MENU<br />
S e n s<br />
G<br />
G<br />
G<br />
P<br />
C<br />
C<br />
F<br />
o<br />
o<br />
o<br />
r<br />
b<br />
R<br />
b<br />
s<br />
R<br />
o<br />
F<br />
m<br />
o l 1<br />
o l 2<br />
o<br />
c<br />
u<br />
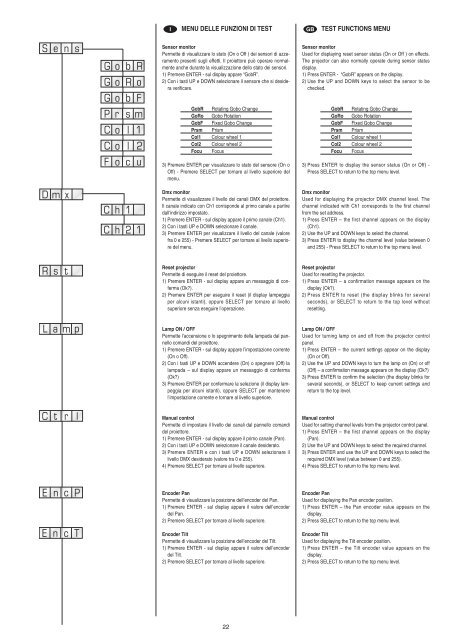
Sensor monitor<br />
Permette di visualizzare lo stato (On o Off ) dei sensori di azzeramento<br />
presenti sugli effetti. Il proiettore può operare normalmente<br />
anche durante la visualizzazione dello stato dei sensori.<br />
1) Premere ENTER - sul display appare “GobR”.<br />
2) Con i tasti UP e DOWN selezionare il sensore che si desidera<br />
verificare.<br />
GobR Rotating Gobo Change<br />
GoRo Gobo Rotation<br />
GobF Fixed Gobo Change<br />
Prsm Prism<br />
Col1 Colour wheel 1<br />
Col2 Colour wheel 2<br />
Focu Focus<br />
3) Premere ENTER per visualizzare lo stato del sensore (On o<br />
Off) - Premere SELECT per tornare al livello superiore del<br />
menu.<br />
Sensor monitor<br />
Used for displaying reset sensor status (On or Off ) on effects.<br />
The projector can also normally operate during sensor status<br />
display.<br />
1) Press ENTER - “GobR” appears on the display.<br />
2) Use the UP and DOWN keys to select the sensor to be<br />
checked.<br />
GobR Rotating Gobo Change<br />
GoRo Gobo Rotation<br />
GobF Fixed Gobo Change<br />
Prsm Prism<br />
Col1 Colour wheel 1<br />
Col2 Colour wheel 2<br />
Focu Focus<br />
3) Press ENTER to display the sensor status (On or Off) -<br />
Press SELECT to return to the top menu level.<br />
Dmx<br />
Ch1<br />
Ch21<br />
Dmx monitor<br />
Permette di visualizzare il livello dei canali DMX del proiettore.<br />
Il canale indicato con Ch1 corrisponde al primo canale a partire<br />
dall’indirizzo impostato.<br />
1) Premere ENTER - sul display appare il primo canale (Ch1).<br />
2) Con i tasti UP e DOWN selezionare il canale.<br />
3) Premere ENTER per visualizzare il livello del canale (valore<br />
fra 0 e 255) - Premere SELECT per tornare al livello superiore<br />
del menu.<br />
Dmx monitor<br />
Used for displaying the projector DMX channel level. The<br />
channel indicated with Ch1 corresponds to the first channel<br />
from the set address.<br />
1) Press ENTER – the first channel appears on the display<br />
(Ch1).<br />
2) Use the UP and DOWN keys to select the channel.<br />
3) Press ENTER to display the channel level (value between 0<br />
and 255) - Press SELECT to return to the top menu level.<br />
Rst<br />
Reset projector<br />
Permette di eseguire il reset del proiettore.<br />
1) Premere ENTER - sul display appare un messaggio di conferma<br />
(Ok?).<br />
2) Premere ENTER per eseguire il reset (il display lampeggia<br />
per alcuni istanti), oppure SELECT per tornare al livello<br />
superiore senza eseguire l’operazione.<br />
Reset projector<br />
Used for resetting the projector.<br />
1) Press ENTER – a confirmation message appears on the<br />
display (Ok?).<br />
2) Press ENTER to reset (the display blinks for several<br />
seconds), or SELECT to return to the top level without<br />
resetting.<br />
L<br />
a<br />
m p<br />
Lamp ON / OFF<br />
Permette l’accensione o lo spegnimento della lampada dal pannello<br />
comandi del proiettore.<br />
1) Premere ENTER - sul display appare l’impostazione corrente<br />
(On o Off).<br />
2) Con i tasti UP e DOWN accendere (On) o spegnere (Off) la<br />
lampada – sul display appare un messaggio di conferma<br />
(Ok?)<br />
3) Premere ENTER per confermare la selezione (il display lampeggia<br />
per alcuni istanti), oppure SELECT per mantenere<br />
l’impostazione corrente e tornare al livello superiore.<br />
Lamp ON / OFF<br />
Used for turning lamp on and off from the projector control<br />
panel.<br />
1) Press ENTER – the current settings appear on the display<br />
(On or Off).<br />
2) Use the UP and DOWN keys to turn the lamp on (On) or off<br />
(Off) – a confirmation message appears on the display (Ok?)<br />
3) Press ENTER to confirm the selection (the display blinks for<br />
several seconds), or SELECT to keep current settings and<br />
return to the top level.<br />
C<br />
t<br />
r l<br />
Manual control<br />
Permette di impostare il livello dei canali dal pannello comandi<br />
del proiettore.<br />
1) Premere ENTER - sul display appare il primo canale (Pan).<br />
2) Con i tasti UP e DOWN selezionare il canale desiderato.<br />
3) Premere ENTER e con i tasti UP e DOWN selezionare il<br />
livello DMX desiderato (valore tra 0 e 255).<br />
4) Premere SELECT per tornare al livello superiore.<br />
Manual control<br />
Used for setting channel levels from the projector control panel.<br />
1) Press ENTER – the first channel appears on the display<br />
(Pan).<br />
2) Use the UP and DOWN keys to select the required channel.<br />
3) Press ENTER and use the UP and DOWN keys to select the<br />
required DMX level (value between 0 and 255).<br />
4) Press SELECT to return to the top menu level.<br />
E<br />
E<br />
n<br />
n<br />
c P<br />
c T<br />
Encoder Pan<br />
Permette di visualizzare la posizione dell’encoder del Pan.<br />
1) Premere ENTER - sul display appare il valore dell’encoder<br />
del Pan.<br />
2) Premere SELECT per tornare al livello superiore.<br />
Encoder Tilt<br />
Permette di visualizzare la posizione dell’encoder del Tilt.<br />
1) Premere ENTER - sul display appare il valore dell’encoder<br />
del Tilt.<br />
2) Premere SELECT per tornare al livello superiore.<br />
Encoder Pan<br />
Used for displaying the Pan encoder position.<br />
1) Press ENTER – the Pan encoder value appears on the<br />
display.<br />
2) Press SELECT to return to the top menu level.<br />
Encoder Tilt<br />
Used for displaying the Tilt encoder position.<br />
1) Press ENTER – the Tilt encoder value appears on the<br />
display.<br />
2) Press SELECT to return to the top menu level.<br />
22