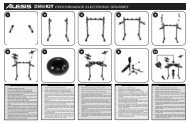
CONNECTING THE Trigger|iO MODULECÓMO CONECTAR EL MÓDULO Trigger|iO | BRANCHEMENT DU MODULE Trigger|iOCOLLEGAMENTO DEL MODULO Trigger|iO | ANSCHLUSS DES Trigger|iO MODULSPlease study the following connection diagram to hook up your pads and pedals to the Trigger|iO module:Estudie el siguiente diagrama para saber cómo conectar sus pads y pedales al módulo Trigger|iO:Examinez bien le schéma de raccordement afin de brancher les pads et les pédales au module Trigger|iO:Studiare attentamente il seguente schema per il collegamento dei pad e dei pedali al modulo Trigger|iO:Informieren Sie sich in der folgenden Anschlussübersicht, wie Sie Ihre Pads und Pedale mit dem Trigger|iO Modul verbinden:TriggerMIDI note #(T1 / T2)CONNECTION DIAGRAMRECOMMENDED MODULE SETTINGSGain Vel Thres X Talk RetrigTriggerTypeKick 36 15 Lin 5 1 10 PPSnare 38/40 15 Lin 5 7/7 3 PPTom 3 43/x 15 Lin 5 7/7 5 PPRide 1*#4: BowRide 2*#9: Bell51 15 Lin 5 7/7 5 PS53 - Lin 5 7/7 5 PP* The ride cymbal has two outputs – one for thebow of the cymbal, the other for the bell. Be surethey are connected to the proper Trigger|iO inputsas shown in the diagrams (left and above).** Toms 1 and 2 and the crash cymbal are notsupported in EZ <strong>Drum</strong>mer Lite. For complete kitfunctionality, we recommend purchasing the fullversion of EZ <strong>Drum</strong>mer.• Begin by connecting the pads and pedals as labeled in the illustration. UseTRS cables to connect the pads and cymbals, and use a TS cable toconnect the hi-hat pedal. Then, connect the Trigger|iO module to a powersource, using the included power adapter. Lastly, connect the Trigger|iO toyour computer, using the included <strong>USB</strong> cable, or connect the module to anexternal MIDI device, using a 5-pin MIDI cable. Please refer to theTrigger|iO manual for more information about module features andoperation. We have also included a coupon for downloadable EZ <strong>Drum</strong>merLite software for immediate use. On the bottom of this page, we have alsoprovided a handy chart with recommended settings for using the Trigger|iOwith EZ <strong>Drum</strong>mer Lite.• Comience conectando los pads y los pedales como indican los rótulos de lailustración. Use cables TRS para conectar los pads y los platillos, y uncable TS para conectar el pedal de hi-hat. Luego, conecte el móduloTrigger|iO al suministro eléctrico, usando el adaptador de alimentaciónincluido. Por último, conecte el Trigger|iO a su computadora con el cable<strong>USB</strong> incluido o conecte el módulo a un dispositivo MIDI externo, con uncable MIDI de 5 pines. Consulte el manual del Trigger|iO para másinformación acerca de las características y el funcionamiento del módulo.Hemos incluido también un cupón para el software descargable EZ<strong>Drum</strong>mer Lite para uso inmediato. Al pie de esta página brindamostambién una práctica tabla con los valores de parámetros recomendadospara usar el Trigger|iO con EZ <strong>Drum</strong>mer Lite.• Commencez en reliant les pads et les pédales comme illustré. Utilisez descâbles TRS pour relier les pads et les cymbales, et utilisez un câble TSpour relier la pédale Charleston. Branchez ensuite le module Trigger|iO àune prise d’alimentation à l’aide du bloc d’alimentation inclus. En dernierlieu, reliez le Trigger|iO à un ordinateur, en utilisant le câble <strong>USB</strong> inclus, oureliez le module à un dispositif MIDI externe, à l’aide d’un câble MIDI à 5broches. Veuillez consulter le guide d’utilisation du Trigger|iO pour de plusamples informations sur les caractéristiques et le fonctionnement dumodule. Nous avons également inclus un coupon pour le logicieltéléchargeable EZ <strong>Drum</strong>mer Lite pour utilisation immédiate. Dans le bas decette page, nous vous avons également fourni un schéma pratique desréglages recommandés pour l'utilisation du Trigger|iO avec EZ <strong>Drum</strong>merLite.• Iniziare collegando i pad e i pedali come indicato nell’illustrazione. Servirsidi cavi TRS per collegare i pad e i piatti e di un cavo TS per collegare ilpedale hi-hat. Quindi, collegare il modulo Trigger|iO ad una sorgente dialimentazione servendosi dell’adattatore in dotazione. Infine, collegare ilTrigger|iO al computer, servendosi del cavo <strong>USB</strong> in dotazione, oppurecollegare il modulo ad un dispositivo MIDI esterno servendosi di un cavoMIDI a 5 poli. Fare riferimento al manuale del Trigger|iO per maggioriinformazioni sulle funzioni e l’utilizzo del modulo. Abbiamo anche inclusoun buono per il software scaricabili EZ <strong>Drum</strong>mer Lite per un utilizzoimmediato. In fondo a questa pagina abbiamo anche fornito un comodoschema con le impostazioni raccomandate per l’utilizzo del Trigger|iO conEZ <strong>Drum</strong>mer Lite.• Beginnen Sie nun mit der Verbindung der Pads und Pedale, wie in derAbbildung gezeigt. Verwenden Sie 6,3 mm Stereoklinkenkabel, um Padsund Cymbals anzuschließen. Für den Anschluss des HiHat Pedalsverwenden Sie bitte ein 6,3 mm Monoklinkenkabel. Schließen Sie dann dasTrigger|iO Modul mit dem beiliegenden Netzteil an den Stromkreis an.Stellen Sie zuletzt das Trigger|iO mit dem beiliegenden <strong>USB</strong> Kabel an denComputer an oder verwenden Sie ein normales 5-Pin MIDI Kabel um dieVerbindung mit einem externen MIDI Gerät herzustellen. Beachten Sie bittedas Trigger|iO Handbuch, um weitere Informationen über Handhabung undFunktionen des Trigger|iOs zu erhalten. Auf der CD finden Sie einenGutschein für ladbar EZ <strong>Drum</strong>mer Lite Software. Auf dieser Seite finden Sieauch eine Übersicht mit empfohlenen Einstellungen zur Verwendung desTrigger|iOs mit EZ <strong>Drum</strong>mer Lite.8
7-51-0308-C