Vortex - Alesis
Vortex - Alesis
Vortex - Alesis
- No tags were found...

Create successful ePaper yourself
Turn your PDF publications into a flip-book with our unique Google optimized e-Paper software.
<strong>Vortex</strong>QUICKSTART GUIDEENGLISH ( 2 – 7 )MANUAL DE INICIO RÁPIDOESPAÑOL ( 8 – 13 )GUIDE D'UTILISATION RAPIDEFRANÇAIS ( 14 – 20 )GUIDA RAPIDAITALIANO ( 21 – 27 )KURZANLEITUNGDEUTSCH ( 28 – 34 )
QUICKSTART GUIDE (ENGLISH)1. Make sure all items listed in the Box Contentsare included.2. READ THE SAFETY INSTRUCTIONBOOKLET BEFORE USING THE PRODUCT.3. Place the product in an appropriate location foroperation.BOX CONTENTS• <strong>Vortex</strong>• Strap• Software DVD• USB Cable• Quickstart Guide• Safety Instructions & Warranty Information BookletSETUPCONNECTION DIAGRAMComputer*Synthesizer**Sold SeparatelyFootswitch*2
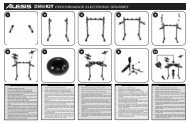
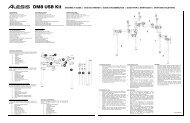
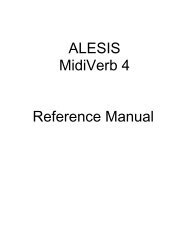
1 2 3LOWERSPLITKEYBOARD ZONESUPPERTILTPATCH EDITACCELEDITACCELCAL PROGRAM BANK BANK MIDISET MSB LSB CHANNEL ASSIGNMODENECK – TOP PANEL10 1112 12 14 15 16131 2 3 48 95 6 7171. Sustain Button – This button continues notes that are playing when2depressed, 4 or are played whiledepressed, until it is released.2. *Ribbon Controller – Touch-sensitive strip that sends MIDI messages.1 33. Octave Down – Press this button to shift the KEYBOARD's octave range down. 54. Octave Up – Press this button to shift the KEYBOARD's octave range up.5. *Ribbon Control Buttons – Sets the type of MIDI message to be sent by the Ribbon Controller.6. Pitch Wheel – Transmits MIDI Pitch Bend information to raise or lower the pitch of a note temporarily.7. *Slider – Sends MIDI data for the currently assigned parameter.8. *Keyboard Zone Buttons – Press these buttons to enter the various Keyboard zones.9. Keyboard – Velocity-sensitive keys with aftertouch for sending MIDI notes. Use the keys to manually entervalues in Patch Edit mode.1310. Display – Shows the data, values, settings, and various <strong>Vortex</strong> functions.11. *Start/Stop Button – Transport control button to toggle MIDI Start/Stop message. The LED will light up when aPlay command is sent and will turn off when a Stop command is sent.12. Program Change Up/Down – Sends program change messages to your computer software or MIDI device.Hold either button to scroll through 10 programs at a time.Note: <strong>Vortex</strong> will not send a program change message until the Up/Down buttons are released.13. Patch Edit Button – Press this button to toggle between Edit and Performance Mode.Note: The three Patch Select LEDs will be lit when in this mode.14. Patch Select –3Press and use 4the drum pads to select onboard patches. The pad of the currently selectedpatch will light up.15. *Knobs – Sends various MIDI messages when turned. Each knob can be individually assigned to a differentMIDI parameter.16. *Trigger/Drum Pads – Press the pads to send MIDI messages or use the Patch Select button along with the8 9pads to select onboard patches.17. Strap Button – Use the included guitar-style strap for added stability when playing.1 25 6 7*See the Appendix for more information.SIDE PANEL1. Power Switch – Use this three-position switch to power the uniton/off. When the switch is set to the left position, the unit will bebattery-powered. When set to the middle position, the unit will beoff. When set to the right position, the unit will be poweredthrough USB or a power adapter (sold separately).2. USB Port – Connects to a computer’s USB port, using theincluded USB cable. The USB connection will power <strong>Vortex</strong>.1 3 53. MIDI Output – Connects to an external device’s MIDI input portwith a standard MIDI cable.4. Sustain Pedal Input – Connect a 1/4" TS sustain pedal (a standard non-latching footswitch, sold separately) tothis input.5. Power Connector – Connect a power adapter (optional, sold separately) here.BOTTOM PANEL10 1112 14 15241. Storage – Use this compartment to store your owncables, such as USB and MIDI cables.2. Battery Compartment – Install four AA batteries3here (optional, sold separately) to power <strong>Vortex</strong>.3. Strap Button – Use the included guitar-style strapfor added stability when playing. 123
KEYBOARD FUNCTIONSActivate the functions below by pressing their associated key on the keyboard while in Patch Edit Mode to accessvarious features. These functions are described in more detail later in the manual.• Cal Accel (Calibrate Accelerometer): Resets the accelerometer to factory default settings.• Bank LSB (Least Significant Byte): Sends Bank LSB CC messages.• Bank MSB (Most Significant Byte): Sends Bank MSB CC messages.• Program Set: Stores the program # (0 – 127) into the patch.• MIDI Channel: Assigns the MIDI channel for various controls.• Mode Assign: Assigns the mode in which controls operate.• Edit Accel (Edit Accelerometer): Allows you to edit the accelerometer MIDI messages.KEYBOARD MODESPerformance Mode: Use this mode when performing. PF will be displayed on the screen. In this mode, MIDI datacan be transmitted at any time from the assigned controls.Patch Edit Mode: Press the Patch Edit button to enter this mode. The three Patch Select LEDs will be lit when in thismode and “PE” will be displayed on the screen. This mode lets you adjust MIDI message values. To exit Patch Editmode and save all adjustments, press the Patch Edit button again.PATCHESLOADING PATCHESThere are three Patch banks to select from (A, B, and C) on <strong>Vortex</strong>.1. Press the Patch Select button to cycle through patch banks. The corresponding bank LED will be lit.2. Use the Trigger/Drum pads to select the patch to load.EDITING PATCHES<strong>Vortex</strong> allows you to store and recall up to 23 different patches.1. Load the patch that you would like to edit.2. Press the Patch Edit button.3. Select a parameter to edit.4. Press the Enter key to save or press the Cancel key to revert your changes.5. Press the Patch Edit button to exit.EDITING THE PADSThe pads can be in any of four modes:• Note Mode: Sends a note-on message when pressed and a note-off message when released.• CC Toggle: Toggles between two CC values when pressed.• CC Momentary: Sends a CC message when pressed and another CC message when released.• Program Change: Sends a Bank MSB and a Bank LSB message, followed by a program change messagewhen pressed.To set the mode of a pad:1. Press the Patch Edit button.2. Press the pad you want to edit. The LED screen will display the name of the currently edited pad. For example,“Pd1” will be displayed when editing pad 1.3. Press the key labeled “Mode Assign”.4. Select the mode (1 – 4) using the numeric keys followed by the Enter key to save or press the Cancel key torevert to the original settings. Alternatively, you can press the Mode Assign button to cycle modes.To edit mode parameters:1. Press the Patch Edit button.2. Press the pad you want to edit. The LED screen will display the name of the currently edited pad. For example,“Pd1” will be displayed when editing pad 1.3. Use the three knobs to change parameter values. See Appendix for parameter assignments.Note: After moving the corresponding knob, you can use the numeric keys to enter a value.4. Press the Enter key to save the changes or the Cancel key to revert to original settings.4
To change the MIDI channel of a pad:1. Press the Patch Edit button.2. Press the pad you want to edit. The LED screen will display the name of the currently edited pad. For example,“Pd1” will be displayed when editing pad 1.3. Press the key labeled “MIDI Channel”. The current MIDI channel of the pad you are editing will display on theLED Screen.4. Use the numeric keys to enter a MIDI channel (1 – 16).5. Press the Enter key to save the changes or the Cancel key to revert to the original setting.EDITING THE SLIDER, ACCELEROMETER, RIBBON CONTROLLER, AND KNOBSThese controls can be in any of three modes:• CC: Sends control change messages.• Pitch Bend: Sends pitch bend messages.• Aftertouch: Sends channel aftertouch messages.To set the mode of a control:1. Press the Patch Edit button.2. Move the control you want to edit. The LED screen will display the name of the currently edited control.a. For the accelerometer, press the Edit Accel key on the keyboard.b. For the ribbon controllers, press one of the three buttons that you want to edit.Note: You can set each of the three ribbon control buttons to different modes within the same patch.3. Press the key labeled “Mode Assign”.4. Select the mode (1 – 3) using the numeric keys followed by the Enter key to save or press the Cancel key torevert to the original settings. Alternatively, you can press the Mode Assign button to cycle modes.To edit mode parameters:1. Press the Patch Edit button.2. Move the control you want to edit. The LED screen will display the name of the currently edited control.a. For the accelerometer, press the Edit Accel key on the keyboard.b. For the ribbon controllers, press one of the three buttons that you want to edit.3. Use the 3 knobs to change parameter values. See Appendix for parameter assignments.Note: After moving the corresponding knob, you can use the numeric keys to enter a value.4. Press the Enter key to save the changes or the Cancel key to revert to original settings.To change the MIDI channel of a control:1. Press the Patch Edit button.2. Move the control you want to edit. The LED screen will display the name of the currently edited control.a. For the accelerometer, press the Edit Accel key on the keyboard.b. For the ribbon controllers, press one of the three buttons that you want to edit.3. Press the key labeled “MIDI Channel”. The current MIDI channel of the pad you are editing will display on theLED Screen.4. Use the numeric keys to enter a MIDI channel (1 – 16).5. Press the Enter key to save the changes or the Cancel key to revert to the original setting.To reverse the direction of a control:Follow the steps below to reverse the direction of a control, e.g., the ribbon controller in Ribbon Mode 1, so that themaximum value is located at the left of the ribbon and the minimum value is located on the right side of the ribbon:1. Press “Patch Edit” (the Display screen will show “PE”.).2. Press the “Ribbon Mode 1” button (the Display screen will show “rb1”.).3. Turn the K2 knob to “127” and turn the K3 knob to “0”.4. Press the “Enter” key on <strong>Vortex</strong>’s keyboard.5. Press “Patch Edit” to return to Performance Mode (the Display screen will show “PF”.). The ribbon controllerwill now be reversed in Ribbon Mode 1.EDITING PROGRAM CHANGE MESSAGESWhen a patch is loaded on <strong>Vortex</strong>, a program change message will be sent through the USB port and 5-pin MIDIOUT port. This section describes what message will be sent when a patch is selected.Setting Program Number:1. Press the Patch Edit button.2. Press the Program Set key.3. To enter the Program number for the patch, use the numeric keys to enter a value (0 – 127).4. Press the Enter key to save the changes or the Cancel key to revert to the original setting.5
Setting the LSB (Least Significant Byte) and MSB (Most Significant Byte) Message:1. Press the Patch Edit button.2. Press the Bank MSB or Bank LSB key.3. Use the numeric keys to enter the MSB or LSB (0-127).4. Press the Enter key to save the changes or the Cancel key to revert to the original setting.EDITING THE KEYBOARD MODESThe keys on <strong>Vortex</strong> can be placed in any one of three modes: Upper, Lower and Split. The upper and lower modeshave a MIDI channel and transposition value assigned to them. The split mode places the lower mode in onekeyboard range and the upper mode in another range. You can also adjust the split point.Editing The Lower And Upper Zones1. Press the Patch Edit button.2. Press the upper or lower keyboard zone button (located on the neck of <strong>Vortex</strong>).3. Use the three knobs to change parameter values. See Appendix for parameter assignments.Note: After moving the corresponding knob, you can use the numeric keys to enter a value.4. Press the Enter key to save the changes or the Cancel key to revert to original settings.Setting Split Points1. Press the Patch Edit button.2. Press the Split Zone button. The current split point will be displayed on the LED display.3. Press the key on the keyboard that you want to use as the split point to divide the keyboard.4. Press the Enter key to save the changes or the Cancel key to revert to original settings.RIBBON CONTROLLER RESPONSE SETTINGSThe touch-sensitive ribbon control can respond to its release in two different ways. In the Latch Mode, the setting willbe retained after releasing the ribbon controller. In the Return Mode, the setting will return to its default value afterreleasing the ribbon controller.Setting The Ribbon Controller Response Mode1. Press the Patch Edit button.2. Touch the Ribbon. “rib” will display on the LED.3. Press Mode Assign.4. Set the mode (1 – 2) using the numeric keys. Alternatively, press “Mode Assign” to cycle between modes.Note: The LED will display “Lch” (for “Latch Mode”), or “rn” (for “Return Mode”).5. Press the mode using the numeric keys followed by the ‘Enter’ key to save or the ‘Cancel’ key to revert tooriginal settings. Use #1 for “Latch Mode” and use # 2 for “Return Mode”. The LED screen will display “PE”after the parameter has been saved.START/STOP BUTTON ASSIGNMENTSThe Start and Stop button of <strong>Vortex</strong> can be assigned to two different modes:MIDI Mode is used to send a Start or Stop message using the standard MIDI Start or Stop message. Most hardwaresynths will respond to this type of MIDI message.CC Mode is used to send a Start or Stop message using two “CC” message. Some DAWs, such as Ableton Live, useCC messages for starting and stopping sequences.1. Editing the Start and Stop Mode Button:2. Press the Patch Edit button.3. Press the Start and Stop Button.4. Press Mode Assign.5. Set the mode (1 – 2) using the numeric keys. Alternatively, press “Mode Assign” to cycle between modes.Note: The LED will display “rt” (for “Realtime Mode”), or “CC” (for “CC Mode”).6. Use the 3 knobs to change parameter values and select the mode. See Appendix for parameter assignments.Note: After moving the corresponding knob, you can use the numeric keys to enter a value.7. Press the Enter key to save the changes or the Cancel key to revert to original settings.6
RESETTING PATCHESTo restore <strong>Vortex</strong>’s patches to their default settings:1. Make sure <strong>Vortex</strong> is powered off.2. Press and hold the “Start/Stop” and “Patch Select” buttons.3. While holding these buttons, turn <strong>Vortex</strong>’s power on.4. After all LEDs are illuminated on the body of <strong>Vortex</strong>, release the buttons.Note: All LEDs on the neck of <strong>Vortex</strong> will flash 4 times to confirm that all patches are now at their defaultsettings.ACCELEROMETERThe accelerometer sends MIDI data when <strong>Vortex</strong> is tilted upwards. The Tilt LED will indicate whether the unit is pastthe threshold to send the MIDI messages. The accelerometer will only send MIDI messages when <strong>Vortex</strong> is tilted withthe neck pointed upwards at the set calibrated threshold (45 degrees by default).To turn off the accelerometer on a patch, follow this procedure:1. Press “Patch Edit”. (the Display screen will show “PE”)2. Press the “Edit Accelerometer” key. (the Display screen will show “Acc”)3. Press the “Mode Assign” key until the Display screen shows “oFF”.4. Press the “Enter” key. (the Display screen will show “PE”)5. Press “Patch Edit” to return to Performance Mode. (the Display screen will show “PF”)CALIBRATING THE ACCELEROMETER1. Press the Patch Edit button.2. Press the Cal Accel key. “XY1” will be displayed on the LED.3. Move <strong>Vortex</strong> in the minimum up-down position.4. Press the Enter key to set the X1-Y1 position. “XY2” will be displayed on the LED.5. Move <strong>Vortex</strong> in the maximum up-down position.6. Press the Enter key to set the X2-Y2 position.SETTING UP VORTEX WITH ABLETON LIVE LITE1. Visit www.alesis.com/vortex, click on "Docs & Downloads," and download and install the <strong>Vortex</strong> Ableton LiveController Map.2. Press “Patch Select” until the LED located next to “A” is lit.3. Press “P1” (Pad 1) within 5 seconds. The display screen will show “P1” when the correct patch is selected.Note: “P1” will not display if the correct patch is already selected.SETTING UP VORTEX WITH SONiVOX VORTEX-I DVi1. Visit the <strong>Alesis</strong> <strong>Vortex</strong> support page to download the Sonivox <strong>Vortex</strong>-I DVi at www.alesis.com/vortex.2. Press “Patch Select” until the LED located next to “C” is lit.3. Press “P7” (Pad 7) within 5 seconds. The display screen will show “P23” when the correct patch is selected.After following this procedure, your DVi will be mapped to <strong>Vortex</strong>'s controls when the <strong>Vortex</strong> DVi is opened.7
GUÍA DE INICIO RÁPIDO (ESPAÑOL)1. Asegúrese de que estén presentes todos loselementos enumerados en Contenido de lacaja.2. LEA EL FOLLETO DE INSTRUCCIONES DESEGURIDAD ANTES DE UTILIZAR ELPRODUCTO.3. Coloque el producto en un lugar adecuado parasu funcionamiento.CONTENIDO DE LA CAJA• <strong>Vortex</strong>• Correa• DVD de software• Cable USB• Guía de inicio rápido• Folleto de instrucciones de seguridad e informaciónsobre la garantíaINSTALACIÓNDIAGRAMA DE CONEXIÓNComputadora*Sintetizador*Interruptor depedal**Se vende porseparado8
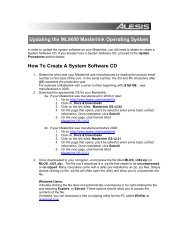
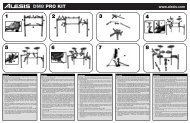
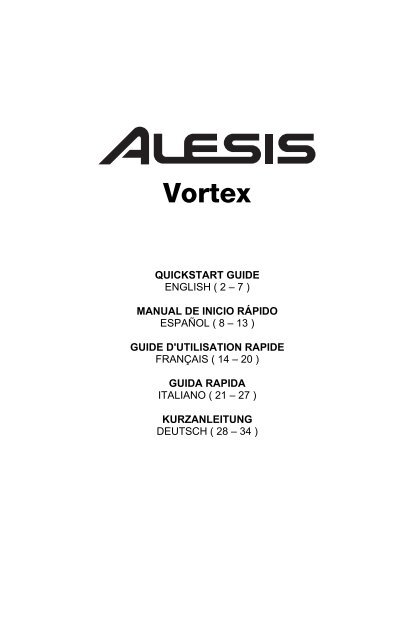
1 2 3LOWERSPLITKEYBOARD ZONESUPPERTILTPATCH EDITEDIT CAL PROGRAM BANK BANK MIDIACCEL ACCEL SET MSB LSB CHANNEL ASSIGNMODECUELLO – PANEL SUPERIOR10 1112 12 14 15 16131 2 3 48 95 6 7171. Botón de sostenido – Con este botón se continúan las notas que se están reproduciendo 2 4al pulsarlo o setocan mientras está pulsado, hasta que se libera el botón.2. *Controlador de cinta – Banda sensible al tacto que envía los mensajes MIDI.13. Octava abajo – Pulse este botón para desplazar la gama de octavas del TECLADO una 3 octava 5hacia abajo.4. Octava arriba – Pulse este botón para desplazar la gama de octavas del TECLADO una octava hacia arriba.5. *Botones de control de cinta – Con estos botones se establece el tipo de mensaje MIDI que envía elcontrolador de cinta.6. Rueda de pitch – Transmite la información de inflexión de pitch MIDI para elevar o bajar temporalmente elpitch de una nota.7. *Cursor – Se utiliza para enviar datos MIDI del parámetro asignado actualmente.8. *Botones de zona del teclado – Pulse estos botones para ingresar a las diversas zonas del teclado:9. Teclado – Teclas sensibles a la velocidad con post-pulsación para enviar notas MIDI. Use las teclas paraingresar manualmente valores en modo Patch Edit (Edición de parche).10. Pantalla – Muestra los datos, valores, ajustes y diversas funciones del <strong>Vortex</strong>.10 1112 14 151311. *Botón de inicio/parada – Botón de control de transporte para conmutar el mensaje de inicio/parada MIDI. ElLED se enciende cuando se envía un comando Reproducir y se apaga cuando se envía un comando Parar.12. Cambio de programa - subir/bajar – Envía mensajes de cambio de programa al software de su computadorao dispositivo MIDI. Mantenga pulsado uno de los botones para recorrer 10 programas a la vez.Nota: <strong>Vortex</strong> no envía un mensaje de cambio de programa hasta que se sueltan los botones Subir/Bajar.13. Botón de edición de parches – Pulse este botón para conmutar entre los modos Edit (Edición) yPerformance (Interpretación).Nota: Cuando está en este modo, se encienden los tres LED Patch Select (Selección de parche).14. Selección de parche – Púlselo y use los pads de batería para seleccionar los parches incorporados. Se2 3 48 917. Botón de la correa – Use la correa estilo guitarra incluida para mejorar la estabilidad al tocar.*Para más información, consulte el Apéndice.PANEL 6 7LATERALilumina el pad del parche seleccionado actualmente.15. *Perillas – Envían diversos mensajes MIDI cuando se giran. Cada perilla se puede asignar individualmente aun parámetro MIDI diferente.16. *Pads de disparo/batería – Presione los pads para enviar mensajes MIDI o use el botón Patch Select(Selección de parche) junto con los pads para seleccionar los parches incorporados.1. Interruptor de encendido – Use este interruptor de tresposiciones para encender y apagar la unidad. Cuando elinterruptor se coloca en la posición izquierda, la unidad se 22.alimenta con pilas. Cuando se coloca en la posición central, launidad se apaga. Cuando se coloca en la posición derecha, launidad se alimenta por USB o un adaptador de alimentación(que se vende por separado).Puerto USB – Sirve para conectar la unidad al puerto USB deuna computadora mediante el cable USB incluido. La1 3 5conexión USB alimenta al <strong>Vortex</strong>.3. Salida MIDI – Sirve para conectar la unidad al puerto de entrada MIDI con un cable MIDI estándar.4. Entrada del pedal de sostenido – Conecte a esta entrada un pedal de sostenido TS de 1/4 pulg. (uninterruptor sin enganche estándar, que se vende por separado).5. Conector de alimentación – Conecte aquí un adaptador de alimentación (opcional que se vende porseparado).49
PANEL INFERIOR1. Almacenamiento – Use este compartimiento paraguardar sus propios cables, tales como los cablesUSB y MIDI.2. Compartimiento de las pilas – Instale aquí cuatropilas AA (opcionales que se venden por separado)para alimentar el <strong>Vortex</strong>.3. Botón de la correa – Use la correa estilo guitarraincluida para mejorar la estabilidad al tocar.312FUNCIONES DEL TECLADOActive las funciones que se indican a continuación pulsando su tecla asociada del teclado estando en modoPatch Edit (Edición de parches) para acceder a diversas características. Estas funciones se describen conmás detalle más adelante en el manual.• Cal Accel (Calibrar acelerómetro): Permite reiniciar el acelerómetro a los parámetros predeterminados defábrica.• Bank LSB (Byte menos significativo): Permite enviar mensajes CC de LSB del banco.• Bank MSB (Byte más significativo): Permite enviar mensajes CC de MSB del banco.• Program Set (Asignación de programa): Permite almacenar el número de programa (0 – 127) en el parche.• MIDI Channel (Canal MIDI): Permite asignar el canal MIDI para diversos controles.• Mode Assign (Asignación de modo): Permite asignar el modo en que operan los controles.• Edit Accel (Editar acelerómetro): Permite editar los mensajes MIDI del acelerómetro.MODOS DEL TECLADOModo Performance (Interpretación): Use este modo cuando interpreta un tema. Aparece PF en la pantalla. En estemodo, los datos MIDI se pueden transmitir en cualquier momento desde los controles asignados.Modo Patch Edit (Edición de parches): Pulse el botón Patch Edit para entrar a este modo. Cuando la unidad estáen este modo, se encienden los tres LED Patch Select y aparece “PE” en la pantalla. Este modo permite ajustar losvalores de los mensajes MIDI. Para salir del modo Patch Edit y guardar todos los ajustes, pulse otra vez el botónPatch Edit.PARCHESCÓMO CARGAR PARCHESEl <strong>Vortex</strong> tiene tres bancos de parches para seleccionar (A, B y C).1. Pulse el botón Patch Select para recorrer los bancos de parches. Se enciende el LED correspondiente.2. Use los pads de disparo/batería para seleccionar el parche a cargar.CÓMO EDITAR PARCHESEl <strong>Vortex</strong> le permite guardar y recuperar hasta 23 parches diferentes.1. Cargue el pad que le gustaría editar.2. Pulse el botón Patch Edit.3. Seleccione el parámetro a editar.4. Pulse la tecla Enter para guardar o Cancel (Cancelar) para revertir sus cambios.5. Pulse el botón Patch Edit para salir.CÓMO EDITAR LOS PADSLos pads pueden estar en uno de cuatro modos:• Modo Note (Nota): Se envía un mensaje de nota activada cuando se pulsa y un mensaje de nota desactivadacuando se suelta.• CC Toggle (Conmutación de CC): Conmuta entre dos valores de CC cuando se pulsa.• CC Momentary (CC momentáneo): Se envía un mensaje CC cuando se pulsa y otro mensajes CC cuando sesuelta.• Program Change (Cambio de programa): Cuando se pulsa, se envía un mensaje de MSB del Banco y unode LSB del Banco, seguidos por un mensaje de cambio de programa.10
Para establecer el modo de un pad:1. Pulse el botón Patch Edit.2. Presione el pad que desea editar. Aparece en la pantalla de LED el nombre del pad que se está editando. Porejemplo, aparece “Pd1” cuando se edita el pad 1.3. Pulse la tecla rotulada “Mode Assign” (Asignación de modo).4. Seleccione el modo (1 – 4) usando las teclas numéricas seguidas por la tecla Enter para guardar o Cancelpara revertir a los valores originales. Como alternativa, puede pulsar el botón Mode Assign para recorrer losmodos.Para editar los parámetros del modo:1. Pulse el botón Patch Edit.2. Presione el pad que desea editar. Aparece en la pantalla de LED el nombre del pad que se está editando. Porejemplo, aparece “Pd1” cuando se edita el pad 1.3. Use las tres perillas para cambiar los valores de los parámetros. Consulte las asignaciones de parámetros enel Apéndice.Nota: Después de mover la perilla correspondiente, puede usar las teclas numéricas para ingresar un valor.4. Pulse la tecla Enter para guardar o Cancel para revertir a los valores originales.Para cambiar el canal MIDI de un pad:1. Pulse el botón Patch Edit.2. Presione el pad que desea editar. Aparece en la pantalla de LED el nombre del pad que se está editando. Porejemplo, aparece “Pd1” cuando se edita el pad 1.3. Pulse la tecla rotulada “MIDI Channel” (Canal MIDI). Aparece en la pantalla de LED el canal MIDI actual delpad que está editando.4. Use las teclas numéricas para ingresar un canal MIDI (1 – 16).5. Pulse la tecla Enter para guardar o Cancel para revertir al valor original.CÓMO EDITAR EL CURSOR, EL ACELERÓMETRO, EL CONTROLADOR DE CINTA Y LAS PERILLASLos pads pueden estar en uno de cuatro modos:• CC: Envía mensajes de cambio de control.• Pitch Bend (Inflexión de pitch): Envía mensajes de inflexión de pitch.• Aftertouch (Post pulsación): Envía mensajes de post-pulsación del canal.Para establecer el modo de un control:1. Pulse el botón Patch Edit.2. Mueva el control que desea editar. Aparece en la pantalla de LED el nombre del control que se está editandoen ese momento.a. Para el acelerómetro, pulse el botón Edit Accel del teclado.b. Para los controladores de cinta, pulse uno de los tres botones que desea editar.Nota: Puede configurar cada uno de los tres botones de cinta a modos diferentes dentro del mismo parche.3. Pulse la tecla rotulada “Mode Assign” (Asignación de modo).4. Seleccione el modo (1 – 3) usando las teclas numéricas seguidas por la tecla Enter para guardar o Cancelpara revertir a los valores originales. Como alternativa, puede pulsar el botón Mode Assign para recorrer losmodos.Para editar los parámetros del modo:1. Pulse el botón Patch Edit.2. Mueva el control que desea editar. Aparece en la pantalla de LED el nombre del control que se está editandoen ese momento.a. Para el acelerómetro, pulse el botón Edit Accel del teclado.b. Para los controladores de cinta, pulse uno de los tres botones que desea editar.3. Use las 3 perillas para cambiar los valores de los parámetros. Consulte las asignaciones de parámetros en elApéndice.Nota: Después de mover la perilla correspondiente, puede usar las teclas numéricas para ingresar un valor.4. Pulse la tecla Enter para guardar o Cancel para revertir a los valores originales.Para cambiar el canal MIDI de un control:1. Pulse el botón Patch Edit.2. Mueva el control que desea editar. Aparece en la pantalla de LED el nombre del control que se está editandoen ese momento.a. Para el acelerómetro, pulse el botón Edit Accel del teclado.b. Para los controladores de cinta, pulse uno de los tres botones que desea editar.3. Pulse la tecla rotulada “MIDI Channel” (Canal MIDI). Aparece en la pantalla de LED el canal MIDI actual delpad que está editando.4. Use las teclas numéricas para ingresar un canal MIDI (1 – 16).5. Pulse la tecla Enter para guardar o Cancel para revertir al valor original.11
CÓMO EDITAR LOS MENSAJES DE CAMBIO DE PROGRAMACuando se carga un parche en <strong>Vortex</strong>, se envía un mensaje de cambio de programa por el puerto USB y el puertode 5 pines MIDI OUT (Salida MIDI). Se explica en esta sección qué mensaje se envía cuando se selecciona unparche.Cómo configurar el número de programa:1. Pulse el botón Patch Edit.2. Pulse el botón Program Set (Configuración de programa).3. Para ingresar el número de programa del parche, use las teclas numéricas a fin de ingresar un valor (0 – 127).4. Pulse la tecla Enter para guardar o Cancel para revertir al valor original.Cómo configurar el mensaje de LSB (byte menos significativo) y el MSB (byte menos significativo)e:1. Pulse el botón Patch Edit.2. Pulse la tecla Bank MSB o Bank LSB.3. Use las teclas numéricas para ingresar el MSB O LSB (0-127).4. Pulse la tecla Enter para guardar o Cancel para revertir al valor original.CÓMO EDITAR LOS MODOS DEL TECLADOLas teclas del <strong>Vortex</strong> se pueden colocar en uno de tres modos: Superior, inferior y dividido. Los modos superior einferior tienen un canal MIDI y un valor de transposición asignados a ellos. El modo dividido coloca al modo inferioren una gama del teclado y el superior en otra. Usted también puede ajustar el punto de división.Cómo editar las zonas inferior y superior1. Pulse el botón Patch Edit.2. Pulse el botón de zona superior o inferior del teclado (ubicado en el cuello del <strong>Vortex</strong>).3. Use las tres perillas para cambiar los valores de los parámetros. Consulte las asignaciones de parámetros enel Apéndice.Nota: Después de mover la perilla correspondiente, puede usar las teclas numéricas para ingresar un valor.4. Pulse la tecla Enter para guardar o Cancel para revertir a los valores originales.Cómo ajustar los puntos de división1. Pulse el botón Patch Edit.2. Pulse el botón Split Zone (Dividir zona). Aparece en la pantalla de LED el punto de división actual.3. Pulse la tecla del teclado que desea usar como punto de división para dividir el teclado.4. Pulse la tecla Enter para guardar o Cancel para revertir a los valores originales.AJUSTES DE RESPUESTA DEL CONTROLADOR DE CINTAEl control de cinta sensible al tacto puede responder a su liberación de dos maneras diferentes. En modo Latch(Enganche), el ajuste se retiene después de liberar el controlador de cinta. En modo Return (Retorno), el ajustevuelve a su valor predeterminado después de liberar el controlador de cinta.Cómo configurar el modo de respuesta del controlador de cinta1. Pulse el botón Patch Edit.2. Toque la cinta. Aparece “rib” en la pantalla de LED.3. Pulse Mode Assign.4. Ajuste el modo (1 – 2) con las teclas numéricas. Como alternativa, pulse “Mode Assign” para recorrer losmodos.Nota: Aparece en la pantalla de LED “Lch” (para “modo de enganche”), o “rn” (para “modo de retorno”).5. Seleccione el modo usando los teclas numéricas seguidas por la tecla ‘Enter’ para guardar o ‘Cancel’ pararevertir a los valores originales. Use el N° 1 para modo de enganche y el N° 2 para modo de retorno. Aparece“PE” en la pantalla de LED después de guardar el parámetroASIGNACIONES DEL BOTÓN DE INICIO/PARADALos boton Start (Inicio) y Stop (Parada) del <strong>Vortex</strong> se puede asignar a dos modos diferentes:Modo MIDI se usa para enviar un mensaje de inicio o parada mediante el mensaje MIDI de inicio o parada estándar.La mayoría de los sintetizadores de hardware responden a este tipo de mensaje MIDI.Modo CC se usa para enviar un mensaje de inicio o parada mediante dos mensajes “CC”. Algunas DAW, comoAbleton Live, usan mensajes CC para iniciar y parar las secuencias.12
1. Como editar el botón de modo de inicio y parada:2. Pulse el botón Patch Edit.3. Pulse el botón Start y Stop.4. Pulse Mode Assign.5. Ajuste el modo (1 – 2) con las teclas numéricas. Como alternativa, pulse “Mode Assign” para recorrer losmodos.Nota: Aparece en la pantalla de LED “rt” (para “modo de tiempo real”), o “CC” (para “modo CC”).6. Use las 3 perillas para cambiar los valores de los parámetros y seleccionar el modo. Consulte las asignacionesde parámetros en el Apéndice.Nota: Después de mover la perilla correspondiente, puede usar las teclas numéricas para ingresar un valor.7. Pulse la tecla Enter para guardar o Cancel para revertir a los valores originales.CÓMO REINICIAR LOS PARCHESPara restablecer los ajustes predeterminados de los parches de <strong>Vortex</strong>:1. Asegúrese de que el <strong>Vortex</strong> esté apagado.2. Mantenga pulsados los botones “Start/Stop” (Inicio/parada) y “Patch Select” (Selección de parche).3. Mientras mantiene pulsados estos botones, encienda el <strong>Vortex</strong>.4. Después de que se hayan encendido todos los LED del cuerpo del <strong>Vortex</strong>, suelte los botones.Nota: Todos los LED del cuello del <strong>Vortex</strong> destellarán 4 veces para confirmar que todos los parches están ensus ajustes predeterminados.ACELERÓMETROEl acelerómetro envía datos MIDI cuando el <strong>Vortex</strong> se inclina hacia arriba. El LED Tilt indica si la unidad está másallá del umbral para enviar los mensajes MIDI. EL acelerómetro envía mensajes MIDI sólo cuando el <strong>Vortex</strong> seinclina con el cuello orientado hacia arriba en el nivel calibrado ajustado (45 grados como valor predeterminado).Para desactivar el acelerómetro de un parche, siga este procedimiento:1. Pulse “Patch Edit” (Edición de parches) (aparece “PE” en la pantalla).2. Pulse la tecla “Edit Accelerometer” (Editar acelerómetro) (aparece “Acc” en la pantalla).3. Pulse la tecla “Mode Assign” (Asignación de modo) hasta que aparezca “oFF” en la pantalla.4. Pulse la tecla “Enter” (aparece “PE” en la pantalla).5. Pulse “Patch Edit” para volver al modo Performance (Interpretación) (aparece “PF” en la pantalla).CÓMO CALIBRAR EL ACELERÓMETRO1. Pulse el botón Patch Edit.2. Pulse la Cal Accel tecla. Aparece “XY1” en la pantalla de LED.3. Mueva <strong>Vortex</strong> en la posición mínima arriba-abajo.4. Pulse la tecla Enter para ajustar la posición X1-Y1. Aparece “XY2” en la pantalla de LED.5. Mueva <strong>Vortex</strong> en la posición máxima arriba-abajo.6. Pulse la tecla Enter para ajustar la posición X2-Y2.COMO CONFIGURAR EL VORTEX CON ABLETON LIVE LITE1. Visite www.alesis.com/vortex, haga clic en "Docs & Downloads" (Documentos y descargas) y baje e instale el<strong>Vortex</strong> Ableton Live Controller Map (Mapa de controladores de <strong>Vortex</strong> Ableton Live).2. Pulse “Patch Select” hasta que se encienda el LED ubicado junto a la “A”.3. Pulse “P1” (Pad 1) dentro de los 5 segundos. Cuando se selecciona el patch correcto, aparece “P1” en lapantalla.Nota: Si ya está seleccionado el patch correcto, no aparece “P1” en la pantalla.CÓMO CONFIGURAR EL VORTEX CON SONiVOX VORTEX-I DVi1. Visite primero la página de soporte de <strong>Alesis</strong> <strong>Vortex</strong> para bajar el Sonivox <strong>Vortex</strong>-I DVi enwww.alesis.com/vortex.2. Pulse “Patch Select” hasta que se encienda el LED ubicado junto a la “C”.3. Pulse “P7” (Pad 7) dentro de los 5 segundos. Cuando se selecciona el patch correcto, aparece “P23” en lapantalla.Después de seguir este procedimiento, su DVi quedará mapeado con los controles del <strong>Vortex</strong> cuando se abra <strong>Vortex</strong>DVi.13
GUIDE D’UTILISATION SIMPLIFIÉ (FRANÇAIS)1. Assurez-vous que tous les articles énumérésdans le contenu de la boîte de ce guide sontinclus dans la boîte.2. VEUILLEZ LIRE LE LIVRET DES CONSIGNESDE SÉCURITÉ AVANT D'UTILISER LEPRODUIT.3. Placez le produit dans un endroit approprié àson utilisation.CONTENU DE LA BOÎTE• <strong>Vortex</strong>• Courroie• DVD logiciel• Câble USB• Guide d’utilisation simplifié• Consignes de sécurité et informations concernant lagarantieINSTALLATIONSCHÉMA DE CONNEXIONOrdinateur*Synthétiseur*Pédale**Venduséparément14
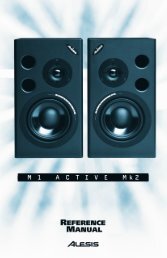
1 2 3LOWERSPLITKEYBOARD ZONESUPPERTILTPATCH EDITACCELEDITACCELCAL PROGRAM BANK BANK MIDISET MSB LSB CHANNEL ASSIGNMODECARACTÉRISTIQUES DU MANCHE – PANNEAU SUPÉRIEUR10 1112 12 14 15 16131 2 3 48 95 6 7172 41. Touche Sustain – Lorsqu’enfoncée, cette touche permet de maintenir les notes jouées jusqu’à ce qu’ellessoient relâchées.2. *Contrôleur à effleurement – Barre d'effleurement qui envoie des messages 1 MIDI. 3 53. Touche Octave Down – Cette touche vous permet de baisser la plage d'octaves du clavier.4. Touche Octave Up – Cette touche vous permet de hausser la plage d'octaves du clavier.5. *Touches Ribbon Modes – Ces touches permettent de sélectionner le type de message MIDI envoyé par labarre d’effleurement.6. Molette de modulation de la hauteur tonale – Cette molette transmet des données MIDI concernantl’augmentation ou la réduction temporaire de la vitesse de lecture.7. *Potentiomètre à glissière – Transmet les données MIDI pour le paramètre assigné en cours.8. *Touches Keyboard Modes – Ces touches permettent d’accéder aux diverses 13zones du clavier.9. Clavier – Touches sensibles à la dynamique avec fonction aftertouch pour transmettre des notes MIDI. Utilisezles touches afin d’entrer manuellement les valeurs en mode Patch Edit.10. Écran d’affichage – Cet écran affiche les données, les valeurs, les réglages et les différentes fonctions du<strong>Vortex</strong>.11. *Touche Start/Stop – Commande pour lancer/arrêter les messages MIDI. La DEL s’allume lorsqu’unecommande de lecture est transmise et s'éteint lorsqu'une commande d'arrêt est transmise.12. Touches Program Up/Down – Ces touches transmettent des messages de changement de programme àvotre logiciel ou votre appareil MIDI. Maintenez une des touches afin de parcourir 10 programmes à la fois.: Le <strong>Vortex</strong> ne transmet aucun message de changement de programme avant que la touche ne soitrelâchée.13. Touche Patch Edit – Cette touche permet de commuter entre les modes Edit et Performance.3Remarque 4: Les trois DEL Patch Select s’allument lorsque ce mode est sélectionné.14. Touche Patch Select – Enfoncez et utilisez les pads de batterie afin de sélectionner une des patchesintégrées. Le pad de la patches sélectionnée s’allume.15. *Boutons – Ces boutons permettent de transmettre différents messages MIDI lorsqu’ils sont tournés. Chaquebouton peut être assigné à un paramètre MIDI différent.16. *Pad de déclenchement/de 8 9batterie – Enfoncez les pads afin de transmettre des messages MIDI ou utilisezla touche Patch Select avec les pads afin de sélectionner une des patches intégrées.17. Borne pour courroie – Cette borne permet d’attacher la courroie de guitare pour plus de stabilité.7*Pour plus d’information, reportez-vous à l’Appendice.PANNEAU DE CÔTÉ10 1112 14 151. Interrupteur d'alimentation – Cet interrupteur à troispositions permet de mettre l’appareil sous et horstension. Lorsque le sélecteur est à gauche, l’appareil est 22.alimenté par pile. Lorsqu’il est au milieu, l’appareil esthors tension. Lorsque le sélecteur est à droite, l’appareilest alimenté par connexion USB ou par un adaptateurd'alimentation (non inclus).PORT USB – Utilisez le câble USB inclus pour brancherce port au port USB d’un ordinateur. Le <strong>Vortex</strong> sera1 3 5alimenté par la connexion USB.3. MIDI OUT – Cette sortie permet de brancher un appareil MIDI externe à l’aide d’un câble MIDI standard.4. Entrée Sustain Pedal – Cette entrée permet de brancher une pédale de soutien TS de 1/4” po (commutateurau pied momentané standard, non incluse).5. Entrée d’alimentation – Ce connecteur permet de brancher le câble d’alimentation (facultatif, venduséparément).415
PANNEAU INFÉRIEUR1. Rangement – Utilisez cecompartiment afin de ranger voscâbles USB, MIDI, etc.2. Compartiment des piles – Insérez 4piles de type AA (facultatif, venduesséparément) afin d’alimenter le<strong>Vortex</strong>.3. Borne pour courroie – Cette bornepermet d’attacher la courroie deguitare pour plus de stabilité.312FONCTIONS DU CLAVIERAcitivez les fonctions ci-dessous en appuyant sur la touche correspondante du clavier en mode Patch Editafin d’accéder aux fonctions diverses. Ces fonctions sont vues plus en détail dans les sectionssubséquentes du présent guide.• Cal Accel (Étalonnage de l’accéléromètre) : Ceci permet de réinitialiser les réglages d’usine par défaut.• Bank LSB (bit le moins significatif) : Ceci permet de transmettre des messages Bank LSB CC (messagescontinus).• Bank MSB (bit le plus significatif) : Ceci permet de transmettre des messages Bank MSB CC (messagescontinus).• Program Set : Enregistre le numéro de programme (0 à 127) dans la patch.• MIDI Channel : Ceci permet d’assigner un canal MIDI pour différentes commandes.• Mode Assign : Ceci permet d’assigner le mode dans lequel les commandes fonctionnent.• Edit Accel (modification de l’accéléromètre) : Ceci vous permet d’apporter des modifications aux messagesMIDI de l’accéléromètre.MODES CLAVIERMode Performance : Utilisez ce mode lorsque vous jouez. PF s’affiche à l’écran. En ce mode, les données MIDIpeuvent être transmises en tout temps avec les commandes assignées.Mode Patch Edit : Appuyez sur la touche Patch Edit afin d’accéder à ce mode. Les trois DEL Patch Selects’allument lorsque ce mode est sélectionné et “PE” s’affiche à l’écran. Ce mode vous permet d'apporter desmodifications aux valeurs des messages MIDI. Pour enregistrer les modifications et quitter ce mode, appuyez sur latouche Patch Edit de nouveau.LES PATCHESCHARGEMENT DES PATCHESLe <strong>Vortex</strong> dispose de trois banques de patches (A, B et C).1. Appuyez sur la touche Patch Select afin de parcourir les banques de patches. La DEL de banquecorrespondante devrait s’allumer.2. Utilisez les pads afin de sélectionner la patch à charger.MODIFICATION DES PATCHESLe Vortez permet d’enregistrer et de rappeler jusqu’à 23 patches différentes.1. Chargez la patch que vous désirez modifier.2. Appuyez sur la touche Patch Edit.3. Sélectionnez un paramètre à modifier.4. Appuyez sur la touche Enter afin d’enregistrer les modifications ou sur Cancel afin de les annuler.5. Appuyer sur la touche Patch Edit pour quitter.16
MODIFICATION DES PADSLes pads disposent de quatre modes de fonctionnement :• Note Mode : Transmet un message d’activation de la note lors qu’enfoncée et de désactivation lorsquerelâché.• CC Toggle : Permet de commuter entre deux valeurs CC lorsqu’enfoncée.• CC Momentary : Transmet un message CC lors qu’enfoncée et un autre message CC lorsque relâché.• Program Change : Transmet un message Bank MSB et Bank LSB, suivi d’un message de changement deprogramme lorsqu’enfoncée.Pour régler le mode d’un pad :1. Appuyer sur la touche Patch Edit.2. Appuyer sur le pad que vous désirez modifier. L’écran affiche le nom du pad sélectionné pour modification. Parexemple, « Pd1 » sera affiché lors de la modification du pad 1.3. Appuyez sur la touche « Mode Assign » du clavier.4. Sélectionnez le mode (1 à 4) à l’aide des touches numériques, puis appuyez sur la touche Enter afind’enregistrer les modifications, ou sur la touche Cancel afin de réinitialiser les paramètres originaux. Vouspouvez également appuyer sur la touche Mode Assign afin de parcourir les modes.Pour modifier les paramètres d’un mode :1. Appuyer sur la touche Patch Edit.2. Appuyer sur le pad que vous désirez modifier. L’écran affiche le nom du pad sélectionné pour modification. Parexemple, « Pd1 » sera affiché lors de la modification du pad 1.3. Utilisez les trois boutons afin de modifier les valeurs de paramètre. Consultez l’Appendice pour l’assignationdes paramètres.Remarque : Une fois le réglage du bouton modifié. Vous pouvez utiliser les touches numériques afin d’entrerune valeur.4. Appuyez sur la touche Enter afin d’enregistrer les modifications, ou sur la touche Cancel afin de réinitialiser lesparamètres originaux.Pour modifier le canal MIDI d’un pad :1. Appuyer sur la touche Patch Edit.2. Appuyer sur le pad que vous désirez modifier. L’écran affiche le nom du pad sélectionné pour modification. Parexemple, « Pd1 » sera affiché lors de la modification du pad 1.3. Appuyez sur la touche « MIDI Channel » du clavier. Le canal MIDI correspondant au pad que vous désirezmodifier s’affichera à l’écran.4. Utilisez les touches numériques du clavier afin d’entrer le numéro de canal MIDI désiré (1 à 16).5. Appuyez sur la touche Enter afin d’enregistrer les modifications, ou sur la touche Cancel afin de réinitialiser lesparamètres originaux.MODIFICATION DU POTENTIOMÈTRE, DE L’ACCÉLÉROMÈTRE, DU CONTRÔLEUR ÀEFFLEUREMENT ET DES BOUTONSCes commandes peuvent être utilisées dans n’importe lequel des trois modes :• CC : Transmet des messages de changement de contrôle.• Pitch Bend : Transmet des messages de modification de la hauteur tonale.• Aftertouch : Transmet des messages d’activation/désactivation de la fonction aftertouch sur le canal.Pour régler le mode d’une commande :1. Appuyer sur la touche Patch Edit.2. Appuyer sur la commande que vous désirez modifier. L’écran affiche le nom de la commande sélectionné pourmodification.a. Pour l’accéléromètre, appuyez sur la touche Edit Accel du clavier.b. Pour les contrôleurs à effleurement, appuyez sur la touche que vous désirez modifier.Remarque : Vous pouvez régler chacun des trois contrôleurs sur un mode différent à l’intérieur d’unemême patch.3. Appuyez sur la touche « Mode Assign » du clavier.4. Sélectionnez le mode (1 à 3) à l’aide des touches numériques, puis appuyez sur la touche Enter afind’enregistrer les modifications, ou sur la touche Cancel afin de réinitialiser les paramètres originaux. Vouspouvez également appuyer sur la touche Mode Assign afin de parcourir les modes.17
Pour modifier les paramètres d’un mode :1. Appuyer sur la touche Patch Edit.2. Appuyer sur la commande que vous désirez modifier. L’écran affiche le nom de la commande sélectionné pourmodification.a. Pour l’accéléromètre, appuyez sur la touche Edit Accel du clavier.b. Pour les contrôleurs à effleurement, appuyez sur la touche que vous désirez modifier.3. Utilisez les trois boutons afin de modifier les valeurs de paramètre. Consultez l’Appendice pour l’assignationdes paramètres.Remarque : Une fois le réglage du bouton modifié. Vous pouvez utiliser les touches numériques afin d’entrerune valeur.4. Appuyez sur la touche Enter afin d’enregistrer les modifications, ou sur la touche Cancel afin de réinitialiser lesparamètres originaux.Pour modifier le canal MIDI d’une commande :1. Appuyer sur la touche Patch Edit.2. Appuyer sur la commande que vous désirez modifier. L’écran affiche le nom de la commande sélectionné pourmodification.a. Pour l’accéléromètre, appuyez sur la touche Edit Accel du clavier.b. Pour les contrôleurs à effleurement, appuyez sur la touche que vous désirez modifier.3. Appuyez sur la touche « MIDI Channel » du clavier. Le canal MIDI correspondant au pad que vous désirezmodifier s’affichera à l’écran.4. Utilisez les touches numériques du clavier afin d’entrer le numéro de canal MIDI désiré (1 à 16).5. Appuyez sur la touche Enter afin d’enregistrer les modifications, ou sur la touche Cancel afin de réinitialiser lesparamètres originaux.MODIFICATION DES MESSAGES DE CHANGEMENT DE PROGRAMMELorsqu’un patch est chargée sur <strong>Vortex</strong>, un message de changement de programme est transmis par le biais du portUSB et de la sortie MIDI à cinq broches. Cette section explique quel message est transmis lorsque la patch estsélectionnée.Réglage du numéro de programme :1. Appuyer sur la touche Patch Edit.2. Appuyez sur la touche Program Set du clavier.3. Utilisez les touches numériques du clavier afin d’entrer le numéro de programme désiré (0 à 127).4. Appuyez sur la touche Enter afin d’enregistrer les modifications, ou sur la touche Cancel afin de réinitialiser lesparamètres originaux.Réglage du message LSB (bit le moins significatif) et MSB (bit le plus significatif) :1. Appuyer sur la touche Patch Edit.2. Appuyez sur la touche Bank MSB ou Bank LSB du clavier.3. Utilisez les touches numériques du clavier afin d'entrer le numéro MSB ou LSB (0 à 127).4. Appuyez sur la touche Enter afin d’enregistrer les modifications, ou sur la touche Cancel afin de réinitialiser lesparamètres originaux.MODIFICATION DU MODE DU CLAVIERLes touches du <strong>Vortex</strong> peuvent être utilisées dans n’importe lequel des trois modes : Upper (supérieur), Lower(inférieur) et Split (divisé). Les modes Upper et Lower disposent d’un canal MIDI et d’une valeur de transposition quileur est assignée. Le mode Split permet de programmer le mode Lower et le mode Upper dans deux plages d’octavedifférentes. Vous pouvez également régler le point de division du clavier.Modification des zones Lower et Upper :1. Appuyer sur la touche Patch Edit.2. Appuyez sur la touche de la zone supérieure ou inférieure du clavier (située sur le manche du <strong>Vortex</strong>).3. Utilisez les trois boutons afin de modifier les valeurs de paramètre. Consultez l’Appendice pour l’assignationdes paramètres.Remarque : Une fois le réglage du bouton modifié. Vous pouvez utiliser les touches numériques afin d’entrerune valeur.4. Appuyez sur la touche Enter afin d’enregistrer les modifications, ou sur la touche Cancel afin de réinitialiser lesparamètres originaux.18
Réglage des points de division :1. Appuyer sur la touche Patch Edit.2. Appuyez sur la touche Split Zone. Le point de division programmé devrait s’afficher.3. Appuyez sur la touche du clavier où vous désirez programmer le nouveau point de division.4. Appuyez sur la touche Enter afin d’enregistrer les modifications, ou sur la touche Cancel afin de réinitialiser lesparamètres originaux.RÉGLAGES DU MODE DE RÉACTION DU CONTRÔLEURLa réaction de la barre d’effleurement une fois relâchée peut être programmée de deux manières. En mode Latch, leréglage est maintenu une fois la barre d'effleurement relâchée. En mode Return, le réglage par défaut est réinitialiséune fois la barre d'effleurement relâchée.Réglage du mode de réaction du contrôleur1. Appuyer sur la touche Patch Edit.2. Touchez à la barre d’effleurement. « rib » devrait s’afficher.3. Appuyez sur Mode Assign.4. Sélectionnez le mode (1 ou 2) à l’aide des touches numériques. Vous pouvez également appuyer sur « ModeAssign » afin de parcourir les modes.Remarque : « Lch » devrait s’afficher pour le mode Latch ou « rn » pour le mode Return.5. Sélectionnez le mode à l’aide des touches numériques, puis appuyez sur la touche Enter afin d’enregistrer lesmodifications, ou sur la touche Cancel afin de réinitialiser les paramètres originaux. Utilisez #1 pour « LatchMode » ou #2 pour « Return Mode ». « PE » devrait s’afficher une fois que le paramètre a été enregistré.ASSIGNATIONS DE LA TOUCHE START/STOPLa touche Start/Stop peut être assignée en deux modes différents :Le MIDI Mode est utilisé afin de transmettre un message d’activation (start) ou de désactivation (stop) entransmettant un message d’activation ou de désactivation MIDI standard. La plupart des synthétiseurs matérielsrépondent à ce type de message MIDI.Le CC Mode est utilisé afin de transmettre un message d’activation ou de désactivation en transmettant deuxmessages « CC ». Certains postes de travail audio numérique logiciel, comme le Ableton Live, utilisent desmessages CC pour l’activation et la désactivation des séquences.1. Modification de la touche Start/Stop Mode :2. Appuyer sur la touche Patch Edit.3. Appuyez sur la touche Start/Stop Mode.4. Appuyez sur Mode Assign.5. Sélectionnez le mode (1 ou 2) à l’aide des touches numériques. Vous pouvez également appuyer sur « ModeAssign » afin de parcourir les modes.Remarque : « rt » devrait s’afficher pour le mode Realtime ou « CC » pour le mode CC.6. Utilisez les trois boutons afin de modifier les valeurs de paramètre et de sélectionner le mode. Consultezl’Appendice pour l’assignation des paramètres.Remarque : Une fois le réglage du bouton modifié. Vous pouvez utiliser les touches numériques afin d’entrerune valeur.7. Appuyez sur la touche Enter afin d’enregistrer les modifications, ou sur la touche Cancel afin de réinitialiser lesparamètres originaux.RÉINITIALISATION DES PATCHESPour réinitialiser les patches du <strong>Vortex</strong> :1. Veuillez vous assurer que le <strong>Vortex</strong> est hors tension.2. Maintenez les touches « Start/Stop » et « Patch Select » enfoncées.3. Tout en maintenant ces touches enfoncées, mettez le <strong>Vortex</strong> sous tension.4. Une fois que toutes les DEL sur le corps du <strong>Vortex</strong> sont allumées, relâchez les touches.Remarque : Toutes les DEL de la touche du <strong>Vortex</strong> clignoteront 4 fois afin de confirmer que toutes les patchesont été réinitialisées à leur paramètre par défaut.19
ACCÉLÉROMÈTREL’accéléromètre transmet des données MIDI lorsque le manche du Votex est basculé vers le haut. La DEL Tilt indiquesi l’appareil n’est pas en position pour transmettre des messages MIDI. L’accéléromètre peut uniquement transmettredes messages MIDI lorsque le manche du <strong>Vortex</strong> est basculé vers le haut au seuil sélectionné (45 degrés pardéfaut).Pour désactiver l’accéléromètre sur une patch :1. Appuyez sur « Patch Edit » (« PE » s’affichera).2. Appuyez sur la touche « Enter » (« Acc » s’affichera).3. Enfoncez la touche « Mode Assign » jusqu’à ce que « oFF » s’affiche.4. Appuyez sur la touche « Enter » (« PE » s’affichera).5. Appuyez sur la touche « Patch Edit » pour retourner au mode Performance (« PF » s’affichera).ÉTALONNAGE DE L’ACCÉLÉROMÈTRE1. Appuyer sur la touche Patch Edit.2. Appuyez sur la Cal Accel touche. « XY1 » devrait s’afficher.3. Basculez le <strong>Vortex</strong> en position haut/bas minimum.4. Appuyez sur la touche Enter afin de régler la position X1-Y1. « XY2 » devrait s’afficher.5. Basculez le <strong>Vortex</strong> en position haut/bas maximum.6. Appuyez sur la touche Enter afin de régler la position X2-Y2.CONFIGURATION DU VORTEX POUR ABLETON LIVE LITE1. D’abord, vous devez visiter le site www.alesis.com/vortex, cliquer sur « Docs & Downloads », puistélécharger et installer le <strong>Vortex</strong> Ableton Live Controller Map.2. Appuyez sur « Patch Select » jusqu’à ce que la DEL près de « A » s’allume.3. Appuyez sur « P1 » (Pad 1) en dedans de 5 secondes. Lorsque la patch correspondante est sélectionnée,« P1 » s’affiche.Remarque : « P1 » ne s’affiche pas lorsque la patch correspondante est déjà sélectionnée.CONFIGURATION DU VORTEX POUR SONiVOX VORTEX-I DVi1. D’abord, vous devez visiter le site d'assistance technique d'<strong>Alesis</strong> pour le <strong>Vortex</strong> au www.alesis.com/vortex afinde télécharger Sonivox <strong>Vortex</strong>-I DVi.2. Appuyez sur « Patch Select » jusqu’à ce que la DEL près de « C » s’allume.3. Appuyez sur « P7 » (Pad 7) en dedans de 5 secondes. Lorsque la patch correspondante est sélectionnée,« P23 » s’affiche.Une fois cette procédure effectuée, les commandes du <strong>Vortex</strong> seront affectées aux DVi lorsque celui-ci est lancé.20
GUIDA RAPIDA (ITALIANO)1. Assicurarsi che tutti gli elementi elencati nellaparte “Contenuti della confezione” siano inclusi.2. LEGGERE ATTENTAMENTE IL LIBRETTODELLE ISTRUZIONI DI SICUREZZA PRIMA DIUTILIZZARE IL PRODOTTO.3. Collocare il prodotto in una posizione adeguataall’uso.CONTENUTI DELLA CONFEZIONE• <strong>Vortex</strong>• Fascia• DVD recante il software• Cavo USB• Guida rapida• Istruzioni di sicurezza e garanziaSETUPSCHEMA DEI COLLEGAMENTIComputer*Sintetizzatore*Interruttore apedale**Vendutiseparatamente21
1 2 3LOWERSPLITKEYBOARD ZONESUPPERTILTPATCH EDITEDIT CAL PROGRAM BANK BANK MIDI MODEACCEL ACCEL SET MSB LSB CHANNEL ASSIGNCOLLO – PANNELLO SUPERIORE10 1112 12 14 15 16131 2 3 48 95 6 7172 41. Tasto Sustain – Questo tasto mantiene note che stavano suonando quando viene premuto o che vengonosuonate quando è premuto, fino a quando non viene rilasciato.2. *Controller a nastro – Fascetta sensibile al tatto che invia messaggi MIDI. 1 3 53. Octave Down (ottave giù) – Premere questo pulsante per spostare la gamma delle ottave della TASTIERAverso il basso.4. Octave Up (ottave su) – Premere questo pulsante per spostare la gamma delle ottave della TASTIERA versol'alto.5. *Pulsanti di controllo del nastro – Impostano il tipo di messaggio MIDI che deve essere inviato dal Controllera nastro.6. Rotella del pitch – Trasmette informazioni di bend del pitch MIDI per alzare o abbassare temporaneamente ilpitch di una nota.7. *Cursore – Invia dati MIDI per il parametro assegnato attualmente.8. *Tasti Keyboard Zone (zone tastiera) – Premere questi pulsanti per entrare nelle varie zone della tastiera:9. Tastiera – Tasti sensibili alla velocità con aftertouch per l'invio di note MIDI. Servirsi di questi tasti per inseriremanualmente i valori in modalità Patch Edit .10. Display – Mostra i dati, i valori, le impostazioni e varie funzioni <strong>Vortex</strong>.11. *Tasto Start/Stop – Pulsante di controllo del trasporto per commutare il messaggio 13 MIDI Start/Stop. Il LED siaccende quando viene inviato un comando Play e si spegne quando viene inviato un comando Stop.12. Program Change Up/Down (cambio programma su/giù) – Invia messaggi di cambio del programma alsoftware del computer o al dispositivo MIDI. Tenere premuto uno dei pulsanti per scorrere lungo 10 programmialla volta.Nota bene: <strong>Vortex</strong> non invierà un messaggio di cambio di programma fino a quando i pulsanti Up/Down nonverranno rilasciati.13. Tasto Patch Edit – Premere questo pulsante per commutare tra le modalità Edit e Performance.Nota bene: i tre LED Patch Select saranno accesi quando ci si trova in questa modalità.14. Patch Select – Premere e utilizzare i pad batteria per selezionare patch incorporate. Il pad della patchselezionata si accende. 3 415. *Manopole – Quando vengono girate inviano vari messaggi MIDI. Ciascuna manopola può essere assegnataindividualmente ad un parametro MIDI diverso.16. *Pad Trigger/Drum – Premere i pad per inviare messaggi MIDI o servirsi del tasto Patch Selectcontemporaneamente ai pad 8 9per selezionare patche incorporate.17. Tasto Strap – Servirsi della fascia da chitarra per una maggiore stabilità mentre si suona.1 26 7*Si veda l'Appendice per maggiori informazioni.PANNELLO LATERALE10 1112 14 151. Interruttore di alimentazione – Servirsi di questo interruttore atre posizioni per accendere e spegnere l'apparecchio. Quando 2l'interruttore è impostato sulla posizione a sinistra, l'apparecchioè alimentato a batteria. Quando è al centro, l'apparecchio èspento. Quando è a destra, l'apparecchio sarà alimentato tramiteUSB o tramite un adattatore di alimentazione (vendutoseparatamente).2. Porta USB – Per collegare l'apparecchio alla porta USB del1 3 5computer servendosi del cavo USB in dotazione. Il collegamento USB alimenta il <strong>Vortex</strong>.3. Uscita MIDI – Si collega alla porta di ingresso MIDI di un dispositivo esterno con un cavo MIDI standard.4. Ingresso per pedale Sustain – Collegare a questo ingresso un pedale sustain da 1/4" TS (interruttore apedale standard, venduto separatamente).5. Connettore di alimentazione – Collegare a questo livello un adattatore di alimentazione (opzionale, vendutoseparatamente).422
PANNELLO INFERIORE1. Scomparto – Servirsi di questoscomparto per riporre i cavi, adesempio i cavi USB e MIDI.2. Scomparto batterie – Inserirequattro batterie AA a questo livello(opzionali, vendute separatamente)per alimentare il <strong>Vortex</strong>.3. Tasto Strap – Servirsi della fascia dachitarra per una maggiore stabilitàmentre si suona.312FUNZIONI DELLA TASTIERAAttivare le funzioni indicate qui di seguito premendo il tasto ad esse associato sulla tastiera in modalitàPatch Edit per accedere a varie opzioni. Tali funzioni sono descritte in maggior dettaglio più avanti nelmanuale.• Cal Accel (Calibrate Accelerometer - calibra accelerometro): riporta l'accelerometro ai valori predefiniti difabbrica.• Banco LSB (Byte meno significativo): invia messaggi Banco LSB CC.• Banco MSB (Byte più significativo): invia messaggi Banco MSB CC.• Impostare programma: memorizza il n. di programma (0 – 127) nella patch.• Canale MIDI: assegna il canale MIDI per vari comandi.• Assegna modalità: assegna la modalità in cui operano i comandi.• Edit Accel (Edit Accelerometer - modifica accelerometro): consente di modificare i messaggi MIDIdell'accelerometro.MODALITÀ DELLA TASTIERAModalità "Performance": servirsi di questa modalità quando ci si esibisce. Sullo schermo compare PF. In questamodalità, i dati MIDI possono essere trasmessi in qualsiasi momento dai comandi assegnati.Modalità Patch Edit: premere il tasto Patch Edit per entrare in questa modalità. I tre LED Patch Select sarannoaccesi quando ci si trova in questa modalità e sullo schermo compare “PE”. Questa modalità consente di regolare ivalori dei messaggi MIDI. Per uscire dalla modalità Patch Edit e salvare tutte le regolazioni, premere nuovamente iltasto Patch Edit.PATCHCARICAMENTO DELLE PATCHVi sono tre banchi Patch tra cui scegliere (A, B e C) sul <strong>Vortex</strong>.1. Premere il tasto Patch Select per passare da un banco patch all'altro. Il corrispondente LED del banco saràacceso.2. Servirsi dei pad Trigger/Drum per selezionare la patch da caricare.MODIFICA DELLE PATCH<strong>Vortex</strong> consente di memorizzare e richiamare fino a 23 patch diverse.1. Caricare la patch che si desidera modificare.2. Premere il tasto Patch Edit.3. Selezionare un parametro da modificare.4. Premere il tasto Invio per salvare o il tasto Canc per annullare le modifiche.5. Premere il tasto Patch Edit per uscire.23
MODIFICA DEI PADI pad si possono trovare in una di quattro modalità:• Modalità Note: invia un messaggio note on quando viene premuto e note off quando la pressione vienerilasciata.• CC Toggle: quando viene premuto, commuta tra due valori CC.• CC Momentaneo: invia un messaggio CC quando viene premuto e un altro messaggio CC quando vienerilasciato.• Modifica Programma: quando viene premuto, invia un messaggio Banco MSB e un messaggio Banco LSB,seguito da un messaggio di modifica programma.Per impostare la modalità di un pad:1. Premere il tasto Patch Edit.2. Premere il pad che si desidera modificare. Lo schermo a LED mostrerà il nome del pad modificato. Adesempio, quando si modifica il pad 1 compare “Pd1” a display.3. Premere il tasto “Mode Assign”.4. Selezionare la modalità (1 – 4) servendosi dei tasti numerici seguiti dal tasto Invio per salvare oppure premereil tasto Canc per tornare alle impostazioni originarie. Alternativamente, si può premere il tasto Mode Assign perpassare da una modalità all'altra.Per modificare i parametri delle modalità:1. Premere il tasto Patch Edit.2. Premere il pad che si desidera modificare. Lo schermo a LED mostrerà il nome del pad modificato. Adesempio, quando si modifica il pad 1 compare “Pd1” a display.3. Servirsi delle tre manopole per modificare i valori dei parametri. Si veda l'Appendice per l'assegnazione deiparametri.Nota bene: dopo aver spostato la manopola corrispondente, si possono utilizzare i tasti numerici per inserireun valore.4. Premere il tasto Invio per salvare o il tasto Canc per tornare alla configurazione originaria.Per modificare il canale MIDI di un pad:1. Premere il tasto Patch Edit.2. Premere il pad che si desidera modificare. Lo schermo a LED mostrerà il nome del pad modificato. Adesempio, quando si modifica il pad 1 compare “Pd1” a display.3. Premere il tasto “MIDI Channel”. Il canale MIDI attuale del pad che si sta modificando compare a display sulloschermo a LED.4. Servirsi dei tasti numerici per inserire un canale MIDI (1 – 16).5. Premere il tasto Invio per salvare le modifiche o il tasto Canc per tornare alla configurazione originaria.MODIFICA DI CURSORE, ACCELEROMETRO, CONTROLLER A NASTRO E MANOPOLEQuesti comandi si possono trovare in una di tre modalità:• CC: invia messaggi di modifica del comando.• Bend del pitch: invia messaggi di bend del pitch.• Aftertouch: invia messaggi aftertouch di canale.Per impostare la modalità di un comando:1. Premere il tasto Patch Edit.2. Muovere il comando che si desidera modificare. Lo schermo a LED mostrerà il nome del comando modificato.a. Per l'accelerometro, premere il tasto Edit Accel sulla tastiera.b. Per i controller a nastro, premere quello dei tre tasti che si desidera modificare.Nota bene: si può impostare ciascuno dei tre pulsanti di comando a nastro su modalità diverse nell'ambitodella stessa patch.3. Premere il tasto “Mode Assign”.4. Selezionare la modalità (1 – 3) servendosi dei tasti numerici seguiti dal tasto Invio per salvare oppure premereil tasto Canc per tornare alle impostazioni originarie. Alternativamente, si può premere il tasto Mode Assign perpassare da una modalità all'altra.24
Per modificare i parametri delle modalità:1. Premere il tasto Patch Edit.2. Muovere il comando che si desidera modificare. Lo schermo a LED mostrerà il nome del comando modificato.a. Per l'accelerometro, premere il tasto Edit Accel sulla tastiera.b. Per i controller a nastro, premere quello dei tre tasti che si desidera modificare.3. Servirsi delle tre manopole per modificare i valori dei parametri. Si veda l'Appendice per l'assegnazione deiparametri.Nota bene: dopo aver spostato la manopola corrispondente, si possono utilizzare i tasti numerici per inserireun valore.4. Premere il tasto Invio per salvare o il tasto Canc per tornare alla configurazione originaria.Per modificare il canale MIDI di un comando:1. Premere il tasto Patch Edit.2. Muovere il comando che si desidera modificare. Lo schermo a LED mostrerà il nome del comando modificato.a. Per l'accelerometro, premere il tasto Edit Accel sulla tastiera.b. Per i controller a nastro, premere quello dei tre tasti che si desidera modificare.3. Premere il tasto “MIDI Channel”. Il canale MIDI attuale del pad che si sta modificando compare a display sulloschermo a LED.4. Servirsi dei tasti numerici per inserire un canale MIDI (1 – 16).5. Premere il tasto Invio per salvare le modifiche o il tasto Canc per tornare alla configurazione originaria.MODIFICA DI MESSAGGI PROGRAM CHANGE (cambiamento di programma)Quando viene caricata una patch sul <strong>Vortex</strong>, un messaggio di cambiamento di programma verrà inviato tramite laporta USB e la porta MIDI OUT a 5 poli. Questo paragrafo descrive quale messaggio verrà inviato quando vieneselezionata una patch.Impostazione numero programma:1. Premere il tasto Patch Edit.2. Premere il tasto Program Set.3. Per inserire il numero di programma per la patch, servirsi dei tasti numerici e inserire un valore (0 – 127).4. Premere il tasto Invio per salvare le modifiche o il tasto Canc per tornare alla configurazione originaria.Impostazione del messaggio LSB (Least Significant Byte - byte meno significativo) ed MSB (Most SignificantByte - byte più significativo):1. Premere il tasto Patch Edit.2. Premere il tasto Banco MSB o Banco LSB.3. Servirsi dei tasti numerici della tastiera per inserire l'MSB o l'LSB (0-127).4. Premere il tasto Invio per salvare le modifiche o il tasto Canc per tornare alla configurazione originaria.MODIFICA DELLE MODALITÀ TASTIERATasti del I <strong>Vortex</strong> possono essere impostati in una di tre modalità: superiore, inferiore e divisa. Alle modalità superioree inferiore vengono assegnati un canale MIDI e un valore di trasposizione. La modalità divisa pone la modalitàinferiore in un intervallo della tastiera e la modalità superiore in un altro intervallo. Si può anche regolare il punto didivisione.Modifica delle zone inferiore e superiore1. Premere il tasto Patch Edit.2. Premere il pulsante di zona superiore o inferiore della tastiera (situato sul collo del <strong>Vortex</strong>).3. Servirsi delle tre manopole per modificare i valori dei parametri. Si veda l'Appendice per l'assegnazione deiparametri.Nota bene: dopo aver spostato la manopola corrispondente, si possono utilizzare i tasti numerici per inserireun valore.4. Premere il tasto Invio per salvare o il tasto Canc per tornare alla configurazione originaria.Impostazione dei punti di divisione1. Premere il tasto Patch Edit.2. Premere il pulsante Split Zone. Il punto di divisione attuale comparirà sul display a LED.3. Premere il tasto sulla tastiera che si desidera utilizzare come punto di divisione per dividere la tastiera stessa.4. Premere il tasto Invio per salvare o il tasto Canc per tornare alla configurazione originaria.25
CONFIGURAZIONI DELLA RISPOSTA DEL CONTROLLER A NASTROIl comando a nastro sensibile al tatto può rispondere in due modi diversi. In modalità Latch, l'impostazione verràmantenuta dopo aver rilasciato la pressione dal controller a nastro. In modalità Return, l'impostazione tornerà alvalore predefinito dopo aver rilasciato il controller a nastro.Impostazione della modalità di risposta del controller a nastro1. Premere il tasto Patch Edit.2. Toccare il nastro. “rib” comparirà sul display a LED.3. Premere Mode Assign.4. Impostare la modalità (1 – 2) servendosi dei tasti numerici. Alternativamente, premere “Mode Assign” perpassare da una modalità all'altra.Nota bene: sul display a LED comparirà “Lch” (per “Latch Mode”), o “rn” (per “Return Mode”).5. Premere la modalità servendosi dei tasti numerici seguiti dal tasto ‘Invio’ per salvare o dal tasto ‘Canc’ pertornare alle impostazioni originali. Servirsi del n. 1 per “Latch Mode” e del n. 2 per “Return Mode”. Dopo aversalvato il parametro, sullo schermo a LED comparirà “PE”ASSEGNAZIONE TASTO START/STOP:I tasto Start e Stop del <strong>Vortex</strong> possono essere assegnati a due modalità diverse:Modalità MIDI: viene utilizzata per inviare un messaggio Start o Stop servendosi del messaggio standard MIDI Starto Stop. La maggior parte dei sintetizzatori hardware risponderà a questo tipo di messaggio MIDI.Modalità CC: serve per inviare un messaggio Start o Stop servendosi di due messaggi “CC”. Alcuni DAW qualil'Ableton Live, utilizzano i messaggi CC per avviare e interrompere le sequenze.1. Modifica del pulsante Start e Stop Mode:2. Premere il tasto Patch Edit.3. Premere il tasto Start e Stop.4. Premere Mode Assign.5. Impostare la modalità (1 – 2) servendosi dei tasti numerici. Alternativamente, premere “Mode Assign” perpassare da una modalità all'altra.Nota bene: sul display a LED comparirà “rt” (per “modalità Realtime”), o “CC” (per “Modalità CC”).6. Servirsi delle 3 manopole per cambiare i valori dei parametri e selezionare la modalità. Si veda l'Appendice perl'assegnazione dei parametri.Nota bene: dopo aver spostato la manopola corrispondente, si possono utilizzare i tasti numerici per inserireun valore.7. Premere il tasto Invio per salvare o il tasto Canc per tornare alla configurazione originaria.ACCELEROMETROL'accelerometro invia dati MIDI quando il <strong>Vortex</strong> è inclinato verso l'alto. Il LED Tilt indicherà se l'apparecchio hasuperato la soglia per inviare i messaggi MIDI. L'accelerometro invierà messaggi MIDi unicamente quando il <strong>Vortex</strong> èinclinato con il collo che punta verso l'alto alla soglia calibrata stabilita (45 gradi in via predefinita).RESET DELLE PATCHPer riportare le patch del <strong>Vortex</strong> alle loro impostazioni predefinite:1. Assicurarsi che il <strong>Vortex</strong> sia spento.2. Mantenere la pressione sui tasti “Start/Stop” e “Patch Select”.3. Mantenendo premuti questi tasti, accendere il <strong>Vortex</strong>.4. Quando tutti i LED presenti sul corpo del <strong>Vortex</strong> si sono accesi, rilasciare la pressione dei tasti.Nota bene: tutti i LED presenti sul collo del <strong>Vortex</strong> lampeggeranno 4 volte a conferma che tutte le patch sonoora state riportate alle loro impostazioni predefinite.CALIBRARE L'ACCELEROMETRO1. Premere il tasto Patch Edit.2. Premere il Cal Accel tasto. “XY1” comparirà sul display a LED.3. Spostare <strong>Vortex</strong> nella posizione minima su-giù.4. Premere il tasto Invio per impostare la posizione X1-Y1. “XY2” comparirà sul display a LED.5. Spostare <strong>Vortex</strong> nella posizione massima su-giù.6. Premere il tasto Invio per impostare la posizione X2-Y2.26
Per spegnere l'accelerometro su una patch, procedere come segue:1. Premere “Patch Edit” (modifica patch) (a Display comparirà “PE”).2. Premere il pulsante “Edit Accelerometer” (modifica accelerometro) (a Display comparirà “Acc”).3. Premere il tasto “Mode Assign” (assegna modalità) fino a quando a display non compare “OFF”.4. Premere il tasto Invio (a Display comparirà “PE”).5. Premere “Patch Edit” (modifica patch) per tornare in modalità Performance (a Display comparirà “PF”).CONFIGURAZIONE DEL VORTEX CON ABLETON LIVE LITE1. Recarsi all'indirizzo www.alesis.com/vortex, cliccare su "Docs & Downloads" (documenti e download) escaricare e installare la <strong>Vortex</strong> Ableton Live Controller Map.2. Premere “Patch Select” (seleziona patch) fino a quando il LED accanto ad “A” non si accende.3. Premere “P1” (Pad 1) entro 5 secondi. Quando viene selezionata la patch corretta, a display compare “P1”.Nota bene: “P1” non compare a display se la patch corretta è già stata selezionata.CONFIGURAZIONE DEL VORTEX CON SONiVOX VORTEX-I DVi1. Innanzitutto visitare la pagina di assistenza di <strong>Alesis</strong> <strong>Vortex</strong> per scaricare Sonivox <strong>Vortex</strong>-I DVi all'indirizzowww.alesis.com/vortex.2. Premere “Patch Select” (seleziona patch) fino a quando il LED accanto a “C” non si accende.3. Premere “P7” (Pad 7) entro 5 secondi. Quando viene selezionata la patch corretta, a display compare “P23”.Dopo aver seguito questa procedura, il DVi sarà mappato sui comandi del <strong>Vortex</strong> quando il <strong>Vortex</strong> DVi viene aperto.27
SCHNELLSTART-ANLEITUNG (DEUTSCH)1. Stellen Sie sicher, dass alle im Lieferumfangaufgelisteten Teile in der Verpackung enthaltensind.2. LESEN SIE DIE SICHERHEITSHINWEISE,BEVOR SIE DAS PRODUKT VERWENDEN.3. Stellen Sie das Gerät an einen für den Betriebgeeigneten Standort.LIEFERUMFANG• <strong>Vortex</strong>• Gurt• Software-DVD• USB-Kabel• Schnellstart-Anleitung• Sicherheitshinweise & GarantieinformationenSETUPANSCHLUSSÜBERSICHTComputer*Synthesizer*Fußschalter**Separat erhältlich28
1 2 3LOWERSPLITKEYBOARD ZONESUPPERTILTPATCH EDITEDIT CAL PROGRAM BANK BANK MIDIACCEL ACCEL SET MSB LSB CHANNEL ASSIGNMODEHALS - OBERSEITE10 1112 12 14 15 16131 2 3 48 95 6 7171. Sustain-Taste - Diese Taste hält jene Noten, die gespielt werden, während die 2 4Taste betätigt wird bzw. jeneNoten, die gespielt werden, bis die Taste losgelassen wird.2. *Ribbon Controller - Berührungsempfindlicher Controller, der MIDI-Befehle sendet.13. Oktave tiefer (Octave Down) - Drücken Sie diese Taste, um den Oktavenbereich 3des KEYBOARDS 5 nachunten zu bewegen.4. Oktave höher (Octave Up) - Drücken Sie diese Taste, um den Oktavenbereich des KEYBOARDS nach obenzu bewegen.5. *Ribbon Control Tasten - Legen den MIDI-Befehlstyp fest, der vom Ribbon Controller gesendet werden soll.6. Pitch-Bend Rad – Überträgt MIDI Pitch Bend-Informationen zum vorübergehenden Anheben oder Absenkender Tonhöhe einer Note.7. *Schieberegler - Sendet MIDI-Daten für den aktuell zugewiesenen Parameter.8. *Zonen-Tasten des Keyboards - Drücken Sie diese Tasten, um die verschiedenen Keyboard-Zoneneinzugeben:9. Keyboard - Velocity-Tasten mit Aftertouch für das Senden von MIDI-Noten. Mit den Tasten können Sie Wertemanuell im Modus Patch Bearbeiten eingeben.10. Anzeige - Zeigt die Daten, Werte, Einstellungen und verschiedenen <strong>Vortex</strong>-Funktionen.11. *Taste Start/Stopp - Transport-Taste, um zwischen MIDI Start oder Stopp umzuschalten. Die LED leuchtetauf, wenn ein Wiedergabebefehl gesendet wird und schaltet sich aus, wenn ein Stopp-Befehl gesendet wird.12. Programmwechsel Aufwärts/Abwärts (Program Change Up/Down) - Sendet Programmwechselbefehle anIhre Computersoftware oder an Ihr MIDI-Gerät. Halten Sie eine dieser Tasten, um jeweils durch 10 Programmeauf einmal zu blättern.Hinweis: <strong>Vortex</strong> wird erst dann einen Programmwechselbefehl senden, wenn die Tasten Aufwärts/Abwärtslosgelassen werden.13. Taste Patch Bearbeiten (Patch Edit Button) - Drücken Sie diese Taste, um zwischen den Modi Bearbeitenund Performance umzuschalten.Hinweis: In diesem Modus leuchten die drei LEDs für die Patch-Auswahl auf.14. Patch-Auswahl (Patch Select) Drücken Sie auf die Drum-Pads, um interne Patches auszuwählen. Das Paddes aktuell ausgewählten Patch wird aufleuchten.15. *Drehregler - Beim Drehen werden verschiedene MIDI-Befehle gesendet. Jeder Drehregler kann individuelleinem anderen MIDI-Parameter zugewiesen werden.16. *Trigger/Drum Pads - Drücken Sie auf die Pads, um MIDI-Befehle zu senden oder nutzen Sie die TastePatch-Auswahl mit den Pads, um interne Patches auszuwählen.17. Gurthalter - Verwenden Sie den mitgelieferten Gitarrengurt für zusätzlichen Halt beim Spielen.*Im Anhang finden Sie weitere Informationen.29
SEITENTEIL1. Power-Taste - Verwenden Sie diesen Treppenschaltermit drei 3 Positionen, um das Gerät ein- bzw.auszuschalten. Wenn der Schalter auf der linken22.Position steht, wird das Gerät über Batterie betrieben. Inder mittleren Position ist das Gerät ausgeschaltet. In derrechten Position wird das Gerät über USB oder über einNetzteil (separat erhältlich) betrieben.USB-Port - Verbindung zum USB-Port eines Computersüber das mitgelieferte USB-Kabel. <strong>Vortex</strong> wird über die1 3 5USB-Verbindung mit Strom versorgt.3. MIDI-Ausgang - Anschluss an den MIDI-Eingang eines externen Geräts mit einem Standard-MIDI-Kabel.4. Sustainpedaleingang - Schließen Sie ein 1/4" TS Sustain-Pedal (einen standardmäßigen, nicht einrastenden)Fußschalter, separat erhältlich) an diesen Eingang an.5. Netzanschluss - Schließen Sie ein Netzteil hier an (optional, separat erhältlich).UNTERSEITE8741. Kabelfach - Verwenden Sie diesesFach, um Ihre eigenen Kabel zuverstauen, wie z.B. USB- und MIDI-Kabel.2. Batteriefach - Legen Sie hier vierAA-Batterien ein (optional, separaterhältlich), um <strong>Vortex</strong> mit Strom zuversorgen.3. Gurthalter - Verwenden Sie denmitgelieferten Gitarrengurt fürzusätzlichen Halt beim Spielen.312KEYBOARDFUNKTIONENAktivieren Sie die folgenden Funktionen, indem Sie die zugehörige Taste am Keyboard drücken, während Siesich im Modus Patch Bearbeiten befinden, um auf verschiedene Funktionen zuzugreifen. Diese Funktionenwerden in der Anleitung später noch genauer beschrieben.• Cal Accel: Setzt den Akzelerometer auf die Werkseinstellung zurück.• Bank LSB (niedrigstwertiges Byte): Sendet Bank LSB CC-Nachrichten.• Bank MSB (höchstwertiges Byte): Sendet Bank MSB CC-Nachrichten.• Programm einstellen: Speichert das Programm # (0 - 127) im Patch.• MIDI-Kanal: Weist dem MIDI-Kanal verschiedenen Steuerungen zu.• Modus zuweisen: Weist den Modus zu, in dem die Controls betrieben werden.• Edit Accel: Ermöglicht es Ihnen, die MIDI-Befehle des Akzelerometers zu bearbeiten.KEYBOARD-MODIPerformance-Modus. Verwenden Sie diesen Modus bei der Performance. Auf der Anzeige erscheint PF. In diesemModus können von den zugeordneten Steuerelementen jederzeit MIDI-Daten übertragen werden.Modus Patch Bearbeiten: Drücken Sie die Taste Patch Bearbeiten (Patch Edit), um in diesen Modus zu gelangen.In diesem Modus leuchten die drei LEDs für die Patch-Auswahl auf und auf der Anzeige erscheint “PE”. DieserModus ermöglicht die Anpassung der MIDI-Werte. Um den Modus Patch Bearbeiten zu verlassen und alleEinstellungen zu speichern, drücken Sie erneut die Taste Patch Bearbeiten.30
PATCHESLADEN VON PATCHES<strong>Vortex</strong> hat drei Patch-Bänke zur Auswahl (A, B und C).1. Drücken Sie die Taste Patch-Auswahl, um durch die Patch-Banken zu blättern. Die entsprechende Bank-LEDleuchtet.2. Verwenden Sie die Trigger/Drum-Pads, um den Patch auszuwählen, den Sie laden möchten.PATCHES BEARBEITEN<strong>Vortex</strong> ermöglicht Ihnen das Speichern und Aufrufen von bis zu 23 verschiedenen Patches.1. Laden Sie den zu bearbeitenden Patch.2. Drücken Sie die Taste Patch Bearbeiten.3. Wählen Sie einen zu bearbeitenden Parameter aus.4. Drücken Sie die Enter-Taste zum Speichern oder die Taste Abbrechen, um Ihre Änderungen rückgängig zumachen.5. Drücken Sie auf die Taste Patch Bearbeiten, um auszusteigen.BEARBEITEN DER PADSDie Pads können in einem der vier Modi sein:• Noten-Modus: Drücken des Pads sendet eine Note On-Nachricht, Loslassen des Pad eine Note Off-Nachricht.• CC-Umschalten: Das Drücken des Pads schaltet zwischen zwei CC-Werten um.• Vorübergehende CC: Drücken des Pads sendet eine CC-Nachricht und Loslassen des Pad eine weitere CC-Nachricht.• Programmwechsel: Drücken des Pads sendet eine Bank MSB und Bank LSB-Nachricht, die von einemProgrammwechselbefehl gefolgt werden.So stellen Sie den Modus eines Pads ein:1. Drücken Sie die Taste Patch Bearbeiten.2. Drücken Sie das Pad, das Sie bearbeiten möchten. Die LED-Anzeige zeigt den Namen des geradebearbeiteten Pad. Beim Bearbeiten von Pad 1 wird zum Beispiel "Pd1" angezeigt.3. Drücken Sie die Taste mit der Aufschrift "Modus Zuweisen" ("Mode Assign").4. Wählen Sie den Modus (1 - 4) mit den numerischen Tasten. Drücken Sie dann die Enter-Taste zum Speichernoder die Abbrechen-Taste, um zu den ursprünglichen Einstellungen zurückzugehen. Alternativ können Sie dieTaste "Modus zuweisen" drücken, um durch die Modi zu blättern.Um Modusparameter zu bearbeiten:1. Drücken Sie die Taste Patch Bearbeiten.2. Drücken Sie das Pad, das Sie bearbeiten möchten. Die LED-Anzeige zeigt den Namen des geradebearbeiteten Pad. Beim Bearbeiten von Pad 1 wird zum Beispiel "Pd1" angezeigt.3. Verwenden Sie die drei Drehknöpfe, um Parameterwerte zu ändern. Siehe Anhang über das Zuweisen vonParametern.Hinweis: Nachdem Sie den entsprechenden Drehregler bewegt haben, können Sie mit den Zifferntasten einenWert eingeben.4. Drücken Sie die Enter-Taste zum Speichern oder die Taste Abbrechen, um zu den ursprünglichenEinstellungen zurückzukehren.So ändern Sie den MIDI-Kanal eines Pads:1. Drücken Sie die Taste Patch Bearbeiten.2. Drücken Sie das Pad, das Sie bearbeiten möchten. Die LED-Anzeige zeigt den Namen des geradebearbeiteten Pad. Beim Bearbeiten von Pad 1 wird zum Beispiel "Pd1" angezeigt.3. Drücken Sie die Taste mit der Aufschrift "MIDI-Kanal" ("MIDI Channel"). Der aktuelle MIDI-Kanal des Pads, dasSie bearbeiten, wird am LED-Bildschirm angezeigt.4. Benutzen Sie die numerischen Tasten, um den MIDI-Kanal (1-16) einzugeben.5. Drücken Sie die Enter-Taste zum Speichern oder die Taste Abbrechen, um zu den ursprünglichenEinstellungen zurückzukehren.31
BEARBEITEN DER SCHIEBEREGLER, AKZELEROMETER, RIBBON CONTROLLER UNDDREHREGLERDiese Controls können sich in einem von drei Modi befinden:• CC: Sendet Control Change-Nachrichten.• Pitch-Bend: Sendet Pitch-Bend-Nachrichten.• Aftertouch: Sendet Channel Aftertouch-Nachrichten.Um den Modus eines Reglers festzulegen:1. Drücken Sie die Taste Patch Bearbeiten.2. Bewegen Sie den Regler, den Sie bearbeiten möchten. Die LED-Anzeige zeigt den Namen des geradebearbeiteten Reglers.a. Für den Akzelerometer drücken Sie am Keyboard die Taste Edit Accel.b. Für den Ribbon Controller drücken Sie eine der drei Tasten, die Sie bearbeiten möchten.Hinweis: Sie können für jede der drei Ribbon Control-Tasten verschiedene Modi innerhalb des gleichenPatch einstellen.3. Drücken Sie die Taste mit der Aufschrift "Modus Zuweisen" ("Mode Assign").4. Wählen Sie den Modus (1 - 3) mit den numerischen Tasten. Drücken Sie dann die Enter-Taste zum Speichernoder die Abbrechen-Taste, um zu den ursprünglichen Einstellungen zurückzugehen. Alternativ können Sie dieTaste "Modus zuweisen" drücken, um durch die Modi zu blättern.Um Modusparameter zu bearbeiten:1. Drücken Sie die Taste Patch Bearbeiten.2. Bewegen Sie den Regler, den Sie bearbeiten möchten. Die LED-Anzeige zeigt den Namen des geradebearbeiteten Reglers.a. Für den Akzelerometer drücken Sie am Keyboard die Taste Edit Accel.b. Für den Ribbon Controller drücken Sie eine der drei Tasten, die Sie bearbeiten möchten.3. Verwenden Sie die drei Drehknöpfe, um Parameterwerte zu ändern. Siehe Anhang über das Zuweisen vonParametern.Hinweis: Nachdem Sie den entsprechenden Drehregler bewegt haben, können Sie mit den Zifferntasten einenWert eingeben.4. Drücken Sie die Enter-Taste zum Speichern oder die Taste Abbrechen, um zu den ursprünglichenEinstellungen zurückzukehren.So ändern Sie den MIDI-Kanal eines Reglers:1. Drücken Sie die Taste Patch Bearbeiten.2. Bewegen Sie den Regler, den Sie bearbeiten möchten. Die LED-Anzeige zeigt den Namen des geradebearbeiteten Reglers.a. Für den Akzelerometer drücken Sie am Keyboard die Taste Edit Accel.b. Für den Ribbon Controller drücken Sie eine der drei Tasten, die Sie bearbeiten möchten.3. Drücken Sie die Taste mit der Aufschrift "MIDI-Kanal" ("MIDI Channel"). Der aktuelle MIDI-Kanal des Pads, dasSie bearbeiten, wird am LED-Bildschirm angezeigt.4. Benutzen Sie die numerischen Tasten, um den MIDI-Kanal (1-16) einzugeben.5. Drücken Sie die Enter-Taste zum Speichern oder die Taste Abbrechen, um zu den ursprünglichenEinstellungen zurückzukehren.BEARBEITEN VON PROGRAMMWECHSELBEFEHLENWenn <strong>Vortex</strong> einen Patch lädt, wird ein Programmwechselbefehl über den USB-Port und den 5-poligen MIDI OUT-Port gesendet. In diesem Abschnitt wird beschrieben, welcher Befehl gesendet wird, wenn ein Patch ausgewähltwird.Einstellen der Programmnummer:1. Drücken Sie die Taste Patch Bearbeiten.2. Drücken Sie die Taste "Program einstellen" ("Program Set").3. Um die Programmnummer für den Patch einzugeben, verwenden Sie die Zifferntasten, um einen Wert (0 - 127)einzugeben.4. Drücken Sie die Enter-Taste zum Speichern oder die Taste Abbrechen, um zu den ursprünglichenEinstellungen zurückzukehren.32
Zum Einstellen des LSB (Least Significant Byte - niedrigstwertiges Byte) und MSB (Most Significant Byte -höchstwertiges Byte):1. Drücken Sie die Taste Patch Bearbeiten.2. Drücken Sie die Taste Bank MSB oder Bank LSB.3. Benutzen Sie die numerischen Tasten des Keyboards, um den MSB oder LSB (0-127) einzugeben.4. Drücken Sie die Enter-Taste zum Speichern oder die Taste Abbrechen, um zu den ursprünglichenEinstellungen zurückzukehren.BEARBEITEN DER KEYBOARD-MODIDie <strong>Vortex</strong>-Tasten können in einen von drei Modi gesetzt werden: Oberer, unterer und geteilter Modus. Den oberenund unteren Modi sind Werte für den MIDI-Kanal und die Transponierung zugewiesen. Der Spalt-Modus verlegt denunteren Modus in einen Tastaturbereich und den oberen Modus in einen anderen Bereich. Sie können auch denSpalt-Punkt bearbeiten.Bearbeitung der unteren und oberen Zonen1. Drücken Sie die Taste Patch Bearbeiten.2. Drücken Sie die Taste für die obere und untere Keyboard-Zone (am Hals der <strong>Vortex</strong>).3. Verwenden Sie die drei Drehknöpfe, um Parameterwerte zu ändern. Siehe Anhang über das Zuweisen vonParametern.Hinweis: Nachdem Sie den entsprechenden Drehregler bewegt haben, können Sie mit den Zifferntasten einenWert eingeben.4. Drücken Sie die Enter-Taste zum Speichern oder die Taste Abbrechen, um zu den ursprünglichenEinstellungen zurückzukehren.Einstellen der Spalt-Punkte1. Drücken Sie die Taste Patch Bearbeiten.2. Drücken Sie die Taste Spalt-Zone (Split Zone). Der aktuelle Spalt-Punkt wird am LED-Bildschirm angezeigt.3. Drücken Sie eine Taste am Keyboard, die Sie als Spalt-Punkt verwenden möchten, um das Keyboard zuunterteilen.4. Drücken Sie die Enter-Taste zum Speichern oder die Taste Abbrechen, um zu den ursprünglichenEinstellungen zurückzukehren.EINSTELLEN DER RIBBON CONTROLLER REAKTIONDie berührungsempfindliche Ribbon Control kann beim Loslassen auf zwei verschiedene Arten reagieren. Im Latch-Modus bleibt die Einstellung nach dem Loslassen des Ribbon Controllers erhalten. Im Return-Modus wird dieEinstellung nach dem Loslassen des Ribbon Controllers auf den Standardwert zurückgesetzt.Einstellen des Reaktionsmodus für den Ribbon Controller1. Drücken Sie die Taste Patch Bearbeiten.2. Berühren Sie den Ribbon Controller. Auf der LED-Anzeige erscheint "rib".3. Drücken Sie Modus Zuweisen (Mode Assign).4. Stellen Sie den Modus (1 - 2) mit den Zifferntasten ein. Drücken Sie wahlweise auf Modus Zuweisen (ModeAssign), um durch die Modi zu blättern.Hinweis: Die LED zeigt "Lch" (für "Latch-Modus"), oder "rn" (für "Return-Modus").5. Wählen Sie den Modus mit den numerischen Tasten. Drücken Sie dann die Enter-Taste zum Speichern oderdie Abbrechen-Taste, um zu den ursprünglichen Einstellungen zurückzugehen. Wählen Sie #1 für "Latch-Modus" und # 2 für "Return-Modus". Nachdem der Parameter gespeichert wurde, erscheint auf der LED-Anzeige "PE".ZUWEISEN DER START-/STOPP-TASTENDen Start- und Stopp-Tasten der <strong>Vortex</strong> können zwei verschiedene Modi zugewiesen werden:Der MIDI-Modus wird verwendet, um einen Start- oder Stopp-Befehl mithilfe eines standardmäßigen MIDIStart/Stopp-Befehls zu senden. Die meisten Hardware-Synths reagieren auf diese Art von MIDI-Befehl.Der CC-Modus dient dazu, einen Start-Stopp-Befehl mit Hilfe von zwei "CC"-Befehlen zu senden. Einige DAWs, wieAbleton Live, verwenden CC-Befehle zum Starten und Stoppen von Sequenzen.33
1. Bearbeiten der Start/Stopp Modus-Taste:2. Drücken Sie die Taste Patch Bearbeiten.3. Drücken Sie die Start- und Stopp-Taste.4. Drücken Sie Modus Zuweisen (Mode Assign).5. Stellen Sie den Modus (1 - 2) mit den Zifferntasten ein. Drücken Sie wahlweise auf Modus Zuweisen (ModeAssign), um durch die Modi zu blättern.Hinweis: Die LED zeigt "rt" (für "Realtime-Modus") oder "CC" (für "CC-Modus").6. Verwenden Sie die 3 Drehregler, um Parameterwerte zu ändern und den Modus auszuwählen. Siehe Anhangüber das Zuweisen von Parametern.Hinweis: Nachdem Sie den entsprechenden Drehregler bewegt haben, können Sie mit den Zifferntasten einenWert eingeben.7. Drücken Sie die Enter-Taste zum Speichern oder die Taste Abbrechen, um zu den ursprünglichenEinstellungen zurückzukehren.ZURÜCKSETZEN DER PATCHESSo setzen Sie die <strong>Vortex</strong>-Patches wieder auf die Standardeinstellung zurück:1. Vergewissern Sie sich, dass Ihr <strong>Vortex</strong> ausgeschaltet ist.2. Halten Sie die Tasten "Start/Stopp" und "Patch-Auswahl" gedrückt.3. Schalten Sie Ihr <strong>Vortex</strong> ein während Sie diese Tasten gedrückt halten.4. Sobald alle LEDs am <strong>Vortex</strong> leuchten, lassen Sie die Tasten los.Hinweis: Alle LEDs am Steg des <strong>Vortex</strong> blinken 4-mal, um anzuzeigen, dass sich nun alle Patches in denStandardeinstellungen befinden.AKZELEROMETERDer Akzelerometer sendet MIDI-Daten, wenn <strong>Vortex</strong> nach oben geneigt wird. Die Tilt-LED zeigt an, ob das Gerät denSchwellwert erreicht, um die MIDI-Befehle zu senden. Der Akzelerometer sendet nur dann MIDI-Befehle, wenn<strong>Vortex</strong> mit dem Hals nach oben zeigt und den eingestellten Schwellwert erreicht (45 Grad in derStandardeinstellung).Um den Akzelerometer eines Patch auszuschalten, gehen Sie wie folgt vor:1. Drücken Sie "Patch Bearbeiten". (Am Display erscheint "PE")2. Drücken Sie die Taste "Akzelerometer Bearbeiten". (Am Display erscheint "Acc")3. Drücken Sie die Taste "Modus Zuweisen" bis das Display "oFF" anzeigt.4. Drücken Sie die "Enter"-Taste. (Am Display erscheint "PE")5. Drücken Sie "Patch Bearbeiten", um in den Performance-Modus zurückzukehren. (Am Display erscheint "PF")KALIBRIEREN DES AKZELEROMETERS1. Drücken Sie die Taste Patch Bearbeiten.2. Drücken Sie die Cal Accel Taste. Auf der Anzeige erscheint "XY1".3. Bringen Sie <strong>Vortex</strong> in die minimale Höhenposition.4. Drücken Sie die Enter-Taste, um die X1-Y1 Position festzusetzen. Auf der Anzeige erscheint "XY2".5. Bringen Sie <strong>Vortex</strong> in die maximale Höhenposition.6. Drücken Sie die Enter-Taste, um die X2-Y2 Position festzulegen.EINRICHTEN DES VORTEX MIT ABLETON LIVE LITE1. Besuchen Sie www.alesis.com/<strong>Vortex</strong>, klicken Sie auf "Docs & Downloads", laden Sie die <strong>Vortex</strong> Ableton LiveController Map herunter und installieren Sie sie.2. Drücken Sie auf "Patch-Auswahl" bis die LED neben "A" leuchtet.3. Drücken Sie "P1" (Pad 1) innerhalb von 5 Sekunden. Wenn der richtige Patch ausgewählt ist, zeigt das Display"P1".Hinweis: "P1" wird nicht angezeigt, wenn der richtige Patch bereits ausgewählt ist.EINRICHTEN DES VORTEX MIT SONiVOX VORTEX-I DVi1. Besuchen Sie zuerst die <strong>Alesis</strong> <strong>Vortex</strong> Support-Seite, um die Sonivox <strong>Vortex</strong>-I DVi auf www.alesis.com/vortexherunterzuladen.2. Drücken Sie auf "Patch-Auswahl" bis die LED neben "C" leuchtet.3. Drücken Sie "P7" (Pad 7) innerhalb von 5 Sekunden. Wenn der richtige Patch ausgewählt ist, zeigt das Display"P23".Nun ist Ihr DVi den <strong>Vortex</strong>-Bedienelementen zugewiesen, wenn das <strong>Vortex</strong> DVi geöffnet wird.34
APPENDIX A: PAD MODESMODE ASSIGNED KNOB FUNCTIONNote Knob #1 MIDI Note - MIDI Note number (0 – 127)Knob #2Velocity - Velocity of the note-on messageValue 1 – 127: Sends this velocity value regardless of how hardyou press the pad (velocity sensitivity is disabled).Value 0: Sends a velocity value proportional to how hard you pressthe pad (velocity sensitivity is enabled).Knob #3 Pad Velocity Curve - (1 – 8)This only applies when velocity is set to 0(See Appendix E for velocity charts.).CC Toggle Knob #1 CC # (0 – 127)Knob #2 Toggle value 1 (0 – 127)Knob #3 Toggle value 2 (0 – 127)CC Momentary Knob #1 CC # (0 – 127)Knob #2 Press value (0 – 127)Knob #3 Release value (0 – 127)Program Change Knob #1 Program Number (0 – 127)Knob #2 Bank LSB (0 – 127)Knob #3 Bank MSB (0 – 127)APPENDIX B: KEYBOARD ZONE MODESZONES ASSIGNED KNOB FUNCTIONUpper and Lower Knob #1 Transposition -12 – +12Knob #2 MIDI Channel (1 – 16)Knob #3 Velocity Curve (0 – 8)35
APPENDIX C: KNOB, SLIDER, ACCELEROMETER, AND RIBBON CONTROLLER MODESMODE ASSIGNED KNOB FUNCTIONCC Message Knob #1 CC # (0 – 127)Knob #2 Range Min (0 – 127)Knob #3 Range Max (0 – 127)Pitch Bend Knob #1 MIDI Channel (1 – 16)Knob #2 Range Min (0 – 127)Knob #3 Range Max (0 – 127)Aftertouch Knob #1 MIDI Channel (1 – 16)Knob #2 Range Min (0 – 127)Knob #3 Range Max (0 – 127)APPENDIX D: START AND STOP ASSIGNMENTSMODE ASSIGNED KNOB FUNCTIONRealtime MIDI Mode Knob #1 Change Mode(0 – 63) Realtime MIDI Mode(64 – 127) CC ModeKnob #2No effectKnob #3No effectCC Mode Knob #1 Change Mode(0 – 63) Realtime MIDI Mode(64 – 127) CC ModeKnob #2 Start Message CC # (0 – 127)Knob #3 Stop Message CC # (0 – 127)36
APPENDIX E: VELOCITY CURVES37
MIDI IMPLEMENTATION CHART1. Basic InformationTransmit /ExportMIDI channels 1-16 1-16Note numbers 1-128 1-128Program change 1-128 0-24Bank Select response Yes NoModes supported:Mode 1: Omni-On, PolyMode 2: Omni-On, MonoMode 3: Omni-Off, PolyMode 4: Omni-Off, MonoMulti ModeNoNoYesNoNoRecognize /ImportNoNoNoNoNoNote-On Velocity Yes NoNote-Off Velocity No NoChannel Aftertouch Yes NoPoly (Key) Aftertouch No NoPitch Bend Yes NoActive Sensing No NoSystem Reset Yes NoTune Request No NoUniversal System Exclusive Yes Yes Device inquiryManufacturer or Non-CommercialSystem ExclusiveYesNRPNs No NoRPNs No No2. MIDI Timing & SynchronizationMIDI Clock No NoSong Position Pointer No NoSong Select No NoStartContinueStopRecordFast-forwardRewindYesNoYesNoNoNoNoNoNoNoNoNoNoMIDI Time Code No NoMIDI Machine Control No NoMIDI Show Control No NoRemarksLights pads assigned to notenumbers38
SPECIFICATIONSPower: 5V DC, 300mA, center-positiveDimensions (L x W x H): 35.1" x 10.6” x 2.2" (892 mm x 269 mm x 56 mm)Weight: 6.5 lbs. (2.9 kg)39
www.alesis.com7-51-0383-C