Télécharger la notice au format pdf (36ko) - Babymoov
Télécharger la notice au format pdf (36ko) - Babymoov
Télécharger la notice au format pdf (36ko) - Babymoov

Create successful ePaper yourself
Turn your PDF publications into a flip-book with our unique Google optimized e-Paper software.
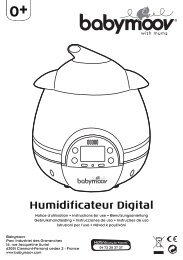
0+Humidificateur AquariumNotice d’utilisation • Instructions for use • BenutzungsanleitungGebruikshandleiding • Instrucciones de uso • Instruções de usoIstruzioni per l’uso • Návod k používání<strong>Babymoov</strong>Parc Industriel des Gravanches16, rue Jacqueline Auriol63051 Clermont-Ferrand cedex 2 - Francewww.babymoov.com
abdefgckJih1 22
3 4567 83
FRMerci d’avoir choisi l’humidificateur aquarium <strong>Babymoov</strong>.IMPORTANT - À CONSERVER POUR CONSULTATIONULTÉRIEURE - À LIRE SOIGNEUSEMENTCARACTÉRISTIQUES TECHNIQUES- Tension nominale en courant alternative : 220 V – 240 V / 50 Hz- Débit de vaporisation : 250 ml/heure <strong>au</strong> nive<strong>au</strong> maximum- Puissance : 30 W- Capacité du réservoir d’e<strong>au</strong> : 1.8 lVous devez impérativement respecter lespréc<strong>au</strong>tions suivantes à chaque fois que vousutilisez un appareil électrique.• Veuillez lire attentivement ces instructions avant demettre votre humidificateur en marche.• Assurez-vous que <strong>la</strong> tension indiquée sur l’appareilcorresponde bien à celle que vous avez chez vous.• Pour éviter tout choc électrique : ne plongez jamaisl’appareil, le cordon ou <strong>la</strong> prise dans de l’e<strong>au</strong> ou dansquelque <strong>au</strong>tre liquide que ce soit.• N’utilisez jamais l’appareil pour un usage différent decelui pour lequel il a été conçu. Tout <strong>au</strong>tre usage doitêtre considéré comme dangereux et inapproprié.• Si vous constatez que l’appareil, <strong>la</strong> prise ou le cordond’alimentation ont été endommagés, déconnectezimmédiatement l’humidificateur et ne l’utilisez plus. Laréparation doit être effectuée par une personne qualifiée.• L’humidificateur ne comprend <strong>au</strong>cune pièce demaintenance pour les utilisateurs. Ne le démontez pas.• L'utilisation d’accessoires non recommandés par lefabricant peut aboutir à un incident, une déchargeélectrique ou une blessure.• Vous devez être très vigi<strong>la</strong>nt lorsque l’humidificateurest utilisé en présence d’enfants.• Réservez à l’usage domestique. Ne l’utilisez pasen extérieur.• N’utilisez jamais l’appareil en plein air.• Ne <strong>la</strong>issez pas le cordon d'alimentation <strong>au</strong> bord d'unetable ou d'un comptoir. Ne le posez pas sur unesurface ch<strong>au</strong>de.• P<strong>la</strong>cez l’humidificateur sur une surface stable et p<strong>la</strong>ne,à l’abri de <strong>la</strong> lumière du soleil.• Ne p<strong>la</strong>cez jamais l’appareil à proximité d’une surfacech<strong>au</strong>de, dans un four ch<strong>au</strong>d ou à proximité de p<strong>la</strong>quesélectriques ou fonctionnant <strong>au</strong> gaz.• Ne touchez jamais le transducteur avec vos doigts ouavec un objet en métal.4AVERTISSEMENTSHUMIDIFICATEUR AQUARIUM • Notice d’utilisation• Ne dép<strong>la</strong>cez jamais l’humidificateur s’il contient del’e<strong>au</strong> ou s’il est en marche.• Ne <strong>la</strong>issez pas d’e<strong>au</strong> dans le réservoir pendant tropde temps : ceci peut favoriser <strong>la</strong> <strong>format</strong>ion de bactéries.• Débranchez l’humidificateur avant de le nettoyer, dele ranger, ou lorsque vous ne l’utilisez pas.• Ce dispositif n'est pas conçu pour être utilisé par despersonnes y compris des enfants, avec des handicapsment<strong>au</strong>x ou physiques, sensoriels, ou par despersonnes sans expérience ou connaissance dedispositifs électroniques, à l’exception d’être sous unesurveil<strong>la</strong>nce stricte par <strong>la</strong> personne responsable.• Conservez <strong>la</strong> <strong>notice</strong> d’utilisation dans un endroit sécurisépour une future utilisation.• Les équipements électriques et électroniques font l’objetd’une collecte sélective. Ne pas se débarrasser desdéchets d’équipements électriques et électroniquesavec les déchets municip<strong>au</strong>x non triés, mais procéderà leur collecte sélective.Ce symbole indique à travers l’Union Européenneque ce produit ne doit pas être jeté à <strong>la</strong> poubelleou mé<strong>la</strong>ngé <strong>au</strong>x ordures ménagères, mais fairel’objet d’une collecte sélective.
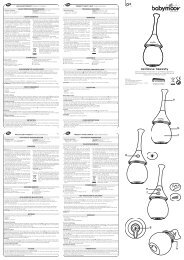
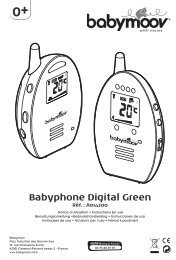
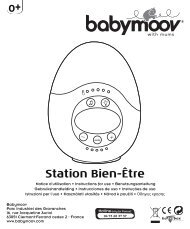
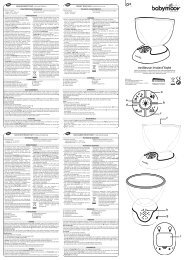
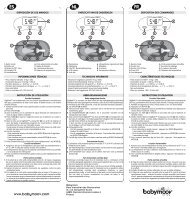
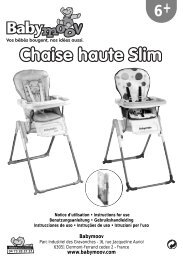
a. Sortie d’airb. Capacité d’e<strong>au</strong>c. Capteur de nive<strong>au</strong> d’e<strong>au</strong>d. Transducteure. Boitier principal / Soclef. Rég<strong>la</strong>ge du nive<strong>au</strong> de débit de vapeurCOMPOSITIONg. T<strong>au</strong>x d’hygrométrie minimumh. Bouchon de remplissagei. Réservoir d’e<strong>au</strong>J. Canal d’évacuationk. Sortie d’airINSTRUCTIONSVeuillez lire les instructions avec préc<strong>au</strong>tion avant d’allumer l’humidificateur. Veuillez installer l’humidificateursur une surface p<strong>la</strong>ne et loin des enfants.Remplir le réservoir d’e<strong>au</strong>1. Retirer le réservoir du socle de l’humidificateur (schéma 1). Mettre le réservoir d’e<strong>au</strong> à l’envers.2. Dévisser le bouchon de remplissage (schéma 2).3. Remplir le réservoir d’e<strong>au</strong> du robinet ou d’e<strong>au</strong> distillée (schéma 3).4. Visser fermement le bouchon de remplissage (schéma 4).5. Rep<strong>la</strong>cer le réservoir sur le boîtier principal (schéma 5). Attendre quelques secondes que le socle de l’humidificateurse remplisse d’e<strong>au</strong>.Utiliser l’humidificateur6. Brancher le cordon d’alimentation sur le secteur (schéma 6). Orienter le bouton de rég<strong>la</strong>ge vers MAX.Ajuster l’intensité de l’humidificateur <strong>au</strong> nive<strong>au</strong> désiré :- orienté vers OFF = faible intensité,- orienté vers MAX = forte intensité.S'assurer que <strong>la</strong> sortie de vapeur n'est pas dirigée vers des parois, des prises ou des meubles.Vider l’humidificateur7. Eteindre l'humidificateur en orientant le bouton vers OFF et déconnecter l’appareil (schéma 7). L’indicateurlumineux doit être éteint. Débrancher l’appareil, enlever le réservoir d’e<strong>au</strong> de son socle.8. Vider l'e<strong>au</strong> de <strong>la</strong> cuve et du socle (schéma 8). Ensuite, essuyer les gouttes qui restent, à l’aide d’un tissu doux.Si l’humidificateur ne fonctionne pas, vous devez vérifier que :- le câble est bien branché sur <strong>la</strong> prise de courant,- le commutateur de commande de l’intensité de <strong>la</strong> vapeur est bien en marche,- le réservoir d’e<strong>au</strong> a été correctement rep<strong>la</strong>cé sur le socle,- il y a suffisamment d’e<strong>au</strong> dans le réservoir.ENTRETIEN• Avant de le nettoyer, débranchez toujours l’humidificateur et assurez-vous qu’il s’est bien refroidi.• Il vous sera facile de nettoyer l’humidificateur à l’aide d’un tissu doux ou d’une éponge, légèrement humides.Laissez sécher naturellement. Ne plongez jamais le socle dans de l'e<strong>au</strong> ni dans <strong>au</strong>cun <strong>au</strong>tre liquide.• Nettoyez régulièrement le réservoir d’e<strong>au</strong> (à l’aide d’un écouvillon par exemple). Utilisez un mé<strong>la</strong>nge de javel etd’e<strong>au</strong> pour nettoyer le réservoir d’e<strong>au</strong>. Rincez avec de l’e<strong>au</strong> propre, et <strong>la</strong>issez sécher naturellement. N’utilisezjamais de détergent pour nettoyer une pièce de l’humidificateur destinée à contenir de l’e<strong>au</strong>. Un nuage dedétergent dissout dans l’e<strong>au</strong> pourrait interférer avec <strong>la</strong> vaporisation de votre humidificateur.• N’utilisez jamais de décapant, de solvant ou de substance abrasive pour le nettoyage : ils risqueraient d’endommagerl’humidificateur et ses parois.• Avant de le ranger, videz le réservoir d’e<strong>au</strong> et enlevez l’e<strong>au</strong> qui reste dans le boîtier principal. Assurez-vous que toutesles pièces sont parfaitement sèches. Laissez le bouchon dévissé pour éviter que le joint ne reste collé <strong>au</strong> réservoir.HUMIDIFICATEUR AQUARIUM • Notice d’utilisation 5
ENThank you for choosing the <strong>Babymoov</strong> aquarium humidifier.IMPORTANT - PLEASE KEEP THESE INSTRUCTIONSFOR FUTURE USE - READ THEM CAREFULLYTECHNICAL CHARACTERISTICS- Rated AC voltage: 220 V – 240 V / 50 Hz- Vaporisation flow rate: 250 ml/hour at maximum output- Power: 30 W- Capacity of the water reservoir: 1.8 lYou must comply with the following prec<strong>au</strong>tionseach time you use an electrical appliance.• Please read these instructions carefully before switchingyour humidifier on.• Make sure that the voltage indicated on the appliancecorresponds with the voltage in your home.• To prevent electric shocks: never immerse theappliance, the lead or the socket in water or in anyother liquid whatsoever.• Never use the appliance for any purpose other thanthat for which it was designed. Any other usage shallbe deemed hazardous and inappropriate.• If you <strong>notice</strong> that the appliance, the power lead or thesocket have been damaged, unplug the humidifierimmediately and do not use it any more. Repairs mustbe carried out by a qualified person.• The humidifier does not contain any maintenance partsfor users. Do not dismantle the appliance.• The use of accessories not recommended by themanufacturer may result in an incident, an electricaldischarge or injury.• You must take extra special care when the humidifieris being used in the presence of children.• Reserved for domestic use. Not for use outdoors.• Never use the appliance in the open air.• Never leave the supply lead on the edge of a table orcounter. Never p<strong>la</strong>ce it on a hot surface.• P<strong>la</strong>ce the humidifier on a f<strong>la</strong>t, stable surface, awayfrom sunlight.• Never p<strong>la</strong>ce the appliance close to a hot surface, in ahot oven or close to electric p<strong>la</strong>tes or gas hot p<strong>la</strong>tes.6WARNINGSAQUARIUM HUMIDIFIER • Instruction Manual• Never touch the transducer with your fingers or with ametal object.• Never move the humidifier if it contains water or if it isswitched on.• Never leave any water in the reservoir for too long atime: this can result in the <strong>format</strong>ion of bacteria.• Unplug the humidifier before cleaning it, putting it away,or if you are not using it.• This appliance is not designed for use by persons,including children, with mental or physical disabilitiesor sensory deprivation, or by persons with noknowledge or experience of electronic devices, exceptin circumstances when they are being strictly supervisedby a responsible person.• Keep the user guide in a safe p<strong>la</strong>ce for future reference.• Waste Electrical and Electronic Equipment should bedisposed of by selective collection. Do not throwelectrical and electronic equipment away with unsortedhousehold waste, but dispose of it at a selectivecollection point.This marking indicates that this product shouldnot be disposed with other household wastesthroughout the EU.
a. Air outputb. Water capacityc. Water level sensord. Transducere. Basef. Vapour flow adjustmentCOMPOSITIONg. Minimum humidity settingh. Filling plugi. Water reservoirJ. Emptying tubek. Air outputINSTRUCTIONSPlease read these instructions carefully before switching the humidifier on. Please install the humidifier on af<strong>la</strong>t surface well out of the reach of children.Fill the water reservoir1.Remove the reservoir from the humidifier base (diagram 1). Turn the water reservoir upside down.2. Unscrew the filling plug (diagram 2).3. Fill the water reservoir with tap water or distilled water (diagram 3).4. Screw the filling plug in firmly (diagram 4).5. Refit the reservoir on the main casing (diagram 5). Wait a few seconds for the humidifier base to fill with water.Using the humidifier6. Connect the supply lead to the mains (diagram 6). Turn the setting button to MAX .Adjust the humidifier intensity to the desired setting:- OFF = low intensity,- MAX = high intensity.Make sure that the vapour output is not facing walls, sockets or furniture.Emptying the humidifier7. Switch the humidifier off by turning to OFF and unplugging the appliance (diagram 7). The indicator light mustbe off. Disconnect the appliance, remove the water reservoir from its base.8. Empty the water from the base (diagram 8). Next, wipe off any remaining drops with a soft cloth.If the humidifier does not work, you should check that:- the lead is connected to the power socket,- the vapour intensity control switch is working,- the water reservoir has been rep<strong>la</strong>ced correctly on the base,- there is sufficient water in the reservoir.MAINTENANCE• Before cleaning, always unplug the humidifier and make sure that it has cooled down.• You can clean the humidifier simply using a soft and slightly damp cloth or sponge. Leave it to dry naturally. Neverimmerse the base in water or any other liquid.• Clean the water reservoir regu<strong>la</strong>rly (using a swab for example). Use a mixture of water and bleach to clean thewater reservoir. Rinse with clean water, and leave to dry naturally. Never use detergent to clean any part of thehumidifier that is designed to hold water. A cloud of detergent dissolved in water could interfere with yourhumidifier's vaporisation function.• Never use stripper, solvent or any abrasive substance for cleaning: they would risk damaging your humidifierand its walls.• Before putting your humidifier away, empty the water reservoir and also empty out any water remaining in themain casing. Make sure that all parts are absolutely dry. Leave the plug unscrewed to prevent the seal stickingto the reservoir.AQUARIUM HUMIDIFIER • Instruction Manual 7
DEVielen Dank, das Sie sich für einen Luftbefeuchter Aquarium von <strong>Babymoov</strong> entschieden haben.WICHTIG - ZUR SPÄTEREN EINSICHTAUFBEWAHREN – SORGFÄLTIG DURCHLESENTECHNISCHE KENNDATEN- Nennspannung mit Wechselstrom: 220 V – 240 V / 50 Hz- Verdampfungsleistung: 250 ml/Stunde bei Höchstpegel- Wattleistung: 30 W- Aufnahmeleistung des Wasserbehälters: 1.8 lBei jedem Einsatz eines Elektrogerätes sind vonIhnen unbedingt folgende Vorsichtsmaßnahmeneinzuhalten.• Lesen Sie diese Anweisungen <strong>au</strong>fmerksam durch,bevor Sie Ihren Luftbefeuchter in Betrieb nehmen.• Vergewissern Sie sich, dass die <strong>au</strong>f dem Gerätangegebene Spannung gen<strong>au</strong> mit der Spannungübereinstimmt, die bei Ihnen anliegt.• Um Stromsch<strong>la</strong>g zu vermeiden: T<strong>au</strong>chen Sie das Gerät,das Kabel oder den Stecker niemals in Wasser oderirgendeine andere Flüssigkeit ein.• Verwenden Sie das Gerät niemals für einen anderenals den Gebr<strong>au</strong>chszweck, für den es <strong>au</strong>sgelegt wurde.Jeder andere Gebr<strong>au</strong>ch ist als gefährlich undunangemessen zu betrachten.• Wenn Sie feststellen, dass das Gerät, der Stecker oderdas Netzkabel beschädigt worden sind, schalten Sieden Luftbefeuchter unverzüglich ab und verwendenSie ihn nicht mehr. Die Reparatur muss von einerPerson mit entsprechender fachlicher Qualifikationdurchgeführt werden.• Der Luftbefeuchter enthält kein Wartungsteil fürAnwender. B<strong>au</strong>en Sie ihn nicht <strong>au</strong>seinander.• Der Gebr<strong>au</strong>ch von Zubehörteilen, die nicht vomHersteller empfohlen worden sind, kann zu einemAusfall, einer elektrischen Ent<strong>la</strong>dung oder einerVerletzung führen.• Sie müssen sehr wachsam sein, wenn der Luftbefeuchterin Gegenwart von Kindern eingesetzt wird.• Das Gerät ist für den H<strong>au</strong>sgebr<strong>au</strong>ch vorbehalten.Setzen Sie es nicht im Außenbereich ein.• Verwenden Sie das Gerät niemals an der freien Luft.• Lassen Sie das Netzkabel niemals <strong>au</strong>f einer Tischkanteliegen. Verlegen Sie es nicht <strong>au</strong>f einer warmen oderheißen Oberfläche.• P<strong>la</strong>tzieren Sie den Luftbefeuchter <strong>au</strong>f eine stabile undebene Oberfläche und schützen Sie ihn vor Sonnenlicht.8WARNHINWEISELUFTBEFEUCHTER AQUARIUM • Bedienungsanleitung• P<strong>la</strong>tzieren Sie das Gerät niemals in die Nähe einerwarmen oder heißen Oberfläche, in einen warmenOfen oder in die Nähe von elektrischen odergasbetriebenen P<strong>la</strong>tten.• Berühren Sie den Messwandler niemals mit IhrenFingern oder mit einem metallischen Gegenstand.• Stellen Sie den Luftbefeuchter niemals an eine andereStelle, wenn er Wasser enthält oder in Betrieb ist.• Lassen Sie das Wasser niemals über einen zu<strong>la</strong>ngen Zeitr<strong>au</strong>m im Behälter: Das kann dieBakterienbildung begünstigen.• Stellen Sie den Luftbefeuchter ab, bevor Sie ihn reinigen,wegräumen oder nicht mehr gebr<strong>au</strong>chen.• Dieses Gerät ist nicht dafür <strong>au</strong>sgelegt von Personen,d.h. <strong>au</strong>ch von Kindern, benutzt zu werden, die geistigeoder körperliche Behinderungen oderWahrnehmungsstörungen haben oder die keineErfahrungen mit bzw. keine Kenntnisse vonelektronischen Vorrichtungen haben, es sei denn siebefinden sich unter strenger Aufsicht einerverantwortlichen Person.• Bewahren Sie die Gebr<strong>au</strong>chsanweisung an einemgesicherten Ort für eine zukünftige Verwendung <strong>au</strong>f.• Elektro- und Elektronikgeräte werden getrenntgesammelt. Alt-Elektro- und Elektronikgeräte nicht mitumsortiertem H<strong>au</strong>smüll entsorgen, sondern einerMülltrennung unterziehen.Dieses Symbol weist in der Europäischen Uniondar<strong>au</strong>f hin, dass das Produkt nicht in denMülleimer geworfen oder zu anderenH<strong>au</strong>sabfällen gegeben werden darf, sondern imMülltrennungsverfahren entsorgt werden muss.
a. Luft<strong>au</strong>s<strong>la</strong>ssb. Wasserleistungc. Mess-Sonde Wasserpegeld. Transducteure. Sockelf. Einstellung des Dampfleistungsnive<strong>au</strong>sZUSAMMENSETZUNGg. Mindestfeuchteh. Füllstopfeni. WasserbehälterJ. Ab<strong>la</strong>ssrinnek. Luft<strong>au</strong>s<strong>la</strong>ssANWEISUNGENBevor Sie den Luftbefeuchter einschalten, lesen Sie diese Anweisungen sorgfältig durch. Richten Sie denLuftbefeuchter <strong>au</strong>f einer ebenen Fläche und <strong>au</strong>ßer Reichweite von Kindern ein.Auffüllen des Wasserbehälters1. Ziehen Sie den Wasserbehälter <strong>au</strong>s dem Sockel des Luftbefeuchters her<strong>au</strong>s (Abbildung 1). Drehen Sie denWasserbehälter um.2. Schr<strong>au</strong>ben Sie den Füllstopfen ab (Abbildung 2).3. Füllen Sie den Wasserbehälter mit Leitungswasser oder destilliertem Wasser <strong>au</strong>f (Abbildung 3).4. Schr<strong>au</strong>ben Sie den Füllstopfen wieder fest <strong>au</strong>f (Abbildung 4).5. Setzen Sie den Wasserbehälter wieder <strong>au</strong>f das H<strong>au</strong>ptgehäuse <strong>au</strong>f (Abbildung 5). Warten Sie einige Sekunden,bis dass der Sockel des Luftbefeuchters mit Wasser angefüllt ist.Anwendung des Luftbefeuchters6. Schließen Sie das Zuführkabel am Netz an (Abbildung 6). Richten Sie den Regelknopf <strong>au</strong>f MAX <strong>au</strong>s.Stellen Sie die Betriebsstärke <strong>au</strong>f das gewünschte Nive<strong>au</strong> ein:- OFF = Geringe Intensität,- MAX = Hohe Intensität.Vergewissern Sie sich, dass der Dampf<strong>au</strong>s<strong>la</strong>ss nicht <strong>au</strong>f Wände, Steckdosen oder -möbel <strong>au</strong>sgerichtet ist.Entleerung des Luftbefeuchters7. Stellen Sie den Luftbefeuchter ab, indem Sie ihn <strong>au</strong>f OFF <strong>au</strong>srichten und das Gerät abschalten (Abbildung 7). DieLeuchtanzeige muss erloschen sein. Nehmen Sie das Gerät vom Netz und nehmen Sie den Wasserbehälter vonseinem Sockel herunter.8. Lassen Sie das Wasser <strong>au</strong>s dem Trichter und vom Sockel <strong>la</strong>ufen (Abbildung 8). Wischen Sie dann die verbleibendenWassertropfen mit einem weichen Tuch ab.Wenn der Luftbefeuchter nicht funktioniert, müssen Sie sicherstellen, dass:- das Kabel gut an die Steckdose angeschlossen ist.- der Regelschalter für die Dampfstärke in Betrieb ist.- der Wasserbehälter korrekt <strong>au</strong>f den Sockel zurückgestellt worden ist.- sich genügend Wasser im Wasserbehälter befindet.WARTUNG• Bevor Sie den Luftbefeuchter reinigen, nehmen Sie ihn grundsätzlich vom Netz und vergewissern Sie sich, dasser gut abgekühlt ist.• Sie können den Luftbefeuchter leicht mit einem weichen oder etwas angefeuchteten Tuch oder Schwamm reinigen.Lassen Sie ihn einfach an der Luft trocknen. T<strong>au</strong>chen Sie den Sockel niemals in Wasser oder irgendeine andereFlüssigkeit ein.• Reinigen Sie den Wasserbehälter regelmäßig (z.B. mit einer Rohrbürste). Verwenden Sie dazu eine Mischung <strong>au</strong>sE<strong>au</strong> de Javel und normalem Wasser Spülen Sie ihn mit s<strong>au</strong>berem Wasser ab und <strong>la</strong>ssen Sie ihn natürlich an derLuft trocknen. Verwenden Sie niemals synthetisches Reinigungsmittel, um ein Teil des Luftbefeuchters zu reinigen,das dazu bestimmt ist, Wasser <strong>au</strong>fzunehmen. Schon eine geringe Menge in Wasser <strong>au</strong>fgelösten Reinigungsmittelskönnte sich störend <strong>au</strong>f die Verdampfungsvorrichtung Ihres Luftbefeuchters <strong>au</strong>swirken.• Verwenden Sie niemals Beizmittel, Lösungsmittel oder Substanzen mit Abriebeffekt für die Reinigung: Sie könntenden Luftbefeuchter und seine Wände beschädigen.• Um ihn wegzuräumen, entleeren Sie den Wasserbehälter und entfernen die im H<strong>au</strong>ptgehäuse verbliebenenWasserreste. Vergewissern Sie sich, dass sämtliche Teile vollkommen trocken sind. Lassen Sie den Stopfenabgeschr<strong>au</strong>bt, um zu vermeiden, dass die Dichtung am Wasserbehälter haften bleibt.LUFTBEFEUCHTER AQUARIUM • Bedienungsanleitung 9
NLU hebt zojuist de aquarium bevochtiger van <strong>Babymoov</strong> aangeschaft en wij danken u vooruw vertrouwen.BELANGRIJK - DEZE HANDLEIDING BEWAREN OM HEMLATER TE KUNNEN RAADPLEGEN - AANDACHTIG LEZENTECHNISCHE EIGENSCHAPPEN- Nominale spanning en wisselstroom: 220 V – 240 V / 50 Hz- Vaporiseer debiet: 250 ml/uur in de maximale stand- Vermogen: 30 W- Inhoud van de watertank: 1.8 lU moet de hierna volgende voorzorgsmaatregelenabsoluut in acht nemen bij het gebruik vanelektrische apparaten.• Deze instructies aandachtig lezen voordat u debevochtiger aan zet.• Controleren of de spanning vermeld op het apparaatovereenkomt met de spanning van uwstroominstal<strong>la</strong>tie thuis.• Om elektrische schokken te voorkomen : nooit hetapparaat, het snoer of de steker in water of een anderevloeistof onderdompelen.• Het apparaat nooit gebruiken voor een ander doeldan dat waarvoor het is ontworpen. Ieder ander gebruikmoet worden beschouwd als gevaarlijk en onjuist.• Als u ziet dat het apparaat, de steker of het snoerbeschadigd is, moet u de steker van de bevochtigeronmiddellijk uit de contactdoos halen en hem niet meergebruiken. De reparatie moet door een erkendevakman tot stand gebracht worden.• De bevochtiger bevat geen enkel onderdeel dat doorde gebruikers vervangen kan worden. U mag hemdan ook niet demonteren.• Het gebruik van toebehoren die niet door de fabrikantzijn aangeraden, kan een incident, een elektrischeont<strong>la</strong>sting of letsel veroorzaken.• Wees bijzonder op uw hoede als de bevochtigergebruikt wordt in aanwezigheid van kinderen.• Bestemd voor gebruikt thuis, niet buiten gebruiken.• Het apparaat nooit in de open lucht gebruiken.• De voedingskabel niet <strong>la</strong>ten hangen over de rand van eentafel of een b<strong>la</strong>d. Niet leggen op een warme opperv<strong>la</strong>kte.• De bevochtiger p<strong>la</strong>atsen op een stabiele en v<strong>la</strong>kkeondergrond beschermd tegen zonlicht.• Het apparaat niet zetten in de buurt van een warmeopperv<strong>la</strong>kte, in een warme oven of in de nabijheid vaneen elektrische kookp<strong>la</strong>at of gaspitten.10WAARSCHUWINGAQUARIUM BEVOCHTIGER • InstructieHandleiding• Nooit met de vingers of een metalen voorwerp aande transductor komen.• De bevochtiger nooit verp<strong>la</strong>atsen als hij met water isgevuld of als hij aan staat.• Niet te <strong>la</strong>ng water in de tank <strong>la</strong>ten staan : dit kan hetontstaan van bacteriën bevorderen.• De steker van de bevochtiger uit de contactdoos halenvoordat u hem gaat schoonmaken, opbergen of als uhem niet gebruikt.• Dit apparaat is niet ontworpen om gebruikt te wordendoor personen, kinderen inbegrepen, met eengeestelijk, lichamelijk of zintuigelijk handicap of doorpersonen zonder ervaring of kennis van elektrischeapparaten behalve indien zij onder toezicht van eenverantwoordelijke volwassene staan.• De gebruikshandleiding op een veilige p<strong>la</strong>ats bewarenom hem <strong>la</strong>ter te kunnen raadplegen indien nodig.• De elektronische en elektrische uitrustingen moetengesorteerd worden voordat ze worden afgevoerd.Afgedane elektronische en elektrische uitrustingen nietafvoeren in het huisvuil, deze vooraf sorteren en naarde juiste p<strong>la</strong>ats brengen.Dit symbool geeft aan voor heel Europa datdit product niet bij het huisvuil weggegooidmag worden, het moet op selectieve wijzeafgevoerd worden.
a. Luchtuit<strong>la</strong>atb. Waterinhoudc. Sonde waterpeild. Transductore. Soclef. Instelling stoom debietSAMENSTELLINGg. Minimum luchtvochtigheidh. Vuldopi. WatertankJ. Afvoerleidingk. Luchtuit<strong>la</strong>atINSTRUCTIESDe instructies aandachtig lezen voordat u de bevochtiger aanzet. De bevochtiger installeren op een v<strong>la</strong>kkeondergrond, ver uit de buurt van kinderen.Vullen van de watertank1. Haal de bak van het voetstuk van de bevochtiger af en zet hem onderste boven (schema 1).2. Draai de vuldop los (schema 2).3. Vul de bak met kraanwater of gedistilleerd water (schema 3).4. De vuldop stevig aandraaien (schema 4).5. De bak terug p<strong>la</strong>atsen in de hoofdbehuizing (schema 5). Enkele seconden wachten tot het voetstuk van debevochtiger zich met water heeft gevuld.Gebruik van de bevochtiger6. Steek de steker van de voedingskabel op een contactdoos van het stroomnet (schema 6). Zet de stel knop op MAX.Dan de sterkte van de bevochtiger op het gewenste nive<strong>au</strong> instellen:- OFF = <strong>la</strong>ag nive<strong>au</strong>,- MAX = hoog nive<strong>au</strong>.Controleren of de stoom uit<strong>la</strong>at niet naar wanden, contactdozen of meubels gericht is.Legen van de bevochtiger7. De bevochtiger uitzetten door de knop op OFF te zetten en het apparaat uit te zetten (schema 7). De lichtgevendeverklikker moet uit gaan. De steker uit de contactdoos halen en de bak van het voetstuk afhalen.8. Het water in de bak en het voetstuk legen (schema 8). Dan de achtergebleven druppeltjes afvegen met eenzachte doek.Als de bevochtiger het niet doet, moet u de volgende punten controleren:- kijken of de kabel naar behoren is aangesloten op de contactdoos,- verifiëren of de schake<strong>la</strong>ar van de sterkte van de stoom wel is aangezet,- kijken of de watertank naar behoren is teruggezet op het voetstuk,- en of er voldoende water in de bak zit.ONDERHOUD• Alvorens het apparaat schoon te maken, moet u de steker uit de contactdoos halen en controleren of het wel is afgekoeld.• De bevochtiger mag schoongemaakt worden met een zachte en iets vochtige doek of spons. Dan gewoon <strong>la</strong>tendrogen. Nooit het voetstuk in water of een andere vloeistof onderdompelen.• De watertank regelmatig schoonmaken (met behulp van een flessenborstel bijvoorbeeld). Gebruik een mengselvan bleekwater en water voor het schoonmaken van de watertank. Met helder water uitspoelen en zo <strong>la</strong>ten drogen.Nooit een detergens gebruiken voor het schoonmaken van een onderdeel van de bevochtiger dat in contact metwater staat. Enkele druppels detergens opgelost in water zouden de stoom van uw bevochtiger kunnen aantasten.• Nooit een afbijtmiddel, oplosmiddel of schurende stof gebruiken voor het schoonmaken : zij zouden de bevochtigerzelf en zijn wanden kunnen aantasten.• Alvorens de bevochtiger op te bergen, moet u de waterbak legen en ook het water dat is achtergebleven in dehoofdbehuizing weg <strong>la</strong>ten lopen. Controleer of de onderdeel helemaal zijn opgedroogd. De dop niet vastdraaienom te voorkomen dat hij vast blijft zitten op de bak.AQUARIUM BEVOCHTIGER • InstructieHandleiding 11
ESGracias por haber elegido el humidificador aquarium <strong>Babymoov</strong>.IMPORTANTE - CONSERVE ESTAS INSTRUCCIONES PARACONSULTARLAS ULTERIORMENTE - LÉALAS DETENIDAMENTECARACTERÍSTICAS TÉCNICAS- Tensión nominal en corriente alterna: 220 V – 240 V / 50 Hz- C<strong>au</strong>dal de vaporización 250 ml/hora en posición máxima- Potencia: 30 W- Capacidad del depósito de agua: 1.8 lResulta primordial respetar <strong>la</strong>s siguientes prec<strong>au</strong>cionescada vez que utilice un aparato eléctrico.• Lea detenidamente estas instrucciones antes de poneren marcha su humidificador.• Asegúrese de que <strong>la</strong> tensión indicada en el aparatocorresponde a <strong>la</strong> de su insta<strong>la</strong>ción eléctrica.• Para evitar cualquier cortocircuito: no sumerja nuncael aparato, el cable ni el enchufe en agua ni en ningúnotro líquido.• No dé nunca al aparato un uso distinto de aquel parael que ha sido diseñado. Cualquier otro uso deberáconsiderarse peligroso e inapropiado.• Si advierte que el aparato, <strong>la</strong> toma o el cable dealimentación están dañados, desconecte elhumidificador inmediatamente y no lo utilice más.Deberá ser reparado por una persona cualificada.• El humidificador no contiene ninguna pieza querequiera mantenimiento por parte del usuario.No lo desmonte.• La utilización de accesorios no recomendados por elfabricante puede provocar un incidente, una descargaeléctrica o una lesión.• Debe tener mucho cuidado cuando se utilice elhumidificador en presencia de niños.• Reservado para un uso doméstico. No lo utilice a<strong>la</strong>ire libre.• No deje nunca el aparato al aire libre.• No deje el cable de alimentación en el borde de unamesa o una encimera. No lo ponga sobre unasuperficie caliente.• Coloque el humidificador sobre una superficie p<strong>la</strong>nay estable, al abrigo del sol.• No coloque nunca el aparato cerca de una superficiecaliente, en un horno encendido o cerca de p<strong>la</strong>caseléctricas o de gas.• No toque nunca el transductor con los dedos ni conningún objeto metálico.12ADVERTENCIASHUMIDIFICADOR AQUARIUM • Manual de Instrucciones• No desp<strong>la</strong>ce nunca el humidificador si contiene aguao si está funcionando.• No deje agua dentro del depósito durante demasiadotiempo: podría favorecer el desarrollo de bacterias.• Desenchufe el humidificador antes de limpiarlo,guardarlo, o cuando no lo esté utilizando.• Este dispositivo no ha sido diseñado para ser utilizadopor personas – incluyendo niños – con deficienciasmentales o físicas, sensoriales, o por personas sinexperiencia o conocimientos sobre dispositivoselectrónicos, salvo si son supervisados estrictamentepor parte de un responsable.• Conserve el manual de utilización en un lugar seguropara una futura utilización.• Los equipos eléctricos y electrónicos deben serrecic<strong>la</strong>dos. No se deshaga de los desechos deequipos eléctricos y electrónicos junto con losdesechos municipales sin separar, debe proceder asu recogida selectiva.Este símbolo indica, en toda <strong>la</strong> Unión Europea,que este producto no debe tirarse a <strong>la</strong> basurani mezc<strong>la</strong>rse con residuos domésticos, sino quedebe ser objeto de una recogida selectiva.
a. Salida de aireb. Capacidad de aguac. Sensor del nivel de aguad. Transductore. Basef. Ajuste del nivel de c<strong>au</strong>dal de vaporCOMPOSICIÓNg. Grado mínimo de humedadh. Tapón de rellenadoi. Depósito de aguaJ. Canal de evacuaciónk. Salida de aireINSTRUCCIONESAsegúrese de leer <strong>la</strong>s instrucciones detenidamente antes de encender el humidificador. Asegúrese de insta<strong>la</strong>rel humidificador en una superficie p<strong>la</strong>na y fuera del alcance de los niños.Rellenar el depósito de agua1. Saque el depósito de agua de <strong>la</strong> base del humidificador (imagen 1). Dé <strong>la</strong> vuelta al depósito de agua.2. Desenrosque el tapón de llenado (imagen 2).3. Llene el depósito con agua del grifo o agua desti<strong>la</strong>da imagen 3).4. Vuelva a enroscar bien el tapón de llenado (imagen 4).5. Vuelva a colocar el depósito en el armazón principal (imagen 5). Espere unos segundos a que <strong>la</strong> base delhumidificador se llene de agua.Utilizar el humidificador6. Enchufe el cable de alimentación a <strong>la</strong> red (imagen 6). Oriente el botón de ajuste hacia el MÁX.Ajuste <strong>la</strong> intensidad del humidificador al nivel deseado:- OFF = intensidad débil,- MÁX = intensidad fuerte.Asegúrese de que <strong>la</strong> salida del vapor no se ha dirigido hacia paredes, enchufes eléctricos o muebles.Vaciar el humidificador7. Apague el humidificador llevando el botón al OFF y desconecte el aparato (imagen 7). El indicador luminosodebe estar apagado. Desenchufe el aparato, retire el depósito de agua de su base.8. Vacíe el agua de <strong>la</strong> base (imagen 8). A continuación, seque <strong>la</strong>s gotas que queden con un paño suave.Si el humidificador no funciona, deberá comprobar que:- el cable está bien enchufado a <strong>la</strong> toma de alimentación,- el conmutador de mando de <strong>la</strong> intensidad del vapor está funcionando,- el depósito de agua está colocado correctamente en <strong>la</strong> base,- hay suficiente agua en el depósito.LIMPIEZA Y MANTENIMIENTO• Antes de limpiarlo, desenchufe siempre el humidificador y asegúrese de que se ha enfriado totalmente.• Puede limpiar el humidificador fácilmente con un paño o una esponja suave y ligeramente húmedecido/a. Déjelosecar al aire. No sumerja nunca <strong>la</strong> base en agua ni en ningún otro líquido.• Limpie con regu<strong>la</strong>ridad el depósito de agua (por medio de una escobil<strong>la</strong>, por ejemplo). Utilice una mezc<strong>la</strong> delejía y agua para limpiar el depósito de agua. Ac<strong>la</strong>re con agua limpia y déjelo secar al aire. No utilice nuncadetergente para limpiar una pieza del humidificador que vaya a contener agua. Un poco de detergente disueltoen agua podría interferir con <strong>la</strong> vaporización de su humidificador.• No utilice nunca productos decapantes, disolventes o sustancias abrasivas para <strong>la</strong> limpieza: se arriesga aestropear el humidificador y sus paredes.• Antes de guardar el humidificador, vacíe el depósito de agua y quite el agua que quede en el armazón principal.Asegúrese de que todas <strong>la</strong>s piezas estén totalmente secas. Deje el tapón desenroscado para evitar que <strong>la</strong> juntase quede pegada al depósito.HUMIDIFICADOR AQUARIUM • Manual de Instrucciones 13
PTAgradecemos ter escolhido o humidificador aquarium da <strong>Babymoov</strong>.IMPORTANTE - POR FAVOR LEIA ESTE FOLHETOATENTAMENTE E GUARDE - O PARA CONSULTA ULTERIORCARACTERÍSTICAS TÉCNICAS- Tensão nominal em corrente alternada: 220 V – 240 V / 50 Hz- Débito de vaporização: 250 ml/hora no nível máximo- Potência: 30 W- Capacidade do reservatório de água: 1.8 lÉ essencial respeitar as prec<strong>au</strong>ções seguintes de cadavez que utilizar um aparelho eléctrico.• Leia atentamente estas instruções antes de ligar o seuhumidificador.• Assegure-se de que o valor da tensão indicado noaparelho corresponde exactamente ao da insta<strong>la</strong>çãoeléctrica em sua casa.• Para evitar choques eléctricos, nunca mergulhe emágua ou em qualquer líquido o aparelho, o cabo oua ficha.• Nunca utilize o aparelho para fins diferentes daquelepara o qual foi construído. Qualquer outra utilizaçãodeve ser considerada perigosa e inadequada.• Se verificar que o aparelho, a ficha ou o cabo dealimentação apresentam danos, desligue imediatamenteo humidificador e não volte a utilizá-lo antes de serreparado por pessoa devidamente qualificada.• O humidificador não contém peças que possamser reparadas pelos seus utilizadores. Por isso, nãoo desmonte.• A utilização de acessórios não recomendados pelofabricante pode dar origem a acidentes, a descargaeléctrica ou a ferimentos.• É preciso estar atento quando o humidificador éutilizado na presença de crianças.• Aparelho reservado ao uso doméstico. Não deve serutilizado no exterior.• Nunca utilize o aparelho ao ar livre.• Não deixe o cabo eléctrico assente sobre o bordo deuma mesa ou de um armário e não o pouse sobreuma superfície quente.• Coloque o humidificador numa superfície estável ep<strong>la</strong>na, ao abrigo da luz directa do sol.• Nunca coloque o aparelho perto de uma superfíciequente, num forno quente ou perto de discos eléctricosou de bicos de gás.• Nunca toque no transdutor com os dedos nem comum objecto metálico.14AVISOSHUMIDIFICADOR AQUARIUM • Manual de Instruções• Nunca desloque o humidificador se tiver água ou seestiver em funcionamento.• Nunca deixe água no reservatório durante muitotempo, pois pode haver formação de bactérias.• Desligue o humidificador antes de o limpar e guardeosempre que não esteja a ser utilizado.• Este aparelho não foi construído para ser utilizadopor crianças, por pessoas com deficiências mentaisou físicas, sensoriais, nem por pessoas semexperiência ou conhecimento de aparelhoselectrónicos, excepto no caso de haver vigilância estritapor parte de pessoa responsável.• Guarde as instruções de uso em local seguro para aspoder consultar futuramente sempre que necessário.• Os equipamentos eléctricos e electrónicos são objectode recolha especial. Não devemser deitados forajuntamente como lixo doméstico não seleccionado; asua recolha deve ser selectiva.Na União Europeia, este símbolo indica queeste produto não deve ser deitado no lixo nemmisturado com o lixo doméstico; deve serobjecto de recolha selectiva.
a. Saída de arb. Capacidade de águac. Sensor do nível de águad. Transdutore. Basef. Regu<strong>la</strong>ção do nível de débito de vaporCOMPOSIÇÃOg. Gr<strong>au</strong> mínimo de humidadeh. Tampão de enchimentoi. Reservatório de águaJ. Canal de evacuaçãok. Saída de arMODO DE UTILIZAÇÃOLeia as instruções com atenção antes de ligar o humidificador. Instale o humidificador numa superfície p<strong>la</strong>nae longe de crianças.Como encher o reservatório de água1. Retire o reservatório da base do humidificador (esquema 1). Vire o reservatório ao contrário.2. Dsaperte o tampão do bocal de enchimento (esquema 2).3. Encha o reservatório com água da torneira ou desti<strong>la</strong>da (esquema 3).4. Feche bem a tampa do bocal de enchimento (esquema 4).5. Volte a insta<strong>la</strong>r o reservatório na caixa principal (esquema 5). Aguarde alguns segundos até a base dohumidificador se encher de água.Utilização do humidificador6. Ligue a ficha do cabo eléctrico na tomada da parede (esquema 6). Rode o botão de regu<strong>la</strong>ção para MAX.Regule a intensidade do humidificador para o nível pretendido:- OFF = intensidade fraca,- MAX = intensidade forte.Assegure-se de que a saída de vapor não fica dirigida para paredes, tomadas eléctricas ou móveis.Esvaziamento do humidificador7. Para desligar o humidificador, rode o botão para OFF e desligue (esquema 7). O indicador luminoso deve estarapagado. Desligue a ficha da tomada e retire o reservatório de água da respectiva base.8. Esvazie a água da base (esquema 8). Seguidamente, com um pano macio enxugue as gotas que houver.Se o humidificador não funcionar, é preciso verificar se- o cabo está bem ligado na tomada;- o comutador de comando da intensidade do vapor está ligado;- o reservatório de água foi novamente colocado correctamente na sua base;- no reservatório há água em quantidade suficiente.MANUTENÇÃO• Antes de limpar o aparelho, desligue-o sempre e assegure-se de que arrefeceu completamente.• Será mais fácil limpar o humidificador com um pano ou com uma esponja macios e ligeiramente humedecidos.Deixe secar naturalmente. Nunca mergulhe a base em água nem noutros líquidos.• Limpe periodicamente o reservatório da água (com um escovilhão, por exemplo). Use uma mistura de lixívia eágua para limpar o reservatório da água. Enxagúe com água limpa e deixe secar naturalmente. Nunca usedetergentes para limpar qualquer peça do humidificador que se destine a conter água. Um resto de detergentedissolvido na água poderia interferir com a vaporização do seu humidificador.• Nunca use decapante, solvente ou substância abrasiva para a limpeza, pois o humidificador sofreria danos nassuas paredes.• Antes de guardar o humidificador, esvazie o reservatório da água e elimine a água que ainda houver na caixaprincipal. Assegure-se de que todas as peças se encontram perfeitamente secas. Deixe a tampa desapertadapara evitar que a junta cole ao reservatório.HUMIDIFICADOR AQUARIUM • Manual de Instruções 15
ITGrazie per aver scelto l’umidificatore Aquarium <strong>Babymoov</strong>.IMPORTANTE - DA CONSERVARE PER CONSULTAZIONIFUTURE - DA LEGGERE ATTENTAMENTECARATTERISTICHE TECNICHE- Tensione nominale in corrente alternata: 220 V – 240 V / 50 Hz- Portata di vaporizzazione: 250 ml/ora al livello massimo- Potenza: 30 W- Capacità del serbatoio d’acqua: 1.8 lRispettare rigorosamente le seguenti prec<strong>au</strong>zioniquando si utilizza un apparecchio elettrico.• Leggere attentamente queste istruzioni prima diaccendere l’umidificatore.• Assicurarsi che <strong>la</strong> tensione indicata sull’apparecchiocorrisponda al<strong>la</strong> tensione di rete utilizzata.• Per evitare il rischio di scosse elettriche: non immergeremai l’apparecchio, il cavo o <strong>la</strong> spina nell’acqua o inqualsiasi altro liquido.• Non usare mai l’apparecchio per impieghi diversi daquello per il quale è stato progettato. Qualsiasi altro usodeve essere considerato come pericoloso e inappropriato.• Se l’apparecchio, <strong>la</strong> spina o il cavo di alimentazionerisultano danneggiati, disconnettere immediatamentel’umidificatore e non utilizzarlo più. La riparazione deveessere effettuata da una persona qualificata.• Nessuna parte dell’umidificatore può essere riparatadall’utente. Non smontare l’apparecchio.• L’uso di accessori non raccomandati dal produttorepuò c<strong>au</strong>sare incidenti, scariche elettriche o lesioni.• Prestare <strong>la</strong> massima attenzione quando l’umidificatoreè utilizzato in presenza di bambini.• Solo per uso domestico. Non usare all’esterno.• Non usare l’apparecchio all’aperto.• Non <strong>la</strong>sciare il cavo di alimentazione al bordo di untavolo o di un ripiano. Non appoggiarlo su unasuperficie calda.• Sistemare l’umidificatore su una superficie stabile epiana, al riparo dal<strong>la</strong> luce del sole.• Non sistemare mai l’apparecchio in prossimità di unasuperficie calda, in un forno caldo o in prossimità dipiastre elettriche o a gas.• Non toccare mail il trasduttore con le dita o con unoggetto di metallo.• Non spostare l’umidificatore se contiene dell’acqua ose è in funzione.16AVVERTENZEUMIDIFICATORE AQUARIUM • Manuale di Istruzioni• Non <strong>la</strong>sciare l’acqua nel serbatoio troppo a lungo: ciòpotrebbe favorire <strong>la</strong> formazione di batteri.• Disconnettere l’umidificatore prima di pulirlo, di riporlo,o quando non lo si utilizza.• Questo dispositivo non è progettato per essere utilizzatoda persone (compresi i bambini) con handicap mentalio fisici, sensoriali, o da persone senza esperienza oconoscenza di dispositivi elettronici, se non sotto <strong>la</strong>stretta sorveglianza di una persona responsabile.• Conservare le istruzioni per l’uso in un luogo sicuroper riferimenti futuri.• Gli apparecchi elettrici ed elettronici sono soggetti araccolta differenziata. Non smaltire i rifiuti di apparecchielettrici ed elettronici assieme ai rifiuti municipali nondifferenziati, bensì procedere al<strong>la</strong> loro raccoltadifferenziata.Questo simbolo indica, nell'Unione europea,che questo prodotto non deve essere gettatotra i rifiuti comuni o nel<strong>la</strong> spazzatura domestica,ma deve essere smaltito separatamente.
a. Uscita dell’ariab. Capacità d’acquac. Sensore di livello dell’acquad. Trasduttoree. Basef. Rego<strong>la</strong>zione del livello di portata del vaporeCOMPOSIZIONEg. Livello di igrometria minimoh. Tappo di riempimentoi. Serbatoio dell’acquaJ. Canale di scolok. Uscita dell’ariaMODO D’USOLeggere attentamente le istruzioni prima di accendere l’umidificatore. Sistemare l’umidificatore su una superficiepiana e lontana dal<strong>la</strong> portata dei bambini.Riempire il serbatoio d’acqua1. Togliere il serbatoio dal<strong>la</strong> base dell’umidificatore (figura 1). Capovolgere il serbatoio dell’acqua.2. Svitare il tappo di riempimento (figura 2).3. Riempire il serbatoio con acqua del rubinetto o con acqua distil<strong>la</strong>ta (figura 3).4. Avvitare fino in fondo il tappo di riempimento (figura 4).5. Rimettere in posizione il serbatoio sul corpo principale (figura 5). Attendere qualche secondo affinché <strong>la</strong> basedell’umidificatore si riempia d’acqua.Utilizzare l’umidificatore6. Collegare il cavo di alimentazione al<strong>la</strong> rete elettrica (figura 6). Ruotare il tasto di rego<strong>la</strong>zione su MAX.Rego<strong>la</strong>re l’intensità dell’umidificatore sul livello desiderato:- OFF = intensità bassa,- MAX = intensità alta.Assicurarsi che l’uscita del vapore non sia diretta verso le pareti, le prese di corrente o i mobili.Svuotare l’umidificatore7. Spegnere l’umidificatore portando l’interruttore su MIN e disconnettendo l’apparecchio (figura 7). La spia luminosadeve essere spenta. Disconnettere l’apparecchio, quindi togliere il serbatoio dal<strong>la</strong> base.8. Svuotare <strong>la</strong> vaschetta e <strong>la</strong> base dall’acqua (figura 8). Asciugare quindi le gocce rimanenti con un panno morbido.Se l’umidificatore non funziona, verificare che:- il cavo sia correttamente collegato al<strong>la</strong> presa di corrente,- il commutatore di comando dell’intensità del vapore sia stato azionato,- il serbatoio dell’acqua sia stato correttamente inserito nel<strong>la</strong> base,- ci sia acqua a sufficienza nel serbatoio.MANUTENZIONE• Prima di pulirlo, disconnettere sempre l’umidificatore e accertarsi che si sia completamente raffreddato.• L’umidificatore si pulisce semplicemente con un panno o una spugna morbidi e leggermente umidi. Lasciareasciugare all’aria. Non immergere mai <strong>la</strong> base nell’acqua né in altri liquidi.• Pulire rego<strong>la</strong>rmente il serbatoio dell’acqua (ad esempio servendosi di uno scovolino). Usare una misce<strong>la</strong> di acquae candeggina per pulire il serbatoio. Sciacquare con acqua pulita e <strong>la</strong>sciare asciugare all’aria. Non usare maidetersivi per pulire le parti dell’umidificatore destinate a contenere l’acqua. Il detersivo dissolto nell’acqua potrebbeinterferire con <strong>la</strong> vaporizzazione dell’umidificatore.• Non usare mai prodotti corrosivi, solventi o sostanze abrasive per <strong>la</strong> pulizia: rischierebbero di danneggiarel’umidificatore e le sue pareti.• Prima di riporlo, svuotare il serbatoio ed eliminare l’acqua restante dal corpo principale. Assicurarsi che tutte leparti siano perfettamente asciutte. Lasciare il tappo svitato per evitare che il giunto resti incol<strong>la</strong>to al serbatoio.UMIDIFICATORE AQUARIUM • Manuale di Istruzioni 17
CZDěkujeme, že jste se rozhodli pro zvlhčovač vzduchu s nádrží od společnosti <strong>Babymoov</strong>.DŮLEŽITÉ - POZORNĚ SI PŘEČTĚTE TENTO NÁVODK POUŽITÍ A USCHOVEJTE SI JEJ PRO DALŠÍ POTŘEBUTECHNICKÉ PARAMETRY- Nominální napětí při napájení střídavým proudem: 220 V – 240 V / 50 Hz- Průtok páry: 250 ml/hod při nastavení na maximum- Výkon: 30 W- Obsah nádrže na vodu: 1,8 litruPři každém používání jakéhokoliv elektrickéhospotřebiče dodržujte následující bezpečnostní předpisy.• Před zapnutím zvlhčovače vzduchu si pozorně přečtětetyto bezpečnostní pokyny.• Zkontrolujte, zda napětí uvedené na spotřebiči odpovídánapětí v síti u vás doma.• Abyste zabránili ráně elektrickým proudem: spotřebič,šňůru napájení a zástrčku zásadně neponořujte do vodyči jakékoliv jiné kapaliny.• Spotřebič zásadně nepoužívejte k jinému účelu, než kekterému je určen. Používání za jakýmkoliv jiným účelemje považováno za nebezpečné a nevhodné.• Pokud zjistíte poškození spotřebiče, zástrčky nebo šňůrynapájení, přístroj ihned odpojte ze sítě a dále honepoužívejte. Opravu musí provádět pracovník spříslušnou odbornou kvalifikací.• Zvlhčovač vzduchu neobsahuje žádné díly, které byuživatelé mohli použít pro jiné opravy. Neprovádějtedemontáž spotřebiče.• Používání příslušenství nebo dodatečné výbavynedoporučené výrobcem může mít za důsledek závadu,elektrický výboj nebo zranění.• Při používání zvlhčovače vzduchu v přítomnosti dětíbuďte velmi opatrní.• Spotřebič je určen pro domácí použití v interiéru.Spotřebič nepoužívejte ve venkovních prostorách.• Spotřebič zásadně nepoužívejte na volném prostranství.• Šňůru napájení nenechávejte na hraně stolu neboprodejního pultu. Šňůru nepokládejte na horkou plochu.• Zvlhčovač vzduchu ustavte na pevný a rovný podk<strong>la</strong>da chraňte jej před přímým slunečním zářením.• Spotřebič zásadně nepokládejte blízko horké plochy,nevkládejte ho do horké trouby a nestavte ho doblízkosti elektrických nebo plynových plotýnek.• Transduktoru se zásadně nedotýkejte prsty nebokovovým předmětem.18UPOZORNĚNÍZVLHČOVAČ VZDUCHU S NÁDRŽÍ • Návod k použití• Zvlhčovač vzduchu zásadně nepřenášejte, pokudobsahuje vodu, nebo pokud je zapnutý.• Nenechávejte vodu v nádrži příliš dlouho: v opačnémpřípadě může dojít k bakteriálnímu bujení.• Před čištěním, uložením nebo pokud zvlhčovačnepoužíváte, vytáhněte spotřebič ze zásuvky.• Tento spotřebič není určený pro používání osobami (adětmi) se sníženými fyzickými, smyslovými neboduševními schopnostmi nebo osobami, které nemajízkušenosti s používáním přístroje nebo které s nímnebyly obeznámeny s výjimkou případů, kdy jsou poddohledem osoby, která odpovídá za jejich bezpečnost.• Návod k použití uschovejte na bezpečném místě propřípadné další použití.• Elektrické a elektronické přístroje je třeba odkládat dospeciálních odpadových nádob na tříděný odpad.Elektrické a elektronické přístroje nevyhazuje dosměsného komunálního odpadu, ale do speciálníchnádob na tříděný odpad.Tento symbol označuje v celé Evropské unii, žedaný výrobek nelze vyhodit do popelnice nebodo směsného komunálního dopadu, ale dospeciální nádoby na tříděný odpad.
a. Výstup vzduchub. Obsah vodyc. Ukazatel množství vodyd. Transduktore. Zák<strong>la</strong>dnaf. Regulátor pro nastavení průtoku párySLOŽENÍg. Minimální procento vlhkostih. Zátka plnícího otvorui. Nádrž na voduj. Odvodní kanálekk. Výstup vzduchuINSTRUKCEPřed zapnutím zvlhčovače vzduchu si pozorně přečtěte následující instrukce. Zvlhčovač vzduchu ustavte narovném povrchu a mimo dosah dětí.Naplnění nádrže vodou1. Vyjměte nádrž ze zák<strong>la</strong>dny zvlhčovače vzduchu (Obr. 1). Ustavte nádrž na vodu vzhůru nohama.2. Odšroubujte zátku plnícího otvoru (Obr. 2).3. Naplňte nádrž kohoutkovou nebo destilovanou vodou (Obr. 3).4. Utáhněte pevně zátku plnícího otvoru (Obr. 4).5. Ustavte nádrž na zák<strong>la</strong>dnu (Obr. 5). Vyčkejte několik sekund, dokud se zák<strong>la</strong>dna zvlhčovače vzduchu nenaplní vodou.Používání zvlhčovače vzduchu6. Zasuňte zástrčku napájecí šňůry do elektrické zásuvky (Obr. 6). Ov<strong>la</strong>dač nastavení otočte do polohy MAXNastavte intenzitu páry na požadovanou hodnotu:- OFF = nízká intenzita,- MAX = vysoká intenzita.Zkontrolujte, zda výstup páry nesměřuje na stěny, elektrické zásuvky nebo nábytek.Vyprázdnění zvlhčovače vzduchu7. Zvlhčovač vzduchu vypněte tak, že jej nastavíte na OFF, a potom odpojte přístroj ze sítě (Obr. 7). Světelná kontrolkaprovozu musí být zhasnutá. Odpojte přístroj ze sítě a sejměte nádrž na vodu ze zák<strong>la</strong>dny.8. Vylijte vodu z nádrže a ze zák<strong>la</strong>dny (Obr. 8). Potom otřete zbývající kapky vody měkkým suchým hadříkem.Pokud zvlhčovač vzduchu nefunguje, zkontrolujte:- zda je zástrčka napájecí šňůry dobře zapojená do elektrické zásuvky.- zda je přepínač regu<strong>la</strong>ce intenzity páry funkční a zda je zapnutý.- zda je nádrž s vodou řádně ustavená na zák<strong>la</strong>dně.- zda je v nádrži dostatečné množství vody.ÚDRŽBA• Před čištěním zvlhčovač vzduchu vytáhněte z elektrické zásuvky a zkontrolujte, zda vych<strong>la</strong>dnul.• Zvlhčovač vzduchu snadno vyčistíte navlhčeným jemným hadříkem nebo houbičkou. Vyčištěný přístroj nechejteuschnout na vzduchu. Zák<strong>la</strong>dnu přístroje zásadně neponořujte do vody ani do jakékoliv jiné kapaliny.• Nádrž na vodu pravidelně čistěte (napřík<strong>la</strong>d kartáčem na čištění <strong>la</strong>hví). Pro čištění nádrže na vodu použijte směsSAVA a vody. Dobře vypláchněte čistou vodou a nechte uschnout na vzduchu. Pro čištění jakéhokoliv dílu zvlhčovačevzduchu určeného k tomu, aby obsahoval vodu, zásadně nepoužívejte detergenty. Roztok detergentu s vodou bymohl narušit výstup páry ze zvlhčovače vzduchu.• Pro čištění spotřebiče zásadně nepoužívejte odstraňovač vodního kamene, rozpouštěd<strong>la</strong> nebo abrazivní látky: vopačném případě hrozí nebezpečí poškození zvlhčovače a jeho stěn.• Před uložením vylijte vodu z nádrže a odstraňte zbývající vodu ze zák<strong>la</strong>dny. Zkontrolujte, zda jsou všechny dílyzvlhčovače dokonale suché. Zátku plnícího otvoru nechte odšroubovanou, aby se těsnění nepřilepilo k nádrži.ZVLHČOVAČ VZDUCHU S NÁDRŽÍ • Návod k použití 19
Bon de garantie à vie(à renvoyer dans les 15 jours suivant l’achat)❐ Oui, je souhaite garantir à vie mon produit <strong>Babymoov</strong> et je vous joins une copie de monticket de caisse (OBLIGATOIRE). Sans ce<strong>la</strong>, nous ne pourrons garantir à vie votre achat.❐ Oui, je souhaite recevoir <strong>la</strong> Moovletter, lettre d’in<strong>format</strong>ion électronique sur lesnouve<strong>au</strong>tés et <strong>la</strong> société <strong>Babymoov</strong>. Merci de bien remplir votre adresse e-mail.Nom des parents : . . . . . . . . . . . . . . . . . . . . . . . . . . . . . . . . . . . . . . . . . . . . . . . . . . . . . . . . . . . . . . . . . . . . .Prénoms des parents : . . . . . . . . . . . . . . . . . . . . . . . . . . . . . . . . . . . . . . . . . . . . . . . . . . . . . . . . . . . . . . . . . .Adresse : . . . . . . . . . . . . . . . . . . . . . . . . . . . . . . . . . . . . . . . . . . . . . . . . . . . . . . . . . . . . . . . . . . . . . . . . . . . .. . . . . . . . . . . . . . . . . . . . . . . . . . . . . . . . . . . . . . . . . . . . . . . . . . . . . . . . . . . . . . . . . . . . . . . . . . . . . . . . . . . .Code Postal / Ville : . . . . . . . . . . . . . . . . . . . . . . . . . . . . . . . . . . . . . . . . . . . . . . . . . . . . . . . . . . . . . . . . . . . .N° de téléphone : . . . . . . . . . . . . . . . . . . . . . . . . . . . . . . . . . . . . . . . . . . . . . . . . . . . . . . . . . . . . . . . . . . . . . .E-mail : . . . . . . . . . . . . . . . . . . . . . . . . . . . . . . . . . . . . . . . . . . . . . . . . . . . . . . . . . . . . . . . . . . . . . . . . . . . . . .Prénoms de vos enfants : . . . . . . . . . . . . . . . . . . . . . . . . . . . . . . . . . . . . . . . . . . . . . . . . . . . . . . . . . . . . . . .Dates de naissance : . . . . . . . . . . . . . . . . . . . . . . . . . . . . . . . . . . . . . . . . . . . . . . . . . . . . . . . . . . . . . . . . . . .Nom du produit acheté : . . . . . . . . . . . . . . . . . . . . . . . . . . . . . . . . . . . . . . . . . . . . . . . . . . . . . . . . . . . . . . . .Référence : . . . . . . . . . . . . . . . . . . . . . . . . . . . . . . . . . . . . . . . . . . . . . . . . . . . . . . . . . . . . . . . . . . . . . . . . . . .N° de code barre (obligatoire) : . . . . . . . . . . . . . . . . . . . . . . . . . . . . . . . . . . . . . . . . . . . . . . . . . . . . . . . . . . .Date de l’achat : . . . . . . . . . . . . . . . . . . . . . . . . . . . . . . . . . . . . . . . . . . . . . . . . . . . . . . . . . . . . . . . . . . . . . .Lieu de l’achat : . . . . . . . . . . . . . . . . . . . . . . . . . . . . . . . . . . . . . . . . . . . . . . . . . . . . . . . . . . . . . . . . . . . . . . .Votre opinion sur <strong>la</strong> qualité du produit : M<strong>au</strong>vaise 1 2 3 4 5 très bonneCombien de produits <strong>Babymoov</strong> avez-vous déjà acheté ?1 2 3 4 5 6 7 8 <strong>au</strong>tre : . . . . . . . . . . . . . . . . . . . . . . . . . . . . . . . . . . . . . . . . . . . . . . . . . . . . . . . . . . . . . . .Avez-vous des commentaires sur ce produit ?. . . . . . . . . . . . . . . . . . . . . . . . . . . . . . . . . . . . . . . . . . . . . . .. . . . . . . . . . . . . . . . . . . . . . . . . . . . . . . . . . . . . . . . . . . . . . .Avez-vous une idée d’un produit génialà créer pour bébé ?. . . . . . . . . . . . . . . . . . . . . . . . . . . . . . . . . . . . . . . . . . . . . . .. . . . . . . . . . . . . . . . . . . . . . . . . . . . . . . . . . . . . . . . . . . . . . . * Garantie à vie. Cette garantie est soumise àconditions. Va<strong>la</strong>ble en France. Liste des <strong>au</strong>tres. . . . . . . . . . . . . . . . . . . . . . . . . . . . . . . . . . . . . . . . . . . . . . .pays concernés, activation et renseignementsen ligne à l'adresse suivante :. . . . . . . . . . . . . . . . . . . . . . . . . . . . . . . . . . . . . . . . . . . . . . .www.service-babymoov.comPhotographies et illustrations non contractuelles A047006-Manual-Artwork-02* sous réserve d’une utilisation conforme à <strong>la</strong> <strong>notice</strong>. La garantie à vie ne couvre pas les détériorations dues à une utilisation anormale, le textile, les consommables(sucettes, ampoules…), <strong>la</strong> sérigraphie, l’usure normale de certains éléments comme le p<strong>la</strong>stique, le rou<strong>la</strong>nt...• Nous vous rappelons que vous disposez d'un droit d'accès, de modification, de rectification et de suppression des données qui vous concernent (art. 34 de <strong>la</strong> loi "In<strong>format</strong>iqueet Libertés" du 6 janvier 1978). Pour exercer ce droit, adressez-vous à <strong>Babymoov</strong> - 16, rue Jacqueline Auriol - 63100 Clermont-Ferrand.• Les in<strong>format</strong>ions qui vous concernent sont destinées à <strong>Babymoov</strong>. Nous pouvons être amenés à les transmettre à des tiers (partenaires commerci<strong>au</strong>x, etc).Le souhaitez-vous ? Oui ❒ Non ❒