CAPPA ASPIRANTE - Istruzioni per l'uso ... - Thermex
CAPPA ASPIRANTE - Istruzioni per l'uso ... - Thermex
CAPPA ASPIRANTE - Istruzioni per l'uso ... - Thermex
- No tags were found...

You also want an ePaper? Increase the reach of your titles
YUMPU automatically turns print PDFs into web optimized ePapers that Google loves.
IDEFGBNLP<strong>CAPPA</strong> <strong>ASPIRANTE</strong> - <strong>Istruzioni</strong> <strong>per</strong> l’usoDUNSTABZUGSHAUBE - GebrauchsanweisungCAMPANA EXTRACTORA - Manual de utilizaciónHOTTE DE CUISINE - Notice d’utilisationCOOKER HOOD - User instructionsAFZUIGKAP - GebruiksaanwijzingCOIFA <strong>ASPIRANTE</strong> - Manual do usuário
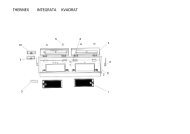
100 secondi, la valvola si chiude.• InstallazionePer installare la cappa in modo corretto deve essere seguitoil seguente schema:1. Montaggio della cappa nella parte inferiore del pensile2. Scelta della versione (aspirante o filtrante).3. Prima di procedere con le o<strong>per</strong>azioni di montaggio, <strong>per</strong>una più facile manovrabilità dell’apparecchio disinserire ilfiltro antigrasso:- Aprire il pannello B come indicato in Fig.2.- Tirare la maniglia C come indicato in Fig.3.• Fissaggio della cappa nella parte inferiore del pensile- Per le quote d’ingombro della cappa fare riferimento allaFig.4.- Prima di fissare la cappa nella parte inferiore del mobileeseguire le seguenti fasi:1- Togliere le 4 viti E che tengono fissate le due plafoniere H(dx e sx) della cappa come indicato in Fig. 5A.2- Togliere le plafoniere H e <strong>per</strong> facilitare l’istallazione scollegareanche i connettori W delle lampade alogene come indicatonella Fig. 5B.3. Fare attenzione che lo spessore del pensile rientri nelle quoteindicate in Fig. 5C.- Incassare la cappa nel pensile (Fig.6) e fare attenzione che le4 molle siano ben incastrate.- Fissare definitivamente la cappa al pensile agendo conun cacciavite sulle apposite viti M e avvitare fino a portarel’apparecchio a battuta con il pensile (Fig.6).4. Ricollegare di nuovo i connettori W delle lampadealogene e rinstallare le plafoniere H fissandole con le 4 viti Eprecedentemente rimosse.• Versione aspiranteCon questo tipo d’installazione l’apparecchio scarica i vaporiall’esterno attraverso una parete <strong>per</strong>imetrale o canalizzazioneesistente.E’ necessario a tale scopo acquistare, un tubo evacuazione aria(non fornito), del tipo previsto dalle vigenti normative noninfiammabile e collegarlo alla flangia N (Fig.1B).• Versione filtranteAttenzione!- Per trasformare la cappa da versione <strong>ASPIRANTE</strong> a versioneFILTRANTE i filtri al carbone devono essere ordinati presso ilvostro rivenditore come accessorio. Abbiamo disponibili duetipi diversi di Kit, uno con filtri a carbone a cassetta(Fig. 7) el’altro con i filtri a carbone rigenerabili (lavabili).(Fig.8)-Per sostituire i filtri al carbone attivo a cassetta X, bisogna tirareverso l’esterno la leva come indicato in (Fig. 7 ).- Per sostituire i filtri a carbone rigenerabili Y, rimuovere le staffedalla sede, tirandole verso l’esterno. (Fig.8)- Se nel nell’imballo trovate una staffa come quella indicata inFig.9 occorre fissarla alla cappa tramite le viti in dotazione.USO E MANUTENZIONE• Si raccomanda di mettere in funzione l’apparecchio prima diprocedere alla cottura di un qualsiasi alimento. Si raccamandadi lasciar funzionare l’apparecchio <strong>per</strong> 15 minuti dopo averterminato la cottura dei cibi, <strong>per</strong> un’evacuazione completadell’aria viziata.Il buon funzionamento della cappa è condizionato da unacorretta e costante manutenzione; una particolare attenzionedeve essere data al filtro antigrasso e al filtro al carboneattivo.• Il filtro antigrasso ha il compito di trattenere le particellegrasse in sospensione nell’aria, <strong>per</strong>tanto è soggetto ad intasarsiin tempi variabili relativamente all’uso dell’apparecchio.- Per prevenire il <strong>per</strong>icolo di eventuali incendi, al massimoogni 2 mesi è necessario lavare i filtri antigrasso, <strong>per</strong> i quali èpossibile utilizzare anche la lavastoviglie.- Dopo alcuni lavaggi, si possono verificare delle alterazionidel colore. Questo fatto non dà diritto a reclamo <strong>per</strong>l’eventuale loro sostituzione.In caso di inadempienza delle istruzioni di sostituzionee di lavaggio si può verificare il rischio di incendio dei filtriantigrasso.• I filtri al carbone attivo servono <strong>per</strong> depurare l’aria che vienerimessa nell’ambiente. I filtri non sono lavabili o rigenerabilie devono essere sostituiti ogni quattro mesi al massimo. Lasaturazione del carbone attivo dipende dall’uso più o menoprolungato dell’apparecchio, dal tipo di cucina e dalla regolaritàcon cui viene effettuata la pulizia del filtro antigrasso• Pulire frequentemente tutti i depositi sul ventilatore esulle altre su<strong>per</strong>fici, usando un panno inumidito con alcooldenaturato o detersivi liquidi neutri non abrasivi.• L’ impianto di illuminazione è progettato <strong>per</strong> l’uso durante lacottura e non <strong>per</strong> l’uso prolungato di illuminazione generaledell’ambiente. L’uso prolungato dell’illuminazione diminuiscenotevolmete la durata media delle lampade.• Sostituzione delle lampade alogene (Fig.10).Per sostituire le lampade alogene B togliere il vetrino C facendoleva sulle apposite fessure.Sostituire con lampade dello stesso tipo.Attenzione: non toccare la lampadina a mano nude.•Comandi:(Fig.11) luminosi ia simbologia è di seguitoriportata:A= tasto ILLUMINAZIONEB= tasto OFFC= tasto PRIMA VELOCITA’D= tasto SECONDA VELOCITA’E= tasto TERZA VELOCITA’F= tastoTIMER ARRESTO AUTOMATICO 15 minuti• Se il vostro apprecchio è provvisto della funzione velocitàINTENSIVA, tenere premuto <strong>per</strong> 2 secondi circa il tasto E equesta verrà attivata <strong>per</strong> 10 minuti dopo di che ritornerà allavelocità precedentemente impostata.Quando la funzione è attiva il LED lampeggia. Per interrom<strong>per</strong>laprima dei 10 minuti premere di nuovo il tasto EPremendo il tasto F <strong>per</strong> 2 secondi (a cappa spenta) si attiva lafunzione “clean air”. Questa funzione fa accendere il motore<strong>per</strong> 10 minuti ogni ora alla prima velocità. Appena attivatala funzione, il motore parte alla 1° velocità <strong>per</strong> la durata di 10minuti durante i quali devono lampeggiare contemporaneamenteil tasto F e il tasto C. Trascorso questo tempo il motoresi spegne ed il led del tasto F rimane acceso di luce fissa finoa quando dopo altri 50 minuti riparte il motore alla primavelocità e i led F e C ricominciano a lampeggiare <strong>per</strong> 10 minutie così via. Premendo qualsiasi tasto ad esclusione delle luci lacappa torna al suo funzionamento normale immediatamente(es. se premo il tasto D si disattiva la funzione “clean air”e il motore va subito alla 2° velocità; premendo il tasto B lafunzione si disattiva).(*) La funzione “TIMER ARRESTO AUTOMATICO” ritardal’arresto della cappa, che continuerà a funzionare alla velocità- 7 -
DEUTSCHDALLGEMEINESDiese Anleitung bitte aufmerksam durchlesen, da sie wichtigeSicherheitshinweise zur Installation, zum Gebrauch und zurWartung enthält. Die Anleitung für eventuelle zukünftigeKonsultationen aufbewahren. Das Gerät wurde zum Gebrauchin Aspirationsversion (Luftausscheidung nach außen -Abb.1B), Fitrationsversion (innerer Luftumlauf - Abb.1A) odermit äußerem Motor (Abb.1C) entworfen.SICHERHEITSHINWEISE1. Vorsicht ist geboten, wenn gleichzeitig eine Abzugshaubeund ein raumluftabhängiger Boiler oder ein offenes Feuerin Betrieb sind, die von einer anderen Energiequelle alsStrom versorgt werden, da die Küchenhaube die Raumluftabsaugt, die auch der Boiler oder das Feuer zur Verbrennungbenötigen. Der Unterdruck im Raum darf den Wert von 4 Pa(4x10⁻⁵ bar) nicht übersteigen. Um einen sicheren Betriebder Abzugshaube zu gewährleisten, ist daher immer aufeine ausreichende Belüftung des Raumes zu achten. Beider Ableitung der Luft nach aussen müssen die nationalenVorschriften eingehalten werden.gas- oder brennstoffbetriebenen Geräten gleichzeitigverwendet wird.L) Es besteht Brandgefahr, wenn die Reinigung nichtentsprechend den Anleitungen durchgeführt wird.Dieses Gerät ist gemäß der EU-Richtlinie 2002/96/EC, WasteElectrical Electronic Equipment (WEEE) gekennzeichnet.Sorgen Sie bitte dafür, dass das Gerät korrekt entsorgt wird, derBenutzer trägt dazu bei, den potentiellen negativen Folgen fürUmwelt und Gesundheit vorzubeugen. Das auf dem Produktoder auf den Begleitpapieren befindliche Symbol sagt aus, dass dieses Produkt nichtwie normaler Hausmüll behandelt werden darf, sonderndass es einer geeigneten Sammelstelle für das Recyclingder elektrischen und elektronischen Geräteteile zugeführtwerden muss. Entsorgen Sie bitte das Altgerät gemäß derlokalen Richtlinien. Für weitere Informationen hinsichtlichder Behandlung, der Wiederverwertung und des Recyclingdes Produkts wenden Sie sich bitte an die zuständige lokaleStelle, an die Sammelstelle für Hausmüll, oder an den Händler,bei dem Sie das Gerät erworben haben.INSTALLATIONSANLEITUNGVor Anschluss des Modells an das Stromnetz :- kontrollieren Sie das Typenschild an der Geräteinnenseiteum sich zu vergewissern, ob Spannung und Stromstärke derdes Stromnetzes entsprechen und die Steckdose geeignet ist.Im Zweifelsfall wenden Sie sich bitte an einen qualifiziertenElektriker.- Sollte das Speisekabel beschädigt sein, ist es durch einanderes - beim Hersteller oder dessen Kundendiensterhältliches - Kabel oder mit einem speziellen Bausatz - zuersetzen.- Das Gerät muss mittels eines Steckers mit 3A-Sicherung oderüber die beiden Drähte des Zweiphasenanschlusses, die durcheine 3A-Sicherung geschützt sind, an die Stromversorgungangeschlossen werden.2. Achtung !Elektrogeräte können unter gewissen Umständengefährlich sein!A) Niemals die Filter kontrollieren, wenn dieDunstabzugshaube in Betrieb ist.B) Die Lampen und die umliegenden Bereiche nichtwährend oder nach längerer Benutzung des Lichtsberühren.C) Es ist verboten, Speisen unter der Dunstabzugshaubezu flambieren.D) Offene Flammen sind unbedingt zu vermeiden, dadiese die Filter beschädigen und einen Brand verursachenkönnen.E) Beim Frittieren sind die Speisen ständig zu kontrollieren,um eine Entzündung von überhitztem Öl zu verhindern.F) Vor jeglichen Wartungsarbeiten unbedingt denNetzstecker aus der Steckdose entfernen.G) Das Gerät sollte nicht von kleinen Kindern odergebrechlichen Personen ohne Beaufsichtigung benutztwerden.H) Kleine Kinder sollten beaufsichtigt werden, umsicherzugehen, dass sie nicht mit dem Gerät spielen.I) Der Raum muss über eine hinreichende Belüftungverfügen, wenn die Dunstabzugshaube mit anderen- 9 -Montage und Anschluss müssen von einem Fachmanndurchgeführt werden.• ElektroanschlussDie Küchenhaube gehört zur Geräteklasse II, daher muss keineder Leitungen geerdet werden.Der Stecker muss nach der Montage des Geräts leichtzugänglich sein.Sollte das Gerät mit einem Kabel ohne Stecker ausgestattetsein, ist für den Anschluss an das Stromnetz ein allpoliger,der Last und den einschlägigen Vorschriften entsprechenderSchalter mit einer Kontaktmindestöffnung von 3 mm zwischenGerät und Stromnetz vorzusehen.Der Anschluss an das Stromnetz ist folgendermassendurchzuführen:BRAUN = L LeitungBLAU = Neutrale Linie• Falls das benutzte Kochfeld ein Elektro-, Gas- oderInduktionsfeld ist, muss der Mindestabstand zwischendiesem und dem untersten Teil der Dunstabzugshaubemindestens 65 cm betragen.Falls ein Verbindungsrohr verwendet wird, das aus zweioder mehr Teilen zusammengesetzt ist, muss der obere Teilüber den unteren gestülpt werden. Auf keinen Fall darf dasAbluftrohr der Küchenhaube an ein Rohr angeschlossenwerden, in dem Warmluft zirkuliert oder das zur Entlüftungvon Geräten verwendet wird, die an eine andere Energiequelleals an Strom angeschlossen sind. Vor der Durchführung derMontagevorgänge, den/die Fettfilter entfernen, damit sichdas Gerät leichter handhaben läßt (Abb.2-3).Sollte das Gerät mit Abzugsvorrichtung montiert werden,bereiten Sie eine Luftabzugsöffnung vor.• Es empfiehlt sich der Einsatz eines Luftableitungsrohres,das denselben Durchmesser aufweist, wie der derLuftabzugsöffnung. Die Verwendung eines Reduzierstückskönnte die Leistungen des Erzeugnisses beeinträchtigenund das Betriebsgeräusch erhöhen.
ciclo. Presionando cualquier botón, a excepción de las luces,la campana inmediatamente regresa a su funcionamientonormal (ej. presionando el botón D se desactiva la función“clean air” y el motor cambia a la 2° velocidad; presionandoel botón B la función se desactiva).(*) La función “timer parada automatica” retarda la paradade la campana, que continuará a funcionar a la velocidadseleccionada en el momento del encendido de esta función,15 minutos.• Saturación de los filtros antigrasa/carbón activo:- Cuando el botón A centellea con una frecuencia de 2 seg.,los filtros antigrasa deben ser lavados.- Cuando el botón A centellea con una frecuencia de 0,5 seg.,los filtros de carbón deben ser sustituidos.Después que se vuelve a colocar el filtro limpio, es necesarioreiniciar la memoria electrónica presionando el botón Adurante 5 seg. hasta que deje de centellear.EL FABRICANTE NO SE HACE RESPONSABLE DE LOSDAÑOS PRODUCIDOS POR EL INCUMPLIMIENTO DE ESTASADVERTENCIAS.- 14 -
FRANÇAISFGÉNERALITÉSLire attentivement le contenu du mode d’emploi puisqu’ilfournit des indications importantes concernant la sécuritéd’installation, d’emploi et d’entretien. Le conserver pour d’ultérieures consultations. L’appareil a été conçu pour êtreutilisé dans le modèle aspirant (évacuation de l’air à l’extérieur– Fig.1B), filtrant (retour de l’air à l’intérieur – Fig.1A) ou dotéd’un moteur externe (Fig.1C).CONSEILS POUR LA SÉCURITÉ1. Attention, lorsque dans la même pièce vous utilisezsimultanément la hotte à évacuation avec un brûleur ou unecheminée alimentés par une énergie autre que l’électricité,vous pouvez créer un problème “d’inversion de flux”. Dansce cas la hotte aspire l’air nécessaire à leur combustion. Ladépression dans le local ne doit pas dépasser les 4 Pa (4x10⁻⁵bar). Pour un fonctionnement en toute sécurité, n’oubliez pasde prévoir une ventilation suffisante du local. Pour l’évacuationvers l’extérieur, veuillez vous référer aux dispositions en vigueurdans votre pays.Avant de brancher la hotte au réseau de distributionélectrique :- lire les données reportées sur la plaquette d’identification(appliquée à l’intérieur de la hotte) pour vérifier si le voltageet la puissance correspondent à ceux du réseau. Contrôleraussi si la prise est adaptée. - En cas de doutes, contacter unélectricien qualifié.Si le câble d’alimentation est abîmé, il faut le remplacer parun autre câble ou par un ensemble, spécialement prévus, quevous pouvez commander au fabricant ou à un de ses servicesd’assistance technique.- Raccorder le dispositif au secteur à l’aide d’une prise avecfusible 3A ou aux deux fils du diphasé protégés par unfusible 3A.2. Attention !Dans certaines circonstances les électroménagers peuventêtre dangereux.A) N’essayez pas de contrôler l’état des filtres quand lahotte est en marche.B) Ne jamais toucher les lampes et les zones adjacentes,pendant et tout de suite après l’utilisation prolongée del’éclairage.C) Il est absolument interdit de flamber sous la hotte.D) Évitez de laisser des flammes libres, elles sont dangereusespour les filtres et pour les risques d’incendie.E) Surveillez constamment les fritures pour éviter quel’huile surchauffée prenne feu.F) Avant de procéder à toute opération d’entretien, coupezl’alimentation électrique de la hotte.G) Cet appareil ne peut pas être utilisé par des enfants oupar des <strong>per</strong>sonnes nécessitant une surveillance.H) Veillez à ce que les enfants ne jouent pas avecl’appareil.I) Lorsque la hotte est utilisée en présence d’appareilsutilisant du gaz ou d’autres combustibles, la pièce doit êtrecorrectement ventilée.L) Si le nettoyage n’est pas réalisé conformément auxinstructions, un incendie peut se déclarer.Cet appareil est marqué conformément à la Directive- 15 -européenne 2002/96/CE sur les déchets d’équipementsélectriques et électroniques (DEEE). Assurez-vous quecet appareil soit mis au rebus selon la réglementation envigueur, vous éviterez ainsi des conséquences néfastes surl’environnement et la santé.Le symbole appliqué sur le produit ou sur la documentationjointe rappelle que cet appareil ne doit pas être traité commeun déchet domestique mais faire l’objet d’une collectesélective dans une déchetterie spécialisée dans le recyclagedes appareils électriques et électroniques. Conformez-vousaux réglementations locales sur la collecte et l’élimination desdéchets. Pour tout autre renseignement sur le traitement, larécupération et le recyclage de cet appareil, veuillez contacterle bureau concerné de votre ville, le service de collecte desdéchets domestiques ou le magasin où vous avez achetévotre appareil.INSTRUCTIONS POUR L’INSTALLATIONLe montage et le branchement électrique doivent êtreeffectués par un <strong>per</strong>sonnel spécialisé.• Connexion électriqueL’appareil est construit en classe II, pour cela aucun cable nedoit être connecté avec la prise terre.La prise doit être accessible après l’installation de l’appareil.Si l’appareil est équipé d’un cordon dépourvu de fiche, uninterrupteur omnipolaire ayant une distance d’ouverturedes contacts d’au moins 3 mm, dimensionné à la charge etconforme aux réglementations applicables en la matière, doitêtre intercalé entre le secteur et l’appareil.La connection avec le réseau électrique doit être éxécutéecomme suit:MARRON = L ligneBLEU = N neutre• En cas de table de cuisson électrique, à gaz ou à induction, ilfaut prévoir une distance de sécurité d’au moins 65 cm entrecette dernière et le point le plus bas de la hotte.S’il doit être utilisé un tuyau de connection composé de deuxou plusieurs parties, la partie su<strong>per</strong>ieure doit être à l’exterieurde celle inférieure. Ne pas relier le tuyau d’échappement dela hotte à un conduit dans lequel circule de l’air chaud ouemployé pour évacuer les fumées des appareils alimentéspar une énergie differente de celle électrique. En vue d’unemanœuvrabilité de l’appareil plus facile, avant d’exécuter lesopérations de montage, déconnecter le filtre/les filtres antigraisse(Fig.2-3).S’il s’agit d’une hotte aspirante, il faudra prévoir une ouverturepour l’évacuation de l’air.• Nous conseillons d’utiliser un tuyau d’évacuation de l’airde même diamètre que l’orifice de sortie de l’air. L’utilisationd’une réduction pourrait diminuer les <strong>per</strong>formances duproduit et augmenter le niveau sonore.• Si votre appareil a été étudié pour être utilisé dans deshabitations pourvues d’aspiration centralisée, effectuer lesopérations suivantes:-L’interrupteur commande l’ouverture et la fermeture d’unesoupape au moyen d’un dispositif thermoélectrique. Encommutant l’interrupteur sur la position ON, après une minute,la soupape s’ouvre en tournant de 90°, ce qui <strong>per</strong>met l’aspirationde l’air vicié. En inversant l’interrupteur sur la position OFF, après
100 secondes, la soupape se ferme.• InstallationPour effectuer correctement l’installation de la hotte suivez lesinstructions suivantes :1. Montage de la hotte dans la partie inférieure du panneau2. Choix de la version (à évacuation au recyclage)3. Avant de procéder aux opérations de montage, ôtez le filtreanti-gras pour faciliter la manipulation de l’appareil:- Ouvrez le panneau B comme illustré Fig.2.- Tirez la poignée C comme illustré Fig. 3.• Fixation de la hotte au-dessous du meuble hautPour les dimensions d’encombrement de la hotte, consulterla Fig.4.Avant de fixer la hotte au-dessous du meuble, effectuer lesopérations suivantes :1- Retirer les 4 vis E qui fixent les deux plafonniers H (de drteet de gche) de la hotte comme illustré Fig. 5A.2- Retirer les plafonniers H et, pour simplifier l’installation,débrancher aussi les connecteurs W des lampes halogènescomme illustré Fig.5B.3. Veiller à ce que l’épaisseur du meuble soit bien comprise entreles dimensions indiquées Fig.5C.Insérer la hotte à l’intérieur du meuble (Fig.6) en veillant à ceque les 4 ressorts soient bien encastrés.Fixer définitivement la hotte au meuble à l’aide des vis Mprévues qu’il faut visser avec un tournevis jusqu’à ce quel’appareil vienne en butée contre le meuble (Fig.6).4. Rebrancher les connecteurs W des lampes halogènes etremonter les plafonniers H en les fixant à l’aide des 4 vis Eenlevées précédemment.• Version evacuationGrâce à ce type d’installation, l’appareil évacue les vapeurs decuisson à l’extérieur à travers un mur de l’habitation ou dansun conduit préexistant.Il faut donc se munir d’un tuyau d’évacuation de l’air (non fourni)non inflammable, du type préconisé par les normes en vigueuret le raccorder à la bride N (Fig.1B).• Version recyclageAttention!Pour transformer la hotte de la version ASPIRATION en uneversion FILTRATION, demandez à votre revendeur de filtresà charbon.Nous disposons de deux types de Kit, un avec filtres cassette àcharbon (Fig. 7) et l’autre avec filtres à charbon régénérables(lavables). (Fig. 8)- Pour remplacer les filtres cassette à charbon X, tirer versl’extérieur le levier comme illustré (Fig. 7).- Pour remplacer les filtres à charbon régénérables Y, dégagerles fixations de leur emplacement en les tirant vers l’extérieur.(Fig.8)- Si l’emballage contient une bride comme celle indiquée Fig.9,il faut la fixer à la hotte à l’aide des vis fournies.EMPLOI ET ENTRETIEN• Il est conseillé de mettre en service la hotte quelques minutesavant de commencer à cuisiner. De même il est conseillé del’arrêter 15 minutes après avoir terminé la cuisson pour éliminerau maximum les odeurs et évacuer l’air vicié.Le bon fonctionnement de la hotte est lié à la fréquence des- 16 -opérations d’entretien et, plus particulièrement, à l’entretiendu filtre anti-graisse et du filtre à charbon actif.• Le filtre anti-graisse a pour rôle de retenir les particulesgrasses en suspension dans l’air. Il peut donc se boucher plus oumoins rapidement selon la fréquence d’utilisation de la hotte.- Pour prévenir tout risque d’incendie, il faut laver les filtresanti-graisse au moins tous les 2 mois, ces derniers son lavablesmême au lave-vaisselle.- Après plusieurs lavages, ils peuvent changer de couleur. Cecine donne pas droit à réclamation ni droit, par conséquent, àleur remplacement.Le non-respect des consignes de remplacement et de lavagepeut entraîner un risque d’incendie des filtres anti-graisse.• Les filtres à charbon actif servent à filtrer l’air qui estensuite renvoyé dans la pièce. Les filtres ne sont ni lavablesni régénérables, il faut par conséquent les changer au moinstous les quatre mois. La saturation du charbon actif dépendde l’utilisation plus ou moins prolongée de l’appareil, du typede cuisine pratiquée et de la régularité du nettoyage du filtreanti-graisse.• Nettoyez fréquemment la hotte, à l’intérieur et à l’extérieur, àl’aide d’un chiffon imbibé d’alcool dénaturé ou de détergentsliquides neutres non abrasifs.• N’utiliser l’éclairage de la hotte que pendant la cuisson, cedernier n’est en effet pas conçu pour un éclairage généralprolongé de la pièce. Une utilisation prolongée de l’éclairagediminue considérablement la durée de vie moyenne deslampes.• Remplacement des lampes halogènes (Fig. 10).Pour changer les lampes halogènes B retirez le verre C enfaisant levier dans les fentes prévues.Remplacez-les par des lampes de même type.Attention : ne touchez pas aux lampes mains nues.• Commandes: (Fig.11) lumineux le symbole sont le suivant:A = touche ECLAIRAGEB = touche OFFC = touche PREMIERE VITESSED = touche DEUXIEME VITESSEE = touche TROISIEME VITESSEF = touche MINUTEUR ARRET AUTOMATIQUE 15 minutes• Si votre appareil possède la fonction vitesse INTENSE,maintenir appuyé pendant environ 2 secondes le bouton Epour activer la fonction pendant 10 minutes, après quoi elleretournera à la vitesse établie en précédence.Quand la fonction est active, la LED clignote. Pour l’interrompreavant les 10 minutes, presser de nouveau sur la touche E.• En appuyant sur le bouton F pendant 2 secondes (lorsquela hotte est allumée), la fonction « clean air » s’active. Cettefonction démarre le moteur pour 10 minutes par heure à lapremière vitesse. Dès que la fonction est activée, le moteurdémarre en 1 ère vitesse pour 10 minutes pendant lesquellesles boutons F et C doivent clignoter en même temps. A la finde ce temps, le moteur s’arrête et la diode électroluminescentedu bouton F reste allumée sans clignoter jusqu’à ce que lemoteur reparte en 1 ère vitesse 50 minutes plus tard. Les diodesélectroluminescentes F et C recommencent à clignoter pendant10 minutes et ainsi de suite. En appuyant sur n’importe quelletouche à l’exception des touches de lumière, la hotte retourneimmédiatement à son fonctionnement normal (ex. en appuyantsur le bouton D la fonction « clean air » se désactive et le moteurpasse directement à la 2 ème vitesse ; en appuyant sur le boutonB la fonction se désactive).(*) La fonction “minuter arrêt automatique” retarde l’arrêt dela hotte, qui continuera de fonctionner à la vitesse de service
en cours au moment de l’activation de cette fonction, pendant15 minutes.• Saturation filtres anti-gras/charbon actif :- Quand la touche A se met à clignoter par intervalles de 2secondes, il est temps de laver les filtres anti-gras.- Quand la touche A se met à clignoter par intervalles de 0,5secondes, il est temps de changer les filtres à charbon.Après avoir remis le filtre propre à sa place, procéder à uneremise à zéro la mémoire électronique en appuyant 5 secondesde suite sur la touche A jusqu’à ce que cette dernière cessede clignoter.NOUS DECLINOS TOUTE RESPONSABILI TE POUR LESEVENTUELS DÉGATS PROVOQUÉS PAR L’INOBSERVATIONDES SUSDITES INSTRUCTIONS.- 17 -
ENGLISHGBGENERALCarefully read the following important information regardinginstallation safety and maintenance. Keep this informationbooklet accessible for further consultations. The appliance hasbeen designed for use in the ducting version (air exhaust tothe outside – Fig.1B), filtering version (air circulation on theinside – Fig.1A) or with external motor (Fig.1C).SAFETY PRECAUTION1. Take care when the cooker hood is o<strong>per</strong>ating simultaneouslywith an open fireplace or burner that depend on the air in theenvironment and are supplied by other than electrical energy,as the cooker hood removes the air from the environmentwhich a burner or fireplace need for combustion. The negativepressure in the environment must not exceed 4Pa (4x10⁻⁵ bar).Provide adequate ventilation in the environment for a safeo<strong>per</strong>ation of the cooker hood. Follow the local laws applicablefor external air evacuation.Before connecting the model to the electricity network:- Control the data plate (positioned inside the appliance)to ascertain that the voltage and power correspond to thenetwork and the socket is suitable. If in doubt ask a qualifiedelectrician.- If the power supply cable is damaged, it must be replacedwith another cable or a special assembly, which may beobtained direct from the manufacturer or from the TechnicalAssistance Centre.- This device must be connected to the supply networkthrough eiter a plug fused 3A or hardwired to a 2 fase spurprotected by 3A fuse.2. Warning !In certain circumstances electrical appliances may be adanger hazard.A) Do not check the status of the filters while the cookerhood is o<strong>per</strong>atingB) Do not touch bulbs or adjacent areas, during or straightafter prolonged use of the lighting installation.C) Flambè cooking is prohibited underneath the cookerhoodD) Avoid free flame, as it is damaging for the filters anda fire hazardE) Constantly check food frying to avoid that theoverheated oil may become a fire hazardF) Disconnect the electrical plug prior to anymaintenance.G) This appliance is not intended for use by young childrenor infirm <strong>per</strong>sons without su<strong>per</strong>visionH) Young children should be su<strong>per</strong>vised to ensure they donot play with the applianceI) There shall be adequate ventilation of the room whenthe rangehood is used at the same time as appliancesburning gas or other fuelsL) There is a risk of fire if cleaning is not carried out inaccordance with the instructionsThis appliance conforms to the European Directive EC/2002/96,Waste Electrical and Electronic Equipment (WEEE). By makingsure that this appliance is disposed of in a suitable manner,the user is helping to prevent potential damage to theenvironment or to public health.The symbol on the product or on the accompanyingpa<strong>per</strong>work indicates that the appliance should not be treatedas domestic waste, but should be delivered to a suitableelectric and electronic appliance recycling collection point.Follow local guidelines when disposing of waste. For moreinformation on the treatment, re-use and recycling of thisproduct, please contact your local authority, domestic wastecollection service or the shop where the appliance waspurchased.INSTALLATION INSTRUCTIONSAssembly and electrical connections must be carried outby specialised <strong>per</strong>sonnel.• Electric ConnectionThe appliance has been manufactured as a class II, thereforeno earth cable is necessary.The plug must be easily accessible after the installation ofthe appliance.If the appliance is equipped with power cord without plug, asuitably dimensioned omnipolar switch with 3 mm minimumopening between contacts must be fitted between theappliance and the electricity supply in compliance with theload and current regulations.The connection to the mains is carried out as follows:BROWN = L lineBLUE = N neutral• If the hob is electric, gas, or induction, the minimum distancebetween the same and the lower part of the hood must beat least 65 cm.If a connection tube composed of two parts is used, theup<strong>per</strong> part must be placed outside the lower part. Do notconnect the cooker hood exhaust to the same conductorused to circulate hot air or for evacuating fumes from otherappliances generated by other than an electrical source.Before proceeding with the assembly o<strong>per</strong>ations, removethe anti-grease filter(s) (Fig.2-3) so that the unit is easier tohandle.- In the case of assembly of the appliance in the suction versionprepare the hole for evacuation of the air.• We recommend the use of an air exhaust tube which hasthe same diameter as the air exhaust outlet hole. If a pipewith a smaller diameter is used, the efficiency of the productmay be reduced and its o<strong>per</strong>ation may become noisier.• If your appliance has been designed for use in habitationssupplied with acentralised suction device <strong>per</strong>form thefollowing o<strong>per</strong>ations:-The switch controls opening and closure of a valve usinga thermoelectical device. By placing the switch in the ONposition, after a minute, the valve opens rotating 90° allowingsuction of the stale air. By placing the switch in the OFFposition, the valve closes after 100 seconds.• InstallationThe following instruction should be followed to carry out thecorrect installation of the cooker hood.1. Mounting of the cooker hood on the lower side of the- 18 -
cupboard.2. Selection of the version (extraction or filtration)3. Before starting to fix the hood, disconnect the anti-greasefilter for easier appliance handling:- Open panel B as shown in Fig.2.- Pull handle C as shown in Fig.3.• Fitting the cooker hood into the lower part of the wallcabinetFor all measurements relating to the cooker hood, pleaserefer to Fig.4.Before fixing the cooker hood to the lower part of the cabinet,the following steps should be <strong>per</strong>formed:1- Remove the 4 screws E fixing the two cooker hood lamps H(RHS and LHS) in place as indicated in Fig. 5A.2- Remove the lamps H and disconnect the connectors W ofthe halogen lamps to make installation easier, as indicatedin Fig. 5B.3. Make sure the thickness of the cabinet falls within the rangeof values listed in Fig. 5C.Fit the cooker hood in the cabinet (Fig. 6) and make sure the4 springs are fixed in place well.Fix the cooker hood to the cabinet securely by using ascrewdriver to tighten the screws M until the appliance isflush with the cabinet (Fig. 6).4. Connect the connectors W of the halogen lamps again andreinstall the lamps H fixing them with the 4 screws E that werepreviously removed.• Extractor versionWhen installed in this way the appliance expels fumes outside,either through a <strong>per</strong>imeter wall or through existing ducting.It is therefore necessary to purchase a non-flammable airexhaust tube (not supplied) which complies with all currentlegislation and connect it to flange N (Fig.1B).• Filter hoodPlease note:In order to transform the hood from EXTRACTOR HOODinto FILTER HOOD the carbon filters must be ordered at yourdistributor as accessory.We have two different types of Kit, one with extractable carbonfilters (Fig.7) and the other one with re-usable carbon filters(washable). (Fig.8)- To replace the extractable active carbon filters X, pull leveroutwards as shown in Fig.7- To replace re-usable carbon filters Y, remove the bracketsfrom their seat, pulling them outwards. (Fig.8)If you find a bracket such as the one indicated in Fig.9 includedin the product packaging, this should be fixed to the hoodusing the supplied screws.USE AND MAINTENANCE• We recommend that the cooker hood is switched on beforeany food is cooked.We also recommend that the appliance is left running for15 minutes after the food is cooked, in order to thoroughlyeliminate all contaminated air.The effective <strong>per</strong>formance of the cooker hood depends onconstant maintenance; the anti-grease filter and the activecarbon filter both require special attention.• The anti-grease filter is used to trap any grease particlessuspended in the air, therefore is subject to saturation (thetime it takes for the filter to become saturated depends onthe way in which the appliance is used).- To prevent potential fire hazards, the anti-grease filters shouldbe washed a minimum of every 2 months (it is possible to usethe dishwasher for this task).- After a few washes, the colour of the filters may change. Thisdoes not mean they have to be replaced.If the replacement and washing instructions are not followed,the anti-grease filters may present a fire hazard.• The active carbon filters are used to purify the air which isreleased back into the room.The filters are not washable or re-usable and must be replacedat least once every four months.The active carbon filter saturation level depends on thefrequency with which the appliance is used, the type ofcooking <strong>per</strong>formed and the regularity with which the antigreasefilters are cleaned.• Clean the cooker hood frequently, both inside and outside,using a cloth which has been dampened with denaturedalcohol or neutral, non-abrasive liquid detergents.• The light on the cooker hood is designed for use duringcooking and not for general room illumination.Extended use of the light reduces the average duration ofthe bulb.• Replacing halogen light bulbs (Fig. 10).To replace the halogen light bulbs B, remove the glass paneC using a lever action on the relevant cracks.Replace the bulbs with new ones of the same type.Caution: do not touch the light bulb with bare hands.• Commands: (Fig.11) luminous the key symbols areexplained below:A = LIGHTB = OFFC = SPEED ID = SPEED IIE = SPEED IIIF = AUTOMATIC STOP TIMER - 15 minutes• If your appliance does not have the INTENSIVE speedfunction, press key E for two seconds and it will be activatedfor 10 minutes after which it will return to the previouslyset speed.When the function is active the LED flashes. To interrupt itbefore the 10 minutes have expired press key E again.• By pressing key F for two seconds (with the hood switchedoff) the “clean air” function is activated. This function switchesthe appliance on for ten minutes every hour at the first speed.As soon as this function is activated the motor starts up at thefirst speed for ten minutes, During this time key F and key Cmust flash at the same time.After ten minutes the motor switches off and the LED of keyF remains switched on with a fixed light until the motor startsup again at the first speed after fifty minutes and keys F andC start to flash again for ten minutes and so on.By pressing any key for the exclusion of the hood light thehood will return immediately to its normal functioning (e.g.if key D is pressed the “clean air” function is deactivated andthe motor moves to the 2nd speed straight away. By pressingkey B the function is deactivated).(*) The “automatic stop timer” delays stopping of thehood, which will continue functioning for 15 minutes at theo<strong>per</strong>ating speed set at the time this function is activated.- 19 -
• Active carbon/grease filter saturation:- When button A flashes at a frequency of 2 seconds, thegrease filters must be cleaned.- When button A flashes at a frequency of 0.5 seconds, thecarbon filters must be replaced.After the clean filter has been replaced, the electronic memorymust be reset by pressing button A for approximately 5seconds, until the light on the button stops flashing.THE MANUFACTURER DECLINES ALL RESPONSIBILITYFOR EVENTUAL DAMAGES CAUSED BY BREACHING THEABOVE WARNINGS.- 20 -
NEDERLANDSNLALGEMEENDe inhoud van dit boekje grondig doorlezen, daar hetbelangrijke informatie bevat voor veilige installatie, gebruiken onderhoud.Het boekje bewaren voor verdere raadpleging.Het apparaat is ontworpen als afzuigkap (Iuchtafvoer naarbuiten, waarbij gezorgd moet worden voor voldoendeluchttoevoer naar de keuken) of als filter (Iuchtrecirculatiebinnen). Het apparaat is ontworpen om gebruikt te wordenin de afzuigversie (externe afvoer van de lucht - Afb.1B), inde filterversie (interne hercirculatie van de lucht - Afb.1A) ofmet externe motor (Afb.1C).VEILIGHEIDSVOORSCHRIFTEN1. Opletten indien tegelijkertijd een afzuigkap en eenbrander of haard functioneren die afhankelijk zijn vande omgevingslucht en gevoed worden door een andereenergiebron dan de elektrische energie. De afzuigkapkan de lucht die de brander of haard nodig heeft voor deverbranding aan de omgeving onttrekken. De negatievedruk in de omgeving mag niet boven de 4 Pa (4x10⁻⁵ bar)liggen. Voor een veilige werking dient u te zorgen voor eengoede ventilatie van de ruimte. Voor de afvoer naar buitenmoet u zich houden aan de geldende voorschriften die vantoepassing zijn in uw land.L) Als de reinigingswerkzaamheden niet wordenuitgevoerd zoals aangegeven in de handleiding loopt uhet risico dat er brand uitbreekt.Dit apparaat is voorzien van het keurmerk Waste Electricaland Electronic Equipment (WEEE), zoals vastgesteld doorde Europese Norm 2002/96/EC. Door te zorgen dat deafvalverwijdering van dit product correct wordt uitgevoerd,werkt de gebruiker mee aan het voorkomen van potentiëlenegatieve consequenties voor omgeving en gezondheid.Het symbool op het product of op het bijgeleverdedocumentatiemateriaal geeft aan dat het niet moet wordenbehandeld als normaal huisvuil, maar dat het moet wordeningeleverd bij een speciaal verzamelpunt voor het recyclen vanelektrische en elektronische apparatuur. De afvalverwijderingmoet plaatsvinden in het respect van de gemeentelijkenormen. Voor meer informatie over het onderhoud en hetrecyclen van dit product kunt u contact opnemen met uwgemeente, de locale reinigingsdienst, of de winkel waar u hetproduct heeft aangeschaft.INSTALLATIE INSTRUCTIESDe werkzaamheden m.b.t de montage en de elektrischeaansluiting dienen verricht te worden door gespecialiseerd<strong>per</strong>soneel.Voordat u het model op het elektriciteitsnet aansluit:- Controleer op het gegevensplaatje (aan de binnenkant vanhet apparaat) of de spanning en het vermogen overeenkomenmet die van het net, en of de stekker geschikt is voor deaansluiting. Neem in geval van twijfel contact op met eengekwalificeerde elektricien.- Als de voedingskabel beschadigd is dient deze teworden vervangen door een andere kabel of een specialekabelcombinatie, beschikbaar bij de fabrikant of de technischeservicedienst.- Verbind het mechanisme aan de voeding m.b.v. en stekkermet zekering 3A of aan de twee draden van de tweefasebeschermd met een 3A zekering.2. Attentie!In bepaalde omstandigheden kunnen huishoudelijkeapparaten gevaarlijk zijn.A) Probeer niet om de filters te controleren terwijl deafzuigkap werktB) Raak de lampen en de zones vlakbij niet aan als deverlichting lang aan is of kort daarna.C) Het is verboden om eten met open vlam te bereidenonder de kapD) Voorkom open vlammen, deze zijn schadelijk voor defilters en brandgevaarlijkE) Controleer voortdurend gebakken waren om tevoorkomen dat hete olie vlam vatF) Voor elke willekeurige onderhoudsbeurt moet men deelektrische energie afschakelen.G) Dit apparaat is niet bestemd voor gebruik door kinderenof andere <strong>per</strong>sonen die toezicht nodig hebben.H) Controleer dat kinderen niet met het apparaatspelen.I) Als de afzuigkap tegelijk met andere apparaten wordtgebruikt die gas of andere brandstoffen verbranden, moethet vertrek goed worden geventileerd.- 21 -Elektrische aansluitingHet apparaat is gemaakt in klasse II (dubbel geïsoleerd),het snoer hoeft derhalve niet op een geaard stopcontactaangesloten te worden.De stekker moet na de installatie van het apparaat gemakkelijktoegankelijk zijn.In het geval dat het apparaat een kabel zonder stekkerheeft, moet men deze op het electrische net aansluitenmet een schakelaar tussen apparaat en net, waarvan allepolen onderbroken worden; de minimale opening tussende contacten moet 3 mm zijn en de schakelaar moetgedimensioneerd zijn voor de belasting en voldoen aan devan kracht zijnde normen.De aansluiting op het elektriciteitsnet moet als volgtuitgevoerd worden:BRUIN = L faseBLAUW = N nulleiding• Indien het gebruikte fornuis electrisch, op gas of metinductie werkt, dan moet de minimale afstand hiertussen enhet laagste deel van de kap tenminste 65 cm bedragen.Sluit de afvoer van de afzuigkap niet aan op een leidingwaardoor warme lucht circuleert of die gebruikt wordtvoor de afvoer van rook van apparaten die door een andereenergiebron dan elektrische energie gevoed worden.- Voordat u verder gaat met de montage dient u, om hetapparaat makkelijker te kunnen verplaatsen, de antivetfilter(s)te verwijderen (Afb.2-3).Bij montage van het apparaat in de afzuigversie dient u vooreen gat voor de luchtafvoer te zorgen.• We raden u aan een luchtafvoerbuis te gebruiken meteenzelfde diameter als die van de luchtafvoeropening. Hetgebruik van een reduceerelement zou de prestaties vanhet product kunnen be<strong>per</strong>ken en het lawaai kunnen doentoenemen.
• Indien uw apparaat ontworpen is voor het gebruik inwoningen die voorzien zijn met een gecentraliseerdafzuigsysteem dan voert u onderstaande handelingen uit:- De schakelaar regelt de opening en de sluiting van een klepvia een thermo-elektrisch systeem. Door de schakelaar op ONte zetten gaat de klep na één minuut open met een rotatie van90° zodat de vervuilde lucht afgezogen kan worden. Zet u deschakelaar op OFF dan gaat de klep na 100 seconden dicht.• InstallatieOm de afzuigkap op de juiste wijze te installeren moet hetvolgende schema gevolgd worden:1. Montage van de afzuigkap aan de onderkant van hethangkastje.2. Functiekeuze (zuigfunctie of filterfunctie).3. Voor u overgaat tot het monteren dient u, om het apparaatbeter te kunnen bewegen, het vetfilter uit te schakelen:- Open het paneel B zoals aangegeven in Afb. 2.- Trek aan het handvat C zoals aangegeven in Afb. 3.• Bevestiging van de kap aan de onderzijde van eenkeukenkastjeVoor de ruimte die de afzuigkap in beslag neemt kunt u deafmetingen naslaan op Afb. 1.Voor u de kap aan de onderzijde van het keukenkastjebevestigt dient u de volgende handelingen uit te voeren:1 - De 4 schroeven E waarmee de twee plafondlampen H(links en rechts) van de kap bevestigd zijn verwijderen zoalsaangegeven in Fig. 5A.2 – De plafondlampen H verwijderen en om de installatie tevergemakkelijken ook connectoren W van de halogeenlampenlosmaken zoals aangegeven in Fig.5B.3. Let goed op dat de dikte van het keukenkastje zich bevindttussen de afmetingen aangegeven in Afb. 5C.Monteer de kap in het keukenkastje (Afb.6) en let goed opdat de 4 veren op hun plaats zitten.Bevestig de kap definitief aan het keukenkastje door met eenschroevendraaier aan de schroeven M te draaien. Schroefhet vast totdat het apparaat tegen het keukenkastje aanzit(Afb. 6).4. De connectoren W van de halogeenlampen weer aansluitenen de plafondlampen H weer met de 4 eerder verwijderdeschroeven E bevestigen.• AfzuigversieMet dit type installatie voert het apparaat de dampen naarbuiten af door een buitenmuur of een bestaand kanaal.Hiertoe is het nodig een luchtafvoerbuis aan te schaffen(niet bijgeleverd) van een type dat voldoet aan de geldendenormen met betrekking tot brandbare stoffen en deze vastte maken aan de flens N (Afb.1B).• FilterversieAttentie!Om de kap te veranderen van de AFZUIG- naar de FILTERversie,moet men de koolfilters bij de eigen dealer alstoebehoren bestellen.- Er zijn twee verschillende typen kits verkrijgbaar, een metkoolstoffilterdozen (Fig.7) en de andere met herbruikbarekoolstoffilters (wasbaar). (Fig.8)- Om de koolstoffilterdozen X te vervangen, moet men dehendel naar buiten trekken, zoals aangegeven in Fig.7- Om de herbruikbare koolstoffilters Y te vervangen, moetmen de beugels verwijderen door ze naar buiten te trekken.(Fig.8)- Indien men in de verpakking een beugel vindt zoals- 22 -aangegeven in Fig.9 moet men deze met de bijgeleverdeschroeven aan de kap vastmaken.GEBRUIK EN ONDERHOUD• We raden aan het apparaat aan te zetten voordat u met debereiding begint van elke willekeurige maaltijd. We radenu aan het apparaat 15 minuten aan te laten nadat het etenbereid is, voor een optimale luchtverversing.De goede werking van de afzuigkap hangt af van eenregelmatig en correct onderhoud; in het bijzonder moetmen aandacht besteden aan het vetfilter en aan het filtermet actieve koolstof.• Het vetfilter dient voor het tegenhouden van de vetdeeltjesdie in de lucht circuleren, en raakt daarom oververzadigd naonvoorzienbare <strong>per</strong>ioden, afhankelijk van het gebruik vanhet apparaat.- Om eventueel brandgevaar te voorkomen dient u maximaalom de 2 maanden het vetfilter te wassen. Dit kan ook in deafwasautomaat.- Nadat u het filter enige malen heeft gewassen kan het lichtverkleuren. Dit geeft echter geen recht op vervanging vanhet filter.Voert men de aanwijzingen betreft de vervanging of hetwassen niet op, dan kan er brandgevaar optreden in devetfilters.• De koolstoffilters zuiveren de lucht die weer in de ruimteteruggevoerd wordt. De filters kunnen niet gereinigd ofgeregenereerd worden en moeten minimaal eens in de viermaanden vervangen worden. De koolstofverzadiging hangtaf van een al dan niet intensief gebruik van de afzuigkap, vanhet type keuken en van de regelmaat waarmee de vetfiltersgereinigd worden.• Reinig de afzuigkap regelmatig van binnen en van buiten metbehulp van een doek gedrenkt in spiritus of in een neutraal,niet schurend afwasmiddel.• De verlichtingsinstallatie is ontworpen om gebruikt teworden tijdens het koken en niet voor langdurige verlichtingvan de omgeving. Het langdurige gebruik van de verlichtingvermindert de levensduur van de lampen aanzienlijk.• Vervanging van de halogeenlampen (Fig.10).Om de halogeenlampen B te vervangen moet men het glaasjeC verwijderen door een voorwerp als hefboom in de daarvoorbestemde spleten te steken.Vervang met lampen van hetzelfde type.Opgelet: raak de lampen niet met de blote handen aan.• Kontroller : (Fig.11) med iys zijn de symbolen hieronderweergegeven:A = knop LICHTB = knop UITC = knop EERSTE SNELHEIDD = knop TWEEDW DERDE SNELHEIDE = knop DERDE SNELHEIDF = knop TIMER AUTOMATISCHE ONDERBREKING na 15minuten• Indien uw apparaat voorzien is van de INTENSIEVEsnelheidsfunctie, drukt u dan ongeveer 2 seconden op toetsE zodat de functie geactiveerd wordt gedurende 10 minuten,waarna het terugkeert naar de eerder ingestelde snelheid.Wanneer de functie actief is knip<strong>per</strong>t de LED: Om de functiete onderbreken voordat de 10 minuten verstreken zijn druktu opnieuw op toets E.Door 2 seconden op toets F te drukken (met uitgeschakelde
kap) wordt de functie “clean air” geactiveerd. Deze functieschakelt om het uur de motor 10 minuten in bij de eerstesnelheid. Zodra de functie geactiveerd wordt start de motorbij de 1 e snelheid, gedurende 10 minuten. Tijdens dezetijd moeten de toetsen F en C tegelijkertijd knip<strong>per</strong>en. Nahet verstrijken van deze tijd gaat de motor uit en blijft deled van toets F <strong>per</strong>manent branden tot na 50 minuten demotor opnieuw van start gaat bij de eerste snelheid en deleds van de toetsen F en C weer gedurende 10 minutenknip<strong>per</strong>en, enz. Door op ongeacht welke toets te drukken,met uitzondering van de lichten, keert de kap onmiddellijkterug naar de gewone werking (drukt u bijvoorbeeld op toetsD dan wordt de functie “clean air” gedeactiveerd en gaat demotor onmiddellijk over naar de 2 de snelheid. Drukt u op toetsB dan wordt de functie gedeactiveerd).(*) De knop “timer/automatische onderbreking” zorgtervoor dat de afzuigkap niet meteen stopt, deze zal voor 15minuten blijven functioneren, op dezelfde snelheidsstandwaarop de kap ingesteld stond.• Vetfilters/koolstoffilters verzadigd:- Wanneer de toets A knip<strong>per</strong>t met een frequentie van 2 sec.,moeten de vetfilters worden gereinigd.- Wanneer de toets A knip<strong>per</strong>t met een frequentie van 0,5 sec.,moeten de koolstoffilters worden vervangen.Als het schone filter weer op zijn plaats zit dient u een resetuit te voeren van het elektronische geheugen door circa 5seconden op de toets A te drukken, totdat deze stopt metknip<strong>per</strong>en.DE FABRIKANT IS NIET AANSPRAKELIJK VOOR SCHADEDIE VOORTVLOEIT UIT HET NIET IN ACHT NEMEN VAN DEBOVENSTAANDE VOORSCHRIFTEN.- 23 -
PORTUGUÊSPGENERALIDADESLer cuidadosamente o conteúdo do presente manual já queeste fornece indicações importantes referentes à segurançade instalação, de uso e de manutenção. Conservar o manualpara qualquer ulterior consulta. O aparelho foi projectadopara utilização em versão aspirante (evacuação de ar para oexterior - Fig.1B), filtrante (circulação de ar no interior - Fig.1A)ou com motor exterior (Fig.1C).ADVERTÊNCIAS PARA A SEGURANÇA1. Prestar atenção se estão funcionando contemporaneamenteuma coifa aspirante e um queimador ou um fogão dependentesdo ar ambiente e alimentados por uma energia que não aelétrica, já que a coifa, aspirando, tira do ambiente o ar que oqueimador ou o fogão necesitam para a combustão. A pressãonegativa no local não deve ser su<strong>per</strong>ior a 4 Pa (4x10⁻⁵ bar).Para um funcionamento seguro, providenciar uma oportunaventilação do local. Para a evacuação externa, ater-se àsdisposições vigentes no seu País.Antes de ligar o modelo à rede eléctrica:- Controle a placa dos dados (posta no interior do aparelho)para verificar que a tensão e a potência correspondam às darede e que a tomada seja apropriada. Em caso de dúvidasinterpele um electricista qualificado.- Se o cabo de alimentação estiver danificado, deverá sersubstituído por um cabo ou um conjunto especiais fornecidospelo fabricante ou pelo seu serviço de assistência técnica.- Ligar o dispositivo à rede de alimentação através de umaficha com fusível 3A ou aos dois fios da bifásica protegidospor um fusível 3A.2. Atenção!Em determinadas circunstâncias, os electrodomésticospodem ser <strong>per</strong>igosos.A) Não procure controlar os filtros com o exaustor emfuncionamento.B) Não toque as lâmpadas e as áreas adjacentes, durante elogo pós o uso prolongado da instalação de iluminação.C) É proibido cozinhar alimentos flambé sob o exaustor.D) Evite a chama livre, porque é danosa para os filtros e<strong>per</strong>igosa para os incêndios.E) Controle constantemente os alimentos fritos para evitarque o óleo aquecido pegue fogo.F) Antes de efectuar qualquer manutenção, desligue oexaustor da rede eléctrica.G) Este aparelho não é destinado ao uso por parte decrianças ou pessoas que precisem de su<strong>per</strong>visão.H) Não <strong>per</strong>mita que as crianças brinquem com oaparelho.I) Quando o exaustor for utilizado contemporaneamentea aparelhos que queimam gás ou outros combustíveis, olocal deverá ser adequadamente ventilado.L) Se as o<strong>per</strong>ações de limpeza não forem efectuadas norespeito das instruções, existe o risco de incêndio.Este aparelho está marcado em conformidade com aDirectiva Europeia 2002/96/EC, Waste Electrical and ElectronicEquipment (WEEE).Assegurar-se que este aparelho seja eliminado de maneiracerta, o utilizador contribui a prevenir as consequênciaspotenciais negativas para o meio ambiente e a saúde.O símbolo no aparelho ou na documentação deacompanhamento indica que o mesmo não deve ser tratadocomo resíduo doméstico, mas deve ser levado a um pontode colecta idóneo para reciclar equipamento eléctrico eelectrónico. Para eliminá-lo obedecer os regulamentos locaissobre a eliminação de resíduos. Para maiores informaçõessobre o tratamento, a recu<strong>per</strong>ação e a reciclagem desteaparelho, contactar o serviço local encarregado pelacolecta de resíduos domésticos ou a loja onde o mesmo foicomprado.ISTRUÇÕES PARA A INSTALAÇÃOAs o<strong>per</strong>ações de montagem e ligação eléctrica devem serefectuadas por pessoal especializado.• Conexão elétricaO aparelho é construído em classe II, portanto nenhum cabodeve ser ligado à tomada de terra.A ficha deve ser facilmente acessível após a instalação doaparelho.No caso em que o aparelho não disponha de cabo sem ficha,para ligá-lo à rede eléctrica será necessário interpor uminterruptor omnipolar com abertura mínima de 3 cm entreos contactos, dimensionado para a carga e que atenda aosregulamentos em vigor.A ligação à rede elétrica deve ser feito como segue:MARROM = L faseAZUL = N neutro• Se o plano de cozedura utilizado for eléctrico, a gás ou porindução, a distância mínima entre o mesmo e a parte maisbaixa do exaustor deverá ser de no mínimo 65 cm.Tendo que ser usado um tubo de conexão composto de duasou mais partes, a parte su<strong>per</strong>ior deve ficar externamenteàquela inferior. Não conectar a descarga da coifa a umduto pelo qual circule ar quente ou utilizado para evacuarfumos de aparelhos alimentados por uma energia que nãoa elétrica. Antes de proceder às o<strong>per</strong>ações de montagem,para um manejo mais fácil do aparelho retirar os filtros antigordura(Fig. 2-3).No caso de montagem do aparelho em versão aspirantepredisponha o furo de evacuação do ar.• Aconselha-se o uso de um tubo de evacuação do ar como mesmo diâmetro da boca de saída do ar. O uso de umaredução poderia diminuir o desempenho do produto eaumentar o ruído.• Se o seu aparelho foi projectado para ser utilizado emhabitações com aspiração centralizada, execute as seguinteso<strong>per</strong>ações:- O interruptor comanda a abertura e o fecho de uma válvulaatravés de um dispositivo termoeléctrico. Comutando ointerruptor para a posição ON, após um minuto, a válvulaabre-se rodando 90° e <strong>per</strong>mitindo assim a aspiração do arviciado. Comutando o interruptor para a posição OFF, após100 segundos, a válvula fecha-se.• InstalaçãoPara instalar a coifa de maneira correta deve ser seguido e- 24 -
seguinte esquema:1. Montagem da coifa na parte inferior do armário pênsil2. Escolha da versão (aspirante ou filtrante)3. Antes de efectuar as o<strong>per</strong>ações de montagem, parafacilitar as manobras com o aparelho, desinserir o filtroanti-gordura:- Abra o painel B como indicado na Fig. 2.- Puxe o pegador C como indicado na Fig. 3.• Fixação da coifa na parte inferior do armário suspensoPara as medidas da coifa, veja a Fig. 4.Antes de fixar a coifa na parte inferior do armário suspenso,efectue as seguintes o<strong>per</strong>ações:1- Remova os 4 parafusos E que fixam as duas plafonnières H(dir e esq) do exaustor, como indicado na Fig. 5A.2 – Remova as plafonnières H e para facilitar a instalação,desligue também os conectores W das lâmpadas halogéneas,como indicado na Fig. 5B.3. Preste atenção para que a espessura do móvel esteja dentrodas quotas indicadas na Fig. 5C.Encaixe a coifa no móvel (Fig. 6) e preste atenção para que as4 molas estejam bem encaixadas.Fixe definitivamente a coifa ao armário suspenso agindo comuma chave de fendas nos parafusos M e parafuse até nivelaro aparelho com o móvel (Fig. 6).4. Ligue novamente os conectores W das lâmpadas halogénease reinstale as plafonnières H fixando-os com os 4 parafusos Eprecedentemente removidos.• Versão aspiranteCom este tipo de instalação o aparelho descarrega osvapores para o exterior através de uma parede <strong>per</strong>iférica oucanalização existente.Será necessário adquirir um tubo para a evacuação de ar(não fornecido) do tipo previsto pelas regulamentações emvigor que terá de ser não inflamável e conectá-lo ao rebordoN (Fig. 1B).• Versão filtranteAtenção!Para transformar o exaustor de versão <strong>ASPIRANTE</strong> paraversão FILTRANTE, encomende ao seu revendedor os filtrosde carvão activo.- Dispomos de dois diferentes conjuntos, um com os filtrosde carvão tipo caixa (Fig.7) e outro com os filtros de carvãoregeneráveis (laváveis). (Fig.8)- Para substituir os filtros de carvão activo tipo caixa X, devesepuxar para o lado externo a alavanca, como indicado naFig. 7- Para substituir os filtros de carvão regeneráveis Y, removeros estribos das suas posições, puxando-os para o ladoexterior. (Fig.8)- Se na embalagem houver um estribo como aquele indicadona Fig.9 , deverá ser fixado ao exaustor através dos parafusosfornecidos com o produto.USO E MANUTENÇÃO• É recomendável colocar o aparelho a funcionar antes deproceder com a cozedura de qualquer alimento.É recomendável deixar o aparelho 15 minutos a funcionar,depois de ter terminado a cozedura dos alimentos, paradescarregar inteiramente o ar impuro.O bom funcionamento do exaustor depende de uma- 25 -correcta e constante manutenção; uma atenção especialdeve ser dedicada ao filtro anti-gordura e ao filtro de carvãoactivado.• O filtro anti-gordura tem a função de reter as partículasgordurosas suspensas no ar, portanto está sujeito à obstruir-seapós algum tempo, conforme o uso que se faz do aparelho.- Para prevenir o <strong>per</strong>igo de eventuais incêndios, no máximo acada 2 meses é necessário lavar os filtros anti-gordura, para osquais é possível utilizar também a máquina de lavar louça.- Após algumas lavagens, podem verificar-se alterações dacor.Este fato não dá direito a reclamações para a eventualsubstituição dos mesmos.No caso de não cumprimento das instruções de substituiçãoe lavagem, pode-se verificar o <strong>per</strong>igo de incêndio dos filtrosanti-gordura.• Os filtros de carvão activado servem para depurar o ar queserá reintroduzido no ambiente.Os filtros de carvão activado não são laváveis ou regeneráveise deverão ser substituídos no máximo a cada quatro meses.A saturação do carvão activado depende do uso mais oumenos prolongado do aparelho, do tipo de cozinha e daregularidade com a que é efectuada a limpeza do filtroanti-gordura.• Limpar frequentemente o exaustor, tanto internamentequanto externamente, usando um pano humedecido comálcool desnaturado ou detergentes líquidos neutros e nãoabrasivos.• O sistema de iluminação foi projectado para o uso durantea cozedura e não para um uso prolongado de iluminaçãogeral do ambiente.O uso prolongado da iluminação diminui sensivelmente aduração média das lâmpadas.• Substituição das lâmpadas de halogéneo (Fig.10).Para substituir as lâmpadas de halogéneo B tire o vidro Cfazendo forças nas específicas espessuras.Substitua com lâmpadas do mesmo tipo.Atenção: não toque a lâmpada directamente com as mãos.• Comandos: (Fig.11) luminosos a simbologia é indicadaa seguir:A = botão ILUMINAÇÃOB = botão OFFC = botão PRIMEIRA VELOCIDADED = botão SEGUNDA VELOCIDADEE = botão TERCEIRA VELOCIDADEF = botão TIMER PARADA AUTOMÁTICA 15 minutos• Se o seu aparelho for dotado da função velocidadeINTENSIVA, manter pressionada a tecla E por cerca 2segundos e esta função será ativada durante 10 minutos,porque depois volta para a velocidade anteriormenteprogramada.Quando a função está activa, o LED pisca. Para a interrom<strong>per</strong>antes dos 10 minutos, prima novamente a teclas E• Pressionar a tecla F por 2 segundos (com o exaustordesligado ) e ativa-se a função “clean air”. Esta função liga omotor por 10 minutos a cada hora na primeira velocidade.Quando inicialmente ativada esta função, inicia-se o motorna primiera velocidade com uma duração de 10 minutos,durante os quais devem piscar contemporaneamente a teclaF e a tecla C. Depois disto, o motor se desliga e o led da teclaF <strong>per</strong>manece aceso com a sua luz fixa até que, depois de 50minutos, o motor liga-se na primeira velocidade e os leds F eC recomeçam a piscar por 10 minutos e assim sucessivamente.Pressionando qualquer tecla, menos as das luzes o exaustor
torna imediatamente ao seu funcionamento normal (porexemplo: se pressiono a tecla D desativa-se a função “clean air”e o motor trabalha em sua segunda velocidade; pressionandoa tecla B a função desativa-se).(*) A função “timer parada automática” retarda a parada dacoifa, que continuará a funcionar à velocidade de exercícioem curso no momento em que foi atuada esta função, de15 minutos.• Saturação dos filtros anti-gordura carvão activo:- Quando a tecla A piscar com uma frequência de 2 seg. osfiltros anti-gordura deverão ser lavados.- Quando a tecla A piscar com uma frequência de 0,5 seg. osfiltros carvão deverão ser substituídos.Uma vez colocado o filtro limpo deve-se restabelecer a memóriaelectrónica, carregando na tecla A por aproximadamente 5segundos até o indicador luminoso apagar-se.DECLINA-SE DE QUALQUER RESPONSABILIDADE POREVENTUAIS DANOS PROVOCADOS PELA INOBSERVÂNCIADAS ADVERTÊNCIAS ACIMA.- 26 -
3LIK0578