10049469 - Pivolok, porte de d... - Maax
10049469 - Pivolok, porte de d... - Maax
10049469 - Pivolok, porte de d... - Maax
- No tags were found...

Create successful ePaper yourself
Turn your PDF publications into a flip-book with our unique Google optimized e-Paper software.
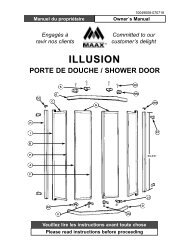
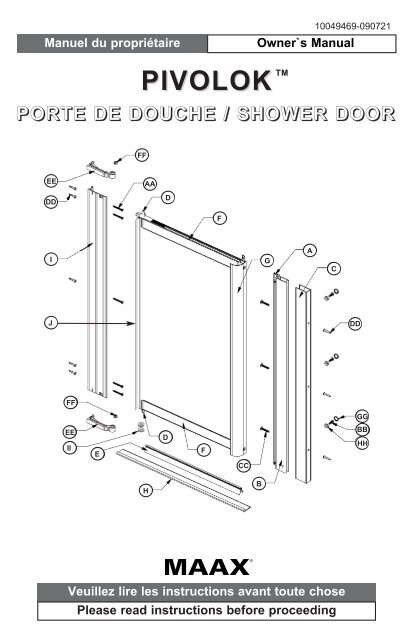
Manuel du propriétairePIVOLOKOwner`s ManualPORTE DE DOUCHE / SHOWER DOORTM<strong>10049469</strong>-090721FFEEDDAADFIGACJDDFFGGEEIIEDFCCBBHHHBVeuillez lire les instructions avant toute chosePlease read instructions before proceeding
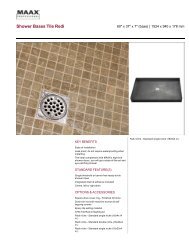
ILLUSTRATION DES PIÈCESILLUSTRATION OF COMPONENTSA 10048207 B 10041305 C 10041045 D 10017437 E 10048838F 10041084G 10041121H 10041369I 10041276J 10041252SAC DE QUINCAILLERIEHARDWARE BAGAA 10047009 BB 10047235 CC 10047010 DD 10048201 EE 10048217FF 10048219GG10048075 / 10048084 HH 10002880 II 10047146-20Dessin non à l’échelleDrawings not to scaleDes changements peuvent être apportés aux produits sans préavis. Veuillez utiliserle manuel fourni avec le produit.Product specifications are subject to change without notice. Use owner’s manualinstructions supplied with product.2# <strong>10049469</strong>-090721
DESCRIPTION DES PIÈCESPARTS DESCRIPTIONITEMDESCRIPTION DES PIÈCESPARTS DESCRIPTIONQUANT.# PIECE #ABCDEFGHIJAIMANTMONTANT D’ALUMINIUMMONTANT MURALAXE DE PIVOTDÉFLECTEUR SOUPLECADRE HAUT / BASPOIGNÉE RONDESEUILMONTANT DE PIVOTCADRE LATÉRALMAGNETSTRIKERWALL JAMBPIVOT PINPLASTIC DRIP SHIELDTOP / BOTTOM FRAMEROUND PULL FRAMESILLPIVOT JAMBSIDE FRAME111212111110048207100413051004104510017437100488381004108410041121100413691004127610041252ITEMSAC DE QUINCAILLERIEHARDWARE BAGQUANT.# PIECE #AABBCCDDEEFFGGHHIIVIS #6 X 1-1/4’’VIS #8 X 1/2’’VIS #8 X 1’’CHEVILLESUPPORT DE PIVOT EN PLASTIQUEBARRURECAPUCHON À VIS, NOIR / BLANCRONDELLEESPACEUR#6 X 1-1/4’’ SCREW#8 X 1/2’’ SCREW#8 X 1’’ SCREWPLUGPLASTIC PIVOT SUPPORTSNAPNUTBALCK / WHITE SNAP CAPWASHERSPACER53382333210047009100472351004701010048201100482171004821948075 / 480841000288010047146-20Les comman<strong>de</strong>s pour les pièces <strong>de</strong> remplacement doivent inclure leurs numéros,<strong>de</strong>scription, dimensions et couleur.When or<strong>de</strong>ring replacement parts, please refer to part number, <strong>de</strong>scription,dimensions and color.AVANT DE DÉBUTERBEFORE STARTINGLors <strong>de</strong> la réception, vérifiez si votre <strong>porte</strong> <strong>de</strong>douche ou <strong>de</strong> bain est en bonne condition et sitoutes les pièces sont incluses dans le sac <strong>de</strong>quincaillerie. S’il y a un problème, signalez-leimmédiatement à votre distributeur.Équipement requis: Tournevis, plat, carré ou étoile #1 et #2 Crayon Perceuse Ruban à masquer Mèche 1/8”, 7/64”, 3/16” ou 7/32”(selon le mur) Gallon à mesurer Niveau Calfeutrant au silicone clairATTENTION:Pour un fonctionnement optimal, il est important que la<strong>porte</strong> <strong>de</strong> douche soit installée <strong>de</strong> niveau sur <strong>de</strong>s murségalement <strong>de</strong> niveau.Manipulez les pièces <strong>de</strong> métal avec soin.Upon reception, verify if your shower or tub dooris in good condition and make sure that all partsare inclu<strong>de</strong>d in the hardware bag. If you have aproblem, please contact your distributorimmediately.Required equipment: Flat, square or Phillips #1 and #2 screwdriver Pencil Drill Masking tape 1/8”, 7/64”, 3/16” or 7/32” drill bit (According to wall) Measuring tape Level Clear silicone caulkingWARNING:For optimum operation, it is important that the showerdoor be installed perfectly levelled on walls that are alsoperfectly leveled.Manipulate metal parts with care.# <strong>10049469</strong>-090721 3
SPECIAL INSTRUCTIONS FOR INSTALLATION IN PREFABRICATED STALLS.Fiberglass or acrylic construction may not be of sufficient strength to support yourshower or tub door enclosure. To provi<strong>de</strong> for a secure mounting of this door it isimportant that you use wood framing behind the face edge of your stall. Apply a beadof silicone between walls and base of stall.BEFORE INSTALLATION :Wall and base joints must be siliconed properly.ÉTAPE 1 - Porte réversibleINSTRUCTIONS SPÉCIALSSPECIAL INSTRUCTIONSINSTRUCTIONS SPÉCIALES POUR INSTALLATION SUR DES ENCLOS PRÉFABRIQUÉS.Des structures <strong>de</strong> fibre <strong>de</strong> verre ou <strong>de</strong> plastique peuvent ne pas avoir la résistance nécessairepour sup<strong>porte</strong>r votre <strong>porte</strong> <strong>de</strong> douche ou <strong>de</strong> bain. Pour obtenir une installation sécuritaire <strong>de</strong> votre<strong>porte</strong>, il est important d'utiliser un cadrage <strong>de</strong> bois à l'arrière du rebord <strong>de</strong> votre enclos.AVANT L'INSTALLATION :Assurez-vous qu'un joint <strong>de</strong> silicone a été tiré entre les murs et la base <strong>de</strong> plastique.I. Déterminez le sens d’ouverture <strong>de</strong> la <strong>porte</strong> en fonction <strong>de</strong>la pomme <strong>de</strong> douche (votre <strong>porte</strong> est réversible). Fig. AII.Marquez l’emplacement du seuil (H) à 1/8”(3mm) durebord intérieur <strong>de</strong> la douche. Fig. BSTEP 1 - Reversible doorI. Deci<strong>de</strong> from which direction the door will open, taking intoconsi<strong>de</strong>ration location of the shower head (this door isreversible). Fig. AFig. A1/8’’(3mm)II.Mark sill (H) location 1/8” (3mm) away from the interioredge of the shower stall. Fig. BFig. BHÉTAPE 2 - Installation du seuilI. Mesurez l’ouverture <strong>de</strong> la <strong>porte</strong> sur la marque faite à l’étape 1.II. Coupez le seuil (H) 1/16”(2 mm) plus court que l’ouverture.III. Mettre un léger cordon <strong>de</strong> silicone dans les rainures sous leseuil. Fig.CIV. Installez et retenez en place à l’ai<strong>de</strong> <strong>de</strong> ruban àmasquer. Fig.DFig. CSiliconeSTEP 2 - Sill installationOuverture / Opening- 1/16’’ (2mm)I. Measure door opening along the mark ma<strong>de</strong> in step 1.II. Cut sill (H) 1/16” (2mm) shorter than the opening.III. Apply a light bead of silicone to the grooves un<strong>de</strong>rneath thesill. Fig.CIV. Install and hold in place with masking tape. Fig.D4# <strong>10049469</strong>-090721Fig. DHRuban à masquerMasking tape
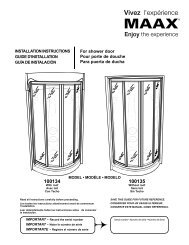
STEP 3 - Installation du montant <strong>de</strong> pivotI. Insérez le support <strong>de</strong> pivot en plastique (EE) sur le bas dumontant <strong>de</strong> pivot (I).II.Bloquez l’assemblage avec la barrure (FF).IMPORTANT: Avant <strong>de</strong> fixer le montant assurez-vousd’avoir un cadre <strong>de</strong> bois <strong>de</strong>rrière votre mur afin <strong>de</strong> fixersoli<strong>de</strong>ment le montant. Si ce n’est pas le cas, noussuggérons <strong>de</strong> le fixer à l’ai<strong>de</strong> d’ailettes en nylon ou àressort ou utilisez les ancrages appropriés (cheville DD).Cela dans le but d’assurer un ancrage soli<strong>de</strong>.I2.FFIII. Placez le montant <strong>de</strong> pivot (I) contre le rebord extérieur duseuil (H).1.IV. Nivelez verticalement.V. Marquez l’emplacement <strong>de</strong>s trous avec un crayon. Déplacerle montant mural (I), puis percer <strong>de</strong>s trous aux marques.Mèches: -Pour céramique: 7/32” (6mm) au carbure-Pour plastique: 1/8”(3,2mm)-Pour mur préfabriqué: 3/16’’ (4,8mm)EEVI. Insérez les chevilles <strong>de</strong> plastique (DD) excepté sur les murspré-fabriqués.VII. Vissez avec 5 vis (AA).STEP 3 - Pivot jamb installationI. Insert plastic pivot support (EE) on bottom of pivot jamb (I).II.Lock with snap nut (FF).IMPORTANT: Before securing the wall jamb, make sure youhave a wood structure behind your wall. If it is not thecase, we suggest you fix the wall jamb with nylon orspring toggle bolts or use proper anchor hardware (plugDD). To ensure a solid wall anchoring.III. Stand pivot jamb (I) upright against the exterior lip of thesill (H).IV. Level vertically.IAAEENiveauLevelDDV. Mark holes and si<strong>de</strong> locations with pencil. Remove pivotjamb (I) and drill holes at marked locations.HDrill bits:-For ceramic tile wall: 7/32” (6mm) carbi<strong>de</strong>-For plastic wall: 1/8” (3,2mm)- For dry wall: 3/16’’ (4,8mm)VI. Insert plastic plug (DD) except for prefab walls.VI. Fasten with five screws (AA).# <strong>10049469</strong>-090721 5
ÉTAPE 4 - Installation <strong>de</strong> la <strong>porte</strong>I. Insérez le déflecteur souple (E) dans le bas <strong>de</strong> la <strong>porte</strong> etcoupez le surplus. Vous pouvez humecter le déflecteursouple pour faciliter l’insertion. Fig. APorteDoorFig. AII.Insérez l’axe du bas du panneau dans le support <strong>de</strong> pivoten plastique (EE). Fig. BIII. Maintenez en place et insérez l’autre support <strong>de</strong> pivot enplastique (EE) au haut du montant <strong>de</strong> pivot (I) et sur l’axe<strong>de</strong> pivot. Fig. CEIV. Bloquez l’assemblage avec la barrure <strong>de</strong> plastique (FF).( Voir étape 3 )STEP 4 - Door installationI. Insert plastic drip shield (E) into the bottom of the doorand cut surplus plastic. Fig. A You can dampen the dripshield to facilitate insertion.II.Insert lower pin of door panel into lower plastic pivotsupport (EE). Fig. BIEEFig. BPorteDoorAxePinIII. Hold in place, insert upper plastic pivot support (EE)onto pivot jamb (I) and pin of door panel. Fig. CEEIV. Lock with plastic snap nut (FF). (See step 3)1.FF2.IEEAxePinIFig. CPorteDoor6# <strong>10049469</strong>-090721
ÉTAPE 5 - Installation du montant muralIMPORTANT: Avant <strong>de</strong> fixer le montant assurez-vousd’avoir un cadre <strong>de</strong> bois <strong>de</strong>rrière votre mur afin <strong>de</strong> fixersoli<strong>de</strong>ment le montant. Si ce n’est pas le cas, noussuggérons <strong>de</strong> le fixer à l’ai<strong>de</strong> d’ailettes en nylon ou àressort ou utilisez les ancrages appropriés (chevilleDD). Cela dans le but d’assurer un ancrage soli<strong>de</strong>.I. Alignez le montant mural (C) sur le bord intérieur du seuil(H) et laissez un espace <strong>de</strong> 7/16” (11 mm) entre ceux-ci.II.Nivelez verticalement.LevelCIII. Marquez l’emplacement <strong>de</strong>s trous avec un crayon.Déplacer le montant mural (C) et percez le mur vis-à-visles marques.IV. Insérez les chevilles <strong>de</strong> plastique (DD), excepté dans unmur préfabriqué.V. Vissez le montant mural avec les vis (CC) en place.7/16’’HCrayonPencilSTEP 5 - Wall jamb installationIMPORTANT: Before securing the wall jamb, make sureyou have a wood structure behind your wall. If it is notthe case, we suggest you fix the wall jamb with nylon orspring toggle bolts or use proper anchor hardware (plugDD). To ensure a solid wall anchoringCI. Align the wall jamb (C) with the sill edge (H), leaving a7/16” (11 mm) gab between the latter.II.Level verticallyIII. Mark holes and si<strong>de</strong> locations with pencil. Remove walljamb (C) and drill holes at marked locations.IV. Insert plastic plug (DD)except for prefab walls.V. Use screw (CC) to fit the wall jamb in place.CCDD# <strong>10049469</strong>-090721 7
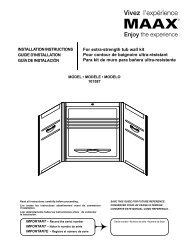
ÉTAPE 6 - Ajustement <strong>de</strong> la <strong>porte</strong>I. Incliner légèrement la <strong>porte</strong> vers l’intérieur à l’ai<strong>de</strong> <strong>de</strong>s visd’ajustement pour permettre l’écoulement <strong>de</strong> l’eau àl’intérieur <strong>de</strong> la douche. Fig.APorteDoorII.Insérez le percuteur (B) à l’intérieur du montant (C) tel quela figure B.III. Fermez la <strong>porte</strong> et ajustez le percuteur <strong>de</strong> façon à ce qu’ilsoit parallèle à celle-ci, en laissant un espace entre les<strong>de</strong>ux (au minimum <strong>de</strong> 1/16’’(1,6mm) et au maximum <strong>de</strong>1/4” (6,5mm). Fig CEAjustementAdjustmentFig. AIV. Marquez l’emplacement <strong>de</strong>s trous sur le percuteur (B)(intérieur <strong>de</strong> la douche) et percez seulement la premièreparoi <strong>de</strong> celui-ci. Utilisez une mèche <strong>de</strong> 7/64’’ (3mm).CBV. Fixez à l’ai<strong>de</strong> <strong>de</strong> trois vis (BB), <strong>de</strong>s ron<strong>de</strong>lles (HH) et <strong>de</strong>scapuchons à vis (GG). Fig BBBHHPorteDoorSTEP 6 - Door adjustementI. Slightly incline the door towards the insi<strong>de</strong> using adjustmentscrews to permit proper water evacuation. Fig.A.GGFig. BII.Insert the striker (B) insi<strong>de</strong> the wall jamb (C) as shown inthe figure B.Fig. CIII. Close the door and adjust the striker, leaving a 1/16” gapbetween the striker and the pull frame (a minimum of 1/16”(1,6mm) and a maximum of 1/4” (6,5mm). Fig.CIV. Mark hole locations on the striker (interior of the shower)and drill through the first wall of the striker (B) only. Use a7/64” (3mm) drill bit.V. Fasten it with three screws (BB) use the washer (HH) andthe snap cap (GG) with the screw (BB). Fig BMinimum 1/16’’(1,6mm)Maximum 1/4’’(6,5 mm)8# <strong>10049469</strong>-090721
ÉTAPE 7 - Ajustement <strong>de</strong> la <strong>porte</strong> (suite)I. Vérifiez si la <strong>porte</strong> ferme bien. Si ce n’est pas le cas,enlevez-la en vous référant à l’étape 5.III.Insérez dans le pivot du bas <strong>de</strong> la <strong>porte</strong> un espaceur (II) ou<strong>de</strong>ux pour réduire la friction entre le déflecteur souple (E) etle cadre <strong>de</strong> <strong>porte</strong>.III. Réinstallez la <strong>porte</strong> selon l’étape 5.PorteDoorSTEP 7 - Door adjustment (continued)AxePinI. If the door does not open easily, remove the door (refer tostep 5).IIEII.Slip one or two spacers (II) as required to reduce thefriction between the plastic drip shield (E) and the doorframe.EEIII. Reinstall door as per step 5.ÉTAPE 8 - SiliconeI. Appliquez le silicone à l’extérieur seulement.II.Laissez sécher le silicone pendant 24 heures avantl’utilisation.STEP 8 - SiliconeI. Apply silicone to exterior of unit only.II.Allow 24 hours for silicone to cure before using.Silicone# <strong>10049469</strong>-090721 9
NETTOYAGETO CLEANLes nettoyeurs ménagers liqui<strong>de</strong>s doux sontsuffisants pour gar<strong>de</strong>r la surface propre etbrillante . Rincez à fond et asséchez avec unchiffon propre.Ne jamais utiliser <strong>de</strong> nettoyants abrasifs,grattoirs, brosses métalliques, ni autresobjets ou produits pouvant égratigner outernir les surfaces.Ne jamais mettre une surface en contactavec <strong>de</strong>s produits contenant <strong>de</strong> l'acétone(nettoyant <strong>de</strong> polis à ongle), <strong>de</strong>s solvants,<strong>de</strong>s décapants, <strong>de</strong> l'essence, etc.Mild liquid household cleaners will keep themetal surface bright and clean. Rinse welland dry with a clean cloth.Do not use abrasive cleaners, scrapers,metal brushes, or any items or products thatcould scratch or dull the surface.Do not allow the surface to come intocontact with products such as acetone (nailpolish remover), dry cleaning solution,lacquer thinner, gasoline, etc.Enlevez la poussière grâce à un linge douxet humi<strong>de</strong>.Utilisez l'alcool à friction pour enlever lestaches <strong>de</strong> peinture, d’encre ou <strong>de</strong> graisse.Les égratignures et marques sont rarementvisibles sur la surface et si elles <strong>de</strong>vaientparaître, il serait facile <strong>de</strong> les enlever grâce àun polisseur liqui<strong>de</strong> pour automobile.Remove dust with a soft, damp cloth.Clean grease, oil, paint and ink with rubbingalcohol.Acci<strong>de</strong>ntal scratches or stains will rarelyshow, and if they do they can be easilyremoved with a liquid automobile polish.10# <strong>10049469</strong>-090721
GARANTIE LIMITÉEMAAX Bath Inc.(ci-après “<strong>Maax</strong>”) offre la garantie limitée expresse suivante sur chacun <strong>de</strong> ses produits. Cettegarantie s’adresse uniquement au propriétaire/utilisateur original pour un usage personnel domestique. Desrestrictions additionnelles s’appliquent aux utilisations commerciales.MAAX garantit les <strong>porte</strong>s <strong>de</strong> douches contre tout défaut <strong>de</strong> matériel ou <strong>de</strong> fabrication dans <strong>de</strong>s conditionsnormales d'utilisation et d'entretien pour une pério<strong>de</strong> <strong>de</strong> dix (10) ans à compter <strong>de</strong> la date d'achat originale duproduit par le propriétaire/utilisateur, l'entrepreneur ou le constructeur auprès d'un distributeur agrée.MAAX procé<strong>de</strong>ra à la réparation ou au remplacement (avec un produit <strong>de</strong> même valeur), à sa discrétion, <strong>de</strong> toutproduit dont le défaut sera rapporté au distributeur agrée ou à MAAX durant la pério<strong>de</strong> <strong>de</strong> garantie. Cette garanties'applique au propriétaire/utilisateur original et n'est pas transférable à un propriétaire subséquent.Ni le distributeur, ni le concessionnaire autorisé MAAX, ni personne d'autre n'est autorisé à faire d'affirmations, <strong>de</strong>représentations ou <strong>de</strong> garanties autres que celles stipulées aux présentes; les affirmations, représentations etgaranties contrevenant à cette interdiction ne sauraient s'appliquer à MAAX ni à personne d'autre MAAX se réservele droit <strong>de</strong> modifier cette garantie en tout temps; il est entendu que <strong>de</strong> telles modifications ne changeront pas lesconditions <strong>de</strong> la garantie applicable au moment <strong>de</strong> la vente <strong>de</strong>s produits en cause.RESTRICTIONSLa présente garantie ne s'applique pas dans le cas d'utilisations ou d'opérations non conformes ou incorrectes, <strong>de</strong>bris ou <strong>de</strong> dommages causés par la faute, la négligence, l'abus, le mauvais emploi, le mauvais usage, le mauvaisentretien, l'altération ou la modification du produit, <strong>de</strong> même que par la corrosion chimique ou naturelle, le feu,l'inondation, les catastrophes naturelles ou tout autre cas fortuit. La présente garantie ne s'applique pas aux tachesprovoquées par une eau ferreuse ou une eau dure.Le propriétaire/utilisateur du produit visé par la présente garantie est entièrement responsable <strong>de</strong> l'installation et dubranchement approprié <strong>de</strong> l'appareil. MAAX ne procè<strong>de</strong> pas à l'installation, n'engage pas d'entrepreneur à cet effet,ni ne supervise l'installation et, conséquemment, ne peut être tenue responsable <strong>de</strong> tout défaut, bris ou dommagecausé directement ou indirectement par l'installation du produit ou résultant <strong>de</strong> celle-ci. Le propriéaire / utilisateurdoit assurer un accès aux composantes du produit tel que le décrit le gui<strong>de</strong> d'installation afin que MAAX puisseexécuter la garantie spécifiée aux présentes. Si un tel accès n'existe pas, tous les coûts inhérents à sonaménagement seront la responsabilité du propriétaire/utilisateur. La présente garantie ne s'applique pas auxproduits qui n'auraient pas été installés ou utilisés conformément aux instructions fournies par MAAX ainsi qu'à toutrèglement ou loi applicable à <strong>de</strong> telles installations.MAAX recomman<strong>de</strong> fortement que ses produits, par exemple ses <strong>porte</strong>s <strong>de</strong> douches, soient installés par <strong>de</strong>sprofessionnels spécialisés en produits <strong>de</strong> salles <strong>de</strong> bains. L'installation d'une <strong>porte</strong> <strong>de</strong> douche par une personneinexpérimentée peut entraîner le bris d'une vitre et, par conséquent, <strong>de</strong>s blessures ou la mort.MAAX n'est pas responsable <strong>de</strong>s coûts, dommages ou réclamations résultant <strong>de</strong> l'achat <strong>de</strong> produits qui neconviendraient pas aux ouvertures ou aux structures existantes. MAAX n'est pas responsable <strong>de</strong>s coûts ,dommagesou réclamations résultant <strong>de</strong> vices qui auraient pu être découverts, réparés ou évités dans le cadre d'une inspectionou d'une vérification antérieure à l'installation.MAAX n'est aucunement responsable <strong>de</strong>s blessures corporelles, du décès d'une personne, <strong>de</strong>s dommages directs,particuliers, accessoires ou indirects, <strong>de</strong> la perte <strong>de</strong> temps ou <strong>de</strong> profit, <strong>de</strong>s inconvénients, <strong>de</strong>s frais accessoires,<strong>de</strong>s coûts <strong>de</strong> main d'œuvre ou <strong>de</strong> matériel ou <strong>de</strong> tout autre coût résultant <strong>de</strong> l'utilisation du produit ou <strong>de</strong>l'équipement ou relatif à l'application <strong>de</strong> la présente garantie ou résultant du retrait ou du remplacement <strong>de</strong> toutproduit, élément ou pièce faisant l'objet <strong>de</strong> la présente garantie.À MOINS D'INDICATION CONTRAIRE AUX PRÉSENTES, MAAX N'OFFRE AUCUNE GARANTIE EXPRESSEOU IMPLICITE, NI AUCUNE GARANTIE DE QUALITÉ MARCHANDE OU D'ADAPTABILITÉ À UN USAGEPARTICULIER OU DE CONFORMITÉ À UN CODE.Dans tous les cas, MAAX ne peut être tenue responsable <strong>de</strong> tout montant excédant le prix d'achat du produitdéboursé par le propriétaire/utilisateur, l'entrepreneur ou le constructeur.# <strong>10049469</strong>-090721 11
Restrictions commercialesEn plus <strong>de</strong>s conditions et restrictions mentionnées ci-<strong>de</strong>ssus, la pério<strong>de</strong> <strong>de</strong> garantie relative à tout produit installédans le cadre d'une application commerciale ou utilisé dans le cadre d'une entreprise commerciale est <strong>de</strong> un (1) anà compter <strong>de</strong> la date d'achat originale par le propriétaire/utilisateur, l'entrepreneur ou le constructeur auprès d'undistributeur agrée. MAAX n'est pas responsable <strong>de</strong> la perte d'usage ou <strong>de</strong> profit dans aucune circonstance.La présente garantie accor<strong>de</strong> <strong>de</strong>s droits spécifiques au propriétaire/utilisateur : le propriétaire/utilisateur peut jouird’autres droits pouvant varier d’un État ou d’une province à l’autre.Garantie <strong>de</strong> servicePour se prévaloir du service offert en vertu <strong>de</strong> la présente garantie pendant les heures normales d'ouverture,communiquer avec le détaillant ou le distributeur qui a vendu le produit, ou encore avec MAAX directement.MAAX honorera la garantie <strong>de</strong> service décrite ci-<strong>de</strong>ssus aux conditions suivantes: (1) la défaillance est d'une natureou d'un type couvert par la garantie; (2) l'utilisateur a informé un agent autorisé <strong>de</strong> MAAX ou un représentant duservice <strong>de</strong> la garantie <strong>de</strong> la nature du problème durant la pério<strong>de</strong> <strong>de</strong> la garantie; (3) une preuve concluante (p. ex.,une preuve d'achat ou d'installation) <strong>de</strong> ce qui précè<strong>de</strong> est fournie par l'utilisateur, démontrant que la défaillance estsurvenue ou a été découverte pendant la pério<strong>de</strong> <strong>de</strong> garantie; et (4) une personne autorisée d'un serviceindépendant ou un représentant <strong>de</strong> la compagnie a eu la permission d'inspecter le produit pendant les heuresnormales d'ouverture, dans un délai raisonnable après le signalement du problème par l'utilisateur.L'obligation <strong>de</strong> MAAX en vertu <strong>de</strong> la garantie cesse au moment où MAAX fournit le remplacement ou la réparation.Le refus du client d'accepter cette mesure met un terme à l'obligation <strong>de</strong> MAAX en vertu <strong>de</strong> la garantie.Les produits MAAX sont certifiés par un ou plusieurs <strong>de</strong>s organismes <strong>de</strong> certification suivants :- CSA- UL- IAPMO- ULI- INTERTEK (ETL)- WARNOCK HERSEY- US TESTING- NAHBCertains modèles sont en attente <strong>de</strong> certification.MAAX ou un organisme <strong>de</strong> certification peut annuler une certification sans préavis.MAAX une marque <strong>de</strong> commerce déposée <strong>de</strong> MAAX Bath Inc.PIVOLOK est une marque <strong>de</strong> commerce <strong>de</strong> MAAX Bath Inc.12# <strong>10049469</strong>-090721
LIMITED WARRANTYMAAX Bath Inc. (hereafter “<strong>Maax</strong>”) offers the following express limited warranty on each of its products. Thiswarranty extends only to the original owner/end-user for personal household use. For commercial uses, additionallimitations apply.MAAX warrants shower doors to be free from <strong>de</strong>fects in workmanship and materials un<strong>de</strong>r normal use and servicefor a period of ten (10) years from the initial date of purchase by the owner/end-user, contractor or buil<strong>de</strong>r from anauthorized <strong>de</strong>aler.Any product re<strong>porte</strong>d to the authorized <strong>de</strong>aler or to MAAX as being <strong>de</strong>fective within the warranty period will berepaired or replaced (with a product of equal value) at the option of MAAX. This warranty extends to the originalowner/end-user and is not transferable to a subsequent owner.Neither the distributor, authorized MAAX <strong>de</strong>aler nor or any other person has been authorized to make anyaffirmation, representation or warranty other than those contained in this warranty; any affirmation, representationor warranty other than those contained in this warranty shall not be enforceable against MAAX or any other person.MAAX reserves the right to modify this warranty at any time, it being un<strong>de</strong>rstood that such modification will not alterthe warranty conditions applicable at the time of the sale of the products in question.LimitationsThis warranty shall not apply following incorrect operating procedures, breakage or damages caused by fault,carelessness, abuse, misuse, misapplication, improper maintenance, alteration or modification of the unit, as wellas chemical or natural corrosion, acci<strong>de</strong>nt, fire, flood, act of God or any other casualty. This warranty shall not applyto stains caused by ferrous water or hard water.The owner/end-user of the product covered this warranty is entirely responsible for its proper installation an<strong>de</strong>lectrical wiring. MAAX neither installs nor supervises the installation, nor hires a contractor for this purpose, andconsequently cannot be held responsible for any <strong>de</strong>fect, breakage or damage caused thereby or resulting thereof,either directly or indirectly. The owner/end-user must provi<strong>de</strong> access to the components of the product as <strong>de</strong>scribedin the installation gui<strong>de</strong>, so that MAAX can execute the warranty specified herein. If such access is not available,all expenses to provi<strong>de</strong> said access will be the responsibility of the owner/end-user.This warranty does not apply to products or equipment not installed or operated in accordance with instructionssupplied by MAAX and all applicable rules, regulations and legislation pertaining to such installations.MAAX strongly recommends that its products-for example, but without limitation, shower doors and other items-beinstalled by professionals with experience in bathroom products. Installation of shower doors by an inexperiencedperson may result in glass breakage and, consequently, cause personal injury or <strong>de</strong>ath.MAAX is not liable for any costs, damages or claims resulting from the purchase of products that do not fit throughopenings or existing structures. MAAX is not liable for any costs, damages or claims resulting from <strong>de</strong>fects thatcould have been discovered, repaired or avoi<strong>de</strong>d by inspection and testing prior to installation.MAAX is not liable for personal injuries or <strong>de</strong>ath to any person or for any direct, special, inci<strong>de</strong>ntal or consequentialdamage, loss of time, loss of profits, inconvenience, inci<strong>de</strong>ntal expenses, labor or material charges, or any othercosts resulting from the use of the product or equipment or pertaining to the application of the present warranty, orresulting from the removal or replacement of any product or element or part covered by this warranty.EXCEPT AS OTHERWISE PROVIDED ABOVE, MAAX MAKES NO WARRANTIES, EXPRESS OR IMPLIED,INCLUDING WARRANTIES OF MERCHANTABILITY AND FITNESS FOR A PARTICULAR PURPOSE ORCOMPLIANCE WITH ANY CODE.In any case, MAAX cannot be liable for any amount over and above the purchase price paid for the product by theowner/end-user, contractor or buil<strong>de</strong>r.# <strong>10049469</strong>-090721 13
Commercial LimitationsIn addition to the above conditions and limitations, the warranty period for products installed for commercialapplications or used in commercial ventures is of one (1) year from the initial date of purchase by the owner/end -user, contractor or buil<strong>de</strong>r from an authorized <strong>de</strong>aler. MAAX is not responsible for loss of use or profit un<strong>de</strong>r anycircumstances. If the product is used as a display, the warranty period begins when the product is placed on display.This warranty gives the owner/end-user specific legal rights. The owner/end-user may also have other rights whichvary from one state and/or province to another.Warranty serviceIn or<strong>de</strong>r to obtain service provi<strong>de</strong>d un<strong>de</strong>r this warranty during regular business hours, contact the <strong>de</strong>aler ordistributor who sold the unit, or MAAX directly.MAAX will provi<strong>de</strong> the warranty service <strong>de</strong>scribed above when the following conditions have been met: (1) thefailure is of the nature or type covered by the warranty;(2) the user has informed an authorized MAAX Agent orWarranty Service Department representative of the nature of the problem during the warranty period; (3) conclusiveevi<strong>de</strong>nce (e.g., proof of purchase or installation) is provi<strong>de</strong>d to the foregoing by the user proving that the failureoccurred or was discovered within the warranty period; and (4) an authorized in<strong>de</strong>pen<strong>de</strong>nt service person orcompany representative has been permitted to inspect the product during regular business hours within areasonable time after the problem was re<strong>porte</strong>d by the user.MAAX's warranty obligation shall be discharged upon ten<strong>de</strong>r of replacement or repair. The purchaser refusal toaccept the ten<strong>de</strong>r terminates MAAX's warranty obligation.MAAX products are certified by one or more of the following certification agencies:- CSA- UL- IAPMO- ULI- INTERTEK (ETL)- WARNOCK HERSEY- US TESTING- NAHBCertain mo<strong>de</strong>ls are pending approval.Certification may be en<strong>de</strong>d by MAAX or certification agencies without notice.MAAX is a registered tra<strong>de</strong>mark of MAAX Bath Inc.PIVOLOK is a tra<strong>de</strong>mark of MAAX Bath Inc.14# <strong>10049469</strong>-090721
# <strong>10049469</strong>-090721 15
Save this manual for future referenceConservez ce manuel pour usage ultérieurwww.maax.comTechnical Services / Service techniqueCanadaT. 1 800-361-2045F. 1 888-361-2045United States / États-UnisT. 1 800 328-2531F. 1 800 944-9808KEEP THESE INFORMATIONS :CONSERVEZ CES INFORMATIONS :Purchase date / Date d’achat :____________________________________________________Serial number / Numéro <strong>de</strong> série :____________________________________________________The content of this package have been verified by:Le contenu <strong>de</strong> cet emballage a été vérifié par :Inspector / Inspecteur :____________________________________________________No:____________________________________________________© 2008 MAAX Bath Inc. PRINTED IN CANADA / IMPRIMÉ AU CANADA2009-07-21 <strong>10049469</strong>