Prins autogassystemen b.v. Veldhoven
Prins autogassystemen b.v. Veldhoven
Prins autogassystemen b.v. Veldhoven
- No tags were found...

Create successful ePaper yourself
Turn your PDF publications into a flip-book with our unique Google optimized e-Paper software.
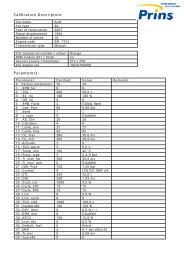
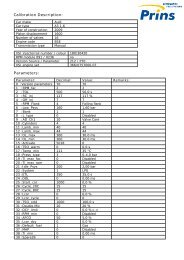
<strong>Prins</strong> <strong>autogassystemen</strong> b.v.<strong>Veldhoven</strong>MOUNTING INSTRUCTIONENGINE CONVERSION SETMAKE OF AUTOMOBILE:AUDITYPE:A3PISTON DISPLACEMENT:1800 cc ATNUMBER OF VALVES:20VENGINE NUMBER:APGINJECTION SYSTEM:MULTI-POINT INJECTIONMODEL YEAR: 2001=>NUMBER : 076/2605400DATE : 2003-12-08VERSION NR : 1
PAGE 1 076/2605400AUDIA3 1.8i 20V 2001=>VERSION NR : 1GENERAL INSTRUCTIONS• Do not place the 7,5 A into the fuse holder before having completed the installation of the VSIsystem. The VSI computer has to be activated by means of the diagnosis software (refer to the lastpage).• In the unlikely event the VSI computer fails, it will automatically switch over to petrol.Never disconnect the VSI computer connector, unless you have removed the 7,5 A fuse.• When installing the cable harness, ensure that it does not run near any of the ignition components.• The power supply cable and the ground cable of the VSI system are always to be connected at thebattery.• Solder all electrical connections.• Remove any internal burrs, after having shortened the LPG hose. (This guarantees the maximumflow through the hose.)• If holes have to be drilled in order to facilitate mounting the device frame, the reservoir frame, theLPG cut-off valve, etc., the drilled holes must always be treated with an anti-corrosive, after theburrs have been removed.• After having completed the installation, check the whole system for gas leakage; use a gas leakdetection device.• Mount the VSI-system according to the LPG regulations.Fill the warranty card in completely and return it within 8 days.
PAGE 2 076/2605400AUDIA3 1.8i 20V 2001=>VERSION NR : 1BASE VSI LAYOUTELECTRICALCONNECTIONSLPG TANKFILLERLOCK OFFVALVEFUELLEVELINDICATORPETROLINJECTORINJECTOR RAIL VSIPRESSURE RELIEF HOSEINJECTIONEVAPORATOR+LOCK OFF VALVEMODULEECT SENSORPsys+FILTER UNITTlpgSENSOR11 20SWITCH PERSONAL COMPUTERMAIN FUSE15 AmpENGINE ECUIGNITION +RPM- +BEEPERADAPTERBATTERYLAMBDA SENSORVSI COMPUTER5 AmpFUSE LPG INJECTORSPRINS
PAGE 3 076/2605400AUDIA3 1.8i 20V 2001=>VERSION NR : 1MOUNTING AND CONNECTION POINTSH KGOFEJDCBAA : Reducer G : “+” ignition ( 13 )B : Filter unit H : Engine speed signal ( 40 )C : Injector railD : Vsi Computer J : “+” interruption petrol inj. ( 26+27 )E : Injector moduleK : “--“ interruption petrol. inj.F : Water connectionsL : Overpressure coupling
PAGE 4 076/2605400AUDIA3 1.8i 20V 2001=>VERSION NR : 1MOUNTING THE EVAPORATORRemove the battery.Mount the bracket on the left underside of the car.Drill the original hole up to 8.5 mm.Mount the evaporator with the 16mm lpg hose and the 6mm overpressure hose on the bracket.Before installing the battey back : mount the vsi computer (page 10).Overpressure hose coupling: in the vacuum hose of the pressure regulator.Water connections: parallel with the heater hoses.Use thread locking agent when mounting the gas and water line couplings. Do not rotate thecouplings after installation. However, you may rotate the gas and water lines, if required.Ensure that the 2 bolts of the gas valve have been fastened.
PAGE 5 076/2605400AUDIA3 1.8i 20V 2001=>VERSION NR : 1MOUNTING THE INLET MANIFOLD COUPLINGSRemove the inlet manifold.Drill 4 holes of 4,8 mm in the inlet manifold. Tap M6 in these holes.Place the couplings with a lock compound in the inlet manifold.Watch out that the lock compound doesn’t come inside the couplings.Mount the hoses on the couplings and place the inlet manifold back on the engine.IMPORTANTAlways check the inlet manifold coupling for leakage after installation.Spray brake cleaner onto the couplings and check whether the engine speedand the lambda signal change with the engine running on LPG.1 2 3 41 2 3 4underside
PAGE 6 076/2605400AUDIA3 1.8i 20V 2001=>VERSION NR : 1MOUNTING THE INJECTOR RAILRemove the dipstick bracket (two 6mm bolts). Place instead of the two 6mm bolts, two 6mmthreadends.Mount the dipstick bracket and the injector rail bracket on the treadends and tighten with two nuts.Place the hoses on the rail and mount the rail on the bracket.place threadends1 2 3 4
PAGE 7 076/2605400AUDIA3 1.8i 20V 2001=>VERSION NR : 1MOUNTING THE FILTER UNITMount the filter unit with a bracket on the front panel.Look out that the cooling fan cant tough the lpg hose!
PAGE 8 076/2605400AUDIA3 1.8i 20V 2001=>VERSION NR : 1TUBESLength of hose A, ø 16 mm = 55 cmLength of hose B, ø 6 mm = 100 cmLength of hose C, ø 11 mm = 24 cmLength of hose D, ø 6 mm = ±32 cmLength of hose E, ø 6 mm = ±28 cmLength of hose F, ø 6 mm = ±28 cmLength of hose G, ø 6 mm = ±32 cmUse a hose clip on all the connections.CAD E F GB
PAGE 9 076/2605400AUDIA3 1.8i 20V 2001=>VERSION NR : 1BASE ELECTRICAL DIAGRAMcylinder 1cylinder 2cylinder 3cylinder 4LAMBDA SONDE461 2 3 4FILTER UNITINJECTOR RAIL VSIPRINSCONNECTIONS LPG TANK10INJECTORSIMULATOR3938543736-42 Not used16 Not used18 Not used1 250BATTERY PERSONAL COMPUTER40ENGINE ECUEVAPORATORRPMLPG VALVENot used4435BEEPER25-51- +ECT SENSORSWITCH+PETROL INJECTOR27 26VSI COMPUTERIGNITION +1315 Amp535 Amp (1-4)FUSE LPG INJECTORS
PAGE 10 076/2605400AUDIA3 1.8i 20V 2001=>VERSION NR : 1MOUNTING THE COMPUTERRemove the battery.Mount the computer by means of a bracket on the left side against the wheel housing.
PAGE 11 076/2605400AUDIA3 1.8i 20V 2001=>VERSION NR : 1Mount the switch.MOUNTING THE FUEL SELECTION SWITCHAttention:When mounting the switch, only push on its sides. Pushing the switch in the centre may resultin damage to the switch.ELECTRICAL CONNECTION OF THE SWITCHVSI SWITCHPOWER SUPPLY SWITCH EN BEEPER(51) ARE EXCHANGABLE.VSI COMPUTER8-POLECONNECTORSBLUEPOSITION 1 ON CONNECTORTANK INDICATORBEEPERBROWNPOSITION 2 ON CONNECTORYELLOW-GREENPOSITION 3 ON CONNECTORREDPOSITION 4 ON CONNECTORYELLOWPOSITION 5 ON CONNECTORORANGEPOSITION 6 ON CONNECTORBLACKPOSITION 7 ON CONNECTORREDPOSITION 8 ON CONNECTOR50535112494851GROUNDPOWER FEED TANKINDICATIONPOWER FEED SWITCHPULSE FUEL SWITCHDIAGNOSTIC LEDGROUND BEEPERPOWER FEED BEEPER
PAGE 12 076/2605400AUDIA3 1.8i 20V 2001=>VERSION NR : 1ELECTRICAL CONNECTIONS ON THE LPG RESERVOIRThe cable harness contains the wires for connecting the LPG reservoir.Refer to the following diagram when connecting the LPG reservoir.TRIPLE WIRE CABLEVSI COMPUTERFITTING BOXCOILTANK VALVEBLACKPRINSBLACK BLUEGROUND SIGNALTANKINDICATORREDREDBLACKBLUEBLACKBLUESOLDER THE CONNECTIONS IN THE FITTING BOXAND PROTECT THEM WITH A SHRINK SLEEVE.
PAGE 13 076/2605400AUDIA3 1.8i 20V 2001=>VERSION NR : 1ELECTRICAL CONNECTIONCable number / Cable colour Connectioncode50 MAIN GND brown Connect to the '–' of the battery; use a ring terminal for thispurpose.25-51 +12V BAT red Connect to the '+' of the battery; use a ring terminal for thispurpose.Do not place the 7,5 A into the fuse holder before havingcompleted the installation of the LPG system.50 LPGVLV GND brown Ground LPG shut-off valve. 2-pole connector shut-off valve.53 + LPG VLV42 ECT GNDyellow / greenbrown43 ECT grey22 RS232 TxD grey23 RS232 RxD grey50 DIAGNOSE GND brown51 +12V DIAG red15 T LPG grey17 Psys pale green18 + 5V Psys red42 Psys GND brown33 33G INJ OUT1 green / white34 34 G INJ A PLUS red32 32G INJ OUT2 green / white34 34 G INJ A PLUS red31 31G INJ OUT3 green / white34 34 G INJ A PLUS red30 30G INJ OUT4 green / white34 34 G INJ A PLUS redPower supply LPG shut-offvalve.Ground ECT sensor. 2-pole black connectortemperature sensor in theECT measurement. evaporator.4-pole black connector diagnosis cable connection.4-pole black connector filter unit connection.Connector VSI-injector to cylinder 1.See under 'Mounting the injector rail' for the cylinder numbers.Connector VSI-injector to cylinder 2.See under 'Mounting the injector rail' for the cylinder numbers.Connector VSI-injector to cylinder 3.See under 'Mounting the injector rail' for the cylinder numbers.Connector VSI-injector to cylinder 4.See under 'Mounting the injector rail' for the cylinder numbers.Petrol computer under top cowl81-pole40-pole* rpm cable (40)* petrol injector cables (36 37 38 39)with injector simulator module.
PAGE 14 076/2605400AUDIA3 1.8i 20V 2001=>VERSION NR : 1ELECTRICAL CONNECTIONS13 IGNITION +ignition switchgrey / white Make a connection to ignition + / contact +.Cable colour : BlackCable location : in wiring harness from ignition switch46 LAMBDA 1-L orange For the measurement of the lambda signal of cylinder bank 1.Cable not used in this car: insulate.40 RPMecupurple / whiteFor measuring the engine speed.Cable colour : PURPLE-YELLOWCable location : petrol computer, 40-pole connector, pos. 10326 +B INJ IN27 +B INJ OUTleft side inlet manifoldredred / whiteFor interrupting injector power supply.Connect cable 26 to the main relay - injector power supplyside and cable 27 to the injector side (refer to the injectordiagram).Cable colour : RED-PURPLECable location : left side petrol rail, wiring harness, cut beforethe spice (one wire).The 4 red-purple injector wires come together in a splice, cutbefore the splice : one red-purple injector feed wire.54 INJ SIMULATORscuttle boardred / blackPower supply for the simulation of the injector(s).Connect the red / black cable (54) to the loose red cable of theinjector simulator(s).For the connection of the injector simulator the control cablesof the petrol injectors must be interrupted.Connect the red cables of the module to the injector side andthe black cables of the module to the computer side.Do not interchange the red and the black cables, but connectthose as a pair to each of the injectors (refer to the injectordiagram).
PAGE 15 076/2605400AUDIA3 1.8i 20V 2001=>VERSION NR : 1ELECTRICAL CONNECTIONSFor measuring the petrol injectors.ecu39 B INJ IN 138 B INJ IN 237 B INJ IN 336 B INJ IN 4yellow / whiteyellow / whiteyellow / whiteyellow / whiteConnect each yellow / white measuring cable to the position atwhich the control cables of the petrol injectors have beeninterrupted (refer to the injector diagram).Injector cable locations: petrol computer, 40-pole connector,Cylinder cable colour 1 : PURPLE, position 96Cylinder cable colour 2 : GREEN-BLACK, position 89Cylinder cable colour 3 : GREEN-RED, position 97Cylinder cable colour 4 : PURPLE-BLUE, position 88Attention:Each yellow / white measuring cable corresponds to aspecific LPG injector and cylinder number. Do notinterchange the cables. Refer to the page 'mounting theinjector rail' for the correct cylinder numbers.RED-BLACKYELLOW-WHITE54VSI COMPUTER26 27REDREDINJECTORSIMULATORBLACKREDRED-WHITEGREEN-WHITERED-+VSI INJECTORPETROLINJECTORinterrupt the power supply of each injector
PAGE 16 076/2605400AUDIA3 1.8i 20V 2001=>VERSION NR : 1CHECKLIST AFTER THE INSTALLATION1. Connect the serial interface cable and run the VSI diagnosis program.2. When commissioning the LPG system, you must activate the VSI computer with thediagnosis software. When the VSI computer has not been activated, it will keep ongenerating error codes. To activate the VSI computer, select function F11 (activate ECM).3. Check whether the program in the VSI computer matches with the car:Refer with F2 to the box number and car description in the diagnosis software and comparethese with the packer's number.4. The system will switch over to LPG as soon as the temperature of the coolant (T-ect)becomes higher than the parameter T-min set.5. Check all components and connections for any gas or water leakage.6. Let the engine run warm on petrol.Adjust the evaporator pressure:Let the engine run idle on LPG.Refer to the parameter list for the idle level value set.Adjust the evaporator pressure in such a way that the pressure measured ( P-sys ) equalsthe idle level value.Turn the socket-head screw at the front of the evaporator to adjust the pressure.An error code will be generated whenever the pressure variation is to high.Seal the evaporator with the sticker included in the delivery after having adjusted thepressure.7. Use the diagnosis software to check all input and output signals.8. Check the system for error codes and solve these, if required.Check the MMS for EOBD error codes.9. Make a test drive.