30681 Spitfire MK IX Multi Manual.indb - Horizon Hobby UK
30681 Spitfire MK IX Multi Manual.indb - Horizon Hobby UK
30681 Spitfire MK IX Multi Manual.indb - Horizon Hobby UK
- No tags were found...

You also want an ePaper? Increase the reach of your titles
YUMPU automatically turns print PDFs into web optimized ePapers that Google loves.
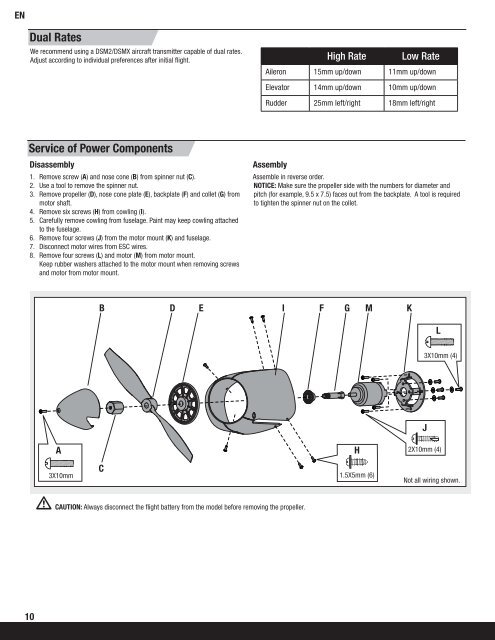
ENDual RatesWe recommend using a DSM2/DSMX aircraft transmitter capable of dual rates.Adjust according to individual preferences after initial fl ight.High RateLow RateAileron 15mm up/down 11mm up/downElevator 14mm up/down 10mm up/downRudder 25mm left/right 18mm left/rightService of Power ComponentsDisassembly1. Remove screw (A) and nose cone (B) from spinner nut (C).2. Use a tool to remove the spinner nut.3. Remove propeller (D), nose cone plate (E), backplate (F) and collet (G) frommotor shaft.4. Remove six screws (H) from cowling (I).5. Carefully remove cowling from fuselage. Paint may keep cowling attachedto the fuselage.6. Remove four screws (J) from the motor mount (K) and fuselage.7. Disconnect motor wires from ESC wires.8. Remove four screws (L) and motor (M) from motor mount.Keep rubber washers attached to the motor mount when removing screwsand motor from motor mount.AssemblyAssemble in reverse order.NOTICE: Make sure the propeller side with the numbers for diameter andpitch (for example, 9.5 x 7.5) faces out from the backplate. A tool is requiredto tighten the spinner nut on the collet.BD EI F G<strong>MK</strong>L3X10mm (4)JAH2X10mm (4)3X10mmC1.5X5mm (6)Not all wiring shown.CAUTION: Always disconnect the fl ight battery from the model before removing the propeller.10