Create successful ePaper yourself
Turn your PDF publications into a flip-book with our unique Google optimized e-Paper software.
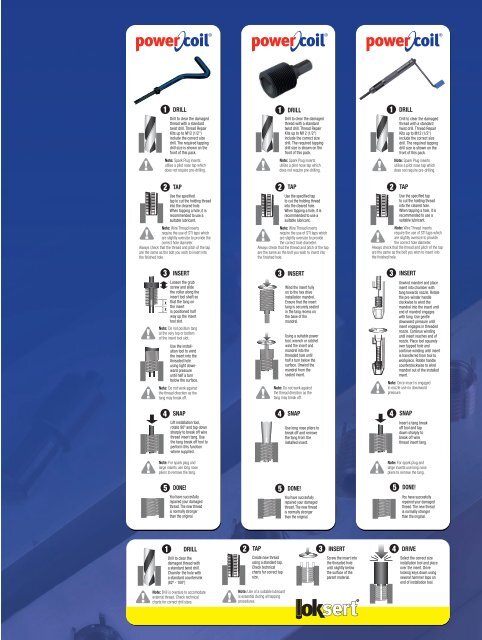
® ® ®1DRILLDrill to clear the damaged<strong>thread</strong> with a standardtwist drill. Thread RepairKits up to M12 (1/2")include the correct sizedrill. The required tappingdrill size is shown on thefront of this pack.Note: Spark Plug <strong>insert</strong>sutilise a pilot nose tap whichdoes not require pre-drilling.2TAPUse the specifiedtap to cut the holding <strong>thread</strong>into the cleared hole.When tapping a hole, it isrecommended to use asuitable lubricant.Note: Wire Thread <strong>insert</strong>srequire the use of STI taps whichare slightly oversize to provide thecorrect hole diameter.Always check that the <strong>thread</strong> and pitch of the tapare the same as the bolt you wish to <strong>insert</strong> intothe finished hole.3INSERTLoosen the grubscrew and slidethe collar along the<strong>insert</strong> tool shaft soX that the tang onthe <strong>insert</strong>Xis positioned halfway up the <strong>insert</strong>tool slot.Note: Do not position tangat the very top or bottomof the <strong>insert</strong> tool slot.Use the installationtool to windthe <strong>insert</strong> into the<strong>thread</strong>ed holeusing light downwardpressureuntil half a turnbelow the surface.Note: Do not work againstthe <strong>thread</strong> direction as thetang may break off.1DRILLDrill to clear the damaged<strong>thread</strong> with a standardtwist drill. Thread RepairKits up to M12 (1/2")include the correct sizedrill. The required tappingdrill size is shown on thefront of this pack.Note: Spark Plug <strong>insert</strong>sutilise a pilot nose tap whichdoes not require pre-drilling.2TAPUse the specified tapto cut the holding <strong>thread</strong>into the cleared hole.When tapping a hole, it isrecommended to use asuitable lubricant.Note: Wire Thread <strong>insert</strong>srequire the use of STI taps whichare slightly oversize to providethe correct hole diameter.Always check that the <strong>thread</strong> and pitch of the tapare the same as the bolt you wish to <strong>insert</strong> intothe finished hole.3INSERTWind the <strong>insert</strong> fullyon to the hex driveinstallation mandrel.Ensure that the <strong>insert</strong>tang is securely seatedin the tang recess onthe base of themandrel.Using a suitable powertool, wrench or ratchetwind the <strong>insert</strong> andmandrel into the<strong>thread</strong>ed hole untilhalf a turn below thesurface. Unwind themandrel from theseated <strong>insert</strong>.Note: Do not work againstthe <strong>thread</strong> direction as thetang may break off.1Drill to clear the damaged<strong>thread</strong> with a standardtwist drill. Thread RepairKits up to M12 (1/2")include the correct sizedrill. The required tappingdrill size is shown on thefront of this pack.Note: Spark Plug <strong>insert</strong>sutilise a pilot nose tap whichdoes not require pre-drilling.2Use the specified tapto cut the holding <strong>thread</strong>into the cleared hole.When tapping a hole, it isrecommended to use asuitable lubricant.Note: Wire Thread <strong>insert</strong>srequire the use of STI taps whichare slightly oversize to providethe correct hole diameter.Always check that the <strong>thread</strong> and pitch of the tapare the same as the bolt you wish to <strong>insert</strong> intothe finished hole.3DRILLTAPINSERTUnwind mandrel and place<strong>insert</strong> into chamber withtang towards nozzle. Rotatethe pre-winder handleclockwise to wind themandrel into the <strong>insert</strong> untilend of mandrel engageswith tang. Use gentledownward pressure until<strong>insert</strong> engages in <strong>thread</strong>ednozzle. Continue windinguntil <strong>insert</strong> reaches end ofnozzle. Place tool squarelyover tapped hole andcontinue winding until <strong>insert</strong>is transferred from tool toworkpiece. Rotate handlecounterclockwise to windmandrel out of the installed<strong>insert</strong>.Note: Once <strong>insert</strong> is engagedin nozzle use no downwardpressure.4SNAPLift installation tool,rotate 90º and tap downsharply to break off <strong>wire</strong><strong>thread</strong> <strong>insert</strong> tang. Usethe tang break off tool toperform this functionwhere supplied.4SNAPUse long nose pliers tobreak off and removethe tang from theinstalled <strong>insert</strong>.4SNAPInsert a tang breakoff tool and tapdown sharply tobreak off <strong>wire</strong><strong>thread</strong> <strong>insert</strong> tang.Note: For spark plug andlarge <strong>insert</strong>s use long nosepliers to remove the tang.Note: For spark plug andlarge <strong>insert</strong>s use long nosepliers to remove the tang.5DONE!You have succesfullyrepaired your damaged<strong>thread</strong>. The new <strong>thread</strong>is normally strongerthan the original.5DONE!You have succesfullyrepaired your damaged<strong>thread</strong>. The new <strong>thread</strong>is normally strongerthan the original.5DONE!You have succesfullyrepaired your damaged<strong>thread</strong>. The new <strong>thread</strong>is normally strongerthan the original.1 DRILL2 TAPINSERTDrill to clear thedamaged <strong>thread</strong> witha standard twist drill.Chamfer the hole witha standard countersink(82º - 100º)Note: Drill is oversize to accomodateexternal <strong>thread</strong>. Check technicalcharts for correct drill sizes.Create new <strong>thread</strong>using a standard tap.Check technicalcharts for correct tapsize.Note: Use of a suitable lubricantis essential during all tappingprocedures.3Screw the <strong>insert</strong> intothe <strong>thread</strong>ed holeuntil slightly belowthe surface of theparent material.4DRIVESelect the correct sizeinstallation tool and placeover the <strong>insert</strong>. Drivelocking keys down usingseveral hammer taps onend of installation tool.


