
You also want an ePaper? Increase the reach of your titles
YUMPU automatically turns print PDFs into web optimized ePapers that Google loves.
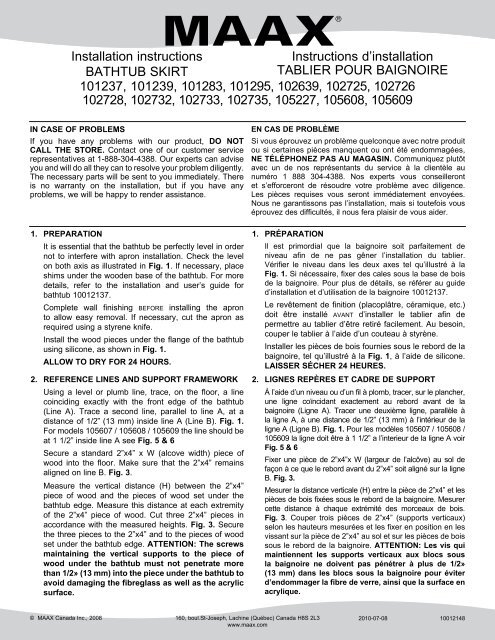
Important:For some models, a cut-out may need to be made inthe wood framing to accomodate the apron design.Fig. 4c.Important:Pour certains tabliers, le cadre de support devra êtreentaillé afin de s’ajuster aux formes prémoulées dutablier. Fig. 4c.3. APRON INSTALLATIONLightly sand the back side of the apron where the Velcrostrips will be installed. Clean surface with soft cleancloth. Remove the protective film on the back of theVelcro strips and place the strips on the back of theapron as shown in Fig. 2.ALLOW TO DRY FOR 24 HOURS.Mark the Velcro pieces position on the framework. Makesure that the Velcro pieces position on both apron andframework fit together. Remove the protective film onthe back of the Velcro strips and fix the strips to theframework.Install the apron by sliding the upper edge of the apronunder the edge of the bathtub and push down the apronagainst the 2”x4” so that the Velcro sticks to the backside of the apron. Fig. 3.Install the apron by sliding the upper edge of the apronunder the edge of the bathtub (Fig. 3) and push down theapron against the 2”x4”. Install #8 x ¾” screws and screwcaps included. Fig. 4a.3. Installation du tablierSabler légèrement le côté arrière du tablier aux endroitsoù les pièces de Velcro seront installées. Nettoyer lasurface à l’aide d’un linge propre et doux. Retirer lapellicule qui protège le côté autocollant des pièces deVelcro et coller les pièces de Velcro derrière le tablier telqu’illustré à la Fig. 2.Laisser sécher 24 heures.Marquer la position des pièces de Velcro sur les 2”x4”.S’assurer que la position des pièces de Velcro du tabliercorrespond à la position des marques sur les pièces de2”x4”. Retirer la pellicule qui protège le côté autocollantdes pièces de Velcro et les coller sur les pièces de 2”x4”.Glisser la partie supérieure du tablier sous le rebord dela baignoire, entre celui-ci et la pièce de bois et abaisserle bas du tablier contre le 2”x4” de manière à ce que lespièces de Velcro adhèrent à l’arrière du tablier. Fig. 3.Glisser la partie supérieure du tablier sous le rebord dela baignoire, entre celui-ci et la pièce de bois (Fig. 3) etabaisser le bas du tablier contre le 2”x4” et fixer le tablieren position à l’aide des vis fournies. Installer les cache-vis.Fig. 4a.Model / Modèles : 102639, 105227, 102725, 102732, 102726, 102733, 101239, 105608, 105609# Parts / Pièces Description Qty / QteFig. 11/2"(13 mm)1/2"(13 mm)hours24heures1000283510048084-003Screw #8 X ¾ " SS Type A FlatVis #8 X ¾ " SS Type A Plate 6Snap cap decorative whiteCapuchon decoratif blanc 6Silicone10002880Tub wall washer ( Snap base # 6-8)Receveur cache vis # 6-8 6Silicone10005184Block - Yellow pine 2 ¼ " X 3 ½ "Bloc - pin jaune 2 ¼ " X 3 ½ " 5Model / Modèles : 101237, 101283, 101295# Parts / Pièces Description Qty / Qte100242161002421710005184Velcro hook white 18 X 25 mmVelcro piquant blanc 18 X 25 mm 6Velcro loop white 18 X 25 mmVelcro doux blanc 18 X 25 mm 6Block - Yellow pine 2 ¼ " X 3 ½ "Bloc - pin jaune 2 ¼ " X 3 ½ " 5Model / Modèles : 102728, 1027351/2"(13 mm)1 1/2"(38 mm)# Parts / Pièces Description Qty / Qte1000283510048084-003Screw #8 X ¾ " SS Type A FlatVis #8 X ¾ " SS Type A Plate 6Snap cap decorative whiteCapuchon decoratif blanc 6AB 10560710560810560910002880100051841002421610024217Tub wall washer ( Snap base # 6-8)Receveur cache vis # 6-8 6Block - Yellow pine 2 ¼ " X 3 ½ "Bloc - pin jaune 2 ¼ " X 3 ½ " 5Velcro hook white 18 X 25 mmVelcro piquant blanc 18 X 25 mm 6Velcro loop white 18 X 25 mmVelcro doux blanc 18 X 25 mm 6© MAAX Canada Inc., 2008160, boul.St-Joseph, Lachine (Québec) Canada H8S 2L3www.maax.com2010-07-08 10012148
Fig. 2Fig. 3Sabler légèrementl’arrière du tablier.Lightly sand theback of the apron.Min. 5"VelcroBathtub edgeRebord de la baignoireApronTablier1/2"(13 mm)HH2"x4"Max. 1 1/2"2"x4"Fig. 4Fig. 5 ( Modèles-Models 105607 / 105608 / 105609 )6X#8 x ¾"Fig. 4a6XVELCROFig. 4bSupports verticauxVertical supportsApronTablier1/2"(13 mm)1 1/2"(38 mm) MINHH2"x4"Fig. 4cTablierApron1 1/2"(38 mm)Line C2"x4"Fig. 6 ( Modèles-Models 105607 / 105608 / 105609 )Fig. 6aAcrylic-ABSAcrylique-ABS4X#8 x ¾"Supports verticauxVertical supportsCache visScrew capReceveur de cache visScrew cap receiverTablierApron© MAAX Canada Inc., 2008160, boul.St-Joseph, Lachine (Québec) Canada H8S 2L3www.maax.com2010-07-08 10012148