10049477-031114 PIVOLOK Shower Door.qxd - Wolseley Express
10049477-031114 PIVOLOK Shower Door.qxd - Wolseley Express
10049477-031114 PIVOLOK Shower Door.qxd - Wolseley Express

Create successful ePaper yourself
Turn your PDF publications into a flip-book with our unique Google optimized e-Paper software.
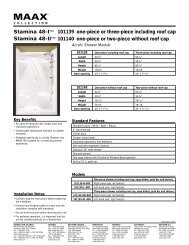
ILLUSTRATION DES PIÈCESILLUSTRATION OF COMPONENTSA 48207 B 61305 C 61045 D 68003 E 48838F 61084G 61121H 61369I 61276J 48380K 48381SAC DE QUINCAILLERIEHARDWARE BAGAA 47009 BB 47235 CC 47010 DD 48201 EE 48217FF 48219 GG 48075 / 48084 HH 48076 II 47146-20qDessin non à l’échelleqDrawings not to scaleDes changements peuvent être apportés aux produits sans préavis. Veuillez utiliserle manuel fourni avec le produit.Product specifications are subject to change without notice. Use owner’s manualinstructions supplied with product.2# <strong>10049477</strong>-<strong>031114</strong># <strong>10049477</strong>-<strong>031114</strong> 15
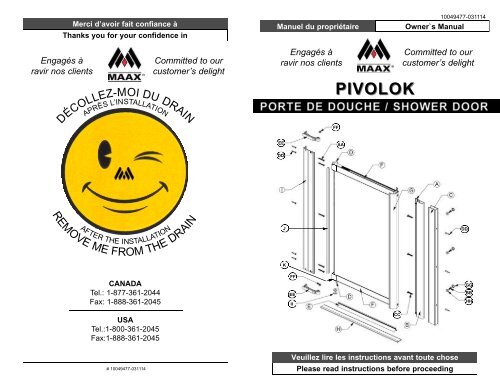
MAAX is not liable for personal injuries or death to any person or for any direct, special, incidental or consequentialdamage, loss of time, loss of profits, inconvenience, incidental expenses, labor or material charges, or anyother costs resulting from the use of the product or equipment or pertaining to the application of the present warranty,or resulting from the removal or replacement of any product or element or part covered by this warranty.EXCEPT AS OTHERWISE PROVIDED ABOVE, MAAX MAKES NO WARRANTIES, EXPRESS OR IMPLIED,INCLUDING WARRANTIES OF MERCHANTABILITY AND FITNESS FOR A PARTICULAR PURPOSE ORCOMPLIANCE WITH ANY CODE.In any case, MAAX cannot be liable for any amount over and above the purchase price paid for the product bythe owner/end-user, contractor or builder.Commercial LimitationsIn addition to the above conditions and limitations, the warranty period for products installed for commercial applicationsor used in commercial ventures is of one (1) year from the initial date of purchase by the owner/end-user,contractor or builder from an authorized dealer. MAAX is not responsible for loss of use or profit under any circumstances.If the product is used as a display, the warranty period begins when the product is placed on display.This warranty gives the owner/end-user specific legal rights. The owner/end-user may also have other rightswhich vary from one state and/or province to another.Warranty serviceIn order to obtain service provided under this warranty during regular business hours, contact the dealer or distributorwho sold the unit, or MAAX directly.MAAX will provide the warranty service described above when the following conditions have been met: the failureis of the nature or type covered by the warranty; the user has informed an authorized MAAX Agent or WarrantyService Department representative of the nature of the problem during the warranty period; conclusive evidence(e.g., proof of purchase or installation) is provided to the foregoing by the user proving that the failure occurred orwas discovered within the warranty period; an authorized independent service person or company representativehas been permitted to inspect the product during regular business hours within a reasonable time after the problemwas reported by the user.MAAX’s warranty obligation shall be discharged upon tender of replacement or repair. The customer’s refusal toaccept the tender terminates MAAX’s warranty obligation.MAAX products are certified by one or more of the following certification agencies:- CSA - UL- IAPMO - ULI- INTERTEK (ETL) - WARNOCK HERSEY- US TESTING - NAHBCertain models are pending approval. Certification may be ended by MAAX or certification agencies withoutnotice.ITEMABCDEFGHIJKITEMAABBCCDDEEFFGGHHIIDESCRIPTION DES PIÈCESAIMANTMONTANT D’ALUMINIUMMONTANT MURALAXE DE PIVOTDÉFLECTEUR SOUPLECADRE HAUT / BASPOIGNÉE RONDESEUILMONTANT DE PIVOTJOINT D’ÉTANCHÉITÉCAPUCHON DE PLASTIQUESAC DE QUINCAILLERIEVIS #6 X 1-1/4’’VIS #8 X 1/2’’VIS #8 X 1’’CHEVILLESUPPORT DE PIVOT EN PLASTIQUEBARRURECAPUCHON À VIS, NOIR / BLANCRONDELLEESPACEURDESCRIPTION DES PIÈCESPARTS DESCRIPTIONPARTS DESCRIPTIONMAGNETSTRIKERWALL JAMBPIVOT PINPLASTIC DRIP SHIELDTOP / BOTTOM FRAMEROUND PULL FRAMESILLPIVOT JAMBWATER GASKETPLASTIC CAPHARDWARE BAG#6 X 1-1/4’’ SCREW#8 X 1/2’’ SCREW#8 X 1’’ SCREWPLUGPLASTIC PIVOT SUPPORTSNAPNUTBALCK / WHITE SNAP CAPWASHERSPACERQUANT.11121211112QUANT.When ordering replacement parts, please refer to part number, description,dimensions and color.533823332# PIECE #482076130561045680034883861084611216136961276483848381# PIECE #47009472354701048201482174821948075 / 480844807647146-20Les commandes pour les pièces de remplacement doivent inclure leurs numéros,description, dimensions et couleur.AVANT DE DÉBUTERLors de la réception, vérifiez si votre porte dedouche ou de bain est en bonne condition et sitoutes les pièces sont incluses dans le sac dequincaillerie. Si il y a un problème, signalez-leimmédiatement à votre distributeur.Équipement requis:q Tournevis, plat, carré ou étoile #1 et #2q Crayonq Perceuseq Ruban à masquerq Mêche 1/8”, 7/64, 3/16” ou 7/32”(selon le mur)q Gallon à mesurerq Niveauq Calfeutrant au silicone clairATTENTION:Pour un fonctionnement optimal, il est important que laporte de douche soit installée de niveau sur des murségalement de niveau.Manipulez les pièces de métal avec soin.BEFORE STARTINGUpon reception, verify if your shower or tub dooris in good condition and make sure that all partsare included in the hardware bag. If you have aproblem, please contact your distributor immediately.Required equipment:q Flat, square or Phillips #1 and #2 screwdriverq Pencilq Drillq Masking tapeq 1/8”, 7/64, 3/16” or 7/32” drill bit (According toq Measuring tapeq Levelq Clear silicone caulkingwall)WARNING:For optimum operation, it is important that the showerdoor be installed perfectly levelled on walls that arealso perfectly leveled.Manipulate metal parts with care.14# <strong>10049477</strong>-<strong>031114</strong># <strong>10049477</strong>-<strong>031114</strong> 3
MAAX n’est pas responsable des coûts, dommages ou réclamations résultant de l’achat de produits qui neconviendraient pas aux ouvertures ou aux structures existantes. MAAX n’est pas responsable des coûts,dommages ou réclamations résultant de vices qui auraient pu être découverts, réparés ou évités dans le cadred’une inspection ou d’une vérification antérieure à l’installation.MAAX n’est aucunement responsable des blessures corporelles, du décès d’une personne, des dommagesdirects, particuliers, accessoires ou indirects, de la perte de temps ou de profit, des inconvénients, des fraisaccessoires, des coûts de maind’œuvre ou de matériel ou de tout autre coût résultant de l’utilisation du produitou de l’équipement ou relatif à l’application de la présente garantie ou résultant du retrait ou du remplacement detout produit, élément ou pièce faisant l’objet de la présente garantie.À MOINS D’INDICATION CONTRAIRE AUX PRÉSENTES, MAAX N’OFFRE AUCUNE GARANTIE EXPRESSEOU IMPLICITE, NI AUCUNE GARANTIE DE QUALITÉ MARCHANDE OU D’ADAPTABILITÉ À UN USAGEPARTICULIER OU DE CONFORMITÉ À UN CODE.Dans tous les cas, MAAX ne peut être tenue responsable de tout montant excédant le prix d’achat du produitdéboursé par le propriétaire/utilisateur, l’entrepreneur ou le constructeur.Restrictions commercialesSTEP 3 - Installation du mur (montant de pivot)I. Insérez le support de pivot en plastique (EE) sur le bas dumontant de pivot (I).II.Bloquez l’assemblage avec la barrure (FF).IMPORTANT: Avant de fixer le montant assurez-vousd’avoir un cadre de bois derrière votre mur afin de fixersolidement le montant. Si ce n’est pas le cas, nous suggéronsde le fixer à l’aide d’ailettes en nylon ou àressort ou utilisez les ancrages appropriés (cheville N).Cela dans le but d’assurer un ancrage solide.III. Placez le montant de pivot (I) contre le rebord extérieur duseuil (H).I1.2.FFEn plus des conditions et restrictions mentionnées ci-dessus, la période de garantie relative à tout produit installédans le cadre d’une application commerciale ou utilisé dans le cadre d’une entreprise commerciale est de un (1)an à compter de la date d’achat originale par le propriétaire/utilisateur, l’entrepreneur ou le constructeur auprèsd’un détaillant autorisé. MAAX n’est pas responsable de la perte d’usage ou de profit dans aucune circonstance.Si le produit est utilisé dans le cadre d’un étalage, la période de garantie commence au moment où le produit estmis en montre.La présente garantie accorde des droits spécifiques au propriétaire/utilisateur, et le propriétaire/utilisateur peutjouir d’autres droits pouvant varier d’un État ou d’une province à l’autre.Garantie de serviceIV. Nivelez verticalement.V. Marquez l’emplacement des trous avec un crayon. Déplacerle montant mural (I), puis percer des trous aux marques.Mèches:-Pour céramique: 7/32” (6mm) au carbure-Pour plastique: 1/8”(3,2mm)-Pour mur préfabriqué: 3/16’’ (4,8mm)VI. Insérez les chevilles de plastique (DD) excepté sur les murspré-fabriqués.EEPour se prévaloir du service offert en vertu de la présente garantie pendant les heures normales d’ouverture,communiquer avec le détaillant ou le distributeur qui a vendu le produit, ou encore avec MAAX directement.VII. Vissez avec 5 vis (AA).MAAX honorera la garantie de service décrite ci-dessus aux conditions suivantes : la défaillance est d’une natureou d’un type couvert par la garantie; l’utilisateur a informé un agent autorisé de MAAX ou un représentant duservice de la garantie de la nature du problème durant la période de la garantie; une preuve concluante(p. ex., une preuve d’achat ou d’installation) de ce qui précède est fournie par l’utilisateur, démontrant que ladéfaillance est survenue ou a été découverte pendant la période de garantie; une personne autorisée d’un serviceindépendant ou un représentant de la compagnie a eu la permission d’inspecter le produit pendant les heuresnormales d’ouverture, dans un délai raisonnable après le signalement du problème par l’utilisateur.STEP 3 - Wall installation ( pivot side )I. Insert plastic pivot support (EE) on bottom of pivot jamb (I).II.Lock with snap nut (FF).L’obligation de MAAX en vertu de la garantie cesse au moment où MAAX fournit le remplacement ou la réparation.Le refus du client d’accepter cette mesure met unterme à l’obligation de MAAX en vertu de la garantie.Les produits MAAX sont certifiés par un ou plusieurs des organismes de certification suivants :- CSA - UL- IAPMO - ULI- INTERTEK (ETL) - WARNOCK HERSEY- US TESTING - NAHBIMPORTANT: Before securing the wall jamb, make sure youhave a wood structure behind your wall. If it is not thecase, we suggest you fix the wall jamb with nylon orspring toggle bolts or use proper anchor hardware (plugN). To ensure a solid wall anchoring.III. Stand pivot jamb (I) upright against the exterior lip of thesill (H).IV. Level vertically.IAAEENiveauLevelDDV. Mark holes and side locations with pencil. Remove pivotjamb (I) and drill holes at marked locations.Drill bits:-For ceramic tile wall: 7/32” (6mm) carbide-For plastic wall: 1/8” (3,2mm)- For dry wall: 3/16’’ (4,8mm)HCertains modèles sont en attente de certification.MAAX ou un organisme de certification peut annuler une certification sans préavis.VI. Insert plastic plug (DD) except for prefab walls.VI. Fasten with five screws (AA).12# <strong>10049477</strong>-<strong>031114</strong># <strong>10049477</strong>-<strong>031114</strong> 5
ÉTAPE 6 - Ajustement de la porteI. Incliner légèrement la porte vers l’intérieur à l’aide des visd’ajustement pour permettre l’écoulement de l’eau à l’intérieurde la douche. Fig.APorte<strong>Door</strong>ÉTAPE 8 - Installation du montant mural(Côté de l’ouverture)I. Vérifiez si la porte ferme bien. Si ce n’est pas le cas,enlevez-la en vous référant à l’étape 5.III.Insérez le percuteur (B) à l’intérieur du montant (C) tel quela figure B.III. Fermez la porte et ajustez le percuteur de façon à ce qu’ilsoit parallèle à celle-ci, en laissant un espace entre lesdeux (au minimum de 1/16’’(1,6mm) et au maximum de1/4” (6,5mm). Fig CIV. Marquez l’emplacement des trous sur le percuteur (B)(intérieur de la douche) et percez seulement la premièreparoi de celui-ci. Utilisez une mèche de 7/64’’ (3mm).V. Fixez à l’aide de trois vis (BB), des rondelles (HH) et descapuchons à vis (GG). Fig BSTEP 6 - <strong>Door</strong> adjustementI. Slightly incline the door towards the inside using adjustmentscrews to permit proper water evacuation. Fig.A.II.Insert the striker (B) inside the wall jamb (C) as shown inthe figure B.ECBBGGHHFig. CAjustementAdjustmentBFig. APorte<strong>Door</strong>Fig. BII.Insérez dans le pivot du bas de la porte un espaceur (II) oudeux pour réduire la friction entre le déflecteur souple (E) etle cadre de porte.III. Réinstallez la porte selon l’étape 5.STEP 8 - Wall jamb installationI. If the door does not open easily, remove the door (refer tostep 5).II.Slip one or two spacers (II) as required to reduce the frictionbetween the plastic drip shield (E) and the door frame.III. Reinstall door as per step 5.(Opening side)EEPorte<strong>Door</strong>AxePinIIEIII. Close the door and adjust the striker, leaving a 1/16” gapbetween the striker and the pull frame (a minimum of 1/16”(1,6mm) and a maximum of 1/4” (6,5mm). Fig.CMinimum 1/16’’(1,6mm)IV. Mark hole locations on the striker (interior of the shower)and drill through the first wall of the striker (B) only. Use a7/64” (3mm) drill bit.V. Fasten it with three screws (BB) use the washer (HH) andthe snap cap (GG) with the screw (BB). Fig BÉTAPE 7 - Joint d’étanchéitéI. Insérez le joint d’étanchéité (J) sur la bordure du verre.Prenez soin d’orienter la languette souple (J) tel qu’illustré,vers l’extérieur.Maximum 1/4’’(6,5 mm)Languette souplevers l’extérieur.Flexible flangeoutside the door.IÉTAPE 9 - SiliconeI. Appliquez le silicone à l’extérieur seulement.II.Laissez sécher le silicone pendant 24 heures avantl’utilisation.STEP 9 - SiliconeSTEP 7 - Water gasketI. Insert the water gasket (J) on the edge of the glass. Makesure to insert the gasket in the proper orientation (see illustration).JI. Apply silicone to exterior of unit only.II.Allow 24 hours for silicone to cure before using.Silicone8# <strong>10049477</strong>-<strong>031114</strong># <strong>10049477</strong>-<strong>031114</strong> 9