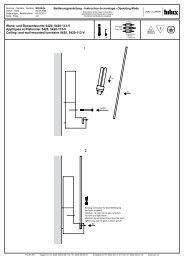
LED Aussenleuchte IMAGO 9026C1-28L4, 9026C2-28L4 ... - Tulux AG
LED Aussenleuchte IMAGO 9026C1-28L4, 9026C2-28L4 ... - Tulux AG
LED Aussenleuchte IMAGO 9026C1-28L4, 9026C2-28L4 ... - Tulux AG

Create successful ePaper yourself
Turn your PDF publications into a flip-book with our unique Google optimized e-Paper software.
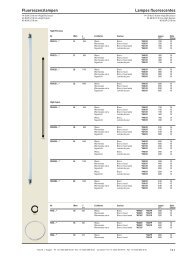
Nummer - Numéro - Number<br />
Datum - Date<br />
Änderungen - Modifications<br />
Seite - Page<br />
M0113dfe<br />
05.09.2012<br />
1/2<br />
Montageanleitung - Instruction de montage - Mounting instruction<br />
Technische Änderungen vorbehalten<br />
Modifications techniques sous réserve<br />
Technical modifications excepted<br />
<strong>LED</strong> <strong>Aussenleuchte</strong> <strong>IM<strong>AG</strong>O</strong> <strong>9026C1</strong>-<strong>28L4</strong>, <strong>9026C2</strong>-<strong>28L4</strong>, 9026C3-<strong>28L4</strong>, 9026C4-<strong>28L4</strong><br />
<strong>LED</strong> Luminaires d’extérieur <strong>IM<strong>AG</strong>O</strong> <strong>9026C1</strong>-<strong>28L4</strong>, <strong>9026C2</strong>-<strong>28L4</strong>, 9026C3-<strong>28L4</strong>, 9026C4-<strong>28L4</strong><br />
<strong>LED</strong> Outdoor luminaires <strong>IM<strong>AG</strong>O</strong> <strong>9026C1</strong>-<strong>28L4</strong>, <strong>9026C2</strong>-<strong>28L4</strong>, 9026C3-<strong>28L4</strong>, 9026C4-<strong>28L4</strong><br />
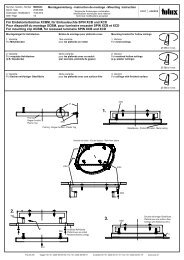
Allgemeine Installations-Hinweise<br />
1. Diese Leuchte ist nach geltenden europäischen<br />
Vorschriften (EN 60598) gebaut und<br />
geprüft.<br />
2. Bei unsachgemässer Montage oder Gebrauch<br />
wird keine Haftung übernommen.<br />
3. Elektroinstallationen und Reparaturen müssen<br />
von einer Fachperson ausgeführt werden.<br />
4. Der Netzanschluss muss während der Installation<br />
spannungsfrei sein.<br />
5. Merkblatt <strong>LED</strong> beachten.<br />
Gebrauchs-Hinweise<br />
1. Beim Auswechseln der <strong>LED</strong>, bei Reinigung,<br />
Montage, Demontage, immer zuerst Gerät von<br />
Netzspannung trennen.<br />
2. Die Leuchtmittel, Reflektoren usw. werden<br />
während des Betriebes heiss und müssen vor<br />
dem Berühren ausgekühlt sein.<br />
3. Zur Reinigung empfehlen wir, die Leuchte mit<br />
einem feuchten Tuch abzuwischen.<br />
Achten Sie darauf, dass keine Feuchtigkeit in<br />
die Elektronik eindringt.<br />
4. Aggressive Reinigungsmittel wie auch deren<br />
Dämpfe können sowohl die Leuchtenoberfläche<br />
als auch die <strong>LED</strong>s schädigen.<br />
5. Gläser empfehlen wir mit Seifenlauge zu reinigen.<br />
6. <strong>LED</strong>-Produkte sind elektronische Komponenten<br />
und als solche empfindlich gegen elektrostatisches<br />
Entladen. Zur Vermeidung von<br />
ESD-Schäden müssen beim Auswechseln der<br />
<strong>LED</strong> Vorkehrungen getroffen werden, damit es<br />
zu keiner elektrostatischen Entladung führt.<br />
7. Bewahren Sie diese Montageanleitung für<br />
einen späteren Gebrauch auf.<br />
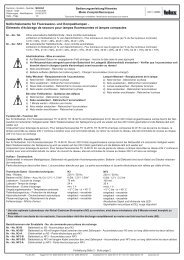
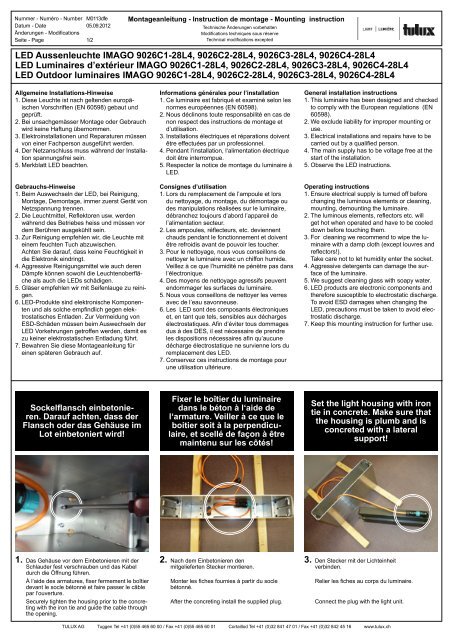
Sockelflansch einbetonieren.<br />
Darauf achten, dass der<br />
Flansch oder das Gehäuse im<br />
Lot einbetoniert wird!<br />
1. Das Gehäuse vor dem Einbetonieren mit der<br />
Schlauder fest verschrauben und das Kabel<br />
durch die Öffnung führen.<br />
À l‘aide des armatures, fixer fermement le boîtier<br />
devant le socle bétonné et faire passer le câble<br />
par l‘ouverture.<br />
Securely tighten the housing prior to the concreting<br />
with the iron tie and guide the cable through<br />
the opening.<br />
Informations générales pour l’installation<br />
1. Ce luminaire est fabriqué et examiné selon les<br />
normes européennes (EN 60598).<br />
2. Nous déclinons toute responsabilité en cas de<br />
non respect des instructions de montage et<br />
d’utilisation.<br />
3. Installations électriques et réparations doivent<br />
être effectuées par un professionnel.<br />
4. Pendant l‘installation, l‘alimentation électrique<br />
doit être interrompue.<br />
5. Respecter la notice de montage du luminaire à<br />
<strong>LED</strong>.<br />
Consignes d’utilisation<br />
1. Lors du remplacement de l’ampoule et lors<br />
du nettoyage, du montage, du démontage ou<br />
des manipulations réalisées sur le luminaire,<br />
débranchez toujours d’abord l’appareil de<br />
l’alimentation secteur.<br />
2. Les ampoules, réflecteurs, etc. deviennent<br />
chauds pendant le fonctionnement et doivent<br />
être refroidis avant de pouvoir les toucher.<br />
3. Pour le nettoyage, nous vous conseillons de<br />
nettoyer le luminaire avec un chiffon humide.<br />
Veillez à ce que l’humidité ne pénètre pas dans<br />
l’électronique.<br />
4. Des moyens de nettoyage agressifs peuvent<br />
endommager les surfaces du luminaire.<br />
5. Nous vous conseillons de nettoyer les verres<br />
avec de l’eau savonneuse.<br />
6. Les <strong>LED</strong> sont des composants électroniques<br />
et, en tant que tels, sensibles aux décharges<br />
électrostatiques. Afin d’éviter tous dommages<br />
dus à des DES, il est nécessaire de prendre<br />
les dispositions nécessaires afin qu’aucune<br />
décharge électrostatique ne survienne lors du<br />
remplacement des <strong>LED</strong>.<br />
7. Conservez ces instructions de montage pour<br />
une utilisation ultérieure.<br />
Fixer le boîtier du luminaire<br />
dans le béton à l‘aide de<br />
l‘armature. Veiller à ce que le<br />
boitier soit à la perpendiculaire,<br />
et scellé de façon à être<br />
maintenu sur les côtés!<br />
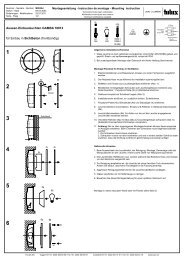
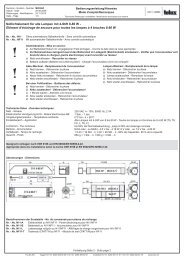
2. Nach dem Einbetonieren den<br />
mitgelieferten Stecker montieren.<br />
Monter les fiches fournies à partir du socle<br />
bétonné.<br />
After the concreting install the supplied plug.<br />
General installation instructions<br />
1. This luminaire has been designed and checked<br />
to comply with the European regulations (EN<br />
60598).<br />
2. We exclude liability for improper mounting or<br />
use.<br />
3. Electrical installations and repairs have to be<br />
carried out by a qualified person.<br />
4. The main supply has to be voltage free at the<br />
start of the installation.<br />
5. Observe the <strong>LED</strong> instructions.<br />
Operating instructions<br />
1. Ensure electrical supply is turned off before<br />
changing the luminous elements or cleaning,<br />
mounting, demounting the luminaire.<br />
2. The luminous elements, reflectors etc. will<br />
get hot when operated and have to be cooled<br />
down before touching them.<br />
3. For cleaning we recommend to wipe the luminaire<br />
with a damp cloth (except louvres and<br />
reflectors!).<br />
Take care not to let humidity enter the socket.<br />
4. Aggressive detergents can damage the surface<br />
of the luminaire.<br />
5. We suggest cleaning glass with soapy water.<br />
6. <strong>LED</strong> products are electronic components and<br />
therefore susceptible to electrostatic discharge.<br />
To avoid ESD damages when changing the<br />
<strong>LED</strong>, precautions must be taken to avoid electrostatic<br />
discharge.<br />
7. Keep this mounting instruction for further use.<br />
Set the light housing with iron<br />
tie in concrete. Make sure that<br />
the housing is plumb and is<br />
concreted with a lateral<br />
support!<br />
3. Den Stecker mit der Lichteinheit<br />
verbinden.<br />
Relier les fiches au corps du luminaire.<br />
Connect the plug with the light unit.<br />
TULUX <strong>AG</strong> Tuggen Tel +41 (0)55 465 60 00 / Fax +41 (0)55 465 60 01 Cortaillod Tel +41 (0)32 841 47 01 / Fax +41 (0)32 842 45 16 www.tulux.ch
Nummer - Numéro - Number<br />
Datum - Date<br />
Änderungen - Modifications<br />
Seite - Page<br />
M0113dfe<br />
05.09.2012<br />
2/2<br />
Montageanleitung - Instruction de montage - Mounting instruction<br />
Technische Änderungen vorbehalten<br />
Modifications techniques sous réserve<br />
Technical modifications excepted<br />
<strong>LED</strong> <strong>Aussenleuchte</strong> <strong>IM<strong>AG</strong>O</strong> <strong>9026C1</strong>-<strong>28L4</strong>, <strong>9026C2</strong>-<strong>28L4</strong>, 9026C3-<strong>28L4</strong>, 9026C4-<strong>28L4</strong><br />
<strong>LED</strong> Luminaires d’extérieur <strong>IM<strong>AG</strong>O</strong> <strong>9026C1</strong>-<strong>28L4</strong>, <strong>9026C2</strong>-<strong>28L4</strong>, 9026C3-<strong>28L4</strong>, 9026C4-<strong>28L4</strong><br />
<strong>LED</strong> Outdoor luminaires <strong>IM<strong>AG</strong>O</strong> <strong>9026C1</strong>-<strong>28L4</strong>, <strong>9026C2</strong>-<strong>28L4</strong>, 9026C3-<strong>28L4</strong>, 9026C4-<strong>28L4</strong><br />
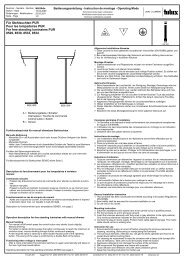
4. Die Lichteinheit mit dem Stecker nach unten im<br />
Gehäuse versenken. Dabei<br />
darauf achten, dass das Kabel in der dafür<br />
vorgesehenen Vertiefung Platz findet.<br />
En tirant la fiche vers le bas, faire glisser le<br />
corps du luminaire pour l‘insérer dans le boîtier.<br />
Veiller également à ce que le câble puisse être<br />
inséré dans le creux prévu à cet effet.<br />
Lower the light unit together with the plug into<br />
the base of the housing. Make sure to place the<br />
cable into the provided recess.<br />
7. Das Gehäuse mit 4 Schrauben befestigen.<br />
Fixer le boîtier avec 4 vis.<br />
Attach the housing using 4 screws.<br />
5. Achtung Verdrehsicherung:<br />
Die Lichteinheit kann nur auf eine Weise im<br />
Gehäuse platziert werden.<br />
Attention: sécurité anti-torsion:<br />
Le corps du luminaire ne peut être positionné<br />
que d‘une façon dans le boîtier.<br />
Caution with the locking device:<br />
there is only one way to position the light unit<br />
into the housing.<br />
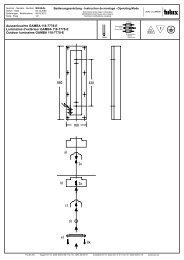
8. Das Glas mit dem daran befestigten<br />
Rahmen senkrecht von oben auf die<br />
Lichteinheit stellen.<br />
Par le dessus, faites glisser verticalement le<br />
verre le long du cadre prévu à cet effet, pour<br />
l‘installer devant le corps du luminaire.<br />
Place the glass with the attached frame from up<br />
top onto the light unit.<br />
10. Fertig montierte Leuchte.<br />
Le montage de votre luminaire est terminé.<br />
The installation of the light is complete.<br />
6. Durch Zusammendrücken die Eckteile ins Gehäuse<br />
einpassen.<br />
Appuyer pour bien insérer les coins dans le<br />
boîtier.<br />
Fit it in by pressing the edges together.<br />
9. Den Deckel mit 4 Schrauben schliessen.<br />
Fixer le couvercle avec 4 vis.<br />
Close the cover using 4 screws.<br />
TULUX <strong>AG</strong> Tuggen Tel +41 (0)55 465 60 00 / Fax +41 (0)55 465 60 01 Cortaillod Tel +41 (0)32 841 47 01 / Fax +41 (0)32 842 45 16 www.tulux.ch