TAG 1022 TAG 1022 GT
TAG 1022 TAG 1022 GT
TAG 1022 TAG 1022 GT

You also want an ePaper? Increase the reach of your titles
YUMPU automatically turns print PDFs into web optimized ePapers that Google loves.
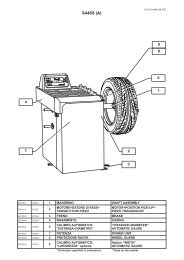
6.2 REMOVING THE TYRE<br />
Before any operation remove the old wheel balancing weights and check that the tyre is deflated.<br />
During arm tilting make sure that nobody stays behind the tyre-changer.<br />
•Press pedal (H) to tilt the arm (P) thereby clearing the turntable.<br />
•Spread the supplied grease (or grease of a similar type) onto the tyre bead.<br />
I<br />
T<br />
Fig. 16 Fig. 17<br />
30<br />
Failure to use the grease supplied risks<br />
causing serious damage to the tyre bead.<br />
During rim locking NEVER keep your hands under the tyre. For a correct locking operation set the tyre<br />
exactly in the middle of turntable.<br />
OUTER LOCKING<br />
• Position the clamps (G) according to the reference mark<br />
on the turntable (Y) by pressing pedal (V) down to its<br />
intermediate position.<br />
• Place the tyre on the clamps and, keeping the rim pressed<br />
down, press the pedal (V) as far as it will go.<br />
Make sure that the rim is firmly fixed to the clamps.<br />
INNER LOCKING<br />
• Position the clamps (G) so that they are completely closed.<br />
• Place the tyre on the clamps and press down the pedal (V) to<br />
open the clamps and thereby lock the rim.<br />
Never keep your hands onto the wheel: the arm recovery to “working position” could set the operator at<br />
risk of hand crushing between rim and mounting tool.<br />
•Return the arm (P) by pressing the pedal (H).<br />
•Unlock the mounting bar (M) by placing the locking button (K) into position "2".<br />
•Lower the mounting bar (M) so that the mounting head (I) rests against the upper edge of the wheel rim and lock the entire assembly by<br />
placing the locking button into position "1". This will lock the arm in both vertical and horizontal direction and automatically move the mounting<br />
head (I) of about 2 mm from the rim.<br />
Never keep your hands onto the wheel: the arm recovery to “working position” could set the operator at<br />
risk of hand crushing between rim and mounting tool.<br />
•With the lever (T) inserted between the bead and the front section of the mounting head (I), move the tyre bead over the mounting head<br />
Note: In order to avoid damaging the inner tube, if there is one, it is advisable to carry out this operation with the valve about 10 cm .<br />
right of the mounting head. (Fig. 16)<br />
Chains, bracelets, loose clothing or foreign objects in the vicinity of moving parts can represent a danger<br />
for the operator.<br />
•With the lever held in this position, let the turntable (Y) rotate in a clockwise direction by pressing pedal (Z) down until the tyre is completely<br />
separated from the wheel rim (Fig. 17).<br />
•In order to remove the inner tube, if there is one, without unlocking the mounting bar, tilt the arm (P) by pushing pedal (H) down.<br />
•Repeat the operation for the other bead.<br />
K<br />
K<br />
pos. 1<br />
pos. 2