

Sony NEX-C3A - NEX-C3A Consignes d’utilisation Russe
Sony NEX-C3A - NEX-C3A Consignes d’utilisation Russe
Sony NEX-C3A - NEX-C3A Consignes d’utilisation Russe

You also want an ePaper? Increase the reach of your titles
YUMPU automatically turns print PDFs into web optimized ePapers that Google loves.
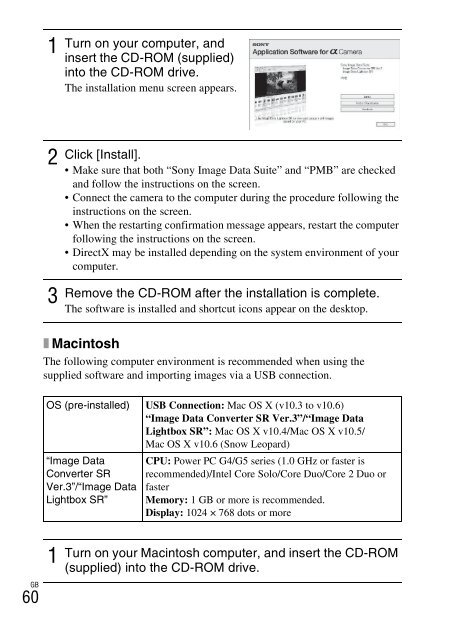
2<br />
3<br />
4<br />
Double-click the CD-ROM icon.<br />
Copy the [IDS_INST.pkg] file in the [MAC] folder to the<br />
hard disk icon.<br />
Double-click the [IDS_INST.pkg] file in the copy-to folder.<br />
• Follow the instructions on the screen to complete the installation.<br />
What you can do with the supplied software<br />
x “PMB”<br />
With “PMB” you can do the following, etc.:<br />
• Import images shot with the camera and display them on the computer.<br />
• Organize images on the computer on a calendar by shooting date to view<br />
them.<br />
• Print or save still images with the date.<br />
For details on “PMB,” refer to “PMB Help”.<br />
To start Help, click (PMB Help) displayed on the desktop after<br />
installation. Or, from the start menu, click [Start] t [All Programs] t<br />
[PMB] t [PMB Help].<br />
The support information for the “PMB” (English only):<br />
http://www.sony.co.jp/pmb-se/<br />
Note<br />
• “PMB” is not compatible with Macintosh computers.<br />
x “Image Data Converter SR”/“Image Data Lightbox<br />
SR”<br />
With “Image Data Converter SR,” you can edit images recorded in RAW<br />
format with various corrections, such as tone curve, and sharpness.<br />
With “Image Data Lightbox SR,” you can display and compare RAW/JPEG<br />
images recorded with this camera.<br />
For details on “Image Data Converter SR” and “Image Data Lightbox SR,”<br />
refer to Help.<br />
To start Help, click [Start] t [All Programs] t [<strong>Sony</strong> Image Data Suite] t<br />
[Help] t [Image Data Converter SR Ver.3] or [Image Data Lightbox SR].<br />
GB<br />
61<br />
Importing images to the computer


