

Sony CDX-G1102U - CDX-G1102U Mode d'emploi Italien
Sony CDX-G1102U - CDX-G1102U Mode d'emploi Italien
Sony CDX-G1102U - CDX-G1102U Mode d'emploi Italien

You also want an ePaper? Increase the reach of your titles
YUMPU automatically turns print PDFs into web optimized ePapers that Google loves.
After matching the connections and switching<br />
power supply leads correctly, connect the unit to<br />
the car’s power supply. If you have any questions<br />
and problems connecting your unit that are not<br />
covered in this manual, consult the car dealer.<br />
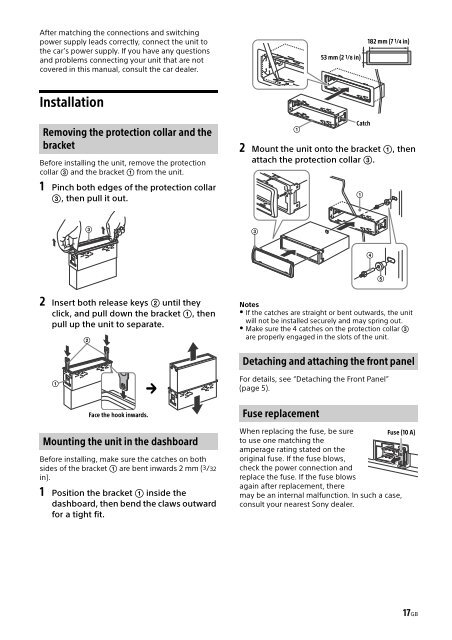
53 mm (2 1/8 in)<br />
182 mm (7 1/4 in)<br />
Installation<br />
Removing the protection collar and the<br />
bracket<br />
Before installing the unit, remove the protection<br />
collar and the bracket from the unit.<br />
1 Pinch both edges of the protection collar<br />
, then pull it out.<br />
<br />
Catch<br />
2 Mount the unit onto the bracket , then<br />
attach the protection collar .<br />
<br />
<br />
<br />
<br />
<br />
2 Insert both release keys until they<br />
click, and pull down the bracket , then<br />
pull up the unit to separate.<br />
<br />
Notes<br />
If the catches are straight or bent outwards, the unit<br />
will not be installed securely and may spring out.<br />
Make sure the 4 catches on the protection collar <br />
are properly engaged in the slots of the unit.<br />
<br />
<br />
Detaching and attaching the front panel<br />
For details, see “Detaching the Front Panel”<br />
(page 5).<br />
Face the hook inwards.<br />
Fuse replacement<br />
Mounting the unit in the dashboard<br />
Before installing, make sure the catches on both<br />
sides of the bracket are bent inwards 2 mm (3/32<br />
in).<br />
1 Position the bracket inside the<br />
dashboard, then bend the claws outward<br />
for a tight fit.<br />
When replacing the fuse, be sure<br />
Fuse (10 A)<br />
to use one matching the<br />
amperage rating stated on the<br />
original fuse. If the fuse blows,<br />
check the power connection and<br />
replace the fuse. If the fuse blows<br />
again after replacement, there<br />
may be an internal malfunction. In such a case,<br />
consult your nearest <strong>Sony</strong> dealer.<br />
17GB


