

Sony STR-D550Z - STR-D550Z Consignes d’utilisation Anglais
Sony STR-D550Z - STR-D550Z Consignes d’utilisation Anglais
Sony STR-D550Z - STR-D550Z Consignes d’utilisation Anglais

You also want an ePaper? Increase the reach of your titles
YUMPU automatically turns print PDFs into web optimized ePapers that Google loves.
1 Press one of the SYSTEM CONTROL/FUNCTION<br />
buttons to select the component you want to use.<br />
The receiver and the selected component turn on.<br />
The SYSTEM CONTROL/FUNCTION buttons on<br />
the remote are factory-set as follows:<br />
Receiver Operations<br />
To listen to or watch<br />
Records<br />
Radio programs<br />
Compact Discs (CD)<br />
Digital Audio Tapes (DAT)<br />
or MiniDiscs (MD)<br />
Audio tapes<br />
TV programs<br />
Laser discs<br />
10 EN<br />
Press<br />
PHONO<br />
TUNER<br />
CD<br />
DAT/MD<br />
TAPE<br />
TV/DBS<br />
Video tapes VIDEO 1 (VTR 1*),<br />
VIDEO 2 (VTR 2*) or<br />
VIDEO 3** (VTR 3*)<br />
LD**<br />
* <strong>Sony</strong> VCRs are operated with a VTR 1, 2, or 3 setting<br />
that correspond to VHS, Beta, and 8mm respectively.<br />
** VIDEO 3 and LD set the remote to operate the<br />
respective <strong>Sony</strong> video component but do not switch<br />
the function of the receiver.<br />
For example, to watch <strong>Sony</strong> LD player connected to<br />
the VIDEO 2 terminals (as shown on page 8):<br />
Press VIDEO 2 to switch the function, then press LD<br />
to set the remote control to operate the LD player.<br />
If you want to change the factory setting of a button<br />
See page 20.<br />
If the component does not turn on<br />
Press the power switch on the component.<br />
2 Start playing.<br />
Refer to “Remote Button Descriptions” on page 27<br />
for details.<br />
To turn off the components<br />
Press SYSTEM OFF. This will also turn off the video and<br />
audio components connected to the SWITCHED AC<br />
OUTLETs on the back of this unit at the same time.<br />
If you use a <strong>Sony</strong> TV<br />
When you press TV to watch a TV program, the TV<br />
turns on and switches to the TV input. The TV also turns<br />
on automatically and switches to the appropriate video<br />
input when you press VIDEO 1 or VIDEO 2. If the TV<br />
does not switch to the appropriate input automatically,<br />
press TV/VIDEO on the remote.<br />
Watching TV without the receiver (for <strong>Sony</strong> TVs only)<br />
Press TV CONTROL ON to set the remote to operate TV<br />
functions only (see “Remote Button Descriptions” on<br />
page 27 for details). When you press this button, the TV<br />
turns on and switches to the TV input. If the TV does<br />
not automatically switch to the TV input, press TV/<br />
VIDEO.<br />
Receiving Broadcasts<br />
This receiver lets you enter a station’s frequency<br />
directly by using the numeric buttons (direct tuning). If<br />
you don’t know the frequency of the station you want,<br />
see “Receiving broadcasts by scanning stations<br />
(automatic tuning)”.<br />
Before you begin, make sure you have:<br />
• Connected an FM/AM antenna to the receiver as<br />
indicated on page 5.<br />
• Selected the appropriate speaker system. (For details,<br />
see “Selecting the speaker system” on page 7.)<br />
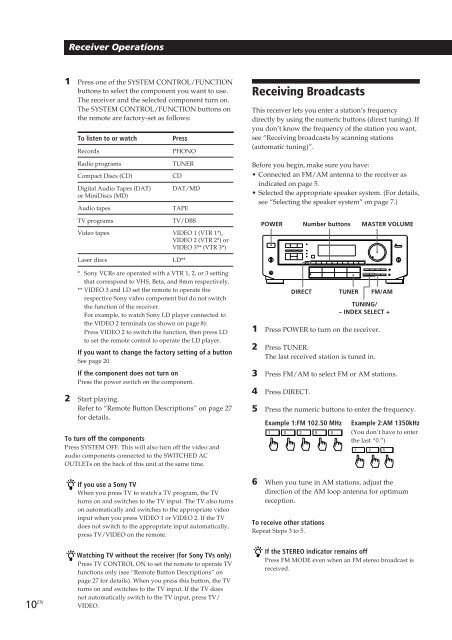
POWER<br />
DIRECT<br />
Number buttons<br />
TUNER<br />
MASTER VOLUME<br />
FM/AM<br />
TUNING/<br />
– INDEX SELECT +<br />
1 Press POWER to turn on the receiver.<br />
2 Press TUNER.<br />
The last received station is tuned in.<br />
3 Press FM/AM to select FM or AM stations.<br />
4 Press DIRECT.<br />
5 Press the numeric buttons to enter the frequency.<br />
Example 1:FM 102.50 MHz<br />
1 0 2 5 0<br />
Example 2:AM 1350kHz<br />
(You don’t have to enter<br />
the last “0.”)<br />
6 When you tune in AM stations, adjust the<br />
direction of the AM loop antenna for optimum<br />
reception.<br />
To receive other stations<br />
Repeat Steps 3 to 5.<br />
1 3 5<br />
If the STEREO indicator remains off<br />
Press FM MODE even when an FM stereo broadcast is<br />
received.


