
Create successful ePaper yourself
Turn your PDF publications into a flip-book with our unique Google optimized e-Paper software.
EN<br />
3.3.3 Wooden side railings<br />
Page 16<br />
<strong>Luna</strong><br />
2010-11<br />
Assembly shown below applicable for types: <strong>Luna</strong>, <strong>Luna</strong> Basic, <strong>Luna</strong> Deluxe, <strong>Luna</strong> X-low.<br />
Depending on your type of <strong>Luna</strong> <strong>bed</strong>, certain images might appear different.<br />
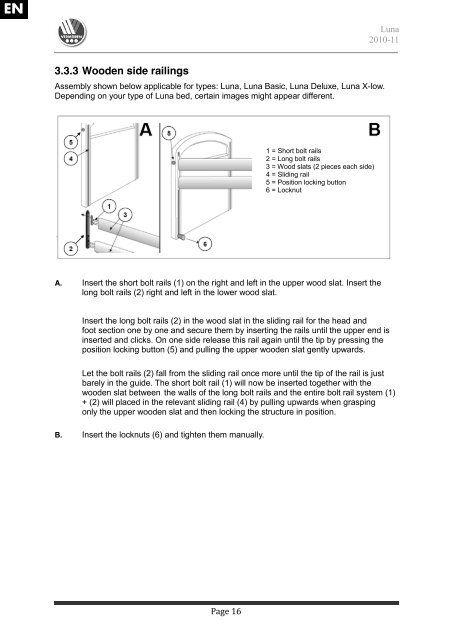
A. Insert the short bolt rails (1) on the right and left in the upper wood slat. Insert the<br />
long bolt rails (2) right and left in the lower wood slat.<br />
Insert the long bolt rails (2) in the wood slat in the sliding rail for the head and<br />
foot section one by one and secure them by inserting the rails until the upper end is<br />
inserted and clicks. On one side release this rail again until the tip by pressing the<br />
position locking button (5) and pulling the upper wooden slat gently upwards.<br />
Let the bolt rails (2) fall from the sliding rail once more until the tip of the rail is just<br />
barely in the guide. The short bolt rail (1) will now be inserted together with the<br />
wooden slat between the walls of the long bolt rails and the entire bolt rail system (1)<br />
+ (2) will placed in the relevant sliding rail (4) by pulling upwards when grasping<br />
only the upper wooden slat and then locking the structure in position.<br />
B. Insert the locknuts (6) and tighten them manually.<br />
1 = Short bolt rails<br />
2 = Long bolt rails<br />
3 = Wood slats (2 pieces each side)<br />
4 = Sliding rail<br />
5 = Position locking button<br />
6 = Locknut