RAM 784
RAM 784
RAM 784

You also want an ePaper? Increase the reach of your titles
YUMPU automatically turns print PDFs into web optimized ePapers that Google loves.
310 582 01<br />
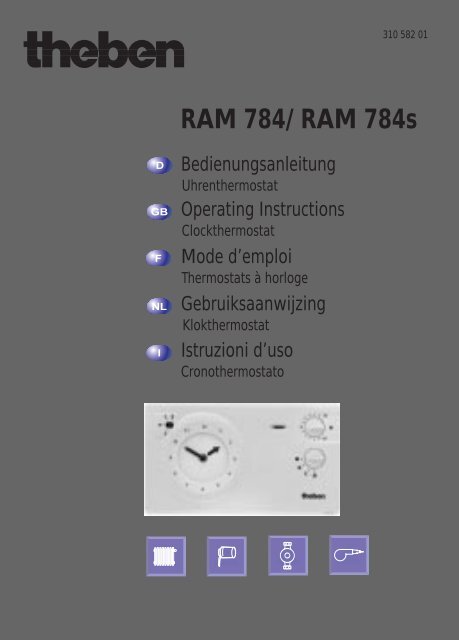
<strong>RAM</strong> <strong>784</strong>/ <strong>RAM</strong> <strong>784</strong>s<br />
Bedienungsanleitung<br />
Uhrenthermostat<br />
Operating Instructions<br />
Clockthermostat<br />
Mode d’emploi<br />
Thermostats à horloge<br />
Gebruiksaanwijzing<br />
Klokthermostat<br />
Istruzioni d’uso<br />
Cronothermostato
Abb.<br />
<strong>RAM</strong> <strong>784</strong>s<br />
2<br />
1<br />
2<br />
11<br />
3 4<br />
10<br />
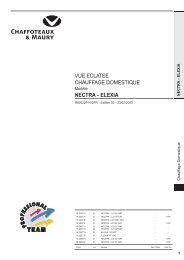
1 <strong>RAM</strong> <strong>784</strong>s Tagesprogramm mit Segmenten<br />
<strong>RAM</strong> <strong>784</strong> Tages-/ Wochenprogramm umschaltbar mit Schaltreiter<br />
2 Handschalter und Anzeige Normal-r oder Energiesparbetrieb m (Nacht)<br />
3 Blinkt die LED, Batteriewechsel erforderlich.<br />
4 Elektronische Rückführung zur Anpassung an Ihre Heizung<br />
5 Lüftungsschlitze im Sockel<br />
6 Einstellung der Normaltemperatur r (Tag)<br />
7 Programmwahlschalter (Normalbetrieb in Pos. AUTO n) oder dauernd<br />
Normal-r oder Energiesparbetrieb m, Frostschutzbetrieb + 6° C f<br />
8 Temperaturabgleich zur Anpassung an die örtlichen Gegebenheiten<br />
9 Einstellung der Absenktemperatur m (Energiesparprogramm)<br />
10 Batteriefach<br />
11 Verschluß zur Gerätebefestigung<br />
1 <strong>RAM</strong> <strong>784</strong>s Day program with Segments<br />
<strong>RAM</strong> <strong>784</strong> Day/Week program switchable with Tappets<br />
2 Manual Switching and display normal r or energy saving operation m (night)<br />
3 LED displays heating operation / LED flashing, battery change necessary<br />
4 Electronic feedback for adjustment to your heating<br />
5 Ventilation apertures in the plinth<br />
6 Setting normal temperature r (day)<br />
7 Program selection switch (normal operation in position AUTO n or continuously<br />
normal r or energy saving operation m protection operation + 6° C f<br />
8 Temperature compensation for adjustment to the location conditions<br />
9 Setting the set-back temperature m (energy saving program)<br />
10 Battery compartment<br />
11 Seal for product security<br />
6<br />
7<br />
8<br />
9<br />
5
1 <strong>RAM</strong> <strong>784</strong>s programme journalier avec segments imperdables<br />
<strong>RAM</strong> <strong>784</strong> programme journalier/hebdomadaire, au choix, avec cavaliers<br />
amovibles<br />
2 Dérogation manuelle et affichage du régime en cours, confort r ou réduit<br />
m (nuit)<br />
3 LED. En cas de clignotement, le changement des piles est nécessaire.<br />
4 Anticipation thermique électronique pour l’adaptation à votre chauffage<br />
5 Fentes d’aération dans le socle.<br />
6 Réglage de la température confort r (jour).<br />
7 Sélecteur de programme permettant de choisir le régime: normal AUTO n<br />
ou confort permanent r ou réduit permanent m, ou antigel + 6° C f.<br />
8 Etalonnage pour l’adaptation aux particularités du local<br />
9 Réglage de la température réduite m (régime économique).<br />
10 Logement pour les piles.<br />
11 Fermeture pour la fixation de l’appareil.<br />
1 <strong>RAM</strong> <strong>784</strong>s dagprogramma met onverliesbare segmenten<br />
<strong>RAM</strong> <strong>784</strong> dag-/weekprogramma naar keuze, met versteekbare ruiters<br />
2 Manuele afwijking en weergave van de actieve periode, comfort r of<br />
verlaagd m (nuit)<br />
3 Knipperende LED: de batterijen moeten vervangen worden<br />
4 Elektronische terugkoppeling ter aanpassing aan uw verwarming<br />
5 Ventilatieopeningen in de sokkel<br />
6 Instelling van de comforttemperatuur r (dag)<br />
7 Keuzeschakelaar voor normaal bedrijf in stand AUTO n of permanent<br />
comfort r of permanent verlaagd m, vorstbeveiliging + 6° C f<br />
8 Ijking ter aanpassing ann de plaatselijke omstandigheden<br />
9 Instelling van de verlaagde temperatuur m (energiebesparend programma)<br />
10 Batterijhouder<br />
11 Vergrendeling voor de bevestiging van het apparaat<br />
1 <strong>RAM</strong> <strong>784</strong>s programma giornaliero con segmenti<br />
<strong>RAM</strong> <strong>784</strong> programma giornaliero-/ settimale reversibile<br />
2 Visualizzazione temperatura comfort<br />
3 LED visualizzazione del tipo di commutatione<br />
4 Anticipatione termica (Indicazioni per l’elettricista)<br />
5 Zona ventilazione sonda temperatura.<br />
6 Temperatura normale r (giorno).<br />
7 Selettore di programma (viene eseguita in base al programma ora pos. n)<br />
temperatura normale permanente r, notturna m, temperatura antigelo + 6°C f<br />
8 Impostzationi dei periodi di regolazione (Indicazioni per l’elettricista)<br />
9 Temperatura notturna<br />
10 Cassettino di batteria<br />
11 Vite contrassegnata<br />
3
4<br />
Information / Information / Information/<br />
Informatie / Informazioni<br />
Batterie/Batteriewechsel /<br />
Battery/battery change / Piles/<br />
chengement des piles /<br />
Batterijen/Batterijen vervangen /<br />
Campio pile<br />
Aktuelle Uhrzeit einstellen/ Korrigieren /<br />
Set/correct actual time / Réglage de<br />
l’heure/correction / Instelling/correctie<br />
van de actuele kloktijd / Impostare l’ora<br />
selezionata<br />
Sommer-/ Winterzeitkorrektur /<br />
Summer/Winter time adjustment /<br />
Changement d’heure été/hiver /<br />
Zomer-/wintertijdomschakeling /<br />
Correzione ora solare/legale<br />
Temperatur einstellen / Set temperature /<br />
Réglage de la température /<br />
Temperatuur instellen / Programmazione<br />
della temperatura<br />
Handschaltung / Manual switching /<br />
Dérogation manuelle / Manuele<br />
afwijking / Selezione manuale<br />
Heizzeit programmieren (Tagesprogramm)<br />
/ Program heating time (day<br />
program) / Programmation des périodes<br />
de chauffe (programme journalier) /<br />
Programmeren van de verwarmingsperiodes<br />
(dagprogramma /<br />
Programmazione della temperatura<br />
(programma giornaliero)<br />
Umschaltung Tages- / Wochenprogramm /<br />
Switch over day/ week program /<br />
Changement de programme (24h/7jours)/<br />
Omschakeling dag-/ weekprogramma /<br />
Commutazione programma giornaliero/<br />
settimanale<br />
SAFE<br />
Heizzeit programmieren (Wochenprogramm)<br />
/ Program heating time<br />
(week program) / Programmation<br />
des périodes de chauffe<br />
(programme hebdomadaire) /<br />
Programmeren van de verwarmingsperiodes<br />
(weekprogramma) /<br />
Programmazione della temperatura<br />
(programma settimanale)<br />
Sicherheitshinweise / Safety<br />
instructions / Conseils de sécurité /<br />
Veiligheidsaanwijzing / Avvertenze<br />
Montage / Installation / Montage /<br />
Montage / Installazione<br />
Anschluß / Connection /<br />
Raccordement / Aansluiting /<br />
Collegamento<br />
Anpassen an die Heizung /<br />
Matching to the heating /<br />
Adaptation au chauffage<br />
(différentiel) / Aanpassing aan de<br />
verwarming (differentieel) /<br />
Regolazione cicli ora<br />
(differenziale termico)<br />
Arbeitspunkt anpassen / Adjusting<br />
operating point / Etalonnage du<br />
seuil de commutation / Ijking van<br />
schakeldrempel / Punto di lavoro<br />
regolabile<br />
Telefonfernschalter /<br />
Remote telephone switch /<br />
Commande à distance par le contact<br />
d’un récepteur téléphonique /<br />
Telefonische afstandsbediening /<br />
Comando telefonico<br />
Pumpenschutz/ pump protection/<br />
Dégommage du circulateur/<br />
Beveiliging van de circulatiepomp/<br />
Pompa di circulazione<br />
Technische Daten / Technical data /<br />
Caractéristiques techniques /<br />
Technische gegevens / Dati tecnici
Verwendung: Der Uhrenthermostat ist geeignet zur Temperaturregelung von<br />
Wohn- und Geschäftsräumen, jedoch nicht für Räume mit starker Schmutzentwicklung<br />
(Montagehallen). Zum Beispiel während der Bürozeiten wird auf Normaltemperatur<br />
und bei Büroende auf reduzierte Temperatur (Energiesparprogramm)<br />
geregelt. Beginn und Ende der Normal- und Energiespartemperatur kann durch<br />
Steckreiter oder Segmente frei programmiert werden.<br />
Use: The clock thermostat is suitable for temperature control of domestic and<br />
business rooms, but not for rooms with major dirt generation (assembly units). For<br />
example during office hours normal temperature or (energy saving program).<br />
Saving temperature can be selected by means of tappets or segments.<br />
Application: le thermostat à horloge convient pour la régulation de température<br />
de locaux d’habitations ou professionnels, mais ne convient pas pour les locaux très<br />
poussiéreux (halls de fabrication) ou humides (piscines, salles de bain, saunas etc.).<br />
Par exemple, durant les heures de bureau, on assure une température confort; à la<br />
fin des heures de bureau, une température réduite. Le début et la fin du régime de<br />
température confort ou réduite est programmable librement par les cavaliers ou<br />
segments disposés autour du cadran de l’horloge.<br />
Toepassing: de klokthermostaat is geschikt voor de temperatuurregeling van<br />
woon- of beroepsruimten, echter niet voor zeer stoffige media (fabriekshallen) of<br />
vochtige media (zwembaden, badkamers, sauna’s enz.). Bijvoorbeeld, gedurende de<br />
kantoortijden wordt op comforttemperatuur geregeld, op het einde van de<br />
kantoortijden op verlaagde temperatuur. Het begin en het einde van de comfort- of<br />
verlaagde periodes kan vrij geprogrammeerd worden d.m.v. de ruitertjes of<br />
segmenten, die zich rond de klokschijf bevinden.<br />
Il cronotermostato è stato studiato per la regolazione di unità abitative o uffici.<br />
Esempio: Durante l’orario di ufficio sarà regolata la temperatura normale<br />
permanente, al termine dell’orario d’ufficio il cronotermostato ridurrà la temperatura<br />
(programma a risparmio di energia). Sia la temperatura iniziale che quella<br />
finale dei programmi normale e a risparmio di energia potranno essere liberamente<br />
programmate con i cavalieri o con i segmenti.<br />
5
6<br />
Der Uhrenthermostat ist batteriebetrieben. Je nach Schalthäufigkeit, müssen<br />
die Batterien nach ca. 12 Monaten gewechselt werden.<br />
Erstinbetriebnahme: Neue Batterien sind der Verpackung beigelegt<br />
Beachten Sie die Polung der Batterien<br />
Legen Sie die Batterien in das Batteriefach ein<br />
Die Batterieüberwachung erfolgt bei jedem Wechsel des Heizprogrammes bzw. einmal pro Tag<br />
Batteriewechsel notwendig: LED 3 blinkt.<br />
Maßnahme: Erneuern Sie innerhalb von 3 Wochen die verbrauchten<br />
Batterien.<br />
Wirkung bei leeren Batterien: Die LED leuchtet danach noch einige Tage dauernd.<br />
Danach bleibt die Uhr stehen, die Heizung schaltet dauernd<br />
EIN, wird aber nicht mehr geregelt.<br />
Batterien wechseln: 1. Entnehmen Sie die verbrauchten Batterien<br />
2. Entsorgen Sie die Batterien umweltgerecht<br />
3. Verwenden Sie ausschließlich neue,<br />
typengleiche Alkaline LR6 Zellen<br />
4. Beachten Sie die Polung, und legen Sie die Batterien ein<br />
Überprüfen Sie von Zeit zu Zeit die Batterien. Auslaufende Batterien beschädigen Ihr Gerät.<br />
The clock thermostat is battery powered. Depending on switching frequency,<br />
you must change the batteries after approx. 12 months.<br />
First time of operation: New batteries are included at the time of packing<br />
1. Note the polarity of the batteries.<br />
2. Place the batteries in the battery compartment.<br />
Battery change necessary: LED 3 flashes<br />
Action: Change the old batteries within 3 weeks.<br />
If action not taken: The LED is illuminated after this for a few days continuously<br />
Afterwards the clock stops, the heating switches on<br />
continuously, but is not controlled.<br />
Changing batteries: 1. Take out the used batteries.<br />
2. Dispose of the batteries in an environmentally friendly way.<br />
3. Use only new similar type alkaline cells LR6<br />
4. Note the polarity and fit the batteries.<br />
Recommendation: Check the batteries from time to time. Leaking batteries<br />
damage your product.<br />
Le thermostat à horloge fonctionne sur piles. Selon la fréquence<br />
d’enclenchement, vous devrez changer les piles après environ un an.<br />
Première mise en service: de nouvelles piles sont incluses dans l’emballage.<br />
1. vérifiez la polarité des piles<br />
2. incorporez les piles dans le tiroir à piles<br />
Nécessité de remplacer<br />
les piles: la LED 3 clignote<br />
Mesure: changez les piles dans les 3 semaines
En cas de négligence: la LED reste allumée encore quelques jours en permanence.<br />
Ensuite, l’horloge s’arrête, le chauffage est enclenché en<br />
permanence mais la régulation de température n’est plus<br />
assurée.<br />
Changement des piles: 1. enlevez les piles usagées<br />
2. débarrassez-vous de ces piles en respectant<br />
l’environnement<br />
3. utilisez seulement des nouvelles piles, de même<br />
type, alcalines LR6<br />
4. respectez la polarité et installez les nouvelles piles.<br />
Recommandation: contrôlez de temps en temps les piles car celles-ci peuvent<br />
couler et endommager votre appareil.<br />
De klokthermostaat werkt op batterijvoeding. Naar gelang de inschakelfrequentie,<br />
moeten de batterijen na ca. 12 maanden vervangen worden.<br />
Eerste inwerkingstelling: in de verpakking zijn nieuwe batterijen bijgevoegd.<br />
1. controleer de polariteit van de batterijen.<br />
2. plaats de batterijen in het batterijvakje.<br />
Batterijvervanging<br />
noodzakelijk: LED 3 knippert.<br />
Maatregel: de batterijen binnen de 3 weken vervangen.<br />
Bij onachtzaamheid: De LED blijft nog enkele dagen permanent lichten. Daarna,<br />
valt de klok stil, de verwarming wordt permanent ingeschakeld<br />
maar niet meer geregeld.<br />
Batterijen vervangen: 1. de lege batterijen uitnemen.<br />
2. de lege batterijen in de milieubox deponeren.<br />
3. alleen nieuwe batterijen van hetzelfde type,<br />
alkaline LR6, gebruiken.<br />
4. bij het plaatsen van de nieuwe batterijen, de polariteit in<br />
acht nemen.<br />
Aanbeveling: controleer van tijd tot tijd de batterijen; lekkende batterijen.<br />
kunnen uw apparaat beschadigen.<br />
Il cronotermostato è alimentato a pile. E’necessario, quindi, sostituirle ogni 12 mesi.<br />
Prima messa in funzione: 1. Fare attenzione alla polarizzatione<br />
2. Inserire le pile<br />
Cambio delle batterie necessario: Il LED lampeggerà<br />
Significato: Nel caso in cui il segnale LED rimane sempre fisso, acceso,<br />
significa che le pile sono completamente scariche.<br />
Il seguito: In questa situazione l’orologio si ferma, il relè che comanda il riscaldamento<br />
rimane sempre posizione acceso (ON) e non seguirà<br />
più il programma memorizzato sino alla sostituzione delle<br />
pila.<br />
Cambio delle batterie: 1. Sollevare pile<br />
2. Utilizzare sempre pile nuove<br />
3. Utilizzare sempre 2 pile dello stesso tipo LR6<br />
4. Fare attenzione alla polarizzatione.<br />
Indicazioni: Controllare di tanto in tanto il LED stato pile poichè le pile<br />
scariche danneggiano l’apparecchio.<br />
7
8<br />
14°°<br />
2 °°<br />
z.B.: p.ex., e.g., p.es.: 14°°<br />
<strong>RAM</strong> <strong>784</strong> / <strong>784</strong>s<br />
Aktuelle Uhrzeit einstellen oder Sommer-/ Winterzeitkorrektur<br />
Drehen Sie den großen Zeiger in Uhr- oder Gegenuhrzeigersinn bis die<br />
aktuelle Uhrzeit angezeigt wird.<br />
Beachten: z.B. 14°° Uhr, nicht 2°° Uhr!<br />
Setting actual time or adjusting Summer/Winter time<br />
Turn the big hand in a clock-wise or anti clock-wise direction until the<br />
actual time is displayed.<br />
Note: e.g. 14.00 hours, not 2.00 hours!<br />
Réglage de l’heure ou changement d’heure été/hiver<br />
Tournez la grande aiguille, dans le sens horlogique ou anti-horlogique,<br />
jusqu’à ce que l’heure correcte apparaisse.<br />
Attention: ex.: 14h00 et non 02h00!<br />
Actuele kloktijd instellen of zomer-/wintertijdomschakeling<br />
Verdraai de grote wijzer met of tegen wijzerzin, tot de actuele tijd wordt<br />
aangeduid.<br />
Opgelet: vb.: 14.00 h en niet 02.00 h!<br />
Sincronizzazione dell’orario o modifica dell’ora legale/solare<br />
Fate ruotare la lancetta grande in senso orario o antiorario fino a che<br />
non avrete sincronizzato l’orario attuale.<br />
Avvertenza: ad esempio 14:00 e non 2:00.<br />
14
<strong>RAM</strong> <strong>784</strong>/ <strong>784</strong>s<br />
2<br />
2<br />
Normalprogramm<br />
Programme normal<br />
Normal programm<br />
Komforttemperatuur<br />
Temperatura normale<br />
Energiesparprogramm<br />
Programme reduit<br />
Set back temperatur<br />
Verlagte temperatuur<br />
Temperatura risparmio<br />
20°C<br />
16°C<br />
Handschalter/ Schaltungsvorwahl in Stellung:<br />
2 in Pos r , die Einstellung an Drehknopf r (6) bestimmt die Temperatur<br />
2 in Pos m, die Einstellung an Drehknopf m (9) bestimmt die Temperatur<br />
Beachten Sie: 1 Grad Temperaturreduzierung, bedeutet ca. 6 % Energieeinsparung.<br />
Manual switching/override switching in place:<br />
2 in pos. r , the setting on rotary switch r (6) determines the temperature<br />
2 in pos. m, the setting on rotary switch m (9) determines the temperature<br />
Note: The temperature reduction by 1° C means approx. 6 % energy saving<br />
Sélecteur manuel pour le choix du régime:<br />
2 en position r , le réglage au bouton r (6) détermine la température confort<br />
2 en position m, le réglage au bouton m (9) détermine la température réduite<br />
Attention: la réduction de température ambiante d’un degré (1° C) correspond à une<br />
économie d’énergie d’environ 6 %.<br />
Manuele keuzeschakelaar:<br />
2 in stand r , de instelling met de instelknop r (6) bepaalt de comforttemperatuur<br />
2 in stand m, de instelling met de instelknop m (9) bepaalt de verlaagde temperatuur<br />
Opgelet: één temperatuurverlaging van één graad (1° C) komt overeen met één<br />
energiebesparing van ca. 6 %<br />
Interruttore manuale/collegamento di preselezione in posizione:<br />
2 in Pos r Predisposizione della temperatura tramite la manopola r (6).<br />
2 in Pos m Predisposizione della temperatura tramite la manopola m (9)<br />
Avvertenza: Se programmate la riduzione di temperatura di 1° C risparmierete circa il<br />
6 % di energia<br />
9<br />
6<br />
9
10<br />
15 Min.<br />
<strong>RAM</strong> <strong>784</strong>s <strong>RAM</strong> <strong>784</strong><br />
Beispiel: täglich von 6°° Uhr bis 8°° Uhr Normalprogramm r<br />
Klappen Sie alle Segmente von<br />
6°° Uhr bis 7.45 Uhr nach innen,<br />
ab 8°° Uhr nach außen.<br />
20 Min.<br />
5 Min.<br />
Stecken Sie den roten Reiter auf 6°° Uhr<br />
Stecken Sie den blauen Reiter auf 8°° Uhr<br />
Example: daily from 6.00 to 22.00 hours normal program r<br />
Push all segments from 6 00 hours<br />
to 7.45 hours inwards, from 8 00<br />
hours outwards<br />
Exemple: régime confort r tous les jours de 6h00 à 8h00<br />
Basculez tous les segments entre<br />
6h00 et 7h45 vers l’intérieur, à<br />
partir de 8h00 vers l’extérieur.<br />
Voorbeeld:<br />
comfortperiode r alle dagen van 6.00 h tot 8.00 h<br />
Alle segmenten tussen 6.00 h en<br />
7.45 h naar binnen duwen, vanaf<br />
8.00 h naar buiten.<br />
Muovete i segmenti dalle 6:00 alle<br />
7:45 verso l’interno, fino alle 8:00<br />
Verso l’esterno.<br />
Push the red tappet onto 6 00 hours<br />
Push the blue tappet onto 8 00 hours<br />
Enfichez le cavalier rouge sur 6h00 et le<br />
cavalier bleu sur 8h00.<br />
De rode ruiter insteken op 6.00 h en de<br />
blauwe ruiter op 8.00 h.<br />
Esempio: Programma giornaliero temperatura normale ore 6 alle ore 8 r<br />
Inserendo il cavaliere rosso alle ore 6<br />
Inserendo il cavaliere blu alle ore 8
<strong>RAM</strong> <strong>784</strong><br />
- Tagesprogramm<br />
- Programm journalier<br />
- dayprogramm<br />
- dagprogramm<br />
- programma giornaliero<br />
- Wochenprogramm<br />
- Programm hebdomadaire<br />
- weekprogramm<br />
- weekdagprogramm<br />
- programma settimale<br />
Gerätetyp <strong>RAM</strong> <strong>784</strong> kann von Tages- auf<br />
Wochenprogramm, oder umgekehrt,<br />
umgeschaltet werden.<br />
Product tpye <strong>RAM</strong> <strong>784</strong> can be switchted from day to week<br />
program or vice versa.<br />
Le type <strong>RAM</strong> <strong>784</strong> permet de passer d’un régime<br />
journalier à un régime hebdomadaire ou vice versa.<br />
Het type <strong>RAM</strong> <strong>784</strong> is omschakelbaar van dag- naar weekprogramma<br />
of omgekeerd.<br />
L’apparecchio tipo <strong>RAM</strong> <strong>784</strong> può essere commutato sul<br />
programma giornaliero o sul programma settimanale e<br />
viceversa.<br />
-> Nehmen Sie den Skalenring ab.<br />
-> Zeiger drehen, bis sich die Nuten im grünen und blauen<br />
Ring decken<br />
-> Schieben Sie den Metallstift nach außen Pos. 7d.<br />
-> Take off the graduated ring<br />
-> Turn the big hand until the groove in the blue and the<br />
groove in the green ring cover each other<br />
-> Slide the drive pin into pos 7d.<br />
-> Enlevez le cadran horaire<br />
-> Tournez la grande aiguille jusqu’à ce que l’encoche du<br />
disque verte soit en face de celle du disque bleu.<br />
-> Déplacez la bille d’entraînement métallique vers<br />
l’extérieur sur la position 7 d.<br />
-> De wijzerplaat wegnemen<br />
-> De grote wijzer zodanig draaien dat de nok in de groene<br />
ring en de nok in de blauwe ring naast elkaar staan<br />
-> De metalen stift naar buiten toe in positie 7d schuiven<br />
-> Sollevate e rimuovete la ghiera graduata.<br />
-> Fate coincidere la tacca della corona blu con quella della<br />
corona verde, ruotando la lancetta<br />
-> Posizionate il nottolino metallico verso l’esterno in<br />
modo che si fissi in posizione 7d<br />
-> Drehen Sie den Skalenring um.<br />
-> Setzen Sie den Skalenring auf, bis er hörbar einrastet.<br />
-> Turn the graduated ring over and set up again.<br />
-> Retournez le cadran<br />
-> Replacez le cadran sur l’horloge de telle sorte que vous<br />
entendiez un “clic“.<br />
-> De wijzerplaat omdraaien<br />
-> Zodanig terugplaatsen dat deze hoorbaar inklikt.<br />
-> Riposizionate la ghiera con la parte graduata verso<br />
l’alto in modo che si fissi nuovamente in sede.<br />
11
12<br />
<strong>RAM</strong> <strong>784</strong><br />
theben Nr.<br />
9 343 236<br />
theben Nr.<br />
9 343 111<br />
16°C<br />
20°C<br />
z.B.: V = Fr, fr, ve, vr,<br />
Beispiel Wochenprogramm mit Normaltemperatur r von:<br />
Mo - Fr: 4°° - 8°° Uhr und 16°° - 20°°/ Sa: 8°° - 0°°/ So: 8°° - 20 °°<br />
Startet Normalprogramm r und beendet das Energiesparprogramm m<br />
Startet Energiesparprogramm m und beendet das Normalprogramm r<br />
Stecken Sie jeweils von Montag (I) bis Freitag (V):<br />
Roten Reiter auf 400 Uhr und blauen Reiter auf 800 Uhr<br />
Roten Reiter auf 16°° Uhr und blauen Reiter auf 20°° Uhr<br />
Samstag (VI): Roten Reiter auf 8°° Uhr und blauen Reiter auf 0°° Uhr<br />
Sonntag (VII): Roten Reiter auf 8°° Uhr und blauen Reiter auf 20°° Uhr<br />
Beachten: Drücken Sie alle Schaltreiter ganz nach unten!<br />
Example for weekprogram:<br />
mo - fr: 4 AM - 8 AM + 4 PM - 8PM/ sa: 8 AM - mid-night / su: 8 AM - 20 PM<br />
finish energiesafeingprogram r start comfortprogram m<br />
finish comfortprogram m start energiesafeingprogram r<br />
Insert alternate mo (I) to fr (V):<br />
a red tappet at 4 AM and a blue tappet at 8 AM<br />
a red tappet at 4 PM and a blue tappet at 20 PM<br />
sa (VI): a red tappet at 8 AM and a blue tappet at mid-night<br />
su (VII): a red tappet at 8 AM and a blue tappet at 8 PM<br />
Note: The tappets must be pressed down until the boss engages
Exemple de programme hebdomadaire avec température confort<br />
r de:<br />
Lu - ve: 4h00 - 8h00 et 16h00 - 20h00 / Sa: 8h00 - 0h00 / Di: 8h00 - 20h00<br />
débute un régime confort r et met fin au régime réduit m<br />
débute un régime réduit m et met fin au régime confort r<br />
Enfichez chaque fois du lundi (I) au vendredi (V):<br />
cavalier rouge sur 4h00 et cavalier bleu sur 8h00<br />
cavalier rouge sur 16h00 et cavalier bleu sur 20h00<br />
Samedi (VI): cavalier rouge sur 8h00 et cavalier bleu sur 0h00<br />
Dimanche (VII): cavalier rouge sur 8h00 et cavalier bleu sur 20h00<br />
Attention: enfichez tous les cavaliers à fond.<br />
Voorbeeld van weekprogramma met comforttemperatuur r van:<br />
Ma-Vr: 4.00 - 8.00 h en 16.00 - 20.00 h / Za: 8.00 - 0.00 h / Zo: 8.00 - 20.00 h<br />
start één comfortperiode r en beëindigd één verlaagde periode m<br />
start één verlaagde periode m en beëindigd één comfortperiode r<br />
Telkens van maandag (I) tot vrijdag (V) insteken:<br />
rode ruiter op 4.00 h en blauwe ruiter op 8.00 h<br />
rode ruiter op 16.00 h en blauwe ruiter op 20.00 h<br />
Zaterdag (VI): rode ruiter op 8.00 h en blauwe ruiter op 0.00 h<br />
Zondag (VII): rode ruiter op 8.00 h en blauwe ruiter op 20.00 h<br />
Opgelet: de steekruiters helemaal tot op de bodem indrukken.<br />
Esempio di programma settimale con temperatura comfort permanente:<br />
Lu - Ve: 4:00 – 8:00 e 16:00 – 20:00<br />
Sa: 8:00 – 0:00 / Do 8:00 – 20:00<br />
Inizia il programma comfort r e termina il programma a risparmio di energia m<br />
Inizia il programma a risparmio di energia m e termina il programma comfort r<br />
Inserimento di volta in volta da lunedi (I) a venerdi (V):<br />
Cavaliere rosso sulle 4:00 e cavaliere blu sulle 8:00<br />
Cavaliere rosso sulle 16:00 e cavaliere blu sulle 20:00<br />
Sabato (VI) Cavaliere rosso sulle 8:00 e cavaliere blu sulle 0:00<br />
Domenica (VII) Cavaliere rosso sulle 8:00 e cavaliere blu sulle 20:00<br />
Avvertenza: Assicurate Vi che i cavalieri siano inseriti saldamente alla<br />
ruota graduata.<br />
13
14<br />
Anschluß nur durch Elektrofachkraft / Connection only by a qualified<br />
electrician / Raccordement exclusivement par un professionnel / Aansluiting<br />
enkel door één bevoegd vakman / Indicazioni per l’elettricista<br />
Anschluß nur durch Elektrofachkraft<br />
Der Anschluß und die Montage elektrischer Geräte darf nur durch eine Elektrofachkraft<br />
erfolgen.<br />
Werden Uhrenthermostate mit anderen Geräten in einer Anlage verwendet, so ist<br />
darauf zu achten, daß die gesamte Anlage keine Funkstörung verursacht.<br />
Die nationalen Vorschriften und die jeweiligen Sicherheitsbestimmungen sind zu<br />
beachten.<br />
Eingriffe und Veränderungen am Gerät haben den Verlust des Garantieanspruchs zur<br />
Folge.<br />
Only for qualified electricien<br />
The connection and the installation of electrical products may be effected only by a<br />
qualified electrician. If clock thermostats are used in a lay-out with other products,<br />
attention must be given to ensure that the whole system does not cause radio<br />
interference.<br />
National directives and relevant safety regulations must be observed.<br />
Intereference with and changes to the product will result in the loss of the<br />
guarantee.<br />
Raccordement exclusivement par un professionel<br />
Le montage et le raccordement ne peuvent être effectués que par un professionnel.<br />
Si le thermostat à horloge est utilisé avec d’autres appareils dans une installation, il<br />
faut veiller à ce que l’installation dans son ensemble ne provoque pas de<br />
perturbation électrique.<br />
Les normes nationales et les prescriptions de sécurité doivent être respectées.<br />
Des interventions dans l’appareil ou des modifications de celui-ci entraînent la<br />
perte de la garantie.<br />
Aansluiting enkel door een vakman<br />
De montage en de aansluiting mogen enkel door één elektro-installateur<br />
uitgevoerd worden. Indien de klokthermostaat in één installatie met andere<br />
apparaten gebruikt wordt, moet men erop letten dat de ganse installatie geen<br />
elektrische storing veroorzaakt.<br />
De nationale voorschriften en de lokaal geldende veiligheidsbepalingen dienen in<br />
acht genomen te worden.<br />
Ingrepen of wijzigingen aan het apparaat hebben het verlies van de garantie ten<br />
gevolge.<br />
Indicazioni per l’elettricista<br />
Il collegamento e l’installazione di apparecchi elettrici può essere fatto solo da un<br />
elettricista esperto.<br />
Se il cronotermostato dovesse entrare in contatto con altri apparecchi dell’impianto,<br />
dovrete tenere presente che l’intero impianto non subirà alcun disturbo.<br />
Sono da tenere in considerazione le prescrizioni nazionali e le disposizioni di<br />
sicurezza corrispondenti in materia.<br />
Qualsiasi intervento o modifica all’apparecchio farà immediatamente decadere<br />
qualsiasi garanzia.
OK<br />
11<br />
Achten Sie bei Montage- und Demontage des Uhrenthermostaten<br />
darauf, daß die Anschlußleitung spannungsfrei geschaltet ist.<br />
Montage:<br />
Nur zur Montage auf nicht leitenden und ebenen Untergrund geeignet.<br />
1. Klappen Sie den Frontdeckel nach unten<br />
2. Drehen Sie mit einem Schraubendreher den Verschluß 11 in Pos.<br />
3. Heben Sie den grauen Sockel vom Reglerteil ab<br />
4. Ziehen Sie die Anschlußdrähte durch den Sockel<br />
5. Befestigen Sie den Sockel an der Wand, ca. 1,5 m über dem Fußboden,<br />
an einer Innenwand, an der die Luft ungehindert zirkulieren kann<br />
6. Schließen Sie den Sockel entsprechend zutreffendem Anschlußbild an<br />
7. Drücken Sie die Anschlußleitungen flach in den Sockel<br />
8. Setzen Sie den Uhrenthermostaten auf den verdrahteten Sockel auf<br />
9. Drehen Sie mit dem Schraubendreher den Verschluß 11 in Pos.<br />
Beachten: Die Lüftungsschlitze 5 im Sockel freihalten, keine Farbe, Tapete o.ä.<br />
Ensure that when installing and dismantling the clock thermostat<br />
that the voltage in the connecting lead is switched off.<br />
Mounting: Do not mount the device on an even conductive base.<br />
1. Lower the front cover<br />
2. With a screwdriver turn the seal 11 to position<br />
3. Lift the grey plinth from the control section<br />
4. Pull the connecting wires through the plinth<br />
5.Fix the plinth to the wall approx. 1.5M above the floor, if possible on an<br />
internal wall, against which air can circulate without hindrance<br />
6. Connect the plinth in accordance with the applicable circuit diagram<br />
7. Press the connecting leads flat into the plinth<br />
8. Fit the clock thermostat to the wired plinth<br />
9. Turn the seal 11 into position with a screwdriver<br />
Note: Keep the ventilation apertures 5 in the plinth free, no paint, wallpaper or<br />
other such material.<br />
15<br />
5
16<br />
Lors du montage et du démontage du thermostat à horloge,<br />
veillez à ce que les fils de raccordement soient hors tension.<br />
Montage:<br />
L’appareil doit etre monté sur une surface plane et non conductrice.<br />
1. Basculez le couvercle vers le bas<br />
2. Avec un tournevis, orientez la fermeture 11 en position<br />
3. Enlevez le socle gris de la partie thermostat<br />
4. Faites passer les fils de raccordement par les ouvertures du socle<br />
le thermostat ne peut, en aucun cas, être monté sur un support<br />
électriquement conducteur<br />
5. Fixez l’appareil sur le mur, à 1,5 m de hauteur, si possible, sur un mur<br />
intérieur, à un endroit où l’air peut circuler librement<br />
6. Raccordez le socle selon le schéma de raccordement approprié<br />
7. Mettez les câbles à plat dans le socle<br />
8. Adaptez le thermostat à horloge sur le socle câblé<br />
9. Avec un tournevis, orientez la fermeture 11 en position<br />
Attention: veillez à ce que les fentes d’aération 5 dans le socle ne soient pas<br />
bouchées par de la peinture, du papier peint, du plafonnage, etc.<br />
Bij de montage en demontage van de klokthermostaat dient erop<br />
gelet te worden dat de aansluitdraden spanningsloos zijn.<br />
Monteer: Het apparaat niet op een stromgeleidende onderground.<br />
1. Het deksel naar beneden doen kantelen<br />
2. Draai met één schroevendraaier de vergrendeling 11 in stand<br />
3. De grijze sokkel verwijderen van het thermostaatgedeelte<br />
4. De aansluitdraden door de openingen van de sokkel trekken<br />
de thermostat mag in geen geval op één elektrisch geleidende basis<br />
gemonteerd worden.<br />
5. Bevestig het apparaat op de muur, op 1,5 m hoogte, zo mogelijk op eén<br />
binnenmuur waar de lucht ongehinderd kan circuleren<br />
6. De sokkel aansluiten in overeenkomst met het aansluitschema<br />
7. De aansluitkabels platdrukken in de sokkel<br />
8. De klokthermostaat op de bedrade sokkel bevestigen<br />
9. Draai met één schroevendraaier de vergrendeling 11 in positie<br />
Opgelet: de ventilatieopeningen 5 van de sokkel mogen niet verstopt worden door<br />
verf, behangpapier, pleisterwerk, enz.<br />
Fate attenzione di conseguenza affinche’ durante il montaggio<br />
e los montaggio del cronotermostato l’apparecchiatura sia<br />
scollegata da fonti di energia elettrica<br />
Installazione: Non installare l’apparecchio su superficie conducttiva<br />
1. Aprite lo sportellino frontale tirandolo verso il basso.<br />
2. Girate con l’aiuto di un cacciavite la manopola 11 in pos.<br />
3. Rimuovete la base posteriore dall’apparecchio.<br />
4. Fate passare il filo di collegamento attraverso la base<br />
5. Fissate la basetta al muro ad un’altezza di circa 1,5 m dal pavimento,<br />
preferibilmente ad una parete interna, in modo che possa circolare<br />
liberamente l’aria.<br />
6. Fissate la basetta in corrispondenza della dima dell’apparecchio.<br />
7. Premete a fondo corsa il guscio fissandolo saldamente alla parete.<br />
8. Posizionate il cronotermostato sulla basetta collegata.<br />
9. Girate con l’aiuto di un cacciavite la chiusura 11 in pos.<br />
Avvertenze: Assicurate Vi che esista una libera circolazione dell’aria 5.
Anschluß nur durch Elektrofachkraft / Only for qualified electrician/ Raccordement<br />
exclusivement par un professionnel / Aansluiting enkel door één bevoegd<br />
vakman / Indicazioni per l’elettricista<br />
*<br />
Beachten Sie die Anschlußvorschriften des Herstellers / Please state manufacture<br />
and type no/ Respectez les prescriptions de raccordement du constructeur /<br />
De aansluitvoorschriften van de fabrikant in acht nemen / Attenersi alle<br />
istruzioni del produttore per il collegamento<br />
Regelung über Öl-/ Gasfeuerungsrelais Regelung über thermischen Stellantrieb 1<br />
Control via the oil-/ gas furnance relay<br />
Commande du relais de brûleur<br />
(gaz ou fuel)<br />
Besturing van branderrelais<br />
(gas of stookolie)<br />
Comando relè del bruciatore a gas<br />
o a nafta<br />
10 10<br />
11<br />
Regelung über Umwälzpumpe, Warmluft<br />
und Speicherheizung<br />
e.g. Control via circulation pump, warm<br />
air and storage heating<br />
Commande de la pompe de circulation,<br />
chauffage à accumulation et à air chaud<br />
pulsé<br />
Besturing van circulatiepomp, accumulatieverwarming<br />
en luchtverwarming<br />
Comando pompa di circulazione, e impianti<br />
di riscaldamento ad accumulo e ad aria calda<br />
10<br />
11<br />
Regelung über das<br />
Motor - Mischventil<br />
The connecting leads must conform<br />
to national regulations<br />
Commande de vannes mèlangeuses<br />
motorisées<br />
Besturing van gemotoriseerde<br />
mengkranen<br />
Comando valvola di miscelazione<br />
motorizzata<br />
10<br />
11<br />
theben Nr:<br />
907 0 261 1<br />
Control via the thermal mixing valve 1<br />
Commande d’une vanne électrothermique<br />
(vanne de zone) 1<br />
Besturing van elektrothermische kraan<br />
(zoneventiel) 1<br />
Comando valvola di miscelazione thermica 1<br />
11<br />
17
18<br />
4<br />
Einstellung durch den Fachmann/ Only for qualified electrician/ Réglage par le<br />
professionnel uniquement / Instelling enkel door één bevoegd vakman /<br />
Indicazioni per l’elettricista<br />
Elektronische Rückführung:<br />
Der Uhrenthermostat ist werksseitig auf die in der Praxis üblichen Heizungsanlagen<br />
eingestellt. Sollte durch die Heizungsanlage eine Anpassung notwendig<br />
sein, wählen Sie am Drehknopf 4 die empfohlene Einstellung.<br />
Electronic feed-back<br />
The clock thermostat is set in the factory to usual heating systems in practical<br />
operation. If, as a consequence of the heating system, an adjustment is<br />
necessary, select the recommended setting on the potentiometer (rotary knob) 4.<br />
Anticipation thermique électronique:<br />
le thermostat à horloge est réglé en usine en fonction des installations de<br />
chauffage les plus couramment rencontrées. Si une adaptation à l’installation<br />
s’avérait nécessaire, le bouton de réglage 4 permet de modifier le<br />
comportement du thermostat.<br />
Elektronische terugkoppeling:<br />
De klokthermostaat is standaard ingesteld in functie van de gebruikelijke<br />
verwarmingsinstallaties. Indien één aanpassing aan de installatie noodzakelijk<br />
zou blijken, kan men d.m.v. de instelknop 4 de instelling van de thermostaat<br />
wijzigen.<br />
Punto di lavoro (4):<br />
I cronotermostati sono predisposti in fabbrica per gli impianti di riscaldamento<br />
tradizionali. Qualora l’impianto rendesse necessaria una successiva regolazione,<br />
la stessa puo essere eseguita solo da un tecnico spezializzato.<br />
Pos 1: für Fußbodenheizung/ Bimetallmischer/ Ölbrenner<br />
for floor heating/bi-metal mixer/ oil furnance<br />
chaudières fuel/ brûleurs fuel.<br />
stookolieketels/ besturing van de brander<br />
comando valvola di miscelazione motorizzato/ bruciatore a gas o a nafta<br />
Pos 2: für langsames Mischventil<br />
for slow mixing valve<br />
vannes électrothermiques<br />
elektrothermische kranen<br />
comando valvola di miscelazione thermica<br />
Pos 3: für Umwälzpumpe/ schnelles Mischventil<br />
for circulation pump/rapid mixing valve<br />
pompes de circulation, vannes mélangeuses<br />
chaudières gaz<br />
circulatiepompen/mengkranen/gasketels<br />
comando pompa di circulazione<br />
Pos 4: für Gastherme/ Speicherheizung/ Magnetventile<br />
for Gasheating/storage heating/magnetic valve<br />
chauffage à accumulation, chauffage électrique direct,<br />
électrovannes, chauffage à air chaud<br />
accumulatieverwarming/directe elektrische verwarming/<br />
magneetventielen/luchtverwarming<br />
bruciatore a gas o a nafta
Einstellung durch den Fachmann/ Only for qualified electrician/ Réglage par le<br />
professionnel uniquement / Instelling enkel door één bevoegd vakman/<br />
Indicazioni per l’elettricista<br />
8<br />
Anpassung des Arbeitspunktes:<br />
Der Uhrenthermostat ist werksseitig justiert. Sollte durch den Montageort, z.B.<br />
kalte Betonwand, eine Nachstellung notwendig sein, so kann am Poti 8 die gemessene<br />
Temperaturabweichung korrigiert werden.<br />
Bsp.: Geregelte Temperatur zu hoch:<br />
Drehen Sie den Drehknopf 8 in Pfeilrichtung s.Abb.<br />
Nach Stabilisierung der Raumtemperatur ggf. wiederholen.<br />
Adjustment of the operating point:<br />
The clock thermostat is adjusted in the factory. If re-setting is necessary due to the<br />
place of installation e.g. a cold cement wall, the measured temperature deviation<br />
can be corrected with the pentiometer 8.<br />
Example: Controlled temperature too high:Turn the potentiometer (rotary switch)<br />
see illustration in anti-clockwise direction.<br />
After the roomtemperature is stabilized, repeat if necessary.<br />
Etalonnage du seuil de commutation:<br />
le thermostat à horloge est étalonné en usine.<br />
Si l’endroit de montage, par exemple, un mur de béton froid, rendait un nouveau<br />
réglage nécessaire, l’écart de température constaté peut être corrigé au bouton de<br />
réglage 8.<br />
Ex.: température régulée trop élevée:<br />
tournez le bouton 8 légèrement dans le sens anti-horlogique,<br />
Répéter l´opération si besoin est, après stabilisation de la température ambiante.<br />
Remarque: veillez à ce qu’il n’y ait pas de courant d’air froid au dos de l’appareil. Au<br />
besoin, obturez les canalisations électriques avec du silicone.<br />
Ijking van de schakeldrempel:<br />
de klokthermostaat wordt in de fabriek geijkt. Indien vanwege de montageplaats,<br />
bv. één koude betonnen muur, één bijstelling noodzakelijk zou zijn, kan het vastgestelde<br />
temperatuurverschil gecorrigeerd worden met de instelknop 8.<br />
Vb.: geregelde temperatuur te hoog:<br />
verdraai de instelknop 8 één weinig tegen wijzerzin, zo nodig herhalen.<br />
Opmerking: koude luchtstroom aan de rugzijde van het apparaat moet vermeden<br />
worden. Zo nodig, de elektrische leidingen met silicone afdichten.<br />
Punto di lavoro regolabile all’atto dell’installazione<br />
Il cronotermostato è regolato in fabbrica. Durante la fase d’installazione, ad<br />
esempio una parete fredda, potrebbe rivelarsi necessaria una registrazione<br />
della temperatura. Potrà così essere corretto il valore della temperatura rilevata.<br />
Esempio: Regolazione piú alta della temperatura:<br />
Ruotate la manopola 8 nel senso della freccia (vedi figura), eventualmente ripetete.<br />
Come il temperatura di unità abitative e stabilizzato, ripete si nessesario.<br />
19
20<br />
Anschluß nur durch Elektrofachkraft/ Only for qualified electrician/<br />
Raccordement exclusivement par un professionnel / Aansluiting enkel door<br />
één bevoegd vakman/ Indicazioni per l’elettricista<br />
Der Uhrenthermostat <strong>RAM</strong> <strong>784</strong>/ <strong>RAM</strong> <strong>784</strong> s ist mit einem Anschluß für Telefonfernschalter<br />
ausgestattet.<br />
Anwendung: z.B mit Telefonfernschalter für Ferienwohnungen.<br />
Wirkung: Der Uhrenthermostat regelt auf konstant 21° C, wenn der Telefonkontakt<br />
geschlossen wird.<br />
Beachten: Der Telefonfernschalter (z. B. t ATON) muß eine sichere<br />
Trennung zum Netz gewährleisten.<br />
Anschluß: Anschlußklemmen 10 und 11 mittels Fernmeldeinstallationskabel zum<br />
Telefonfernschalter.<br />
Verlegen Sie dieses Kabel nicht parallel zu Starkstromleitungen.<br />
The clock thermostat <strong>RAM</strong> <strong>784</strong>/<strong>RAM</strong> <strong>784</strong>s has a connection for telephone remote<br />
switching.<br />
Application: For holiday homes with telephone remote switching.<br />
Operation: If connecting terminals 10 and 11 are closed by means of a floating<br />
contact, the product is controlled at a constant 21° C.<br />
Note: ** The telephone remote switch (e.g. t ATON) must guarantee a<br />
secure separation for the telecommunication system.<br />
Connection: Telephone cable is authorised for connection of terminals 10 and 11<br />
to the telephone remote switch.<br />
Do not place parallel with mains.<br />
Le thermostat à horloge <strong>RAM</strong> <strong>784</strong>/<strong>RAM</strong> <strong>784</strong>s dispose de bornes pour le<br />
raccordement d’un contact téléphonique à distance.<br />
Le report à distance du signal transmis par téléphone permet de commuter l’appareil<br />
sur la température confort, quelle que soit sa position à cet instant. La température<br />
sera régulée en permanence sur 21° C<br />
Action: si les bornes 10 et 11 sont fermées par un contact libre de potentiel,<br />
l’appareil régule en permanence sur 21° C.<br />
Attention: le contact à distance doit garantir une séparation fiable vis-à-vis du<br />
réseau téléphonique.<br />
Raccordement: un câble de type téléphonique est autorisé pour le raccordement<br />
des bornes 10 et 11 au contact téléphonique (p.ex. t ATON) à distance.<br />
Ne jamais raccorder les fils du téléphone sur ces bornes.<br />
Ne pas mettre en parallélle avec des circuit pour courant fort.
De klokthermostaat <strong>RAM</strong> <strong>784</strong>/<strong>RAM</strong> <strong>784</strong>s beschikt over klemmen voor de<br />
aansluiting van één telefonische afstandsbediening.<br />
Door afstandsoverbrenging van het via de telefoon gezonden signaal, kan het<br />
apparaat op de komforttemperatuur geschakeld worden, onafhankelijk van de<br />
instelling op dat ogenblik.<br />
Werking: als de klemmen 10 en 11 door één potentiaalvrij contact gesloten<br />
worden, regelt het apparaat permanent op 21° C.<br />
Opgelet: de telefonische afstandsbediening moet één betrouwbare scheiding<br />
t.o.v. het telefoonnet garanderen.<br />
Aansluiting: voor het aansluiten van de klemmen 10 en 11 aan het telefooncontact<br />
(ex. t ATON) voor afstandsbediening is één telefoonkabel<br />
veroorloofd.<br />
Voor de kabel niet parallel aan sterkstroomleidingen.<br />
Il cronotermostato <strong>RAM</strong> <strong>784</strong>/<strong>RAM</strong> <strong>784</strong> S ha la possibilità di controllo a distanza<br />
tramite il telefono. Impieghi: per le seconde case (es. mare, montagna) con<br />
connessione a distanza tramite il telefono.<br />
Trasmettendo opportuni segnali via telefono, il cronotermostato può essere<br />
commutato da-qualsiasi posizione alla temperatura „comfort“.<br />
La regolazione avviene in questo caso a 21° C constanti.<br />
Avvertenze:<br />
la connessione tramite telefono (ad esempio t ATONTEL R)<br />
fornisce una sicura garanzia di separazione dalla rete di telecomunicazioni.<br />
Non montate il cavo di connessione telefonica parallelo alla rete di alimentazione.<br />
Die Anschlußleitungen * müssen<br />
den nationalen Vorschriften<br />
entsprechen<br />
The connecting * leads must<br />
conform to national regulations<br />
Les câbles de raccordement * doivent<br />
répondre aux prescriptions nationales.<br />
De aansluitkabels * moeten aan de<br />
nationale voorschriften voldoen<br />
I collegamenti * devono rispondere<br />
alle disposizioni nazionali in<br />
materia.<br />
*<br />
*<br />
21
SAFE<br />
22<br />
Wirkung des Pumpenschutzprogramms:<br />
Durch den Stillstand der Heizungsanlage in den Sommermonaten, kann sich die Umwälzpumpe<br />
festsetzen. Die Umwälzpumpe wird auch in den Sommermonaten für ca.<br />
1 Min. pro Tag bewegt, wenn ein roter Schaltreiter (<strong>RAM</strong> <strong>784</strong>) bzw. ein eingeklapptes<br />
Schaltsegment (<strong>RAM</strong> <strong>784</strong>s), die Schaltzustandsanzeige 2 durchläuft.<br />
Aktivieren des Pumpenschutzprogramm:<br />
Unterbrechen Sie die blaue Drahtbrücke auf der Geräterückseite.<br />
Eine Rückänderung ist nicht erlaubt.<br />
Operation of the pump protection program:<br />
Because the heating system is switched off in the summer months, the circulation<br />
pump can seize up. The circulation pump is operated for approx. 1 min. per day even<br />
in the summer months, if a red tappet (<strong>RAM</strong> <strong>784</strong>) or a depressed switching segment<br />
(<strong>RAM</strong> <strong>784</strong>s) runs through the switching status display 2.<br />
Activation of the pump protection program:<br />
Cut the blue wire bridge on the back of the product.<br />
Changing back again is not permitted.<br />
Dégommage du circulateur:<br />
Pour éviter un blaocage du circulateur après un arrête prolongé de l’installation de<br />
chauffage, le <strong>RAM</strong> <strong>784</strong> dispose d’un programme de dégommage. Le thermostat commande<br />
le circulateur, si lui-ci est enclenché pendant environ 1 minute, chaque fois<br />
qu’un cavalier rouge (<strong>RAM</strong> <strong>784</strong>) ou un segment basculé (<strong>RAM</strong> <strong>784</strong>s), commute le<br />
contact de l’horloge 2.<br />
Activer le dégommage:<br />
Coupez le pontage bleu à l’arrière de l’appareil (voir illustration).<br />
Mise en garde: Le suppression du programme de dégommage n’est plus possible<br />
ultérieurment.
Beveiliging van de circulatiepomp:<br />
Om te vermijden dat de circulatiepomp zou blokkeren na een langdurige uitschakeling,<br />
beschikt <strong>RAM</strong> <strong>784</strong> over een geintereerde abriblokkering. Telkens als de rode<br />
ruiter (<strong>RAM</strong> <strong>784</strong>) een segment tussen (<strong>RAM</strong> <strong>784</strong>s), het klokcontact 2 schakelt, wordt<br />
de thermostaat ca. 1 min. inschakeld.<br />
Aktiveren:<br />
Dit programma wordt geactiveerd op voorwaarde dat men de blaue overbruging aan<br />
de achterzijde van de apparaat doorsnijd (zie afbeedling).<br />
Opgelet: het antiblockkeringsprogramma kan nadien niet meer opgeheven worden.<br />
Indicazioni per la programmazione della pompa di circulazione:<br />
Durante la pausa del riscaldamento nei mesi la pompa di circulazione può blocarsi.<br />
La pompa di circulazione sarà attiva anche nei mesi estiva per circa 1 minuto al<br />
giorno tramite un cavaliere rosso (<strong>RAM</strong> <strong>784</strong>) oppure un segmento (<strong>RAM</strong> <strong>784</strong>s), il<br />
selettore manuale 2 sarà posizionato su comfort.<br />
Attivazione del programma della pompa di circolazione:<br />
Interrompere il ponticello blu situato nella parte posteriore dell’apparecchio.<br />
Indicazioni: Nel cas in cui il programma protezione pompa sia già stato impostato,<br />
non è più possibile effettuare alcun modifica.<br />
23
<strong>RAM</strong> <strong>784</strong>/ <strong>RAM</strong> <strong>784</strong>s<br />
Batterie 2 x 1,5 V<br />
Alkaline LR6<br />
6 A/ 250 V~ (cos =1)<br />
1 A/ 250 V~ (cos = 0,6)<br />
0,4 ... 1,2 K<br />
THEBEN -WERK ZEITAUTOMATIK GmbH<br />
Hohenbergstr.32, 72401 Haigerloch<br />
http:www://theben.de, E.Mail: theben@theben.de<br />
SIBLIK ELEKTRIK GES.M.B.H&CO.KG<br />
Murbangasse 6, 1108 Wien<br />
TEMPOLEC International s.a.<br />
Route de Biesme,49, B 6530 Thuin<br />
WISAR WYSER + ANLIKER AG<br />
Steinackerstr. 29, CH-8302 Kloten<br />
TIMEGUARD LTD, Victory Park,<br />
400 Edgware Road, London NW2 6ND<br />
THEBEN S.A.R.L, Zone Industrielle des<br />
Vignes, 32-38 Rue Bernard,<br />
93012 Bobigny cèdex<br />
ITHO B.V., P.O. Box 21,<br />
310 AA Shiedam<br />
THEBEN S.R.L., via Ciro Menotti 11,<br />
20129 Milano<br />
~ 1 a<br />
EN 60730-2-9<br />
EN 60335-1 II nach Einbau<br />
EN 60529 IP 20<br />
RS Typ 1B nach EN 60730 - 1<br />
07474 692 - 0 07474/ 692 -150<br />
01/ 68006 - 0 01/ 6800659<br />
071.59.00.39 071.59.01.61<br />
(10 lignes)<br />
01/ 8152233 01/ 8152260<br />
0181/ 4508944 0181/ 4525143<br />
01/ 49159700 01/ 48445761<br />
010/ 4278500 010/ 4278882<br />
02/ 7386141/2/3/4 02/ 7386144