CO2 bemestingsinstallatie Exclusive 2.000 g - Dennerle
CO2 bemestingsinstallatie Exclusive 2.000 g - Dennerle
CO2 bemestingsinstallatie Exclusive 2.000 g - Dennerle

Create successful ePaper yourself
Turn your PDF publications into a flip-book with our unique Google optimized e-Paper software.
D<br />
F<br />
GB<br />
I<br />
NL<br />
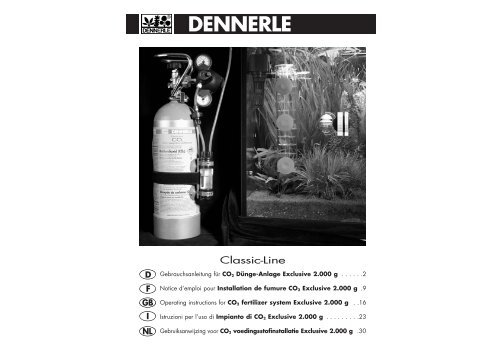
DENNERLE<br />
Classic-Line<br />
Gebrauchsanleitung für <strong>CO2</strong> Dünge-Anlage <strong>Exclusive</strong> <strong>2.000</strong> g . . . . . .2<br />
Notice d’emploi pour Installation de fumure <strong>CO2</strong> <strong>Exclusive</strong> <strong>2.000</strong> g .9<br />
Operating instructions for <strong>CO2</strong> fertilizer system <strong>Exclusive</strong> <strong>2.000</strong> g . .16<br />
Istruzioni per l’uso di Impianto di <strong>CO2</strong> <strong>Exclusive</strong> <strong>2.000</strong> g . . . . . . . . .23<br />
Gebruiksanwijzing voor <strong>CO2</strong> voedingsstofinstallatie <strong>Exclusive</strong> <strong>2.000</strong> g .30
Classic-Line<br />
<strong>CO2</strong> Dünge-Anlage <strong>Exclusive</strong> <strong>2.000</strong> g<br />
Komplett-Set mit wiederbefüllbarer <strong>2.000</strong> g <strong>CO2</strong> Mehrweg-Vorratsflasche.<br />
Zur <strong>CO2</strong>-Düngung von Aquarien bis 5.000 Liter.<br />
- Gebrauchsinformationen: Bitte aufmerksam lesen. Gut aufbewahren. -<br />
Herzlichen Glückwunsch zum Kauf dieser hochwertigen <strong>CO2</strong> Dünge-Anlage aus dem Hause DENNERLE.<br />
Bei sachgemäßer Anwendung und Pflege versorgen Sie Ihr Aquarium damit einfach, bequem und zuverlässig mit <strong>CO2</strong>, dem wichtigsten Dünger für<br />
Aquarienpflanzen - für fantastischen Pflanzenwuchs. Gleichzeitig kann man mit <strong>CO2</strong> einen für Fische und Pflanzen optimalen pH-Wert im leicht sauren bis neutralen<br />
Bereich einstellen. DENNERLE wünscht Ihnen viel Spaß und Freude an Ihrem Aquarium!<br />
Sicherheitsvorschriften für Kohlendioxyd (<strong>CO2</strong>)-Flaschen<br />
• Nur für die <strong>CO2</strong>-Versorgung von Aquarien verwenden.<br />
• <strong>CO2</strong>-Flaschen stehen unter hohem Druck. Deshalb bitte folgendes beachten:<br />
• <strong>CO2</strong>-Flaschen nicht werfen. Kühl lagern. Vor Sonne und Wärme über 50 °C schützen.<br />
• <strong>CO2</strong>-Entnahme nur mit geeigneten Druckminderern für <strong>CO2</strong>-Mehrwegflaschen mit Anschlussgewinde W21,8 x 1/14", z.B. DENNERLE Druckminderer<br />
Modelle Profi 2000, Compact, Professional und <strong>Exclusive</strong>.<br />
• <strong>CO2</strong>-Entnahme nur aus aufrecht stehenden Flaschen. Gegen Umfallen sichern.<br />
• <strong>CO2</strong>-Flaschen nicht gewaltsam öffnen.<br />
• <strong>CO2</strong>-Flaschen nicht vollständig entleeren. Nachfüllen nur bei autorisierten <strong>CO2</strong>-Füllstationen. Bitte beachten: Tara-Gewicht ohne Cage. Cage vor<br />
Wiederbefüllen demontieren.<br />
• <strong>CO2</strong>-Gas ist schwerer als Luft und wirkt erstickend in hoher Konzentration, deshalb:<br />
• <strong>CO2</strong>-Gas nicht einatmen.<br />
• Außerhalb der Reichweite von Kindern aufbewahren.<br />
• <strong>CO2</strong>-Flaschen an gut belüftetem Ort und nicht in Kellerräumen aufbewahren.<br />
• Beim Transport von Einzelflaschen in Fahrzeugen beachten: Gegen Verrutschen und Umherrollen gut sichern, sonst kann das Ventil beschädigt werden und<br />
<strong>CO2</strong>-Gas austreten. Für ausreichende Belüftung sorgen, z.B. offenes Fenster, eingeschaltetes Gebläse o.ä.<br />
So arbeitet die <strong>CO2</strong><br />
Dünge-Anlage <strong>Exclusive</strong><br />
Der <strong>CO2</strong>-Druckminderer <strong>Exclusive</strong> reduziert den Flaschendruck auf einen<br />
praxisgerecht einstellbaren Arbeitsdruck. Mit dem Präzisions-Getriebe-<br />
Nadelventil lässt sich das <strong>CO2</strong> äußerst exakt und komfortabel dosieren.<br />
Die Kontrolle erfolgt mit dem <strong>CO2</strong> Blasenzähler Exact.<br />
Über den <strong>CO2</strong>-dichten Special-Schlauch Softflex gelangt das <strong>CO2</strong> zum<br />
Aquarium. Der <strong>CO2</strong> Cyclo Turbo XL sorgt für hoch effektive <strong>CO2</strong>-<br />
Auflösung im Aquarienwasser. Die <strong>CO2</strong> Special-Rücklaufsicherung<br />
schützt den wertvollen Druckminderer vor eventuell zurücklaufendem<br />
Wasser. Anhand des <strong>CO2</strong> Langzeittest Correct kann man den <strong>CO2</strong>-Gehalt<br />
im Aquarienwasser direkt ablesen.<br />
Besonderer Vorteil: Die wiederbefüllbare <strong>2.000</strong> g <strong>CO2</strong> Mehrweg-<br />
Vorratsflasche. Sie sorgt, auch bei größeren Aquarien, für lange <strong>CO2</strong>-<br />
Versorgung ohne Flaschenwechsel.<br />
�<br />
<strong>CO2</strong> Dünge-Anlage Exlusive im Überblick<br />
�<br />
�<br />
�<br />
�<br />
� <strong>CO2</strong> Mehrweg-Vorratsflasche <strong>2.000</strong> g mit Cage (Ventilschutzkorb)<br />
� <strong>CO2</strong> Druckminderer <strong>Exclusive</strong><br />
� <strong>CO2</strong> Special-Rücklaufsicherung<br />
� <strong>CO2</strong> Blasenzähler Exact<br />
� <strong>CO2</strong> Special-Schlauch Softflex, 5 m<br />
� <strong>CO2</strong> Zugabegerät Cyclo Turbo XL<br />
� Motorpumpe � <strong>CO2</strong> Langzeittest Correct<br />
�<br />
�<br />
�<br />
D<br />
<strong>CO2</strong> Druckminderer <strong>Exclusive</strong><br />
� Flaschendruck-Manometer<br />
� Arbeitsdruck-Einstellschraube (unter Schutzkappe)<br />
� Präzisions-Getriebe-Nadelventil<br />
� Arbeitsdruck-Manometer<br />
<strong>CO2</strong> Cyclo Turbo XL<br />
� Schlauchanschluss für <strong>CO2</strong>-Zufuhr<br />
� Deckel mit Falschgasentlüftung<br />
� Wirbelkammer-Kopfteil<br />
� Wasserauslaufdüse<br />
� Turboeinsatz<br />
� Cyclo-Verlängerung<br />
� Verschlussstopfen<br />
� Verschlussgitter<br />
� Longlife-Sauger<br />
10 Verteilerwinkel<br />
11 Schlauchanschluss<br />
für Filterauslauf oder Pumpe<br />
12 Regulierhahn<br />
13 Zerhackerdüse<br />
<strong>CO2</strong> Blasenzähler<br />
� Halterung<br />
� Longlife-Sauger<br />
� Blasenzähler<br />
� <strong>CO2</strong>-Zufuhr vom Druckminderer<br />
� <strong>CO2</strong>-Abgang zum Aquarium<br />
� Reflektorspange<br />
� Haltegurt<br />
Aufbau und Anschluss<br />
1. Druckminderer anschließen<br />
• Nadelventil durch Drehen gegen den<br />
Uhrzeigersinn schließen (falls noch nicht<br />
geschlossen). ACHTUNG: Nur leicht anziehen!<br />
�<br />
• Druckminderer mit Überwurfmutter an<br />
<strong>CO2</strong>-Flasche befestigen. Überwurfmutter<br />
mit beiliegendem 30er Maulschlüssel festziehen.<br />
� Auf korrekt sitzende Dichtung<br />
und saubere Dichtflächen achten!<br />
ACHTUNG: <strong>CO2</strong>-Entnahme nur aus aufrecht<br />
stehenden Flaschen. Gegen Umfallen<br />
sichern.<br />
2. Rücklaufsicherung<br />
in <strong>CO2</strong>-Schlauch einbauen<br />
• Vom <strong>CO2</strong>-Schlauch 2 je 5 cm lange<br />
Stücke mit kräftiger Schere gerade<br />
abschneiden. �<br />
�<br />
�<br />
�<br />
• Beide Überwurfmuttern von <strong>CO2</strong>-<br />
Rücklaufsicherung abschrauben.<br />
• Überwurfmuttern auf die Schlauchenden<br />
stecken und Schläuche bis zum Anschlag<br />
auf die Schlauchanschlüsse der Rücklaufsicherung<br />
schieben. TIPP: Schlauchanschlüsse<br />
vorher anfeuchten, dann lässt<br />
sich der Schlauch leichter aufschieben.<br />
• Überwurfmuttern festschrauben. �<br />
3. <strong>CO2</strong>-Schlauch an Druckminderer<br />
anschließen<br />
• Schlauch mit Rücklaufsicherung an<br />
Nadelventil des Druckminderers anschließen<br />
und mit Überwurfmutter<br />
sichern. � ACHTUNG: Der Pfeil auf der<br />
Rücklaufsicherung muss in Fließrichtung<br />
des <strong>CO2</strong> zeigen!<br />
4. Blasenzähler anschließen<br />
• Beide Verschlusslaschen öffnen und<br />
Blasenzähler aus Halterung nehmen.<br />
• Haltegurt, mit der flauschigen Seite nach<br />
außen, durch die beiden Schlitze der<br />
Halterung führen und Halterung an <strong>CO2</strong>-<br />
Vorratsflasche befestigen. �<br />
Weitere Befestigungsmöglichkeiten:<br />
(1) mit den beiden Saugern an der<br />
Aquarienscheibe oder (2) mit Hilfe von<br />
Schrauben (nicht im Lieferumfang) an<br />
der Wand oder im Unterschrank. Dazu<br />
Sauger und Saugernippel entfernen.<br />
• Blasenzähler zu 3/4 mit Leitungswasser<br />
füllen. �<br />
• Überwurfmuttern von Blasenzähler<br />
abschrauben und auf Schlauchenden<br />
stecken. Den Schlauch, der vom<br />
Druckminderer kommt, auf den<br />
Schlauchanschluss mit dem Blasenzählrohr<br />
schieben, den Schlauch, der zum<br />
Aquarium führt, auf den anderen<br />
Schlauchanschluss. Überwurfmuttern<br />
wieder festschrauben. �<br />
• Blasenzähler in Halterung einklinken und<br />
Verschlusslaschen schließen. �<br />
5. <strong>CO2</strong> Cyclo Turbo XL anschließen<br />
• Cyclo Turbo XL mit warmem Leitungswasser<br />
abspülen. Keine Reinigungsmittel<br />
verwenden! �<br />
• Im Aquarium eine geeignete Stelle zur<br />
Befestigung wählen. Die Stelle sollte<br />
nicht zu hell sein, um möglicher<br />
Veralgung vorzubeugen.<br />
• <strong>CO2</strong>-Zuleitungsschlauch auf Schlauchanschluss<br />
stecken (vorher anfeuchten!)<br />
�<br />
2 3<br />
13<br />
12<br />
11<br />
10<br />
�<br />
�<br />
�<br />
�<br />
�<br />
�<br />
�<br />
�<br />
�<br />
�<br />
�<br />
�<br />
�<br />
� � �<br />
�<br />
�<br />
�<br />
�<br />
�<br />
�<br />
�<br />
�<br />
�<br />
�<br />
�<br />
�
�<br />
�<br />
�<br />
• Die Motorpumpe an den Regulierhahn<br />
anschließen. �<br />
Hinweis: Der Cyclo Turbo XL kann auch<br />
(ohne Pumpe) an den Filterauslauf des<br />
Außenfilters angeschlossen werden. Es<br />
passen alle Schläuche der handelsüblichen<br />
Größen 9/12 mm, 12/16 mm<br />
und 16/22 mm.<br />
• Den Cyclo mit den Saugern senkrecht,<br />
mindestens 5 cm unter dem Wasserspiegel<br />
im Aquarium befestigen. �<br />
6. <strong>CO2</strong> Schlauch befestigen<br />
• Der <strong>CO2</strong>-Schlauch kann mit Hilfe der<br />
Schlauchhalterungen sauber verlegt und<br />
sicher befestigt werden. �<br />
Ihre <strong>CO2</strong> Dünge-Anlage <strong>Exclusive</strong><br />
ist jetzt betriebsbereit.<br />
Einstellen der <strong>CO2</strong>-Menge (Blasenzahl)<br />
7. Die richtige <strong>CO2</strong>-Menge<br />
DENNERLE empfiehlt für prächtigen Pflanzenwuchs einen <strong>CO2</strong>-Gehalt im<br />
Aquarium zwischen 15 und 30 mg/l, ideal sind 20 bis 25 mg/l.<br />
Die für diesen <strong>CO2</strong>-Gehalt benötigte Blasenzahl pro Minute hängt von<br />
verschiedenen Faktoren ab, z.B. Bepflanzung, Wasserbewegung,<br />
Oberfläche/Volumen-Verhältnis, usw. Deshalb ist es erforderlich, die<br />
<strong>CO2</strong>-Zugabemenge für jedes Aquarium individuell zu ermitteln.<br />
8. Blasenzahl einstellen<br />
Faustregel für die Grundeinstellung: Beginnen Sie mit ca. 10 Blasen pro<br />
Minute pro 100 l Aquarienwasser, d.h. für ein 200 l-Aquarium z.B. mit<br />
2 x 10 = 20 Blasen pro Minute.<br />
Passen Sie die <strong>CO2</strong>-Zugabe in kleinen Schritten über mehrere Tage verteilt<br />
dem gewünschten <strong>CO2</strong>-Gehalt an. Beachten Sie: Je stärker die<br />
Wasseroberfläche bewegt wird (z.B. durch Filter, zusätzliche Belüftung),<br />
desto mehr <strong>CO2</strong> wird wieder aus dem Aquarium ausgetrieben.<br />
• Flaschenventil durch Drehen des<br />
Handrads gegen den Uhrzeigersinn<br />
langsam öffnen. Ventil bis zum<br />
Anschlag aufschrauben und anschließend<br />
1/2 Umdrehung wieder<br />
zuschrauben. � Das Flaschendruck-<br />
Manometer zeigt jetzt ca. 60 bar an<br />
(bei 20 °C).<br />
• Nadelventil langsam und zunächst nur<br />
wenig öffnen bis im Blasenzähler die<br />
ersten Blasen austreten.<br />
• Gewünschte Blasenzahl am Nadelventil<br />
einstellen:<br />
- im Uhrzeigersinn drehen: Blasenzahl<br />
erhöhen<br />
- gegen den Uhrzeigersinn drehen:<br />
Blasenzahl verringern. �<br />
�<br />
�<br />
-<br />
+<br />
Bitte beachten: Die Blasenzahl reagiert zeitverzögert auf Änderungen<br />
am Nadelventil. Blaseneinstellung daher behutsam durchführen.<br />
• Blasenzahl in den ersten Tagen öfter kontrollieren und gegebenenfalls<br />
nachregulieren. Später genügt es im allgemeinen, die<br />
Blasenzahl einmal pro Woche zu kontrollieren.<br />
Interessant zu wissen: Die vom <strong>CO2</strong> Blasenzähler Exact produzierten<br />
<strong>CO2</strong>-Blasen haben ein durchschnittliches Gewicht von 0,125 mg und<br />
ein Volumen von 0,063 ml. 10 Blasen pro Minute entsprechen damit<br />
einer <strong>CO2</strong>-Zugabe von 1,8 g bzw. 0,9 Litern pro Tag.<br />
9. Cyclo Turbo XL einstellen<br />
Motorpumpe in Betrieb nehmen<br />
• Netzstecker mit dem Stromnetz verbinden. Sicherheitsvorschriften<br />
beachten (siehe unten)!<br />
Regulierhahn einstellen<br />
Mit Hilfe des Regulierhahns leitet man einen Teil des vom Filter kommenden<br />
Wassers zur <strong>CO2</strong> -Auflösung in die Wirbelkammer. Das übrige<br />
Wasser fließt durch die Wasserauslaufdüse direkt ins Aquarium.<br />
A<br />
• Stellung A: Es wird kein Wasser in<br />
die Wirbelkammer geleitet.<br />
B<br />
• Stellung B: 50 % des Wassers<br />
werden in den Cyclo, 50 % ins<br />
Aquarium geleitet.<br />
C<br />
• Stellung C: Alles Wasser wird in die<br />
Wirbelkammer des Cyclo geleitet.<br />
Der Regulierhahn sollte so eingestellt werden, dass der Wasserdurchfluss<br />
durch die Wirbelkammer möglichst groß ist, die <strong>CO2</strong>-Blasen jedoch nicht<br />
nach unten gedrückt werden, sondern langsam hochsteigen.<br />
Falschgasentlüftung einstellen<br />
Die Falschgase werden durch den speziell konstruierten Deckel des<br />
Cyclo automatisch und regelmäßig abgeführt. Der Deckel kann dazu<br />
etwas verdreht werden:<br />
Am linken Anschlag (im Uhrzeigersinn<br />
drehen) ist die Falschgasentlüftung maximal<br />
offen, erkennbar an den dort austretenden,<br />
großen Blasen. Je mehr man<br />
gegen den Uhrzeigersinn dreht, umso<br />
kleiner werden die Blasen. Dreht man bis<br />
zum rechten Anschlag, ist die<br />
Falschgasentlüftung geschlossen. Achten<br />
Sie auf das entsprechende Symbol auf<br />
dem Deckel. �<br />
�<br />
Die Falschgasentlüftung sollte so eingestellt werden, dass die<br />
Falschgase zwar regelmäßig abgeführt werden, aber gleichzeitig das im<br />
Wirbelkammer-Kopfteil befindliche Rest- <strong>CO2</strong> möglichst viel Zeit hat sich<br />
aufzulösen. Dazu beginnt man immer mit der Stellung "große Blasen".<br />
Werden zu viele Blasen über die Falschgasentlüftung ausgestoßen,<br />
dreht man den Deckel ein wenig in Richtung "kleine Blasen".<br />
10. Einfache Kontrolle mit dem <strong>CO2</strong> Langzeittest Correct<br />
Der <strong>CO2</strong> Langzeittest Correct erlaubt die permanente, exakte Kontrolle der<br />
<strong>CO2</strong>-Menge im Aquarium.<br />
Je nach <strong>CO2</strong>-Gehalt reagiert der <strong>CO2</strong> Special-Indicator mit einer<br />
Farbänderung: von • Blau = zu wenig <strong>CO2</strong> über • Grün = <strong>CO2</strong> optimal<br />
nach • Gelb = zu viel <strong>CO2</strong>.<br />
An der Farbvergleichs-Skala kann man die <strong>CO2</strong>-Menge im Aquarium direkt<br />
in Milligramm pro Liter ablesen.<br />
Durch den von DENNERLE entwickelten <strong>CO2</strong> Special-Indicator zeigt der Test<br />
den <strong>CO2</strong>-Gehalt immer richtig an. Andere Säuren im Aquarienwasser, z.B.<br />
Huminsäuren und Änderungen der Karbonathärte durch Aufhärtung,<br />
Verdunstung oder Wasserwechsel haben keinen Einfluss!<br />
Was ist was<br />
�<br />
� � �<br />
� Testbehälter-Unterteil<br />
� Testbehälter-Oberteil<br />
� Reflektionskegel<br />
� O-Ringe<br />
� Haltespange<br />
• Gehäuse-Unterteil samt Reflektorkegel<br />
in das Oberteil stecken. Auf richtigen<br />
Sitz der O-Ringe achten! 21<br />
• Testbehälter vorsichtig umdrehen und<br />
in Haltespange einsetzen. 22<br />
• <strong>CO2</strong>Langzeittest mit Hilfe des<br />
Saugers an einer gut sichtbaren Stelle<br />
mit leichter Wasserströmung senkrecht<br />
im Aquarium befestigen. 23<br />
• Farbvergleichs-Skala außen auf die<br />
Aquarienscheibe kleben. 24<br />
Bitte beachten Sie: Weil das <strong>CO2</strong> eine<br />
gewisse Zeit braucht, um in den Indikator<br />
hinein zu diffundieren, reagiert die<br />
Farbanzeige auf Änderungen des <strong>CO2</strong>-Gehaltes jeweils mit einigen<br />
Stunden Verzögerung. Erhöhen Sie die <strong>CO2</strong>-Zugabemenge deshalb<br />
immer nur in kleinen Schritten über mehrere Tage verteilt, bis der optimale<br />
<strong>CO2</strong>-Gehalt eingestellt ist.<br />
11. Verwendung als pH Langzeittest<br />
Der pH-Wert im Aquarium wird in erster Linie durch die Karbonathärte<br />
und den Gehalt an <strong>CO2</strong> - es löst sich im Wasser zum Teil als Kohlensäure -<br />
bestimmt. Unter der Voraussetzung, dass sich keine anderen, maßgeblich<br />
pH-beeinflussenden Substanzen im Wasser befinden (z.B. größere<br />
Mengen Huminsäuren oder Nitrat, pH Plus-, pH Minus-Präparate usw.)<br />
kann man mit dem DENNERLE <strong>CO2</strong> Langzeittest auch den pH-Wert im<br />
Aquarium überwachen. Dazu:<br />
25<br />
• Karbonathärte des Aquarienwassers messen<br />
(Tests im Fachhandel).<br />
• Entsprechende Farbvergleichs-Skala außen<br />
an Aquarienscheibe kleben. 25<br />
An der Farbskala kann man nun direkt den<br />
pH-Wert des Aquarienwassers ablesen.<br />
Karbonathärte regelmäßig messen und immer entsprechende Farbskala<br />
verwenden.<br />
12. Wer noch mehr wissen will: Wie Sie den <strong>CO2</strong>-Gehalt<br />
im Aquarium auch bestimmen könnnen<br />
Da <strong>CO2</strong>-Gehalt, Karbonathärte (KH) und pH-Wert in einem gewissen<br />
Verhältnis zueinander stehen, lässt sich der <strong>CO2</strong>-Gehalt des Wassers folgendermaßen<br />
berechnen:<br />
• Messen Sie die Karbonathärte des Aquarienwassers.<br />
4 5<br />
�<br />
�<br />
�<br />
�<br />
�<br />
�<br />
�<br />
�<br />
� Halterung<br />
� Longlife-Sauger<br />
� <strong>CO2</strong> Special-Indicator<br />
� Farbvergleichs-Skala<br />
• Testbehälter aus Haltespange nehmen.<br />
Testbehälter-Oberteil abziehen. �<br />
• Eine Ampulle mit <strong>CO2</strong> Special-Indicator<br />
nehmen und sicherstellen, dass sich kein<br />
Indikator im Ampullenhals befindet!<br />
Dazu Indikator in der Ampulle herunterschütteln<br />
(wie bei einem Fieberthermometer).<br />
Ampulle durch Abdrehen der<br />
Verschlusslasche öffnen. �<br />
• Gesamten Ampullen-Inhalt in das Testbehälter-Oberteil<br />
tropfen. �<br />
21<br />
22<br />
23<br />
24
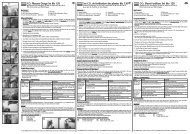
• Lesen Sie in der Tabelle den zum gewünschten <strong>CO2</strong>-Gehalt passenden<br />
pH-Wert ab. Diesen pH-Wert +/- 0,1 sollten Sie durch entsprechende<br />
Regelung der Blasenzahl einstellen.<br />
Beispiel: Karbonathärte 4 °d, empfohlener pH 6,8 +/-0,1.<br />
zu viel <strong>CO2</strong> <strong>CO2</strong> richtig<br />
pH-Wert<br />
zu wenig <strong>CO2</strong><br />
KH 6,3 6,4 6,5 6,6 6,7 6,8 6,9 7,0 7,1 7,2 7,3 7,4 7,5<br />
2 32 25 20 16 13 10 8 6 5 4 3 3 2<br />
3 48 38 30 24 19 15 12 10 8 6 5 4 3<br />
4 64 51 40 32 25 20 16 13 10 7 6 5 4<br />
5 80 63 50 40 32 25 20 16 13 10 8 6 5<br />
6 96 76 60 48 38 30 24 19 15 12 10 8 6<br />
7 111 89 70 56 44 35 28 22 18 14 11 9 7<br />
8 127 101 80 64 51 40 32 25 20 16 13 10 8<br />
9 143 114 90 72 57 45 36 29 23 18 14 11 9<br />
10 159 126 100 80 63 50 40 32 25 20 16 13 10<br />
11 175 139 111 88 70 55 44 35 28 22 18 14 11<br />
12 191 152 121 96 76 60 48 38 30 24 19 15 12<br />
13 207 164 131 104 82 65 52 41 33 26 21 16 13<br />
14 223 177 141 112 89 70 56 44 35 28 22 18 14<br />
13. So arbeitet der <strong>CO2</strong> Cyclo Turbo XL<br />
Das <strong>CO2</strong> tritt unten im Cyclo an der Öffnung des <strong>CO2</strong>-Rohres aus. Von hier<br />
aus steigen die Blasen nach oben und sammeln sich unter den einzelnen<br />
Stufen des Turbo-Einsatzes.<br />
Das Wasser dagegen strömt in einer Wirbelbewegung an den so 'festgehaltenen'<br />
<strong>CO2</strong>-Blasen vorbei nach unten. Durch dieses hoch wirksame<br />
Gegenstromprinzip löst sich das <strong>CO2</strong> äußerst schnell und effektiv.<br />
Gleichzeitig dringen andere, natürlicherweise im Aquarienwasser gelöste<br />
Gase in die <strong>CO2</strong>-Blasen ein. Diese sogenannten Falschgase sind der Grund<br />
dafür, dass die Blasen nach oben hin zwar kleiner werden, sich jedoch<br />
nicht vollständig auflösen. Wenn die Blasen im Wirbelkammer-Kopfteil des<br />
Cyclo ankommen, bestehen sie bereits überwiegend aus Falschgasen und<br />
enthalten kaum noch <strong>CO2</strong>. Hier werden sie nun von der Zerhackerdüse<br />
angesaugt und in Tausende kleinster Bläschen zerteilt. Dadurch werden<br />
auch noch die letzten <strong>CO2</strong>-Reste gelöst,<br />
bevor die Falschgase über die speziell konstruierte<br />
Falschgasentlüftung abgeführt<br />
werden.<br />
Der Cyclo Turbo XL versorgt, bei normalem<br />
<strong>CO2</strong>-Bedarf, Aquarien bis zu 5.000<br />
Liter. Er ist in seiner Leistung noch erheblich<br />
steigerungsfähig und läßt sich so jedem<br />
Aquarium individuell anpassen. Dazu werden<br />
unten einfach Verlängerungsstücke<br />
(Best.-Nr.: 1588) sowie Turboeinsätze<br />
(Best.-Nr.: 1580) aufgesteckt.<br />
Pflege und Wartung<br />
14. <strong>CO2</strong>-Flasche auswechseln<br />
• Flaschenventil schließen.<br />
• Eventuellen Restdruck im Druckminderer durch Öffnen des<br />
Nadelventils ablassen. Anschließend Nadelventil schließen.<br />
Achtung: Nur leicht anziehen!<br />
• Druckminderer von <strong>CO2</strong>-Flasche abschrauben und auf neu gefüllte<br />
<strong>CO2</strong>-Mehrweg-Flasche aufschrauben. Blasenzahl neu einstellen.<br />
ACHTUNG: Wiederbefüllung von <strong>CO2</strong>-Mehrweg-Flaschen nur durch autorisierte<br />
<strong>CO2</strong>-Füllstationen zulässig!<br />
Besondere Hinweise: Das Nadelventil dient nur zur Feineinstellung der<br />
Blasenzahl. Zum längeren Abstellen der <strong>CO2</strong>-Zugabe immer das<br />
Flaschenventil schließen!<br />
Bei längerem Nichtgebrauch Druckminderer abschrauben.<br />
15. Arbeitsdruck am Druckminderer nachstellen<br />
Der Arbeitsdruck des Druckminderers <strong>Exclusive</strong> ist werksseitig auf ca. 1<br />
bar eingestellt. Insbesondere in den ersten Wochen nach<br />
Inbetriebnahme kann sich der Arbeitsdruck noch etwas ändern, da sich<br />
die Dichtungen setzen.<br />
Arbeitsdruck nachstellen:<br />
26<br />
• Schutzkappe abnehmen<br />
• Erhöhen: Arbeitsdruck-Einstellschraube<br />
mit geeignetem Schraubenzieher gegen<br />
+ -<br />
den Uhrzeigersinn drehen 26<br />
Verringern: Arbeitsdruck-Einstellschraube<br />
im Uhrzeigersinn drehen<br />
16. <strong>CO2</strong>-Rücklaufsicherung prüfen<br />
Die Rücklaufsicherung schützt Ihren wertvollen Druckminderer vor<br />
Korrosion durch zurücklaufendes Wasser. Sie übt ihre Funktion sehr<br />
lange und zuverlässig aus. Da sich jedoch im Laufe der Zeit Staub- und<br />
Metallteilchen auf den Dichtflächen absetzen können, sollte man die<br />
Rücklaufsicherung spätestens alle 2 Jahre überprüfen und eventuell austauschen.<br />
Prüfung:<br />
• Nadelventil am <strong>CO2</strong>-Druckminderer schließen.<br />
• Nach 24 Stunden Überwurfmutter an der Seite der Rücklaufsicherung,<br />
die zum Druckminderer zeigt, abschrauben.<br />
• <strong>CO2</strong>-Schlauch abziehen und überprüfen, ob Wasser eingedrungen<br />
ist. Wenn JA: Rücklaufsicherung austauschen. Wenn NEIN: Schlauch<br />
wieder an Rücklaufsicherung anschließen.<br />
• Blasenzahl neu einstellen.<br />
Keine Sorge: 24 Std. ohne <strong>CO2</strong>-Versorgung wird von einem gut funktionierenden<br />
Aquarium normalerweise problemlos verkraftet.<br />
Wichtiger Hinweis: Benutzen Sie ausschließlich Rücklaufsicherungen,<br />
die für den Betrieb mit <strong>CO2</strong> ausgelegt sind, wie die DENNERLE <strong>CO2</strong><br />
Special-Rücklaufsicherung. Normale Luft-Rücklaufsicherungen<br />
können durch <strong>CO2</strong> bereits innerhalb kurzer Zeit – meist unbemerkt -<br />
verspröden und werden dann undicht.<br />
17. <strong>CO2</strong> Special-Indicator austauschen<br />
Der Indikator ist, wie die meisten Farbstoffe, einer gewissen Alterung durch<br />
photochemische Prozesse unterworfen. Um stets eine möglichst schnelle<br />
und exakte Farbreaktion zu gewährleisten, empfehlen wir deshalb, den<br />
Testbehälter alle 4 Wochen mit frischem <strong>CO2</strong> Special-Indicator zu füllen:<br />
• Dazu Testbehälter öffnen und alten Indikator wegschütten<br />
(Hauskanalisation).<br />
• Testbehälter mit Leitungswasser ausspülen und vor dem Neubefüllen<br />
mit einem Küchentuch o.ä. trocknen.<br />
18. <strong>CO2</strong> Langzeittest reinigen<br />
Mit warmem Wasser und weichem Schwamm. Keine Reinigungsmittel<br />
verwenden!<br />
Der Testbehälter kann zur Reinigung zerlegt werden. Die beiden O-<br />
Ringe vor dem Zusammenbau eventuell leicht (!) mit Vaseline einfetten<br />
(Apotheke, Drogerie).<br />
ACHTUNG: Setzen Sie keine anderen Schmiermittel ein (z.B.<br />
Spülmittel, Handcreme, usw.), da sie die Farbanzeige verfälschen können.<br />
19. Cyclo Turbo XL reinigen<br />
Mit warmem Wasser und weichem Schwamm. Keine Reinigungsmittel<br />
verwenden. Der Cyclo kann zur Reinigung komplett zerlegt werden. Die<br />
Innenteile lassen sich mit einer weichen Flaschenbürste säubern.<br />
20. Motorpumpe reinigen<br />
27<br />
• Netzstecker ziehen. Pumpe von Cyclo<br />
abziehen. Ansaugkorb abnehmen.<br />
Bajonettverschluss öffnen und<br />
Pumpengehäuse abnehmen. 27<br />
• Komplettes Pumpenrad und Achse herausziehen.<br />
28<br />
• Alle Teile mit geeigneter Bürste unter<br />
28<br />
Leitungswasser reinigen. In umgekehrter<br />
Reihenfolge wieder zusammenbauen.<br />
21. Wichtiger Hinweis zum <strong>CO2</strong>-Schlauch<br />
Der <strong>CO2</strong> 29<br />
Special-Schlauch Softflex ist<br />
selbstdichtend und selbstsichernd und bietet<br />
so ein Höchstmaß an Sicherheit. Zum<br />
Entfernen den Schlauch immer abhebeln,<br />
NICHT abziehen! 29<br />
TIPP: Durch Schläuche, die nicht <strong>CO2</strong>-dicht sind ("Luftschläuche"), können<br />
täglich große Mengen wertvolles <strong>CO2</strong> verloren gehen. Benutzen Sie<br />
deshalb immer geeignete <strong>CO2</strong>-Schläuche wie den DENNERLE <strong>CO2</strong><br />
Special-Schlauch Softflex.<br />
Was tun wenn... – Fehlerbehebung<br />
Fehler Ursache Behebung<br />
An Schraubverbindung<br />
von Druckminderer<br />
und <strong>CO2</strong>-Flasche<br />
ist ein leises Zischen<br />
zu hören.<br />
Keine Blasen mehr<br />
am Blasenzähler<br />
Im oberen Bereich<br />
der Wirbelkammer<br />
bildet sich eine große<br />
Gasblase.<br />
Es werden zu viele<br />
Blasen über die<br />
Falschgasentlüftung<br />
ausgestoßen.<br />
Druckminderer ist<br />
schräg oder nicht<br />
fest genug aufgeschraubt.<br />
Dichtung defekt.<br />
<strong>CO2</strong>-Flasche leer.<br />
Nadelventil geschlossen.<br />
Schlauchverbindung<br />
en undicht.<br />
Arbeitsdruck zu niedrig<br />
Die Falschgasentlüftung<br />
ist zu klein<br />
eingestellt.<br />
Die Ansaugöffnung<br />
der Zerhackerdüse<br />
oder die Falschgasentlüftung<br />
sind verstopft.<br />
Die Falschgasentlüftung<br />
ist zu groß<br />
eingestellt.<br />
Es wird zuviel <strong>CO2</strong><br />
zugegeben.<br />
Durch die Wirbelkammer<br />
wird zu<br />
wenig Wasser geleitet.<br />
Druckminderer abschrauben<br />
und wieder<br />
gerade aufschrauben.<br />
Überwurfmutter festziehen.<br />
Neue Dichtung einbauen.<br />
Auf korrekten<br />
Sitz und saubere<br />
Dichtflächen achten.<br />
<strong>CO2</strong>-Flasche auswechseln.<br />
Nadelventil öffnen.<br />
Schlauchverbindung<br />
prüfen und ggf.<br />
erneuern.<br />
Arbeitsdruck auf ca.<br />
1 bar einstellen.<br />
Deckel (2) etwas<br />
in Richtung "große<br />
Blasen" verdrehen.<br />
Cyclo und Ansaugkorb<br />
der Pumpe<br />
unter fließendem<br />
Wasser reinigen.<br />
Deckel (2) etwas<br />
in Richtung "kleine<br />
Blasen" verdrehen.<br />
<strong>CO2</strong>-Zufuhr etwas<br />
drosseln.<br />
Wasserdurchfluss<br />
durch Drehen des<br />
Regulierhahns erhöhen.<br />
Ausbaustufen<br />
Stufe 1: Die DENNERLE <strong>CO2</strong> Nachtabschaltung Comfort<br />
schaltet, gesteuert über eine Zeitschaltuhr, nachts die<br />
<strong>CO2</strong>-Zufuhr ab, da Pflanzen nachts kein <strong>CO2</strong> verbrauchen.<br />
So spart man wertvolles <strong>CO2</strong>.<br />
6 7
Stufe 2: Der DENNERLE pH-Controller 588 Digital<br />
Comfort misst permanent den pH-Wert im Aquarium<br />
und regelt über die <strong>CO2</strong> Nachtabschaltung<br />
Comfort die <strong>CO2</strong>-Zugabe exakt und vollautomatisch.<br />
Besondere Hinweise<br />
<strong>CO2</strong>-Special-Indicator<br />
• <strong>CO2</strong>Langzeittest und Indikator von Kindern fernhalten!<br />
• Der <strong>CO2</strong> Special-Indicator ist ungefährlich und frei von chemischen<br />
Lösungsmitteln. Trotzdem längeren Hautkontakt und Augenkontakt<br />
vermeiden.<br />
• Der Indikator kann eventuell färben – Kontakt mit Kleidung,<br />
Teppichen, Holz, usw. vermeiden.<br />
• Versehentlich ins Aquarienwasser gelangter Indikator ist für alle<br />
Fische, Pflanzen und andere Aquarienbewohner harmlos.<br />
• Der <strong>CO2</strong> Special-Indicator ist unter Schutzatmosphäre abgefüllt.<br />
Füllhöhe technisch bedingt.<br />
• <strong>CO2</strong>Special-Indicator vor Sonne, Hitze und Frost schützen. Die<br />
Ampullen stets lichtgeschützt lagern.<br />
Motorpumpe<br />
• Die Pumpe darf nicht trocken laufen!<br />
• Nur für Wechselstrom 230 V / 50 Hz.<br />
• Nur zur Verwendung in Räumen<br />
• Vor dem Hineinfassen ins Aquarium stets den<br />
Netzstecker ziehen.<br />
• Die Anschlussleitung der Pumpe kann nicht<br />
ersetzt werden. Bei Beschädigung der Leitung<br />
darf das Gerät nicht mehr benutzt werden.<br />
Technische Daten<br />
<strong>CO2</strong> Mehrweg-Vorratsflasche<br />
• UN-Nr. 1013, Kl. 2, Ziff.: 2A, GGVS/ADR/RID/GGVE/EINECS 2046969<br />
• Inhalt: max. <strong>2.000</strong> g <strong>CO2</strong>; Flaschenleergewicht (ohne Cage):<br />
siehe Stempelung Flasche; Druck bei Zimmertemperatur: ca. 60<br />
bar; Prüfdruck: 250 bar; Flaschenventil mit Berstsicherung;<br />
Anschlussgewinde W21,8 x 1/14"<br />
• TÜV-Stempel: siehe Prägung Flasche. Wiederbefüllbare <strong>CO2</strong>-<br />
Flaschen müssen regelmäßig von den länderspezifischen Institutionen<br />
geprüft werden. Daher länderspezifische Vorschriften<br />
beachten! In Deutschland müssen <strong>CO2</strong>-Flaschen alle 10 Jahre<br />
vom TÜV geprüft werden.<br />
• Wichtiger Hinweis: Bei zu hoher Temperatur bzw. zu hohem Druck<br />
platzt die Berstsicherung am Flaschenventil und <strong>CO2</strong>-Gas kann<br />
austreten. Reparatur nur durch autorisierte <strong>CO2</strong>-Füllstationen -<br />
NICHT selbst reparieren!<br />
<strong>CO2</strong>-Druckminderer <strong>Exclusive</strong> für Classic-Line<br />
Flaschendruck-Manometer: 0 – 250 bar. Arbeitsdruck-Manometer: 0 –<br />
6 bar. Arbeitsdruck einstellbar. Anschluss für Schlauch 4/6 mm.<br />
Präzisions-Getriebe-Nadelventil mit Edelstahlnadel und Feinstgewinde.<br />
Selbstschließendes Überdruckventil.<br />
Garantiezeit: 3 Jahre ab Kaufdatum (außer Verschleißteile).<br />
8<br />
Ersatzteile und nützliches Zubehör<br />
(beim Fachhandel erhältlich)<br />
3031 <strong>CO2</strong> Mehrweg-Vorratsflasche <strong>2.000</strong> g mit Cage<br />
3025 Classic-Line <strong>CO2</strong> Druckminderer <strong>Exclusive</strong><br />
3028 Dichtung für Classic-Line Druckminderer, 2 Stück<br />
1580 Turboeinsatz<br />
1588 Cyclo-Verlängerung<br />
3043 Longlife-Sauger, grün, 2 Stück<br />
3042 Longlife-Sauger, schwarz, 2 Stück<br />
1484 Lecksuchspray<br />
3061 <strong>CO2</strong> Special-Schlauch Softflex, 5 m<br />
3050 <strong>CO2</strong> Blasenzähler Exact<br />
3053 <strong>CO2</strong> Special-Rücklaufsicherung<br />
3041 <strong>CO2</strong> Special-Indicator, 5 Ampullen<br />
Lassen Sie sich vom Fachhandel über das DENNERLE Aquarienpflanzen- und<br />
Zubehör-Programm beraten oder fordern Sie die kostenlosen DENNERLE<br />
Profi-Tipps an!<br />
DENNERLE Profi-Tipps erhalten Sie auch beim Fachhandel und im Internet<br />
unter www.dennerle.de!<br />
Vertrieb: DENNERLE GmbH, D-66957 Vinningen<br />
Kundenservice: DENNERLE GmbH, D-66981 Münchweiler<br />
www.dennerle.de<br />
Classic-Line<br />
Installation de fumure <strong>CO2</strong> <strong>Exclusive</strong> <strong>2.000</strong> g<br />
Set complet avec bouteille de <strong>CO2</strong> de <strong>2.000</strong> g rechargeable.<br />
Pour la fumure <strong>CO2</strong> d’aquariums jusqu’à 5.000 litres<br />
- Lisez attentivement cette notice et conservez-la soigneusement ! -<br />
Nous vous remercions de votre confiance pour l’achat de cette installation de fumure <strong>CO2</strong> DENNERLE.<br />
En cas d’utilisation et d’entretien conformes, vous assurez à votre aquarium un apport facile, fiable et régulier en <strong>CO2</strong>, l’engrais essentiel pour les plantes<br />
d’aquarium, leur garantissant une croissance fantastique. En même temps, le <strong>CO2</strong> vous permet de régler le pH optimal pour plantes et poissons, dans la zone<br />
légèrement acide à neutre. DENNERLE vous souhaite beaucoup de plaisir et de bonheur avec votre aquarium !<br />
Consignes de sécurité pour les bouteilles de dioxyde de carbone (<strong>CO2</strong>)<br />
• Utiliser exclusivement les bouteilles pour l’approvisionnement d’aquariums en <strong>CO2</strong>.<br />
• Les bouteilles de <strong>CO2</strong> sont sous haute pression. Respecter donc les consignes suivantes :<br />
• Ne pas lancer les bouteilles de <strong>CO2</strong>. Conserver les bouteilles au frais, à l’abri du soleil et d’une température supérieure à 50 °C.<br />
• Ne prélever le <strong>CO2</strong> qu'avec un détendeur pour bouteilles de <strong>CO2</strong> rechargeables avec filetage de raccordement W21,8 x 1/14", par exemple<br />
les détendeurs DENNERLE modèles Profi 2000, Compact, Professional et <strong>Exclusive</strong><br />
• Lors du prélèvement de <strong>CO2</strong>, veiller à ce que la bouteille soit toujours placée à la verticale et attachée pour qu’elle ne puisse pas se renverser.<br />
• Ne pas ouvrir de force les bouteilles de <strong>CO2</strong>.<br />
• Ne pas vider totalement les bouteilles de <strong>CO2</strong>. Ne remplir les bouteilles qu'auprès de stations de remplissage de <strong>CO2</strong> agréées. Veuillez noter :<br />
la tare est déterminée sans la cage. Démonter la cage avant le remplissage.<br />
• Le <strong>CO2</strong> est plus lourd que l’air et par conséquent asphyxiant à concentration élevée. Donc :<br />
• Ne pas inhaler le <strong>CO2</strong>.<br />
• Conserver hors de portée des enfants.<br />
• Conserver les bouteilles de <strong>CO2</strong> en un endroit bien aéré et non dans des locaux en sous-sol..<br />
• Lors du transport de bouteilles isolées dans un véhicule, respecter les consignes suivantes :<br />
• Bien attacher les bouteilles pour qu’elles ne glissent et ne roulent pas, sinon la soupape risque de s’endommager et de laisser échapper du <strong>CO2</strong>. Veiller à<br />
une aération suffisante, p.ex. en ouvrant une vitre, en branchant la ventilation, etc<br />
Fonctionnement de l’installation<br />
de fumure <strong>CO2</strong> <strong>Exclusive</strong><br />
Le détendeur <strong>CO2</strong> <strong>Exclusive</strong> réduit la pression de la bouteille à une pression<br />
de service adaptée à la pratique. La valve à aiguille de haute précision<br />
permet un dosage aisé et très précis du <strong>CO2</strong>. Le contrôle est réalisé<br />
à l'aide du compte-bulles <strong>CO2</strong> Exact.<br />
Le dioxyde de carbone est amené dans l’aquarium par le tuyau spécial<br />
Softflex étanche au <strong>CO2</strong>. Le diffuseur <strong>CO2</strong> Cyclo Turbo XL assure une dissolution<br />
très efficace du <strong>CO2</strong> dans l'eau de l'aquarium. Une protection<br />
anti-retour spéciale <strong>CO2</strong> protège le détendeur très précieux contre tout<br />
retour d’eau éventuel. Le test <strong>CO2</strong> longue durée Correct permet de lire<br />
directement le taux de <strong>CO2</strong> dans l’eau de l’aquarium.<br />
Avantage particulier : la bouteille de <strong>2.000</strong> g de <strong>CO2</strong> rechargeable. Elle<br />
assure, même dans les grands aquariums, une alimentation de <strong>CO2</strong> de<br />
longue durée, sans changement de bouteille.<br />
�<br />
Aperçu de<br />
l’installation de fumure <strong>CO2</strong> <strong>Exclusive</strong><br />
�<br />
�<br />
�<br />
�<br />
�<br />
� Bouteille de <strong>CO2</strong> rechargeable de <strong>2.000</strong> g avec cage (panier de protection de la valve)<br />
� Détendeur <strong>CO2</strong> <strong>Exclusive</strong><br />
� Protection anti-retour spéciale <strong>CO2</strong><br />
� Compte-bulles <strong>CO2</strong> Exact<br />
� Tuyau spécial <strong>CO2</strong> Softflex, 5 m � Pompe<br />
� Diffuseur de <strong>CO2</strong> Cyclo Turbo XL � Test <strong>CO2</strong> longue durée Correct<br />
�<br />
�<br />
F<br />
9
Détendeur <strong>CO2</strong> <strong>Exclusive</strong><br />
� Manomètre pour la pression de bouteille<br />
� Vis de réglage de la pression de service<br />
(sous couvercle de protection)<br />
� Manomètre pour la pression de service<br />
� Valve à aiguille de précision<br />
<strong>CO2</strong> Cyclo Turbo XL<br />
� Raccordement du tuyau<br />
d'alimentation en <strong>CO2</strong><br />
� Couvercle avec évacuation de<br />
mauvais gaz<br />
� Tête de la chambre de turbulence<br />
� Buse d'écoulement de l'eau<br />
� Insert Turbo<br />
� Module de chambre de turbulence<br />
� Bouton de fermeture<br />
� Grille de fermeture<br />
� Ventouse Longlife<br />
� Coude de distribution<br />
� Raccord du tuyau pour la pompe<br />
� Robinet de réglage<br />
� Buse de pulvérisation<br />
Compte-bulles <strong>CO2</strong><br />
� � �<br />
� Attache<br />
� Ventouse Longlife<br />
�<br />
�<br />
� Compte-bulles<br />
� Alimentation en <strong>CO2</strong><br />
du détendeur<br />
�<br />
� Sortie de <strong>CO2</strong> vers l'aquarium<br />
� Clip réflecteur<br />
� Sangle de retenue<br />
Montage et raccordement<br />
�<br />
�<br />
1. Raccorder le détendeur<br />
de pression<br />
• Fermer la valve à aiguille en la tournant<br />
dans le sens contraire des aiguilles d’une<br />
montre (si elle n'est pas déjà fermée).<br />
ATTENTION : Ne serrer que légèrement !�<br />
�<br />
• Fixer le détendeur sur la bouteille <strong>CO2</strong> à<br />
l'aide de l'écrou-raccord. Bien serrer<br />
l'écrou-raccord à l'aide de la clé à fourche<br />
de 30 fournie. � Vérifier la mise en place<br />
du joint et la propreté des surfaces<br />
étanches !<br />
ATTENTION : Ne prélever le <strong>CO2</strong> que sur des<br />
bouteilles en position verticale. Fixer les<br />
bouteilles pour éviter qu'elles ne tombent.<br />
�<br />
2. Insérer la protection anti-retour<br />
sur le tuyau de <strong>CO2</strong><br />
• Avec de bons ciseaux, couper bien droit<br />
deux bouts d'environ 5 cm de long du<br />
tuyau de <strong>CO2</strong>. �<br />
• Dévisser les deux écrous-raccords de la protection<br />
anti-retour <strong>CO2</strong>.<br />
• Glisser les deux écrous-raccords sur les<br />
extrémités du tuyau et engager les tuyaux<br />
13<br />
12<br />
11<br />
10<br />
�<br />
�<br />
�<br />
�<br />
�<br />
�<br />
�<br />
�<br />
�<br />
�<br />
�<br />
�<br />
�<br />
�<br />
�<br />
�<br />
�<br />
�<br />
�<br />
�<br />
�<br />
jusqu’à la butée dans les raccords de la<br />
protection anti-retour. CONSEIL : humidifier<br />
au préalable les raccords des tuyaux<br />
pour faciliter leur insertion.<br />
• Visser les écrous-raccords. �<br />
3. Raccorder le tuyau de <strong>CO2</strong> au<br />
détendeur<br />
• Raccorder le tuyau avec la protection antiretour<br />
à la valve à aiguille du détendeur et<br />
le bloquer au moyen de l’écrou-raccord.<br />
� ATTENTION ! La flèche sur la protection<br />
anti-retour doit pointer dans le sens<br />
d’écoulement du <strong>CO2</strong> !<br />
4. Raccorder le compte-bulles<br />
• Ouvrir les deux colliers de fermeture et<br />
enlever le compte-bulles de l’attache.<br />
• Passer la sangle de retenue –le côté<br />
moelleux vers l’extérieur – dans les<br />
deux fentes de l’attache et fixer celle-ci<br />
sur la bouteille de <strong>CO2</strong>. �<br />
Autres possibilités de fixation : (1) sur la<br />
vitre de l’aquarium, au moyen des deux<br />
ventouses ; (2) au mur ou dans l’armoire<br />
sous l’aquarium, à l’aide de vis (non<br />
comprises). Pour ce faire, enlever les<br />
ventouses et les nipples.<br />
• Remplir le compte-bulles à trois quarts<br />
d’eau de distribution. �<br />
• Dévisser les écrous-raccords du comptebulles<br />
et les placer sur les extrémités du<br />
tuyau. Placer le tuyau qui vient du détendeur<br />
sur le raccord avec le tuyau comptebulles<br />
et le tuyau qui mène à l’aquarium<br />
sur l’autre raccord. Revisser fermement<br />
les écrous-raccords. �<br />
• Encliqueter le compte-bulles dans l’attache<br />
et refermer les colliers de fermeture.<br />
�<br />
5. Raccorder le diffuseur<br />
<strong>CO2</strong> Cyclo Turbo XL<br />
• Rincer le diffuseur Cyclo Turbo XL à l'eau<br />
courante chaude. Ne pas utiliser de produits<br />
de nettoyage ! �<br />
• Choisir dans l'aquarium un emplacement<br />
approprié pour le fixer.<br />
Cet emplacement ne doit pas être trop<br />
éclairé pour éviter la formation d'algues.<br />
• Insérer le tuyau d'alimentation en <strong>CO2</strong><br />
sur le raccord (humidifié au préalable !).<br />
�<br />
�<br />
• Raccorder la pompe au robinet de réglage.<br />
�<br />
Remarque : Le diffuseur Cyclo Turbo XL<br />
peut également être raccordé (sans<br />
pompe) à la sortie du filtre extérieur.<br />
Vous pouvez utiliser tous les tuyaux aux<br />
dimensions de qualité commerciale<br />
9/12 mm, 12/16 mm et 16/22 mm.<br />
• Fixer verticalement le diffuseur Cyclo<br />
dans l'aquarium à l’aide des ventouses, à<br />
5 cm au moins au-dessous de la surface<br />
de l'eau. �<br />
�<br />
6. Attacher le tuyau de <strong>CO2</strong><br />
• Le tuyau de <strong>CO2</strong> peut être posé et attaché<br />
de manière impeccable et fiable à l’aide<br />
des attaches prévues à cet effet. �<br />
Votre installation de fumure <strong>CO2</strong><br />
<strong>Exclusive</strong> est maintenant en<br />
ordre de marche.<br />
Réglage de la quantité de <strong>CO2</strong><br />
(nombre de bulles)<br />
7. La bonne quantité de <strong>CO2</strong><br />
Pour une croissance superbe des plantes, DENNERLE recommande un taux<br />
de <strong>CO2</strong> dans l’aquarium compris entre 15 et 30 mg/l, les valeurs idéales<br />
se situant entre 20 et 25 mg/l. Le nombre de bulles par minute nécessaire<br />
pour obtenir ce taux de <strong>CO2</strong> dépend d’une multitude de facteurs<br />
(végétation, mouvements de l’eau, rapport surface/volume, etc.). C’est<br />
pourquoi il faut déterminer la quantité de <strong>CO2</strong> à apporter individuellement<br />
pour chaque aquarium.<br />
8. Régler le nombre de bulles<br />
Règle de base : commencer avec environ 10 bulles par minute par 100 litres<br />
d’eau dans l’aquarium ; autrement dit, pour un aquarium de 200 litres p. ex.,<br />
avec 2 x 10 = 20 bulles par minute.<br />
Augmentez toujours l’approvisionnement en <strong>CO2</strong> par petits paliers et sur plusieurs<br />
jours, jusqu’à ce que le taux de <strong>CO2</strong> souhaité soit atteint. N.B.: plus les<br />
remous sont forts à la surface de l’eau (p. ex. en raison de filtres, d’une aération<br />
supplémentaire), plus l’aquarium expulse à nouveau le <strong>CO2</strong> apporté.<br />
�<br />
�<br />
-<br />
+<br />
• Ouvrir lentement la valve de la bouteille en<br />
tournant le volant en sens contraire des aiguilles<br />
d’une montre. Ouvrir la valve jusqu'à la<br />
butée, puis la refermer d'un 1/2 tour. � A<br />
présent, le manomètre pour la pression de la<br />
bouteille indique env. 60 bars (à 20 °C).<br />
• Ouvrir lentement (et dans un premier temps<br />
très légèrement) la valve à aiguille jusqu’à ce<br />
que l’ouverture du compte-bulles laisse<br />
s'échapper les premières bulles.<br />
• Réglage du nombre de bulles souhaité sur la<br />
valve à aiguille :<br />
- rotation dans le sens des aiguilles d’une<br />
montre : augmentation du nombre de bulles<br />
- rotation dans le sens contraire des aiguilles<br />
d’une montre : diminution du nombre de bulles<br />
�<br />
Veuillez noter : le nombre de bulles réagit avec un temps de retard aux modifications<br />
du réglage de la valve à aiguille. Réglez par conséquent le nombre<br />
de bulles avec précaution.<br />
• Contrôler fréquemment le nombre de bulles au cours des premiers jours<br />
et procéder éventuellement à un réglage complémentaire.<br />
Ultérieurement, il suffit généralement de contrôler le nombre de bulles<br />
une fois par semaine.<br />
• Information utile : les bulles de <strong>CO2</strong> produites par le compte-bulles <strong>CO2</strong><br />
Exact ont un poids moyen de 0,125 mg et un volume de 0,063 ml. Une<br />
production de 10 bulles par minute correspond donc à une adjonction de<br />
<strong>CO2</strong> d’env. 1,8 g ou 0,9 litres par jour.<br />
9. Régler le diffuseur Cyclo Turbo XL<br />
Mettre la pompe en service<br />
• Relier le cordon d'alimentation au secteur. Respecter les prescriptions de<br />
sécurité (voir ci-dessous).<br />
Régler le robinet de réglage<br />
Le robinet de réglage amène une partie de l'eau sortant du filtre vers la chambre<br />
de turbulence, pour assurer la dissolution du <strong>CO2</strong>. Le reste de l'eau coule<br />
à travers la buse de d'écoulement de l'eau directement dans l'aquarium.<br />
A<br />
• Position A : l'eau ne traverse pas la<br />
chambre de turbulence.<br />
B<br />
• Position B : 50 % de l'eau traverse<br />
le diffuseur Cyclo, 50 % s'écoule<br />
dans l'aquarium.<br />
C<br />
• Position C : toute l'eau traverse la<br />
chambre de turbulence du Cyclo.<br />
Le robinet de réglage doit être positionné de telle sorte que le débit d'eau à<br />
travers la chambre de turbulence est aussi fort que possible et que les bulles<br />
de <strong>CO2</strong> ne sont pas entraînées vers le bas, mais remontent lentement.<br />
Régler l’évacuation des mauvais gaz<br />
Les mauvais gaz sont évacués régulièrement et automatiquement grâce au<br />
couvercle spécialement conçu du diffuseur Cyclo. A cet effet, le couvercle peut<br />
être légèrement tourné :<br />
�<br />
vers la butée de gauche (rotation dans le<br />
sens des aiguilles d’une montre), l'évacuation<br />
des mauvais gaz est ouverte au maximum,<br />
ce qui est reconnaissable aux grosses<br />
bulles qui s'en échappent. Plus on tourne<br />
dans le sens contraire des aiguilles d’une<br />
montre, plus les bulles rapetissent. Si la rotation<br />
se poursuit jusqu'à la butée de droite,<br />
l'évacuation des mauvais gaz est fermée.<br />
Orientez-vous d’après le symbole correspondant<br />
sur le couvercle. �<br />
L'évacuation des mauvais gaz doit être réglée de telle sorte que les mauvais<br />
gaz sont régulièrement évacués, mais que le <strong>CO2</strong> résiduel présent dans la tête<br />
de la chambre de turbulence dispose d'un maximum de temps pour se<br />
dissoudre. À cet effet, il faut toujours commencer par la position "grosses<br />
bulles". Si de trop nombreuses bulles s'échappent à travers l'évacuation des<br />
mauvais gaz, tourner le couvercle légèrement dans la direction "petites<br />
bulles".<br />
10 11<br />
�
10. Contrôle facile avec le test <strong>CO2</strong> longue durée Correct<br />
Le test <strong>CO2</strong> longue durée Correct permet le contrôle permanent et précis du<br />
taux de <strong>CO2</strong> dans l’aquarium.<br />
Selon le taux de <strong>CO2</strong>, l’indicateur spécial <strong>CO2</strong> réagit par un changement de<br />
couleur : du • bleu = trop peu de <strong>CO2</strong> au • jaune = trop de <strong>CO2</strong>, en passant<br />
par le • vert = <strong>CO2</strong> optimal. L’échelle colorimétrique permet de lire directement<br />
en milligrammes par litre le taux de <strong>CO2</strong> dans l’aquarium.<br />
Grâce à l’indicateur spécial <strong>CO2</strong> développé par DENNERLE, le taux de <strong>CO2</strong> indiqué<br />
par le test <strong>CO2</strong> est toujours fiable. La présence d’autres acides<br />
(p. ex. humiques) dans l’eau de l’aquarium et les variations de la dureté carbonatée<br />
par durcissement, évaporation ou changement d’eau n’ont aucune<br />
influence.<br />
Explications<br />
�<br />
�<br />
�<br />
�<br />
�<br />
�<br />
�<br />
�<br />
�<br />
�<br />
�<br />
�<br />
� Partie inférieure du récipient de test<br />
� Partie supérieure du récipient de test<br />
� Cône de réflexion<br />
� Joints toriques d’étanchéité<br />
� Clip de retenue<br />
� Attache<br />
� Ventouse Longlife<br />
� Indicateur spécial <strong>CO2</strong><br />
� Échelle colorimétrique<br />
• Enlever le récipient de test du clip de maintien.<br />
Retirer la partie supérieure du récipient.<br />
�<br />
• Prendre une ampoule contenant l’indicateur<br />
spécial <strong>CO2</strong> et s’assurer qu’il n’y a pas de<br />
liquide indicateur dans le col de l’ampoule !<br />
Sinon, faire descendre l’indicateur en<br />
secouant l’ampoule (comme avec un thermomètre<br />
médical). Ouvrir l’ampoule en<br />
tournant le collier de fermeture. �<br />
• Verser tout le contenu de l’ampoule dans la<br />
partie supérieure du récipient de test. �<br />
21<br />
22<br />
23<br />
• Placer la partie inférieure du boîtier, y<br />
compris le cône réflecteur, dans la partie<br />
supérieure. Veiller à la bonne position<br />
des joints toriques d’étanchéité !<br />
21<br />
• Faire tourner avec précaution le récipient<br />
de test et le placer dans le clip de<br />
maintien. 22<br />
• A l’aide de la ventouse, fixer le test <strong>CO2</strong><br />
longue durée en position verticale dans<br />
l’aquarium, à un endroit bien visible<br />
avec un léger courant d’eau. 23<br />
24<br />
• Coller l’échelle colorimétrique sur la<br />
face extérieure de la vitre de l’aquarium.<br />
24<br />
Important ! Comme le <strong>CO2</strong> a besoin<br />
d’un certain temps pour diffuser jusque<br />
dans l’indicateur, l’affichage couleur<br />
réagit toujours avec quelques heures<br />
de retard aux changements du taux de <strong>CO2</strong>. Il convient donc d’augmenter<br />
toujours la quantité de <strong>CO2</strong> à ajouter par petits paliers et sur<br />
plusieurs jours, jusqu’à ce que le taux de <strong>CO2</strong> optimal soit atteint.<br />
11. Utilisation comme test pH longue durée<br />
Dans l’aquarium, le pH dépend principalement de la dureté carbonatée<br />
et du taux de <strong>CO2</strong>, ce dernier se dissolvant dans l’eau partiellement<br />
sous forme de gaz carbonique. Sous réserve que l’eau ne contienne<br />
pas d’autres substances qui influencent fortement le pH (p. ex. de grandes<br />
quantités d’acides humiques ou de nitrates, des préparations pour<br />
augmenter ou diminuer le pH, etc.), le test <strong>CO2</strong> longue durée de<br />
DENNERLE permet aussi de surveiller le pH de l’aquarium.<br />
Voici comment procéder :<br />
• mesurer la dureté carbonatée de l’eau de<br />
25<br />
l’aquarium (tests disponibles en magasin<br />
spécialisé) ;<br />
• coller l’échelle colorimétrique correspondante<br />
sur la face extérieure de la vitre de<br />
l’aquarium. 25 L’échelle colorimétrique<br />
permet alors de lire directement le pH de<br />
l’eau de l’aquarium.<br />
Mesurer régulièrement la dureté carbonatée et toujours utiliser l’échelle<br />
colorimétrique correspondante.<br />
12. Pour ceux qui veulent en savoir encore davantage :<br />
voici comment déterminer également le taux de <strong>CO2</strong> dans<br />
l’aquarium<br />
Comme le taux de <strong>CO2</strong>, la dureté carbonatée et le pH sont liés d’une<br />
certaine manière, il est possible de calculer le taux de <strong>CO2</strong> dans l’eau.<br />
Voici comment procéder :<br />
• Mesurez la dureté carbonatée de l’eau de votre aquarium.<br />
• Consultez le tableau pour connaître le pH adapté au taux de <strong>CO2</strong><br />
souhaité. Vous devriez régler ce pH +/- 0,1 en choisissant le nombre<br />
de bulles adapté.<br />
Exemple : dureté carbonatée 4 °d, pH recommandé 6,8 +/-0,1.<br />
trop de <strong>CO2</strong> <strong>CO2</strong> correct<br />
pH-Wert<br />
trop peu de <strong>CO2</strong><br />
KH 6,3 6,4 6,5 6,6 6,7 6,8 6,9 7,0 7,1 7,2 7,3 7,4 7,5<br />
2 32 25 20 16 13 10 8 6 5 4 3 3 2<br />
3 48 38 30 24 19 15 12 10 8 6 5 4 3<br />
4 64 51 40 32 25 20 16 13 10 7 6 5 4<br />
5 80 63 50 40 32 25 20 16 13 10 8 6 5<br />
6 96 76 60 48 38 30 24 19 15 12 10 8 6<br />
7 111 89 70 56 44 35 28 22 18 14 11 9 7<br />
8 127 101 80 64 51 40 32 25 20 16 13 10 8<br />
9 143 114 90 72 57 45 36 29 23 18 14 11 9<br />
10 159 126 100 80 63 50 40 32 25 20 16 13 10<br />
11 175 139 111 88 70 55 44 35 28 22 18 14 11<br />
12 191 152 121 96 76 60 48 38 30 24 19 15 12<br />
13 207 164 131 104 82 65 52 41 33 26 21 16 13<br />
14 223 177 141 112 89 70 56 44 35 28 22 18 14<br />
13. Fonctionnement du diffuseur <strong>CO2</strong> Cyclo Turbo XL<br />
Le <strong>CO2</strong> sort à la base du Cyclo au niveau de l'ouverture du tuyau de <strong>CO2</strong>. Les<br />
bulles remontent et s'accumulent sous les différents paliers de l'insert Turbo.<br />
L'eau s'écoule dans un mouvement tourbillonnant vers le bas, le long des bulles<br />
de <strong>CO2</strong> ainsi 'retenues'. Ce principe de contre-courant permet une dissolution<br />
particulièrement rapide et efficace du <strong>CO2</strong>. Abb.: Cyclo in Funktion<br />
Simultanément, les gaz dissous naturellement dans l'eau de l'aquarium<br />
pénètrent dans les bulles de <strong>CO2</strong>. Ces gaz appelés "mauvais gaz" sont la raison<br />
pour laquelle les bulles diminuent en montant, mais sans se dissoudre<br />
totalement. Lorsque les bulles atteignent la tête de la chambre de turbulence<br />
du Cyclo, elles sont essentiellement composées<br />
de mauvais gaz et ne contiennent<br />
presque plus de <strong>CO2</strong>. C'est là qu'elles sont<br />
aspirées par la buse de pulvérisation et<br />
divisées en milliers de petites bulles. Les derniers<br />
résidus de <strong>CO2</strong> sont alors dissous, avant<br />
que les mauvais gaz ne soient éliminés par<br />
l'évacuation des mauvais gaz.<br />
Cyclo Turbo XL permet d'alimenter, pour des<br />
besoins en <strong>CO2</strong> normaux, des aquariums jusqu'à<br />
5.000 litres. Ses performances peuvent<br />
être sensiblement augmentées, pour<br />
convenir à chaque aquarium. À cet effet, il<br />
suffit de raccorder la rallonge (réf. 1588) et<br />
l'insert Turbo (réf. 1580).<br />
Entretien et maintenance<br />
14. Remplacement de la bouteille <strong>CO2</strong><br />
• Retirer le couvercle de protection.<br />
• Laisser évacuer la pression résiduelle éventuelle du détendeur en<br />
ouvrant la valve à aiguille. Fermer ensuite la valve à aiguille.<br />
Attention : ne serrer que légèrement !<br />
• Dévisser le détendeur de la bouteille <strong>CO2</strong> et le visser sur une nouvelle bouteille<br />
<strong>CO2</strong>. Régler à nouveau le nombre de bulles.<br />
ATTENTION : le remplissage des bouteilles de <strong>CO2</strong> rechargeables n'est permis<br />
que par des stations de remplissage de <strong>CO2</strong> agréées !<br />
Consignes particulières : la valve à aiguille ne sert qu'au réglage précis du<br />
nombre de bulles. Pour interrompre l'alimentation en <strong>CO2</strong> pour une longue<br />
durée, toujours fermer la valve de la bouteille !<br />
En cas de non-utilisation de longue durée, dévisser le détendeur.<br />
15. Régler la pression de service sur le détendeur<br />
La pression de service du détendeur <strong>Exclusive</strong> est réglée en usine à environ 1<br />
bar. Au cours des premières semaines suivant la mise en service, la pression<br />
de service peut varier légèrement en raison du tassement des joints.<br />
Réglage de la pression de service :<br />
26<br />
• Retirer le couvercle de protection<br />
• Augmentation : tourner la vis de réglage de<br />
la pression de service dans le sens contrai-<br />
+ - re des aiguilles d’une montre, à l’aide d’un<br />
tournevis approprié 26<br />
Réduction : tourner la vis de réglage de la<br />
pression de service dans le sens des aiguilles<br />
d’une montre<br />
16. Contrôler la protection anti-retour spéciale <strong>CO2</strong><br />
La protection anti-retour protège votre détendeur très précieux de la corrosion<br />
par reflux d’eau. Elle assume sa fonction à très long terme et de manière fiable.<br />
Mais au fil du temps, des particules de poussière, de peinture et de métal<br />
peuvent se déposer sur les surfaces normalement étanches ; il est donc<br />
recommandé de contrôler la protection anti-retour au moins tous les deux ans<br />
et de la remplacer éventuellement.<br />
Contrôle :<br />
• Refermer la valve à aiguille sur le détendeur <strong>CO2</strong>.<br />
• Après 24 heures, dévisser l’écrou-raccord du côté de la protection antiretour<br />
dirigé vers le détendeur.<br />
• Retirer le tuyau de <strong>CO2</strong> et vérifier si de l’eau y a pénétré. Si c’est le cas,<br />
remplacer la protection anti-retour. Sinon, raccorder à nouveau le tuyau à<br />
la protection anti-retour.<br />
• Régler à nouveau le nombre de bulles.<br />
Ne vous inquiétez pas ! Normalement, un aquarium qui fonctionne bien supporte<br />
sans problème 24 heures sans apport de <strong>CO2</strong>.<br />
Remarque importante : utilisez exclusivement des protections anti-retour<br />
conçues pour l’utilisation avec du <strong>CO2</strong>, p. ex. la protection anti-retour<br />
spéciale <strong>CO2</strong> de DENNERLE. Les protections anti-retour à air normales<br />
peuvent être fragilisées en très peu de temps par le <strong>CO2</strong>, le plus souvent de<br />
manière inaperçue, et présenter alors des fuites.<br />
17. Remplacer l’indicateur spécial <strong>CO2</strong><br />
Comme la plupart des colorants, l’indicateur spécial <strong>CO2</strong> connaît un certain<br />
vieillissement dû à des processus photochimiques. Afin de toujours garantir<br />
une réaction de couleur rapide et exacte, nous recommandons donc de remplir<br />
le récipient de test toutes les quatre semaines avec un nouvel indicateur<br />
spécial <strong>CO2</strong>.<br />
12 13
• Pour cela, ouvrir le récipient de test et jeter le vieil indicateur (dans les<br />
égouts). Rincer le récipient de test à l’eau courante et l’essuyer avec un<br />
torchon ou un moyen similaire avant d’y verser le nouvel indicateur.<br />
18. Nettoyer le test <strong>CO2</strong> longue durée<br />
Nettoyer le test à l’eau chaude, à l’aide d’une éponge douce. Ne pas utiliser<br />
de produits de nettoyage ! Le récipient de test peut être désassemblé pour<br />
le nettoyage. Enduire éventuellement (légèrement !) de vaseline (disponible<br />
en pharmacie et droguerie) les deux joints toriques d’étanchéité avant le<br />
montage.<br />
ATTENTION ! Ne pas utiliser d’autres lubrifiants parce qu’ils risquent de fausser<br />
l’indication de couleur.<br />
19. Nettoyer le diffuseur Cyclo Turbo XL<br />
Nettoyer le diffuseur à l’eau chaude, à l’aide d’une éponge douce. Ne pas<br />
utiliser de produits de nettoyage. Le Cyclo peut être entièrement désassemblé<br />
pour le nettoyage. Les éléments internes peuvent être nettoyés à l'aide<br />
d'un goupillon doux.<br />
20. Nettoyer la pompe<br />
27<br />
28<br />
• Retirer le câble d'alimentation du secteur.<br />
Retirer la pompe du Cyclo. Retirer le<br />
panier d'aspiration. Ouvrir le raccord à<br />
baïonnette et retirer le boîtier de la<br />
pompe. 27<br />
• Retirer la turbine et l'axe de la pompe.<br />
28<br />
• Rincer toutes les pièces avec une brosse<br />
appropriée sous l'eau courante.<br />
Remonter en suivant l'ordre inverse.<br />
21. Remarque importante concernant le tuyau de <strong>CO2</strong><br />
Le tuyau spécial <strong>CO2</strong> Softflex est auto-<br />
29<br />
étanchéifiant et auto-bloquant, ce qui lui<br />
permet d’offrir un maximum de sécurité.<br />
Pour l’enlever, toujours déboîter le tuyau,<br />
ne JAMAIS tirer dessus ! 29<br />
CONSEIL : Les tuyaux qui ne sont pas étanches au <strong>CO2</strong> ("tuyaux à air")<br />
peuvent faire perdre quotidiennement de grandes quantités de <strong>CO2</strong>.<br />
Utiliser donc toujours des tuyaux appropriés au <strong>CO2</strong>, par exemple le tuyau<br />
DENNERLE <strong>CO2</strong> Special Softflex.<br />
Que faire si... – Dépannage<br />
Défaut Cause Dépannage<br />
Un léger sifflement se<br />
fait entendre au niveau<br />
du raccordement vissé<br />
du détendeur et de la<br />
bouteille de <strong>CO2</strong>.<br />
Plus de bulles au<br />
niveau du compte-bulles<br />
Une grande bulle de<br />
gaz se forme dans la<br />
partie supérieure de la<br />
chambre de turbulence.<br />
Un trop grand nombre<br />
de bulles s'échappent<br />
de l'évacuation des<br />
mauvais gaz.<br />
Le détendeur est vissé<br />
en biais ou n'est pas<br />
suffisamment serré.<br />
Le joint est défectueux.<br />
La bouteille de <strong>CO2</strong> est<br />
vide.<br />
La valve à aiguille est<br />
fermée.<br />
Le raccord du tuyau<br />
fuit.<br />
La pression de service<br />
est trop basse.<br />
Le réglage de l'évacuation<br />
des mauvais<br />
gaz est trop petit.<br />
L'ouverture d'aspiration<br />
de la buse de pulvérisation<br />
ou l'évacuation<br />
des mauvais gaz<br />
est bouchée.<br />
Le réglage de l'évacuation<br />
des mauvais<br />
gaz est trop grand.<br />
L'alimentation en <strong>CO2</strong><br />
est trop forte.<br />
Trop peu d'eau est<br />
amenée dans la chambre<br />
de turbulence.<br />
Dévisser le détendeur<br />
et le revisser bien<br />
droit. Resserrer l'écrouraccord.<br />
Mettre en place un<br />
nouveau joint. Vérifier<br />
la position du joint et<br />
la propreté des surfaces<br />
étanches.<br />
Remplacer la bouteille<br />
de <strong>CO2</strong>.<br />
Ouvrir la valve à aiguille.<br />
Vérifier le raccord de<br />
tuyau et le remplacer,<br />
le cas échéant.<br />
Régler la pression de<br />
service à environ 1 bar.<br />
Faire tourner légèrement<br />
le couvercle (2)<br />
dans la direction "grosses<br />
bulles".<br />
Rincer le Cyclo et le<br />
panier d'aspiration sous<br />
l'eau courante.<br />
Faire tourner légèrement<br />
le couvercle (2)<br />
dans la direction "petites<br />
bulles".<br />
Réduire légèrement<br />
l'alimentation en <strong>CO2</strong>.<br />
Augmenter le débit<br />
d'eau en réglant le<br />
robinet de réglage.<br />
Phases d’extension<br />
Phase 1 : L´Electrovanne <strong>CO2</strong> Comfort de DENNERLE<br />
commandée par une minuterie coupe l’apport de <strong>CO2</strong> durant<br />
la nuit où les plantes n’en consomment pas. Ainsi, vous<br />
économisez le <strong>CO2</strong> si précieux.<br />
Phase 2 : Le Contrôleur de pH 588 Digital Comfort de<br />
DENNERLE mesure en permanence le pH dans l’aquarium<br />
et assure un réglage précis et entièrement automatique<br />
de l’adjonction de <strong>CO2</strong> au moyen de l’Electrovanne<br />
<strong>CO2</strong> Comfort.<br />
Consignes particulières<br />
Indicateur spécial <strong>CO2</strong><br />
• Tenir le test <strong>CO2</strong> longue durée et l’indicateur hors de portée des enfants.<br />
• L’indicateur spécial <strong>CO2</strong> n’est pas nocif et ne contient pas de<br />
solvants chimiques. Éviter néanmoins tout contact prolongé avec la<br />
peau et les yeux.<br />
• L’indicateur peut éventuellement tacher les vêtements, les tapis, le bois,<br />
etc. Éviter donc tout contact avec ces matières.<br />
• Le liquide indicateur qui s’écoule par mégarde dans l’eau de<br />
l’aquarium est sans danger pour les poissons, plantes et autres occupants.<br />
• L’indicateur spécial <strong>CO2</strong> est emballé sous atmosphère protégée. Le<br />
niveau de remplissage est lié au processus technique.<br />
• Protéger l’indicateur spécial <strong>CO2</strong> du soleil, de la chaleur et du gel.<br />
Toujours stocker les ampoules à l’abri de la lumière.<br />
Pompe<br />
• La pompe ne doit pas tourner à sec !<br />
• Alimenter uniquement en courant alternatif<br />
230 V / 50 Hz.<br />
• Utiliser uniquement à l'intérieur.<br />
• Toujours retirer la prise secteur avant de mett<br />
re les mains dans l'aquarium.<br />
• Le cordon d'alimentation de la pompe ne peut pas être remplacé. En cas<br />
de détérioration du cordon, ne plus utiliser l'appareil.<br />
Caractéristiques techniques<br />
Bouteille de <strong>CO2</strong> rechargeable<br />
• N° UN 1013, Cl. 2, Code : 2A, GGVS/ADR/RID/GGVE/EINECS 2046969<br />
• Contenance : max. 2000 g <strong>CO2</strong> ; Poids à vide de la bouteille (sans cage):<br />
voir estampille de la bouteille ; pression à température ambiante : env. 60<br />
bar ; Pression d'essai : 250 bar ; Valve de bouteille avec soupape de sécurité<br />
; Filetage de raccordement W21,8 x 1/14"<br />
• Estampille TÜV : voir empreinte sur la bouteille. Les bouteilles de <strong>CO2</strong><br />
rechargeables doivent être contrôlées régulièrement par des organismes<br />
agréés, selon les pays. Respecter les prescriptions nationales ! En<br />
Allemagne, les bouteilles de <strong>CO2</strong> doivent être contrôlées tous les 10 ans<br />
par le TÜV.<br />
• Remarque importante : en cas de température ou de pression excessive,<br />
la sécurité anti-éclatement se rompt au niveau de la valve de la bouteille<br />
et du gaz <strong>CO2</strong> peut s'échapper. Ne faire réparer que par des stations de<br />
remplissage de <strong>CO2</strong> agréées - Ne PAS réparer vous-même !<br />
Détendeur <strong>Exclusive</strong> pour Classic-Line<br />
Manomètre pour pression de bouteille : 0 -250 bar. Manomètre pour pression<br />
de service : 0 -6 bar.<br />
Pression de service réglable. Raccordement pour tuyau 4/6 mm. Valve à<br />
aiguille de précision avec aiguille inox et filetage micrométrique. Valve de surpression<br />
à fermeture automatique.<br />
Durée de garantie : 3 ans à partir de la date d'achat (sauf les pièces<br />
d'usure).<br />
Pièces de rechange et accessoires utiles<br />
(disponibles dans les magasins spécialisés)<br />
3031 Bouteille de <strong>CO2</strong> rechargeable de <strong>2.000</strong> g avec cage<br />
3025 Détendeur <strong>CO2</strong> <strong>Exclusive</strong> Classic-Line<br />
3028 Joint pour détendeur Classic-Line, 2 pièces<br />
1580 Insert Turbo<br />
1588 Rallonge Cyclo<br />
3043 Ventouse Longlife, verte, 2 pièces<br />
3042 Ventouse Longlife, noire, 2 pièces<br />
1484 Spray détecteur de fuites<br />
3061 Tuyau spécial <strong>CO2</strong> Softflex, 5 m<br />
3050 Compte-bulles de <strong>CO2</strong> Exact<br />
3053 Protection anti-retour spéciale <strong>CO2</strong><br />
3041 Indicateur spécial <strong>CO2</strong>, 5 ampoules<br />
Pour en savoir plus sur la gamme de plantes et d’accessoires d’aquarium de<br />
DENNERLE, demandez conseil à votre revendeur spécialisé ou commandez<br />
nos conseils professionnels gratuits.<br />
Vous pouvez obtenir les conseils professionnels de DENNERLE chez<br />
votre revendeur spécialisé et sur Internet sous www.dennerle.de<br />
(en français également).<br />
Distribution : DENNERLE GmbH, D-66957 Vinningen<br />
Service après-vente : DENNERLE GmbH, D-66981 Münchweiler<br />
www.dennerle.de<br />
14 15
Classic-Line<br />
<strong>CO2</strong> fertilizer system <strong>Exclusive</strong> <strong>2.000</strong> g<br />
Complete set with reusable <strong>2.000</strong> g <strong>CO2</strong> cylinder.<br />
For <strong>CO2</strong> fertilization of aquaria up to 5.000 litres.<br />
- Instructions for use: please read carefully and keep in a safe place. -<br />
GB<br />
Congratulations on purchasing this high-quality <strong>CO2</strong> fertilizer system from DENNERLE.<br />
If used properly and treated with due care, this set will provide a simple, convenient and reliable means of supplying your aquarium with <strong>CO2</strong>, the most important<br />
fertilizer for aquarium plants - thus ensuring magnificent plant growth. <strong>CO2</strong> also serves to establish an ideal pH value for fish and plants, in the slightly<br />
acidic to neutral range. DENNERLE wishes you hours of fun with your aquarium!<br />
Safety rules for carbon dioxide (<strong>CO2</strong>) cylinders<br />
• Use only to supply <strong>CO2</strong> to aquaria.<br />
• <strong>CO2</strong> cylinders are highly pressurized. The following instructions should therefore be observed:<br />
• Do not throw <strong>CO2</strong> cylinders. Store in cool conditions. Protect from sunlight and temperatures of over 50 °C.<br />
• Use only when fitted with suitable pressure reducers for reusable <strong>CO2</strong> cylinders with W21.8 x 1/14" connecting thread, e.g. DENNERLE pressure<br />
reducer models Profi 2000, Compact, Professional and <strong>Exclusive</strong>.<br />
• Cylinders must always be in an upright position when supplying <strong>CO2</strong>. Secure cylinders to prevent them from falling over.<br />
• Do not open <strong>CO2</strong> cylinders by force.<br />
• Do not empty <strong>CO2</strong> cylinders completely. Refill only at authorised <strong>CO2</strong> filling stations. Please note: Tare weight without cage. Remove cage before<br />
refilling.<br />
• <strong>CO2</strong> gas is heavier than air and has a suffocating effect in high concentrations.<br />
• Therefore, avoid breathing in <strong>CO2</strong> gas.<br />
• Keep out of reach of children.<br />
• Store <strong>CO2</strong> cylinders in well ventilated areas and not in cellars.<br />
• Please note the following when transporting individual cylinders in vehicles: Secure to prevent from sliding and rolling around, as the valve may<br />
otherwise incur damage and <strong>CO2</strong> gas may escape. Ensure adequate ventilation by means of an open window, by switching on the blower, etc.<br />
How the <strong>CO2</strong> fertilizer system<br />
<strong>Exclusive</strong> works<br />
The <strong>CO2</strong> pressure reducer <strong>Exclusive</strong> reduces the cylinder pressure to an<br />
operating pressure which the user can set in line with practical requirements.<br />
The precision-mechanism needle valve enables highly exact and<br />
convenient <strong>CO2</strong> dosage. <strong>CO2</strong> dosage is controlled with the <strong>CO2</strong> bubble<br />
counter Exact.<br />
The <strong>CO2</strong> is transported to the aquarium via the special leak-proof<br />
Softflex <strong>CO2</strong> hose. The <strong>CO2</strong> Cyclo Turbo XL ensures highly effective<br />
dissolving of the <strong>CO2</strong> in the aquarium water. A special <strong>CO2</strong> check valve<br />
protects the valuable pressure reducer from any backflowing water. The<br />
<strong>CO2</strong> content in the aquarium water can be read directly by means of the<br />
<strong>CO2</strong> long-term test Correct.<br />
The reusable <strong>2.000</strong> g <strong>CO2</strong> cylinder is particularly practical, supplying<br />
even large aquaria with <strong>CO2</strong> over a long period before it needs replacing.<br />
�<br />
Overview of the<br />
<strong>CO2</strong> fertilizer system <strong>Exclusive</strong><br />
�<br />
�<br />
�<br />
�<br />
� Reusable <strong>2.000</strong> g <strong>CO2</strong> cylinder with cage (valve protection cage)<br />
� <strong>CO2</strong> pressure reducer <strong>Exclusive</strong><br />
� Special <strong>CO2</strong> check valve<br />
� <strong>CO2</strong> bubble counter Exact<br />
� Special <strong>CO2</strong> Softflex hose, 5 m<br />
� <strong>CO2</strong> diffusor Cyclo Turbo XL<br />
� Motor pump � <strong>CO2</strong> long-term test Correct<br />
�<br />
�<br />
�<br />
<strong>CO2</strong> Pressure Reducer <strong>Exclusive</strong><br />
� Cylinder pressure manometre<br />
� Operating pressure valve (under protective cap)<br />
� Operating pressure manometre<br />
� Precision-mechanism needle valve<br />
<strong>CO2</strong> Cyclo Turbo XL<br />
� Hose connector for <strong>CO2</strong> supply<br />
� Lid with waste gas vent<br />
� Head of the whirl chamber<br />
� Water outlet vent<br />
� Turbo attachment<br />
� Whirl chamber extension module<br />
� Sealing plug<br />
� Grid<br />
� Longlife suction clip<br />
� Water flow separator<br />
� Hose connector for pump<br />
� Control tap<br />
� Atomizer jet<br />
<strong>CO2</strong> Bubble Counter<br />
� Mounting bracket<br />
� Longlife suction clip<br />
� Bubble counter<br />
� <strong>CO2</strong> supply from<br />
pressure reducer<br />
� <strong>CO2</strong> outlet to aquarium<br />
� Reflector bracket<br />
� Strap<br />
Set-up and connection<br />
�<br />
�<br />
�<br />
13<br />
12<br />
11<br />
10<br />
�<br />
�<br />
�<br />
�<br />
�<br />
�<br />
�<br />
�<br />
�<br />
1. Connect the Pressure Reducer<br />
• Close the needle valve by turning in anticlockwise<br />
direction (if it is not yet closed).<br />
IMPORTANT: Tighten only gently!<br />
�<br />
• Fit pressure reducer to <strong>CO2</strong> cylinder with<br />
coupling ring. Tighten coupling ring with<br />
30 mm spanner. � Ensure that the<br />
washer is fitted correctly and that the<br />
sealing surfaces are clean!<br />
IMPORTANT: Cylinders must always be in<br />
an upright position when supplying <strong>CO2</strong>.<br />
Secure cylinders to prevent them from<br />
falling over.<br />
2. Fit check valve in <strong>CO2</strong> hose<br />
• Using a strong pair of scissors, cut 2 pieces<br />
of 5 cm in length from the <strong>CO2</strong> hose,<br />
ensuring that the cut is straight. �<br />
• Unscrew both coupling rings from the<br />
<strong>CO2</strong> check valve.<br />
• Fit coupling rings to the ends of the<br />
�<br />
�<br />
�<br />
�<br />
�<br />
�<br />
�<br />
�<br />
hoses and slide hoses as far as they will<br />
go onto the hose connectors of the<br />
check valve. TIP: Wet hose connectors<br />
beforehand - it will then be easier to<br />
slide on the hoses.<br />
• Screw coupling rings tight. �<br />
3. Connect the <strong>CO2</strong> hose to the<br />
Pressure Reducer<br />
• Connect hose with check valve to the<br />
needle valve of the pressure reducer and<br />
secure with coupling ring. � IMPOR-<br />
TANT: The arrow on the check valve must<br />
point in the <strong>CO2</strong> flow direction!<br />
4. Connect the Bubble Counter<br />
• Open the two sealing tabs and remove<br />
bubble counter from mounting bracket.<br />
• Insert strap through the two slots on the<br />
mounting bracket with the soft side<br />
facing outwards and attach mounting<br />
bracket to <strong>CO2</strong> cylinder. �<br />
Other possible methods of attachment:<br />
(1) on the front pane of the aquarium<br />
by means of the two suction clips or (2)<br />
on the wall or in the base cabinet by<br />
means of screws (not included in scope<br />
of delivery). Remove the suction clips<br />
and nipples for this purpose.<br />
• Pour tap water into bubble counter until<br />
it is 3/4 full. �<br />
• Unscrew coupling rings from bubble<br />
counter and fit to the ends of the hoses.<br />
Slide the hose coming from the pressure<br />
reducer onto the hose connector for<br />
connection to the bubble counter and<br />
the hose leading to the aquarium onto<br />
the other hose connector. Retighten<br />
coupling rings. �<br />
• Click bubble counter into place on<br />
mounting bracket and close sealing<br />
tabs. �<br />
5. Connect <strong>CO2</strong> Cyclo Turbo XL<br />
• Rinse Cyclo Turbo XL with warm tap<br />
water. Do not use any cleaning agents!<br />
�<br />
• Choose a suitable point in the aquarium<br />
at which to attach the diffusor.<br />
The selected location should not be too<br />
exposed to light, in order to prevent<br />
algae formation.<br />
• Fit <strong>CO2</strong> supply hose to hose connector<br />
(wet connector beforehand!). �<br />
16 17<br />
�<br />
�<br />
�<br />
�<br />
�<br />
� � �<br />
�<br />
�<br />
�
�<br />
�<br />
• Connect the motor-driven pump to the<br />
control tap. �<br />
Note: It is also possible to connect the<br />
Cyclo Turbo XL (without pump) to the filter<br />
outlet of the external filter. Any<br />
hoses in standard sizes 9/12 mm,<br />
12/16 mm or 16/22 mm can be<br />
used.<br />
• Use the suction clips to secure the Cyclo<br />
in a vertical position in the aquarium, at<br />
least 5 cm below the water surface. �<br />
6. Install and secure the CO hose<br />
• The hose clips enable neat and secure<br />
installation of the <strong>CO2</strong> hose. �<br />
�<br />
Your <strong>CO2</strong> fertilizer system<br />
<strong>Exclusive</strong> is now ready for<br />
operation.<br />
The right amount of <strong>CO2</strong><br />
(number of bubbles)<br />
7. The right amount of <strong>CO2</strong><br />
For magnificent plant growth, DENNERLE recommends a <strong>CO2</strong> content in<br />
the aquarium of between 15 and 30 mg/l, between 20 and<br />
25 mg/l are ideal.<br />
The number of bubbles per minute required to achieve this level of <strong>CO2</strong><br />
depends on a variety of factors, such as the types of plants in the aquarium,<br />
motion of the water, surface area/volume ratio, etc. That’s why<br />
it is always necessary to determine the <strong>CO2</strong> amount for each aquarium<br />
individually.<br />
8. How to set the number of bubbles<br />
Rule of thumb for the basic setting: start with approx. 10 bubbles per<br />
minute per 100 l of aquarium water, i.e. for a 200-l aquarium, for<br />
example, use 2 x 10 = 20 bubbles per minute.<br />
Check the <strong>CO2</strong> supply and the <strong>CO2</strong> levels in the aquarium water regularly<br />
and adjust the <strong>CO2</strong> supply if necessary. If necessary, only ever<br />
increase the <strong>CO2</strong> level gradually over the course of several days! Please<br />
note: the more vigorous the surface of the water is set in motion (e.g.<br />
by filters, additional aeration), the more <strong>CO2</strong> will be expelled from the<br />
aquarium again.<br />
�<br />
�<br />
-<br />
+<br />
• Open cylinder valve slowly by turning the<br />
handwheel in anti-clockwise direction.<br />
Unscrew valve as far as it will go, then<br />
screw in again by one half-turn. � The<br />
cylinder pressure manometer will now<br />
indicate approx. 60 bar (at 20 °C).<br />
• Open needle valve slowly, initially only<br />
very slightly, until the first bubbles issue<br />
from the opening of the bubble counter.<br />
• Set the desired number of bubbles on<br />
the needle valve:<br />
- Turn in clockwise direction to increase<br />
the number of bubbles<br />
- Turn in anti-clockwise direction to<br />
reduce the number of bubbles. �<br />
Please note: There is always a certain delay before the number of bubbles<br />
changes in response to adjustment of the needle valve. The number<br />
of bubbles should thus be set with due care.<br />
• Check the number of bubbles regularly in the first few days, correcting<br />
as necessary. After this initial period it is generally sufficient<br />
to check the number of bubbles once a week.<br />
• Interesting facts: The <strong>CO2</strong> bubbles produced by the <strong>CO2</strong> bubble<br />
counter Exact have a mean weight of 0.125 mg and a volume of<br />
0.063 ml. 10 bubbles per minute thus correspond to a <strong>CO2</strong> supply<br />
of 1.8 g or 0.9 litres per day.<br />
9. Setting the Cyclo Turbo XL<br />
Install the motor pump<br />
• Connect mains plug to power supply. Observe safety rules (see<br />
below)!<br />
Set the control tap<br />
The control tap serves to channel part of the water coming from the filter<br />
into the whirl chamber for the purpose of dissolving <strong>CO2</strong> content.<br />
The remaining water flows through the water outlet vent directly into<br />
the aquarium.<br />
A<br />
• Setting A: No water is supplied to the<br />
whirl chamber.<br />
B<br />
• Setting B: 50 % of the water is supplied<br />
to the Cyclo, 50 % to the aquarium.<br />
C<br />
• Setting C: All the water is supplied to<br />
the Cyclo’s whirl chamber.<br />
The control tap should be set such as to attain the largest possible flow<br />
of water through the whirl chamber while at the same time ensuring<br />
that the <strong>CO2</strong> bubbles are not forced down but are able to rise slowly.<br />
Set the waste gas vent<br />
The waste gases are discharged regularly and automatically through the<br />
specially designed lid of the Cyclo. For this purpose, the lid can be turned<br />
slightly:<br />
�<br />
The left stop (when turned in clockwise<br />
direction), represents the maximum opening<br />
of the waste gas vent, as indicated by<br />
the large bubbles which issue here. The<br />
further the lid is turned in anti-clockwise<br />
direction, the smaller the bubbles become.<br />
At the right stop, the waste gas vent is closed.<br />
See the corresponding symbol on the<br />
lid. �<br />
The waste gas vent should be set such that the waste gases are discharged<br />
on a regular basis, while at the same time ensuring that residual<br />
<strong>CO2</strong> in the head of the whirl chamber has as much time as possible to<br />
dissolve. For this purpose, always begin in the setting for “large bubbles”.<br />
If too many bubbles are discharged through the waste gas vent,<br />
turn the lid slightly in the direction of “small bubbles”.<br />
10. <strong>CO2</strong> Long-Term Test Correct for simple control of <strong>CO2</strong><br />
content.<br />
The <strong>CO2</strong> long-term test Correct enables continuous, exact control of the<br />
<strong>CO2</strong> content in the aquarium.<br />
The colouring of the special <strong>CO2</strong> indicator varies according to the <strong>CO2</strong><br />
content: from • blue = not enough <strong>CO2</strong> through • green = ideal <strong>CO2</strong><br />
content to • yellow = too much <strong>CO2</strong>.<br />
The level of <strong>CO2</strong> in the aquarium can be read directly from the colour<br />
matching scale in milligrams per litre.<br />
The test shows the correct <strong>CO2</strong> content at all times by means of the<br />
special <strong>CO2</strong> indicator developed by DENNERLE. The test remains unaffected<br />
by any other acids in the aquarium water, e.g. humic acids, and<br />
any changes in carbonate hardness resulting from an increase in water<br />
hardness, evaporation or a change of water!<br />
What’s what<br />
�<br />
�<br />
�<br />
• Remove test container from clasp. Pull off<br />
top part of test container. �<br />
• Take an ampoule of special <strong>CO2</strong> indicator<br />
and ensure that there is no indicator in the<br />
neck of the ampoule! For this purpose,<br />
shake the indicator down to the bottom of<br />
the ampoule (in the same manner as a<br />
thermometer is shaken before taking<br />
someone’s temperature). Open ampoule by<br />
twisting off the sealing tab. �<br />
• Drip the entire contents of the ampoule into<br />
the top part of the test container. �<br />
21<br />
22<br />
23<br />
• Slot bottom part of housing including<br />
conical reflector into the top part.<br />
Check that the O-rings are fitted correctly!<br />
21<br />
• Turn test container carefully (ideally<br />
over a kitchen cloth, in case any indicator<br />
spills out) and insert container in<br />
clasp. 22<br />
• Use the suction clip to secure the <strong>CO2</strong><br />
long-term test in an upright position at<br />
a clearly visible point in the aquarium<br />
where a gentle flow of water prevails.<br />
23<br />
24<br />
• Stick the colour matching scale to the<br />
outside of the front pane. 24<br />
Please note. As the <strong>CO2</strong> takes some time<br />
to diffuse into the indicator, the colouring<br />
of the indicator always responds to changes<br />
in the <strong>CO2</strong> content after a delay of<br />
several hours. You should therefore always increase the supply of <strong>CO2</strong><br />
in small steps spread over several days until the ideal <strong>CO2</strong> content is<br />
attained.<br />
11. Use as a Long-Term pH Test<br />
The pH value in an aquarium is determined primarily by the carbonate<br />
hardness and the level of <strong>CO2</strong>, some of which forms carbonic acid when<br />
it dissolves in the water. Provided that there are no other substances in<br />
the water which will have a substantial influence on the pH level (e.g.<br />
major quantities of humic acids or nitrate, pH plus / pH minus preparations<br />
etc.), the DENNERLE <strong>CO2</strong> long term test can also be used to<br />
monitor the pH value in the aquarium.<br />
For this purpose, you must:<br />
• Measure the carbonate hardness of the<br />
25<br />
aquarium water (tests available from<br />
specialist retailers).<br />
• Stick an appropriate colour matching<br />
scale to the outside of the front pane.<br />
25<br />
The pH value of the aquarium water<br />
can now be read directly from the colour scale.<br />
Measure the carbonate hardness regularly and always use an appropriate<br />
colour scale.<br />
12. If you’re keen to know more: How to calculate the<br />
<strong>CO2</strong> content in the aquarium<br />
As certain correlations apply between <strong>CO2</strong> content, carbonate hardness<br />
(CH) and pH value, the <strong>CO2</strong> content in the water can be calculated as<br />
follows:<br />
18 19<br />
�<br />
�<br />
�<br />
�<br />
�<br />
�<br />
�<br />
� Bottom part of test container<br />
� Top part of test container<br />
� Conical reflector<br />
� O-ring<br />
� Clasp<br />
�<br />
�<br />
� Mounting bracket<br />
� Longlife suction clip<br />
� Special <strong>CO2</strong> indicator<br />
� Colour matching scale
• Measure the carbonate hardness of your aquarium water.<br />
• Read the pH value which corresponds to the desired <strong>CO2</strong> content<br />
from the table. You should set this pH value +/- 0.1 by adjusting<br />
the number of bubbles accordingly.<br />
Example: Carbonate hardness 4 °d, recommended pH 6.8 +/- 0.1.<br />
Too much <strong>CO2</strong> <strong>CO2</strong> correct Not enough <strong>CO2</strong><br />
pH value<br />
KH 6,3 6,4 6,5 6,6 6,7 6,8 6,9 7,0 7,1 7,2 7,3 7,4 7,5<br />
2 32 25 20 16 13 10 8 6 5 4 3 3 2<br />
3 48 38 30 24 19 15 12 10 8 6 5 4 3<br />
4 64 51 40 32 25 20 16 13 10 7 6 5 4<br />
5 80 63 50 40 32 25 20 16 13 10 8 6 5<br />
6 96 76 60 48 38 30 24 19 15 12 10 8 6<br />
7 111 89 70 56 44 35 28 22 18 14 11 9 7<br />
8 127 101 80 64 51 40 32 25 20 16 13 10 8<br />
9 143 114 90 72 57 45 36 29 23 18 14 11 9<br />
10 159 126 100 80 63 50 40 32 25 20 16 13 10<br />
11 175 139 111 88 70 55 44 35 28 22 18 14 11<br />
12 191 152 121 96 76 60 48 38 30 24 19 15 12<br />
13 207 164 131 104 82 65 52 41 33 26 21 16 13<br />
14 223 177 141 112 89 70 56 44 35 28 22 18 14<br />
13. How the <strong>CO2</strong> Cyclo Turbo XL works<br />
The <strong>CO2</strong> is released at the opening of the <strong>CO2</strong> hose which is located at the<br />
bottom of the Cyclo. From here the bubbles rise, collecting under the individual<br />
steps of the turbo attachment.<br />
The water whirls in a downward direction, past the <strong>CO2</strong> bubbles which are<br />
‘held back’ in this way. This counter-current principle dissolves the <strong>CO2</strong> extremely<br />
quickly and effectively.<br />
At the same time, other gases which are naturally dissolved in the aquarium<br />
water penetrate into the <strong>CO2</strong> bubbles. These so-called waste gases explain<br />
why the bubbles do not dissolve completely, despite becoming smaller as<br />
they rise in the aquarium water. By the time the bubbles reach the head of<br />
the Cyclo’s whirl chamber they already consist<br />
predominantly of waste gases and are<br />
virtually devoid of <strong>CO2</strong> content. Here they<br />
are drawn in by the atomizer jet and split<br />
into thousands of minute bubbles. This dissolves<br />
the final remnants of <strong>CO2</strong> before the<br />
waste gases are discharged through the specially<br />
designed waste gas vent.<br />
When normal <strong>CO2</strong> requirements apply, the<br />
Cyclo Turbo XL is able to supply aquaria<br />
of up to 5,000 litres. Its considerable capacity<br />
reserves enable individual adaptation to<br />
any aquarium. Extension pieces (order no.:<br />
1588) and turbo attachments (order no.<br />
1580) are simply connected at the bottom<br />
of the Cyclo for this purpose.<br />
Care and maintenance<br />
14. Replacing the <strong>CO2</strong> cylinder<br />
• Close cylinder valve.<br />
• Let off any residual pressure in the pressure reducer by opening the needle<br />
valve. Close needle valve. Caution: Tighten only gently!<br />
• Unscrew pressure reducer from <strong>CO2</strong> cylinder and screw onto refilled<br />
reusable <strong>CO2</strong> cylinder. Reset number of bubbles.<br />
IMPORTANT: Reusable <strong>CO2</strong> cylinders may only be refilled by authorised<br />
<strong>CO2</strong> filling stations!<br />
Special information: The needle valve is intended only for fine adjustment<br />
of the number of bubbles. Always close the cylinder valve in order<br />
to shut down the <strong>CO2</strong> supply for a prolonged period!<br />
Unscrew the pressure reducer when the cylinder is to remain out of use<br />
for a prolonged period.<br />
15. Adjusting the operating pressure of the Pressure<br />
Reducer<br />
The operating pressure of the <strong>Exclusive</strong> pressure reducer is factory-set<br />
to approx. 1 bar. In the first weeks of operation in particular, the operating<br />
pressure may alter slightly as a result of the washers working<br />
loose. Adjusting the operating pressure.<br />
• Remove protective cap<br />
26<br />
• To increase the pressure: Use a suitable<br />
screwdriver to turn the operating pressu-<br />
+ - re setting screw towards in anti-clockwise<br />
direction<br />
To reduce the pressure: Turn operating<br />
pressure setting screw in clockwise<br />
direction 26<br />
16. Examining the special <strong>CO2</strong> Check Valve<br />
The check valve protects your valuable pressure reducer from corrosion<br />
caused by back-flowing water. It will operate reliably over a very long<br />
period. However, as dust and metal particles may collect on the sealing<br />
surfaces over the course of time, the check valve should be examined<br />
every 2 years at the latest and replaced if necessary.<br />
Examination procedure:<br />
• Close needle valve on <strong>CO2</strong> pressure reducer.<br />
• After 24 hours, unscrew the coupling ring on the side of the check<br />
valve facing the pressure reducer.<br />
• Pull off <strong>CO2</strong> hose and check whether any water has entered into the<br />
hose. If so: Replace check valve. If not: Reconnect hose to check<br />
valve.<br />
• Reset number of bubbles.<br />
Don’t worry: An effectively functioning aquarium will normally have no<br />
problem coping without a <strong>CO2</strong> supply for 24 hours.<br />
Important note: Use only check valves designed for use with <strong>CO2</strong>, such<br />
as the Special <strong>CO2</strong> Check Valve from DENNERLE. Standard air<br />
check valves may become brittle through contact with <strong>CO2</strong> within only<br />
a short space of time, resulting in leaks. This usually goes unnoticed.<br />
17. Replacing the Special <strong>CO2</strong> Indicator<br />
Like most colouring agents, the indicator is subject to ageing as a result<br />
of photochemical processes. In order to guarantee the quickest and<br />
most exact colour response at all times, we thus recommend filling the<br />
test container with fresh special <strong>CO2</strong> indicator every 4 weeks.<br />
• For this purpose, open the test container and pour the old indicator<br />
down the drain.<br />
• Rinse test container with tap water and dry with a kitchen cloth or<br />
similar before refilling.<br />
18. Cleaning the <strong>CO2</strong> Long-Term Test<br />
Use warm water and a soft sponge. Do not use any cleaning agents!<br />
The test container can be dismantled for cleaning. If necessary, grease<br />
the two O-rings slightly (!) with Vaseline (from a pharmacy, drugstore)<br />
before re-assembling the test container.<br />
IMPORTANT: Do not use any other lubricants, as these may lead to<br />
incorrect colour indications.<br />
19. Cleaning the Cyclo Turbo XL<br />
Use warm water and a soft sponge. Do not use any cleaning agents.<br />
The Cyclo can be completely dismantled for cleaning. The internal parts<br />
can be cleaned using a soft bottle brush.<br />
20. Cleaning the motor pump<br />
• Disconnect the mains plug. Pull the<br />
27<br />
pump off the Cyclo. Remove intake<br />
cage. Open bayonet catch and remove<br />
pump housing. 27<br />
• Pull out complete pump impeller and<br />
axle. 28<br />
28<br />
• Clean all parts with a suitable brush<br />
under tap water. Re-assemble via the<br />
reverse procedure.<br />
21. Important note on the <strong>CO2</strong> hose<br />
The special Softflex <strong>CO2</strong> hose is self-<br />
29<br />
sealing and self-locking for maximum<br />
safety. Always lever off the hose with a<br />
screwdriver, DO NOT pull off! 29<br />
TIP: Large quantities of valuable <strong>CO2</strong> may be lost every day through leaking<br />
<strong>CO2</strong> hoses. To avoid this, always use suitable <strong>CO2</strong> hoses, such as<br />
the Special Softflex <strong>CO2</strong> hose from DENNERLE.<br />
What if ... – Troubleshooting<br />
Fault Cause Remedy<br />
A faint hissing sound<br />
is to be heard at the<br />
screwed connection<br />
between pressure<br />
reducer and <strong>CO2</strong> cylinder.<br />
No bubbles at bubble<br />
counter.<br />
Large gas bubble<br />
forms in the upper<br />
area of the whirl<br />
chamber.<br />
Too many bubbles are<br />
discharged through<br />
the waste gas vent.<br />
Pressure reducer is<br />
skew or has not<br />
been screwed in<br />
tight enough.<br />
Washer defective.<br />
<strong>CO2</strong> cylinder empty.<br />
Needle valve closed.<br />
Hose connection leaking.<br />
Operating pressure<br />
too low.<br />
The waste gas vent<br />
is not sufficiently<br />
open.<br />
The intake opening<br />
of the atomizer jet<br />
or the waste gas<br />
vent is blocked.<br />
The opening of the<br />
waste gas vent is<br />
currently too large.<br />
Too much <strong>CO2</strong> is<br />
being supplied.<br />
The flow of water<br />
through the whirl<br />
chamber is inadequate.<br />
Unscrew pressure<br />
reducer and screw<br />
back in place without<br />
canting. Tighten coupling<br />
ring.<br />
Fit new washer.<br />
Ensure that washer is<br />
fitted correctly and<br />
that the sealing surfaces<br />
are clean.<br />
Replace <strong>CO2</strong> cylinder.<br />
Open needle valve.<br />
Check hose connection,<br />
replace if necessary.<br />
Set operating pressure<br />
to approx. 1 bar.<br />
Turn lid (2) slightly<br />
in the direction of<br />
“large bubbles”.<br />
Clean Cyclo and intake<br />
cage of the pump<br />
under running water.<br />
Turn lid (2) slightly<br />
in the direction of<br />
“small bubbles”.<br />
Reduce <strong>CO2</strong> supply<br />
slightly.<br />
Increase water flow<br />
by turning the control<br />
tap.<br />
Upgrade options<br />
Level 1: The DENNERLE <strong>CO2</strong> Night Cut-Off Valve Comfort<br />
is controlled by a time switch and cuts off the <strong>CO2</strong> supply at<br />
night, as plants do not consume any <strong>CO2</strong> at night. This saves<br />
valuable <strong>CO2</strong>.<br />
Level 2: The DENNERLE pH Controller 588 Digital Comfort<br />
measures the pH value in the aquarium continuously and<br />
controls the <strong>CO2</strong> supply precisely and fully automatically via<br />
the <strong>CO2</strong> Night Cut-Off Valve Comfort.<br />
20 21
Special information<br />
<strong>CO2</strong> Special-Indicator<br />
• Keep <strong>CO2</strong> long-term test and indicator away from children!<br />
• The special <strong>CO2</strong> indicator is harmless and does not contain any chemical<br />
solvents. Prolonged skin contact and eye contact should<br />
nevertheless be avoided.<br />
• The indicator may cause stains. Contact with clothing, carpets, wood<br />
or similar should thus be avoided.<br />
• Any indicator which may be dropped into the aquarium water by<br />
mistake is harmless for all fish, plants and any other creatures living<br />
in the aquarium.<br />
• The ampoule is filled with special <strong>CO2</strong> indicator under a protective<br />
atmosphere. The filling level may vary for technical reasons.<br />
• Protect the special <strong>CO2</strong> indicator from sunshine, heat and frost.<br />
Always keep ampoules protected from light during storage.<br />
Motor pump<br />
• The pump must not be allowed to run dry!<br />
• For 230 V AC / 50 Hz only.<br />
• For indoor use only. Symbol Haus mit Pfeil<br />
• Always disconnect the mains plug before putting<br />
your hands in the aquarium.<br />
• The connecting lead of the pump cannot be replaced. Pumps with<br />
damaged leads may no longer be used.<br />
Technical data<br />
Reusable <strong>CO2</strong> cylinder<br />
• UN no. 1013, cl. 2, item: 2A, GGVS/ADR/RID/GGVE/EINECS 2046969<br />
• Capacity: max. 2,000 g <strong>CO2</strong>; cylinder weight when empty (without<br />
cage): see stamp on bottle; pressure at room temperature: approx.<br />
60 bar; test pressure: 250 bar; cylinder valve with overpressure<br />
seal; connecting thread W21.8 x 1/14"<br />
• TÜV (technical control body) stamp: see imprint on bottle. Reusable<br />
<strong>CO2</strong> cylinders must be examined by the competent institutions in the<br />
country concerned on a regular basis. The national regulations are<br />
to be observed in this connection! In Germany, <strong>CO2</strong> cylinders must<br />
be examined by the TÜV technical control body every 10 years.<br />
• Important note: In case of excessive heat or pressure, the overpressure<br />
seal on the cylinder valve will blow and <strong>CO2</strong> gas may escape.<br />
Repair is to be carried out by authorised <strong>CO2</strong> filling stations only -<br />
DO NOT carry out repairs yourself!<br />
<strong>CO2</strong> Pressure Reducer <strong>Exclusive</strong> for Classic-Line<br />
Cylinder pressure manometer: 0 -250 bar. Operating pressure manometer:<br />
0 - 6 bar.<br />
Adjustable operating pressure. Connection for hose 4/6 mm. Precision<br />
needle valve with stainless steel needle and precision thread. Self-closing<br />
pressure-relief valve.<br />
Guarantee period: 3 years from date of purchase (excluding parts<br />
subject to wear).<br />
Spare parts and useful accessories<br />
(available from specialist retailers)<br />
3031 Reusable <strong>2.000</strong> g <strong>CO2</strong> cylinder with cage<br />
3025 Classic-Line <strong>CO2</strong> Pressure Reducer <strong>Exclusive</strong><br />
3028 2 washers for Classic-Line Pressure Reducer<br />
1580 Turbo attachment<br />
1588 Cyclo extension piece<br />
3043 2 Longlife suction clips, green<br />
3042 2 Longlife suction clips, black<br />
1484 Leak detector spray<br />
3061 Special <strong>CO2</strong> Softflex hose, 5 m<br />
3050 <strong>CO2</strong> Bubble Counter Exact<br />
3053 Special <strong>CO2</strong> Check Valve<br />
3041 Special <strong>CO2</strong> Indicator, 5 ampoules<br />
For further information on the range of aquarium plants and accessories<br />
from DENNERLE, consult your dealer or check out DENNERLE’s free<br />
professional tips!<br />
DENNERLE professional tips are available from your dealer and on the<br />
internet at www.dennerle.de!<br />
Sales: DENNERLE GmbH, D-66957 Vinningen<br />
Customer service: DENNERLE GmbH, D-66981 Münchweiler<br />
www.dennerle.de<br />
Classic-Line<br />
Impianto di <strong>CO2</strong> <strong>Exclusive</strong> <strong>2.000</strong> g<br />
Set completo comprensivo di una bombola <strong>CO2</strong> riutilizzabile da <strong>2.000</strong> g.<br />
Impianto di <strong>CO2</strong> per acquari fino a 5.000 litri.<br />
- Informazioni per l’uso: leggere attentamente e conservare bene. -<br />
Congratulazioni per l’acquisto di questo impianto di <strong>CO2</strong> di alto valore della ditta DENNERLE.<br />
Con un uso e una manutenzione corretti questo impianto di <strong>CO2</strong> fornisce in maniera semplice, comoda e sicura al vostro acquario la giusta quantità di <strong>CO2</strong>,<br />
indispensabile per garantire una crescita rigogliosa delle piante d’acquario. In più potrete ottenere un valore pH ottimale per la vita di pesci e piante in ambiente<br />
da leggermente acido a neutro. DENNERLE vi augura buon divertimento e soddisfazione con il vostro acquario!<br />
Norme di sicurezza per bombole di anidride carbonica (<strong>CO2</strong>)<br />
• Utilizzare solo per l’alimentazione di <strong>CO2</strong> in acquari.<br />
• Le bombole di <strong>CO2</strong> sono sotto alta pressione. Quindi fare attenzione a quanto segue:<br />
• Non lanciare le bombole di <strong>CO2</strong>. Conservare al fresco. Proteggere dal sole e da temperature superiori ai 50 °C.<br />
• Prelevare <strong>CO2</strong> solo con adatti riduttori di pressione per bombole <strong>CO2</strong> riutilizzabili con raccordo filettato W21,8 x 1/14", p.es. riduttori di pressione<br />
DENNERLE modelli Profi 2000, Compact, Professional ed <strong>Exclusive</strong>.<br />
• Prelevare <strong>CO2</strong> solo da bombole in posizione verticale. Assicurarsi che siano ben posizionate.<br />
• Non aprire le bombole di <strong>CO2</strong> con forza.<br />
• Non svuotare completamente le bombole di <strong>CO2</strong>. Effettuare la ricarica solo presso centri autorizzati. Attenzione: il peso della tara non comprende la<br />
gabbietta protettiva che infatti deve essere smontata prima di effettuare la ricarica.<br />
• Il gas di <strong>CO2</strong> è più pesante dell’aria e ha un effetto asfissiante ad elevate concentrazioni, quindi:<br />
• Non respirare il gas di <strong>CO2</strong>.<br />
• Tenere fuori dalla portata dei bambini.<br />
• Conservare le bombole di <strong>CO2</strong> in luoghi ben ventilati e non in cantine.<br />
• In caso di trasporto su veicoli, fare attenzione a quanto segue: Fissare la bombola in modo che non scivoli e non rotoli; in caso contrario, la valvola<br />
potrebbe subire danni e il gas di <strong>CO2</strong> potrebbe fuoriuscire. Assicurare una buona ventilazione, ad esempio aprendo il finestrino, azionando la ventola<br />
o simili.<br />
Come funziona l’impianto<br />
di <strong>CO2</strong> <strong>Exclusive</strong><br />
Il riduttore di pressione <strong>CO2</strong> <strong>Exclusive</strong> riduce la pressione d’esercizio<br />
all’interno della bombola ad un livello perfettamente regolato. La valvola<br />
a spillo di alta precisione permette di dosare la <strong>CO2</strong> con massima<br />
esattezza e comfort. Il controllo avviene attraverso il contabollicine <strong>CO2</strong><br />
Exact.<br />
Poi il tubo speciale di <strong>CO2</strong> Softflex ermetico alla <strong>CO2</strong> convoglia la <strong>CO2</strong><br />
all’acquario, dove il <strong>CO2</strong> Cyclo Turbo XL la discioglie efficacemente<br />
nell’acqua. Una valvola speciale di non-ritorno per <strong>CO2</strong> protegge il riduttore<br />
di pressione da eventuali riflussi di acqua. Sulla base del test <strong>CO2</strong><br />
a lunga durata Correct, il contenuto di <strong>CO2</strong> può essere letto direttamente<br />
nell’acqua dell’acquario.<br />
Il particolare vantaggio è la bombola <strong>CO2</strong> riutilizzabile da <strong>2.000</strong> g, che<br />
permette anche in acquari grandi di fornire <strong>CO2</strong> per lunghi periodi senza<br />
doverla sostituire.<br />
L’impianto di <strong>CO2</strong> <strong>Exclusive</strong><br />
– visione d’insieme<br />
� Bombola <strong>CO2</strong> riutilizzabile da <strong>2.000</strong> g<br />
con gabbietta di protezione della valvola<br />
� Riduttore di pressione <strong>CO2</strong> <strong>Exclusive</strong><br />
� Valvola speciale di non-ritorno per <strong>CO2</strong><br />
� Contabollicine <strong>CO2</strong> Exact<br />
� Tubo speciale di <strong>CO2</strong> Softflex, 5 m<br />
� Diffusore di <strong>CO2</strong> Cyclo Turbo XL<br />
22 23<br />
�<br />
�<br />
�<br />
�<br />
�<br />
�<br />
�<br />
�<br />
I<br />
� Pompa a motore<br />
� Test <strong>CO2</strong> a lunga durata<br />
Correct
Riduttore di pressione <strong>CO2</strong> <strong>Exclusive</strong><br />
� Manometro per la pressione della bombola<br />
� Vite di regolazione della pressione di esercizio<br />
(situata sotto il cappuccio di protezione)<br />
� Manometro per la pressione di esercizio<br />
� Valvola a spillo di alta precisione<br />
<strong>CO2</strong> Cyclo Turbo XL<br />
�<br />
�<br />
Collegamento per alimentazione<br />
di <strong>CO2</strong><br />
Coperchio con sfiato dei gas<br />
impropri<br />
13<br />
12<br />
�<br />
�<br />
Parte superiore della camera<br />
di turbolenza<br />
Fuoriuscita dell’acqua superflua<br />
11<br />
10<br />
� Trivella Turbo<br />
� Modulo della camera di turbolenza<br />
�<br />
�<br />
Tappo<br />
Griglia di chiusura<br />
�<br />
� Ventose Longlife<br />
� Deviatore<br />
� Collegamento per la pompa<br />
� Regolatore<br />
� Ugello sminuzzatore<br />
Contabollicine <strong>CO2</strong><br />
� Supporto<br />
� Ventose Longlife<br />
� Contabollicine<br />
� Alimentazione di <strong>CO2</strong> dal<br />
riduttore di pressione<br />
� Uscita di <strong>CO2</strong> verso l’acquario<br />
� Clip riflettente<br />
� Cintura di sostegno<br />
Montaggio e collegamenti<br />
�<br />
1. Collegamento del riduttore di<br />
pressione<br />
• Se è aperta, chiudere la valvola a spillo<br />
ruotando in senso antiorario. ATTENZIO-<br />
NE: serrare solo leggermente! �<br />
• Con il dado di raccordo fissare il riduttore<br />
�<br />
di pressione alla bombola <strong>CO2</strong>. Serrare<br />
bene il dado di raccordo con una chiave<br />
da 30. � Prestare attenzione a che la<br />
guarnizione sia correttamente posizionata<br />
e a che le relative superfici siano pulite!<br />
ATTENZIONE: Prelevare <strong>CO2</strong> solo da<br />
bombole in posizione verticale.<br />
�<br />
Assicurarsi che siano ben posizionate.<br />
2. Montaggio della valvola di nonritorno<br />
nel tubo <strong>CO2</strong><br />
• Tagliare con delle forbici robuste dal<br />
tubo <strong>CO2</strong> due pezzi di 5 cm ciascuno,<br />
con taglio diritto.�<br />
• Svitare i due dadi per raccordi dalla valvola<br />
di non-ritorno <strong>CO2</strong>.<br />
�<br />
�<br />
�<br />
�<br />
�<br />
�<br />
�<br />
�<br />
�<br />
�<br />
�<br />
�<br />
�<br />
� � �<br />
�<br />
�<br />
�<br />
�<br />
�<br />
�<br />
�<br />
�<br />
�<br />
�<br />
�<br />
• Inserire i dadi alle estremità dei tubi e<br />
spingere i tubi a battuta sui collegamenti<br />
della valvola di non-ritorno.<br />
CONSIGLIO: Inumidire i collegamenti in<br />
modo da inserire più facilmente il tubo.<br />
• Serrare i dadi. �<br />
3. Collegamento del tubo <strong>CO2</strong> al<br />
riduttore di pressione<br />
• Collegare il tubo con la valvola di nonritorno<br />
alla valvola a spillo del riduttore<br />
di pressione ed assicurare con un dado<br />
per raccordi. � ATTENZIONE: la freccia<br />
sulla valvola di non-ritorno deve essere<br />
rivolta in direzione del flusso della <strong>CO2</strong>!<br />
4. Collegamento del contabollicine<br />
• Aprire le due linguette di chiusura e togliere<br />
il contabollicine dal suo supporto.<br />
• Far passare la cintura di sostegno, con il<br />
lato morbido rivolto verso l’esterno,<br />
attraverso le due fessure del supporto e<br />
fissare quest’ultimo alla bombola riutilizzabile<br />
<strong>CO2</strong>. �<br />
Il supporto può anche essere fissato<br />
(1) con le due ventose alla parete<br />
dell’acquario, oppure (2) con delle viti<br />
(non comprese nella fornitura) ad una<br />
parete o nel mobiletto di supporto. In tal<br />
caso rimuovere la ventosa e il nipplo.<br />
• Riempire il contabollicine con acqua di<br />
rubinetto fino a 3/4 del livello. �<br />
• Svitare i dadi per raccordi dal contabollicine<br />
ed effettuare il collegamento. Il<br />
tubo proveniente dal riduttore di pressione<br />
andrà spinto fino a collegarsi con<br />
il tubo contabollicine, il tubo che porta<br />
all’acquario andrà invece spinto fino<br />
all’altro collegamento. Riavvitare bene i<br />
dadi. �<br />
• Riposizionare il contabollicine sul suo<br />
supporto e richiudere le linguette. �<br />
5. Collegamento<br />
del <strong>CO2</strong> Cyclo Turbo XL<br />
• Lavare il Cyclo Turbo XL con acqua calda<br />
del rubinetto. Non utilizzare detergenti!<br />
�<br />
• Nell’acquario scegliere un punto adatto<br />
per l’installazione.<br />
L’ubicazione non dovrebbe essere troppo<br />
alla luce, per prevenire la possibile<br />
formazione di alghe. �<br />
�<br />
• Collegare la pompa a motore al regolatore.<br />
�<br />
Nota: Cyclo Turbo XL può essere collegato<br />
anche (senza pompa) all’uscita del<br />
filtro esterno. Sono indicati tutti i tubi<br />
esistenti in commercio da 9/12 mm,<br />
12/16 mm e 16/22 mm.<br />
• Con le ventose fissare il Cyclo in verticale<br />
nell’acquario, almeno 5 cm sotto il<br />
livello dell’acqua. �<br />
�<br />
6. Fissaggio del tubo <strong>CO2</strong><br />
• Il tubo <strong>CO2</strong> può essere fissato nella posizione<br />
corretta utilizzando dei supporti<br />
per tubi. �<br />
Ora il vostro impianto di <strong>CO2</strong><br />
<strong>Exclusive</strong> è pronto per essere<br />
messo in funzione.<br />
Regolazione della quantità di <strong>CO2</strong><br />
(Numero di bollicine)<br />
7. La giusta quantità di <strong>CO2</strong><br />
Per una rigogliosa crescita delle vostre piante DENNERLE consiglia un<br />
contenuto di <strong>CO2</strong> nel acquario pari a 15 - 30 mg/l, ideale è un contenuto<br />
pari a 20 - 25 mg/l.<br />
Il numero di bollicine al minuto necessario per questo contenuto di <strong>CO2</strong><br />
dipende da vari fattori, quali p.es. la quantità di piante, il movimento<br />
dell’acqua, il rapporto superficie/volume, ecc. Per questo motivo è<br />
necessario determinare individualmente per ciascun acquario la quantità<br />
di <strong>CO2</strong> da aggiungere.<br />
8. Regolazione del numero di bollicine<br />
Indicazioni per l’impostazione di base: Iniziate con ca. 10 bollicine al<br />
minuto ogni 100 l d’acqua, vale a dire, per esempio, 20 bollicine al<br />
minuto per 200 l di acqua (2 x 10 = 20).<br />
Regolate l’alimentazione di <strong>CO2</strong> sul contenuto di <strong>CO2</strong> desiderato con piccoli<br />
adattamenti ripartiti nell’arco di più giorni. Importante: quanto più la superficie<br />
dell’acqua viene mossa (p. es. a causa del filtro o di aria addiziona-<br />
ta) tanto maggiore sarà la quantità di <strong>CO2</strong> espulsa dall’acquario.<br />
�<br />
• Aprire lentamente la valvola della bombola<br />
ruotando la manopola in senso<br />
antiorario. Aprire la valvola a fondo e<br />
successivamente riavvitarla con un<br />
mezzo giro. � Ora il manometro per<br />
la pressione della bombola indica circa<br />
60 bar (a 20 °C).<br />
�<br />
• Aprire la valvola a spillo lentamente e<br />
leggermente fino alla fuoriuscita delle<br />
- +<br />
prime bollicine dal contabollicine.<br />
• Regolare il numero desiderato di bollicine<br />
sulla valvola a spillo:<br />
- girando in senso orario si aumenta il<br />
numero di bollicine<br />
- girando in senso anti-orario si diminuisce il numero di bollicine. �<br />
Importante: la regolazione del numero di bollicine è ritardata nel<br />
tempo rispetto alle variazioni apportate alla valvola a spillo.<br />
Pertanto usare molta cautela nel regolare le bollicine.<br />
• Per i primi giorni controllare più spesso il numero di bollicine e, se<br />
necessario, regolarlo meglio. In seguito sarà sufficiente controllare il<br />
numero di bollicine una volta alla settimana.<br />
• È utile sapere che: le bollicine di <strong>CO2</strong> prodotte dal contabollicine<br />
Exact pesano in media ca. 0,125 mg e hanno un volume di 0,063<br />
ml. 10 bollicine al minuto corrispondono ad un’alimentazione di<br />
<strong>CO2</strong> pari a 1,8 g ovvero 0,9 litri al giorno.<br />
9. Registrazione del Cyclo Turbo XL<br />
Messa in funzione della pompa a motore<br />
• Collegare la spina alla rete elettrica. Rispettare le norme di<br />
sicurezza (di seguito specificate)!<br />
Registrazione del regolatore<br />
Grazie al regolatore, parte dell’acqua proveniente dal filtro viene deviata<br />
nella camera di turbolenza per disciogliere la <strong>CO2</strong>. La parte di acqua<br />
non deviata viene immessa direttamente nell’acquario tramite la fuoriuscita<br />
dell'acqua superflua.<br />
• Posizione A: non viene deviata acqua<br />
A<br />
nella camera di turbolenza.<br />
• Posizione B: il 50% dell’acqua viene<br />
B<br />
deviato nel Cyclo, il restante 50%<br />
viene immesso nell’acquario.<br />
C<br />
• Posizione C: tutta l’acqua viene deviata<br />
nella camera di turbolenza del<br />
Cyclo.<br />
Registrare il regolatore in modo da avere il maggior flusso possibile di<br />
acqua nella camera di turbolenza, che però non spinga le bollicine di<br />
<strong>CO2</strong> verso il basso ma permetta loro di salire lentamente.<br />
Registrazione dello sfiato dei gas impropri<br />
I gas impropri sono espulsi regolarmente ed automaticamente dallo<br />
speciale coperchio di Cyclo. Per registrare lo sfiato dei gas impropri è<br />
necessario ruotare leggermente il coperchio.<br />
�<br />
Se il coperchio si trova a battuta sinistra<br />
(ruotare in senso orario), lo sfiato dei gas<br />
impropri è completamente aperto, e ciò è<br />
riconoscibile dal fatto che fuoriescono bollicine<br />
grandi. Man mano che il coperchio<br />
viene ruotato in senso antiorario le bollicine<br />
diventano più piccole. Quando si trova a<br />
battuta destra, lo sfiato dei gas impropri è chiuso. I simboli corrispondenti<br />
sono riportati sul coperchio per maggior chiarezza. �<br />
Regolare lo sfiato dei gas impropri in modo che i gas impropri vengano<br />
espulsi regolarmente, lasciando però alla <strong>CO2</strong> residua, che si trova nella<br />
parte superiore della camera di turbolenza, più tempo possibile per sciogliersi.<br />
Si consiglia di iniziare sempre dalla posizione “bollicine grandi”.<br />
Se vengono espulse troppe bollicine dallo sfiato dei gas impropri, ruotare<br />
il coperchio leggermente verso “bollicine piccole”.<br />
24 25<br />
�
10. Controllo semplice<br />
con il test <strong>CO2</strong> a lunga durata Correct<br />
Il test <strong>CO2</strong> a lunga durata Correct consente un controllo costante e preciso<br />
della quantità di <strong>CO2</strong> all’interno dell’acquario.<br />
A seconda del contenuto di <strong>CO2</strong>, l’indicatore speciale assumerà una<br />
colorazione diversa: • blu = troppo poca <strong>CO2</strong> , • verde = percentuale<br />
ottimale di <strong>CO2</strong>, • giallo = troppa <strong>CO2</strong>.<br />
Sulla scala colorimetrica di riferimento si potrà leggere direttamente la<br />
quantità di <strong>CO2</strong> presente nell’acquario, in milligrammi per litro.<br />
Grazie all’indicatore speciale di <strong>CO2</strong> appositamente svillupato dalla<br />
DENNERLE, il test indica sempre il contenuto esatto di <strong>CO2</strong>. Altri acidi<br />
presenti nell’acquario, come p.es. gli acidi umici e le variazioni della<br />
durezza carbonatica (KH) causate dall’aumento della durezza totale,<br />
dalla lenta evaporazione o dal cambio dell’acqua non influenzano il<br />
risultato del test!<br />
Componenti del set<br />
�<br />
�<br />
�<br />
�<br />
�<br />
�<br />
�<br />
�<br />
�<br />
�<br />
�<br />
�<br />
� Contenitore di test - parte inferiore<br />
� Contenitore di test - parte superiore<br />
� Cono riflettente<br />
� O-ring<br />
� Clip di supporto<br />
� Supporto<br />
� Ventose Longlife<br />
� Indicatore speciale di <strong>CO2</strong><br />
� Scala colorimetrica di<br />
riferimento<br />
• Prendere il contenitore di test dalla clip di<br />
supporto e rimuoverne la parte superiore.<br />
�<br />
• Prendere un’ampolla dell’indicatore speciale<br />
di <strong>CO2</strong> e verificare che non vi siano gocce<br />
d’indicatore nel collo della stessa! Fare<br />
scendere l’indicatore nell’ampolla scuotendola<br />
come si fa con un termometro. Aprirla<br />
svitando la linguetta di chiusura. �<br />
• Versare l’intero contenuto dell’ampolla nella<br />
parte superiore del contenitore di test.<br />
�<br />
21<br />
22<br />
23<br />
• Inserire la parte inferiore del contenitore<br />
con il cono riflettente nella parte<br />
superiore. Verificare che gli o-ring siano<br />
posizionati correttamente! 21<br />
• Capovolgere con attenzione il contenitore<br />
di test e riposizionarlo sulla clip di<br />
supporto. 22<br />
• Servendosi della ventosa, fissare il test<br />
<strong>CO2</strong> a lunga durata in posizione verticale<br />
in un punto ben visibile dell’acquario<br />
dove vi sia anche una leggera<br />
corrente di acqua. 23<br />
• Applicare la scala colorimetrica di riferi-<br />
24<br />
mento sul vetro esterno dell’acquario.<br />
24<br />
Importante: poiché l’anidride carbonica<br />
ha bisogno di un po’ di tempo per diffondersi<br />
nell’indicatore, l’indicazione colorimetrica<br />
reagisce alle variazioni del contenuto di <strong>CO2</strong> con alcune ore di<br />
ritardo. Pertanto la quantità di <strong>CO2</strong> andrà aumentata sempre molto lentamente<br />
nell’arco di alcuni giorni, fino al raggiungimento del contenuto<br />
ottimale di <strong>CO2</strong> nell’acquario.<br />
11. Impiego da test pH a lunga durata<br />
Il valore pH nell’acquario viene determinato principalmente dalla durezza<br />
carbonatica (KH) e dal contenuto di <strong>CO2</strong>, che in parte si scioglie in<br />
acqua sotto forma di anidride carbonica. A condizione che nell’acqua<br />
non vi siano altre sostanze che possano sostanzialmente influenzare il<br />
pH (p.es. grosse quantità di acidi umici oppure nitrati o preparati per<br />
aumentare o diminuire il valore pH)), con il test <strong>CO2</strong> a lunga durata<br />
della DENNERLE si può tenere sotto controllo anche il valore pH nell’acquario.<br />
Quindi:<br />
• Misurare la durezza carbonatica (KH)<br />
25<br />
dell’acqua (test disponibili presso il<br />
vostro rivenditore di fiducia). 25<br />
• Applicare la relativa scala colorimetrica<br />
di riferimento su una parete dell’acquario,<br />
sul lato esterno.<br />
La scala colorimetrica permette di<br />
leggere direttamente il valore pH dell’acquario.<br />
Misurare la durezza carbonatica (KH) con regolarità utilizzando sempre<br />
l’apposita scala colorimetrica.<br />
12. Per chi vuole saperne di più: come determinare il<br />
contenuto di <strong>CO2</strong> nell’acquario<br />
Poiché il contenuto di <strong>CO2</strong>, la durezza carbonatica (KH) e il valore pH<br />
sono in relazione tra loro, il contenuto di <strong>CO2</strong> dell’acqua si determina<br />
come segue:<br />
• Misurate la durezza carbonatica dell’acqua del vostro acquario.<br />
• Ricavate dalla tabella qui sotto il valore pH corrispondente al contenuto<br />
di <strong>CO2</strong> desiderato. Dovrete ottenere questo valore pH +/-<br />
0,1 regolando il numero di bollicine.<br />
Esempio: durezza carbonatica 4 °d, pH consigliato 6,8 +/-0,1.<br />
troppa <strong>CO2</strong> giusta quantità di <strong>CO2</strong><br />
Valore pH<br />
troppo poca <strong>CO2</strong><br />
KH 6,3 6,4 6,5 6,6 6,7 6,8 6,9 7,0 7,1 7,2 7,3 7,4 7,5<br />
2 32 25 20 16 13 10 8 6 5 4 3 3 2<br />
3 48 38 30 24 19 15 12 10 8 6 5 4 3<br />
4 64 51 40 32 25 20 16 13 10 7 6 5 4<br />
5 80 63 50 40 32 25 20 16 13 10 8 6 5<br />
6 96 76 60 48 38 30 24 19 15 12 10 8 6<br />
7 111 89 70 56 44 35 28 22 18 14 11 9 7<br />
8 127 101 80 64 51 40 32 25 20 16 13 10 8<br />
9 143 114 90 72 57 45 36 29 23 18 14 11 9<br />
10 159 126 100 80 63 50 40 32 25 20 16 13 10<br />
11 175 139 111 88 70 55 44 35 28 22 18 14 11<br />
12 191 152 121 96 76 60 48 38 30 24 19 15 12<br />
13 207 164 131 104 82 65 52 41 33 26 21 16 13<br />
14 223 177 141 112 89 70 56 44 35 28 22 18 14<br />
13. Come lavora il <strong>CO2</strong> Cyclo Turbo XL<br />
La <strong>CO2</strong> fuoriesce dall’apertura del tubo <strong>CO2</strong> nella parte inferiore del Cyclo. Da<br />
qui, le bollicine salgono verso l’alto e si raccolgono sotto i singoli gradini della<br />
trivella Turbo.<br />
L’acqua forma un movimento vorticoso verso il basso in corrispondenza delle<br />
bollicine di <strong>CO2</strong> che, in questo modo, vengono trattenute. Grazie a questo<br />
principio di controcorrente altamente efficaca la <strong>CO2</strong> si disciolge molto rapidamente<br />
e completamente.<br />
Contemporaneamente, altri gas presenti nell’acqua dell’acquario penetrano<br />
all’interno delle bollicine di <strong>CO2</strong>. Questi gas, chiamati gas impropri, sono la<br />
causa per cui le bollicine rimpiccioliscono man mano che salgono verso l’alto<br />
senza però disciogliersi completamente. Quando le bollicine raggiungono la<br />
parte superiore della camera di turbolenza<br />
contengono per lo più gas impropri ed una<br />
percentuale molto bassa di <strong>CO2</strong>. Qui, le bollicine<br />
vengono aspirate dall’ugello sminuzzatore<br />
che le divide in tante microbollicine.<br />
In questo modo, anche gli ultimi residui<br />
di <strong>CO2</strong> vengono disciolti, prima che i gas<br />
impropri siano espulsi dall’apposito sfiato<br />
di gas impropri.<br />
Il Cyclo Turbo XL è adatto per acquari<br />
fino a 5.000 litri, in condizioni di normale<br />
fabbisogno di <strong>CO2</strong>. È possibile aumentarne<br />
notevolmente la resa, adattandosi quindi a<br />
qualsiasi tipo di acquario. Per questo, è sufficiente<br />
collegare alla parte inferiore altro<br />
moduli della camera di turbolenza (codice di<br />
ordinazione: 1588) e trivelle Turbo (codice<br />
di ordinazione: 1580).<br />
Cura e manutenzione<br />
14. Sostituzione della bombola di <strong>CO2</strong><br />
• Chiudere la valvola della bombola.<br />
• Fare sfiatare l’eventuale pressione residua presente nel riduttore e precisamente<br />
aprendo la valvola a spillo. Chiudere la valvola a spillo.<br />
Attenzione: Serrare solo leggermente!<br />
• Svitare il riduttore di pressione dalla bombola di <strong>CO2</strong> e riavvitarlo<br />
sulla nuova bombola riutilizzabile. Regolare nuovamente il numero<br />
di bollicine.<br />
ATTENZIONE: La ricarica delle bombole di <strong>CO2</strong> riutilizzabili è consentita<br />
solo presso centri autorizzati!<br />
Istruzioni particolari: La valvola a spillo serve solo per la microregolazione<br />
del numero di bollicine. Se l’alimentazione della <strong>CO2</strong> viene cessata<br />
per un tempo prolungato provvedere sempre a chiudere la valvola<br />
della bombola.<br />
In caso di mancato utilizzo per un tempo prolungato svitare il riduttore<br />
di pressione.<br />
15. Registrazione della pressione di esercizio<br />
del riduttore di pressione<br />
La pressione di esercizio del riduttore di pressione <strong>Exclusive</strong> è regolata<br />
in fabbrica a circa 1 bar. Soprattutto nelle prime settimane dopo la<br />
messa in funzione, la pressione di esercizio può variare ancora un po’<br />
per via dell’assestamento delle guarnizioni.<br />
Registrare la pressione di esercizio:<br />
• Rimuovere il cappuccio di protezione<br />
26<br />
• Per aumentare: ruotare in senso antiorario<br />
la vite di regolazione della pres-<br />
+ - sione di esercizio con un giravite adatto<br />
26 Per diminuire: ruotare in senso orario<br />
la vite di regolazione della pressione<br />
di esercizio<br />
16. Controllo della valvola speciale di non-ritorno <strong>CO2</strong><br />
La valvola di non-ritorno protegge il riduttore di pressione contro la corrosione<br />
causata da eventuali riflussi di acqua. Essa è in grado di funzionare<br />
per molto tempo con la massima affidabilità. Poiché col passare<br />
del tempo si possono depositare particelle di sporco, colore o metallo<br />
sulle superfici di tenuta, si consiglia di controllare la valvola di nonritorno<br />
almeno una volta ogni 2 anni e, se necessario, sostituirla<br />
Controllo:<br />
• Chiudere la valvola a spillo sul riduttore di pressione di <strong>CO2</strong>.<br />
• Dopo 24 ore svitare il dadi per raccordo dal lato della valvola di nonritorno<br />
rivolto verso il riduttore di pressione.<br />
• Estrarre il tubo <strong>CO2</strong> e controllare che non sia penetrata dell’acqua.<br />
Se SÌ: sostituire la valvola di non-ritorno. Se NO: ricollegare il tubo<br />
alla valvola di non-ritorno.<br />
• Regolare nuovamente il numero di bollicine.<br />
Non preoccupatevi: un acquario che funziona bene può normalmente<br />
resistere senza problemi se viene interrotta l’alimentazione di <strong>CO2</strong> per<br />
24 ore.<br />
Nota importante: utilizzate esclusivamente valvole di non-ritorno specifiche<br />
per <strong>CO2</strong>, come p.es. le valvole speciali di non-ritorno <strong>CO2</strong><br />
della DENNERLE. Le normali valvole di non-ritorno per aria possono<br />
diventare fragili a causa della <strong>CO2</strong> già dopo poco tempo (la maggior<br />
parte delle volte senza che questo si noti) perdendo così le loro proprietà<br />
di tenuta.<br />
26 27
17. Sostituzione dell’indicatore speciale di <strong>CO2</strong><br />
Come la maggior parte dei coloranti, l’indicatore speciale di <strong>CO2</strong> è soggetto<br />
ad un certo invecchiamento dovuto a processi fotochimici. Per<br />
essere sicuri di ottenere sempre una reazione colorimetrica più veloce e<br />
precisa possibile, si consiglia di riempire il contenitore di test con dell’indicatore<br />
speciale di <strong>CO2</strong> nuovo ogni 4 settimane.<br />
• Per sostituire l’indicatore speciale aprire il contenitore di test ed eliminare<br />
il vecchio indicatore gettandolo in uno scarico domestico.<br />
• Risciacquare il contenitore con acqua corrente e, prima di riempirlo<br />
nuovamente, asciugarlo con un panno.<br />
18. Pulizia del test <strong>CO2</strong> a lunga durata<br />
Con acqua calda e una spugna morbida. Non utilizzare detergenti!<br />
Il contenitore di test può essere smontato per una migliore pulizia. Se<br />
necessario, ingrassare leggermente (!) i due o-ring prima di ricomporre<br />
il contenitore utilizzando della vaselina (reperibile in farmacia o in<br />
drogheria).<br />
ATTENZIONE: non utilizzare altri prodotti per ingrassare gli o-ring in<br />
quanto potrebbero falsare l’indicazione del colore<br />
19. Pulizia del Cyclo Turbo XL<br />
Con acqua calda e una spugna morbida. Non utilizzare detergenti. Il<br />
Cyclo può essere scomposto in ogni sua parte per effettuarne la pulizia.<br />
Pulire le parti interne con uno scovolino a setole morbide.<br />
20. Pulizia della pompa a motore<br />
• Staccare la spina elettrica. Estrarre la<br />
27<br />
pompa dal Cyclo. Rimuovere la gabbietta<br />
di aspirazione. Aprire la chiusura<br />
a baionetta e rimuovere il corpo della<br />
pompa. 27<br />
• Estrarre l’ingranaggio completo della<br />
pompa e l’asse. 28<br />
28<br />
• Pulire tutti i componenti con acqua di<br />
rubinetto utilizzando una spazzola<br />
adatta. Rimontare seguendo l’ordine di<br />
smontaggio in senso inverso.<br />
21. Nota importante sul tubo <strong>CO2</strong><br />
Il tubo speciale di <strong>CO2</strong> Softflex è ad auto-<br />
29<br />
tenuta e autoadesivo ed offre quindi la<br />
massima sicurezza. Per rimuovere il tubo<br />
fare leva, NON tirare! 29<br />
CONSIGLIO: attraverso tubi che non sono ermetici alla <strong>CO2</strong> (“tubi per<br />
aria”) possono andare quotidianamente perdute grosse quantità di preziosa<br />
<strong>CO2</strong>.<br />
Utilizzare pertanto sempre tubi <strong>CO2</strong> adatti come il tubo speciale di<br />
<strong>CO2</strong> Softflex della DENNERLE.<br />
Cosa fare se… : i rimedi<br />
Difetto Cause Rimedio<br />
Si sente un leggero<br />
sibilo sul raccordo<br />
filettato del riduttore<br />
di pressione e della<br />
bombola di <strong>CO2</strong>.<br />
Assenza di bollicine<br />
nel contabollicine.<br />
Si forma una grande<br />
bolla di gas nella<br />
parte superiore della<br />
camera di turbolenza.<br />
Vengono espulse<br />
troppe bollicine dallo<br />
sfiato dei gas impropri.<br />
Il riduttore di pressione<br />
è avvitato male o<br />
non è sufficientemente<br />
avvitato.<br />
La guarnizione è<br />
difettosa.<br />
Bombola di <strong>CO2</strong><br />
vuota.<br />
Valvola a spillo chiusa.<br />
Collegamenti del<br />
tubo non ermetici.<br />
Pressione di esercizio<br />
troppo bassa.<br />
Lo sfiato dei gas<br />
impropri è regolato<br />
troppo verso “bolle<br />
piccole”.<br />
L’apertura di aspirazione<br />
dell’ugello<br />
sminuzzatore o lo<br />
sfiato dei gas impropri<br />
è intasata/o.<br />
Lo sfiato dei gas<br />
impropri è regolato<br />
troppo verso “bolle<br />
grandi”.<br />
Alimentazione eccessiva<br />
di <strong>CO2</strong>.<br />
Viene deviata una<br />
quantità di acqua<br />
troppo scarsa nella<br />
camera di turbolenza.<br />
Svitare il riduttore di<br />
pressione e riavvitarlo<br />
dritto. Serrare il<br />
dado di raccordo.<br />
Sostituire la guarnizione.<br />
Fare attenzione<br />
a che la guarnizione<br />
sia correttamente<br />
posizionata e<br />
che le relative superfici<br />
siano pulite.<br />
Sostituire la bombola.<br />
Aprire la valvola a<br />
spillo.<br />
Controllare i collegamenti<br />
del tubo e, se<br />
necessario, sostituirli.<br />
Regolare la pressione<br />
di esercizio su ca. 1<br />
bar.<br />
Ruotare leggermente<br />
il coperchio (2)<br />
verso “bolle grandi”.<br />
Pulire il Cyclo e la<br />
gabbietta di aspirazione<br />
della pompa<br />
sotto acqua corrente.<br />
Ruotare leggermente<br />
il coperchio (2)<br />
verso “bolle piccole”.<br />
Ridurre leggermente<br />
l’alimentazione di<br />
<strong>CO2</strong>.<br />
Ruotare il regolatore<br />
in modo da aumentare<br />
il flusso dell’acqua.<br />
Ampliamenti<br />
Livello 1: L’Elettrovalvola per <strong>CO2</strong> Comfort DENNERLE,<br />
controllata da un timer, interrompe l’alimentazione di <strong>CO2</strong><br />
durante la notte, in quanto in queste ore le piante non consumano<br />
anidride carbonica, permettendo così di risparmiare<br />
preziose quantità di <strong>CO2</strong>.<br />
Livello 2: Il DENNERLE pH-Controller 588 Digital Comfort<br />
misura costantemente il valore pH nell’acquario e tramite<br />
l’Elettrovalvola per <strong>CO2</strong> Comfort regola con precisione<br />
e in maniera completamente automatica il valore pH<br />
e l’alimentazione di <strong>CO2</strong>.<br />
Indicazioni utili<br />
<strong>CO2</strong> Special-Indicator<br />
• Tenere il test <strong>CO2</strong> a lunga durata e l’indicatore fuori dalla portata dei<br />
bambini!<br />
• L’indicatore speciale di <strong>CO2</strong> è innocuo e privo di solventi chimici.<br />
Evitare comunque il contatto prolungato con cute ed occhi.<br />
• L’indicatore può macchiare. Evitare quindi il contatto con vestiti, tappeti,<br />
legno e materiali simili.<br />
• Se l’indicatore dovesse rovesciarsi inavvertitamente nell’acquario,<br />
esso risulta innocuo per piante, pesci ed altri abitanti dell’acquario.<br />
• L’indicatore speciale di <strong>CO2</strong> è stato riempito in atmosfera protetta.<br />
Dosaggio tecnicamente predeterminato.<br />
• Proteggere l’indicatore speciale di <strong>CO2</strong> dal sole, dalle temperature<br />
elevate e dal gelo. Conservare le ampolle in ambiente buio.<br />
Pompa a motore<br />
• La pompa non deve funzionare a secco!<br />
• Utilizzare solo con corrente alternata di<br />
230 V / 50 Hz.<br />
• Solo per uso interno.<br />
• Staccare sempre la spina prima di immergere la<br />
mano nell’acquario.<br />
• Il cavo di alimentazione della pompa non può essere sostituito. Non<br />
utilizzare la pompa se il cavo è danneggiato.<br />
Dati tecnici<br />
Bombola <strong>CO2</strong> riutilizzabile<br />
• UN Nr. 1013, Cl. 2, codice: 2A, GGVS/ADR/RID/GGVE/EINECS 2046969<br />
• Indice: max. 2000 g <strong>CO2</strong>; peso a vuoto della bombola (senza<br />
cage): vedi stampigliatura bombola; pressione a temperatura<br />
ambiente: ca. 60 bar; pressione di controllo: 250 bar; valvola della<br />
bombola antiscoppio; filettatura di collegamento W21,8 x 1/14"<br />
• Marchio TÜV: vedi stampa in rilievo sulla bombola. Le bombole <strong>CO2</strong><br />
ricaricabili devono essere periodicamente controllati dalle istituzioni<br />
dei rispettivi paesi. Osservare quindi le norme specifiche del rispettivo<br />
Paese. In Germania le bombole <strong>CO2</strong> devono essere controllati dal<br />
TÜV ogni 10 anni.<br />
• Importante: In caso di temperatura troppo elevata la sicurezza<br />
antiscoppio può deflagrare e dalla valvola della bombola può fuoriuscire<br />
del gas <strong>CO2</strong>. Effettuare la riparazione solo presso centri autorizzati.<br />
NON effettuare la riparazione coi propri mezzi.<br />
Riduttore di pressione <strong>CO2</strong> <strong>Exclusive</strong> per Classic-Line<br />
Manometro per la pressione della bombola: 0 – 250 bar. Manometro<br />
per la pressione di esercizio: 0 – 6 bar. Pressione di esercizio regolabile.<br />
Collegamento per tubi da 4/6 mm. Valvola a spillo con spillo in acciaio<br />
legato e filettatura di precisione. Valvola di sicurezza di pressione a chiusura<br />
automatica.<br />
Periodo di garanzia: 3 anni dalla data di acquisto (sono esclusi i<br />
pezzi di usura).<br />
Ricambi e accessori utili<br />
(presso i negozi specializzati)<br />
3031 Bombola <strong>CO2</strong> riutilizzabile da <strong>2.000</strong> g<br />
con gabbietta di protezione<br />
3025 Riduttore di pressione <strong>CO2</strong> Classic-Line <strong>Exclusive</strong><br />
3028 Guarnizione per riduttore di pressione, 2 pezzi<br />
1580 Trivella Turbo<br />
1588 Modulo della camera di turbolenza Cyclo<br />
3043 Ventose Longlife, verdi, 2 pezzi<br />
3042 Ventose Longlife, nere, 2 pezzi<br />
1484 Spray cercafughe<br />
3061 Tubo speciale <strong>CO2</strong> Softflex, 5 m<br />
3050 Contabollicine <strong>CO2</strong> Exact<br />
3053 Valvola speciale di non-ritorno per <strong>CO2</strong><br />
3041 Regolatore <strong>CO2</strong>, 5 ampolle<br />
Fatevi consigliare dal vostro rivenditore di fiducia sulla gamma DENNERLE<br />
di piante d’acquario e di accessori oppure richiedete i consigli gratuiti<br />
DENNERLE!<br />
Trovate i consigli gratuiti DENNERLE anche nei negozi specializzati e sul<br />
sito Internet www.dennerle.de!<br />
Vendita: DENNERLE GmbH, D-66957 Vinningen<br />
Assistenza clienti: DENNERLE GmbH, D-66981 Münchweiler<br />
www.dennerle.de<br />
28 29
Classic-Line<br />
<strong>CO2</strong> <strong>bemestingsinstallatie</strong> <strong>Exclusive</strong> <strong>2.000</strong> g<br />
Complete set met hervulbare <strong>2.000</strong> g <strong>CO2</strong>-voorraadfles.<br />
Voor de <strong>CO2</strong>-bemesting van aquaria tot 5.000 liter.<br />
- Informatie omtrent het gebruik: Graag aandachtig doorlezen. Goed bewaren. -<br />
Hartelijk gefeliciteerd met het aanschaffen van deze hoogwaardige <strong>CO2</strong> voedingsstofinstallatie van de firma DENNERLE.<br />
Bij een vakkundig gebruik en onderhoud zorgt u hiermee op eenvoudige wijze voor een betrouwbare en gelijkmatige toevoer van <strong>CO2</strong>, de belangrijkste<br />
bemesting voor aquariumplanten - voor een fantastische plantengroei. Tevens kan men met <strong>CO2</strong> een voor vissen en planten optimale pH-waarde in het licht<br />
zure tot neutrale bereik instellen. DENNERLE wenst u veel genoegen en plezier van uw aquarium!<br />
Veiligheidsvoorschriften voor kooldioxide (<strong>CO2</strong>)-flessen<br />
• Uitsluitend voor de <strong>CO2</strong>-voorziening van aquaria gebruiken.<br />
• <strong>CO2</strong>-flessen staan onder hoge druk. Daarom op het volgende letten:<br />
• <strong>CO2</strong>-flessen niet gooien. Koel bewaren. Tegen zon en warmte boven 50° C beschermen.<br />
• <strong>CO2</strong>-afname uitsluitend met geschikte drukregelaars voor <strong>CO2</strong>-flessen met schroefdraad W21,8 x 1/14", b.v. de DENNERLE drukregelaar<br />
modellen Profi 2000, Compact, Professional en <strong>Exclusive</strong>.<br />
• <strong>CO2</strong>-afname uitsluitend uit rechtop staande flessen. Voor omvallen behoeden.<br />
• <strong>CO2</strong>-flessen niet met geweld openen.<br />
• <strong>CO2</strong>-flessen niet volledig ledigen. Bijvullen uitsluitend bij geautoriseerde <strong>CO2</strong>-vulstations. Let op a.u.b.: Tarragewicht zonder Cage.<br />
Cage voor het hervullen demonteren.<br />
• <strong>CO2</strong>-gas is zwaarder dan lucht en werkt in een hoge concentratie verstikkend, daarom:<br />
• <strong>CO2</strong>-gas niet inademen.<br />
• Buiten bereik van kinderen bewaren.<br />
• De <strong>CO2</strong>-flessen op een goed beluchte plaats en niet in kelderruimtes bewaren.<br />
• Bij transport van losse flessen in voertuigen op het volgende letten: Goed beschermen tegen wegglijden en omverrollen, anders kan het<br />
ventiel beschadigd raken en <strong>CO2</strong>-gas ontsnappen. Voor voldoende beluchting zorgen, b.v. open raam, ingeschakelde ventilator e.d.<br />
Zo werkt de<br />
<strong>CO2</strong> voedingsstofinstallatie <strong>Exclusive</strong><br />
De <strong>CO2</strong>-drukregelaar <strong>Exclusive</strong> reduceert de druk van de fles tot een<br />
werkdruk die aan de praktijk kan worden aangepast. Met het precisietransmissie-naaldventiel<br />
kan de <strong>CO2</strong> zeer exact en comfortabel worden<br />
gedoseerd. De controle wordt uitgevoerd met de <strong>CO2</strong>-bellenteller Exact.<br />
Via de speciale <strong>CO2</strong>-dichte Speciaal Slang Softflex komt de <strong>CO2</strong> naar<br />
het aquarium. De <strong>CO2</strong> Cyclo Turbo XL zorgt voor een zeer effectieve<br />
<strong>CO2</strong>-oplossing in het aquariumwater. Een <strong>CO2</strong> speciaal-terugslagventiel<br />
beschermt de kostbare drukregelaar tegen eventueel terugstromend<br />
water. Aan de hand van de <strong>CO2</strong> lange termijn-test Correct kan het <strong>CO2</strong>gehalte<br />
in het aquariumwater direct worden afgelezen.<br />
Bijzonder voordeel: De hervulbare <strong>2.000</strong> g <strong>CO2</strong>-voorraadfles. Deze<br />
zorgt ook bij grotere aquaria voor een lange <strong>CO2</strong>-voorziening zonder dat<br />
er een fles moet worden vervangen.<br />
�<br />
<strong>CO2</strong> voedingsstofinstallatie <strong>Exclusive</strong><br />
in een overzicht<br />
�<br />
�<br />
�<br />
�<br />
NL<br />
� Hervulbare <strong>CO2</strong> fles <strong>2.000</strong> g met Cage (veiligheidsbeugel)<br />
� <strong>CO2</strong> Drukregelaar <strong>Exclusive</strong><br />
� <strong>CO2</strong> Speciaal-Terugslagventiel<br />
� <strong>CO2</strong> Bellenteller Exact<br />
� <strong>CO2</strong> Special Slang Softflex, 5 m<br />
� <strong>CO2</strong>-diffusor Cyclo Turbo XL<br />
� Motorpomp � <strong>CO2</strong> lange termijn-test Correct<br />
�<br />
�<br />
�<br />
<strong>CO2</strong> Drukregelaar <strong>Exclusive</strong><br />
� Flesdruk-manometer<br />
� Werkdruk-instelschroef (onder beschermkap)<br />
� Werkdruk-manometer<br />
� Precisie-transmissie-naaldventiel<br />
<strong>CO2</strong> Cyclo Turbo XL<br />
� Slang met aansluiting voor<br />
<strong>CO2</strong>-toevoer<br />
� Deksel met ontluchting voor oneigenlijke<br />
gassen<br />
� Wervelkamer-hoofdeinde<br />
� Wateruitloopstuk<br />
� Turbo-inzetstuk<br />
� Wervelkamer-module<br />
� Sluitstop<br />
� Sluitrooster<br />
� Longlife-zuignap<br />
� Verdelerhoek<br />
� Slangaansluiting voor pomp<br />
� Regelkraan<br />
� Fijnmaalkop<br />
<strong>CO2</strong> Bellenteller<br />
� Houder<br />
� Longlife-zuiger<br />
� Bellenteller<br />
� <strong>CO2</strong>-toevoer van de drukregelaar<br />
� <strong>CO2</strong>-uitgang aan het aquarium<br />
� Reflectorbeugel<br />
� Veiligheidsriem<br />
Opbouw en aansluiting<br />
�<br />
�<br />
�<br />
13<br />
12<br />
11<br />
10<br />
�<br />
�<br />
�<br />
�<br />
�<br />
�<br />
�<br />
�<br />
�<br />
1. Drukregelaar aansluiten<br />
• Het naaldventiel sluiten door tegen de<br />
wijzers van de klok in te draaien (indien<br />
dit nog niet gesloten is). ATTENTIE:<br />
Slechts licht aandraaien! �<br />
• De drukregelaar met dopmoer aan de<br />
<strong>CO2</strong>-fles bevestigen. De dopmoer met<br />
bijgesloten steeksleutel nr. 30 vastdraaien.<br />
Abb. Op een correct zittende pakking<br />
en schone pakkingsvlakken letten!<br />
� ATTENTIE: <strong>CO2</strong>-afname uitsluitend<br />
uit rechtop staande flessen. Voor omvallen<br />
behoeden.<br />
2. Het Terugslagventiel in de<br />
<strong>CO2</strong>-slang plaatsen<br />
• Met een stevige schaar 2 tot 5 cm lange<br />
stukken recht afknippen van de <strong>CO2</strong>slang.<br />
�<br />
• De twee dopmoeren van het <strong>CO2</strong>-terugslagventiel<br />
afschroeven.<br />
• De dopmoeren op de slangeinden steken<br />
�<br />
�<br />
�<br />
�<br />
�<br />
�<br />
�<br />
�<br />
en de slangen tot aan de aanslag op de<br />
slangaansluitingen van het terugslagventiel<br />
schuiven. TIP: De slangaansluitingen<br />
van tevoren bevochtigen, dan kan de<br />
slang er gemakkelijker opgeschoven worden.<br />
• De dopmoeren vastschroeven. �<br />
3. <strong>CO2</strong>-slang op Drukregelaar<br />
aansluiten<br />
• Slang met terugslagventiel op het naaldventiel<br />
van de drukregelaar aansluiten<br />
en met de dopmoer borgen. � ATTEN-<br />
TIE: De pijl op het terugslagventiel moet<br />
in de stroomrichting van de <strong>CO2</strong> wijzen!<br />
4. Bellenteller aansluiten<br />
• De twee afsluitklemmen openen en de<br />
bellenteller uit de houder nemen.<br />
• De veiligheidsriem met de pluizige kant<br />
naar buiten door de beide gleuven van<br />
de houder halen en de houder aan de<br />
<strong>CO2</strong>-voorraadfles bevestigen. �<br />
Overige bevestigingsmogelijkheden:<br />
(1) met de twee zuignappen aan de<br />
aquariumruit of (2) met behulp van<br />
schroeven (niet bij levering inbegrepen)<br />
aan de muur of in de onderkast.<br />
Daartoe de zuignap en nippel verwijderen.<br />
• De bellenteller voor 3/4 met leidingwater<br />
vullen. �<br />
• De dopmoeren van de bellenteller<br />
afschroeven en op het slanguiteinde steken.<br />
De slang die van de drukregelaar<br />
komt op de slangaansluiting met de bellentellerbuis<br />
schuiven, de slang die naar<br />
het aquarium leidt op de andere slangaansluiting.<br />
De dopmoeren weer vastschroeven.<br />
�<br />
• De bellenteller in de houder klikken en<br />
de afsluitklemmen sluiten. �<br />
5. <strong>CO2</strong> Cyclo Turbo XL aansluiten<br />
• De Cyclo Turbo XL met warm leidingwater<br />
afspoelen. Geen reinigingsmiddelen<br />
gebruiken! �<br />
• In het aquarium een geschikte plaats<br />
voor de bevestiging bepalen.<br />
De plaats mag niet te fel verlicht zijn om<br />
algengroei te voorkomen.<br />
• De <strong>CO2</strong>-toevoerslang op de slangaansluiting<br />
aanbrengen (van tevoren bevochtigen!).<br />
�<br />
30 31<br />
�<br />
�<br />
�<br />
�<br />
�<br />
� � �<br />
�<br />
�<br />
�
�<br />
�<br />
• De motorpomp op de regelkraan aansluiten.<br />
�<br />
Aanwijzing: De Cyclo Turbo XL kan ook<br />
(zonder pomp) op de filteruitgang van<br />
het buitenfilter worden aangesloten. Alle<br />
in de handel verkrijgbare slangmaten<br />
van 9/12 mm en 12/16 mm en<br />
16/22 mm passen.<br />
• De Cyclo met de zuigers loodrecht, minimaal<br />
5 cm onder de waterspiegel in het<br />
aquarium bevestigen. �<br />
6. <strong>CO2</strong>-slang bevestigen<br />
• De <strong>CO2</strong>-slang kan met behulp van de<br />
slanghouders netjes geïnstalleerd en veilig<br />
bevestigd worden.<br />
• Het flesventiel door draaien van het<br />
handwiel tegen de wijzers van de klok<br />
in langzaam openen. Het ventiel er tot<br />
aan de aanslag afschroeven en vervolgens<br />
weer een 1/2 slag vastdraaien.<br />
�<br />
De flesdruk-manometer geeft nu ca.<br />
60 bar aan (bij 20° C).<br />
• Open het naaldventiel langzaam en<br />
aanvankelijk slechts een klein stukje,<br />
tot de eerste bellen uit de opening van<br />
de bellenteller inkomen.<br />
• Het gewenste aantal bellen met het<br />
naaldventiel instellen:<br />
- kloksgewijs draaien: Het aantal bellen verhogen. �<br />
- tegen de wijzers van de klok in draaien: Het aantal bellen reduceren.<br />
�<br />
�<br />
Uw <strong>CO2</strong> voedingsstofinstallatie<br />
<strong>Exclusive</strong> is nu bedrijfsklaar.<br />
Instellen van de hoeveelheid <strong>CO2</strong><br />
(aantal bellen)<br />
7. De juiste hoeveelheid <strong>CO2</strong><br />
Voor prachtig plantengroei raadt DENNERLE een <strong>CO2</strong>-gehalte in het aquarium<br />
aan tussen 15 en 30 mg/l, ideaal is 20 tot 25 mg/l<br />
Het voor dit <strong>CO2</strong>-gehalte benodigde aantal bellen per minuut hangt van<br />
verschillende factoren af (beplanting, beweging van het water, oppervlakte/volume-verhouding,<br />
enz.). Daarom is het nodig, de <strong>CO2</strong>-toevoerhoeveelheid<br />
voor elk aquarium apart vast te stellen<br />
8. Instellen van het aantal bellen<br />
Vuistregel voor de basisinstelling: Begin met ca. 10 bellen per minuut per<br />
100 l aquariumwater, d.w.z. voor een 200 l-aquarium b.v. met 2 x 10<br />
= 20 bellen per minuut.<br />
Pas de toegevoegde hoeveelheid <strong>CO2</strong> in kleine stapjes verdeeld over<br />
meerdere dagen aan het gewenste <strong>CO2</strong>-gehalte aan. Let op: Hoe sterker<br />
het oppervlak van het water in beweging gebracht wordt (b.v. door filter,<br />
extra beluchting), des te meer <strong>CO2</strong> wordt het aquarium weer uitgedreven.<br />
�<br />
�<br />
- +<br />
Let op: Het aantal bellen reageert met vertraging op veranderingen<br />
aan het naaldventiel. Daarom het aantal bellen met zorg instellen.<br />
• Het aantal bellen de eerste dagen meermaals controleren en eventueel<br />
bijstellen. Later volstaat het over het algemeen, het aantal bellen<br />
eenmaal per week te controleren.<br />
Interessant om te weten: De door de <strong>CO2</strong> bellenteller Exact geproduceerde<br />
<strong>CO2</strong>-bellen hebben een gemiddeld gewicht van 0,125 mg en<br />
een volume van 0,063 ml. 10 bellen per minuut komt derhalve overeen<br />
met een <strong>CO2</strong>-toevoer van 1,8 g resp. 0,9 liter per dag<br />
9. Cyclo Turbo XL instellen<br />
Motorpomp in bedrijf stellen<br />
• De netstekker in het stopcontact steken. De veiligheidsvoorschriften<br />
in acht nemen (zie hieronder)!<br />
Regelkraan instellen<br />
Met behulp van de regelkraan leidt men een deel van het van het filter<br />
komende water naar de <strong>CO2</strong>-oplossing in de wervelkamer. Het overige<br />
water stroomt door het wateruitloopstuk direct het aquarium in.<br />
A<br />
• Stelling A: Er wordt geen water naar<br />
de wervelkamer geleid.<br />
B<br />
• Stelling B: 50 % van het water wordt<br />
naar de Cyclo en 50 % het aquarium<br />
in geleid.<br />
C<br />
• Stelling C: Al het water wordt naar de<br />
wervelkamer van de Cyclo geleid.<br />
De regelkraan dient dusdanig ingesteld te worden dat de waterdoorstroming<br />
door de wervelkamer zo groot mogelijk is en de <strong>CO2</strong>-belletjes<br />
niet naar beneden gedrukt worden maar juist langzaam omhooggaan.<br />
Restgas-ontluchting instellen<br />
De oneigenlijke gassen worden door het speciaal geconstrueerde deksel<br />
van de Cyclo automatisch en regelmatig afgevoerd. Het deksel kan<br />
daartoe een beetje worden verdraaid:<br />
�<br />
Tegen de linker aanslag (met de wijzers<br />
van de klok meedraaien) is de ontluchting<br />
voor oneigenlijke gassen maximaal<br />
open, te herkennen aan de daar<br />
uittredende, grote bellen. Hoe meer men<br />
tegen de richting van de wijzers van de<br />
klok draait, hoe kleiner de belletjes wor-<br />
den. Draait men naar rechts tot aan de aanslag, dan is de ontluchting<br />
voor oneigenlijke gassen gesloten. Let op het desbetreffende symbool<br />
op het deksel. �<br />
De ontluchting voor oneigenlijke gassen dient dusdanig ingesteld te<br />
worden dat de oneigenlijke gassen wel regelmatig afgevoerd worden<br />
maar dat de resterende <strong>CO2</strong> in de wervelkamer zoveel mogelijk tijd<br />
heeft om op te lossen. Daarom begint men altijd op de stand "grote<br />
bellen". Als er teveel bellen via de ontluchting voor oneigenlijke gassen<br />
worden afgestoten, draait men het deksel een stukje in de richting<br />
"kleine bellen".<br />
10. Eenvoudige controle met de <strong>CO2</strong> Lange Termijn-Test<br />
Correct<br />
De <strong>CO2</strong> lange termijn-test Correct maakt een permanente en exacte<br />
controle van de <strong>CO2</strong>-hoeveelheid in het aquarium mogelijk.<br />
Afhankelijk van het <strong>CO2</strong>-gehalte reageert de <strong>CO2</strong> speciaal-indicator met<br />
een kleurverandering: van • blauw = te weinig <strong>CO2</strong> via • groen = <strong>CO2</strong><br />
optimaal tot • geel = te veel <strong>CO2</strong>.<br />
Op de kleurenvergelijkings-schaal kan de <strong>CO2</strong>-hoeveelheid in het aquarium<br />
direct in milligram per liter afgelezen worden.<br />
De test geeft het <strong>CO2</strong>-gehalte door de door DENNERLE ontwikkelde <strong>CO2</strong><br />
speciaal-indicator altijd correct aan. Andere zuren in het aquariumwater,<br />
b.v. humuszuren en veranderingen van de karbonaathardheid door toenemende<br />
hardheid, verdamping of water verversen hebben geen<br />
invloed!<br />
Wat is wat<br />
�<br />
�<br />
�<br />
• Testreservoir uit de houdbeugel nemen.<br />
Testreservoir-bovenstuk eraf trekken �<br />
• Een ampul met <strong>CO2</strong> speciaal-indicator<br />
nemen en ervoor zorgen dat er zich geen<br />
indicator in de ampulhals bevindt! Daartoe<br />
de indicator in de ampul naar beneden<br />
schudden (als bij een koortsthermometer).<br />
De ampul openen door de afsluitklem eraf<br />
te draaien. �<br />
• De volledige inhoud van de ampul in het<br />
bovenstuk van het testreservoir druppelen.<br />
�<br />
21<br />
22<br />
23<br />
• Het onderstuk van de behuizing samen<br />
met de reflectorkegel in het bovenstuk<br />
steken. Let erop dat de O-ringen goed<br />
zitten! 21<br />
• Testreservoir voorzichtig omdraaien en<br />
in de houdbeugel plaatsen. 22<br />
• <strong>CO2</strong>lange termijn-test met behulp van<br />
de zuiger op een goed zichtbare plaats<br />
met geringe stroming van het water verticaal<br />
in het aquarium bevestigen. 23<br />
24<br />
• Kleurenvergelijkings-schaal aan de buitenkant<br />
op de aquariumruit plakken. 24<br />
Attentie: Omdat de <strong>CO2</strong> enige tijd nodig<br />
heeft om in de indicator erin te diffunderen,<br />
reageert de kleurenaanduiding op<br />
veranderingen van het <strong>CO2</strong>-gehalte telkens<br />
met een vertraging van enkele<br />
uren. Verhoog daarom de <strong>CO2</strong>-toevoer altijd in kleine stappen verdeeld<br />
over meerdere dagen tot het optimale <strong>CO2</strong>-gehalte is ingesteld.<br />
11. Toepassing als pH Lange Termijn-Test<br />
De pH-waarde in het aquarium op de eerste plaats door de karbonaathardheid<br />
en het <strong>CO2</strong>-gehalte bepaald (de <strong>CO2</strong> lost deels als koolzuur op<br />
in het water). Op voorwaarde dat er zich geen andere, de pH in belangrijke<br />
mate beïnvloedende substanties in het water bevinden (b.v. grotere<br />
hoeveelheden humuszuren of nitraat, pH Plus-, pH Minus-preparaten<br />
enz.) kan met de <strong>CO2</strong> lange termijn-test van DENNERLE ook de pHwaarde<br />
in het aquarium worden bewaakt. Daartoe:<br />
• De karbonaathardheid van het aquari-<br />
25<br />
umwater meten (tests in speciaalzaken<br />
verkrijgbaar).<br />
• De bijpassende kleurenvergelijkingsschaal<br />
aan de buitenkant op de aquariumruit<br />
plakken. 25<br />
Op de kleurenschaal kan dan direct de<br />
pH-waarde van het aquariumwater<br />
afgelezen worden.<br />
De karbonaathardheid regelmatig meten en steeds de bijpassende kleurenschaal<br />
gebruiken.<br />
12. Wie nog meer wil weten: Hoe u het <strong>CO2</strong>-gehalte in<br />
het aquarium ook kunt bepalen<br />
Omdat het <strong>CO2</strong>-gehalte, de karbonaathardheid (KH) en de pH-waarde<br />
in een bepaalde verhouding tot elkaar staan, kan het <strong>CO2</strong>-gehalte van<br />
het water op de volgende manier worden berekend:<br />
32 33<br />
�<br />
�<br />
�<br />
�<br />
�<br />
�<br />
�<br />
�Testreservoir-onderstuk<br />
�Testreservoir-bovenstuk<br />
�Reflectiekegel<br />
�O-ringen<br />
�Houdbeugel<br />
�<br />
�<br />
�Houder<br />
�Longlife-zuignap<br />
�<strong>CO2</strong> speciaal-indicator<br />
�Kleurenvergelijkings-schaal
• Meet de karbonaathardheid van het aquariumwater.<br />
• Lees in de tabel de bij het gewenste <strong>CO2</strong>-gehalte passende pH-waarde<br />
af. Deze pH-waarde +/- 0,1 dient u in te stellen door het passend<br />
afstellen van het aantal bellen.<br />
Voorbeeld: Karbonaathardheid 4° d, aanbevolen pH 6,8 +/-0,1.<br />
te veel <strong>CO2</strong> <strong>CO2</strong> juist te weinig <strong>CO2</strong><br />
pH-waarde<br />
KH 6,3 6,4 6,5 6,6 6,7 6,8 6,9 7,0 7,1 7,2 7,3 7,4 7,5<br />
2 32 25 20 16 13 10 8 6 5 4 3 3 2<br />
3 48 38 30 24 19 15 12 10 8 6 5 4 3<br />
4 64 51 40 32 25 20 16 13 10 7 6 5 4<br />
5 80 63 50 40 32 25 20 16 13 10 8 6 5<br />
6 96 76 60 48 38 30 24 19 15 12 10 8 6<br />
7 111 89 70 56 44 35 28 22 18 14 11 9 7<br />
8 127 101 80 64 51 40 32 25 20 16 13 10 8<br />
9 143 114 90 72 57 45 36 29 23 18 14 11 9<br />
10 159 126 100 80 63 50 40 32 25 20 16 13 10<br />
11 175 139 111 88 70 55 44 35 28 22 18 14 11<br />
12 191 152 121 96 76 60 48 38 30 24 19 15 12<br />
13 207 164 131 104 82 65 52 41 33 26 21 16 13<br />
14 223 177 141 112 89 70 56 44 35 28 22 18 14<br />
13. Zo functioneert de <strong>CO2</strong> Cyclo Turbo XL<br />
De <strong>CO2</strong> treedt onder in de Cyclo door de opening van de <strong>CO2</strong>-buis uit. Van hier<br />
uit stijgen bellen naar boven en verzamelen zich onder de afzonderlijke treden<br />
van het turbo-inzetstuk.<br />
Maar het water stroomt in een wervelbeweging langs de zo "vastgehouden"<br />
<strong>CO2</strong>-bellen heen naar beneden. Door dit zeer effectieve tegenstroomprincipe lost<br />
de <strong>CO2</strong> uiterst snel en effectief op.<br />
Tegelijk dringen andere, op natuurlijke wijze in het aquariumwater opgeloste<br />
gassen in de <strong>CO2</strong>-bellen binnen. Deze zogenoemde oneigenlijke gassen zijn de<br />
reden dat de belletjes naar boven toe weliswaar kleiner worden maar niet volledig<br />
op kunnen lossen. Wanneer de bellen in het hoofdeinde van de wervelkamer<br />
van de Cyclo aankomen, bestaan ze reeds overwegend uit oneigenlijke<br />
gassen en bevatten nauwelijks nog <strong>CO2</strong>. Hier<br />
worden ze nu door de fijnmaalkop aangezogen<br />
en in duizenden kleine belletjes verdeeld.<br />
Daardoor worden ook de laatste <strong>CO2</strong>resten<br />
nog opgelost, voordat de oneigenlijke<br />
gassen via de speciaal geconstrueerde restgas-ontluchting<br />
worden afgevoerd.<br />
De Cyclo Turbo XL dekt, bij normaal <strong>CO2</strong>gebruik,<br />
de behoefte van aquaria tot 5.000<br />
liter. Het vermogen ervan kan nog aanzienlijk<br />
worden opgeschroefd en op die manier kan<br />
de pomp aan ieder aquarium individueel worden<br />
aangepast. Daartoe worden aan de<br />
onderkant gewoon verlengstukken (bestelnr.:<br />
1588) en turbo-inzetstukken (bestelnr.:<br />
1580) geplaatst.<br />
Verzorging en onderhoud<br />
14. <strong>CO2</strong>-fles vervangen<br />
• Flesventiel sluiten.<br />
• De eventuele restdruk in de drukregelaar wegnemen door het naaldventiel<br />
te openen. Het naaldventiel sluiten. Let op: Slechts licht aandraaien!<br />
• De drukregelaar van de <strong>CO2</strong>-fles afschroeven en op nieuw gevulde<br />
<strong>CO2</strong>-fles schroeven. Het aantal bellen opnieuw instellen.<br />
ATTENTIE: Het opnieuw vullen van de hervulbare <strong>CO2</strong>-flessen is uitsluitend<br />
toegestaan door geautoriseerde <strong>CO2</strong>-vulstations!<br />
Bijzondere aanwijzingen: Het naaldventiel dient uitsluitend voor de<br />
fijne afstelling van het aantal bellen. Om de <strong>CO2</strong>-toevoer langere tijd uit<br />
te schakelen altijd het flesventiel sluiten!<br />
Indien de <strong>CO2</strong>-fles langere tijd niet gebruikt wordt, de drukregelaar eraf<br />
schroeven.<br />
15. Werkdruk op de Drukregelaar bijstellen<br />
De werkdruk van de drukregelaar <strong>Exclusive</strong> is door de fabriek op ca. 1<br />
bar ingesteld. Met name in de eerste weken na de ingebruikstelling kan<br />
de werkdruk iets veranderen omdat de pakkingen zich zetten.<br />
Werkdruk bijstellen:<br />
26<br />
• De beschermkap eraf nemen<br />
• Verhogen: De werkdruk-instelschroef<br />
met een passende schroevendraaier<br />
+ - naar " + " draaien 26<br />
Verlagen: De werkdruk-instelschroef<br />
naar " - " draaien<br />
16. <strong>CO2</strong> Special-Terugslagventiel controleren<br />
et terugslagventiel beschermt uw kostbare drukregelaar tegen corrosie<br />
door terugstromend water. Dat geschiedt heel lang en op betrouwbare<br />
wijze. Omdat zich in de loop der tijd echter stof- en verfdeeltjes en<br />
metalen deeltjes op de afdichtingsvlakken af kunnen zetten, moet het<br />
terugslagventiel uiterlijk om de 2 jaar gecontroleerd en eventueel vervangen<br />
worden.<br />
Controle:<br />
• Het naaldventiel op de <strong>CO2</strong>-drukregelaar sluiten:<br />
• Na 24 uur de dopmoer aan die kant van het terugslagventiel die<br />
naar de drukregelaar wijst, eraf schroeven.<br />
• De <strong>CO2</strong>-slang eraf trekken en controleren of er water in binnengedrongen<br />
is. Indien dit het geval is: Het terugslagventiel vervangen.<br />
Indien dit niet het geval is: De slang weer op het terugslagventiel<br />
aansluiten.<br />
• Het aantal bellen opnieuw instellen.<br />
Geen zorg: 24 uur zonder <strong>CO2</strong>-toevoeging wordt door een goed functionerend<br />
aquarium normaal gesproken probleemloos doorstaan.<br />
Belangrijke aanwijzing: Gebruik uitsluitend terugslagventielen die ontworpen<br />
zijn voor het gebruik met <strong>CO2</strong>, zoals het DENNERLE <strong>CO2</strong><br />
Special-Terugslagventiel. Normale lucht-terugslagventielen<br />
kunnen door <strong>CO2</strong> al binnen korte tijd – meestal ongemerkt - bros<br />
worden en gaan dan lekken.<br />
17. <strong>CO2</strong> Special-Indicator vervangen<br />
De indicator is, zoals de meeste kleurstoffen, aan een bepaalde veroudering<br />
door fotochemische processen onderhevig. Om steeds een zo<br />
snel en exact mogelijke kleurreactie te waarborgen raden wij u daarom<br />
aan het testreservoir om de 4 weken met verse <strong>CO2</strong> speciaal-indicator<br />
te vullen.<br />
• Daartoe het testreservoir openen en de oude indicator weg laten<br />
lopen (door de riolering).<br />
• Het testreservoir met leidingwater uitspoelen en, voordat het<br />
opnieuw gevuld wordt, met een keukendoek o.i.d. afdrogen.<br />
18. <strong>CO2</strong> Lange Termijn-Test reinigen<br />
Met warm water en een zachte spons. Geen reinigingsmiddelen gebruiken!<br />
Om het te reinigen kan het testreservoir uit elkaar gehaald worden.<br />
De twee O-ringen voor de montage eventueel licht (!) met vaseline<br />
invetten (apotheek, drogist).<br />
ATTENTIE: Gebruik geen andere smeermiddelen, omdat dat de kleurweergave<br />
vervalsen kan.<br />
19. Cyclo Turbo XL reinigen<br />
Met warm water en een zachte spons. Geen reinigingsmiddelen gebruiken.<br />
Om hem te reinigen kan de Cyclo volledig uit elkaar gehaald worden.<br />
De delen aan de binnenkant kunnen met een zachte flessenborstel<br />
worden schoongemaakt.<br />
20. Motorpomp reinigen<br />
• De netstekker uit het stopcontact trek-<br />
27<br />
ken. De pomp van de Cyclo aftrekken.<br />
De aanzuigkorf eraf halen. De bajonetsluiting<br />
openen en het pomphuis<br />
eraf nemen. 27<br />
• Het complete pomprad en de as eruit<br />
trekken. 28<br />
28<br />
• Alle delen met een passend borsteltje<br />
onder leidingwater reinigen. In omgekeerde<br />
volgorde weer monteren.<br />
21. Belangrijke aanwijzing voor de <strong>CO2</strong>-slang<br />
29<br />
De <strong>CO2</strong>-speciaalslang Softflex is zelfdichtend<br />
en zelfborgend en biedt zo een hoge<br />
mate van veiligheid. Om hem te verwijderen<br />
de slang altijd afhendelen, er NIET<br />
aftrekken! 29<br />
TIP: Door slangen die niet <strong>CO2</strong>-dicht zijn (luchtslangen), kunnen dagelijks<br />
grote hoeveelheden waardevolle <strong>CO2</strong> verloren gaan. Gebruik<br />
daarom altijd geschikte <strong>CO2</strong>-slangen als de DENNERLE <strong>CO2</strong> Special<br />
Slang Softflex.<br />
Wat te doen indien... – Opheffen fouten<br />
Storing Oorzaak Remedie<br />
Op de schroefverbinding<br />
van de drukregelaar<br />
en de <strong>CO2</strong>-fles is<br />
een zacht gesis te<br />
horen.<br />
Geen bellen meer bij<br />
de bellenteller<br />
In het bovenste deel<br />
van de wervelkamer<br />
vormt zich een grote<br />
gasbel.<br />
Er worden teveel bellen<br />
via de restgasontluchtinguitgestoten.<br />
De drukregelaar is er<br />
scheef of niet vast<br />
genoeg op geschroefd.<br />
Pakking defect.<br />
<strong>CO2</strong>-fles leeg.<br />
Naaldventiel gesloten.<br />
Slangverbindingen<br />
lekken.<br />
Werkdruk te laag.<br />
De restgas-ontluchting<br />
is te klein<br />
ingesteld.<br />
De aanzuigopening<br />
van de fijnmaalkop<br />
of de restgas-ontluchting<br />
is verstopt.<br />
De restgas-ontluchting<br />
is te groot<br />
ingesteld.<br />
Er wordt teveel <strong>CO2</strong><br />
toegevoerd.<br />
Er wordt te weinig<br />
water door de wervelkamer<br />
geleid.<br />
De drukregelaar eraf<br />
schroeven en er weer<br />
recht opschroeven.<br />
Dopmoer vastdraaien.<br />
Nieuwe pakking aanbrengen.<br />
Erop letten<br />
dat de pakking correct<br />
zit en dat de<br />
pakkingsvlakken<br />
schoon zijn.<br />
Replace <strong>CO2</strong> cylinder.<br />
Open needle valve.<br />
Check hose connection,<br />
replace if necessary.<br />
Set operating pressure<br />
to approx. 1 bar.<br />
Het deksel (2) een<br />
beetje in de richting<br />
"grote bellen" verdraaien.<br />
De Cyclo en de aanzuigkorf<br />
van de<br />
pomp onder stromend<br />
water reinigen.<br />
Het deksel (2) een<br />
beetje in de richting<br />
"kleine bellen" verdraaien.<br />
De <strong>CO2</strong>-toevoer iets<br />
verminderen.<br />
De waterdoorstroming<br />
met behulp van<br />
de regelkraan verhogen.<br />
Uitbouwfases<br />
Fase 1: De DENNERLE <strong>CO2</strong> Nachtschakeling Comfort schakelt,<br />
gestuurd via een tijdklop, de <strong>CO2</strong>-toevoer 's nachts uit,<br />
omdat planten 's nachts geen <strong>CO2</strong> verbruiken. Zo wordt<br />
waardevol <strong>CO2</strong> gespaard.<br />
34 35
Fase 2: De DENNERLE pH-Controller 588 Digital Comfort<br />
meet permanent de pH-waarde in het aquarium en regelt via<br />
de <strong>CO2</strong> Nachtschakeling Comfort de toevoeging van<br />
de <strong>CO2</strong> exact en volautomatisch.<br />
Bijzondere aanwijzingen<br />
<strong>CO2</strong> Special-Indicator<br />
• De <strong>CO2</strong> lange termijn-test en de indicator buiten bereik van kinderen<br />
houden!<br />
• De <strong>CO2</strong> special-indicator is ongevaarlijk en vrij van chemische oplosmiddelen.<br />
Desondanks langdurig contact met de huid en oogcontact<br />
vermijden.<br />
• De indicator kan eventueel kleur afgeven. Daarom contact met kleding,<br />
kleden, hout e.d. vermijden.<br />
• Per ongeluk in het aquarium terechtgekomen indicator is ongevaarlijk<br />
voor alle vissen, planten en andere aquariumbewoners.<br />
• Der <strong>CO2</strong> special-indicator is onder beschermde atmosfeer gevuld.<br />
Vulhoogte technisch gebonden.<br />
De <strong>CO2</strong> special-indicator tegen zon, hitte en vorst beschermen. De<br />
ampullen steeds tegen licht beschermd bewarenx<br />
Motorpomp<br />
• De pomp mag niet droog lopen!<br />
• Uitsluitend voor wisselstroom 230 V / 50 Hz.<br />
• Uitsluitend voor toepassing in ruimtes<br />
• Voor plaatsing in het aquarium steeds de netstekker<br />
uit het stopcontact trekken.<br />
• De aansluitleiding van de pomp kan niet worden vervangen. Bij<br />
beschadiging van de leiding mag het apparaat niet meer worden<br />
gebruikt.<br />
Technische gegevens<br />
Hervulbare <strong>CO2</strong>-fles<br />
• UN-nr. 1013, kl. 2, alinea.: 2A, GGVS/ADR/RID/GGVE/EINECS 2046969<br />
• Inhoud: max. 2000 g <strong>CO2</strong>; gewicht van de lege fles (zonder Cage):<br />
Zie stempel op de fles; druk op kamertemperatuur: ca. 60 bar; proefdruk:<br />
250 bar; flesventiel met berstzekering; schroefdraad W21,8<br />
x 1/14"<br />
• TÜV-stempel: zie stempel fles. Hervulbare <strong>CO2</strong>-flessen moeten regelmatig<br />
door de daartoe bestemde instituties van een land worden<br />
gecontroleerd. Derhalve de desbetreffende voorschriften in dat land<br />
in acht nemen! In Duitsland moeten <strong>CO2</strong>-flessen op de 10 jaar door<br />
de TÜV (technische keuringsdienst) worden gecontroleerd.<br />
• Belangrijke aanwijzing: Bij een te hoge temperatuur resp. te hoge<br />
druk barst de berstzekering van het flesventiel en kan het <strong>CO2</strong>-gas<br />
eruit stromen. Reparaties mogen uitsluitend door geautoriseerde<br />
<strong>CO2</strong>-vulstations worden uitgevoerd - NIET zelf repareren!<br />
<strong>CO2</strong> Drukregelaar <strong>Exclusive</strong> voor de Classic-Line<br />
Flesdruk-manometer: 0 -250 bar. Werkdruk-manometer: 0 - 6 bar.<br />
Werkdruk instelbaar. Aansluiting voor slang 4/6 mm. Precisie-naaldventiel<br />
met edelstaalnaald en fijne schroefdraad. Zelfsluitend overdrukventiel.<br />
Garantieduur: 3 jaar na datum aankoop (m.u.v. slijtagedelen).<br />
36<br />
Onderdelen en nuttige accessoires<br />
(bij de speciaalzaak verkrijgbaar)<br />
3031 Hervulbare <strong>CO2</strong> fles <strong>2.000</strong> g met Cage<br />
3025 Classic-Line <strong>CO2</strong> Drukregelaar <strong>Exclusive</strong><br />
3028 Pakking voor de Classic-Line Drukregelaar, 2 stuks<br />
1580 Turbo-inzetstuk<br />
1588 Cyclo-verlenging<br />
3043 Longlife-zuignap, groen, 2 stuks<br />
3042 Longlife-zuignap, zwart, 2 stuks<br />
1484 Lekzoekspray<br />
3061 <strong>CO2</strong> Special Slang Softflex, 5 m<br />
3050 <strong>CO2</strong> Bellenteller Exact<br />
3053 <strong>CO2</strong> Special-Terugslagventiel<br />
3041 <strong>CO2</strong> Special-Indicator, 5 ampullen<br />
Laat u zich in de speciaalzaak over het DENNERLE aquariumplanten- en<br />
accessoires-programma adviseren en vraag onze gratis DENNERLE<br />
Proftips aan!<br />
DENNERLE Proftips krijgt u ook bij de speciaalzaak en op het internet<br />
via www.dennerle.de!<br />
Verkoop: DENNERLE GmbH, D-66957 Vinningen<br />
Klantenservice: DENNERLE GmbH, D-66981 Münchweiler<br />
www.dennerle.de