ELICA, ARIA E LUCE - Cucinagalleria-sbo.com
ELICA, ARIA E LUCE - Cucinagalleria-sbo.com
ELICA, ARIA E LUCE - Cucinagalleria-sbo.com

You also want an ePaper? Increase the reach of your titles
YUMPU automatically turns print PDFs into web optimized ePapers that Google loves.
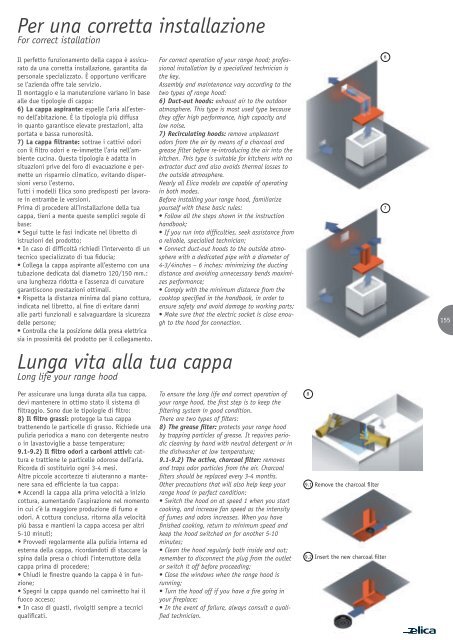
Per una corretta installazione<br />
For correct istallation<br />
Il perfetto funzionamento della cappa è assicurato<br />
da una corretta installazione, garantita da<br />
personale specializzato. È opportuno verifi care<br />
se l’azienda offre tale servizio.<br />
Il montaggio e la manutenzione variano in base<br />
alle due tipologie di cappa:<br />
6) La cappa aspirante: espelle l’aria all’esterno<br />
dell’abitazione. È la tipologia più diffusa<br />
in quanto garantisce elevate prestazioni, alta<br />
portata e bassa rumorosità.<br />
7) La cappa fi ltrante: sottrae i cattivi odori<br />
con il fi ltro odori e re-immette l’aria nell’ambiente<br />
cucina. Questa tipologia è adatta in<br />
situazioni prive del foro di evacuazione e permette<br />
un risparmio climatico, evitando dispersioni<br />
verso l’esterno.<br />
Tutti i modelli Elica sono predisposti per lavorare<br />
in entrambe le versioni.<br />
Prima di procedere all’installazione della tua<br />
cappa, tieni a mente queste semplici regole di<br />
base:<br />
• Segui tutte le fasi indicate nel libretto di<br />
istruzioni del prodotto;<br />
• In caso di diffi coltà richiedi l’intervento di un<br />
tecnico specializzato di tua fi ducia;<br />
• Collega la cappa aspirante all’esterno con una<br />
tubazione dedicata dal diametro 120/150 mm.:<br />
una lunghezza ridotta e l’assenza di curvature<br />
garantiscono prestazioni ottimali.<br />
• Rispetta la distanza minima dal piano cottura,<br />
indicata nel libretto, al fi ne di evitare danni<br />
alle parti funzionali e salvaguardare la sicurezza<br />
delle persone;<br />
• Controlla che la posizione della presa elettrica<br />
sia in prossimità del prodotto per il collegamento.<br />
Lunga vita alla tua cappa<br />
Long life your range hood<br />
Per assicurare una lunga durata alla tua cappa,<br />
devi mantenere in ottimo stato il sistema di<br />
fi ltraggio. Sono due le tipologie di fi ltro:<br />
8) Il fi ltro grassi: protegge la tua cappa<br />
trattenendo le particelle di grasso. Richiede una<br />
pulizia periodica a mano con detergente neutro<br />
o in lavastoviglie a basse temperature;<br />
9.1-9.2) Il fi ltro odori a carboni attivi: cattura<br />
e trattiene le particelle odorose dell’aria.<br />
Ricorda di sostituirlo ogni 3-4 mesi.<br />
Altre piccole accortezze ti aiuteranno a mantenere<br />
sana ed effi ciente la tua cappa:<br />
• Accendi la cappa alla prima velocità a inizio<br />
cottura, aumentando l’aspirazione nel momento<br />
in cui c’è la maggiore produzione di fumo e<br />
odori. A cottura conclusa, ritorna alla velocità<br />
più bassa e mantieni la cappa accesa per altri<br />
5-10 minuti;<br />
• Provvedi regolarmente alla pulizia interna ed<br />
esterna della cappa, ricordandoti di staccare la<br />
spina dalla presa o chiudi l’interruttore della<br />
cappa prima di procedere;<br />
• Chiudi le fi nestre quando la cappa è in funzione;<br />
• Spegni la cappa quando nel caminetto hai il<br />
fuoco acceso;<br />
• In caso di guasti, rivolgiti sempre a tecnici<br />
qualifi cati.<br />
For correct operation of your range hood; professional<br />
installation by a specialized technician is<br />
the key.<br />
Assembly and maintenance vary according to the<br />
two types of range hood:<br />
6) Duct-out hoods: exhaust air to the outdoor<br />
atmosphere. This type is most used type because<br />
they offer high performance, high capacity and<br />
low noise.<br />
7) Recirculating hoods: remove unpleasant<br />
odors from the air by means of a charcoal and<br />
grease fi lter before re-introducing the air into the<br />
kitchen. This type is suitable for kitchens with no<br />
extractor duct and also avoids thermal losses to<br />
the outside atmosphere.<br />
Nearly all Elica models are capable of operating<br />
in both modes.<br />
Before installing your range hood, familiarize<br />
yourself with these basic rules:<br />
• Follow all the steps shown in the instruction<br />
handbook;<br />
• If you run into diffi culties, seek assistance from<br />
a reliable, specialied technician;<br />
• Connect duct-out hoods to the outside atmosphere<br />
with a dedicated pipe with a diameter of<br />
4-3/4inches – 6 inches: minimizing the ducting<br />
distance and avoiding unnecessary bends maximizes<br />
performance;<br />
• Comply with the minimum distance from the<br />
cooktop specifi ed in the handbook, in order to<br />
ensure safety and avoid damage to working parts;<br />
• Make sure that the electric socket is close enough<br />
to the hood for connection.<br />
To ensure the long life and correct operation of<br />
your range hood, the fi rst step is to keep the<br />
fi ltering system in good condition.<br />
There are two types of fi lters:<br />
8) The grease fi lter: protects your range hood<br />
by trapping particles of grease. It requires periodic<br />
cleaning by hand with neutral detergent or in<br />
the dishwasher at low temperature;<br />
9.1-9.2) The active, charcoal fi lter: removes<br />
and traps odor particles from the air. Charcoal<br />
fi lters should be replaced every 3-4 months.<br />
Other precautions that will also help keep your<br />
range hood in perfect condition:<br />
• Switch the hood on at speed 1 when you start<br />
cooking, and increase fan speed as the intensity<br />
of fumes and odors increases. When you have<br />
fi nished cooking, return to minimum speed and<br />
keep the hood switched on for another 5-10<br />
minutes;<br />
• Clean the hood regularly both inside and out;<br />
remember to disconnect the plug from the outlet<br />
or switch it off before proceeding;<br />
• Close the windows when the range hood is<br />
running;<br />
• Turn the hood off if you have a fi re going in<br />
your fi replace;<br />
• In the event of failure, always consult a qualifi<br />
ed technician.<br />
8<br />
9.1 Remove the charcoal fi lter<br />
9.2 Insert the new charcoal fi lter<br />
6<br />
7<br />
155