macchine da caffe' automatiche automatic coffee makers - Expert-CM
macchine da caffe' automatiche automatic coffee makers - Expert-CM
macchine da caffe' automatiche automatic coffee makers - Expert-CM

Create successful ePaper yourself
Turn your PDF publications into a flip-book with our unique Google optimized e-Paper software.
DA T I T E C NIC I / T E C HNIC AL DA T A / T E C HNIS C HE DA T E N<br />
DONNE E S T E C HNIQUE S / DATOS T E C NIC OS<br />
MACCHINE DA CAFFE' AUTOMATICHE<br />
AUTOMATIC COFFEE MAKERS<br />
DE' LONGHI ESAM2000 - ESAM3000 - ESAM3100 - ESAM3200<br />
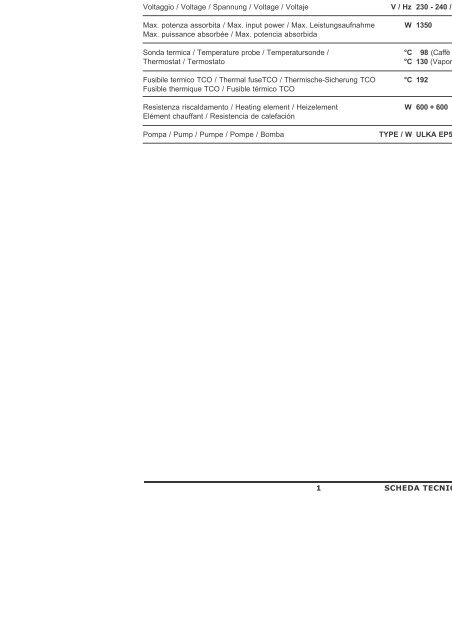
Voltaggio / Voltage / Spannung / Voltage / Voltaje V / Hz 230 - 240 / 50<br />
Max. potenza assorbita / Max. input power / Max. Leistungsaufnahme W 1350<br />
Max. puissance absorbée / Max. potencia absorbi<strong>da</strong><br />
Son<strong>da</strong> termica / Temperature probe / Temperatursonde / °C 98 (Caffè / Coffee)<br />
Thermostat / Termostato °C 130 (Vapore / Steam)<br />
Fusibile termico TCO / Thermal fuseTCO / Thermische-Sicherung TCO °C 192<br />
Fusible thermique TCO / Fusible térmico TCO<br />
Resistenza riscal<strong>da</strong>mento / Heating element / Heizelement W 600 + 600<br />
Elément chauffant / Resistencia de calefación<br />
Pompa / Pump / Pumpe / Pompe / Bomba TYPE / W ULKA EP5 / 48<br />
1<br />
ESAM4000 - ESAM4200<br />
SCHEDA TECNICA ST1462/2008
N<br />
L<br />
SENSORE<br />
TEMPERATURA<br />
TEMPERATURE SENSOR<br />
M1<br />
M2<br />
M5<br />
FLUSSIMETRO<br />
WATER FLOW METER<br />
F14<br />
F15<br />
F0<br />
F1<br />
2<br />
F2<br />
F3<br />
F10<br />
F4<br />
F9<br />
F8<br />
F7<br />
F13<br />
F6<br />
SENSORE REED<br />
REED SENSOR<br />
SCHEDA COMANDI<br />
CONTROL BOARD<br />
SENSORE DI HALL<br />
SENSOR HALL<br />
SCHEDA FILTRO MOTORE<br />
MOTOR FILTER BOARD<br />
TCO<br />
TCO<br />
MOTORE MACININO<br />
GRINDER MOTOR<br />
ELEMENTO RISCALDANTE<br />
HEATING ELEMENT<br />
M<br />
MOTORE GRUPPO INFUSORE<br />
INFUSER GROUP MOTOR<br />
M<br />
P<br />
PROTETTORE POMPA<br />
PUMP THERMAL PROTECTOR<br />
POMPA<br />
PUMP<br />
M4<br />
M3<br />
SCHEDA TECNICA ST1462/2008
GIALLO/VERDE - YELLOW/GREEN<br />
GIALLO/VERDE - YELLOW/GREEN<br />
GIALLO/VERDE - YELLOW/GREEN<br />
M1<br />
M2<br />
M3<br />
M4<br />
M5<br />
ROSSO/RED<br />
GRIGIO/GREY<br />
TCO<br />
GRIGIO/GREY<br />
LEGENDA MICRO / MICROSWITCHES<br />
SENSORE<br />
TEMPERATURA<br />
TEMPERATURE SENSOR<br />
Vedi sotto tabella<br />
Cablaggio Micro<br />
See table below<br />
Microswitches Wiring<br />
FLUSSIMETRO<br />
WATER FLOW METER<br />
ELEMENTO RISCALDANTE SUP.<br />
UPPER HEATING ELEMENT<br />
ELEMENTO RISCALDANTE INF.<br />
LOWER HEATING ELEMENT<br />
GRIGIO/GREY<br />
Infusore alto / Infuser top position<br />
Infusore basso / Infuser bottom position<br />
Cassetto fondi / Coffee grounds container<br />
Portina Service / Service Door<br />
Rubinetto / Tap<br />
D D<br />
E E<br />
ROSSO/RED<br />
TCO<br />
"L" MARRONE/BROWN<br />
GIALLO/VERDE - YELLOW/GREEN<br />
GIALLO/VERDE - YELLOW/GREEN<br />
3<br />
A<br />
A<br />
1<br />
8<br />
F14<br />
F15<br />
J5<br />
J2<br />
J3A<br />
GRIGIO/GREY<br />
A<br />
J4 J7 J6<br />
"N" BLU/BLUE<br />
J1<br />
J3B<br />
BLU/BLUE<br />
F10<br />
F9<br />
F8<br />
F7<br />
F13<br />
A<br />
F0 F1 F2 F3 F4<br />
L L L L N<br />
A<br />
ROSSO / RED<br />
F6<br />
A<br />
ROSSO/RED<br />
A<br />
A<br />
A<br />
A<br />
NERO/BLACK<br />
SCHEDA COMANDI<br />
CONTROL BOARD<br />
SENSORE DI HALL<br />
SENSOR HALL<br />
SENSORE REED<br />
REED SENSOR<br />
MOTORE GRUPPO INFUSORE<br />
INFUSER GROUP MOTOR<br />
M<br />
MARRONE/BROWN<br />
B<br />
B<br />
SCHEDA FILTRO MOTORE<br />
MOTOR FILTER BOARD<br />
+ -<br />
M<br />
MOTORE MACININO<br />
GRINDER MOTOR<br />
B<br />
4 2<br />
B<br />
M4<br />
1<br />
MARRONE/BROWN<br />
B<br />
A<br />
4 2<br />
B<br />
M3<br />
1<br />
CABLAGGIO MICRO / MICROSWITCH WIRING<br />
M1<br />
M2<br />
BIANCO / WHITE<br />
M5<br />
BIANCO / WHITE<br />
BLU / BLUE<br />
BLU / BLUE<br />
ROSSO / RED<br />
B<br />
BIANCO / WHITE<br />
BIANCO / WHITE<br />
POMPA<br />
PUMP<br />
B<br />
P<br />
B<br />
PROTETTORE POMPA<br />
PUMP THERMAL PROTECTOR<br />
BIANCO/WHITE<br />
1<br />
2<br />
4<br />
5<br />
8<br />
NERO/BLACK<br />
VERDE/GREEN<br />
SCHEDA TECNICA ST1462/2008
The following procedure enables the operator to test, one by one, the functional parts of the<br />
machine .<br />
Proceed as follows :<br />
- machine off and plug detached from the socket,<br />
- to enter the test mode: press simultaneously, “1 cup” and “Steam” buttons and insert the plug on<br />
socket,<br />
- the leds “1cup” , “2cups” and “Steam” will light for 2 seconds, then the machine is on “TEST”.<br />
- Release the buttons and the machine is on the “Test function”<br />
- the “test” procedure will be disabled <strong>automatic</strong>ally after 2 minutes.<br />
The operator can check the following function:<br />
- Pressing “1cup”, the movement motor will go “ up”till the “ up-end s witch” then 1 cup led<br />
on,<br />
- Pressing “2cup”, the movement motor will go “down” till the “ down-end s witch” then 2<br />
cups led on,<br />
- While the movement motor is on, the “ grounded <strong>coffee</strong>” led is flashing: means the Hall<br />
sensor is working,<br />
- Pressing “grounded <strong>coffee</strong>” the grinder motor goes on,<br />
- Pressing “steam” button, the pump goes on,<br />
- While the pump is on the “steam” led is on: means the flowmeter is working,<br />
- Pressing “cleani ng and descaling” button, the thermoblock goes on (1 and 2 cups led<br />
on),<br />
- Opening the “ service door” the “generic alarm” goes on,<br />
- Removing the “<strong>coffee</strong> grounds” container, the the relative led goes on,<br />
- Opening the s team valve the “cleaning and des caling led will go on,<br />
- Removing the water tank, the relative led goes on,<br />
- While therm oblock is “ on”, “ 1 and 2 cups led are “on”,<br />
- Pressing the “ on/off” button and turning the “ quantity of <strong>coffee</strong>” knob, the following:<br />
- far left position: “1cup” led on,<br />
- Central position: “2cups led on,<br />
- Far right position: “ s team”led on.<br />
- pressing the “ on/off” button and turning the “ quantity of water” knob , the following:<br />
- far left position: “no water” led on,<br />
- Central position: “<strong>coffee</strong> ground tray” led on,<br />
- Far right position: “generic alarm”led on.<br />
TEST PROCEDURE FOR ESAM<br />
To exit the test mode, unplug the machine (the “test” procedure will be disabled anyway<br />
<strong>automatic</strong>ally after 2 minutes).<br />
4<br />
SCHEDA TECNICA ST1462/2008
5. Mo<strong>da</strong>lità di test della macchina<br />
5.1 Per permettere un controllo funzionale della macchina (senza l’uso del PC), la<br />
sche<strong>da</strong> elettronica deve entrare in mo<strong>da</strong>lità di test.<br />
5.2 La mo<strong>da</strong>lità di test è attivata <strong>da</strong>ll'operatore premendo il tasto 1TAZZA e VAPORE ed<br />
inserendo la spina del cavo di alimentazione nella presa elettrica. La sche<strong>da</strong><br />
elettronica deve accendere i led 1TAZZA, 2TAZZE e VAPORE per 2 secondi;<br />
5.3 La mo<strong>da</strong>lità di test è disattivata <strong>automatic</strong>amente dopo 2 minuti <strong>da</strong>ll'attivazione.<br />
5.4 L'operatore deve essere in grado di attivare ogni singola uscita, in particolare, se<br />
preme il tasto:<br />
1. TAZZA: la sche<strong>da</strong> elettronica deve alimentare in salita il motore MOVIMENTO GRUPPO.<br />
Se il microinterruttore GRUPPO ALTO è premuto, la sche<strong>da</strong> elettronica non deve<br />
alimentare il motore MOVIMENTO GRUPPO;<br />
2. TAZZE: la sche<strong>da</strong> elettronica deve alimentare in discesa il motore MOVIMENTO<br />
GRUPPO. Se il microinterruttore GRUPPO BASSO è premuto, la sche<strong>da</strong> elettronica non<br />
deve alimentare il motore MOVIMENTO GRUPPO;<br />
SELEZIONE MACINATO: finchè il tasto è premuto, la sche<strong>da</strong> elettronica deve alimentare il<br />
motore macinino;<br />
VAPORE: finchè il tasto è premuto, la sche<strong>da</strong> elettronica deve alimentare il pompa;<br />
DECALCIFICAZIONE: finchè il tasto è premuto, la sche<strong>da</strong> elettronica deve alimentare il<br />
thermoblock. Durante questa fase la temperatura del thermoblock è regolata <strong>da</strong>lla sche<strong>da</strong><br />
elettronica;<br />
5.5 L'operatore deve essere in grado di verificare ogni singolo ingresso, in particolare:<br />
1) microinterruttore gruppo alto: se i contatti del microinterruttore GRUPPO ALTO sono<br />
aperti, il led 1TAZZA si accende; e se non è premuto, il led 1TAZZA è spento;<br />
2) microinterruttore gruppo basso: se i contatti del microinterruttore GRUPPO BASSO<br />
sono chiusi, il led 2TAZZA si accende; e se non è premuto, il led 2TAZZA è spento;<br />
3) microinterruttore porta di accesso: se i contatti del microinterruttore PORTA DI<br />
ACCESSO sono chiusi, il led ALLARME GENERICO si accende; e se non è premuto, il led<br />
ALLARME GENERICO è spento;<br />
4) microinterruttore cassetto fondi: se i contatti del microinterruttore CASSETTO<br />
FONDI sono chiusi, il led allarme CASSETTO FONDI si accende; e se non è premuto, il<br />
led CASSETTO FONDI è spento;<br />
5) microinterruttore rubinetto: se i contatti del microinterruttore RUBINETTO VAPORE<br />
sono chiusi, il led ALLARME DECALCIFICAZIONE si accende; e se non sono chiusi, il led<br />
ALLARME DECALCIFICAZIONE è spento;<br />
6) flussimetro: se la pompa è attivata, il led VAPORE si accende per indicare che la<br />
sche<strong>da</strong> riceve impulsi <strong>da</strong>l flussimetro;<br />
5<br />
SCHEDA TECNICA ST1462/2008
7) sensore serbatoio: se il serbatoio è vuoto o mancante, il led allarme MANCANZA<br />
ACQUA si accende; se il serbaotio è pieno, il led allarme MANCANZA ACQUA si spegne;<br />
8) sensore effetto hall: se il motore movimento è in funzione, il led SELEZIONE<br />
MACINATO si accende per indicare che la sche<strong>da</strong> riceve impulsi <strong>da</strong>l sensore ad<br />
effetto hall;<br />
9) sensore NTC: la sche<strong>da</strong> elettronica se rileva il sensore NTC T1, accende i led<br />
1TAZZA E 2TAZZE;<br />
10) manopola QUANTITÀ CAFFE’: se si preme il tasto ON/OFF, i led 1TAZZA, 2TAZZE e<br />
VAPORE, variano al ruotare della manopola QUANTITÀ CAFFE’:<br />
a. manopola QUANTITÀ CAFFÈ tutto a sinistra: led 1TAZZA acceso;<br />
b. manopola QUANTITÀ CAFFÈ circa centrale: led 2TAZZA acceso;<br />
c. manopola QUANTITÀ CAFFÈ tutto a destra: led VAPORE acceso;<br />
11) manopola QUANTITÀ MACINATO: se si preme il tasto ON/OFF, i led allarme<br />
MANCANZA ACQUA, CASSETTO FONDI e ALLARME GENERICO, variano al ruotare della<br />
manopola QUANTITÀ CAFFE’:<br />
d. manopola QUANTITÀ MACINATO tutto a sinistra: led allarme MANCANZA ACQUA<br />
acceso;<br />
e. manopola QUANTITÀ MACINATO circa centrale: led allarme CASSETTO FONDI<br />
acceso;<br />
f. manopola QUANTITÀ MACINATO tutto a destra: led ALLARME GENERICO acceso;<br />
6<br />
SCHEDA TECNICA ST1462/2008
1<br />
Svitare la vite manopola e sfilarla<br />
Svitare le 2 viti e togliere la griglia<br />
di protezione<br />
4 5<br />
Toglere l'anello di blocco<br />
7<br />
Inserire alberino ghiera con la tacca<br />
che indica il segnatacca.<br />
TARATURA MACININO ESAM<br />
2 3<br />
Ruotare l'alberino ghiera in senso<br />
orariofino a fine corsa.Estrarre la<br />
macina mobile<br />
Ruotare l'alberino ghiera in senso<br />
antiorario fino a fine corsa e<br />
toglierlo.<br />
8<br />
Inserire l'anello di blocco nella<br />
giusta posizione.<br />
Verificare il corretto posiszionamento<br />
della guarnizione<br />
6<br />
Ruotare la ghiera in senso ORARIO<br />
per macinare + FINE .<br />
Ruotare la ghiera in senso ANTIORARIO<br />
per macinare + GROSSO .<br />
Ruotare <strong>da</strong> 1 o 2 scatti alla volta<br />
9<br />
Ruotare l'alberino in senso ORARIO<br />
fino a fine corsa e inserire la macina.<br />
Quindi ruotarlo di nuovo in senso<br />
antiorario fino a fine corsa.
1<br />
Remove the <strong>coffee</strong> beans<br />
container, the black finger saver<br />
and the knob.<br />
4<br />
Remove the white plastic ring<br />
by pulling it.<br />
7<br />
Insert the white shaft, making<br />
sure its larger notch is aligned with<br />
the one on the grinder.<br />
Grinder Set-up for all models of the<br />
Magnifica, Automatic <strong>coffee</strong> maker<br />
2<br />
Turn the white shaft clockwise<br />
till it stops. Remove the upper part<br />
of the grinder by pulling it upwards.<br />
5<br />
Turn the white shaft counterclockwise<br />
till it stops.<br />
Pull to remove it.<br />
8<br />
Insert the white ring making<br />
sure its notch as well is inserted<br />
on the correct position<br />
3<br />
Verify the position of the white<br />
gasket (has to be as on the picture)<br />
6<br />
Now you can change the setting:<br />
Turn the gear clockwise* to<br />
reduce the coarseness (finer <strong>coffee</strong>).<br />
Turn the gear counterclockwise*<br />
to increase the courserness (thicker).<br />
9<br />
Turn the shaft CLOCKWISE<br />
till it stops to insert the upper gear.<br />
Then turn the shaft all the way<br />
COUNTER CLOCKWISE.<br />
(*) before to change the setting, check and mark the initial position taking as reference the<br />
position of the metal ball you see through the holes on the white ring.<br />
Change the setting carefully by turning the white ring of one or max two steps (one or two<br />
holes) either way as required.
Per entrare nella mo<strong>da</strong>lità conteggio, fare quanto segue, a macchina non collegata alla rete:<br />
- tenendo premuti simultaneamente i tasti ON/OFF e CAFFE’ IN POLVERE<br />
- attaccare la spina.<br />
Procedura Conteggio per Magnifica,<br />
Macchine <strong>da</strong> Caffè Automatiche<br />
(modelli privi di LCD Display)<br />
.<br />
I LED 1 TAZZA, 2 TAZZE e VAPORE lampeggeranno per 2 secondi, confermando che l’apparecchio<br />
ha inziato con successo la procedura.<br />
In questo modo è possibile visualizzare le seguenti statistiche:<br />
1 - tenendo premuto il tasto ON / OFF, il numero di caffè;<br />
2 – tenendo premuto il tasto 1 tazza, il numero di decalcificazioni eseguite;<br />
3 – tenendo premuto il tasto 2 tazze, il numero di lavaggi eseguiti (disponibile non su tutti i modelli)<br />
4 – tenendo premuto il tasto vapore, il totale di litri di acqua utilizzati.<br />
Il numero verrà visualizzato, come una serie di lampeggi dei 5 LED sotto alle manopole, come segue:<br />
LED “Caffè con polvere” = unità;<br />
LED “Lavaggio / decalcificazione” = decine;<br />
LED “Allarme Generico” = centinaia;<br />
LED “Cassetto fondi” = migliaia;<br />
LED “Mancanza acqua” = decine di migliaia;<br />
Per ciascuno dei LED, nessun lampeggio significa 0 (zero) per quella cifra.<br />
I LED cominceranno a lampeggiare, cominciando <strong>da</strong> quello più a destra (“Caffè con polvere”= unità),<br />
procedendo poi verso sinistra.<br />
Raggiunta la cifra massima, il conteggio inizierà di nuova <strong>da</strong>lle unità.<br />
Esempio:<br />
per visualizzare un totale di 15064 caffè, tenendo premuto il tasto ON / OFF si avrà:<br />
LED “Caffè con polvere” lampeggia per 4 volte;<br />
LED “Lavaggio / decalcificazione” lampeggia per 6 volte;<br />
LED “Allarme Generico” nessun lampeggio;<br />
LED “Cassetto fondi” lampeggia 5 volte;<br />
LED “Mancanza acqua” lampeggia 1 volta.<br />
Per uscire <strong>da</strong>lla procedura, staccare la spina.
To enter the counting mode, with the machine unplugged:<br />
- press simultaneously the buttons ON/OFF and “COFEE POWDER,<br />
- PLUG ON THE MACHINE.<br />
THE LEDS 1cup, 2cups and steam will flash for 2 seconds to confirm that the machine has<br />
succesfully enter the procedure.<br />
In this mode is possibile to visualize:<br />
1 - number of <strong>coffee</strong>s keeping pressed the ON/OFF button;<br />
2 – number of descaling procedure keeping pressed the 1cup button;<br />
3 – number of washing procedure keeping pressed the 2cups button (function not yet<br />
available);<br />
4 – total liters of water used keeping pressed the steam button.<br />
The number will be visualized counting the number of flashes of the 5 leds and according<br />
to the following schema:<br />
Led “no-water” = tens of thousands ;<br />
Led “GROUND COFFE TRAY” = thousands;<br />
Led “GENERIC ALARM” = hundreds;<br />
Led “WASHING/DESCALING” = tens;<br />
Led “COFFE POWDER” = units.<br />
For each led “no flashes” means “Zero” for that digit.<br />
The leds will flash starting from the left hand side one to the right one.<br />
After completing the counting, the cycle will start from the left one.<br />
Example: to visualize the number 15364:<br />
Counting procedure for<br />
Magnifica, Automatic <strong>coffee</strong> maker<br />
(models without LCD dysplay)<br />
- led “NO-WATER: flash 1 time;<br />
- led “GROUNDS COFFEE TRAYS”: flashes 5 times;<br />
- led “GENERIC ALARM”: flashes 3 times;<br />
- led “WASHING/DESCALING”: flashes 6 times;<br />
- led “COFFE POWDER” flashes 4 times.<br />
To exit the procedure, unplug the machine.