Manual tehnic automate cafea Saeco 5P
Manual tehnic automate cafea Saeco 5P
Manual tehnic automate cafea Saeco 5P

Create successful ePaper yourself
Turn your PDF publications into a flip-book with our unique Google optimized e-Paper software.
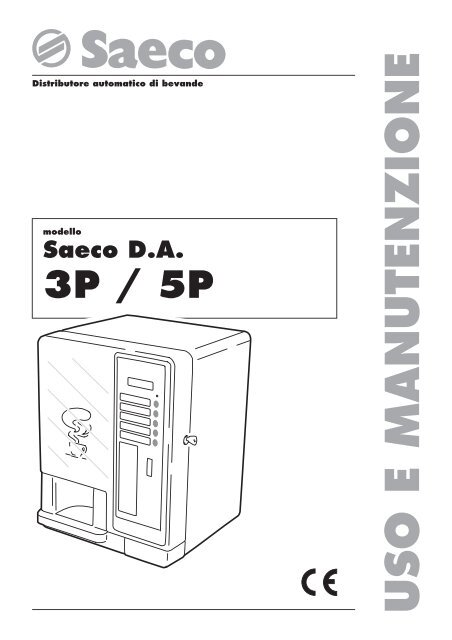
Distributore automatico di bevande<br />
modello<br />
<strong>Saeco</strong> D.A.<br />
3P / <strong>5P</strong><br />
USO E MANUTENZIONE
Italiano<br />
2<br />
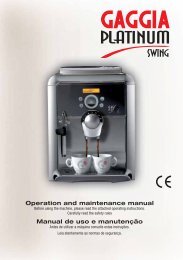
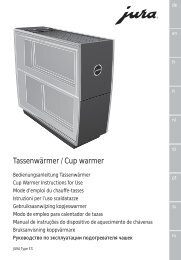
PARTI PRINCIPALI<br />
fig. 1<br />
27<br />
26<br />
30<br />
25<br />
24<br />
23<br />
22<br />
29<br />
1<br />
2<br />
3<br />
4<br />
21<br />
20<br />
1 Display<br />
2 Spia di errore<br />
3 Tasti (D.A 3P - D.A. <strong>5P</strong>)<br />
4 Apertura per monete<br />
5 Boccola in silicone (solo D.A. <strong>5P</strong>)<br />
6 Contenitore solubile (solo D.A. <strong>5P</strong>)<br />
7 Serbatoio acqua<br />
8 Coperchio contenitore caffè<br />
9 Contenitore caffè in grani<br />
10 Manopola di regolazione della macinatura<br />
11 Apertura per esclusione micro di sicurezza<br />
12 Tappo con valvola per serbatoio<br />
13 Gruppo caffè<br />
14 Contenitore fondi<br />
15 Contenitore per monete/gettoni<br />
19<br />
18<br />
6 7 8 9<br />
17<br />
16<br />
15<br />
10<br />
11<br />
12<br />
13<br />
14<br />
16 Vasca raccogligocce<br />
17 Ugello acqua calda<br />
18 Erogatore bevande<br />
19 Griglia appoggiatazze<br />
20 Vano erogazione<br />
21 Supporto griglia<br />
22 Contenitore di miscelazione (solo D.A. <strong>5P</strong>)<br />
23 Imbuto per polveri (solo D.A. <strong>5P</strong>)<br />
24 Chiave per sportello<br />
25 Porta seriale<br />
26 Tasto di RESET<br />
27 Coperchio imbuto polveri (solo D.A. <strong>5P</strong>)<br />
28 Interruttore generale<br />
29 Sportello di accesso interno<br />
30 Sportellino del modulo orologio<br />
5<br />
28
INDICE<br />
PARTI PRINCIPALI. ................................................................................................. 3<br />
1 - INTRODUZIONE AL MANUALE. ......................................... 4<br />
1.1 Premessa. .......................................................................................... 4<br />
1.2 Simbologia utilizzata. .......................................................... 4<br />
2 - INFORMAZIONI SULLA MACCHINA. ......................... 4<br />
2.1 Informazioni per l’utilizzatore. ..................................... 4<br />
2.2 Destinazione d’uso del distributore. ....................... 4<br />
2.3 Rischi residui. ................................................................................ 5<br />
2.4 Identificazione del distributore. .................................. 5<br />
2.5 Dati tecnici. .................................................................................... 5<br />
3 - MOVIMENTAZIONE<br />
E IMMAGAZZINAMENTO. .......................................................... 6<br />
4 - SICUREZZA. .......................................................................................................... 6<br />
4.1 Norme generali di sicurezza. ...................................... 6<br />
4.2 Requisiti degli operatori. ................................................... 6<br />
4.3 Dispositivi di sicurezza installati. ............................... 6<br />
5 - DESCRIZIONE COMANDI STRUMENTI . ................. 7<br />
6 - INSTALLAZIONE. ........................................................................................ 8<br />
6.1 Elenco accessori in dotazione. .................................. 8<br />
6.2 Collegamento idrico. ............................................................ 8<br />
Apparecchio con serbatoio<br />
(Type D.A. 3P standard e<br />
D.A. <strong>5P</strong> standard). .................................................................. 8<br />
Apparecchio con attacco diretto alla rete<br />
(Type D.A. 3P R.I. e D.A. <strong>5P</strong> R.I.). .......................... 8<br />
6.3 Collegamento elettric. .......................................................... 9<br />
6.4 Montaggio monetiera<br />
PARALLELA 12 V d.c.. .......................................................... 9<br />
6.5 Inserimento modulo orologio. ....................................... 10<br />
6.6 Inserimento chiave nazione . ........................................ 10<br />
6.7 Collegamento porta seriale. ......................................... 10<br />
6.8 Montaggio targhette ed adesivi . ............................ 10<br />
7 - PROGRAMMAZIONE. ........................................................................ 11<br />
7.1 Struttura della programmazione. ............................... 12<br />
7.2 Funzione dei tasti. .................................................................... 13<br />
7.3 Accesso alla modalità di programmazione. 13<br />
Italiano<br />
7.4 Selezione del parametro<br />
da modificare o da visualizzare. ............................. 14<br />
7.5 Modifica e memorizzazione dei parametri. .14<br />
7.6 Descrizione dei menù. ......................................................... 14<br />
Prima voce principale<br />
del menù di programmazione. ................................... 14<br />
Seconda voce principale<br />
del menù di programmazione. ................................... 17<br />
Terza voce principale<br />
del menù di programmazione. ................................... 17<br />
Quarta voce principale<br />
del menù di programmazione. ................................... 19<br />
Quinta voce principale<br />
del menù di programmazione. ................................... 20<br />
8 - USO DEL DISTRIBUTORE. .............................................................. 22<br />
8.1 Stati della macchina. ............................................................ 22<br />
8.2 Accensione manuale. ........................................................... 22<br />
8.3 Accensione automatica programmata. .............. 22<br />
8.4 Erogazione delle bevande. ........................................... 22<br />
8.5 Prima accensione del distributore. .......................... 22<br />
Riempimento serbatoi. ......................................................... 22<br />
Contenitore solubile (solo D.A. <strong>5P</strong>). ...................... 22<br />
Serbatoio acqua. ..................................................................... 23<br />
Contenitore caffè. .................................................................... 23<br />
Regolazione della macinatura. .................................. 23<br />
Operazioni da eseguire sul distributore. .......... 23<br />
Cassetto moneta/gettoni. ................................................ 24<br />
8.6 Messaggi sul display. .......................................................... 24<br />
9 - MANUTENZIONE. .................................................................................... 26<br />
9.1 Premessa. .......................................................................................... 26<br />
9.2 Pulizia e manutenzione. ..................................................... 27<br />
Gruppo caffè. .............................................................................. 27<br />
Miscelatore ed erogatore (solo D.A. <strong>5P</strong>). ....... 27<br />
Contenitore polvere solubile. ........................................ 28<br />
Serbatoio acqua. ..................................................................... 28<br />
Zona vano erogazione. ..................................................... 28<br />
9.3 Sostituzione ventolina del Miscelatore. .............. 28<br />
10 -DEMOLIZIONE STRIBUTORE. ................................................... 28<br />
11 -VARIANTI. ............................................................................................................ 28<br />
11.1 Modello D.A. 3P/<strong>5P</strong><br />
(senza modulo orologio). ................................................. 28<br />
11.2 Struttura della programmazione<br />
(versione D.A 3P standard e<br />
D.A <strong>5P</strong> standard senza modulo orologio). ....29<br />
3
Italiano<br />
4<br />
1 - INTRODUZIONE<br />
AL MANUALE<br />
1.1 Premessa<br />
Importante<br />
La presente pubblicazione è parte integrante del distributore<br />
e va letta attentamente. All’interno vi sono le informazioni<br />
tecniche necessarie per una corretta installazione, manutenzione<br />
ed uso relative ai distributori D.A. 3P e <strong>5P</strong> con modulo<br />
orologio. Fate sempre riferimento a questa pubblicazione prima<br />
di compiere qualsiasi operazione.<br />
Le illustrazioni raffigurano il modello D.A. <strong>5P</strong> ma sono riferibili,<br />
con differenze non sostanziali, anche al modello D.A. 3P.<br />
Costruttore: Cosmec S.p.A.<br />
Via Panigali, 39 - 40041 GAGGIO MONTANO (Bo)<br />
Nella parte interna della copertina troverete la pagina con l’illustrazione<br />
a cui il testo fa riferimento più frequentemente. Tenetela<br />
aperta mentre leggete la pubblicazione.<br />
La presente pubblicazione va conservata con cura e deve accompagnare<br />
la macchina durante tutta la sua vita operativa, compresi<br />
gli eventuali passaggi di proprietà.<br />
In caso di smarrimento o deterioramento della presente pubblicazione,<br />
se ne dovrà richiedere immediatamente copia ad un CEN-<br />
TRO DI ASSISTENZA AUTORIZZATO.<br />
• Tutti i diritti di riproduzione della presente pubblicazione sono<br />
riservati al Costruttore.<br />
1.2 Simbologia utilizzata<br />
All’interno di questa pubblicazione sono stati utilizzati diversi tipi<br />
di avvertenze con lo scopo di evidenziare i vari livelli di pericolo<br />
o di competenze.<br />
A completamento del simbolo è riportato un messaggio che spiega<br />
le procedure e fornisce informazioni utili:<br />
Pericolo<br />
E’ utilizzato per evidenziare situazioni pericolose per gli addetti<br />
al distributore e per il distributore stesso.<br />
Manutentore Tecnico<br />
E’ utilizzato per segnalare le operazioni che devono essere<br />
eseguite esclusivamente dal personale specializzato.<br />
Importante<br />
E’ utilizzato per segnalare operazioni che, se eseguite, salvaguardano<br />
il buon funzionamento del distributore.<br />
2 - INFORMAZIONI<br />
SULLA MACCHINA<br />
2.1 Informazioni per l’utilizzatore<br />
• Il distributore è programmabile per ciò che riguarda i dosaggi<br />
di ogni tipo di erogazione.<br />
• Il distributore è predisposto per il montaggio della monetiera<br />
PARALLELA 12V e di accettatore meccanico di gettoni.<br />
• Il distributore è predisposto per l’inserimento di una funzione<br />
aggiuntiva (MODULO OROLOGIO) che consente di programmarne<br />
l’accensione o lo spegnimento.<br />
• Per eventuali necessità rivolgersi al Distributore o all’Importatore<br />
della propria Nazione oppure al Costruttore nel caso non<br />
sia presente alcun importatore.<br />
• I CENTRI DI ASSISTENZA AUTORIZZATI si rendono disponibili<br />
per qualsiasi chiarimento ed informazione riguardanti il funzionamento<br />
del distributore e per esaudire richieste di fornitura<br />
di ricambi o di assistenza tecnica.<br />
• Il Costruttore si riserva il diritto di apportare eventuali migliorie<br />
al distributore senza alcun preavviso.<br />
2.2 Destinazione d’uso del distributore<br />
Il distributore D.A. <strong>5P</strong> è in grado di erogare, in modo completamente<br />
automatico e programmabile:<br />
- caffè espresso preparato con caffè in grani macinato all’istante;<br />
- bevande a base di prodotti solubili liofilizzati (cioccolato, latte,<br />
the, ecc.);<br />
- acqua calda per la preparazione di bevande calde.<br />
Il distributore D.A. 3P è in grado di erogare, in modo completamente<br />
automatico e programmabile:<br />
- caffè espresso preparato con caffè in grani macinato all’istante;<br />
- acqua calda per la preparazione di bevande calde.<br />
Importante<br />
In caso di uso improprio decade ogni forma di garanzia e il<br />
Costruttore declina ogni responsabilità per danni a persone<br />
e/o cose.<br />
E’ da considerarsi uso improprio:<br />
- qualsiasi utilizzo diverso da quello previsto e/o con tecniche<br />
diverse da quelle indicate in questa pubblicazione;<br />
- qualsiasi intervento sul distributore che sia in contrasto con le<br />
indicazioni riportate in questa pubblicazione;<br />
- qualsiasi utilizzo dopo manomissioni a componenti e/o dopo<br />
alterazioni ai dispositivi di sicurezza;<br />
- l'installazione all'esterno dell'apparecchio.
2.3 Rischi residui<br />
Il vano erogazione non ha protezioni che impediscono il contatto<br />
accidentale delle mani con liquido ancora caldo.<br />
2.4 Identificazione del distributore<br />
Il distributore è identificato dal nome del modello e dal numero di<br />
matricola rilevabili sulla targhetta di identificazione posta sul pannello<br />
posteriore in basso a sinistra (fig. 2).<br />
Sulla targhetta sono riportate le seguenti specifiche:<br />
• nome Costruttore<br />
• modello distributore<br />
• alcune specifiche costruttive:<br />
- tensione dell’energia elettrica di alimentazione (V)<br />
- frequenza della corrente elettrica di alimentazione (Hz)<br />
- potenza elettrica assorbita (W)<br />
• marcatura CE<br />
• N° di matricola<br />
• anno di fabbricazione<br />
Importante<br />
Non spostare o danneggiare la targhetta di identificazione<br />
in quanto è l’unico elemento che riporta tutte le informazioni<br />
che permettono al Costruttore di identificare il distributore.<br />
Per qualsiasi richiesta presso i CENTRI DI ASSISTENZA AU-<br />
TORIZZATI (assistenza, parti di ricambio, ecc.), far sempre<br />
riferimento a tale targhetta, riportando i dati specifici del<br />
distributore, impressi su essa.<br />
fig. 2<br />
2.5 Dati tecnici<br />
Italiano<br />
Dimensioni D.A. <strong>5P</strong> D.A. 3P<br />
L. ................................................................. mm 382<br />
P. ................................................................. mm 355<br />
A. ............................................................... mm 505<br />
Peso . ................................................................... kg 25 22,5<br />
Potenza installata. ......................................... W (*)<br />
Tensione di alimentazione. ................... V (*)<br />
Frequenza tensione elettrica. .............. Hz (*)<br />
Lunghezza cavo alimentazione. ..... mm 1500<br />
Capacità<br />
Contenitore prodotto liofilizzato. .... kg. 0,5 a 1,2<br />
(estraibile, trasparente)<br />
Contenitore del caffè. ................................ kg. 1,1<br />
(estraibile, trasparente)<br />
Serbatoio acqua. ........................................... litri 4,8<br />
Alimentazione idrica. ................................. serbatoio esterno<br />
. .................................. allacciamento alla rete<br />
Pressione della rete idrica. ................... bar 1,5 - 8<br />
Collegamento della rete idrica. ...... raccordo 3/4" Gas<br />
(*) Vedere targhetta posta sul retro dell'apparecchio<br />
fig. 3<br />
A<br />
L<br />
P<br />
5
Italiano<br />
6<br />
3 - MOVIMENTAZIONE E<br />
IMMAGAZZINAMENTO<br />
Movimentazione<br />
Il Costruttore protegge il distributore con imballi di cartone su cui<br />
sono stampate le prime avvertenze.<br />
• Durante la movimentazione ed il trasporto, il distributore deve<br />
rimanere in posizione verticale secondo le indicazione stampate<br />
sull’imballo.<br />
• Effettuare con cura le manovre di sollevamento e posizionamento,<br />
utilizzando mezzi adeguati al carico da movimentare.<br />
• Per l’eventuale sollevamento manuale del distributore, utilizzare<br />
le apposite maniglie presenti sui fianchi dell’imballo.<br />
• Non sollevare il distributore cercando la presa sui fianchi dell’imballaggio.<br />
• Non scuotere il distributore.<br />
Immagazzinamento<br />
• Il distributore è contenuto in imballi di cartone con pianale<br />
rinforzato (vedi fig. 4).<br />
Pericolo<br />
L’imballo del distributore può sopportare 50 kg di peso, non<br />
sovrapporre quindi più di due distributori.<br />
• Il distributore deve essere immagazzinato, nel suo imballo originale,<br />
in luoghi non umidi e/o polverosi.<br />
fig. 4<br />
650<br />
370<br />
4 - SICUREZZA<br />
390<br />
4.1 Norme generali di sicurezza<br />
• Leggere attentamente la presente pubblicazione prima di utilizzare<br />
il distributore.<br />
• E’ assolutamente vietato rendere inattive le sicurezze installate<br />
sul distributore.<br />
• Le operazioni di pulizia e di manutenzione del distributore<br />
devono essere effettuate con l’interruttore generale (rif. 28,<br />
fig. 1) in posizione “0“; oppure dopo aver sfilato la spina<br />
dalla presa di corrente.<br />
• Non tentare di aprire o forzare lamiere e pannelli di protezione.<br />
In caso di necessità, rivolgersi alla nostra rete di vendita (indirizzi<br />
riportati in ultima pagina).<br />
• Non modificare autonomamente parti del distributore; il mancato<br />
rispetto di quanto specificato fa decadere le responsabilità<br />
del Costruttore.<br />
• Non dirigere getti d’acqua sul distributore.<br />
• Non versare mai liquidi di alcun tipo sul distributore.<br />
• Non immergere il distributore in acqua.<br />
4.2 Requisiti degli operatori<br />
Ai fini della sicurezza e del buon funzionamento del distributore<br />
sono distinti due addetti con diversi requisiti:<br />
Manutentore tecnico<br />
Persona specializzata e addetta alle operazioni di installazione,<br />
prima regolazione, messa a punto e, più in generale, alla manutenzione<br />
specifica del distributore.<br />
Utilizzatore<br />
Persona con medio livello di specializzazione che ha preso visione<br />
delle norme citate nel presente manuale e ha seguito un corretto<br />
iter formativo, secondo le norme in vigore.<br />
All’Utilizzatore sono permesse la messa in funzione, la regolazione<br />
dei parametri di lavoro, l’arresto del distributore, le normali<br />
operazioni di caricamento, prelievo monete e la pulizia esterna<br />
del distributore.<br />
Qualora rilevi malfunzionamenti del distributore deve richiedere<br />
l’intervento del manutentore tecnico.<br />
Pericolo<br />
E’ vietato all’utilizzatore eseguire operazioni che nella presente<br />
pubblicazione vengono indicate di responsabilità del<br />
manutentore tecnico.<br />
4.3 Dispositivi di sicurezza installati<br />
- Una valvola di sicurezza protegge il distributore dalle sovrappressioni<br />
nell’impianto destinato alla produzione dell’acqua<br />
calda.<br />
- La caldaia è protetta dai surriscaldamenti da un termostato, e<br />
da un termofusibile<br />
- una serie di microinterruttori controllano la posizione della vasca<br />
raccogligocce (rif. 16, fig. 1), dello sportello di accesso<br />
all’interno del distributore (rif. 29, fig. 1) del gruppo caffè (rif.<br />
13, fig. 1) e del cassetto fondi (rif. 14, fig. 1). Se uno dei<br />
componenti non è posizionato correttamente il relativo microinterruttore<br />
blocca il funzionamento del distributore e sul display<br />
apparirà l’indicazione del componente fuori posto.
5 - DESCRIZIONE COMANDI<br />
E STRUMENTI<br />
Importante<br />
Il distributore viene consegnato con i tasti erogazione già<br />
programmati su valori standard.<br />
Interruttore generale (rif. 28, fig. 5)<br />
E’ posto nella parte posteriore del distributore in basso a destra.<br />
In posizione. ”I” accende il distributore (abilitazione funzioni<br />
elettriche).<br />
In posizione. ”O” spegne il distributore (disabilitazione funzioni<br />
elettriche).<br />
fig. 5<br />
28<br />
Tastiera D.A. <strong>5P</strong> (rif. 3, fig. 6)<br />
Si compone di 5 tasti riprogrammabili che comandano, premendoli,<br />
l’erogazione di altrettante bevande identificate, dall’alto<br />
verso il basso, come A - B - C - D - E (rif. 3, fig. 6).<br />
La corrispondenza fra tasto e bevanda erogata è a discrezione<br />
dell’utilizzatore.<br />
I tasti A - B - C - D (rif. 3, fig. 6) servono anche per svolgere<br />
la programmazione.<br />
(Vedi “7 - Programmazione”)<br />
Tastiera D.A. 3P (rif. 3, fig. 6)<br />
Si compone di 3 tasti riprogrammabili che comandano, premendoli,<br />
l’erogazione di altrettante bevande identificate, dall’alto<br />
verso il basso, come A - B - C.<br />
La corrispondenza fra tasto e bevanda erogata è a discrezione<br />
dell’utilizzatore.<br />
I tasti A - B - C (rif. 3, fig. 6) servono anche per svolgere la<br />
programmazione.<br />
(Vedi “7 - Programmazione”)<br />
Display (rif. 1, fig. 6)<br />
E’ composto da 2 linee di 16 caratteri ciascuna e ha il compito<br />
di fornire i messaggi relativi alle operazioni (in svolgimento<br />
o da eseguire) e alle eventuali condizioni di fuori servizio.<br />
fig. 6<br />
Italiano<br />
Spia rossa (rif. 2, fig. 6)<br />
L’accensione della spia indica che il distributore non è pronto<br />
per l’erogazione delle bevande.<br />
Il display (rif. 1, fig. 6) fornisce comunque le indicazioni sullo<br />
stato operativo o di fuori servizio del distributore.<br />
Tasto di reset (rif. 6, fig. 7)<br />
E’ situato nella parte interna dello sportello e può svolgere le<br />
seguenti funzioni:<br />
a) Azzeramento delle segnalazioni di “FUORI SERVIZIO”<br />
(vedi “Messaggi sul display”).<br />
b) Riempimento del circuito idrico (vedi “ 6.2 Collegamento<br />
idrico”).<br />
fig. 7<br />
6<br />
A<br />
B<br />
C<br />
D<br />
E<br />
1<br />
2<br />
3<br />
7
Italiano<br />
8<br />
6 - INSTALLAZIONE<br />
Pericolo<br />
La presenza di forti campi magnetici o la vicinanza di macchine<br />
elettriche che generano forti disturbi, potrebbe essere<br />
causa di malfunzionamento del controllo elettronico del distributore.<br />
- Installare il distributore in un ambiente protetto con temperature<br />
che oscillano fra i 10°C ed i 40°C.<br />
- Accertare che non vi siano state manomissioni durante il trasporto<br />
controllando che l’imballo originale sia integro e chiuso<br />
con le regette.<br />
- Trasportare la scatola ancora chiusa in prossimità del punto<br />
d’installazione (vedi “3 - Movimentazione e Immagazzinamento”),<br />
tagliare le regette di contenimento e sollevare il cartone.<br />
- Verificare lo stato e il modello del distributore contenuto nell’imballo.<br />
- Controllare il contenuto della busta accessori allegata al distributore<br />
(vedi “6.1Elenco accessori in dotazione”)<br />
- Togliere il distributore dall’imballo originale che consigliamo<br />
di conservare per eventuali spostamenti o trasporti successivi.<br />
- Liberare il distributore dall’imballo residuo.<br />
Importante<br />
L’eventuale smaltimento dei componenti dell’imballo, dovrà<br />
avvenire nel rispetto della natura e delle norme vigenti nel<br />
paese.<br />
- Posizionare il distributore su un piano di dimensioni adeguate,<br />
orizzontale e in grado di sopportarne il peso.<br />
Il piano di appoggio non deve superare i 2° di inclinazione.<br />
Importante<br />
Per garantire una corretta ventilazione al distributore, il pannello<br />
posteriore dell’apparecchio, deve avere una distanza<br />
da pareti, divisori, ecc., di almeno 8 cm.<br />
Non coprire il distributore con panni od altro.<br />
6.1 Elenco accessori in dotazione:<br />
• Chiave di azionamento micro per disinserimento sistemi di sicurezza<br />
• N. 4 viti e dadi per fissaggio monetiera<br />
• Serie di adesivi prezzi e monete accettate<br />
• Serie di targhette istruzioni e prodotti erogati<br />
• N. 1 raccordo per tubo acqua al serbatoio (solo per versione<br />
predisposta con serbatoio)<br />
• N. 1 chiave per montaggio ventolina mix<br />
• N. 1 libretto Uso e Manutenzione<br />
6.2 Collegamento idrico<br />
Apparecchio con serbatoio nel mobiletto<br />
- Montare l’apposito attacco idrico.<br />
- Inserire il tubo di aspirazione dell’acqua nell’apposito attacco<br />
sotto il distributore (fig. 8).<br />
- Introdurre il tubo nella tanica.<br />
fig. 8<br />
Apparecchio con attacco diretto alla rete<br />
(Type D.A. 3P R.I. e D.A. <strong>5P</strong> R.I.)<br />
- Collegare il distributore ad una conduttura di distribuzione di<br />
acqua potabile avente pressione compresa tra 1,5 e 8 bar.<br />
Servirsi per questo di un tubo di carico di adeguate caratteristiche<br />
e collegarlo al manicotto da G3/4” posto sul pannello<br />
posteriore del distributore (fig. 9).<br />
fig. 9<br />
Importante<br />
Si consiglia di alimentare il distributore con acqua trattata<br />
per mezzo di un dispositivo di decalcificazione, soprattutto<br />
in caso di acqua ad alto contenuto di sali di calcio e magnesio<br />
(acqua dura).
6.3 Collegamento elettrico<br />
Il distributore è predisposto per il funzionamento elettrico con una<br />
tensione monofase il cui valore è evidenziato nella targhetta di<br />
identificazione (Vedi “2.4 Identificazione del distributore”) (fig. 2).<br />
Pericolo<br />
Il punto di collegamento della presa elettrica deve essere situato<br />
in un luogo facilmente raggiungibile dall’utilizzatore,<br />
in modo che possa sconnettere agevolmente il distributore,<br />
quando è necessario, dalla linea elettrica.<br />
Accertarsi prima dell’allacciamento che:<br />
• La tensione di rete della presa a cui e collegato il distributore<br />
sia corrispondente a quella indicata nella targhetta.<br />
• L’impianto elettrico del luogo in cui viene installato il distributore<br />
sia rispondente alle norme vigenti ed abbia le caratteristiche<br />
per sopportare il carico massimo richiesto indicato nella<br />
targhetta.<br />
È necessario verificare che l’impianto elettrico sia rispondente alle<br />
vigenti norme di sicurezza e, in caso di dubbio, richiedere un<br />
controllo accurato dell’impianto da parte di personale professionale<br />
qualificato.<br />
Pericolo<br />
E’ vietato l’uso di prolunghe o adattatori.<br />
fig. 10<br />
✕<br />
6.4 Montaggio monetiera<br />
PARALLELA 12 V d.c.<br />
Su questo distributore si possono utilizzare esclusivamente monetiere<br />
di tipo parallelo o meccanico a 12 V d.c.<br />
- Rimuovere il supporto accettatore gettone (fig. 11).<br />
- Praticare il foro sul pannello tastiera (fig. 11).<br />
fig. 11<br />
fig. 12<br />
Italiano<br />
- Inserire la monetiera e fissarla utilizzando le 4 viti con dado in<br />
dotazione (fig. 12).<br />
- Collegare il flat cable alla monetiera (fig. 12).<br />
- Collegare il flat cable alla scheda elettronica (fig. 13).<br />
fig. 13<br />
Importante<br />
La Ditta non si assume alcuna responsabilità per danni al<br />
distributore, a cose e a persone, causati da una errata installazione<br />
del sistema di pagamento; tale responsabilità ricade<br />
direttamente su chi ha eseguito il montaggio.<br />
9
Italiano<br />
6.5 Inserimento modulo orologio<br />
10<br />
Pericolo<br />
Operazione di competenza del Manutentore tecnico.<br />
Il dispositivo “Modulo Orologio” gestisce le seguenti funzioni:<br />
- gli orari in cui si effettua l’erogazione gratuita;<br />
- gli orari di accensione e spegnimento del distributore;<br />
- gli orari in cui si applicano sconti o aumenti di prezzo e l'entità<br />
di questi ultimi;<br />
- la periodicità dei lavaggi.<br />
Per inserire il modulo occorre eseguire le seguenti operazioni:<br />
- sconnettere l'apparecchio dall’alimentazione elettrica;<br />
- aprire lo sportello del distributore (rif. 29, fig.1) e rimuovere lo<br />
sportellino (rif. D, fig.14);<br />
- inserire il modulo (rif. A, fig.14) nel connettore della scheda<br />
elettronica.<br />
Importante<br />
Il modulo (rif. A, fig.13) è inserito correttamente quando la<br />
tacca di riferimento è nella parte bassa (fig. 14).<br />
- Rimontare lo sportellino (rif. D, fig.14).<br />
- Richiudere lo sportello (rif. 29, fig.1).<br />
C<br />
fig. 14<br />
6.6 Inserimento chiave nazione<br />
Pericolo<br />
Operazione di competenza del Manutentore tecnico.<br />
La “chiave nazione” contiene i seguenti dati:<br />
- Lingua visualizzata sul display.<br />
- Impostazioni del software legate al Paese di utilizzo.<br />
Importante<br />
Il distributore NON funziona senza la “chiave nazione” inserita,<br />
è perciò necessario provvedere al suo inserimento.<br />
Dopo aver inserito la "chiave nazione" l'apparecchio non<br />
accetterà l'inserimento di chiavi di nazioni diverse.<br />
B<br />
A<br />
D<br />
Per inserire la chiave nazione occorre eseguire le seguenti operazioni:<br />
- Sconnettere l’alimentazione elettrica.<br />
- Aprire lo sportello di accesso interno macchina (fig. 14).<br />
- Inserire la chiave (rif. B, fig.14) nel connettore della scheda<br />
elettronica.<br />
- Richiudere lo sportello.<br />
6.7 Collegamento porta seriale<br />
Pericolo<br />
Operazione di competenza del Manutentore tecnico.<br />
A fianco del connettore per il “modulo orologio” è installata una<br />
porta seriale (rif. C, fig.14).<br />
Tramite la porta seriale è possibile collegare il distributore al Personal<br />
Computer o alle apparecchiature fornite ai CENTRI DI AS-<br />
SISTENZA AUTORIZZATI per effettuare verifiche ed operazioni di<br />
programmazione.<br />
6.8 Montaggio targhette ed adesivi<br />
Separare, seguendo la linea tratteggiata, le targhette delle bevande<br />
fornite a corredo.<br />
Applicare i prezzi adesivi sulle targhette delle bevande.<br />
Inserire le targhette nelle apposite sedi (fig. 15-16), dalle fessure<br />
presenti nella parte interna dello sportello (rif. 29, fig.1).<br />
fig. 15<br />
fig. 16
7 - PROGRAMMAZIONE<br />
Questo capitolo descrive come impostare e/o modificare i parametri<br />
programmati sul distributore.<br />
E’ quindi opportuno leggerlo con attenzione, intervenendo solamente<br />
dopo aver compreso e capito l’esatta sequenza di operazioni<br />
da compiere.<br />
Al fine di comprendere meglio quanto descritto, occorre definire il<br />
significato di alcuni termini, che in questo capitolo vengono utilizzati:<br />
- Con il termine “cifra” si intende il numero, o la lettera, che<br />
insieme ad altre compongono il “parametro”.<br />
- Con il termini “parametro” si intende l’insieme di “cifre” che<br />
imposta una determinata funzione.<br />
Il sistema di Programmazione è sviluppato in quattro livelli:<br />
- al primo livello compaiono le cinque voci principali del menù<br />
di programmazione;<br />
- al secondo livello vengono visualizzate le funzioni di ogni voce<br />
del menù di programmazione;<br />
- al terzo livello sono visualizzate le impostazioni memorizzate<br />
per ogni funzione programmabile;<br />
- al quarto livello compaiono i parametri modificabili delle funzioni.<br />
Le cinque voci principali del menù di programmazione sono:<br />
• gestione sistema<br />
• sistemi di pagamento<br />
• preparazione bevande<br />
• gestione vendite<br />
• gestione orari<br />
GESTIONE GESTIONE SISTEMA<br />
SISTEMA<br />
Prima voce principale del Menu di programmazione.<br />
Consente di impostare i parametri che riguardano il funzionamento<br />
dell’apparecchio e verificarne gli stati d’uso (attraverso la lettura<br />
dei contatori).<br />
E’ inoltre possibile assegnare un codice al distributore, visualizzare<br />
il numero di matricola e inserire o modificare la password di<br />
accesso alla programmazione.<br />
I contatori visualizzabili sono riferiti a:<br />
- caffè;<br />
- acqua;<br />
- bevande;<br />
- solubili (solo D.A. <strong>5P</strong>)<br />
Per ognuno è riportato il numero di erogazioni eseguite e quelle<br />
eseguibili. Oltre tale limite l’apparecchio cesserà l’erogazione delle<br />
bevande.<br />
Ogni contatore è azzerabile.<br />
Il numero di erogazioni possibili (BLOCCHI) è modificabile.<br />
La Gestione Sistema consente di:<br />
• modificare le temperature minime e massime di esercizio del<br />
distributore;<br />
Italiano<br />
• modificare ora e data corrente;<br />
• inserire righe di testo che verranno visualizzate sul display durante<br />
l’erogazione delle bevande, quando il distributore si trova<br />
in stand-by e quando si arresta per fuori servizio o a causa<br />
di una anomalia;<br />
• attivare la preselezione che visualizza l’importo mancante per<br />
l’erogazione delle bevande.<br />
SISTEMI SISTEMI SISTEMI DI<br />
DI<br />
PAGAMENTO<br />
PAGAMENTO<br />
Seconda voce principale del Menu di programmazione.<br />
Consente di impostare tutti i seguenti parametri associati ai diversi<br />
sistemi di pagamento:<br />
• valori delle monete;<br />
• abilitazione alla multivendita (gestione del credito residuo);<br />
• tempo di OVER-PAY (incameramento del credito residuo).<br />
PREPARAZIONE<br />
PREPARAZIONE<br />
BEVANDE<br />
BEVANDE<br />
Terza voce principale del Menu di programmazione.<br />
Nel modello D.A. <strong>5P</strong>, consente la preparazione delle cinque bevande<br />
erogabili.<br />
Ogni bevanda si può ottene combinando la macinazione di caffè<br />
in grani con il prodotto solubile e l’acqua. L’erogazione avverrà<br />
secondo la sequenza impostata. Per ogni bevanda vanno impostati<br />
la quantità di caffè macinato, di solubile, di acqua e le velocità<br />
di erogazione del prodotto solubile e dell’acqua.<br />
Nel modello D.A. 3P, consente la preparazione delle tre bevande<br />
erogabili.<br />
Ogni bevanda si ottiene dalla macinazione di caffè in grani combinata<br />
con acqua. Per ogni bevanda va impostata la quantità di<br />
caffè e di acqua.<br />
GESTIONE GESTIONE VENDITE<br />
VENDITE<br />
Quarta voce principale del Menu di programmazione.<br />
Nel modello D.A. <strong>5P</strong>, consente di impostare il valore di quattro<br />
prezzi da associare alle cinque bevande.<br />
Nel modello D.A. 3P<br />
Consente di impostare il valore di quattro prezzi da associare alle<br />
tre bevande.<br />
GESTIONE GESTIONE ORARI<br />
ORARI<br />
Quinta voce principale del Menu di programmazione.<br />
Consente di impostare le seguenti funzioni del distributore eseguibili<br />
in determinate fasce orarie:<br />
• erogazione gratuita dei prodotti;<br />
• orari di accensione e spegnimento dell’apparecchio;<br />
• fasce orarie in cui applicare sconti o aumenti sul prezzo delle<br />
bevande;<br />
• lavaggio automatico dei circuiti idraulici.<br />
11
Italiano<br />
7.1 Struttura della programmazione<br />
1 a Parte<br />
GESTIONE SISTEMA CODICE D.A.<br />
000000<br />
Continua<br />
12<br />
CONTATORI CONT CAFFE'<br />
T:000000 P:000000<br />
BLOCCHI<br />
TEMPERTURA MIN.<br />
T:095<br />
TEMPERTURA MAX.<br />
T:100<br />
CONTAIMPULSI<br />
BEVANDE<br />
OROLOGIO<br />
17:00 M 17FEB 98<br />
TESTO STAND-BY<br />
*D.A. <strong>5P</strong>N SAECO*<br />
TESTO EROGAZIONE<br />
IN EROGAZIONE<br />
TESTO F. SERVIZIO<br />
FUORI SERVIZIO<br />
PRESELEZIONE<br />
NO<br />
SERIAL NUMBER<br />
909024<br />
CONTATORI BEVANDA<br />
T:000011 P:000011<br />
CONT. SOLUBILI<br />
CONT. ACQUA<br />
T:000011 P:000011<br />
RESET CONT.<br />
BLOCCO CAFFE'<br />
00000 LIM: 00000<br />
BLOCCO BEVANDA<br />
BLOCCO SOLUB.<br />
BLOCCO ACQUA<br />
00000 LIM:00000<br />
BLOCCO FONDI<br />
00000 LIM:00000<br />
RESET BLOCCHI<br />
CONTAIMPULSI<br />
BEVANDE<br />
CONTAIMPULSI<br />
SOLUBILE<br />
CONTAIMPULSI<br />
CAFFE'<br />
PRESELEZIONE<br />
Y >N<<br />
PRESELEZIONE<br />
>Y< N<br />
BEVANDA A<br />
T:000011 P:000011<br />
BEVANDA B<br />
T:000011 P:000011<br />
BEVANDA C<br />
T:000011 P:000011<br />
BEVANDA D<br />
T:000011 P:000011<br />
BEVANDA E<br />
T:000011 P:000011<br />
SOLUBILI 1<br />
T:000011 P:000011<br />
RESET BLOCCHI<br />
Y >N<<br />
RESET BLOCCHI<br />
>Y< N<br />
BEVANDA A<br />
00000 LIM:00000<br />
BEVANDA B<br />
00000 LIM:00000<br />
BEVANDA C<br />
00000 LIM:00000<br />
BEVANDA D<br />
00000 LIM:00000<br />
BEVANDA E<br />
00000 LIM:00000<br />
BLOCCO SOLUB. 1<br />
00000 LIM:00000<br />
RESET BLOCCHI<br />
Y >N<<br />
RESET BLOCCHI<br />
>Y< N<br />
Solo D.A. <strong>5P</strong><br />
CAMBIA PASSWORD NUOVA PASSWORD NUOVA PASSWORD<br />
VALORE:0000<br />
Solo D.A. <strong>5P</strong><br />
Solo D.A. <strong>5P</strong><br />
2 a Parte<br />
SISTEMI<br />
DI PAGAMENTO<br />
PREPARAZIONE<br />
BEVANDA<br />
VALORE MONETE VALORE MONETE<br />
MONETA 01:00050<br />
MULTIVENDITA<br />
NO<br />
OVERPAY TIME<br />
180<br />
VALORE MONETE<br />
MONETA 03:00050<br />
VALORE MONETE<br />
MONETA 04:00050<br />
VALORE MONETE<br />
MONETA 05:00050<br />
VALORE MONETE<br />
MONETA 06:00050<br />
MULTIVENDITA<br />
Y >N<<br />
MULTIVENDITA<br />
>Y< N<br />
BEVANDA A BEVANDA A<br />
SEQUENZA: C100<br />
BEVANDA B<br />
BEVANDA C<br />
BEVANDA D<br />
BEVANDA E<br />
VALORE MONETE<br />
MONETA 02:00050<br />
BEVANDA A<br />
SOLUBILE 1: 100<br />
BEVANDA A<br />
ACQUA 1: 030<br />
BEVANDA A<br />
%SOLUB. 1: 160<br />
BEVANDA A<br />
CAFFE': 050<br />
BEVANDA B<br />
SEQUENZA: C100<br />
BEVANDA B<br />
SOLUBILE 1: 100<br />
BEVANDA B<br />
ACQUA 1: 030<br />
BEVANDA B<br />
%SOLUB. 1: 160<br />
BEVANDA B<br />
CAFFE': 050<br />
BEVANDA C<br />
SEQUENZA: C100<br />
BEVANDA C<br />
SOLUBILE 1: 100<br />
BEVANDA C<br />
ACQUA 1: 030<br />
BEVANDA C<br />
%SOLUB. 1: 160<br />
BEVANDA C<br />
CAFFE': 050<br />
BEVANDA D<br />
SEQUENZA: C100<br />
BEVANDA D<br />
SOLUBILE 1: 100<br />
BEVANDA D<br />
ACQUA 1: 030<br />
BEVANDA D<br />
%SOLUB. 1: 160<br />
BEVANDA D<br />
CAFFE': 050<br />
BEVANDA E<br />
SEQUENZA: C100<br />
BEVANDA E<br />
SOLUBILE 1: 100<br />
BEVANDA E<br />
ACQUA 1: 030<br />
BEVANDA E<br />
%SOLUB. 1: 160<br />
BEVANDA E<br />
CAFFE': 050<br />
GESTIONE VENDITE VALORE PREZZI VALORE PREZZI<br />
PREZZO 01:00000<br />
Continua<br />
VALORE PREZZI<br />
PREZZO 02:00000<br />
VALORE PREZZI<br />
PREZZO 03:00000<br />
VALORE PREZZI<br />
PREZZO 04:00000<br />
PREZZI BEVANDA PREZZI BEVANDA<br />
1- 0000 :ABCDE<br />
PREZZI BEVANDA<br />
2- 0000 :abcde<br />
PREZZI BEVANDA<br />
3- 0000 :abcde<br />
PREZZI BEVANDA<br />
4- 0000 :abcde<br />
Solo D.A. <strong>5P</strong><br />
Solo D.A. <strong>5P</strong><br />
Solo D.A. <strong>5P</strong><br />
Solo D.A. <strong>5P</strong><br />
PREZZI BEVANDA<br />
1- 0000 :ABC<br />
PREZZI BEVANDA<br />
2- 0000 :abc<br />
PREZZI BEVANDA<br />
3- 0000 :abc<br />
PREZZI BEVANDA<br />
4- 0000 :abc<br />
Solo D.A. <strong>5P</strong> Solo D.A. 3P
3 a Parte<br />
GESTIONE ORARI<br />
USCITA<br />
PROGRAMM. Y/N<br />
Fine<br />
7.2 Funzione dei tasti<br />
E’ possibile effettuare la programmazione dei parametri di funzionamento<br />
del distributore, direttamente dalla tastiera di selezione<br />
dei prodotti.<br />
Nel modello D.A. <strong>5P</strong> tasti programmazione sono A - B - C - D (rif.<br />
3, fig. 17).<br />
Nel modello D.A. 3P tasti programmazione sono A - B - C (rif. 3,<br />
fig. 17).<br />
fig. 17<br />
GRATUITO GRATUITO<br />
SEMPRE<br />
ORARI ON/OFF<br />
NO<br />
SCONTO<br />
0000<br />
AUMENTO<br />
0000<br />
GRATUITO<br />
FASCE ORARIE<br />
GRATUITO<br />
MAI<br />
ORARI ON/OFF<br />
Y ->NYNY
Italiano<br />
7.4 Selezione del parametro da<br />
modificare o da visualizzare<br />
E’ possibile far scorrere sul display le cinque voci del menù per<br />
verificarne i parametri ed eventualmente modificarli.<br />
Per far ciò occorre:<br />
- Accedere alla programmazione delle funzioni (vedi “7.3 Accesso<br />
alla modalità di programmazione”).<br />
- Far scorrere le voci del menù con i tasti “UP” e “DOWN”.<br />
- Fermare la selezione sulla voce del menù che gestisce la funzione<br />
in cui si vuole intervenire.<br />
- Premere il tasto “ENTER” per entrare all’interno della voce.<br />
- Far scorrere le varie funzioni con i tasti “UP” e “DOWN”.<br />
- Fermare la selezione sulla funzione di cui si intende visualizzare<br />
o modificare i parametri.<br />
- Premere il tasto “ENTER” per visualizzare il parametro.<br />
7.5 Modifica e memorizzazione dei<br />
parametri<br />
Per modificare o memorizzare i parametri, occorre:<br />
- Visualizzare il parametro che si intende cambiare (vedi “7.4<br />
Selezione del parametro da modificare o da visualizzare”).<br />
- Premere il tasto “ENTER” per accedere al parametro da modificare.<br />
Il cursore lampeggiante si posiziona su una cifra.<br />
- Aumentare o ridurre il valore della cifra tramite i tasti “UP” e<br />
“DOWN”.<br />
Premendo il tasto“ENTER” la cifra visualizzata viene memorizzata<br />
e sostituisce quello precedente, contemporaneamente il<br />
cursore passa alla cifra successiva.<br />
- Eseguire la stessa procedura per impostare le restanti cifre.<br />
- Dopo aver completato la modifica delle cifre, confermare con<br />
il tasto “ENTER” il nuovo parametro.<br />
Se la variazione viene accettata il cursore lampeggiante sparisce.<br />
In alcuni casi il parametro da memorizzare, deve essere scelto fra<br />
una lista di parametri prestabiliti (“YES” e “NO”, “GIORNI DEL-<br />
LA SETTIMANA”, ecc…). In questi casi i tasti “UP” e “DOWN”<br />
hanno la funzione di far scorrere il cursore luminoso o visualizzare<br />
sul display le scelte possibili.<br />
Esempio<br />
Per impostare “YES” o “NO” in una funzione occorre:<br />
- Selezionare la funzione.<br />
- Accedere al livello di modifica tramite il tasto “"ENTER"”.<br />
All’accesso compare un segnale di selezione su una delle due<br />
sigle: “Y” (YES) o “N” (NO).<br />
- Utilizzare i tasti “UP” o “DOWN” per selezionare “Y” (YES) o<br />
“N” (NO).<br />
- Premere “ENTER” per confermare la scelta. La pressione su<br />
“ENTER” rimanda automaticamente al livello di ingresso della<br />
funzione.<br />
Per inserire del testo in una funzione occorre:<br />
- Selezionare la funzione.<br />
- Premere “ENTER” per impostare il testo.<br />
Il cursore luminoso compare sotto la prima lettera a sinistra.<br />
14<br />
- Utilizzare i tasti “UP” o “DOWN” per far scorrere le lettere.<br />
- Premere “ENTER” per confermare la lettera.<br />
Il cursore si porta alla lettera successiva.<br />
Operare allo stesso modo per tutte le lettere inseribili.<br />
E’ possibile inserire un massimo di 16 lettere.<br />
Completato l’inserimento premere 2 volte “ENTER”.<br />
Se si intende passare ad un ulteriore parametro premere i tasti<br />
“UP” o “DOWN”.<br />
• Nel modello D.A. <strong>5P</strong> per uscire dal parametro modificato, e<br />
cambiare livello, occorre premere il tasto “D - Cancel”.<br />
Una volta modificati e memorizzati tutti i parametri premere più<br />
volte il tasto “D - Cancel” fino alla funzione che consente l’uscita<br />
dalla Programmazione “USCITA PROGRAM. Y - N”.<br />
• Nel modello D.A. 3P per uscire dal parametro modificato o<br />
cambiare livello occorre far scorrere i parametri tramite i tasti<br />
“UP” o “DOWN”.<br />
Una volta modificati e memorizzati i parametri premere più volte i<br />
tasti “UP” o “DOWN” fino alla funzione che consente l’uscita<br />
dalla Programmazione “USCITA PROGRAM. Y - N”.<br />
7.6 Descrizione dei menù<br />
N.B.: I numeri da inserire per ogni voce non sono riferiti ad<br />
unità di misura (gr. ml, ecc.) ma sono valori di puro riferimento.<br />
Importante<br />
La descrizione dei menù riportata di seguito è riferita al modello<br />
D.A. <strong>5P</strong>, ma riferibile, con differenze non sostanziali,<br />
anche al modello D.A. 3P.<br />
Prima voce principale<br />
del menù di programmazione<br />
GESTIONE GESTIONE SISTEMA<br />
SISTEMA<br />
Premere “ENTER” per accedere alle funzioni della voce.<br />
CODICE CODICE DISTRIBUT.<br />
DISTRIBUT.<br />
001007<br />
001007<br />
Funzione che consente di assegnare un codice di identificazione<br />
ad ogni apparecchio.<br />
Per inserire il codice occorre comportarsi come descritto nel capitolo<br />
“7.5 Modifica e memorizzazione dei parametri”.<br />
CONTATORI<br />
CONTATORI<br />
CONTATORI<br />
Funzione che consente di controllare il numero di erogazioni delle<br />
bevande, dei solubili e dell’acqua.<br />
Premendo “ENTER” si accede al livello inferiore dove si trovano<br />
elencati i contatori.<br />
Nella riga inferiore di ogni singolo contatore sono visualizzate<br />
precedute dalle sigle “T” e “P”, le erogazioni totali.
Il numero preceduto dalla sigla “T” corrisponde al totale delle<br />
erogazioni eseguite, e non è azzerabile.<br />
Il numero preceduto dalla sigla “P” corrisponde al totale delle<br />
erogazioni eseguite dall’ultimo azzeramento dei contatori (totale<br />
parziale), ed è azzerabile dalla funzione “RESET”.<br />
CONT. CONT. CONT. CAFFE’ CAFFE’<br />
CAFFE’<br />
T:000000 T:000000 T:000000 P:00000<br />
P:00000<br />
Visualizza le erogazioni totali e parziali del caffè.<br />
CONT. CONT. BEVANDE<br />
BEVANDE<br />
T:000025 T:000025 P:00015<br />
P:00015<br />
Visualizza le erogazioni totali e parziali di tutte le bevande, modello<br />
D.A. <strong>5P</strong> tasti erogazione A - B - C - D - E (rif. 3, fig. 17),<br />
modello D.A. 3P tasti erogazione A - B - C (rif. 3, fig. 17).<br />
Premere “ENTER” per accedere ai singoli contatori.<br />
BEVANDA BEVANDA A<br />
A<br />
T:000005 T:000005 P:000003<br />
P:000003<br />
BEVANDA BEVANDA B<br />
B<br />
T:000005 T:000005 P:000003<br />
P:000003<br />
BEVANDA BEVANDA BEVANDA C C<br />
C<br />
T:000005 T:000005 P:000003<br />
P:000003<br />
BEVANDA BEVANDA D<br />
D<br />
T:000005 T:000005 P:000003<br />
P:000003<br />
BEVANDA BEVANDA BEVANDA E<br />
E<br />
T:000005 T:000005 P:000003<br />
P:000003<br />
Utilizzando i tasti “UP” e “DOWN”, si possono visualizzare le<br />
erogazioni totali e parziali di ogni singola bevanda, modello D.A.<br />
<strong>5P</strong> tasti erogazione A - B - C - D - E (rif. 3, fig. 17), modello D.A.<br />
3P tasti erogazione A - B - C (rif. 3, fig. 17).<br />
CONT. CONT. CONT. SOLUBILI<br />
SOLUBILI<br />
Funzione di conteggio dei solubili (solo modello D.A. <strong>5P</strong>).<br />
Premere “ENTER” per accedere alla visualizzazione dei singoli<br />
contatori.<br />
SOLUBILE SOLUBILE SOLUBILE 1<br />
1<br />
T:000010 T:000010 P:000004<br />
P:000004<br />
Visualizza le erogazioni totali e parziali del prodotto solubile.<br />
CONT. CONT. ACQUA ACQUA<br />
ACQUA<br />
T:000010 T:000010 P:000004<br />
P:000004<br />
Visualizza le erogazioni totali e parziali dell’acqua.<br />
RESET RESET CONT.<br />
CONT.<br />
Funzione che consente di azzerare tutti i contatori parziali.<br />
Premere “ENTER” per accedere a questa possibilità.<br />
RESET RESET CONT.<br />
CONT.<br />
->YY
Italiano<br />
Premere “ENTER” per visualizzare il parametro di blocco del solubile.<br />
Funzione che consente di impostare un numero di erogazioni di<br />
acqua prima del blocco.<br />
Premere “ENTER” per visualizzare il parametro di blocco.<br />
Funzione che consente di impostare un numero di espulsioni di<br />
fondi caffè prima del blocco.<br />
Premere “ENTER” per visualizzare il parametro di blocco.<br />
Funzione che consente di azzerare tutti i contatori parziali di quantità<br />
prodotto.<br />
Premere “ENTER” per accedere a questa possibilità.<br />
Per impostare la funzione procedere come descritto nel capitolo<br />
“7.5 Modifica e memorizzazione dei parametri”.<br />
Confermando sigla ”->YYYYYY
NUOVA NUOVA NUOVA PASSWORD<br />
PASSWORD<br />
Voce di menu’ che compare prima della modifica della password.<br />
Premere “ENTER” per impostare la nuova password.<br />
NUOVA NUOVA NUOVA PASSWORD<br />
PASSWORD<br />
VALORE: VALORE: 0000<br />
0000<br />
Un cursore luminoso compare sotto alla prima cifra dopo “VALO-<br />
RE:…”.<br />
Per impostare la password procedere come descritto nel capitolo<br />
“7.5 Modifica e memorizzazione dei parametri”.<br />
La pressione su “ENTER” rimanda automaticamente al livello precedente<br />
“NUOVA PASSWORD”.<br />
Attenzione<br />
Annotarsi la nuova password poiché, in caso di smarrimento,<br />
non sarà più possibile accedere alla programmazione.<br />
Seconda voce principale<br />
del menù di programmazione<br />
SISTEMI SISTEMI DI<br />
DI<br />
PAGAMENTO<br />
PAGAMENTO<br />
Premere “ENTER” per accedere alle funzioni di questa voce.<br />
VALORI VALORI MONETE MONETE<br />
MONETE<br />
Funzione che consente di associare un valore a tutte le possibili<br />
monete selezionabili.<br />
Premere “ENTER” per visualizzare la lista delle monete.<br />
VALORI VALORI MONETE MONETE<br />
MONETE<br />
MONETA MONETA 01:00050<br />
01:00050<br />
VALORI VALORI MONETE MONETE<br />
MONETE<br />
MONETA MONETA 02:00050<br />
02:00050<br />
VALORI VALORI MONETE MONETE<br />
MONETE<br />
MONETA MONETA 03:00050<br />
03:00050<br />
VALORI VALORI MONETE<br />
MONETE<br />
MONETA MONETA 04:00050<br />
04:00050<br />
VALORI VALORI MONETE MONETE<br />
MONETE<br />
MONETA MONETA 05:00050<br />
05:00050<br />
VALORI VALORI MONETE MONETE<br />
MONETE<br />
MONETA MONETA 06:00050<br />
06:00050<br />
Premere “ENTER” per visualizzare il valore della prima moneta.<br />
Premere i tasti “UP” e “DOWN” per far scorrere la lista della<br />
monete.<br />
Per modificare il valore delle monete precedere come descritto nel<br />
capitolo “7.5 Modifica e memorizzazione dei parametri”.<br />
Il valore delle monete è compreso in un range prestabilito dalla<br />
chiave nazione.<br />
La pressione su “ENTER” rimanda automaticamente al livello precedente<br />
“VALORI MONETE”.<br />
MULTIVENDITA<br />
MULTIVENDITA<br />
YES<br />
YES<br />
MULTIVENDITA<br />
MULTIVENDITA<br />
->YY
Italiano<br />
Sulla linea superiore del display comparirà sempre la bevanda<br />
selezionata, mentre nella seconda linea compaiono di volta in<br />
volta i parametri impostabili.<br />
Questa voce permette di impostare l’ordine in cui verranno preparati<br />
ed erogati i prodotti che compongono la bevanda (in questo<br />
caso A). Si possono inserire fino a quattro prodotti.<br />
Per modificare il valore, che varia fra 0, 1 e C, procedere come<br />
descritto nel capitolo “7.5 Modifica e memorizzazione dei parametri”.<br />
18<br />
BEVANDA BEVANDA A<br />
A<br />
SEQUENZA: SEQUENZA: 1000<br />
1000<br />
Importante<br />
In questa funzione alla cifra 0 non corrisponde nessun prodotto,<br />
di conseguenza la combinazione di cifre che corrispondono<br />
a “0100” o “1000” o “0010” prevederà sempre<br />
e solo l’erogazione del prodotto 1.<br />
In base alla sequenza verranno richieste le impostazioni dei parametri<br />
relativi ai prodotti che saranno erogati nella bevanda.<br />
Premere i tasti “UP” e “DOWN” per far scorrere la composizione<br />
della bevanda.<br />
BEVANDA BEVANDA A<br />
A<br />
SOLUBILE SOLUBILE 1: 1: 1: 045<br />
045<br />
(Solo D.A. <strong>5P</strong>)<br />
Definisce la quantità di prodotto solubile da miscelare con l’acqua.<br />
Nella riga inferiore compare “SOLUBILE 1:045”.<br />
045 indica che verranno utilizzate 45 unità di prodotto solubile.<br />
Se si desidera modificare la quantità del solubile occorre procedere<br />
come descritto nel capitolo “7.5 Modifica e memorizzazione<br />
dei parametri”.<br />
Importante<br />
La quantità di polvere solubile è regolabile da 0 a 250 con<br />
passi di 1.<br />
L’erogazione del prodotto non avviene quando il parametro<br />
è impostato a “0000”.<br />
BEVANDA BEVANDA A<br />
A<br />
ACQUA ACQUA ACQUA 1: 1: 1: 030 030<br />
030<br />
Definisce la quantità di acqua da miscelare al solubile in polvere<br />
o al caffè.<br />
Quando nella riga inferiore compare “ACQUA 1:030” significa<br />
che l’acqua verrà miscelata con il prodotto solubile o con il caffè.<br />
030 indica che nel prodotto solubile o nel caffè, verranno erogate<br />
30 unità d’acqua.<br />
Se si desidera modificare la quantità dell’acqua occorre procedere<br />
come descritto nel capitolo “7.5 Modifica e memorizzazione<br />
dei parametri”.<br />
Importante<br />
La quantità di acqua calda è regolabile da 0 a 250 ml con<br />
passi di 1.<br />
L’erogazione del prodotto non avviene quando i parametri<br />
sono impostati a “0000”.<br />
BEVANDA BEVANDA A<br />
A<br />
%SOLUB. %SOLUB. %SOLUB. 1: 1: 160<br />
160<br />
Indica la velocità con cui la polvere solubile e l’acqua vengono<br />
erogati nella bevanda A.<br />
Importante<br />
Impostando il valore 10 la pompa lavora alla massima portata,<br />
mentre il prodotto solubile viene erogato, ad impulsi,<br />
alla portata minima.<br />
Impostando 100 sia il prodotto solubile che l’acqua vengono<br />
erogati alla portata massima.<br />
Impostando 190 la pompa lavora, ad impulsi, alla portata<br />
minima, mentre il prodotto solubile viene erogato alla massima<br />
portata.<br />
Se si desidera modificare la velocità di erogazione occorre procedere<br />
come descritto nel capitolo “7.5 Modifica e memorizzazione<br />
dei parametri”.<br />
Importante<br />
La velocità di erogazione della polvere solubile e dell’acqua<br />
calda è regolabile da 10 a 190 con passi di 10.<br />
BEVANDA BEVANDA A<br />
A<br />
CAFFÈ: CAFFÈ: 050<br />
050<br />
Definisce la quantità di caffè da erogare.<br />
Nella riga inferiore compare “CAFFÈ: 050”.<br />
050 indica che verranno erogate 50 unità di caffè ottenuto con<br />
caffè macinato.<br />
Se si desidera modificare la quantità del caffè occorre procedere<br />
come descritto nel capitolo “7.5 Modifica e memorizzazione dei<br />
parametri”.<br />
Importante<br />
La quantità di caffè erogabile è regolabile da 0 a 500 con<br />
passi di 2.<br />
L’erogazione del prodotto non avviene quando il parametro<br />
è impostato su “0000”.<br />
Esempio di bevanda con 1 prodotto solubile e caffè<br />
BEVANDA BEVANDA C<br />
C<br />
SEQUENZA: SEQUENZA: C100<br />
C100<br />
La lettera “C”, visualizzata nella prima riga, indica la bevanda<br />
corrispondente al tasto C (terzo in alto nella tastiera - rif. 3, fig.<br />
17).<br />
Le 4 cifre indicano quali prodotti (caffè e/o solubile) saranno utilizzati<br />
per la composizione della bevanda.<br />
In questo esempio l’erogazione della bevanda, selezionabile dal<br />
tasto C, sarà ottenuta miscelando: acqua, caffè e prodotto solubile.<br />
N.B.: La stessa bevanda si può ottenere con gli stessi prodotti,<br />
impostati con sequenza diversa (esempio C001, o 0C01,<br />
ecc.).<br />
Premendo il tasto “DOWN” si passa alla voce successiva.
BEVANDA BEVANDA C<br />
C<br />
SOLUBILE SOLUBILE 1: 1: 012<br />
012<br />
Rappresenta la quantità di prodotto solubile utilizzata nella bevanda<br />
C (rif. 3, fig. 17).<br />
Premendo il tasto “DOWN” si passa alla voce successiva.<br />
BEVANDA BEVANDA C<br />
C<br />
ACQUA ACQUA ACQUA 1: 1: 030<br />
030<br />
Rappresenta la quantità di acqua calda erogata nella bevanda C<br />
con il prodotto solubile.<br />
Premendo il tasto “DOWN” si passa alla voce successiva.<br />
BEVANDA BEVANDA C<br />
C<br />
%SOLUB. %SOLUB. 1: 1: 160<br />
160<br />
Indica la velocità con cui il prodotto solubile del contenitore (rif. 1,<br />
fig. 18) e l’acqua, vengono erogati nella bevanda C (rif. 3, fig.<br />
17).<br />
Premendo il tasto “DOWN” si passa alla voce successiva.<br />
BEVANDA BEVANDA C<br />
C<br />
CAFFÈ: CAFFÈ: 050<br />
050<br />
Rappresenta la quantità di caffè macinato utilizzata nella bevanda<br />
C (rif. 3, fig. 17).<br />
Premendo il tasto “DOWN” si passa alla voce successiva.<br />
Quarta voce principale<br />
del menù di programmazione<br />
GESTIONE GESTIONE VENDITE VENDITE<br />
VENDITE<br />
Premere “ENTER” per accedere alle funzioni di questa voce.<br />
VALORE VALORE PREZZI PREZZI<br />
PREZZI<br />
Funzione che consente di impostare un valore ad ogni prezzo.<br />
Gli step ed il range sono preimpostati.<br />
Premere “ENTER” per accedere alla visualizzazione dei valori dei<br />
prezzi.<br />
VALORE VALORE VALORE PREZZI PREZZI<br />
PREZZI<br />
PREZZO PREZZO 01: 01: 01: 00000<br />
00000<br />
VALORE VALORE PREZZI PREZZI<br />
PREZZI<br />
PREZZO PREZZO 02: 02: 02: 00000<br />
00000<br />
VALORE VALORE VALORE PREZZI PREZZI<br />
PREZZI<br />
PREZZO PREZZO 03: 03: 03: 00000<br />
00000<br />
VALORE VALORE PREZZI PREZZI<br />
PREZZI<br />
PREZZO PREZZO 04: 04: 04: 00000<br />
00000<br />
Questo livello visualizza in sequenza i prezzi ed il loro valore.<br />
Premere “ENTER” per accedere alla modifica dei singoli valori.<br />
VALORE VALORE PREZZI<br />
PREZZI<br />
PREZZO PREZZO 01: 01: 01: 00000<br />
00000<br />
Nella seconda riga del display, compare, accanto alla voce<br />
“PREZZO 01:00200”, il valore attualmente assegnato (es.<br />
200).<br />
Per far scorrere i valori, ed eventualmente modificarli, procedere<br />
Italiano<br />
come descritto nel capitolo “7.5 Modifica e memorizzazione dei<br />
parametri”.<br />
Utilizzare i tasti “UP” e “DOWN” per passare ad una ulteriore<br />
voce “PREZZO…:…”.<br />
Ripetere la sequenza delle operazioni per ogni prezzo a cui si<br />
vuole modificare i valore.<br />
PREZZI PREZZI BEVANDA<br />
BEVANDA<br />
Funzione che consente di associare ad ogni bevanda uno dei<br />
prezzi precedentemente impostati in “VALORE PREZZI”.<br />
Premere “ENTER” per accedere alla visualizzazione delle voci<br />
PREZZI PREZZI BEVANDA<br />
BEVANDA<br />
1- 1- 0000 0000 : :abcde : abcde<br />
PREZZI PREZZI BEVANDA<br />
BEVANDA<br />
2- 2- 0000 0000 : :abcde : abcde<br />
PREZZI PREZZI BEVANDA<br />
BEVANDA<br />
3- 3- 0000 0000 : :abcde : abcde<br />
PREZZI PREZZI BEVANDA<br />
BEVANDA<br />
4- 4- 4- 0000 0000 : : :abcde : : abcde<br />
Questo livello visualizza, in sequenza, le associazioni Prezzo/<br />
Bevanda impostate in ogni singola voce.<br />
Importante<br />
Nel modello D.A. 3P la seconda riga del display visualizza<br />
solo le lettere abc dovendo associare il prezzo a sole 3 bevande.<br />
Premere “ENTER” per modificare le associazioni Prezzo/Bevanda.<br />
PREZZI PREZZI BEVANDA<br />
BEVANDA<br />
1- 1- 0200 0200 : :abcde : abcde<br />
Nella seconda riga del display, compare un primo gruppo di cifre<br />
“1- 0200…” non modificabili in questa funzione perchè sono<br />
i prezzi precedentemente impostati.<br />
Il secondo gruppo di cifre “…:abcde” riporta le bevande erogabili,<br />
modello D.A. <strong>5P</strong> tasti erogazione A - B - C - D - E (rif. 3, fig.<br />
17), modello D.A. 3P tasti erogazione A - B - C (rif. 3, fig. 17),<br />
alle quali si possono associare i prezzi.<br />
N.B: LE LETTERE MINUSCOLE indicano che quella bevanda<br />
NON E’ associata al prezzo visualizzato, viceversa, LE<br />
LETTERE MAIUSCOLE indicano che quella bevanda E’<br />
associata al prezzo visualizzato.<br />
- Utilizzare i tasti “UP” e “DOWN” per far scorrere tutti i valori<br />
di prezzo disponibili.<br />
- Premere “ENTER” per modificare l’associazione del Prezzo/<br />
Bevanda.<br />
Compare il cursore lampeggiante sotto alla prima lettera.<br />
Se si vuole associare al prezzo visulizzato una delle cinque<br />
bevande possibili, occorre trasformare da minuscola a maiuscola<br />
la lettera scelta, utilizzando i tasti “UP” e “DOWN”.<br />
- Premere “ENTER” per memorizzare.<br />
Il cursore passa automaticamente alla seconda lettera.<br />
- Eseguire la stessa procedura per impostare le restanti lettere.<br />
- Utilizzare i tasti “UP” e “DOWN” per passare ad una ulteriore<br />
voce di “PREZZI BEVANDA”.<br />
Per uscire dalla funzione premere il tasto D (rif. 3, fig. 6).<br />
19
Italiano<br />
Quinta voce principale<br />
del menù di programmazione<br />
E’ visualizzabile, in aggiunta alle quattro voci base, con l’inserimento<br />
del dispositivo modulo orologio.<br />
Premere “ENTER” per accedere alla modifica delle singole funzioni.<br />
Premere “ENTER” per accedere alle funzioni di questa voce.<br />
Funzione che consente di impostare come e quando erogare gratuitamente<br />
le bevande.<br />
Premere “ENTER” per accedere alla visualizzazione dei modi con<br />
cui avviene l’erogazione gratuita.<br />
Questo livello visualizza in sequenza come e quando l’erogazione<br />
delle bevande è gratuita.<br />
Premere “ENTER” per accedere alla modifica delle singole voci.<br />
GRATUITO<br />
GRATUITO<br />
GRATUITO<br />
SEMPRE<br />
SEMPRE<br />
Nella seconda riga del display, compare il parametro attualmente<br />
assegnato.<br />
- Premere “ENTER” per modificarlo.<br />
Compare a sinistra un cursore lampeggiante.<br />
- Utilizzare i tasti “UP” e “DOWN” per variare la scelta del<br />
parametro, fra le tre disponibili (“SEMPRE”, “MAI” e “FASCE<br />
ORARIE”).<br />
- Premere ENTER per memorizzare la scelta.<br />
La conferma visualizza automaticamente il livello precedente.<br />
Utilizzare i tasti “UP” e “DOWN” per passare alla modifica della<br />
voce successiva.<br />
Se si sceglie questa opzione (“FASCE ORARIE”) si hanno a<br />
disposizione due intervalli di tempo in cui erogare gratuitamente<br />
le bevande. Per ognuno di essi occorre inserire l’orario di inizio<br />
(ON1 - OFF1) e quello di fine (ON2 - OFF2).<br />
Premere “ENTER” per accedere all’impostazione dei tempi di erogazione<br />
gratuita.<br />
Il parametro modificabile compare nella seconda riga del display.<br />
Per impostare i due tempi di erogazione gratuita occorre:<br />
20<br />
GESTIONE GESTIONE ORARI<br />
ORARI<br />
GRATUITO<br />
GRATUITO<br />
GRATUITO<br />
GRATUITO<br />
GRATUITO<br />
SEMPRE<br />
SEMPRE<br />
GRATUITO<br />
GRATUITO<br />
FASCE FASCE FASCE ORARIE<br />
ORARIE<br />
GRATUITO<br />
GRATUITO<br />
FASCE FASCE ORARIE<br />
ORARIE<br />
GRATUITO GRATUITO ON1<br />
ON1<br />
lmmgvsd lmmgvsd 00:00<br />
00:00<br />
GRATUITO GRATUITO OFF1<br />
OFF1<br />
lmmgvsd lmmgvsd 00:00 00:00<br />
00:00<br />
GRATUITO GRATUITO ON2<br />
ON2<br />
lmmgvsd lmmgvsd 00:00<br />
00:00<br />
GRATUITO GRATUITO OFF2 OFF2<br />
OFF2<br />
lmmgvsd lmmgvsd 00:00<br />
00:00<br />
- Premere “ENTER”.<br />
- Un cursore lampeggiante compare sotto alle lettere che identificano<br />
i giorni della settimana, e premendo i tasti “UP” e<br />
“DOWN” si varia il carattere da maiuscolo a minuscolo.<br />
N.B.: “Carattere maiuscolo” = giorno abilitato; “carattere minuscolo”<br />
= giorno non abilitato.<br />
- Premere “ENTER” per memorizzare.<br />
Il cursore passa automaticamente alla lettera successiva.<br />
- Eseguire la stessa procedura per impostare le restanti lettere.<br />
- Premere “ENTER” per confermare il nuovo valore.<br />
Automaticamente viene richiesto l’orario di spegnimento (OFF1).<br />
Ripetere la sequenza delle operazioni per ogni intervallo di tempo<br />
a cui si vuole modificare il valore.<br />
Selezionato l’ultimo valore e confermato con “ENTER”, vengono<br />
richiesti gli orari di accensione e spegnimento della seconda fascia<br />
(ON2-OFF2). In caso non si desideri modificare nulla premere<br />
il tasto D, quarto dall’alto nel modello D.A. <strong>5P</strong> (rif. 3, fig. 17).<br />
Dopo la conferma di OFF2, si esce automaticamente dal menù.<br />
Nel modello D.A. 3P per uscire dalla funzione occorre far scorrere<br />
in sequenza, con i tasti “UP” e “DOWN”, le fasce orarie impostabili.<br />
ORARI ORARI ORARI ON/OFF ON/OFF<br />
ON/OFF<br />
YES YES<br />
YES<br />
Funzione che consente di impostare, nell’arco della settimana, le<br />
fasce orarie di accensione e spegnimento automatici del distributore.<br />
Premere “ENTER” per impostare questa possibilità.<br />
ORARI ORARI ON/OFF<br />
ON/OFF<br />
->YY
Importante<br />
Lo sconto è impostabile con valori che variano da 10 al valore<br />
del prezzo bevanda minore, con passi di 10.<br />
- L’applicazione di uno sconto comporta l’apertura automatica<br />
di un livello successivo.<br />
SCONTO SCONTO ON1<br />
ON1<br />
lmmgvsd lmmgvsd 00:00<br />
00:00<br />
SCONTO SCONTO OFF1<br />
OFF1<br />
lmmgvsd lmmgvsd 00:00<br />
00:00<br />
SCONTO SCONTO ON2<br />
ON2<br />
lmmgvsd lmmgvsd 00:00<br />
00:00<br />
SCONTO SCONTO OFF2<br />
OFF2<br />
lmmgvsd lmmgvsd 00:00<br />
00:00<br />
Da questo livello si possono impostare due fasce orarie (ON1/<br />
OFF1, ON2/OFF2) che determinano gli orari in cui applicare lo<br />
sconto.<br />
Per la programmazione dei giorni e degli orari procedere come<br />
alla voce “GRATUITO - FASCE ORARIE”.<br />
AUMENTO<br />
AUMENTO<br />
0000<br />
0000<br />
Funzione che consente di impostare un aumento sul prezzo delle<br />
bevande, da applicare, nell’arco della settimana, in due diverse<br />
fasce orarie.<br />
Nella riga inferiore del display compare l’aumento da applicare.<br />
Per impostare questa possibilità procedere come descritto nel capitolo<br />
“7.5 Modifica e memorizzazione dei parametri”.<br />
Importante<br />
Lo sconto è impostabile con valori che variano da 10 al valore<br />
del prezzo bevanda minore, con passi di 10.<br />
L’applicazione dell’aumento comporta l’apertura automatica di un<br />
livello successivo.<br />
AUMENTO AUMENTO AUMENTO ON1<br />
ON1<br />
lmmgvsd lmmgvsd 00:00<br />
00:00<br />
AUMENTO AUMENTO AUMENTO OFF1<br />
OFF1<br />
lmmgvsd lmmgvsd 00:00<br />
00:00<br />
AUMENTO AUMENTO AUMENTO ON2<br />
ON2<br />
lmmgvsd lmmgvsd 00:00 00:00<br />
00:00<br />
AUMENTO AUMENTO OFF2 OFF2<br />
OFF2<br />
lmmgvsd lmmgvsd 00:00<br />
00:00<br />
Da questo livello si possono impostare due fasce orarie (ON1/<br />
OFF1, ON2/OFF2) che determinano gli orari in cui applicare<br />
l’aumento.<br />
Per la programmazione dei giorni e degli orari procedere come<br />
alla voce “GRATUITO - FASCE ORARIE”.<br />
ORARI ORARI LAVAGGI LAVAGGI<br />
LAVAGGI<br />
YES<br />
YES<br />
Funzione che consente di impostare due fasce orarie, nell’arco<br />
della settimana, in cui l’apparecchio esegue, in sequenza, un lavaggio<br />
automatico del miscelatore.<br />
Premere “ENTER” per impostare questa possibilità.<br />
ORARI ORARI LAVAGGI<br />
LAVAGGI<br />
->YY
Italiano<br />
22<br />
8 - USO DEL DISTRIBUTORE<br />
Importante<br />
Prima di utilizzare il distributore è necessario aver letto attentamente<br />
la presente pubblicazione ed aver acquisito una buona<br />
conoscenza generale del distributore.<br />
Dopo un periodo di inattività del distributore è consigliabile<br />
rileggere il capitolo “8.6 Prima accensione del distributore”<br />
prima di riutilizzarlo.<br />
8.1 Stati della macchina<br />
In relazione all’alimentazione elettrica il distributore può essere in<br />
uno dei seguenti stati:<br />
Spenta ed isolata elettricamente<br />
- Interruttore generale (rif. 25, fig.1) in posizione “0“.<br />
- E’ attiva esclusivamente la memoria di mantenimento dei dati<br />
programmati.<br />
Accesa<br />
- Interruttore generale (rif. 25, fig. 1) in posizione “I“.<br />
- Sono attive tutte le funzioni ed il display (rif. 1, fig. 1) è acceso.<br />
In standby (distributore spento ma non isolato elettricamente)<br />
- Interruttore generale (rif. 25, fig. 1) in posizione “I“.<br />
- La funzione “ORARI ON/OFF” è attiva e impostata su “YES”.<br />
- Il display e la memoria di mantenimento dei dati programmati,<br />
sono attivi.<br />
8.2 Accensione manuale<br />
Questo tipo di avvio è necessario quando il distributore si trova<br />
nello stato di “spento ed isolato elettricamente” (vedi 8.1 Stati del<br />
distributore). Occorre procedere come descritto in “8.6 Prima accensione<br />
del distributore” escludendo, eventualmente, il controllo<br />
della bevanda erogata.<br />
8.3 Accensione automatica<br />
programmata<br />
E’ possibile quando il distributore è in “STANDBY” ed è attivo, e<br />
impostato, la funzione “ORARI ON/OFF”.<br />
L’accensione del distributore avviene all’ora programmata.<br />
8.4 Erogazione delle bevande<br />
• Scegliere la bevanda tra quelle disponibili ed identificarne il<br />
prezzo corrispondente.<br />
• Introdurre le monete (o il gettone) nell’apposita apertura (rif. 4,<br />
fig. 1) fino a visualizzare sul display (rif. 1, fig. 1) l’importo<br />
richiesto.<br />
Attenzione<br />
Non si possono inserire monete dopo aver raggiunto l’importo<br />
pari al prezzo massimo di vendita.<br />
• Estrarre un bicchiere e posizionarlo nel vano di erogazione<br />
(rif. 9, fig. 1).<br />
Il display indica “SELEZIONARE BEVANDA”.<br />
Attenzione<br />
Se viene premuto il tasto di una bevanda di prezzo superiore<br />
a quello inserito, occorre inserire altre monete e premere nuovamente<br />
il tasto prescelto.<br />
Il display indica per un istante “INSERIRE GETTONE”.<br />
• Premere il tasto corrispondente alla bevanda richiesta.<br />
Attenzione<br />
Per evitare scottature, attendere il segnale di fine erogazione<br />
(spia rossa che si spegne) prima di introdurre la mano nel<br />
vano erogazione.<br />
8.5 Prima accensione<br />
del distributore<br />
Una volta determinate le bevande che il distributore dovrà erogare<br />
(vedi “7 - Programmazione”), procurasi i prodotti da inserire nei<br />
contenitori (caffè, prodotti solubili, ecc…).<br />
Importante<br />
E' indispensabile utilizzare solo prodotti solubili dichiarati<br />
"idoneo per la distribuzione automatica".<br />
Riempimento serbatoi<br />
Importante<br />
Il prodotto liofilizzato deve essere obbligatoriamente versato<br />
nel proprio contenitore (rif. 6, fig. 1).<br />
Non versare caffè in grani nel contenitore del solubile.<br />
Contenitore solubile (solo D.A. <strong>5P</strong>)<br />
Provvedere al riempimento del contenitore del prodotto liofilizzato:<br />
- Estrarre il contenitore dalla sua sede sollevandolo leggermente<br />
per agevolarne l’estrazione.
- Inserire il prodotto solubile senza superare i 2/3 della capacità<br />
massima.<br />
- Chiudere con il coperchio e reinserire completamente il contenitore<br />
nella sua sede.<br />
fig. 18<br />
Serbatoio acqua<br />
Provvedere al riempimento del serbatoio dell’acqua (tranne che<br />
per le versioni con attacco diretto alla rete).<br />
- Scollegare il tubo (rif. A, fig. 19) dal serbatoio agendo sul<br />
raccordo automatico<br />
- Estrarre il serbatoio dalla sua sede sollevando leggermente<br />
l’impugnatura (fig. 19).<br />
- Svitare la ghiera, estrarre la valvola e riempire il serbatoio di<br />
acqua potabile fresca.<br />
- Reinserire la valvola nel foro curandosi che il tubo di aspirazione<br />
(rif. B, fig. 20) sia inserito all’interno della maniglia tubolare<br />
e riavvitare la ghiera.<br />
fig. 19<br />
fig. 20<br />
A<br />
B<br />
Italiano<br />
Contenitore caffè<br />
Provvedere al riempimento del contenitore caffè in grani:<br />
- Tirare verso l’esterno il contenitore del caffè, sollevare il coperchio<br />
e riempire il contenitore di caffè in grani (fig. 21).<br />
fig. 21<br />
Regolazione della macinatura<br />
- Regolare l’indice della macinatura del caffè su uno dei seguenti<br />
valori, ruotando la manopola (fig. 22):<br />
Italia. ....................................................... 4-7<br />
Spagna. .............................................. 5-8<br />
Francia - Svizzera. .................... 5-8<br />
Germania - Austria. ................. 6-9<br />
USA - Canada. ............................ 6-14<br />
- Inserire il gettone (o le monete) richieste nell’apertura, premere<br />
il tasto corrispondente all’erogazione di caffè e verificare la<br />
qualità del prodotto. Se il caffè esce troppo lentamente occorre<br />
regolare la macinatura su un valore più alto, se invece esce<br />
troppo velocemente si deve posizionare l’indice su un valore<br />
di macinatura più basso.<br />
Attenzione<br />
Dopo aver modificato la macinatura occorre erogare almeno<br />
due caffè per poter apprezzare la variazione.<br />
fig. 22<br />
8<br />
6<br />
4<br />
Operazioni da eseguire sul distributore<br />
- Abilitare le funzioni elettriche (interruttore generale in posizione<br />
“I”).<br />
- Effettuare il riempimento del circuito idrico del distributore procedendo<br />
come segue:<br />
- Aprire lo sportello<br />
- Inserire la chiave (rif. 30, fig. 23) nell’apertura (rif. 31,<br />
fig. 23) di azionamento dei microinterruttori di sicurezza.<br />
23
Italiano<br />
- Tenere premuto il pulsante (rif. 26, fig. 1) fino a quando non<br />
esce un getto regolare di acqua dal tubo di erogazione (rif.<br />
18, fig. 1).<br />
- Togliere la chiave esclusione dei micro (rif. 30, fig. 23).<br />
- Chiudere lo sportello.<br />
- Attendere che la spia rossa lampeggiante si spenga.<br />
Se la spia rossa rimane lampeggiante ed il display segnala<br />
“ATTENDERE“ significa che la macchina non ha raggiunto<br />
la giusta temperatura.<br />
- Leggere sul display (rif. 1, fig. 1) il messaggio di dialogo del<br />
distributore ed eseguire le eventuali operazioni indicate.<br />
- Attendere che il display indichi ”INTRODURRE IL GET-<br />
TONE“.<br />
- Posizionare il recipiente nel vano erogatore.<br />
24<br />
fig. 23<br />
Attenzione<br />
Questa operazione, necessaria per l’installazione del distributore,<br />
esclude il sistema di sicurezza previsto sull’apertura<br />
dello sportello. Deve pertanto essere eseguita da personale<br />
specializzato conscio dei rischi a cui si espone operando su<br />
apparecchiature sotto tensione.<br />
Importante<br />
Le bevande devono essere erogate solo in contenitori aperti.<br />
(bicchieri, tazzine ecc.).<br />
- Inserire il credito corrispondente al tipo di bevanda.<br />
- Premere il tasto corrispondente.<br />
31<br />
30<br />
Importante<br />
I prodotti erogati devono essere consumati rapidamente, e<br />
non possono essere conservati e/o confezionati.<br />
- Verificare l’esatto funzionamento della macchina erogando alcune<br />
bevande.<br />
Importante<br />
Nonostante tutti i tasti siano programmati, già all’origine, su<br />
valori standard, occorre controllare che la bevanda ottenuta<br />
corrisponda alle caratteristiche desiderate. Diversamente bisogna<br />
procedere alla programmazione dei tasti erogazione<br />
(vedi “7 - Programmazione”).<br />
Cassetto moneta/gettoni<br />
Per accedere al cassetto moneta (rif. 15, fig. 1) occorre:<br />
- Aprire la serratura di bloccaggio (rif. A, fig. 24) con l’apposita<br />
chiave.<br />
fig. 24<br />
A B<br />
- Estrarlo.<br />
- Togliere il coperchio (rif. B, fig. 24).<br />
- Svuotarlo dalle monete/gettoni contenuti.<br />
- Reinserirlo nella sua sede (fig. 24).<br />
8.6 Messaggi sul display<br />
Il funzionamento del distributore automatico viene bloccato completamente,<br />
o parzialmente, quando si verificano mancanze di<br />
alcuni prodotti o condizioni anomale. Il display (rif. 1, fig. 1)<br />
posto sul pannello di comando, unitamente all’accensione della<br />
spia rossa (rif. 2, fig. 1), fornisce le indicazioni delle cause che<br />
hanno provocato l’eventuale blocco.
MESSAGGIO CAUSA RIMEDIO<br />
Fuori servizio manca acqua<br />
Fuori servizio manca caffè<br />
Fuori servizio vuotare fondi<br />
Fuori servizio mancanza<br />
gruppo<br />
Fuori servizio blocco bevanda<br />
n<br />
Fuori servizio blocco solubile<br />
n<br />
Fuori servizio blocco acqua<br />
Non arriva acqua agli erogatori.<br />
Si verifica quando il motore macina<br />
rimane in funzione per più di un<br />
certo tempo senza che il microinterruttore<br />
dosatore venga chiuso.<br />
Si verifica quando il contenitore dei<br />
fondi ha raggiunto la massima capacità.<br />
Il gruppo non è stato inserito correttamente<br />
nella propria sede oppure<br />
il microinterruttore presenza gruppo<br />
non è funzionante.<br />
Il distributore automatico ha raggiunto<br />
il numero di bevande programmato.<br />
Il distributore automatico ha raggiunto<br />
il numero di erogazioni con solubile<br />
1 (o solubile 2 o solubile 3)<br />
programmato.<br />
Il distributore automatico ha erogato<br />
la quantità di acqua programmata.<br />
Italiano<br />
Si verifica quando la turbina non gira e non arrivano impulsi all’elettronica<br />
ad esempio quando finisce l’acqua durante l’erogazione di<br />
un prodotto o durante il riempimento all’accensione (non funzione la<br />
pompa o gruppo sporco o elettrovalvola bloccata). Spegnendo e<br />
riaccendendo il distributore automatico , la segnalazione persiste,<br />
dal momento che il malfunzionamento viene riscontrato di nuovo<br />
durante la procedura di riempimento all’accensione. Il distributore<br />
automatico è bloccato in tutte le sue funzioni compresa la gestione<br />
della temperatura (caldaia off): occorre riempire il serbatoio dell’acqua<br />
o controllare la presenza di acqua nella rete idrica e dopo<br />
eseguire la procedura di riempimento con tasto di reset finché non<br />
esce un getto di acqua regolare. Il fuori servizio si resetta dopo aver<br />
premuto il tasto interno, al momento che inizia a partire la pompa<br />
per fare il riempimento; sarà cura dell’utente far continuare la procedura<br />
di riempimento fino a quando non fuoriesce un getto di acqua<br />
regolare. Se la segnalazione persiste dopo l’erogazione, rivolgersi<br />
ad un Centro Assistenza.<br />
Il distributore automatico è bloccato in tutte le sue funzioni da tastiera:<br />
occorre riempire il serbatoio caffè, spegnere e riaccendere la<br />
macchina. E’ resettabile anche premendo il tasto interno. Se la segnalazione<br />
persiste dopo l’erogazione di un caffè rivolgersi ad un<br />
centro assistenza.<br />
Il distributore automatico è bloccato in tutte le funzioni da tastiera.<br />
Spegnendo e riaccendendo il distributore automatico la segnalazione<br />
persiste. Il cassetto fondi deve essere vuotato (microinterruttore off<br />
per almeno 5 secondi). Otto caffè prima del raggiungimento del<br />
numero massimo dei fondi (0 ..... 99), appare sul display una segnalazione<br />
di avvertimento.<br />
Se spegnendo e riaccendendo il distribuotre automatico la segnalazione<br />
persiste, rivolgersi ad un centro assistenza. Se manca il gruppo<br />
all’accensione, il distributore automatico non esegue è il riempimento,<br />
nè il reset del gruppo.<br />
Il distributore automatico è bloccato in tutte le sue funzioni da tastiera.<br />
Spegnendo e riaccendendo la macchina, la segnalazione persiste.<br />
Per ripristinare le funzioni del distributore automatico è necessario<br />
entrare in programmazione e utilizzare la funzione di RESET nel<br />
menu BLOCCHI.<br />
Il distributore automatico è bloccato in tutte le sue funzioni da tastiera.<br />
Spegnendo e riaccendendo la macchina, la segnalazione persiste.<br />
Per il ripristino delle funzioni vedi sopra.<br />
Il distributore automatico è bloccato in tutte le sue funzioni da tastiera.<br />
Per il ripristino delle funzioni vedi sopra. Spegnendo e riaccendendo<br />
la macchina, la segnalazione persiste. Volendo effettuare il<br />
reset senza accedere alla programmazione (solo nel caso di questo<br />
fuori servizio, ad esempio per operatori non in possesso della password)<br />
è possibile procedere come segue:<br />
- Tenendo premuto il tasto di RESET, entro 3 secondi premere<br />
anche il tasto A (rif. 3, fig. 6), il led inizia a lampeggiare.<br />
- Premere brevemente il tasto C (rif. 3, fig. 6) per confermare il<br />
reset. Non premendo il tasto C (rif. 3, fig. 6) dopo 10 secondi<br />
il led smette di lampeggiare e il reset non viene effettuato.<br />
25
Italiano<br />
26<br />
MESSAGGIO CAUSA RIMEDIO<br />
Fuori servizio blocco caffè<br />
Attenzione vuotare fondi<br />
Attenzione manca vasca<br />
Attenzione manca cassetto<br />
Fuori servizio errore 03 04<br />
Fuori servizio errore 05<br />
Attenzione errore 21<br />
Fuori servizio errore 15<br />
Fuori servizio errore 14<br />
Fuori servizio errore 16<br />
Fuori servizio errore 22<br />
Fuori servizio errore 23<br />
Fuori servizio errore 24<br />
Fuori servizio errore 25<br />
Il distributore automatico ha raggiunto<br />
il numero di erogazioni caffè programmato.<br />
Otto caffè prima del raggiungimento<br />
del numero massimo dei fondi<br />
appare sul display una segnalazione<br />
di avvertimento.<br />
Si verifica quando il microinterruttore<br />
presenza vasca non è chiuso.<br />
Si verifica quando il microinterruttore<br />
presenza cassetto fondi non è<br />
chiuso<br />
Gruppo bloccato<br />
Errore portata<br />
Errore di programmazione<br />
Errore chiave elettronica<br />
Errore sensore temperatura<br />
Errore elaborazione dati 1 (program)<br />
Errore programmazione flash<br />
Errore zero crossing<br />
9 - MANUTENZIONE<br />
9.1 Premessa<br />
Errore di elaborazione dati 2<br />
<strong>Saeco</strong> card senza time-keeper<br />
Pericolo<br />
Prima di eseguire qualsiasi operazione di manutenzione e/o<br />
pulizia, sconnettere il distributore dall’alimentazione elettrica<br />
ed attenderne il raffreddamento.<br />
fig. 25 ✕<br />
Il distributore automatico è bloccato in tutte le sue funzioni da tastiera.<br />
Spegnendo e riaccendendo il distributore automatico, la segnalazione<br />
persiste. Per il ripristino delle funzioni vedi sopra<br />
Il cassetto fondi deve essere vuotato (microinterruttore off per almeno<br />
5 secondi), altrimenti dopo i successivi otto caffè il distributore<br />
automatico andrà fuori servizio.<br />
Assicurarsi del corretto inserimento della vasca raccogligocce nell’apposita<br />
sede. Se la segnalazione persiste rivolgersi ad un centro<br />
assistenza. Ogni volta che viene tolta la vasca e inserita di nuovo,<br />
avviene il reset del gruppo. Se si verifica una mancanza vasca<br />
all’accensione il distributore non esegue la procedura di riempimento<br />
e di reset del gruppo.<br />
Assicurarsi del corretto inserimento della vasca raccogligocce e del<br />
cassetto fondi nelle rispettive sedi. Se la segnalazione persiste rivolgersi<br />
ad un centro assistenza. Nel caso di mancanza cassetto all’accensione,<br />
il distributore non fa ne il riempimento ne il reset del gruppo.<br />
Chiamare il manutentore tecnico<br />
Chiamare il manutentore tecnico<br />
Chiamare il manutentore tecnico<br />
Chiamare il manutentore tecnico<br />
Chiamare il manutentore tecnico<br />
Chiamare il manutentore tecnico<br />
Chiamare il manutentore tecnico<br />
Chiamare il manutentore tecnico<br />
Chiamare il manutentore tecnico<br />
Chiamare il manutentore tecnico<br />
Per ottenere la massima qualità delle bevande erogate e garantire<br />
il miglior funzionamento del distributore è necessario attenersi alle<br />
disposizioni contenute in questo libretto.<br />
- I componenti non smontabili e la macchina stessa vanno puliti,<br />
quando non specificato diversamente, solo con acqua fredda<br />
o tiepida, utilizzando spugne non abrasive e panni umidi.<br />
- Non utilizzare getti di acqua diretta.<br />
- Tutte le parti da pulire sono facilmente accessibili e non richiedono<br />
l’utilizzo di attrezzi.<br />
- Una manutenzione ed una pulizia regolari preservano e mantengono<br />
efficiente la macchina per un periodo maggiore e<br />
garantiscono il rispetto delle normali norme igieniche.<br />
- I contaimpulsi presenti sul distributore conteggiano il numero di<br />
erogazioni eseguite e consentono di programmare gli interventi<br />
di manutenzione ordinaria da parte del manutentore tecnico.
fig. 26<br />
fig. 27<br />
Pericolo<br />
In caso di anomalie di funzionamento, normalmente segnalate<br />
dal display, spegnere immediatamente la macchina, interrompere<br />
l’alimentazione elettrica per mezzo dell’interruttore<br />
onnipolare o sfilando la spina e contattare il CENTRO DI<br />
ASSISTENZA più vicino.<br />
9.2 Pulizia e manutenzione<br />
• Le operazioni di manutenzione sono da eseguire almeno una<br />
volta all'anno e comprendono il controllo dell'integrità del distributore<br />
e la conformità alle norme degli impianti.<br />
È assolutamente vietato eseguire operazioni di pulizia o manutenzione<br />
con la chiave per l’azionamento dei micro (rif. 17, fig. 1)<br />
inserita (fig. 26).<br />
✕<br />
Attenzione<br />
Tutti gli organi del distributore devono essere lavati esclusivamente<br />
con acqua tiepida senza l’utilizzo di alcun detersivo o<br />
solvente che potrebbe modificarne la forma o la funzionalità<br />
(fig. 27).<br />
Attenzione<br />
Non lavare in lavastoviglie (fig. 27).<br />
Gruppo caffè<br />
- Togliere la vasca raccogligocce ed estrarre l’ugello del tubo<br />
di erogazione acqua calda dalla sua sede nell’erogatore bevande<br />
(fig. 28).<br />
fig. 28<br />
✕<br />
✕<br />
fig. 29<br />
Italiano<br />
- Portare la leva di aggancio in posizione 3 ed estrarre il gruppo<br />
caffè facendo ruotare leggermente sul raccordo di collegamento<br />
al miscelatore del latte (fig. 29). Lavarlo completamente<br />
in acqua tiepida, asciugarlo e reinserirlo nell’apposita sede<br />
tenendo la leva in posizione 3.<br />
N.B.: Per evitare che il gruppo caffè non sia correttamente collegato<br />
al miscelatore del latte, è opportuno prima inserire<br />
completamente il raccordo di collegamento, quindi, con<br />
una leggera rotazione, agganciare il gruppo alla piastra<br />
principale.<br />
Attenzione<br />
Nell’inserire il gruppo curarsi che le frecce di riferimento coincidano.<br />
In caso contrario allinearle servendosi dell’apposita<br />
chiave (fig. 30).<br />
fig. 30<br />
- Reinserire l’ugello del tubo acqua calda nella sua sede sull’erogatore<br />
bevande (fig. 28).<br />
Miscelatore ed erogatore (solo D.A. <strong>5P</strong>)<br />
- Togliere l’imbuto per polveri unitamente al coperchio per imbuto,<br />
facendo attenzione a non danneggiare le guarnizioni poste<br />
alle estremità. Separarli dalla parte sottostante sfilando anche<br />
l’ugello con tubo in silicone (fig. 31).<br />
- Ruotare ora il contenitore di miscelazione in senso orario ed<br />
estrarlo.<br />
- Pulire la ventola di miscelazione con una spugna imbevuta in<br />
acqua tiepida senza esercitare un’eccessiva pressione per non<br />
pregiudicare il posizionamento della guarnizione di tenuta.<br />
- Lavare abbondantemente in acqua tiepida tutti i componenti<br />
e rimontarli eseguendo le operazioni su indicate in senso inverso.<br />
Curarsi in modo particolare del corretto inserimento dell’ugello<br />
con tubo in silicone.<br />
27
Italiano<br />
Contenitore polvere solubile<br />
- Estrarre il contenitore dalla sua sede sollevandolo leggermente<br />
per agevolarne l’estrazione (fig. 32). Il contenitore per polvere<br />
solubile non necessita di una particolare manutenzione.<br />
Tuttavia è necessario provvedere alla sua pulizia con cadenza<br />
perlomeno mensile assicurandosi che all’atto del rifornimento<br />
sia perfettamente asciutto. Il contenitore può essere separato<br />
dalla boccola posteriore mediante rotazione antioraria di quest’ultima,<br />
consentendo l’estrazione del perno posteriore e della<br />
molla. La boccola anteriore in silicone può essere rimossa<br />
asportando l’apposita molla di bloccaggio. Pulire il tutto con<br />
uno straccio asciutto o con un soffio di aria compressa e rimontare<br />
eseguendo le operazioni in senso inverso verificando<br />
che l’anello di tenuta del perno posteriore sia perfettamente<br />
integro.<br />
28<br />
fig. 31<br />
fig. 32<br />
Serbatoio acqua<br />
Il serbatoio dell’acqua deve essere svuotato e pulito ogni qualvolta<br />
si provveda al rifornimento.<br />
Zona vano erogazione<br />
Smontare il vano erogazione semplicemente estraendolo dalla sua<br />
sede. Separarlo dalla griglia, dalla vasca e dal piatto raccogligocce<br />
e lavare il tutto con acqua tiepida (fig.33).<br />
Importante<br />
Il costruttore declina ogni responsabilità per eventuale<br />
malfunzionamento causato da un’errata o scarsa manutenzione.<br />
fig. 33<br />
9.3 Sostituzione ventolina del<br />
Miscelatore<br />
Togliere la vecchia ventolina, inserire la nuova nell’apposito codolo,<br />
appoggiare la chiave sulla flangiatura della ventolina quindi<br />
premere in direzione assiale fino a che la chiave non è a contatto<br />
con il piano del supporto motore (fig. 34). Per ulteriori istruzioni<br />
specifiche, vedi l’apposito manuale di manutenzione.<br />
fig. 34<br />
10 - DEMOLIZIONE<br />
DEL DISTRIBUTORE<br />
Lo smaltimento dei rifiuti derivanti dalla demolizione del distributore,<br />
dovrà essere eseguito nel rispetto ambientale, evitando di inquinare<br />
suolo, acqua ed aria.<br />
In ogni caso dovranno essere rispettate le locali legislazioni vigenti<br />
in materia. Rendere inutilizzabile il distributore staccando la spina<br />
dalla presa e tagliando il cavo elettrico. Consegnare il distributore<br />
fuori uso ad un centro di raccolta idoneo.<br />
Le informazioni presenti in questo manuale sono soggette a modifiche,<br />
decise dal costruttore, senza preavviso. Il contenuto del presente<br />
manuale è riservato, nessuna parte può essere riprodotta in<br />
qualsiasi forma o mezzo elettronico o meccanico, per alcun uso,<br />
senza il permesso del costruttore. Si esclude ogni responsabilità<br />
per inesattezze qui contenute, derivanti da errori di stampa o trascrizione.<br />
11 - VARIANTI<br />
11.1 Modello D.A. 3P/<strong>5P</strong><br />
(senza modulo orologio)<br />
Il distributore Modello 3/<strong>5P</strong>, privo del dispositivo “modulo orologio”,<br />
si utilizza allo stesso modo, ha la stessa destinazione d’uso<br />
e componentistica, del modello più completo.<br />
Differisce da quest’ultimo nella gestione della quinta voce principale<br />
del menù (vedi “11.2 Struttura della programmazione (versione<br />
3/<strong>5P</strong> senza modulo orologio)”), in questo modello, infatti,<br />
la quinta voce “GRATUITO… “ gestisce due possibilità di scelta<br />
“MAI” e “SEMPRE” (nella versione con modulo orologio questa<br />
voce è integrata in “GESTIONE ORARI”).
11.2 Struttura della programmazione<br />
(versione D.A 3P standard e<br />
D.A <strong>5P</strong> standard senza modulo<br />
orologio)<br />
1 a Parte<br />
GESTIONE SISTEMA CODICE D.A.<br />
000000<br />
Continua<br />
CONTATORI CONT CAFFE'<br />
T:000000 P:000000<br />
BLOCCHI<br />
TEMPERTURA MIN.<br />
T:095<br />
TEMPERTURA MAX.<br />
T:100<br />
CONTAIMPULSI<br />
BEVANDE<br />
OROLOGIO<br />
17:00 M 17FEB 98<br />
TESTO STAND-BY<br />
*D.A. <strong>5P</strong>N SAECO*<br />
TESTO EROGAZIONE<br />
IN EROGAZIONE<br />
TESTO F. SERVIZIO<br />
FUORI SERVIZIO<br />
PRESELEZIONE<br />
NO<br />
SERIAL NUMBER<br />
909024<br />
CONTATORI BEVANDA<br />
T:000011 P:000011<br />
CONT. SOLUBILI<br />
CONT. ACQUA<br />
T:000011 P:000011<br />
RESET CONT.<br />
BLOCCO CAFFE'<br />
00000 LIM: 00000<br />
BLOCCO BEVANDA<br />
BLOCCO SOLUB.<br />
BLOCCO ACQUA<br />
00000 LIM:00000<br />
BLOCCO FONDI<br />
00000 LIM:00000<br />
RESET BLOCCHI<br />
CONTAIMPULSI<br />
BEVANDE<br />
CONTAIMPULSI<br />
SOLUBILE<br />
CONTAIMPULSI<br />
CAFFE'<br />
PRESELEZIONE<br />
Y >N<<br />
PRESELEZIONE<br />
>Y< N<br />
BEVANDA A<br />
T:000011 P:000011<br />
BEVANDA B<br />
T:000011 P:000011<br />
BEVANDA C<br />
T:000011 P:000011<br />
BEVANDA D<br />
T:000011 P:000011<br />
BEVANDA E<br />
T:000011 P:000011<br />
SOLUBILI 1<br />
T:000011 P:000011<br />
RESET BLOCCHI<br />
Y >N<<br />
RESET BLOCCHI<br />
>Y< N<br />
BEVANDA A<br />
00000 LIM:00000<br />
BEVANDA B<br />
00000 LIM:00000<br />
BEVANDA C<br />
00000 LIM:00000<br />
BEVANDA D<br />
00000 LIM:00000<br />
BEVANDA E<br />
00000 LIM:00000<br />
BLOCCO SOLUB. 1<br />
00000 LIM:00000<br />
RESET BLOCCHI<br />
Y >N<<br />
RESET BLOCCHI<br />
>Y< N<br />
Solo D.A. <strong>5P</strong><br />
CAMBIA PASSWORD NUOVA PASSWORD NUOVA PASSWORD<br />
VALORE:0000<br />
Solo D.A. <strong>5P</strong><br />
Solo D.A. <strong>5P</strong><br />
2 a Parte<br />
Fine<br />
SISTEMI<br />
DI PAGAMENTO<br />
PREPARAZIONE<br />
BEVANDA<br />
VALORE MONETE VALORE MONETE<br />
MONETA 01:00050<br />
MULTIVENDITA<br />
NO<br />
OVERPAY TIME<br />
180<br />
VALORE MONETE<br />
MONETA 03:00050<br />
VALORE MONETE<br />
MONETA 04:00050<br />
VALORE MONETE<br />
MONETA 05:00050<br />
VALORE MONETE<br />
MONETA 06:00050<br />
MULTIVENDITA<br />
Y >N<<br />
MULTIVENDITA<br />
>Y< N<br />
BEVANDA A BEVANDA A<br />
SEQUENZA: C100<br />
BEVANDA B<br />
BEVANDA C<br />
BEVANDA D<br />
BEVANDA E<br />
VALORE MONETE<br />
MONETA 02:00050<br />
BEVANDA A<br />
SOLUBILE 1: 100<br />
BEVANDA A<br />
ACQUA 1: 030<br />
BEVANDA A<br />
%SOLUB. 1: 160<br />
BEVANDA A<br />
CAFFE': 050<br />
BEVANDA B<br />
SEQUENZA: C100<br />
BEVANDA B<br />
SOLUBILE 1: 100<br />
BEVANDA B<br />
ACQUA 1: 030<br />
BEVANDA B<br />
%SOLUB. 1: 160<br />
BEVANDA B<br />
CAFFE': 050<br />
BEVANDA C<br />
SEQUENZA: C100<br />
BEVANDA C<br />
SOLUBILE 1: 100<br />
BEVANDA C<br />
ACQUA 1: 030<br />
BEVANDA C<br />
%SOLUB. 1: 160<br />
BEVANDA C<br />
CAFFE': 050<br />
BEVANDA D<br />
SEQUENZA: C100<br />
BEVANDA D<br />
SOLUBILE 1: 100<br />
BEVANDA D<br />
ACQUA 1: 030<br />
BEVANDA D<br />
%SOLUB. 1: 160<br />
BEVANDA D<br />
CAFFE': 050<br />
BEVANDA E<br />
SEQUENZA: C100<br />
BEVANDA E<br />
SOLUBILE 1: 100<br />
BEVANDA E<br />
ACQUA 1: 030<br />
BEVANDA E<br />
%SOLUB. 1: 160<br />
BEVANDA E<br />
CAFFE': 050<br />
GESTIONE VENDITE VALORE PREZZI VALORE PREZZI<br />
PREZZO 01:00000<br />
GRATUITO<br />
SEMPRE<br />
USCITA<br />
PROGRAMM. Y/N<br />
VALORE PREZZI<br />
PREZZO 02:00000<br />
VALORE PREZZI<br />
PREZZO 03:00000<br />
VALORE PREZZI<br />
PREZZO 04:00000<br />
PREZZI BEVANDA PREZZI BEVANDA<br />
1- 0000 :ABCDE<br />
GRATUITO<br />
SEMPRE<br />
GRATUITO<br />
MAI<br />
PREZZI BEVANDA<br />
2- 0000 :abcde<br />
PREZZI BEVANDA<br />
3- 0000 :abcde<br />
PREZZI BEVANDA<br />
4- 0000 :abcde<br />
Solo D.A. <strong>5P</strong><br />
Solo D.A. <strong>5P</strong><br />
Solo D.A. <strong>5P</strong><br />
Solo D.A. <strong>5P</strong> Solo D.A. 3P<br />
Italiano<br />
Solo D.A. <strong>5P</strong><br />
PREZZI BEVANDA<br />
1- 0000 :ABC<br />
PREZZI BEVANDA<br />
2- 0000 :abc<br />
PREZZI BEVANDA<br />
3- 0000 :abc<br />
PREZZI BEVANDA<br />
4- 0000 :abc<br />
29
Italiano<br />
30
Italiano<br />
31
Cod. 0721.990 - Ed. 01 10/02
Automatic drink vending machine<br />
model<br />
<strong>Saeco</strong> D.A.<br />
3P / <strong>5P</strong><br />
INSTRUCTION AND MAINTENANCE MANUAL
English<br />
2<br />
MAIN PARTS<br />
fig. 1<br />
27<br />
26<br />
30<br />
25<br />
24<br />
23<br />
22<br />
29<br />
1<br />
2<br />
3<br />
4<br />
21<br />
20<br />
1 Display<br />
2 Fault light<br />
3 Keys (D.A. 3P - D.A. <strong>5P</strong>)<br />
4 Coin slot<br />
5 Silicon bushing (only D.A. <strong>5P</strong>)<br />
6 Soluble product container (solo D.A. <strong>5P</strong>)<br />
7 Water tank<br />
8 Coffee container cover<br />
9 Coffee bean hopper<br />
10 Grinder selecting knob<br />
11 Opening for safety micro-switch bypassing<br />
12 Tank cover with valve<br />
13 Coffee unit<br />
14 Coffee grounds tray<br />
15 Coin/token box<br />
19<br />
18<br />
6 7 8 9<br />
17<br />
16<br />
15<br />
10<br />
11<br />
12<br />
13<br />
14<br />
16 Drip tray<br />
17 Hot water nozzle<br />
18 Drink dispenser<br />
19 Drain grill<br />
20 Dispensing slot<br />
21 Grill stand<br />
22 Mixing chamber (only D.A. <strong>5P</strong>)<br />
23 Instant product funnel (only D.A. <strong>5P</strong>)<br />
24 Door key<br />
25 Serial port<br />
26 RESET key<br />
27 Instant product funnel cover (only D.A. <strong>5P</strong>)<br />
28 Main switch<br />
29 Internal access door<br />
30 Clock module door<br />
5<br />
28
INDEX<br />
MAIN PARTS. ................................................................................................................. 3<br />
1 - MANUAL OVERVIEW. ........................................................................ 4<br />
1.1 Introduction. .................................................................................... 4<br />
1.2 Used symbols. .............................................................................. 4<br />
2 - MACHINE INFORMATION. ......................................................... 4<br />
2.1 User information. ....................................................................... 4<br />
2.2 Vending machine intended use. ................................ 4<br />
2.3 Residual risks. ............................................................................... 5<br />
2.4 Vending machine identification. ................................ 5<br />
2.5 Technical specifications. .................................................... 5<br />
3 - HANDLING<br />
AND STORAGE. ........................................................................................... 6<br />
4 - SAFETY. ........................................................................................................................ 6<br />
4.1 General safety rules. ............................................................. 6<br />
4.2 Operator requirements. ...................................................... 6<br />
4.3 Installed safety devices. ...................................................... 6<br />
5 - INSTRUMENT COMMAND DESCRIPTION . ........ 7<br />
6 - INSTALLATION. ............................................................................................. 8<br />
6.1 List of accessory equipment. .......................................... 8<br />
6.2 Water connection. .................................................................. 8<br />
Machine with tank<br />
(Standard D.A. 3P and<br />
standard D.A. <strong>5P</strong> types). .................................................. 8<br />
Machine with direct waterworks connection<br />
(D.A. 3P R.I. e D.A. <strong>5P</strong> R.I. types). ........................ 8<br />
6.3 Electric connection. ................................................................. 9<br />
6.4 PARALLEL 12 V d.c coiner fitting.. ............................ 9<br />
6.5 Clock module insertion. ..................................................... 10<br />
6.6 Nation key insertion . ........................................................... 10<br />
6.7 Serial port connection. ........................................................ 10<br />
6.8 Affixing labels and stickers . .......................................... 10<br />
7 - PROGRAMMING. ..................................................................................... 11<br />
7.1 Programming structure. ........................................................ 12<br />
7.2 Key functions. ............................................................................... 13<br />
7.3 Programming mode access. .......................................... 13<br />
7.4 Selection of the parameter<br />
to be changed or displayed. ....................................... 14<br />
English<br />
7.5 Changing and memory storing<br />
parameters. ..................................................................................... 14<br />
7.6 Menu description. .................................................................... 14<br />
First main item of<br />
the programming menu. .................................................... 14<br />
Second main item of<br />
the programming menu. .................................................... 17<br />
Third main item of<br />
the programming menu. .................................................... 17<br />
Fourth main item of<br />
the programming menu. .................................................... 19<br />
Fifth main item of<br />
the programming menu. .................................................... 20<br />
8 - VENDING MACHINE USE. ........................................................... 22<br />
8.1 Machine statuses. ..................................................................... 22<br />
8.2 <strong>Manual</strong> start up. ........................................................................ 22<br />
8.3 Programmed automatic start up ................................ 22<br />
8.4 Drink dispensing. ...................................................................... 22<br />
8.5 First vending machine start up. ................................... 22<br />
Tank filling. ...................................................................................... 22<br />
Soluble product container<br />
(only D.A. <strong>5P</strong>). ............................................................................. 22<br />
Water tank. .................................................................................... 23<br />
Coffee container. ...................................................................... 23<br />
Grinding adjustment. ............................................................ 23<br />
Operations to be performed<br />
on the vending machine. .................................................. 23<br />
Coin/token box. ....................................................................... 24<br />
8.6 Display messages. ................................................................... 24<br />
9 - MAINTENANCE. .......................................................................................... 26<br />
9.1 Introduction. .................................................................................... 26<br />
9.2 Cleaning and maintenance. ......................................... 27<br />
Coffee unit. ..................................................................................... 27<br />
Mixer and dispenser (only D.A. <strong>5P</strong>). .................... 27<br />
Soluble powder container. .............................................. 28<br />
Water tank. .................................................................................... 28<br />
Dispensing slot area. ............................................................ 28<br />
9.3 Mix fan replacement. ........................................................... 28<br />
10 -MACHINE SCRAPPING. ................................................................... 28<br />
11 -VARIATIONS. ................................................................................................... 28<br />
11.1 D.A. 3P/<strong>5P</strong> model<br />
(without clock module). ....................................................... 28<br />
11.2 Programming structure<br />
(V.M 3P standard version and<br />
D.A. <strong>5P</strong> standard without clock module). ........ 29<br />
3
English<br />
4<br />
1 - MANUAL<br />
OVERVIEW<br />
1.1 Introduction<br />
Important<br />
This publication is an integral part of the vending machine<br />
and should be read carefully. It contains the technical information<br />
required for proper installation, maintenance and<br />
operation of the D.A. 3P and <strong>5P</strong> with clock module. Always<br />
refer to this publication before performing any operation.<br />
Figures show the model D.A. <strong>5P</strong>, but can also be referred to<br />
the model D.A. 3P without substantial differences.<br />
Manufacturer: Cosmec S.p.A.<br />
Via Panigali, 39 - 40041 GAGGIO MONTANO (Bo)<br />
In the internal part of the cover you will find the page with the<br />
illustration most frequently referred to by the text. Keep it open<br />
while you read the publication.<br />
This publication should be kept with care and must accompany<br />
the machine during the whole of its operating life, including ownership<br />
changes.<br />
In case this publication is lost or damaged, immediately ask an<br />
AUTHORIZED SERVICE CENTRE for a new copy.<br />
• The Manufacturer owns all the copyrights of this publication.<br />
1.2 Used symbols<br />
Various types of indications were used in this publication with the<br />
purpose of underlining the various danger or competency levels.<br />
As a complement to the symbol a message is reported explaining<br />
procedures and giving useful information:<br />
Danger<br />
It’s used to underline dangerous situations for both the vending<br />
machine operators and the machine itself.<br />
Maintenance technician<br />
It’s used to mark out the operations that should be performed<br />
only by specialized personnel.<br />
Important<br />
It’s used to mark out the operations that ensure good vending<br />
machine operation if performed.<br />
2 - MACHINE<br />
INFORMATION<br />
2.1 User information<br />
• The vending machine is programmable as for the doses of any<br />
type of vend.<br />
• The vending machine is pre-set to accommodate the PARALLEL<br />
12V coiner and the mechanic token coiner.<br />
• The vending machine is pre-set for the insertion of an additional<br />
function (CLOCK MODULE) that allows start up or shutdown<br />
programming.<br />
• In case of need refer to the national Importer or Distributor or to<br />
the Manufacturer if the Importer is not available.<br />
• AUTHORIZED SERVICE CENTRES are available for any clarification<br />
or information concerning vending machine operation,<br />
or to satisfy spare part supply or technical assistance demands.<br />
• The manufacturer reserves the right to carry out improvements<br />
to the vending machine without prior notice.<br />
2.2 Vending machine intended use<br />
The vending machine D.A. <strong>5P</strong> is capable of dispensing in a completely<br />
automatic and programmable way:<br />
- espresso coffee prepared with instantly ground bean coffee;<br />
- drinks based on soluble lyophilized products (chocolate, milk,<br />
tea, etc.)<br />
- hot water for the preparation of hot drinks<br />
The vending machine D.A. 3P is capable of dispensing in a completely<br />
automatic and programmable way:<br />
- espresso coffee prepared with instantly ground bean coffee;<br />
- hot water for the preparation of hot drinks.<br />
Important<br />
In case of improper use any form of warranty shall decay<br />
and the manufacturer shall disclaim all responsibilities for<br />
damages to people and/or objects.<br />
The following shall be considered improper uses:<br />
- any use other than the one provided for and/or with techniques<br />
different from the ones described in this publication;<br />
- any intervention on the vending machine in contrast with the<br />
procedures described in this publication;<br />
- any use after component tampering and/or after changes to<br />
the safety devices;<br />
- Installing the device outdoors
2.3 Residual risks<br />
The dispensing slot is not protected against accidental contact of<br />
hands with the hot liquid.<br />
2.4 Vending machine identification<br />
The vending machine is identified by the model name and the<br />
registration number, both of which can be found on the identification<br />
tag placed in the lower left part of the back panel (fig. 2).<br />
The tag bears the following specifications:<br />
• Manufacturer name<br />
• vending machine model<br />
• some constructive specifications:<br />
- power supply voltage (V)<br />
- power supply frequency (Hz)<br />
- power absorption (W)<br />
• EC marking<br />
• Registration number<br />
• Year of manufacture<br />
Important<br />
Do not remove or damage the identification tag, as it’s the<br />
only element that bears all the information allowing the Manufacturer<br />
to identify the vending machine.<br />
For any demand to the AUTHORIZED SERVICE CENTRES (assistance,<br />
spare parts, etc.) always refer to this tag, reporting<br />
specific vending machine data printed on it.<br />
fig. 2<br />
2.5 Technical specifications<br />
English<br />
Size D.A. <strong>5P</strong> D.A. 3P<br />
W. .................................................. mm 382<br />
D. .................................................... mm 355<br />
H. .................................................... mm 505<br />
Weight. ........................................................ .kg 25 22.5<br />
Installed power. ........................................ W (*)<br />
Power supply voltage. ......................... V (*)<br />
Power supply frequency. .................... Hz (*)<br />
Supply cable length. ............................. mm 1500<br />
Capacity<br />
Lyophilized product container. ........ kg. 0.5 to 1.2<br />
(extractable, transparent)<br />
Coffee container. .................................... kg. 1.1<br />
(extractable, transparent)<br />
Water tank. ................................................ litres 4.8<br />
Water supply. ........................................... external tank<br />
. ........................................... waterworks connection<br />
Waterworks pressure. .......................... bar 1.5 - 8<br />
Waterworks connection. .................... 3/4" Gas coupling<br />
(*) See tag on the back of the vending machine<br />
fig. 3<br />
A<br />
L<br />
P<br />
5
English<br />
6<br />
3 - HANDLING<br />
AND STORAGE<br />
Handling<br />
The Manufacturer protects the vending machine with cardboard<br />
packaging that bears the primary warnings.<br />
• During handling and transportation, the vending machine should<br />
remain in a vertical position as per indications printed on the<br />
packaging.<br />
• Perform hoisting and positioning operations with care, using<br />
adequate means to the load to be hoisted.<br />
• For possible manual hoisting use the special handles placed<br />
on the packaging sides.<br />
• Do not lift the vending machine while looking for the grip on<br />
the sides of the packaging.<br />
• Do not shake the vending machine.<br />
Storage<br />
• The vending machine is contained in cardboard packaging<br />
with reinforced base (refer to fig. 4).<br />
Danger<br />
The vending machine packaging can stand 50 kg in weight,<br />
therefore do not stack more than two vending machines.<br />
• The vending machine should be stored in its original packaging,<br />
in dry and non-dusty places.<br />
fig. 4<br />
650<br />
370<br />
4 - SAFETY<br />
4.1 General safety rules<br />
390<br />
• Carefully read this publication before using the vending machine.<br />
• It’s absolutely forbidden to deactivate the safety devices installed<br />
on the vending machine.<br />
• Vending machine cleaning and maintenance operations should<br />
be performed with the main switch (ref. 28, fig. 1) in the “O”<br />
position, or after having removed the plug from the mains outlet.<br />
• Do not try to remove protection plates and panels. If required,<br />
call for the assistance of our sales network (addresses in the<br />
last page).<br />
• Do not autonomously modify parts of the vending machine;<br />
failure in complying with this provision shall result in the cancellation<br />
of the Manufacturer’s responsibility.<br />
• Do not aim water squirts on the vending machine.<br />
• Never pour liquids of any type on the vending machine.<br />
• Do not dip the vending machine in water.<br />
4.2 Operator requirements<br />
With the purpose of proper vending machine operation and safety,<br />
two type of operators with different requirements are defined:<br />
Maintenance technician<br />
Specialized person responsible for vending machine installation,<br />
first adjustment and, more in general, specific maintenance.<br />
User<br />
Person with a medium specialization level that has read the norms<br />
in the present manual and has followed a proper training course<br />
as per laws in force.<br />
The User is allowed to start the vending machine, adjust its working<br />
parameters, stop it, carry out its normal loading and coin collection<br />
operations, and finally to carry out its external cleaning.<br />
Danger<br />
The User is forbidden to carry out the operations indicated in<br />
the present manual as a specific competency of the maintenance<br />
technician.<br />
4.3 Installed safety devices<br />
- A safety valve protects the vending machine from overpressures<br />
in the hot-water production system.<br />
- The heater is protected against overheating by a thermostat<br />
and a thermal fuse.<br />
- A series of micro-switches controls the position of the drip tray<br />
(ref. 16, fig. 1), of the vending machine internal access door<br />
(ref. 29, fig. 1), of the coffee unit (ref. 13, fig. 1), and of the<br />
coffee grounds tray (ref. 14, fig. 1). If one of the components<br />
is not in the proper position, the relevant micro-switch stops<br />
vending machine operation and the display will show the<br />
message informing about component out of place.
5 - COMMAND AND<br />
INSTRUMENT<br />
DESCRIPTION<br />
Important<br />
The vending machine is delivered with the dispensing keys<br />
already programmed on standard values.<br />
Main switch (ref. 28, fig. 5)<br />
it’s located in the lower right back side of the vending machine.<br />
On the ”I” position it turns the vending machine on (enabling<br />
electric functions)<br />
On the “O” position it turns the vending machine off (disables<br />
electric functions)<br />
fig. 5<br />
28<br />
Keypad D.A. <strong>5P</strong> (ref. 3, fig. 6)<br />
It’s composed of 5 re-programmable keys that when pressed<br />
control the dispensing of the same number of drinks, identified<br />
from top to bottom as A - B - C - D - E (ref. 3, fig. 6).<br />
The correspondence between key and dispensed drink is at<br />
the User’s discretion.<br />
The A - B - C - D keys (ref. 3, fig. 6) are also used to perform<br />
programming.<br />
(refer to “7 - Programming”)<br />
Keypad D.A. 3P (ref. 3, fig. 6)<br />
It’s composed of 3 re-programmable keys that when pressed<br />
control the dispensing of the same number of drinks, identified<br />
from top to bottom as A - B - C.<br />
The correspondence between key and dispensed drink is at<br />
the User’s discretion.<br />
The A - B - C keys (ref. 3, fig. 6) are also used to perform<br />
programming.<br />
(refer to “7 - Programming”)<br />
Display (ref. 1, fig. 6)<br />
It’s composed of 2 lines with 16 characters each, and has the<br />
duty of displaying the messages relating to the operations (in<br />
progress or to be performed) and the possible out-of-service<br />
conditions.<br />
fig. 6<br />
English<br />
Red indicator light (ref. 2, fig. 6)<br />
When the light is on it indicates that the vending machine is<br />
not ready for drink dispensing.<br />
In any case the display (ref. 1, fig. 6) supplies the indications<br />
on vending machine operative or out-of-service status.<br />
Reset key (ref. 6, fig. 7)<br />
It’s located on the internal part of the door and may perform<br />
the following functions:<br />
a) Resetting “OUT OF SERVICE” (out –of-service) indications<br />
(refer to “ Display messages ”).<br />
b) Water circuit filling (refer to “ 6.2 Water connection”).<br />
fig. 7<br />
6<br />
A<br />
B<br />
C<br />
D<br />
E<br />
1<br />
2<br />
3<br />
7
English<br />
8<br />
6 - INSTALLATION<br />
Danger<br />
The presence of strong magnetic fields or the vicinity of electric<br />
machines generating strong disturbances might cause malfunctioning<br />
of the vending machine electronic control.<br />
- Install the vending machine in a protected environment with<br />
temperatures varying between 10°C and 40°C.<br />
- Make sure that no tampering occurred during transportation,<br />
checking that original packaging is intact and closed with straps.<br />
- Move the closed box near the installation area (refer to “3 Handling<br />
and storage”), cut the straps and lift the carton.<br />
- Verify the state and the model of the vending machine contained<br />
in the carton.<br />
- Check the contents of the accessory envelope attached to the<br />
vending machine (refer to “6.2 List of accessory equipment).<br />
- Remove the vending machine from the original packaging. It is<br />
advisable to keep the latter for later transportation or moving.<br />
- Free the vending machine from residual packaging.<br />
Important<br />
Possible packaging element disposal shall be performed in<br />
compliance with the laws in force in the country while respecting<br />
the environment.<br />
- Place the vending machine on a horizontal plane surface having<br />
adequate size and capable of standing its weight.<br />
The bearing surface shall not exceed an inclination of 2°.<br />
Important<br />
To ensure proper vending machine ventilation, the machine’s<br />
rear panel should be at least 8 cm away from walls, partitions,<br />
etc.<br />
Do not cover the vending machine with cloths or other things.<br />
6.1 List of accessory equipment<br />
• Micro operation key for safety system deactivation<br />
• 4 screws and nuts for coiner fixing<br />
• Series of stickers with prices and accepted coins<br />
• Series of stickers with instructions and dispensed products<br />
• 1 coupling for water pipe to tank (only for pre-set version with<br />
tank)<br />
• 1 wrench for mix fan fitting<br />
• 1 Operation and Maintenance booklet<br />
6.2 Water connection<br />
Machine with tank into the floor cabinet<br />
- Fit the special water connection.<br />
- Insert the water aspiration tube in the special connection under<br />
the dispenser (fig. 8).<br />
- Insert the tube in the can.<br />
fig. 8<br />
Machine with direct waterworks connection<br />
(Type D.A. 3P R.I. e D.A. <strong>5P</strong> R.I.)<br />
- Connect the vending machine to a drinking water distribution<br />
conduit having a pressure between 1,5 and 8 bar.<br />
To do this use a loading tube with adequate characteristics<br />
and connect it to the G3/4” coupling located on the vending<br />
machine back panel (fig. 9).<br />
fig. 9<br />
Important<br />
It is advisable to feed the vending machine with treated water<br />
by means of a decalcifying device, especially when the water<br />
has high calcium and magnesium salts content (hard water).
6.3 Electrical connection<br />
The vending machine is pre-set for electrical operation with a single-phase<br />
voltage whose value is stated in the identification tag<br />
(Refer to “2.4 Vending machine identification”) (fig. 2).<br />
Danger<br />
The connection point of the electric outlet must be located in a<br />
place that can be easily reached by the user, so that he can<br />
easily disconnect the vending machine from the power supply<br />
when required.<br />
Before connecting, make sure that:<br />
• The mains supply voltage of the outlet the vending machine is<br />
connected to corresponds to the one indicated on the tag.<br />
• The electric installation of the place where the vending machine<br />
is going to be installed complies with the laws in force,<br />
and has the characteristics enabling it to stand the required<br />
maximum load indicated on the tag.<br />
Check the electric installation’s compliance with the safety rules in<br />
force; in case of doubt, require an accurate electric installation<br />
survey by qualified professional staff.<br />
Danger<br />
The use of adapters or patch cords is forbidden.<br />
fig. 10<br />
✕<br />
6.4 Fitting the<br />
PARALLEL 12 V d.c. coiner<br />
Only 12 V d.c. parallel or mechanical coiners may be used on<br />
this vending machine.<br />
- Remove the token accepting device support (fig. 11).<br />
- Drill a hole on the keypad panel (fig. 11).<br />
fig. 11<br />
fig. 12<br />
fig. 13<br />
English<br />
- Insert the coiner and fix it by using the 4 supplied screws with<br />
nuts (fig. 12).<br />
- Connect the flat cable to the coiner (fig. 12).<br />
- Connect the flat cable to the electronic board (fig. 13).<br />
Important<br />
The Company disclaims all responsibilities for damages to<br />
vending machine, properties and people arising out of improper<br />
installation of the payment system; this responsibility<br />
falls directly on whoever performed the fitting.<br />
9
English<br />
6.5 Insertion of the Clock module<br />
10<br />
C<br />
fig. 14<br />
Danger<br />
This operation should be carried out by the maintenance technician.<br />
The “Clock Module” device manages the following functions:<br />
- the times when free dispensing is performed;<br />
- Vending machine start up and shutdown times;<br />
- the times when discounts or price rises should be applied, and<br />
their amount;<br />
- cleaning frequency<br />
The following operations should be performed to insert the module:<br />
- disconnect the device from the power supply;<br />
- open the vending machine door (ref. 29, fig. 1) and remove<br />
the small door (ref. D, fig. 14);<br />
- insert the module (ref. A, fig. 14) in the electronic board connector.<br />
Important<br />
The module (ref. A, fig. 13) is inserted properly when the<br />
reference mark is in the lower part (fig. 14).<br />
- Re-fit the small door (ref. D, fig. 14).<br />
- Re-close the door (ref. 29, fig. 1).<br />
6.6 Insertion of the Nation key<br />
Danger<br />
This operation should be carried out by the maintenance technician.<br />
The “nation key” contains the following data:<br />
- Language used by the display.<br />
- Software settings connected with the country of operation.<br />
Important<br />
The vending machine does NOT work without the “nation<br />
key” inserted, it is therefore necessary to insert it.<br />
After having inserted the “nation key”, the machine will refuse<br />
the introduction of keys for different countries.<br />
B<br />
A<br />
D<br />
To insert the nation key it’s necessary to perform the following operations:<br />
- Disconnect the power supply.<br />
- Open the vending machine internal access door (fig. 14).<br />
- Insert the key (ref. B, fig. 14) in the electronic board connector.<br />
- Re-close the door.<br />
6.7 Serial port connection<br />
Danger<br />
This operation should be carried out by the maintenance technician.<br />
A serial port (ref. C, fig. 14) is installed beside the “clock module”<br />
connector.<br />
Through the serial port the vending machine may be connected to<br />
a Personal Computer or to the devices supplied to the AUTHOR-<br />
IZED SERVICE CENTRES in order to carry out inspections and<br />
programming operations.<br />
6.8 Affixing labels and stickers<br />
Separate the accessory drink labels supplied with the machine by<br />
following the broken line.<br />
Apply the adhesive prices on the drink labels.<br />
Insert the tags in the special housings (fig. 15-16) through the slots<br />
located in the internal part of the door (ref. 29, fig. 1).<br />
fig. 15<br />
fig. 16
7 - PROGRAMMING<br />
This chapter describes how to set and/or change the parameters<br />
programmed on the vending machine.<br />
It is then advisable to read it carefully, performing the intervention<br />
only once the proper sequence of operations to be performed has<br />
been understood.<br />
In order to better understand the issue, it’s necessary to define a<br />
few terms that are going to be used in this chapter:<br />
- The term “digit” stands for the number or the letter that together<br />
with others, composes the “parameter” .<br />
- The term “parameter” stands for the whole of the “digits” that<br />
sets a certain function.<br />
The Programming system is developed in four levels:<br />
- The first level includes the five main items of the programming<br />
menu;<br />
- The second level displays all the functions of each programming<br />
menu item;<br />
- The third level displays the memorized settings for each programmable<br />
function;<br />
- The fourth level displays the modifiable parameters of the functions.<br />
The five main items of the Programming menu are:<br />
• system management<br />
• payment systems<br />
• drink preparation<br />
• vending handler<br />
• time management<br />
SYSTEM SYSTEM MANAGEMENT<br />
MANAGEMENT<br />
It’s the first main item of the Programming menu.<br />
It allows to set the parameters concerning machine operation and<br />
verify its use status (by reading the counters).<br />
Moreover, its’ possible to assign a code to the vending machine,<br />
display the registration number and insert or modify the password<br />
that gives access to programming.<br />
The displayable counters refer to:<br />
- coffee;<br />
- water;<br />
- drinks;<br />
- soluble products (only D.A. <strong>5P</strong>)<br />
For each of them the counter reports the number of performed<br />
vends and the executable ones. Beyond such limit the vending<br />
machine will stop dispensing drinks.<br />
Each counter may be zeroed.<br />
The number of possible vends (BLOCKS) can be modified.<br />
System Management allows to:<br />
• change the maximum and minimum vending machine operating<br />
temperatures;<br />
English<br />
• change current date and time;<br />
• insert text lines that will be visualized on the display during<br />
drink dispensing, when the vending machine is on standby<br />
and when it stops for out-of-service or due to a problem;<br />
• activate the pre-selection that displays the balance cash amount<br />
for drink dispensing.<br />
PAYMENT<br />
PAYMENT<br />
SYSTEMS<br />
SYSTEMS<br />
Its’ the second main item of the programming menu.<br />
It allows the setting of all the following parameters associated with<br />
the different payment systems:<br />
• coin values;<br />
• enabling multi-product dispensing (residual credit management);<br />
• OVER-PAY time (residual credit confiscation).<br />
BEVERAGE<br />
BEVERAGE<br />
PREPARATION<br />
PREPARATION<br />
PREPARATION<br />
Its’ the third main item of the programming menu.<br />
In model D.A. <strong>5P</strong>, it allows the preparation of the five dispensable<br />
drinks.<br />
Each drink may be obtained by combining coffee bean grinding<br />
with the soluble product and water. Dispensing shall be performed<br />
according to the set sequence. The quantity of ground coffee shall<br />
be set for each drink, together with the quantity of soluble product<br />
and water, and the dispensing speeds of the soluble product and<br />
water.<br />
In model D.A. 3P, it allows the preparation of the three dispensable<br />
drinks.<br />
Each drink is obtained from the combination of bean coffee grinding<br />
and water. Each drink requires the setting of coffee and water<br />
quantity.<br />
SALES SALES MANAGEMENT<br />
MANAGEMENT<br />
It’s the fourth main item of the programming menu.<br />
In model D.A. <strong>5P</strong>, it allows to set the value of four prices to be<br />
associated with the five drinks.<br />
In model D.A. 3P it allows to set the value of four prices to be<br />
associated with the three drinks.<br />
TIME TIME MANAGEMENT<br />
MANAGEMENT<br />
It’s the fifth main item of the programming menu.<br />
It allows to set the following vending machine functions to be performed<br />
within certain time bands:<br />
• free product dispensing;<br />
• machine start up and shutdown time;<br />
• time bands within which discounts or rises should be applied<br />
to drink prices;<br />
• hydraulic circuit automatic cleaning<br />
11
English<br />
7.1 Programming structure<br />
Part 1<br />
SYSTEM MANAGEMENT VM CODE<br />
000000<br />
Continues<br />
12<br />
COUNTERS COUNT. COFFEE<br />
T:000000 P:000000<br />
STOP<br />
MIN. TEMPERATURE<br />
T:095<br />
MAX. TEMPERATURE<br />
T:100<br />
MECH. COUNTER<br />
BEVERAGE<br />
CLOCK<br />
17:00 M 17FEB 98<br />
TEXT STAND-BY<br />
*D.A. <strong>5P</strong>N SAECO*<br />
TEXT DISPENSING<br />
DISPENSING<br />
TEXT OUT OF SERV<br />
OUT OF SERVICE<br />
PRESELECTION<br />
NO<br />
SERIAL NUMBER<br />
909024<br />
COUNT. BEVERAGE<br />
T:000011 P:000011<br />
COUNT. SOLUBLE<br />
WATER COUNTER<br />
T:000011 P:000011<br />
RESET COUNTER<br />
STOP COFFEE<br />
00000 LIM: 00000<br />
STOP BEVERAGE<br />
STOP SOLUB.<br />
STOP WATER<br />
00000 LIM:00000<br />
STOP GROUNDS<br />
00000 LIM:00000<br />
RESET STOP<br />
MECH. COUNTER<br />
BEVERAGE<br />
MECH. COUNTER<br />
SOLUBLE<br />
MECH. COUNTER<br />
COFFEE<br />
PRESELECTION<br />
Y >N<<br />
PRESELECTION<br />
>Y< N<br />
BEVERAGE A<br />
T:000011 P:000011<br />
BEVERAGE B<br />
T:000011 P:000011<br />
BEVERAGE C<br />
T:000011 P:000011<br />
BEVERAGE D<br />
T:000011 P:000011<br />
BEVERAGE E<br />
T:000011 P:000011<br />
SOLUBLE 1<br />
T:000011 P:000011<br />
RESET STOP<br />
Y >N<<br />
RESET STOP<br />
>Y< N<br />
BEVERAGE A<br />
00000 LIM:00000<br />
BEVERAGE B<br />
00000 LIM:00000<br />
BEVERAGE C<br />
00000 LIM:00000<br />
BEVERAGE D<br />
00000 LIM:00000<br />
BEVERAGE E<br />
00000 LIM:00000<br />
STOP SOLUBLE 1<br />
00000 LIM:00000<br />
RESET STOP<br />
Y >N<<br />
RESET STOP<br />
>Y< N<br />
Only V.M. <strong>5P</strong><br />
CHANGE PASSWORD NEW PASSWORD NEW PASSWORD<br />
CODE:0000<br />
Only V.M. <strong>5P</strong><br />
Only V.M. <strong>5P</strong><br />
Part 2<br />
PAYMENT<br />
SYSTEMS<br />
PREPARING<br />
BEVERAGE<br />
COIN VALUES COIN VALUES<br />
COIN 01:00050<br />
MULTIVEND<br />
NO<br />
OVERPAY TIME<br />
180<br />
COIN VALUES<br />
COIN 03:00050<br />
COIN VALUES<br />
COIN 04:00050<br />
COIN VALUES<br />
COIN 05:00050<br />
COIN VALUES<br />
COIN 06:00050<br />
MULTIVEND<br />
Y >N<<br />
MULTIVEND<br />
>Y< N<br />
BEVERAGE A BEVERAGE A<br />
SEQUENCE: C100<br />
BEVERAGE B<br />
BEVERAGE C<br />
BEVERAGE D<br />
BEVERAGE E<br />
COIN VALUES<br />
COIN 02:00050<br />
BEVERAGE A<br />
SOLUBLE 1: 100<br />
BEVERAGE A<br />
WATER 1: 030<br />
BEVERAGE A<br />
%SOLUB. 1: 160<br />
BEVERAGE A<br />
COFFEE: 050<br />
BEVERAGE B<br />
SEQUENCE: C100<br />
BEVERAGE B<br />
SOLUBLE 1: 100<br />
BEVERAGE B<br />
WATER 1: 030<br />
BEVERAGE B<br />
%SOLUB. 1: 160<br />
BEVERAGE B<br />
COFFEE: 050<br />
BEVERAGE C<br />
SEQUENCE: C100<br />
BEVERAGE C<br />
SOLUBLE 1: 100<br />
BEVERAGE C<br />
WATER 1: 030<br />
BEVERAGE C<br />
%SOLUB. 1: 160<br />
BEVERAGE C<br />
COFFEE: 050<br />
BEVERAGE D<br />
SEQUENCE: C100<br />
BEVERAGE D<br />
SOLUBLE 1: 100<br />
BEVERAGE D<br />
WATER 1: 030<br />
BEVERAGE D<br />
%SOLUB. 1: 160<br />
BEVERAGE D<br />
COFFEE: 050<br />
BEVERAGE E<br />
SEQUENCE: C100<br />
BEVERAGE E<br />
SOLUBL 1: 100<br />
BEVERAGE E<br />
WATER 1: 030<br />
BEVERAGE E<br />
%SOLUB. 1: 160<br />
BEVERAGE E<br />
COFFEE: 050<br />
SALES MANAGEMENT PRICE VALUES PRICE VALUES<br />
PRICE 01:00000<br />
Continues<br />
PRICE VALUES<br />
PRICE 02:00000<br />
PRICE VALUES<br />
PRICE 03:00000<br />
PRICE VALUES<br />
PRICE 04:00000<br />
BEVERAGE PRICES BEVERAGE PRICES<br />
1- 0000 :ABCDE<br />
BEVERAGE PRICES<br />
2- 0000 :abcde<br />
BEVERAGE PRICES<br />
3- 0000 :abcde<br />
BEVERAGE PRICES<br />
4- 0000 :abcde<br />
Only V.M. <strong>5P</strong><br />
Only V.M. <strong>5P</strong><br />
Only V.M. <strong>5P</strong><br />
Only V.M. <strong>5P</strong><br />
BEVERAGE PRICES<br />
1- 0000 :ABC<br />
BEVERAGE PRICES<br />
2- 0000 :abc<br />
BEVERAGE PRICES<br />
3- 0000 :abc<br />
BEVERAGE PRICES<br />
4- 0000 :abc<br />
Only V.M. <strong>5P</strong> Only V.M. 3P
Part 3<br />
TIME MANAGEMENT<br />
EXIT<br />
PROGRAM Y/N<br />
End<br />
fig. 17<br />
FREE VEND FREE VEND<br />
ALWAYS<br />
ON/OFF TIME<br />
NO<br />
DISCOUNT<br />
0000<br />
INCREASE<br />
0000<br />
FREE VEND<br />
TIME RANGE<br />
FREE VEND<br />
NEVER<br />
ON/OFF TIME<br />
Y ->NNYY
English<br />
7.4 Selection of the parameter to be<br />
changed or displayed<br />
The five menu items can be scrolled on the display to verify their<br />
parameters and eventually modify them.<br />
This requires:<br />
- Entering function programming (refer to “7.3 Programming<br />
Mode Access”)<br />
- Scroll menu items with the “UP” and “DOWN” keys.<br />
- Stop the selection on the menu item managing the function to<br />
be verified or modified.<br />
- Press the “ENTER” key to enter in the item.<br />
- Scroll the various functions with the “UP” and “DOWN” keys.<br />
- Stop the selection on the function whose parameters should be<br />
displayed or modified.<br />
- Press the “ENTER” key to display the parameter.<br />
7.5 Changing and saving parameters<br />
Changing or memory-storing parameters requires:<br />
- Displaying the parameter to be changed (refer to “7.4 Selection<br />
of the parameters to be changed or modified”).<br />
- Pressing the “ENTER” key to access the parameter to be modified.<br />
The flashing cursor places itself on a digit.<br />
- Increasing or decreasing the digit value by means of the “UP”<br />
and “DOWN” keys.<br />
Pressing the ENTER” key the displayed digit is stored to memory<br />
and replaces the previous one, while at the same time the<br />
cursor moves to the next digit.<br />
- Following the same procedure to set the remaining digits.<br />
- After having completed the digit change, confirm the new parameter<br />
with the “ENTER” key.<br />
If the change is accepted the flashing cursor disappears.<br />
Sometimes the parameter to be stored to memory must be chosen<br />
among a list of pre-set parameters (“YES” and “NO”, “WEEKDAYS”<br />
(weekdays), etc…). In these cases the “UP” and “DOWN” keys<br />
are used to scroll the flashing cursor or visualize the possible choices<br />
on the display.<br />
Example<br />
Setting “YES” or “NO” in a function requires:<br />
- Selecting the function.<br />
- Accessing the change level by means of the “ENTER” key.<br />
Upon access a selection signal appears on one of the two<br />
writings: “Y” (YES) or “N” (NO).<br />
- Using the “UP” or “DOWN” keys to select “Y” (YES) or “N”<br />
(NO).<br />
- Pressing “ENTER” to confirm the choice. Pressing “ENTER” automatically<br />
moves to the access level of the function.<br />
Inserting text in a function requires:<br />
- Selecting the function.<br />
- Pressing “ENTER” to type the text.<br />
The flashing cursor appears under the first letter on the left.<br />
- Using the “UP” or “DOWN” keys to scroll the letters.<br />
- Pressing “ENTER” to confirm the letter.<br />
The cursor moves to the following letter.<br />
14<br />
Operate in the same way for all the letters to be entered.<br />
The maximum number of letters that can be inserted is 16.<br />
Once the insertion is completed press “ENTER” twice.<br />
If you want to move to a further parameter press the “UP” or<br />
“DOWN” keys.<br />
• In model D.A. <strong>5P</strong> to exit the modified parameter and change<br />
level, press the “D - Cancel” key.<br />
Once all the parameters have been changed and stored to memory,<br />
press the “D - Cancel” key for as many times until you reach<br />
the function allowing exit from Programming “EXIT PROGRAM<br />
Y/N”.<br />
• In the model D.A. 3P to exit the modified parameter or change<br />
level, press the “UP” or “DOWN” keys.<br />
Once all the parameters have been changed and stored to memory,<br />
press the “UP” o “DOWN” keys for as many times until you<br />
reach the function allowing exit from Programming “EXIT PRO-<br />
GRAM Y/N”.<br />
7.6 Menu description<br />
N.B.: The numbers to be entered for each item are not referred<br />
to a measure unit (gr., ml., etc.), and are mere reference<br />
values.<br />
Important<br />
The following description of the menus refers to model D.A.<br />
<strong>5P</strong>, but it may be referred also to model D.A. 3P without substantial<br />
differences.<br />
First main voice<br />
of the programming menu<br />
SYSTEM SYSTEM MANAGEMENT<br />
MANAGEMENT<br />
Press “ENTER” to enter item functions.<br />
VM VM CODE<br />
CODE<br />
001007<br />
001007<br />
This function allows the assignment of an identification code to<br />
each device.<br />
To insert the code you should follow the procedure described in<br />
chapter “7.5 Changing and saving parameters”.<br />
COUNTERS<br />
COUNTERS<br />
COUNTERS<br />
This function allows the control of the number of drink, soluble<br />
products and water vends.<br />
Pressing “ENTER” gives access to the lower level where counters<br />
are listed.<br />
The lower line of each single counter displays the total vends after<br />
the letters “T” and “P”.
The number after the letter “T” corresponds to the total performed<br />
vends, and cannot be zeroed.<br />
The number after the letter “P” corresponds to the total vends performed<br />
since the last zeroing, (partial total) and may be zeroed<br />
with the “RESET” function.<br />
COUNT. COUNT. COFFEE COFFEE<br />
COFFEE<br />
T:000000 T:000000 T:000000 P:00000<br />
P:00000<br />
Displays total and partial coffee vends.<br />
COUNT. COUNT. BEVERAGE<br />
BEVERAGE<br />
T:000025 T:000025 P:00015<br />
P:00015<br />
Displays total and partial vends of all drinks, model D.A. <strong>5P</strong> dispensing<br />
keys A - B - C - D - E (ref. 3, fig. 17), model D.A. 3P<br />
dispensing keys A - B - C (ref. 3, fig. 17).<br />
Press “ENTER” to access the single counters.<br />
BEVERAGE BEVERAGE A<br />
A<br />
T:000005 T:000005 P:000003<br />
P:000003<br />
BEVERAGE BEVERAGE B<br />
B<br />
T:000005 T:000005 P:000003<br />
P:000003<br />
BEVERAGE BEVERAGE BEVERAGE C C<br />
C<br />
T:000005 T:000005 P:000003<br />
P:000003<br />
BEVERAGE BEVERAGE D<br />
D<br />
T:000005 T:000005 P:000003<br />
P:000003<br />
BEVERAGE BEVERAGE E<br />
E<br />
T:000005 T:000005 P:000003<br />
P:000003<br />
Using the “UP” and “DOWN” keys it’s possible to visualize total<br />
and partial vends for each single drink, model D.A. <strong>5P</strong> dispensing<br />
keys A - B - C - D - E (ref. 3, fig. 17), model D.A. 3P dispensing<br />
keys A - B - C (ref. 3, fig. 17).<br />
COUNT. COUNT. SOLUBLE<br />
SOLUBLE<br />
Counting function for soluble products (only for model D.A. <strong>5P</strong>).<br />
Press “ENTER” to access the display of the single counters.<br />
SOLUBLE SOLUBLE 1<br />
1<br />
T:000010 T:000010 T:000010 P:000004<br />
P:000004<br />
Displays total and partial soluble product vends.<br />
WATER WATER COUNTER<br />
COUNTER<br />
T:000010 T:000010 P:000004<br />
P:000004<br />
Displays total and partial water vends.<br />
RESET RESET COUNTER COUNTER<br />
COUNTER<br />
This function allows zeroing all partial counters.<br />
Press “ENTER” to access this option.<br />
RESET RESET COUNTER<br />
COUNTER<br />
->YYY
English<br />
SOLUBLE SOLUBLE 1<br />
1<br />
00000 00000 LIM:00500<br />
LIM:00500<br />
Press “ENTER” to display the soluble product block parameter.<br />
This function allows the setting of a number of water vends before<br />
blocking.<br />
Press “ENTER” to display the block parameter.<br />
This function allows the setting of a number of coffee grounds<br />
expulsions before blocking.<br />
Press “ENTER” to visualize the block parameter.<br />
This function allows the zeroing of all the product quantity partial<br />
counters.<br />
Press “ENTER” to access this option.<br />
RESET RESET RESET STOP<br />
STOP<br />
->YYYYYY
NEW NEW PASSWORD<br />
PASSWORD<br />
PASSWORD<br />
Menu item that appears before changing the password.<br />
Press “ENTER” to set the new password.<br />
NEW NEW PASSWORD<br />
PASSWORD<br />
CODE: CODE: 0000<br />
0000<br />
A flashing cursor appears under the first digit after “CODE:…”.<br />
To set the password follow the procedure described in chapter<br />
“7.5 Changing and saving parameters”.<br />
By pressing “ENTER” the machine moves automatically to the previous<br />
level “NEW PASSWORD”.<br />
Warning<br />
Write down the new password because in case of loss access<br />
to programming will be impossible.<br />
Second main item<br />
of the programming menu<br />
PAYMENT PAYMENT<br />
PAYMENT<br />
SYSTEM SYSTEM<br />
SYSTEM<br />
Press “ENTER” to access the item functions.<br />
COIN COIN VALUES<br />
VALUES<br />
This function allows the association of a value to all the selectable<br />
coins.<br />
Press “ENTER” to display the coin list.<br />
COIN COIN VALUES<br />
VALUES<br />
COIN COIN COIN 01:00050<br />
01:00050<br />
01:00050<br />
COIN COIN VALUES<br />
VALUES<br />
COIN COIN COIN 02:00050<br />
02:00050<br />
COIN COIN VALUES<br />
VALUES<br />
COIN COIN 03:00050<br />
03:00050<br />
COIN COIN VALUES<br />
VALUES<br />
COIN COIN 04:00050<br />
04:00050<br />
COIN COIN VALUES VALUES<br />
VALUES<br />
COIN COIN 05:00050<br />
05:00050<br />
COIN COIN VALUES<br />
VALUES<br />
COIN COIN 06:00050<br />
06:00050<br />
Press “ENTER” to display the value of the first coin.<br />
Press the “UP” and “DOWN” key to scroll the list of coins.<br />
To modify the coin value follow the procedure described in chapter<br />
“7.5 Changing and saving parameters”.<br />
The coin value falls within a nation key - pre-set range.<br />
Pressing “ENTER” automatically moves the display to the previous<br />
level “COIN VALUES”.<br />
MULTIVEND<br />
MULTIVEND<br />
YES<br />
YES<br />
English<br />
This function allows or not the use of residual credits to purchase<br />
other drinks.<br />
The lower line of the display shows the set parameter.<br />
By enabling the function (YES) it’s possible to use possible residual<br />
credits. On the contrary (NO), once the “OVER PAY”, time is<br />
elapsed, the vending machine confiscates the residual credit.<br />
Press “ENTER” to access this option.<br />
MULTIVEND<br />
MULTIVEND<br />
->YY
English<br />
The upper line of the display will always show the selected drink,<br />
while the second line shows the settable parameters from time to<br />
time.<br />
This item allows the setting of the sequence with which the products<br />
composing the drink shall be prepared and dispensed (in this<br />
case A). Up to four beverages may be inserted.<br />
To change the value, which varies between 0, 1 and C, follow the<br />
procedure described in chapter “7.5 Changing and saving parameters”.<br />
18<br />
BEVERAGE BEVERAGE A<br />
A<br />
SEQUENCE: SEQUENCE: 1000<br />
1000<br />
Important<br />
In this function the digit 0 corresponds to no product, as a<br />
consequence the digit combination corresponding to “0100”<br />
or “1000“ or “0010” will always provide for the dispensing<br />
of product 1.<br />
Depending on the sequence, it will be asked to set the parameters<br />
relating to the products that shall be dispensed in the drink.<br />
Press the “UP” and “DOWN” keys to scroll the drink composition.<br />
BEVERAGE BEVERAGE A<br />
A<br />
SOLUBLE SOLUBLE 1: 1: 045<br />
045<br />
(Only D.A. <strong>5P</strong>)<br />
It defines the quantity of soluble product to be mixed with water.<br />
The lower line shows “SOLUBLE 1:045”.<br />
045 indicates that 45 units of soluble product will be used.<br />
To modify the soluble product quantity follow the procedure described<br />
in chapter “7.5 Changing and saving parameters”.<br />
Important<br />
The quantity of soluble powder may be adjusted from 0 to<br />
250 with 1-by-1 steps.<br />
The product is not dispensed when the parameters are set on<br />
“0000”.<br />
BEVERAGE BEVERAGE A<br />
A<br />
WATER WATER 1: 1: 030<br />
030<br />
It defines the quantity of water to be mixed with the soluble powder<br />
or coffee.<br />
When “WATER 1:030” appears on the lower line, this means<br />
that water will be mixed with the soluble product or with coffee.<br />
030 means that 30 water units will be dispensed in the soluble<br />
product or in coffee.<br />
To modify the water quantity follow the procedure described in<br />
chapter “7.5 Changing and saving parameters”.<br />
Important<br />
The quantity of hot water may be adjusted from 0 to 250 with<br />
1-by-1 steps.<br />
The product is not dispensed when the parameters are set on<br />
“0000”.<br />
BEVERAGE BEVERAGE A<br />
A<br />
%SOLUB. %SOLUB. %SOLUB. 1: 1: 160<br />
160<br />
It indicates the speed with which soluble powder and water are<br />
dispensed in drink A.<br />
Important<br />
By setting the value on 10 the pump works at maximum flow<br />
rate, while the soluble product is dispensed by impulses at<br />
minimum flow rate.<br />
By setting the value on 100 both the soluble product and water<br />
are dispensed at maximum flow rate.<br />
By setting 190 the pump works by impulses at minimum flow<br />
rate, while the soluble product is dispensed at maximum flow<br />
rate.<br />
To change the dispensing speed follow the procedure described<br />
in chapter “7.5 Changing and saving parameters”.<br />
Important<br />
Soluble powder and hot water may be adjusted between 10<br />
and 190, with 10-by-10 steps.<br />
BEVERAGE BEVERAGE A<br />
A<br />
COFFEE: COFFEE: COFFEE: 050<br />
050<br />
It defines the quantity of coffee to be dispensed.<br />
The lower line shows “COFFEE: 050”.<br />
050 means that 50 ground coffee units obtained with ground<br />
coffee shall be dispensed.<br />
To change the coffee quantity follow the procedure described in<br />
chapter “7.5 Changing and saving parameters”.<br />
Important<br />
The quantity of dispensable coffee may be adjusted from 0 to<br />
500 with 2-by-2 steps.<br />
The product is not dispensed when the parameter is set on<br />
“0000”.<br />
Example of a drink with one soluble product and<br />
coffee.<br />
BEVERAGE BEVERAGE C<br />
C<br />
SEQUENCE: SEQUENCE: C100<br />
C100<br />
The letter “C”, displayed in the first line indicates the drink corresponding<br />
to the C key (upper third in the keypad - ref. 3, fig. 17).<br />
The four digits indicate the products (coffee and/or soluble product)<br />
shall be used to compose the drink.<br />
In this example drink dispensing, selectable with the C key, shall<br />
be obtained by mixing water, coffee and soluble product.<br />
N.B.: the same drink may be obtained with the same products,<br />
set in different sequence (e.g. C001, or 0C01, etc.).<br />
Pressing the “DOWN” key moves the display to the next item.
BEVERAGE BEVERAGE C<br />
C<br />
SOLUBLE SOLUBLE 1: 1: 012<br />
012<br />
It represents the quantity of soluble product used in the drink C (ref.<br />
3, fig. 17).<br />
Pressing the “DOWN” key moves the display to the next item.<br />
BEVERAGE BEVERAGE BEVERAGE C<br />
C<br />
WATER WATER 1: 1: 030<br />
030<br />
It represents the quantity of hot water dispensed in drink C with the<br />
soluble product.<br />
Pressing the “DOWN” key moves the display to the next item.<br />
BEVERAGE BEVERAGE C<br />
C<br />
%SOLUB. %SOLUB. 1: 1: 160<br />
160<br />
It indicated the speed with which the soluble product in the container<br />
(ref. 1, fig. 18) and water are dispensed in drink C (ref. 3,<br />
fig. 17).<br />
Pressing the “DOWN” key moves the display to the next item.<br />
BEVERAGE BEVERAGE C<br />
C<br />
COFFEE: COFFEE: 050<br />
050<br />
It represents the quantity of ground coffee used in the drink C (ref.<br />
3, fig. 17).<br />
Pressing the “DOWN” key moves the display to the next item.<br />
Fourth main item of<br />
the programming menu<br />
SALES SALES MANAGEMENT<br />
MANAGEMENT<br />
Press “ENTER” to access the item functions.<br />
PRICE PRICE PRICE VALUES VALUES<br />
VALUES<br />
This function allows the setting a value for each price.<br />
Steps and ranges are pre-set.<br />
Press “ENTER” to access the display of the price values.<br />
PRICE PRICE PRICE VALUES VALUES<br />
VALUES<br />
PRICE PRICE 01: 01: 00000<br />
00000<br />
PRICE PRICE PRICE VALUES VALUES<br />
VALUES<br />
PRICE PRICE 02: 02: 00000<br />
00000<br />
PRICE PRICE PRICE VALUES VALUES<br />
VALUES<br />
PRICE PRICE 03: 03: 00000<br />
00000<br />
PRICE PRICE PRICE VALUES VALUES<br />
VALUES<br />
PRICE PRICE 04: 04: 00000<br />
00000<br />
This level displays in sequence prices and their values.<br />
Press “ENTER” to access the change of the single values.<br />
PRICE PRICE PRICE VALUES<br />
VALUES<br />
PRICE PRICE 01: 01: 00000<br />
00000<br />
The second line of the display shows the currently assigned value<br />
(e.g. 200) beside the item “PRICE 01:00200”.<br />
to scroll the values, and eventually change them, follow the proce-<br />
English<br />
dure described in chapter “7.5 Changing and saving parameters”.<br />
Use the “UP” and “DOWN” keys to move to a further “PRICE…:…”<br />
item.<br />
Repeat the operation sequence for each price whose value is to<br />
be modified.<br />
BEVERAGE BEVERAGE PRICES<br />
PRICES<br />
This function allows the Association of each drink with one of the<br />
prices previously set in “BEVERAGE PRICES”.<br />
Press “ENTER” to access item display.<br />
BEVERAGE BEVERAGE PRICES<br />
PRICES<br />
1- 1- 0000 0000 : :abcde : abcde<br />
BEVERAGE BEVERAGE PRICES<br />
PRICES<br />
2- 2- 0000 0000 : :abcde : abcde<br />
BEVERAGE BEVERAGE PRICES<br />
PRICES<br />
3- 3- 0000 0000 : :abcde : abcde<br />
BEVERAGE BEVERAGE PRICES<br />
PRICES<br />
4- 4- 0000 0000 : :abcde : abcde<br />
This level displays in sequence the Price/Drink associations set for<br />
each single item.<br />
Important<br />
In model D.A. 3P the second line of the display only shows<br />
the letters abc, because the price has to be associated with<br />
only three drinks.<br />
Press “ENTER” to change the Drink/Price associations.<br />
BEVERAGE BEVERAGE PRICES<br />
PRICES<br />
1- 1- 0200 0200 : :abcde : abcde<br />
The second line of the display shows a first group of digits<br />
“1- 0200…” that cannot be changed in this function<br />
because they’re the previously set prices.<br />
The second group of digits “…:abcde” shows the dispensable<br />
drinks, model D.A. <strong>5P</strong> dispensing keys A - B - C - D - E (ref. 3, fig.<br />
17), model D.A. 3P dispensing keys A - B - C (ref. 3, fig. 17),<br />
which can be associated with prices.<br />
N.B: LOWER CASE LETTERS indicate that the drink IS NOT<br />
associated with the displayed price, while UPPER CASE<br />
LETTERS indicate that the drink IS associated with the displayed<br />
price.<br />
- Use the “UP” and “DOWN” keys to scroll all the available<br />
price values.<br />
- Press “ENTER” to change the Price/ Drink association<br />
The flashing cursor appears under the first letter.<br />
If the displayed price is to be associated with one of the five<br />
possible drinks, the chosen letter should be transformed from<br />
lower to upper case by using the “UP” and “DOWN” keys.<br />
- Press “ENTER” to store to memory.<br />
The cursor automatically moves to the second letter.<br />
- Follow the same procedure to set the remaining letters.<br />
- Use the “UP” and “DOWN” keys to move to a further “BEV-<br />
ERAGE PRICES” item.<br />
To exit the function press the D (ref. 3, fig. 6).<br />
19
English<br />
Fifth main item of<br />
the programming menu<br />
It may be displayed as an addition to the four main items by<br />
inserting the clock module device.<br />
Press “ENTER” to access the change of the single functions.<br />
Press “ENTER” to access the item functions.<br />
This function allows the setting of when and how to dispense drinks<br />
for free.<br />
Press “ENTER” to access the display of the methods with which<br />
free dispensing is performed.<br />
FREE FREE VEND<br />
VEND<br />
TIME TIME TIME RANGE<br />
RANGE<br />
This level visualizes in sequence when and how drink dispensing<br />
is free.<br />
Press “ENTER” to access the change to the single items.<br />
The second line of the display shows the currently assigned parameter.<br />
- Press “ENTER” to change it.<br />
A flashing cursor appears on the left.<br />
- Use the “UP” and “DOWN” keys to vary the parameter choice<br />
among the three available ones (“ALWAYS”, “NEVER” and<br />
“TIME RANGE”).<br />
- Press ENTER to store the choice to memory.<br />
Confirmation automatically displays the previous level.<br />
Use the “UP” and “DOWN” keys to move to the change of the<br />
next item.<br />
By choosing this option (“TIME RANGE”) two time intervals are<br />
available during which drinks may be dispensed for free. For each<br />
one of them it’s necessary to enter the starting time (ON1 - OFF1)<br />
and the ending time (ON2 - OFF2).<br />
Press “ENTER” to access the setting of the free dispensing periods.<br />
The modifiable parameter is on the second line of the display.<br />
20<br />
TIME TIME MANAGEMENT<br />
MANAGEMENT<br />
FREE FREE VEND<br />
VEND<br />
FREE FREE VEND<br />
VEND<br />
ALWAYS<br />
ALWAYS<br />
FREE FREE VEND<br />
VEND<br />
ALWAYS<br />
ALWAYS<br />
FREE FREE VEND<br />
VEND<br />
TIME TIME RANGE<br />
RANGE<br />
FREE FREE VEND VEND ON1<br />
ON1<br />
mtwtfss mtwtfss 00:00<br />
00:00<br />
FREE FREE VEND VEND OFF1<br />
OFF1<br />
mtwtfss mtwtfss mtwtfss 00:00<br />
00:00<br />
FREE FREE FREE VEND VEND ON2 ON2<br />
ON2<br />
mtwtfss mtwtfss 00:00<br />
00:00<br />
FREE FREE VEND VEND VEND OFF2 OFF2<br />
OFF2<br />
mtwtfss mtwtfss mtwtfss 00:00<br />
00:00<br />
To set the two free dispensing periods, it’s necessary to:<br />
- Press “ENTER”.<br />
- A flashing cursor appears under the letters identifying the week<br />
days, and by pressing the “UP” and “DOWN” keys the character<br />
changes from upper to lower case.<br />
N.B.: “Upper case character” = enabled day; “lower case character”<br />
= disabled day.<br />
- Press “ENTER” to store to memory.<br />
The cursor automatically moves to the following letter.<br />
- Follow the same procedure to set the remaining letters.<br />
- Press “ENTER” to confirm the new value.<br />
Shutdown time is asked automatically (OFF1).<br />
Repeat the operation sequence for each time interval whose value<br />
is to be modified.<br />
Once the last value has been selected and confirmed with “EN-<br />
TER”, start up and shutdown time are asked for the second band<br />
(ON2-OFF2). In case nothing is to be changed press the D key,<br />
the fourth from the top in the model D.A. <strong>5P</strong> (ref. 3, fig. 17).<br />
After having confirmed OFF2, exit form the menu is automatic.<br />
In model D.A. 3P to exit from the function it’s necessary to scroll in<br />
a sequence the settable time bands by means of the “UP” and<br />
“DOWN” keys.<br />
ON/OFF ON/OFF ON/OFF TIME<br />
TIME<br />
YES YES<br />
YES<br />
This function allows the setting of the vending machine automatic<br />
start up and shutdown time within a period of one week.<br />
Press “ENTER” to set this option.<br />
ON/OFF ON/OFF TIME<br />
TIME<br />
->YY
- The application of a discount automatically causes the opening<br />
of a following level.<br />
DISCOUNT DISCOUNT ON1<br />
ON1<br />
mtwtfss mtwtfss 00:00<br />
00:00<br />
DISCOUNT DISCOUNT OFF1<br />
OFF1<br />
mtwtfss mtwtfss 00:00<br />
00:00<br />
DISCOUNT DISCOUNT ON2<br />
ON2<br />
mtwtfss mtwtfss 00:00<br />
00:00<br />
DISCOUNT DISCOUNT DISCOUNT OFF2 OFF2<br />
OFF2<br />
mtwtfss mtwtfss 00:00<br />
00:00<br />
From this level it’s possible to set two time bands (ON1/ OFF1,<br />
ON2/OFF2), which determine the times in which the discount should<br />
be applied.<br />
To program days and times follow the procedure as per the “FREE<br />
VEND – TIME RANGE” item.<br />
INCREASE<br />
INCREASE<br />
0000<br />
0000<br />
This function allows the setting of a rise on the drink price, to be<br />
applied within one week in two different time bands.<br />
The lower line shows the increase to be applied.<br />
To set this option follow the procedure described in chapter “7.5<br />
Changing and saving parameters”.<br />
Important<br />
Discounts are settable with values varying from 10 to the lowest<br />
drink price, with 10-by-10 steps<br />
Applying a price rise automatically causes the opening of a following<br />
level.<br />
INCREASE INCREASE INCREASE ON1<br />
ON1<br />
mtwtfss mtwtfss 00:00<br />
00:00<br />
INCREASE INCREASE OFF1 OFF1<br />
OFF1<br />
mtwtfss mtwtfss 00:00<br />
00:00<br />
INCREASE INCREASE ON2<br />
ON2<br />
mtwtfss mtwtfss 00:00<br />
00:00<br />
INCREASE INCREASE OFF2<br />
OFF2<br />
mtwtfss mtwtfss 00:00<br />
00:00<br />
From this level it’s possible to set two time bands (ON1/ OFF1,<br />
ON2/OFF2), which determine the times in which the price rises<br />
should be applied.<br />
To program days and times follow the procedure as per the “FREE<br />
VEND – TIME RANGE” item.<br />
RINSING RINSING TIME<br />
TIME<br />
YES<br />
YES<br />
This function allows the setting of two time bands within a week,<br />
during which the machine performs automatic mixer cleaning in<br />
sequence.<br />
Press “ENTER” to set this option.<br />
RINSING RINSING TIME TIME<br />
TIME<br />
->YY
English<br />
22<br />
8 - USE OF THE VENDING<br />
MACHINE<br />
Important<br />
Before using the vending machine it’ necessary to carefully<br />
read this publication and acquire a good general knowledge<br />
of the vending machine.<br />
After a period of inactivity of the vending machine it is advisable<br />
to read chapter “8.6 First start of the Vending machine”<br />
before re-using it.<br />
8.1 Machine statuses<br />
Depending on electric mains supply, the vending machine may be<br />
in one of the following statuses:<br />
Off and electrically isolated<br />
- Main switch (ref. 25, fig. 1) in the “O“ position.<br />
- Only the programmed data maintenance memory is active.<br />
On<br />
- Main switch (ref. 25, fig. 1) in the “I“ position.<br />
- All the functions are active and the display (ref. 1, fig. 1) is on.<br />
Standby (vending machine off, but not electrically isolated)<br />
- Main switch (ref. 25, fig. 1) in the “I“ position.<br />
- The “ON/OFF TIME” function is set on “YES”.<br />
- The display and the programmed data maintenance memory<br />
are active.<br />
8.2 <strong>Manual</strong> start<br />
This type of start up is required when the vending machine is in the<br />
“Off and electrically isolated” status. (see 8.1 Machine statuses).<br />
Follow the procedure described in “8.6 First start of the vending<br />
machine”, eventually leaving out the control of the dispensed drink.<br />
8.3 Programmed automatic start<br />
This is possible when the vending machine is on “STANDBY” and<br />
the “ON/OFF TIME” function is active and set.<br />
Vending machine start up occurs at the programmed time.<br />
8.4 Drink dispensing<br />
• Choose a drink among the ones available and identify the<br />
corresponding price.<br />
• Insert coins (or tokens) in the special slot (ref. 4, fig. 1) until the<br />
display (ref. 1, fig. 1) visualizes the required amount.<br />
Warning<br />
It’s impossible to insert coins once the amount equalling the<br />
maximum vending price has been reached.<br />
• Extract a cup and place it in the dispensing slot (ref. 9, fig. 1).<br />
The display indicates “SELECT BEVERAGE” (select drink).<br />
Warning<br />
If a button is pressed corresponding to a drink having a higher<br />
price than the one inserted, it’s necessary to insert more coins<br />
and press the chosen button once again.<br />
The display indicates for a moment “INSERT COIN” (insert<br />
token)<br />
• Press the button corresponding to the chosen drink.<br />
Warning<br />
In order to avoid scalds, wait for the dispensing end signal<br />
(red light turning off) before inserting your hand in the dispensing<br />
slot.<br />
8.5 First start<br />
of the Vending machine<br />
Once the drinks dispensed by the vending machine have been<br />
determined (see “7 - Programming”), get the products to be inserted<br />
in the containers (coffee, soluble products, etc.).<br />
Important<br />
It is indispensable to use only soluble products declared to be<br />
“suitable for automatic vending”.<br />
Tank filling<br />
Important<br />
The lyophilized product must compulsorily be poured in its<br />
container (ref. 6, fig. 1).<br />
Do not put coffee beans in the soluble product container.<br />
Soluble product container (only D.A. <strong>5P</strong>)<br />
Proceed in filling the lyophilized product container:<br />
- Extract the container from its seat by slightly lifting it to make its<br />
extraction easier.
- Insert the soluble product without exceeding 2/3 of maximum<br />
capacity.<br />
- Close the cover and completely reinsert the container in its<br />
seat.<br />
fig. 18<br />
Water tank<br />
Proceed in filling the water tank (except for the versions with direct<br />
waterworks connection).<br />
- Disconnect the tube (ref. A, fig. 19) from the tank by acting on<br />
the automatic coupling.<br />
- Extract the tank from its seat by slightly lifting the handle (fig.<br />
19).<br />
- Unscrew the ring nut, extract the valve and fill the tank with<br />
fresh drinkable water.<br />
- Reinsert the valve in the hole making sure that the aspiration<br />
tube (ref. B, fig. 20) is inserted inside the tubular handle, and<br />
re-screw the ring nut.<br />
fig. 19<br />
fig. 20<br />
A<br />
B<br />
fig. 21<br />
fig. 22<br />
English<br />
Coffee container<br />
Proceed in filling the coffee bean container:<br />
- Pull the coffee container outward, lift the cover and fill the<br />
container with coffee beans (fig. 21).<br />
Grinding adjustment<br />
- Adjust the coffee grinding indicator on one of the following<br />
values by turning the knob (fig. 22):<br />
Italy.. ........................................................ 4-7<br />
Spain. .................................................... 5-8<br />
France – Switzerland. ............ 5-8<br />
Germany – Austria. .................. 6-9<br />
USA - Canada. ............................ 6-14<br />
- Insert the required token (or coins) in the slot, press the button<br />
corresponding to coffee dispensing and check product quality.<br />
If coffee is dispensed too slowly, it’s necessary to adjust<br />
grinding on a higher value; if on the contrary coffee is dispensed<br />
too fast, place the indicator on a lower grinding value.<br />
Warning<br />
Once grinding has been adjusted it’s necessary to dispense<br />
at least two coffees to notice the difference.<br />
8<br />
6<br />
Operations to be performed on the vending<br />
machine<br />
- Enable electric functions (main switch in the “I” position).<br />
- Fill the vending machine water circuit according to the following<br />
procedure:<br />
- Open the door<br />
- Insert the key (ref. 30, fig. 23) in the safety micro-switch<br />
operation opening (ref. 31, fig. 23).<br />
4<br />
23
English<br />
fig. 23<br />
24<br />
Warning<br />
This operation is required for vending machine installation<br />
and bypasses the safety system provided for in case of door<br />
opening. It should therefore be performed by specialized<br />
personnel that are conscious of the risks involved in working<br />
on live devices.<br />
31<br />
30<br />
- Keep the button pressed (ref. 26, fig. 1) until a steady water<br />
jet is coming out of the dispensing tube (ref. 18, fig. 1).<br />
- Remove the micro-switch bypassing key.(ref. 30, fig. 23).<br />
- Close the door.<br />
- Wait for the flashing red light to go off.<br />
If the red light stays on and the display indicates “PLEASE<br />
WAIT“, this means that the machine didn’t reach the proper<br />
temperature.<br />
- Read the vending machine dialogue message on the display<br />
(ref. 1, fig. 1) and perform the possibly indicated operations.<br />
- Wait for the display to indicate ”INSERT COIN“.<br />
- Place the cup in the dispensing slot.<br />
Important<br />
Drinks should be dispensed only in open containers (glasses,<br />
cups, etc.).<br />
- Insert the credit corresponding to the type of drink.<br />
- Press the corresponding button.<br />
Important<br />
The dispensed products should be consumed rapidly, and<br />
shouldn’t be stored and/or packaged.<br />
- Check proper machine operation by dispensing some drinks.<br />
fig. 24<br />
Important<br />
Although all the buttons are originally programmed on standard<br />
values, it’s necessary to check that the obtained drink has<br />
the desired characteristics. In case it hasn’t, it’s necessary to<br />
proceed in programming the dispensing buttons (see “7 –<br />
Programming).<br />
Token/coin box<br />
Access to the coin box requires (ref. 15, fig. 1):<br />
- Opening the lock (ref. A, fig. 24) with the special key.<br />
A B<br />
- Extracting.<br />
- Remove the cover (ref. B, fig. 24).<br />
- Empty it from the contained coins/tokens.<br />
- Reinsert it in its seat (fig. 24).<br />
8.6 Display messages<br />
Vending machine operation is completely or partially blocked when<br />
some products are missing or faulty conditions occur. The display<br />
(ref. 1, fig. 1) on the control panel indicates the reasons that caused<br />
the possible block, together with the red light (ref. 2, fig. 1) turned<br />
on.
MESSAGE CAUSE CURE<br />
OUT OF SERVICE<br />
NO WATER<br />
OUT OF SERVICE<br />
NO COFFEE BEANS<br />
OUT OF SERVICE<br />
EMPTY GROUNDS<br />
OUT OF SERVICE<br />
NO BREW. UNIT<br />
OUT OF SERVICE<br />
STOP BEVERAGE<br />
OUT OF SERVICE<br />
STOP SOLUB.<br />
OUT OF SERVICE<br />
STOP WATER<br />
Water is not reaching the dispensers.<br />
This happens when the grinder motor<br />
stays in operation for more than<br />
a certain time without closing the<br />
dosing switch.<br />
This happens when the coffee<br />
grounds tray has reached maximum<br />
capacity.<br />
The group was not inserted correctly<br />
in its seat, or the group presence<br />
micro-switch doesn’t work.<br />
The vending machine has reached<br />
the programmed number of drinks.<br />
The vending machine has reached<br />
the programmed number of soluble<br />
product 1 (or soluble product 2 or<br />
soluble product 3) vends.<br />
The vending machine has dispensed<br />
the programmed quantity of water.<br />
English<br />
This happens when the turbine doesn’t turn, and the electronic circuits<br />
receive no impulses, for example when the water supply finishes<br />
while a product is dispensed, or during filling at start up (the<br />
pump doesn’t work, or the group id dirty, or the solenoid valve is<br />
jammed). Turning the vending machine off and on the signals remain<br />
active because malfunctioning is detected once again during filling<br />
procedure at start up. The vending machine is blocked in all its<br />
functions, including temperature management (heater off): it’s necessary<br />
to fill up the water tank or check the presence of water in the<br />
waterworks, and then to perform the filling procedure with the reset<br />
key until a steady water jet doesn’t come out. The out-of-service is<br />
reset after having pressed the internal button the moment the pump<br />
starts in order to perform filling; the user shall take care of continuing<br />
the filling procedure until a regular water jet is coming out. If signalling<br />
persists after dispensing, call a Service Centre.<br />
The vending machine keypad functions are blocked: it’s necessary<br />
to fill the coffee container and turn the machine off and on. It may<br />
also be reset by pressing the internal button. If signalling persists<br />
after coffee dispensing, call a Service Centre.<br />
The vending machine keypad functions are blocked. If the vending<br />
machine is turned off and on again the signalling persists. The coffee<br />
grounds tray must be emptied (micro-switch off for at least 5<br />
seconds). Eight coffees before reaching the maximum coffee grounds<br />
number (0….. 99), the display shows a warning message.<br />
If by turning the vending machine off and on the signalling persists,<br />
call a Service Centre. If the group is missing at start up, the vending<br />
machine does not perform filling and group reset.<br />
The vending machine keypad functions are blocked. If the vending<br />
machine is turned off and on again the signalling persists. To reset<br />
vending machine functions it’s necessary to enter programming and<br />
use the RESET function in the STOP menu.<br />
The vending machine keypad functions are blocked. If the vending<br />
machine is turned off and on again the signalling persists. To reset<br />
vending machine functions see above.<br />
The vending machine keypad functions are blocked. To reset vending<br />
machine functions see above. If the vending machine is turned<br />
off and on again the signalling persists. To perform reset without<br />
accessing programming (only in the case of it being out of service,<br />
for example for operators that don’t know the password) follow this<br />
procedure:<br />
- While pressing the RESET key, press the A key within 3 seconds<br />
(ref. 3, fig. 6), the LED starts to flash.<br />
- Press the C button for a short time (ref. 3, fig. 6) to confirm the<br />
reset. If the C key is not pressed do (ref. 3, fig. 6) within 10<br />
seconds the LED stops flashing and reset id not performed.<br />
25
English<br />
OUT OF SERVICE STOP<br />
COFFEE<br />
ATTENTION EMPTY<br />
GROUNDS<br />
ATTENTION NO DRIP TRAY<br />
ATTENTION NO GROUNDS<br />
CONT.<br />
OUT OF SERVICE<br />
ERROR 03 04<br />
OUT OF SERVICE ERROR 05<br />
ATTENTION ERROR 21<br />
OUT OF SERVICE ERROR 15<br />
OUT OF SERVICE ERROR 14<br />
OUT OF SERVICE ERROR 16<br />
OUT OF SERVICE ERROR 22<br />
OUT OF SERVICE ERROR 23<br />
OUT OF SERVICE ERROR 24<br />
OUT OF SERVICE ERROR 25<br />
26<br />
MESSAGE CAUSE CURE<br />
The vending machine has reached<br />
the programmed number of coffee<br />
vends.<br />
Eight coffees before reaching the<br />
maximum number of grounds a<br />
warning message appears on the<br />
display.<br />
It occurs when the tray presence<br />
micro-switch is not closed.<br />
It occurs when the coffee grounds<br />
presence micro-switch is not closed.<br />
Group jammed.<br />
Flow rate error<br />
Programming error<br />
Electronic key error<br />
Temperature sensor error<br />
Data processing error 1 (program)<br />
Flash programming error<br />
Zero crossing error<br />
9 - MAINTENANCE<br />
9.1 Introduction<br />
Data processing error 2<br />
<strong>Saeco</strong> card without time-keeper<br />
Danger<br />
Before performing any maintenance and/or cleaning operation,<br />
disconnect the vending machine from power supply and<br />
wait for it to cool down.<br />
fig. 25 ✕<br />
The vending machine keypad functions are blocked. If the vending<br />
machine is turned off and on again the signalling persists. To reset<br />
vending machine functions see above.<br />
The coffee grounds tray must be emptied (micro-switch off for at least<br />
5 seconds), otherwise the vending machine will go out of service<br />
after the following eight coffees.<br />
Make sure that the drip tray is properly inserted in its seat. If signalling<br />
persists call a service centre. Each time the drip tray is removed<br />
and re-inserted, the group is reset. If a “drip tray missing” condition<br />
occurs at start up the vending machine does not perform filling and<br />
group reset procedure.<br />
Make sure that the drip tray and the coffee grounds tray are properly<br />
inserted in their respective seats. If signalling persists call a service centre. If<br />
a “coffee grounds tray missing” condition occurs at start up the vending<br />
machine does not perform filling and group reset procedure.<br />
Call the maintenance technician<br />
Call the maintenance technician<br />
Call the maintenance technician<br />
Call the maintenance technician<br />
Call the maintenance technician<br />
Call the maintenance technician<br />
Call the maintenance technician<br />
Call the maintenance technician<br />
Call the maintenance technician<br />
Call the maintenance technician<br />
To achieve the best possible quality of the dispensed drinks and<br />
ensure the best possible operation of the vending machine it’s necessary<br />
to follow the indications contained in this booklet.<br />
- The non removable components and the machine itself should<br />
be cleaned only with cold or lukewarm water using non-abrasive<br />
sponges and dampened cloths, unless differently specified.<br />
- Do not use direct water jets.<br />
- All the parts to be cleaned are easily accessible and do not<br />
require the use of tools.<br />
- Regular maintenance and cleaning preserve the machine and<br />
maintain its efficiency for a longer period, besides granting<br />
respect of the normal hygienic standards.<br />
- The impulse counters on the vending machine count the number<br />
of performed vends and allow ordinary maintenance intervention<br />
programming on the side of the maintenance technician.
fig. 26<br />
fig. 27<br />
fig. 28<br />
Danger<br />
In case of operating defects, typically marked out on the display,<br />
immediately turn the machine off, interrupt power supply<br />
either by means of the omni-pole switch or by disconnecting<br />
the plug, and call the nearest SERVICE CENTRE.<br />
9.2 Cleaning and maintenance<br />
• Maintenance operations should be performed at least once a<br />
year and include checking vending machine integrity and the<br />
compliance of the installations with the existing norms.<br />
It is absolutely forbidden to perform cleaning or maintenance operations<br />
with the micro-switch operation key (ref. 17, fig. 1) inserted<br />
(fig. 26).<br />
✕<br />
✕<br />
Warning<br />
All vending machine elements should be washed only with<br />
lukewarm water, without using any kind of soap or solvent<br />
that could modify its shape or functionality (fig. 27).<br />
Warning<br />
Do not wash in dishwasher (fig. 27).<br />
✕<br />
Coffee unit<br />
- Remove the drip tray and extract the hot water dispensing tube<br />
nozzle from its seat in the drink dispenser (fig. 28).<br />
fig. 29<br />
fig. 30<br />
English<br />
- Move the hooking lever in position 3 and extract the coffee<br />
unit by slightly rotating it on the connecting coupling with the<br />
milk mixer (fig. 29). Wash it completely in lukewarm water,<br />
dry it and reinsert it in its seat holding the lever in position 3.<br />
N.B.: To avoid improper connection of the coffee unit with the<br />
milk mixer, it is advisable to completely insert the connecting<br />
coupling and then hook the unit to the main plate by<br />
means of a slight rotation.<br />
Warning<br />
While inserting the unit make sure that the reference arrows<br />
coincide. If this doesn’t happen, align them by means of the<br />
special wrench (fig. 30).<br />
- Reinsert the hot water tube nozzle in its seat on the drink dispenser<br />
(fig. 28).<br />
Mixer and dispenser (only D.A. <strong>5P</strong>)<br />
- Remove the powder funnel together with the funnel cover, making<br />
sure not to damage the gaskets at both ends. Separate<br />
them from the underlying part extracting also the nozzle with<br />
silicon tube (fig. 31).<br />
- Now rotate the mixing chamber clockwise and extract it.<br />
- Clean the mix fan with a sponge saturated with lukewarm<br />
water, without exerting excessive pressure in order to avoid<br />
jeopardising the sealing gasket’s positioning.<br />
- Abundantly wash in lukewarm water all the components and<br />
refit them by performing the above mentioned operations in<br />
reverse order. Especially take care of the proper insertion of<br />
the nozzle with silicon tube.<br />
27
English<br />
28<br />
fig. 31<br />
Soluble powder container<br />
- Extract the container form its seat by slightly lifting it to make its<br />
extraction easier (fig. 32). The soluble powder container doesn’t<br />
require special maintenance. Nevertheless, it should be cleaned<br />
at least on a monthly basis, making sure that it’s perfectly dried<br />
when filled. The container may be separated from the back<br />
bushing by rotating the latter clockwise, allowing back pin<br />
and spring extraction. The front silicon bushing can be unfitted<br />
by removing the special fixing spring. Clean everything with a<br />
dry cloth or compressed air, then refit performing all operations<br />
in reverse order, making sure that the sealing ring of the<br />
back pin is perfectly intact.<br />
fig. 32<br />
Water tank<br />
The water tank should be emptied and cleaned every time it is<br />
filled.<br />
Dispensing slot area<br />
Unfit the dispensing slot by simply extracting it from its seat. Separate<br />
it from the grill, the tray and the drip tray and wash everything<br />
with lukewarm water (fig. 33).<br />
Important<br />
The manufacture disclaims all responsibilities for possible malfunctioning<br />
caused by improper or scarce maintenance.<br />
fig. 33<br />
9.3 Mix fan replacement<br />
Remove the old fan, insert the new one in the special tang, rest the<br />
wrench on the fan flanging and then press in the axial direction<br />
until the wrench is in contact with the motor bearing surface (fig.<br />
34). For further specific instructions, refer to the special maintenance<br />
manual.<br />
fig. 34<br />
10 - VENDING MACHINE<br />
SCRAPPING<br />
The disposal of the wastes coming from vending machine scrapping<br />
should be performed while respecting the environment, avoiding<br />
ground, water and air pollution.<br />
In any case local existing laws ruling the matter shall be complied<br />
with. Make the vending machine unserviceable by disconnecting<br />
the plug from the outlet and cutting the electric cable. Deliver the<br />
unserviceable vending machine to a suitable disposal centre.<br />
The information in this manual is subject to changes without notice<br />
decided by the manufacturer. The contents of this manual are confidential<br />
and no part of it may be reproduced in any form or mean,<br />
be it electronic or mechanic, for any use, without manufacturer’s<br />
permission. The manufacturer disclaims any liabilities for inaccuracies<br />
arising out of printing or transcription errors.<br />
11 - VARIATIONS<br />
11.1 Model D.A. 3P/<strong>5P</strong><br />
(without clock module)<br />
The vending machine model 3/<strong>5P</strong> without the clock module is<br />
used in the same way, has the same intended use and components<br />
of the more complete model.<br />
The only difference is in the management of the fifth main menu<br />
item (see “11.2 Programming structure” (3/<strong>5P</strong> model without clock<br />
module)”); actually, in this model the fifth item “FREE VEND… “<br />
manages two choice options “NEVER” and “ALWAYS” (In the version<br />
with clock module this item is integrated in “TIME MANAGE-<br />
MENT”).
11.2 Programming structure (D.A. 3P<br />
standard version and<br />
D.A. <strong>5P</strong> standard without clock<br />
module)<br />
Part 1<br />
SYSTEM MANAGEMENT VM CODE<br />
000000<br />
Continues<br />
COUNTERS COUNT. COFFEE<br />
T:000000 P:000000<br />
STOP<br />
MIN. TEMPERATURE<br />
T:095<br />
MAX. TEMPERATURE<br />
T:100<br />
MECH. COUNTER<br />
BEVERAGE<br />
CLOCK<br />
17:00 M 17FEB 98<br />
TEXT STAND-BY<br />
*D.A. <strong>5P</strong>N SAECO*<br />
TEXT DISPENSING<br />
DISPENSING<br />
TEXT OUT OF SERV<br />
OUT OF SERVICE<br />
PRESELECTION<br />
NO<br />
SERIAL NUMBER<br />
909024<br />
COUNT. BEVERAGE<br />
T:000011 P:000011<br />
COUNT. SOLUBLE<br />
WATER COUNTER<br />
T:000011 P:000011<br />
RESET COUNTER<br />
STOP COFFEE<br />
00000 LIM: 00000<br />
STOP BEVERAGE<br />
STOP SOLUB.<br />
STOP WATER<br />
00000 LIM:00000<br />
STOP GROUNDS<br />
00000 LIM:00000<br />
RESET STOP<br />
MECH. COUNTER<br />
BEVERAGE<br />
MECH. COUNTER<br />
SOLUBLE<br />
MECH. COUNTER<br />
COFFEE<br />
PRESELECTION<br />
Y >N<<br />
PRESELECTION<br />
>Y< N<br />
BEVERAGE A<br />
T:000011 P:000011<br />
BEVERAGE B<br />
T:000011 P:000011<br />
BEVERAGE C<br />
T:000011 P:000011<br />
BEVERAGE D<br />
T:000011 P:000011<br />
BEVERAGE E<br />
T:000011 P:000011<br />
SOLUBLE 1<br />
T:000011 P:000011<br />
RESET STOP<br />
Y >N<<br />
RESET STOP<br />
>Y< N<br />
BEVERAGE A<br />
00000 LIM:00000<br />
BEVERAGE B<br />
00000 LIM:00000<br />
BEVERAGE C<br />
00000 LIM:00000<br />
BEVERAGE D<br />
00000 LIM:00000<br />
BEVERAGE E<br />
00000 LIM:00000<br />
STOP SOLUBLE 1<br />
00000 LIM:00000<br />
RESET STOP<br />
Y >N<<br />
RESET STOP<br />
>Y< N<br />
Only V.M. <strong>5P</strong><br />
CHANGE PASSWORD NEW PASSWORD NEW PASSWORD<br />
CODE:0000<br />
Only V.M. <strong>5P</strong><br />
Only V.M. <strong>5P</strong><br />
Part 2<br />
End<br />
PAYMENT<br />
SYSTEMS<br />
PREPARING<br />
BEVERAGE<br />
COIN VALUES COIN VALUES<br />
COIN 01:00050<br />
MULTIVEND<br />
NO<br />
OVERPAY TIME<br />
180<br />
COIN VALUES<br />
COIN 03:00050<br />
COIN VALUES<br />
COIN 04:00050<br />
COIN VALUES<br />
COIN 05:00050<br />
COIN VALUES<br />
COIN 06:00050<br />
MULTIVEND<br />
Y >N<<br />
MULTIVEND<br />
>Y< N<br />
BEVERAGE A BEVERAGE A<br />
SEQUENCE: C100<br />
BEVERAGE B<br />
BEVERAGE C<br />
BEVERAGE D<br />
BEVERAGE E<br />
COIN VALUES<br />
COIN 02:00050<br />
BEVERAGE A<br />
SOLUBLE 1: 100<br />
BEVERAGE A<br />
WATER 1: 030<br />
BEVERAGE A<br />
%SOLUB. 1: 160<br />
BEVERAGE A<br />
COFFEE: 050<br />
BEVERAGE B<br />
SEQUENCE: C100<br />
BEVERAGE B<br />
SOLUBLE 1: 100<br />
BEVERAGE B<br />
WATER 1: 030<br />
BEVERAGE B<br />
%SOLUB. 1: 160<br />
BEVERAGE B<br />
COFFEE: 050<br />
BEVERAGE C<br />
SEQUENCE: C100<br />
BEVERAGE C<br />
SOLUBLE 1: 100<br />
BEVERAGE C<br />
WATER 1: 030<br />
BEVERAGE C<br />
%SOLUB. 1: 160<br />
BEVERAGE C<br />
COFFEE: 050<br />
BEVERAGE D<br />
SEQUENCE: C100<br />
BEVERAGE D<br />
SOLUBLE 1: 100<br />
BEVERAGE D<br />
WATER 1: 030<br />
BEVERAGE D<br />
%SOLUB. 1: 160<br />
BEVERAGE D<br />
COFFEE: 050<br />
BEVERAGE E<br />
SEQUENCE: C100<br />
BEVERAGE E<br />
SOLUBLE 1: 100<br />
BEVERAGE E<br />
WATER 1: 030<br />
BEVERAGE E<br />
%SOLUB. 1: 160<br />
BEVERAGE E<br />
COFFEE: 050<br />
SALES MANAGEMENT PRICE VALUES PRICE VALUES<br />
PRICE 01:00000<br />
FREE VEND<br />
ALWAYS<br />
EXIT<br />
PROGRAM Y/N<br />
PRICE VALUES<br />
PRICE 02:00000<br />
PRICE VALUES<br />
PRICE 03:00000<br />
PRICE VALUES<br />
PRICE 04:00000<br />
BEVERAGE PRICES BEVERAGE PRICES<br />
1- 0000 :ABCDE<br />
FREE VEND<br />
ALWAYS<br />
FREE VEND<br />
NEVER<br />
BEVERAGE PRICES<br />
2- 0000 :abcde<br />
BEVERAGE PRICES<br />
3- 0000 :abcde<br />
BEVERAGE PRICES<br />
4- 0000 :abcde<br />
Only V.M. <strong>5P</strong><br />
Only V.M. <strong>5P</strong><br />
Only V.M. <strong>5P</strong><br />
Only V.M. <strong>5P</strong> Only V.M. 3P<br />
English<br />
Only V.M. <strong>5P</strong><br />
BEVERAGE PRICES<br />
1- 0000 :ABC<br />
BEVERAGE PRICES<br />
2- 0000 :abc<br />
BEVERAGE PRICES<br />
3- 0000 :abc<br />
BEVERAGE PRICES<br />
4- 0000 :abc<br />
29
English<br />
30
English<br />
31
Cod. 0721.991 - Ed. 01 10/02