Manual tehnic expresoare Jura ENA 7
Manual tehnic expresoare Jura ENA 7
Manual tehnic expresoare Jura ENA 7

Create successful ePaper yourself
Turn your PDF publications into a flip-book with our unique Google optimized e-Paper software.
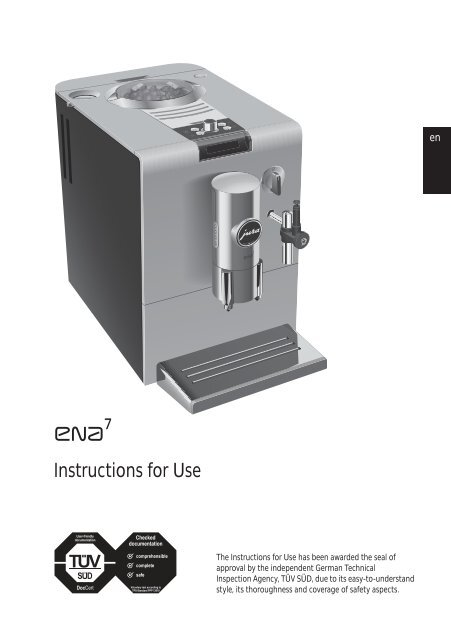
Instructions for Use<br />
The Instructions for Use has been awarded the seal of<br />
approval by the independent German Technical<br />
Inspection Agency, TÜV SÜD, due to its easy-to-understand<br />
style, its thoroughness and coverage of safety aspects.<br />
de<br />
en<br />
fr<br />
it<br />
nl<br />
es<br />
pt<br />
ru
<strong>ENA</strong> 7<br />
Your <strong>ENA</strong> 7<br />
Control elements 34<br />
Important information 36<br />
Proper use ...............................................................................................................................................................36<br />
For your safety .......................................................................................................................................................36<br />
1 Preparing and using for the first time 37<br />
32<br />
JURA on the Internet .............................................................................................................................................37<br />
3-colour plain text display ....................................................................................................................................37<br />
Setting up the machine ........................................................................................................................................37<br />
Filling the water tank ............................................................................................................................................37<br />
Filling the bean container ....................................................................................................................................37<br />
First-time use ..........................................................................................................................................................38<br />
Inserting and activating the filter .......................................................................................................................38<br />
Determining and adjusting the water hardness ..............................................................................................39<br />
Adjusting the grinder ........................................................................................................................................... 40<br />
2 Preparation 40<br />
Espresso and coffee .............................................................................................................................................. 40<br />
Preparing two speciality coffees at the touch of a button ............................................................................. 41<br />
Aroma Boost ........................................................................................................................................................... 41<br />
Preground coffee ................................................................................................................................................... 41<br />
Permanently setting the amount of water for the cup size ...........................................................................42<br />
Cappuccino .............................................................................................................................................................42<br />
Hot milk and milk foam .......................................................................................................................................43<br />
Cappuccino with the 2-stage frothing nozzle ..................................................................................................43<br />
Hot milk with the 2-stage frothing nozzle ....................................................................................................... 44<br />
Hot water................................................................................................................................................................ 44<br />
3 Daily operation 45<br />
Switching on the machine .................................................................................................................................. 45<br />
Daily maintenance ................................................................................................................................................ 45<br />
Switching off the machine .................................................................................................................................. 45<br />
4 Permanent settings in programming mode 45<br />
Products ................................................................................................................................................................. 45<br />
Energy-saving mode ............................................................................................................................................ 46<br />
Automatic switch-off ............................................................................................................................................ 46<br />
Unit for amount of water .....................................................................................................................................47<br />
Language .................................................................................................................................................................47
5 Maintenance 47<br />
Rinsing the machine .............................................................................................................................................47<br />
Cleaning the machine .......................................................................................................................................... 48<br />
Changing the filter................................................................................................................................................ 48<br />
Descaling the machine ....................................................................................................................................... 49<br />
Rinsing the cappuccino frother .......................................................................................................................... 50<br />
Cleaning the cappuccino frother ........................................................................................................................ 51<br />
Dismantling and rinsing the Professional Cappuccino Frother .....................................................................52<br />
Dismantling and rinsing the Easy Cappuccino Frother ..................................................................................52<br />
Dismantling and rinsing the 2-stage frothing nozzle .....................................................................................52<br />
Cleaning the bean container ...............................................................................................................................53<br />
Descaling the water tank ......................................................................................................................................53<br />
6 Display messages 54<br />
7 Troubleshooting 55<br />
8 Transport and environmentally friendly disposal 56<br />
Transport / Emptying the system ...................................................................................................................... 56<br />
Disposal .................................................................................................................................................................. 56<br />
9 Technical data 56<br />
10 Index 57<br />
11 JURA contact details / Legal information 59<br />
Symbol description<br />
Warnings<br />
J CAUTION Always take note of any information marked with the words CAUTION<br />
or WARNING and a warning sign. The signal word WARNING draws<br />
your attention to potential serious injury, and the signal word<br />
CAUTION to potential minor injury.<br />
CAUTION CAUTION draws your attention to potential damage to the machine.<br />
Symbols used<br />
T Prompt to take action. This symbol means that you are being<br />
prompted to perform some action.<br />
E Information and tips to make it even easier to use your <strong>ENA</strong>.<br />
@ References to the JURA website, which provides further information<br />
that may be of interest to you: www.jura.com<br />
READY Display message<br />
<strong>ENA</strong> 7<br />
33<br />
de<br />
en<br />
fr<br />
it<br />
nl<br />
es<br />
pt<br />
ru
<strong>ENA</strong> 7<br />
Control elements<br />
1<br />
2<br />
3<br />
4<br />
5<br />
Figure: <strong>ENA</strong> 7 Ristretto Black<br />
1 Water tank<br />
2 Powder chute for preground coffee<br />
3 Coffee grounds container<br />
4 Drip tray<br />
5 Cup grille<br />
34<br />
6 Bean container cover<br />
7 l Switch for hot water and steam<br />
preparation<br />
8 Connector System © for different<br />
cappuccino frothers<br />
9 Easy Cappuccino Frother<br />
10 Rotating coffee spout<br />
6<br />
7<br />
8<br />
9<br />
10
1<br />
2<br />
1 = Aroma Boost button<br />
2 < Espresso button<br />
3 Q On/Off button<br />
4 Grinding wheel<br />
5 Cover<br />
6 c Maintenance button<br />
7 n Steam button<br />
8 > Coffee button<br />
9 g Rotary Switch<br />
10 Display<br />
The Connector System © permits the use of different cappuccino frothers. These are available from<br />
stockists.<br />
Professional Cappuccino Frother Easy Cappuccino Frother<br />
Milk foam<br />
Milk foam<br />
Hot milk<br />
<strong>ENA</strong> 7<br />
3<br />
4<br />
5<br />
6<br />
7<br />
8<br />
9<br />
10<br />
35<br />
de<br />
en<br />
fr<br />
it<br />
nl<br />
es<br />
pt<br />
ru
<strong>ENA</strong> 7<br />
Important information<br />
Proper use<br />
The machine is designed and intended for private<br />
domestic use. It should only be used for coffee<br />
preparation and to heat milk and water. Use for<br />
any other purpose will be deemed improper. JURA<br />
Elektroapparate AG cannot accept any responsibility<br />
for the consequences of improper use.<br />
36<br />
There is a risk of scalds or burns on the spouts and<br />
the cappuccino frother.<br />
U Place the machine out of the reach of children.<br />
U<br />
Do not touch any hot parts. Use the handles<br />
provided.<br />
U Ensure that the cappuccino frother is correctly<br />
fitted and clean. If incorrectly fitted or if they<br />
become blocked, the cappuccino frother or its<br />
parts might come off.<br />
Before using the machine read these instructions<br />
for use thoroughly and completely and comply<br />
with the instructions they contain. Keep these<br />
instructions for use close to the machine and pass<br />
them on to the next user.<br />
A defective machine is not safe and could cause<br />
injury or fire. To avoid damage and any associated<br />
risk of injury or fire:<br />
U Never allow the mains cable to loosely hang<br />
down. The mains cable could pose a tripping<br />
hazard or become damaged.<br />
U Protect the <strong>ENA</strong> from environmental influ-<br />
For your safety<br />
ences such as rain, frost and direct sunlight.<br />
Please carefully read and observe the important<br />
safety information set out below.<br />
U<br />
U<br />
Do not immerse the <strong>ENA</strong>, cables or connections<br />
in water.<br />
Do not put the <strong>ENA</strong> or any individual parts in<br />
To avoid danger of potentially fatal electric shock: the dishwasher.<br />
U Never use a machine which is damaged or has U Switch your <strong>ENA</strong> off at the power switch before<br />
a defective mains cable.<br />
any cleaning operation. Always wipe the <strong>ENA</strong><br />
U In the event of signs of damage, for example if with a damp cloth rather than a wet one, and<br />
there is a smell of burning, unplug the<br />
protect it from prolonged exposure to water<br />
machine immediately from the mains supply splash.<br />
U<br />
and contact JURA service.<br />
If the mains cable of this machine is damaged,<br />
U Only connect the machine to the mains<br />
voltage in accordance with the information on<br />
it must be repaired either directly by JURA or the rating plate. The rating plate is located on<br />
by an authorised JURA service centre.<br />
the underside of your <strong>ENA</strong>. Further technical<br />
U Make sure that the <strong>ENA</strong> and the mains cable data is provided in these instructions for use<br />
are not located close to hot surfaces.<br />
(see Chapter 9 ‘Technical data’).<br />
U Be careful to ensure that the mains cable is not U Please only use original JURA maintenance<br />
trapped and does not rub against sharp edges. products. Use of products that are not<br />
U Never open and repair the machine yourself. explicitly recommended by JURA could<br />
Do not modify the machine in any way that is damage the <strong>ENA</strong>.<br />
not described in these instructions for use. The U Do not use any coffee beans treated with<br />
machine contains live parts. If opened, there is additives or caramelised coffee beans.<br />
a danger of potentially fatal injury. Repairs<br />
may only be carried out by authorised JURA<br />
U<br />
U<br />
Only fill the water tank with fresh, cold water.<br />
Switch the machine off at the power switch if<br />
service centres, using original spare parts and you are going to be absent for a longer period<br />
accessories.<br />
of time.
People, including children, who<br />
U do not have the physical, sensory or mental<br />
capabilities to use the machine safely or<br />
U are inexperienced or lack knowledge in how to<br />
use the machine safely<br />
must be supervised by a responsible person when<br />
using it, or must be instructed in how to use it<br />
correctly.<br />
Safety when handling the CLARIS Blue filter<br />
cartridge:<br />
U Filter cartridges should be kept out of the<br />
reach of children.<br />
U Store filter cartridges in a dry place in the<br />
sealed packaging.<br />
U Protect cartridges from heat and direct<br />
U<br />
U<br />
sunlight.<br />
Do not use damaged cartridges.<br />
Do not open filter cartridges.<br />
1 Preparing and using for the<br />
first time<br />
This chapter provides you with the information<br />
you need to use your <strong>ENA</strong> without any problems.<br />
You will prepare your <strong>ENA</strong> step-by-step to enjoy<br />
your first perfect cup of coffee.<br />
JURA on the Internet<br />
Visit us on the Internet.<br />
@ On the JURA website (www.jura.com) you<br />
will find interesting and up-to-date<br />
information on your <strong>ENA</strong> and on every<br />
aspect of coffee.<br />
3-colour plain text display<br />
Your <strong>ENA</strong> features a 3-colour plain text display.<br />
The colours of the display texts have the following<br />
meanings:<br />
U Green: The <strong>ENA</strong> is ready for use.<br />
U Red: The <strong>ENA</strong> is prompting you to perform<br />
some action.<br />
U Yellow: You are in programming mode.<br />
Setting up the machine<br />
<strong>ENA</strong> 7<br />
When setting up your <strong>ENA</strong>, please note the following:<br />
U Place the machine on a horizontal surface that<br />
is not sensitive to water.<br />
U Choose a spot for your <strong>ENA</strong> which protects the<br />
machine against overheating. Ensure that the<br />
ventilation slots are not covered.<br />
Filling the water tank<br />
To enjoy the perfect cup of coffee we recommend<br />
changing the water every day.<br />
CAUTION<br />
Milk, mineral water or other liquids can damage<br />
the water tank or the machine.<br />
T Only fill the water tank with fresh, cold water.<br />
T Remove the water tank and rinse with cold<br />
water.<br />
T Fill the water tank with fresh, cold water and<br />
reinsert it.<br />
Filling the bean container<br />
CAUTION<br />
Coffee beans which have been treated with<br />
additives (e.g. sugar), preground coffee or<br />
freeze-dried coffee will damage the grinder.<br />
T Only use untreated coffee beans to refill the<br />
bean container.<br />
T Remove the bean container cover.<br />
T Remove any dirt or foreign objects from<br />
inside the bean container.<br />
T Fill the bean container with coffee beans.<br />
T Close the bean container.<br />
37<br />
de<br />
en<br />
fr<br />
it<br />
nl<br />
es<br />
pt<br />
ru
<strong>ENA</strong> 7<br />
First-time use<br />
38<br />
E When the <strong>ENA</strong> is switched off with the On/<br />
Off button, the machine consumes less than<br />
0.01 W of standby energy.<br />
J WARNING<br />
If the machine is operated with a defective mains<br />
cable, there is a danger of potentially fatal electric<br />
shock.<br />
T Never use a machine which is damaged or<br />
has a defective mains cable.<br />
Precondition: The water tank and bean container<br />
are full.<br />
T Insert the mains plug into a power socket.<br />
Q T Press the On/Off button to switch the<br />
machine on.<br />
SPRACHE DEUTSCH<br />
g T Turn the Rotary Switch until the required<br />
language is displayed, for example<br />
LANGUAGE ENGLISH.<br />
k T Press the Rotary Switch to confirm the<br />
language setting.<br />
OK, the language is set.<br />
OPEN TAP<br />
T Place a receptacle under the cappuccino<br />
frother.<br />
l T Turn the switch anticlockwise to position m.<br />
SYSTEM FILLING<br />
CLOSE TAP<br />
y T Turn the switch clockwise to position o.<br />
SYSTEM FILLING<br />
HEATING<br />
PRESS ROTARY<br />
T Place a receptacle under the coffee spout.<br />
k T Press the Rotary Switch to start the rinse.<br />
RINSING, the system rinses itself,<br />
stopping automatically.<br />
READY<br />
Inserting and activating the filter<br />
Your <strong>ENA</strong> no longer has to be descaled if you are<br />
using the CLARIS Blue filter cartridge.<br />
E Perform the ‘inserting the filter’ operation<br />
without any interruptions. This will ensure<br />
that your <strong>ENA</strong> always produces its best.<br />
Precondition: READY is displayed.<br />
k T Press and hold the Rotary Switch until<br />
RINSE appears.<br />
g T Turn the Rotary Switch until FILTER - is<br />
displayed.<br />
k T Press the Rotary Switch to enter the<br />
programme item.<br />
NO -<br />
g T Turn the Rotary Switch until YES p is<br />
displayed.<br />
k T Press the Rotary Switch to confirm the<br />
setting.<br />
OK<br />
INSERT FILTER<br />
T Remove and empty the water tank.<br />
T Open the filter holder.
T Insert the filter cartridge into the water tank,<br />
exerting slight pressure.<br />
T Close the filter holder. It will click into place<br />
audibly.<br />
E After two months, the filter will cease to<br />
work. You can check the elapsed time by<br />
referring to the date plate on the filter holder<br />
in the water tank.<br />
T Fill the water tank with fresh, cold water and<br />
reinsert it.<br />
T Place a receptacle (at least 500 ml) under the<br />
cappuccino frother.<br />
k T Press the Rotary Switch.<br />
OPEN TAP<br />
l T Turn the switch anticlockwise to position m.<br />
FILTER RINSING, water flows out of<br />
the cappuccino frother.<br />
E You can interrupt rinsing of the filter at any<br />
time. To do this, turn the switch clockwise.<br />
Turn the switch anticlockwise to continue<br />
rinsing the filter.<br />
E The water may be slightly discoloured. This<br />
is not harmful to health and does not affect<br />
the taste.<br />
Rinsing of the filter stops automatically,<br />
CLOSE TAP.<br />
y T Turn the switch clockwise to position o.<br />
HEATING<br />
READY<br />
The filter is now activated.<br />
Determining and adjusting the water<br />
hardness<br />
<strong>ENA</strong> 7<br />
E If you are using the CLARIS Blue filter<br />
cartridge and have activated it in programming<br />
mode, you will not be able to adjust<br />
the water hardness.<br />
The harder the water is, the more frequently the<br />
<strong>ENA</strong> needs to be descaled. It is therefore important<br />
to adjust the water hardness.<br />
The water hardness can be adjusted on a continuous<br />
scale between 1° dH and 30° dH. It can also be<br />
deactivated, which means that the <strong>ENA</strong> will not let<br />
you know when it has to be descaled.<br />
Determining the water hardness<br />
You can find out what the water hardness is by<br />
using the Aquadur® test strip supplied as standard.<br />
T Hold the test strip briefly (for one second)<br />
under running water.<br />
T Shake off the water.<br />
T Wait for about one minute.<br />
T You will then be able to read the degree of<br />
water hardness from the discolouration of<br />
the Aquadur® test strip and the description<br />
on the packaging.<br />
The water hardness can now be adjusted.<br />
Adjusting the water hardness<br />
Example: Change the water hardness setting from<br />
16 °dH to 25 °dH.<br />
Precondition: READY is displayed.<br />
k T Press and hold the Rotary Switch until<br />
RINSE appears.<br />
g T Turn the Rotary Switch until HARDNESS<br />
is displayed.<br />
k T Press the Rotary Switch to enter the<br />
programme item.<br />
16 °dH<br />
g T Turn the Rotary Switch until 25 °dH is<br />
displayed.<br />
39<br />
de<br />
en<br />
fr<br />
it<br />
nl<br />
es<br />
pt<br />
ru
<strong>ENA</strong> 7<br />
k T Press the Rotary Switch to confirm the setting.<br />
OK, the water hardness is set.<br />
HARDNESS<br />
g T Turn the Rotary Switch until EXIT is<br />
displayed.<br />
k T Press the Rotary Switch to exit programming<br />
mode.<br />
READY<br />
Adjusting the grinder<br />
You can adjust the grinder on a continuous scale to<br />
suit the degree of roast of your coffee.<br />
CAUTION<br />
If you adjust the consistency of grind when the<br />
grinder is not operating, the grinding wheel could<br />
be damaged.<br />
T Only adjust the consistency of grind when<br />
the grinder is running.<br />
The consistency of grind setting is correct if the<br />
coffee flows regularly from the coffee spout.<br />
In addition a fine, thick crema forms.<br />
Example: Change the consistency of grind during<br />
the preparation of an espresso.<br />
T Place a cup under the coffee spout.<br />
< T Press the Espresso button to start preparation.<br />
T Turn the grinding wheel to the desired<br />
position while the grinder is running.<br />
40<br />
1 ESPRESSO, the preset amount of<br />
water flows into the cup and preparation<br />
stops automatically.<br />
READY<br />
2 Preparation<br />
E You can stop the machine at any time while<br />
a coffee speciality or steam for cappuccino is<br />
being prepared. Just press any button.<br />
E Before and during the grinding operation<br />
you can select the coffee strength of<br />
‘1 espresso’ and ‘1 coffee’: MILD,<br />
NORMAL, STRONG.<br />
E During preparation, you can change the<br />
preset amount of water by turning the<br />
Rotary Switch.<br />
E You can follow the current status of<br />
preparation on the progress bar.<br />
You can make permanent settings for all products<br />
in programming mode (see Chapter 4 ‘Permanent<br />
settings in programming mode – Products’).<br />
Espresso and coffee<br />
The preparation of ‘1 espresso’ and ‘1 coffee’ always<br />
follows this model.<br />
Example: Prepare one coffee.<br />
Precondition: READY is displayed.<br />
T Turn the coffee spout to the ‘1 cup’ position.<br />
T Place a cup under the coffee spout.<br />
> T Press the Coffee button to start preparation.<br />
1 COFFEE, the preset amount of water<br />
flows into the cup.<br />
Preparation stops automatically.<br />
READY
Preparing two speciality coffees at the<br />
touch of a button<br />
The preparation of ‘2 espressi’ and ‘2 coffees’ follows<br />
this same model.<br />
Example: Prepare two espressi.<br />
Precondition: READY is displayed.<br />
T Turn the coffee spout to the ‘2 cups’<br />
position.<br />
T Place two espresso cups under the coffee<br />
spout.<br />
< T Press the Espresso button twice (within two<br />
seconds) to start coffee preparation.<br />
2 ESPRESSI, the preset amount of<br />
water flows into the cups.<br />
Preparation stops automatically.<br />
READY<br />
Aroma Boost<br />
When you prepare an ‘Aroma Boost’ the maximum<br />
possible amount of powder is freshly ground and<br />
extracted to make an extra strong espresso or<br />
coffee.<br />
Precondition: READY is displayed.<br />
T Turn the coffee spout to the ‘1 cup’ position.<br />
T Place a cup under the coffee spout.<br />
= T Press the Aroma Boost button to start<br />
preparation.<br />
SPECIAL, the preset amount of water<br />
flows into the cup.<br />
Preparation stops automatically.<br />
READY<br />
<strong>ENA</strong> 7<br />
Preground coffee<br />
You can choose a second coffee variety, for example<br />
decaffeinated coffee, with the powder chute for<br />
preground coffee.<br />
E Never add more than two level measuring<br />
spoons of preground coffee.<br />
E Use preground coffee which is not ground<br />
too finely. Very fine coffee can block up the<br />
system so that the coffee only comes out in<br />
drips.<br />
E If you did not fill the machine with a<br />
sufficient amount of preground coffee, NOT<br />
ENOUGH POWDER is displayed and the<br />
<strong>ENA</strong> stops the operation.<br />
E The desired speciality coffee must be<br />
prepared within approximately one minute<br />
after filling with the preground coffee.<br />
Otherwise the <strong>ENA</strong> stops the operation and<br />
is once more ready for use.<br />
All speciality coffees with preground coffee are<br />
prepared following this model.<br />
Example: Prepare a cup of coffee using preground<br />
coffee.<br />
Precondition: READY is displayed, the coffee<br />
spout is set to the ‘1 cup’ position.<br />
T Place a cup under the coffee spout.<br />
T Open the powder chute.<br />
FILL POWDER<br />
41<br />
de<br />
en<br />
fr<br />
it<br />
nl<br />
es<br />
pt<br />
ru
<strong>ENA</strong> 7<br />
42<br />
T Place the filler funnel for preground coffee<br />
on to the powder chute.<br />
T Place one level measuring spoon of<br />
preground coffee into the filler funnel.<br />
T Remove the filler funnel.<br />
T Close the powder chute.<br />
SELECT BUTTON<br />
> T Press the Coffee button to start preparation.<br />
1 COFFEE, the preset amount of water<br />
flows into the cup.<br />
Preparation stops automatically.<br />
READY<br />
E It is also possible to prepare two cups of<br />
preground coffee. To do this, place two cups<br />
under the coffee spout and add two level<br />
measuring spoons of preground coffee into<br />
the filler funnel. Press the Coffee button ><br />
twice (within two seconds) to start<br />
preparation.<br />
Permanently setting the amount of water<br />
for the cup size<br />
It is easy to permanently set the amount of water<br />
for all speciality coffees, milk specialities and hot<br />
water to the cup size. Adjust the amount once as<br />
shown in the following example. Every time you<br />
prepare a drink in the future, this amount of water<br />
will be dispensed.<br />
Permanent setting of the amount of water to the<br />
cup size for all speciality coffees, milk specialities<br />
and hot water follows this model.<br />
Example: Permanently adjust the amount of<br />
water to the cup size.<br />
Precondition: READY is displayed, the coffee<br />
spout is set to the ‘1 cup’ position.<br />
T Place a cup under the coffee spout.<br />
> T Press and hold the Coffee button.<br />
1 COFFEE, the grinding operation starts.<br />
> T Continue to hold the Coffee button down<br />
until ENOUGH COFFEE? appears.<br />
> T Release the Coffee button.<br />
The coffee flows into the cup.<br />
T Press any button as soon as there is<br />
sufficient coffee in the cup.<br />
OK, 1 COFFEE, the set amount of water<br />
for one coffee is permanently stored.<br />
READY<br />
E You can alter this setting at any time by<br />
repeating the above procedure.<br />
Cappuccino<br />
For a cappuccino you must first froth the milk<br />
using the cappuccino frother. You then prepare an<br />
espresso straight into the milk foam.<br />
E This chapter applies to the Professional and<br />
Easy Cappuccino Frothers.<br />
Precondition: READY is displayed, the coffee<br />
spout is set to the ‘1 cup’ position.<br />
T Take the protective cover off the cappuccino<br />
frother.<br />
T Attach the milk pipe to the cappuccino<br />
frother.<br />
T Insert the other end of the milk pipe into a<br />
milk carton or connect it to a milk container.<br />
T Place a cup under the cappuccino frother.
E If you are using the Professional Cappuccino<br />
Frother, set the selector switch to the<br />
Milk Foam position p.<br />
n T Press the Steam button.<br />
HEATING<br />
As soon as the <strong>ENA</strong> has heated up, READY<br />
appears again.<br />
l T Turn the switch anticlockwise to position m.<br />
STEAM, the milk foam is prepared.<br />
y T Turn the switch clockwise to position o<br />
when there is sufficient milk foam in the cup.<br />
E You can continue to prepare steam for the<br />
next 40 seconds or so without the machine<br />
having to heat up again.<br />
T Place a cup under the coffee spout.<br />
< T Press the Espresso button to start preparation.<br />
1 ESPRESSO, the preset amount of<br />
water flows into the cup.<br />
Preparation stops automatically.<br />
To make sure the cappuccino frother always works<br />
properly, it should be rinsed and cleaned regularly<br />
(see Chapter 5 ‘Maintenance – Rinsing the cappuccino<br />
frother’).<br />
Hot milk and milk foam<br />
E This chapter applies to the Professional and<br />
Easy Cappuccino Frothers.<br />
Example: Proceed as follows to prepare milk foam.<br />
Precondition: READY is displayed.<br />
T Take the protective cover off the cappuccino<br />
frother.<br />
T Attach the milk pipe to the cappuccino<br />
frother.<br />
T Insert the other end of the milk pipe into a<br />
milk carton or connect it to a milk container.<br />
T Place a cup under the cappuccino frother.<br />
<strong>ENA</strong> 7<br />
E If you are using the Professional Cappuccino<br />
Frother, set the selector switch to the<br />
Milk Foam position p.<br />
E If you want to heat the milk, turn the<br />
selector switch of the frother to the Milk<br />
position t.<br />
n T Press the Steam button.<br />
HEATING<br />
As soon as the machine has heated up,<br />
READY appears.<br />
l T Turn the switch anticlockwise to position m.<br />
STEAM, the milk foam is prepared.<br />
y T Turn the switch clockwise to position o<br />
when there is sufficient milk foam in the cup.<br />
E You can continue to prepare steam for the<br />
next 40 seconds or so without the machine<br />
having to heat up again.<br />
To make sure the cappuccino frother always works<br />
properly, rinse and clean it regularly (see Chapter 5<br />
‘Maintenance – Rinsing the cappuccino frother’).<br />
Cappuccino with the 2-stage frothing<br />
nozzle<br />
Precondition: READY is displayed, the coffee<br />
spout is set to the ‘1 cup’ position.<br />
T Push the 2-stage frothing nozzle to the<br />
lower position.<br />
43<br />
de<br />
en<br />
fr<br />
it<br />
nl<br />
es<br />
pt<br />
ru
<strong>ENA</strong> 7<br />
44<br />
T Place a cup of milk below the 2-stage<br />
frothing nozzle and immerse the nozzle in<br />
the milk.<br />
E If the nozzle does not reach into the cup, lift<br />
the cup.<br />
n T Press the Steam button.<br />
HEATING<br />
As soon as the <strong>ENA</strong> has heated up, READY<br />
appears again.<br />
l T Turn the switch anticlockwise to position m.<br />
STEAM, the milk is frothed by the hot<br />
steam.<br />
y T Turn the switch clockwise to position o<br />
when the milk foam has reached the<br />
required consistency.<br />
E You can continue to prepare steam for the<br />
next 40 seconds or so without the machine<br />
having to heat up again.<br />
T Place a cup under the coffee spout.<br />
< T Press the Espresso button to start preparation.<br />
1 ESPRESSO, the preset amount of<br />
water flows into the cup.<br />
Preparation stops automatically.<br />
To make sure the 2-stage frothing nozzle always<br />
works properly, it should be rinsed regularly (see<br />
Chapter 5 ‘Maintenance – Dismantle and rinse the<br />
2-stage frothing nozzle’).<br />
Hot milk with the 2-stage frothing nozzle<br />
Precondition: READY is displayed.<br />
T Push the 2-stage frothing nozzle to the<br />
upper position.<br />
T Place a cup of milk below the 2-stage<br />
frothing nozzle and immerse the nozzle in<br />
the milk.<br />
E If the nozzle does not reach into the cup, lift<br />
the cup.<br />
T Prepare steam (see Chapter 2 ‘Preparation –<br />
Cappuccino with the 2-stage frothing<br />
nozzle’).<br />
Hot water<br />
E To prepare hot water, either attach the<br />
hot-water nozzle or the 2-stage frothing<br />
nozzle to the Connector System © .<br />
J CAUTION<br />
There is a danger of scalding from hot water<br />
splashes.<br />
T Avoid direct contact with the skin.<br />
Precondition: READY is displayed.<br />
T Place a cup under the hot-water spout.<br />
l T Turn the switch anticlockwise to position m.<br />
WATER, hot water flows into the cup.<br />
y T Turn the switch clockwise when there is<br />
sufficient water in the cup.<br />
READY
3 Daily operation<br />
Switching on the machine<br />
When the <strong>ENA</strong> is switched on, a prompt to perform<br />
a rinse operation automatically appears.<br />
Q T Press the On/Off button to switch the <strong>ENA</strong> on.<br />
HEATING<br />
PRESS ROTARY<br />
T Place a receptacle under the coffee spout.<br />
k T Press the Rotary Switch to start the rinse.<br />
RINSING, the system rinses itself,<br />
stopping automatically.<br />
READY<br />
Daily maintenance<br />
To ensure that you get many years of reliable<br />
service out of your <strong>ENA</strong> and to guarantee the<br />
optimum coffee quality, the machine requires daily<br />
maintenance.<br />
T Remove the drip tray.<br />
T Empty the coffee grounds container and<br />
drip tray and rinse with warm water.<br />
T Reinsert the coffee grounds container and<br />
the drip tray.<br />
T Rinse the water tank with clean water.<br />
T Dismantle and rinse the cappuccino frother<br />
(see Chapter 5 ‘Maintenance – Rinsing the<br />
cappuccino frother’).<br />
T Wipe the surface of the machine with a<br />
clean, soft, damp cloth (e.g. microfibre<br />
cloth).<br />
Switching off the machine<br />
When the <strong>ENA</strong> is switched off, the system is<br />
automatically rinsed if a coffee speciality has been<br />
prepared.<br />
T Place a receptacle under the coffee spout.<br />
Q T Press the On/Off button.<br />
RINSING, the system rinses itself,<br />
stopping automatically. The <strong>ENA</strong> is switched<br />
off.<br />
<strong>ENA</strong> 7<br />
E When the <strong>ENA</strong> is switched off with the<br />
On/Off button, the machine consumes less<br />
than 0.01 W of standby energy.<br />
4 Permanent settings in<br />
programming mode<br />
Products<br />
You can make the following permanent settings for<br />
coffee specialities:<br />
U Amount of water: 25 ML – 240 ML (per cup)<br />
U Coffee strength (for 1 espresso and 1 coffee):<br />
MILD, NORMAL, STRONG<br />
U Temperature: NORMAL, HIGH<br />
Permanent settings in programming mode always<br />
follow the same model.<br />
Example: Permanently change the coffee strength<br />
(FLAVOUR) for 1 coffee from NORMAL to<br />
STRONG.<br />
Precondition: READY is displayed.<br />
k T Press and hold the Rotary Switch until<br />
RINSE appears.<br />
g T Turn the Rotary Switch until PRODUCT is<br />
displayed.<br />
k T Press the Rotary Switch to enter the<br />
programme item.<br />
SELECT BUTTON<br />
E Next select the button of the product for<br />
which you would like to make settings. No<br />
product is prepared at this point.<br />
E To change the setting for a double product,<br />
press the corresponding button twice within<br />
two seconds.<br />
> T Press the Coffee button.<br />
1 COFFEE<br />
WATER<br />
g T Turn the Rotary Switch until FLAVOUR is<br />
displayed.<br />
45<br />
de<br />
en<br />
fr<br />
it<br />
nl<br />
es<br />
pt<br />
ru
<strong>ENA</strong> 7<br />
k T Press the Rotary Switch to enter the<br />
programme item.<br />
NORMAL<br />
g T Turn the Rotary Switch until STRONG is<br />
displayed.<br />
k T Press the Rotary Switch to confirm the<br />
setting.<br />
OK, the coffee strength is set.<br />
FLAVOUR<br />
g T Turn the Rotary Switch until EXIT is<br />
displayed.<br />
k T Press the Rotary Switch to exit the programme<br />
item.<br />
PRODUCT<br />
g T Turn the Rotary Switch until EXIT is<br />
displayed.<br />
k T Press the Rotary Switch to exit programming<br />
mode.<br />
READY<br />
Energy-saving mode<br />
The <strong>ENA</strong> can be permanently set to an energysaving<br />
mode (Energy Save Mode, E.S.M. © ):<br />
U<br />
U<br />
46<br />
ENERGY -<br />
U The <strong>ENA</strong> is constantly ready for use.<br />
U All speciality coffees as well as hot water can<br />
be prepared without having to wait.<br />
ENERGY p<br />
U After approximately 5 minutes the <strong>ENA</strong><br />
switches to the energy-saving temperature<br />
and is not ready for use. When the machine<br />
is at energy-saving temperature, this is<br />
indicated on the display by the message<br />
ENERGY ON.<br />
U Before preparing coffee or hot water, the<br />
machine heats up.<br />
Example: Change the energy-saving mode from<br />
ENERGY - to ENERGY p.<br />
Precondition: READY is displayed.<br />
k T Press and hold the Rotary Switch until<br />
RINSE appears.<br />
g T Turn the Rotary Switch until ENERGY - is<br />
displayed.<br />
k T Press the Rotary Switch to enter the<br />
programme item.<br />
ECONOMY -<br />
g T Turn the Rotary Switch until ECONOMY p<br />
is displayed.<br />
k T Press the Rotary Switch to confirm the<br />
setting.<br />
OK, the energy-saving mode is set.<br />
ENERGY p<br />
g T Turn the Rotary Switch until EXIT is<br />
displayed.<br />
k T Press the Rotary Switch to exit programming<br />
mode.<br />
READY<br />
Automatic switch-off<br />
By instructing your <strong>ENA</strong> to automatically switch<br />
itself off, you can cut down your energy consumption.<br />
If this function is activated, your <strong>ENA</strong> switches<br />
off automatically after the preset time following<br />
the last action on the machine.<br />
You can set the automatic switch-off to 15 minutes<br />
or 0.5 – 9 hours.<br />
Example: Change the automatic switch-off time<br />
from 2 HRS to 1 HRS.<br />
Precondition: READY is displayed.<br />
k T Press and hold the Rotary Switch until<br />
RINSE appears.<br />
g T Turn the Rotary Switch until OFF AFTER<br />
is displayed.<br />
k T Press the Rotary Switch to enter the<br />
programme item.<br />
2 HRS<br />
g T Turn the Rotary Switch until 1 HRS is<br />
displayed.<br />
k T Press the Rotary Switch to confirm the<br />
setting.<br />
OK, the automatic switch-off time is set.<br />
OFF AFTER
g T Turn the Rotary Switch until EXIT is<br />
displayed.<br />
k T Press the Rotary Switch to exit programming<br />
mode.<br />
READY<br />
Unit for amount of water<br />
You can change the unit for the amount of water<br />
from ‘ml’ to ‘oz’.<br />
Example: Change the unit for the amount of water<br />
from ML to OZ.<br />
Precondition: READY is displayed.<br />
k T Press and hold the Rotary Switch until<br />
RINSE appears.<br />
g T Turn the Rotary Switch until DISPLAY is<br />
displayed.<br />
k T Press the Rotary Switch to enter the<br />
programme item.<br />
ML<br />
g T Turn the Rotary Switch until OZ is displayed.<br />
k T Press the Rotary Switch to confirm the<br />
setting.<br />
OK, the unit for the amount of water is set.<br />
DISPLAY<br />
g T Turn the Rotary Switch until EXIT is<br />
displayed.<br />
k T Press the Rotary Switch to exit programming<br />
mode.<br />
READY<br />
Language<br />
In this programme item you can set the language<br />
used by your <strong>ENA</strong>.<br />
Example: Change the language from ENGLISH<br />
to DEUTSCH.<br />
Precondition: READY is displayed.<br />
k T Press and hold the Rotary Switch until<br />
RINSE appears.<br />
<strong>ENA</strong> 7<br />
g T Turn the Rotary Switch until LANGUAGE<br />
is displayed.<br />
k T Press the Rotary Switch to enter the<br />
programme item.<br />
ENGLISH<br />
g T Turn the Rotary Switch until DEUTSCH is<br />
displayed.<br />
k T Press the Rotary Switch to confirm the<br />
setting.<br />
OK, the language is set.<br />
SPRACHE<br />
g T Turn the Rotary Switch until EXIT is<br />
displayed.<br />
k T Press the Rotary Switch to exit programming<br />
mode.<br />
BEREIT<br />
5 Maintenance<br />
Your <strong>ENA</strong> has the following integrated maintenance<br />
programmes:<br />
U Rinsing the machine<br />
U Cleaning the machine<br />
U Changing the filter<br />
Descaling the machine<br />
U<br />
E Clean or descale the machine or change the<br />
filter when the display prompts you to do so.<br />
Rinsing the machine<br />
You can initiate the rinse operation manually at<br />
any time.<br />
Precondition: READY is displayed.<br />
T Place a receptacle under the coffee spout.<br />
k T Press and hold the Rotary Switch until<br />
RINSE appears.<br />
k T Press the Rotary Switch to enter the<br />
programme item.<br />
RINSE<br />
47<br />
de<br />
en<br />
fr<br />
it<br />
nl<br />
es<br />
pt<br />
ru
<strong>ENA</strong> 7<br />
k T Press the Rotary Switch to initiate the rinse<br />
operation.<br />
RINSING, the system rinses itself,<br />
stopping automatically.<br />
READY<br />
Cleaning the machine<br />
After 180 preparations or 80 switch-on rinses, the<br />
<strong>ENA</strong> will prompt you to clean it.<br />
CAUTION<br />
If the wrong cleaning agent is used, the machine<br />
could be damaged and/or traces could be left<br />
behind in the water.<br />
T Use only original JURA maintenance<br />
products.<br />
48<br />
E The cleaning programme lasts approximately<br />
15 minutes.<br />
E Do not interrupt the cleaning programme.<br />
The quality of cleaning will be impaired if<br />
you do so.<br />
E JURA cleaning tablets are available from<br />
stockists.<br />
Precondition: CLEAN / READY is displayed.<br />
T Open the cover behind the Rotary Switch.<br />
c T Press the Maintenance button.<br />
EMPTY TRAY<br />
T Empty the drip tray and coffee grounds<br />
container and reinsert them.<br />
PRESS ROTARY<br />
T Turn the coffee spout to the ‘Cleaning’<br />
position.<br />
T Place a receptacle under the coffee spout.<br />
k T Press the Rotary Switch to start cleaning.<br />
CLEANING, water flows out of the coffee<br />
spout.<br />
The operation is interrupted,<br />
ADD TABLET.<br />
T Open the powder chute for preground coffee<br />
and drop in a JURA cleaning tablet.<br />
T Close the powder chute for preground<br />
coffee.<br />
PRESS ROTARY<br />
k T Press the Rotary Switch.<br />
CLEANING, water flows out of the coffee<br />
spout several times.<br />
EMPTY TRAY<br />
T Empty the drip tray and coffee grounds<br />
container and reinsert them.<br />
READY<br />
T Turn the coffee spout to the ‘1 cup’ or<br />
‘2 cups’ position.<br />
Changing the filter<br />
E After 50 litres of water have flowed through,<br />
the filter will cease to work. Your <strong>ENA</strong> will<br />
automatically prompt you to change the<br />
filter.<br />
E After two months, the filter will cease to<br />
work. You can check the elapsed time by<br />
referring to the date plate on the filter holder<br />
in the water tank.<br />
E If the CLARIS Blue filter cartridge is not<br />
activated in programming mode, you will<br />
not be prompted to change the filter.
Precondition: FILTER / READY is displayed.<br />
T Open the cover behind the Rotary Switch.<br />
c T Press the Maintenance button.<br />
INSERT FILTER<br />
T Remove and empty the water tank.<br />
T Open the filter holder and remove the old<br />
filter cartridge.<br />
T Insert a new filter cartridge into the water<br />
tank, exerting slight pressure.<br />
T Close the filter holder. It will click into place<br />
audibly.<br />
T Fill the water tank with fresh, cold water and<br />
reinsert it.<br />
T Place a receptacle (at least 500 ml) under the<br />
cappuccino frother.<br />
k T Press the Rotary Switch.<br />
OPEN TAP<br />
l T Turn the switch anticlockwise to position m.<br />
FILTER RINSING, water flows out of<br />
the cappuccino frother.<br />
E You can interrupt rinsing of the filter at any<br />
time. To do this, turn the switch clockwise.<br />
Turn the switch anticlockwise to continue<br />
rinsing the filter.<br />
E The water may be slightly discoloured. This<br />
is not harmful to health and does not affect<br />
the taste.<br />
Rinsing of the filter stops automatically,<br />
CLOSE TAP.<br />
y T Turn the switch clockwise to position o.<br />
HEATING<br />
READY<br />
Descaling the machine<br />
<strong>ENA</strong> 7<br />
The <strong>ENA</strong> builds up deposits of limescale over time<br />
and automatically prompts you to descale it when<br />
necessary. The degree of calcification depends on<br />
the hardness of your water.<br />
J CAUTION<br />
If the descaling agent comes into contact with the<br />
skin or eyes, this can cause irritation.<br />
T Avoid contact with the skin or eyes.<br />
T Rinse off descaling agent with clean water.<br />
Should you get any descaling agent in your<br />
eye, seek medical attention.<br />
CAUTION<br />
If the wrong descaling agent is used, the machine<br />
could be damaged and/or traces could be left<br />
behind in the water.<br />
T Use only original JURA maintenance<br />
products.<br />
CAUTION<br />
If the descaling operation is interrupted, there may<br />
be damage to the machine.<br />
T Allow the descaling programme to run to<br />
the end.<br />
CAUTION<br />
If the descaling agent comes into contact with<br />
sensitive surfaces (e.g. marble), damage cannot be<br />
ruled out.<br />
T Clean up any splashes immediately.<br />
E The descaling programme lasts approximately<br />
40 minutes.<br />
E JURA descaling tablets are available from<br />
stockists.<br />
E If you use a CLARIS Blue filter cartridge and<br />
this is activated, you will not be prompted to<br />
descale.<br />
49<br />
de<br />
en<br />
fr<br />
it<br />
nl<br />
es<br />
pt<br />
ru
<strong>ENA</strong> 7<br />
Precondition: DE-SCALE / READY is<br />
displayed.<br />
T Open the cover behind the Rotary Switch.<br />
c T Press the Maintenance button.<br />
EMPTY TRAY<br />
T Empty the drip tray and coffee grounds<br />
container and reinsert them.<br />
AGENT IN TANK<br />
T Remove and empty the water tank.<br />
T Completely dissolve the contents of one<br />
blister (three JURA descaling tablets) in a<br />
receptacle holding 500 ml of water. This<br />
may take several minutes.<br />
T Pour the solution into the empty water tank<br />
and reinsert the tank.<br />
OPEN TAP<br />
T Carefully pull the cappuccino frother off the<br />
Connector System © .<br />
T Place a receptacle (at least 500 ml) under the<br />
Connector System © .<br />
l T Turn the switch anticlockwise to position m.<br />
DE-SCALING, water flows out of the<br />
Connector System © several times.<br />
CLOSE TAP<br />
y T Turn the switch clockwise to position o.<br />
DE-SCALING, the descaling operation<br />
is continued.<br />
EMPTY TRAY<br />
T Empty the drip tray and coffee grounds<br />
container and reinsert them.<br />
T Empty the receptacle and place it back<br />
under the Connector System © .<br />
FILL WATER TANK<br />
50<br />
T Remove the water tank, rinse thoroughly, fill<br />
with fresh, cold water and reinsert.<br />
OPEN TAP<br />
l T Turn the switch anticlockwise to position m.<br />
DE-SCALING, water flows out of the<br />
Connector System © .<br />
The operation is interrupted, CLOSE TAP.<br />
y T Turn the switch clockwise to position o.<br />
DE-SCALING, the descaling operation<br />
is continued.<br />
EMPTY TRAY<br />
T Empty the drip tray and coffee grounds<br />
container and reinsert them.<br />
READY<br />
T Reattach the cappuccino frother to the<br />
Connector System © .<br />
E If the descaling operation stops unexpectedly,<br />
rinse the water tank thoroughly.<br />
Rinsing the cappuccino frother<br />
E This chapter applies to the Professional and<br />
Easy Cappuccino Frothers.<br />
To ensure that the cappuccino frother always works<br />
properly, you should rinse it with water after every<br />
milk preparation. Your <strong>ENA</strong> will not prompt you to<br />
rinse the cappuccino frother.<br />
T Remove the milk pipe from the milk carton<br />
or the milk container.<br />
T Fill a receptacle with fresh water and<br />
immerse the milk pipe in the water.<br />
T Place another receptacle under the<br />
cappuccino frother.
E If you are using the Professional Cappuccino<br />
Frother, turn the selector switch to the<br />
Milk Foam p or Milk t position.<br />
n T Press the Steam button.<br />
HEATING<br />
As soon as the <strong>ENA</strong> has heated up, READY<br />
appears again.<br />
l T Turn the switch anticlockwise to position m.<br />
STEAM, the cappuccino frother and the<br />
pipe are rinsed.<br />
y T Turn the switch clockwise to position o as<br />
soon as clean water flows into the receptacle.<br />
Cleaning the cappuccino frother<br />
E This chapter applies to the Professional and<br />
Easy Cappuccino Frothers.<br />
To ensure that the cappuccino frother always works<br />
properly, you should clean it daily when you have<br />
been preparing milk. Your <strong>ENA</strong> will not prompt<br />
you to clean the cappuccino frother.<br />
CAUTION<br />
If the wrong cleaning agent is used, the machine<br />
could be damaged and/or traces could be left<br />
behind in the water.<br />
T Use only original JURA maintenance<br />
products.<br />
E JURA Cappuccino Cleaner is available from<br />
stockists.<br />
T Remove the milk pipe from the milk carton<br />
or the milk container.<br />
T Pour 250 ml of fresh water into a receptacle<br />
and add one capful (max. 15 ml) of Cappuccino<br />
Cleaner.<br />
T Immerse the milk pipe in the receptacle.<br />
T Place another receptacle under the<br />
cappuccino frother.<br />
<strong>ENA</strong> 7<br />
E If you are using the Professional Cappuccino<br />
Frother, turn the selector switch to the<br />
Milk Foam p or Milk t position.<br />
n T Press the Steam button.<br />
HEATING<br />
As soon as the <strong>ENA</strong> has heated up, READY<br />
appears again.<br />
l T Turn the switch anticlockwise to position m.<br />
STEAM, the cappuccino frother and the<br />
pipe are cleaned.<br />
y T Turn the switch clockwise to position o as<br />
soon as the receptacle containing the<br />
Cappuccino Cleaner is empty.<br />
T Rinse the receptacle thoroughly, fill it with<br />
250 ml of fresh water and immerse the milk<br />
pipe in it.<br />
T Empty the receptacle under the cappuccino<br />
frother and place it back under the frother.<br />
l T Turn the switch anticlockwise to position m.<br />
STEAM, the cappuccino frother and the<br />
pipe are rinsed with fresh water.<br />
y T Turn the switch clockwise to position o as<br />
soon as the receptacle containing the water<br />
is empty.<br />
51<br />
de<br />
en<br />
fr<br />
it<br />
nl<br />
es<br />
pt<br />
ru
<strong>ENA</strong> 7<br />
Dismantling and rinsing the<br />
Professional Cappuccino Frother<br />
52<br />
T Carefully remove the Professional Cappuccino<br />
Frother from the Connector System © by<br />
twisting slightly.<br />
T Dismantle the cappuccino frother into its<br />
individual parts.<br />
T Rinse all parts of the cappuccino frother<br />
thoroughly under running water.<br />
T Reassemble the cappuccino frother.<br />
E Ensure that all individual parts are correctly<br />
and firmly connected to ensure correct<br />
operation of the cappuccino frother.<br />
T Firmly attach the cappuccino frother to the<br />
Connector System © .<br />
Dismantling and rinsing the<br />
Easy Cappuccino Frother<br />
T Carefully remove the Easy Cappuccino<br />
Frother from the Connector System © by<br />
twisting slightly.<br />
T Dismantle the cappuccino frother into its<br />
individual parts.<br />
T Rinse all parts of the cappuccino frother<br />
thoroughly under running water.<br />
T Reassemble the cappuccino frother.<br />
E Ensure that all individual parts are correctly<br />
and firmly connected to ensure correct<br />
operation of the cappuccino frother.<br />
T Firmly attach the cappuccino frother to the<br />
Connector System © .<br />
Dismantling and rinsing the 2-stage<br />
frothing nozzle<br />
To ensure that the 2-stage frothing nozzle always<br />
works properly, you should clean it regularly if you<br />
have frothed or heated milk.<br />
J CAUTION<br />
Burns caused by hot frothing nozzle and Connector<br />
System © .<br />
T Allow the frothing nozzle to cool before<br />
cleaning it.<br />
T Carefully pull the frothing nozzle off the<br />
Connector System © .<br />
T Unscrew the frothing nozzle using the hole<br />
on the measuring spoon for preground<br />
coffee.<br />
T Rinse all three nozzle parts thoroughly under<br />
running water.<br />
T Reassemble the frothing nozzle and attach it<br />
to the Connector System © .
Cleaning the bean container<br />
Coffee beans may be covered with a slight oil film<br />
which remains on the walls of the bean container.<br />
These traces may negatively affect the coffee<br />
result. For this reason clean the bean container<br />
from time to time.<br />
Q T Press the On/Off button to switch the<br />
machine off.<br />
T Disconnect the mains plug.<br />
T Remove the bean container cover.<br />
T Remove the coffee beans with a vacuum<br />
cleaner.<br />
T Clean the bean container with a soft, dry<br />
cloth.<br />
T Fill the bean container with fresh coffee<br />
beans, then close the bean container cover.<br />
Descaling the water tank<br />
Limescale deposits may form in the water tank. To<br />
ensure correct function of the machine, descale<br />
the water tank from time to time.<br />
T Remove the water tank.<br />
T If you use a CLARIS Blue filter cartridge,<br />
remove it.<br />
T Descale the tank with a mild conventional<br />
descaling agent in accordance with the<br />
manufacturer's instructions.<br />
T Rinse the water tank thoroughly.<br />
T If you use a CLARIS Blue filter cartridge,<br />
reinsert it.<br />
T Fill the water tank with fresh, cold water and<br />
reinsert it.<br />
<strong>ENA</strong> 7<br />
53<br />
de<br />
en<br />
fr<br />
it<br />
nl<br />
es<br />
pt<br />
ru
<strong>ENA</strong> 7<br />
6 Display messages<br />
Message Cause/Result Action<br />
FILL WATER TANK The water tank is empty. You<br />
cannot prepare any products.<br />
EMPTY GROUNDS The coffee grounds container is<br />
full. You cannot prepare any<br />
speciality coffees or steam, but<br />
you can prepare hot water.<br />
TRAY MISSING The drip tray is not inserted<br />
correctly or is not inserted at all.<br />
You cannot prepare any<br />
speciality coffees, but you can<br />
prepare hot water and steam.<br />
FILL BEANS The bean container is empty.<br />
You cannot prepare any<br />
speciality coffees, but you can<br />
prepare hot water and steam.<br />
READY / CLEAN The <strong>ENA</strong> is prompting you to<br />
clean it.<br />
READY / DE-SCALE The <strong>ENA</strong> is prompting you to<br />
descale it.<br />
READY / FILTER After 50 litres of water have<br />
flowed through the CLARIS Blue<br />
filter cartridge, it will cease to<br />
work.<br />
NOT ENOUGH<br />
POWDER<br />
54<br />
There is insufficient preground<br />
coffee in the machine; the <strong>ENA</strong><br />
stops the operation.<br />
TOO HOT The system is too hot to start a<br />
maintenance programme.<br />
OPEN TAP The system must be filled with<br />
water. You cannot prepare any<br />
products.<br />
T Fill the water tank (see Chapter 1<br />
‘Preparing and using for the first time’).<br />
T Empty the coffee grounds container<br />
and the drip tray (see Chapter 3 ‘Daily<br />
operation’).<br />
T Insert the drip tray.<br />
T Fill the bean container (see Chapter 1<br />
‘Preparing and using for the first time’).<br />
T Perform cleaning (see Chapter 5<br />
‘Maintenance – Cleaning the machine’).<br />
T Perform descaling (see Chapter 5<br />
‘Maintenance – Descaling the machine’).<br />
T Replace the CLARIS Blue filter<br />
cartridge (see Chapter 5 ‘Maintenance<br />
– Changing the filter’).<br />
T The next time you prepare a<br />
beverage, add more preground coffee<br />
(see Chapter 2 ‘Preparation – Preground<br />
coffee’).<br />
T Wait for several minutes until the<br />
system has cooled or prepare a<br />
speciality coffee or hot water.<br />
T Place a receptacle under the<br />
cappuccino frother and turn the switch<br />
anticlockwise to position m.
7 Troubleshooting<br />
Problem Cause/Result Action<br />
Insufficient foam is<br />
produced when the milk<br />
is frothed or milk sprays<br />
from the cappuccino<br />
frother.<br />
Coffee only comes out<br />
in drips when it is being<br />
prepared.<br />
Water hardness cannot<br />
be adjusted.<br />
FILL WATER TANK<br />
is displayed although the<br />
water tank is full.<br />
Grinder is making a very<br />
loud noise.<br />
Little or no water or steam<br />
comes out of the<br />
cappuccino frother. The<br />
pump is very quiet.<br />
The cappuccino frother is<br />
dirty.<br />
Coffee or preground coffee<br />
has been ground too finely<br />
and is blocking the system.<br />
The CLARIS Blue filter<br />
cartridge is activated.<br />
The water tank float is<br />
trapped.<br />
There are foreign objects in<br />
the grinder.<br />
The connector of the cappuccino<br />
frother may be blocked<br />
by milk residues or limescale<br />
fragments loosened during<br />
descaling.<br />
ERROR 2 is displayed. If the machine was exposed<br />
to the cold for a long period<br />
of time, heating is disabled<br />
for safety reasons.<br />
Other ERROR messages<br />
are displayed.<br />
T Clean the cappuccino frother (see<br />
Chapter 5 ‘Maintenance – Cleaning the<br />
cappuccino frother’).<br />
T Set the grinder to a coarser setting or<br />
use coarser preground coffee (see<br />
Chapter 1 ‘Preparing and using for the<br />
first time – Adjusting the grinder’).<br />
T Deactivate the CLARIS Blue filter<br />
cartridge in programming mode.<br />
T Descale the water tank.<br />
T Contact customer support in your<br />
country (see Chapter 11 ‘JURA contact<br />
details / Legal information’).<br />
<strong>ENA</strong> 7<br />
T Remove the cappuccino frother.<br />
T Unscrew the black connector with the<br />
aid of the hexagonal hole on the<br />
measuring spoon for preground coffee.<br />
T Thoroughly clean the connector.<br />
T Screw the connector back on by hand<br />
and carefully tighten it using the<br />
hexagonal hole on the measuring spoon,<br />
turning by no more than a quarter of a<br />
rotation.<br />
T Warm the machine at room temperature.<br />
– T Switch off the <strong>ENA</strong> with the On/Off<br />
button. Contact customer support in your<br />
country (see Chapter 11 ‘JURA contact<br />
details / Legal information’).<br />
E If you were unable to solve the problem, contact customer support in your country (see Chapter 11<br />
‘JURA contact details / Legal information’).<br />
55<br />
de<br />
en<br />
fr<br />
it<br />
nl<br />
es<br />
pt<br />
ru
<strong>ENA</strong> 7<br />
8 Transport and environmentally<br />
friendly disposal<br />
Transport / Emptying the system<br />
Keep the packaging for your <strong>ENA</strong>. It should be<br />
used to protect the machine during transport.<br />
In order to protect the <strong>ENA</strong> from frost during transport,<br />
the system must be emptied.<br />
Precondition: READY is displayed.<br />
n T Press the Steam button.<br />
HEATING<br />
As soon as the <strong>ENA</strong> has heated up, READY<br />
appears again.<br />
l T Turn the switch anticlockwise to position m.<br />
STEAM, hot steam is discharged from the<br />
cappuccino frother.<br />
T Remove and empty the water tank.<br />
Steam will continue to be discharged until<br />
the system is empty.<br />
CLOSE TAP<br />
FILL WATER TANK<br />
Q T Press the On/Off button to switch the<br />
machine off.<br />
y T Turn the switch clockwise to position o.<br />
56<br />
E The next time you use the machine the<br />
system must be refilled (see Chapter 1<br />
‘Preparing and using for the first time –<br />
First-time use’).<br />
Disposal<br />
Please dispose of old machines in an environmentally<br />
friendly way.<br />
H<br />
Old machines contain valuable, recyclable materials<br />
which should be recycled. Please therefore<br />
dispose of old machines via suitable collection<br />
systems.<br />
9 Technical data<br />
Voltage 220–240 V ~, 50 Hz<br />
Power 1450 W<br />
Safety test S<br />
Energy consumption<br />
ECONOMY -<br />
Approx. 13.5 Wh<br />
Energy consumption<br />
ECONOMY p<br />
Approx. 4 Wh<br />
Pump pressure Static, max. 15 bar<br />
Holding capacity of<br />
water tank<br />
1.1 l<br />
Holding capacity of<br />
bean container<br />
Holding capacity of<br />
coffee grounds<br />
container<br />
125 g<br />
Approx. 10 servings<br />
Cable length Approx. 1.1 m<br />
Weight Approx. 9.3 kg<br />
Dimensions<br />
(W H D)<br />
23.8 36 44.5 cm
10 Index<br />
A<br />
Addresses 59<br />
Aroma Boost 41<br />
Automatic switch-off 46<br />
B<br />
Bean container 34<br />
Cleaning 53<br />
Filling 37<br />
Bus bar<br />
Technical data 56<br />
Button<br />
Aroma Boost 35<br />
Coffee button 35<br />
Espresso button 35<br />
Maintenance button 35<br />
On/Off button 35<br />
Steam button 35<br />
C<br />
Cappuccino 42<br />
With the 2-stage frothing nozzle 43<br />
Cappuccino frother<br />
Cleaning 51<br />
Easy Cappuccino Frother 34<br />
Rinsing 50<br />
CLARIS Blue filter cartridge<br />
Changing 48<br />
Inserting and activating the filter 38<br />
Cleaning<br />
Bean container 53<br />
Cappuccino frother 51<br />
Machine 48<br />
Coffee 40<br />
Coffee grounds container 34<br />
Coffee spout<br />
Rotating coffee spout 34<br />
Connector System © 34<br />
Consistency of grind<br />
Adjusting the grinder 40<br />
Grinding wheel 35<br />
Contact details 59<br />
Cover 35<br />
Cup grille 34<br />
Customer support 59<br />
<strong>ENA</strong> 7<br />
D<br />
Degree of water hardness 39<br />
Descaling<br />
Machine 49<br />
Water tank 53<br />
Determining and adjusting the water hardness 39<br />
Display 35, 37<br />
Display messages 54<br />
Drip tray 34<br />
E<br />
Easy Cappuccino Frother 34<br />
Easy Cappuccino Frother<br />
Dismantling and rinsing 52<br />
Emptying the system 56<br />
Energy-saving mode 46<br />
Errors<br />
Troubleshooting 55<br />
Espresso 40<br />
F<br />
Filling<br />
Bean container 37<br />
Water tank 37<br />
Filter<br />
Changing 48<br />
Inserting and activating the filter 38<br />
First-time use 38<br />
Frother<br />
Easy Cappuccino Frother 34<br />
H<br />
Hotline 59<br />
Hot milk 43<br />
Hot water 44<br />
Hot water and steam preparation<br />
Switch for hot water and steam preparation 34<br />
I<br />
Internet 37<br />
J<br />
JURA<br />
Contact details 59<br />
Internet 37<br />
L<br />
Language 47<br />
57<br />
de<br />
en<br />
fr<br />
it<br />
nl<br />
es<br />
pt<br />
ru
<strong>ENA</strong> 7<br />
M<br />
Machine<br />
Cleaning 48<br />
Descaling 49<br />
Rinsing 47<br />
Setting up 37<br />
Switching off 45<br />
Switching on 45<br />
Maintenance<br />
Daily maintenance 45<br />
Maintenance 47<br />
Messages, display 54<br />
Milk<br />
Hot 43<br />
Milk foam 43<br />
P<br />
Permanently setting the water for the cup size 42<br />
Permanent settings in programming mode 45<br />
Powder chute 34<br />
Powder chute for preground coffee 34<br />
Preground coffee 41<br />
Preparation 40<br />
Aroma Boost 41<br />
Cappuccino 42<br />
Coffee 40<br />
Espresso 40<br />
Milk 43<br />
Preground coffee 41<br />
Problems<br />
Troubleshooting 55<br />
Professional Cappuccino Frother<br />
Dismantling and rinsing 52<br />
Programming mode 45<br />
Automatic switch-off 46<br />
Energy-saving mode 46<br />
Language 47<br />
Products 45<br />
Unit for amount of water 47<br />
Proper use 36<br />
R<br />
Rinsing<br />
Cappuccino frother 50<br />
Machine 47<br />
Rotary Switch 35<br />
58<br />
S<br />
Safety 36<br />
Safety information 36<br />
Settings<br />
Permanent settings in programming mode 45<br />
Setting up<br />
Setting up the machine 37<br />
Switch for hot water and steam preparation 34<br />
Switching off 45<br />
Switching on 45<br />
Switch-off<br />
Automatic switch-off 46<br />
Symbol description 33<br />
T<br />
Technical data 56<br />
Telephone 59<br />
Troubleshooting 55<br />
U<br />
Unit for amount of water 47<br />
Use, First-time 38<br />
W<br />
Water tank<br />
Descaling 53<br />
Filling 37<br />
Website 37
11 JURA contact details / Legal<br />
info rmatio n<br />
JURA Elektroapparate AG<br />
Kaffeeweltstrasse 10<br />
CH-4626 Niederbuchsiten<br />
Tel. +41 62 38 98 233<br />
@ You will find additional contact details for<br />
your country at www.jura.com.<br />
Directives<br />
The machine complies with the following directives:<br />
U 2006/95/EC – Low Voltage Directive<br />
U 2004/108/EC – Electromagnetic Compatibility<br />
U 2009/125/EC – Ecodesign<br />
Technical changes<br />
We reserve the right to make technical changes.<br />
The illustrations in these instructions for use show<br />
the <strong>ENA</strong> 7 Ristretto Black model. Some details of<br />
your <strong>ENA</strong> may vary.<br />
Feedback<br />
Your opinion is important to us! Use the contact<br />
link at www.jura.com.<br />
Copyright<br />
The instructions for use contain information which<br />
is protected by copyright. It is not permitted to<br />
photocopy these instructions for use or translate<br />
them into another language without the prior written<br />
consent of JURA Elektroapparate AG.<br />
Art. 69357/<strong>ENA</strong> 7/de-ru/201010<br />
<strong>ENA</strong> 7<br />
59<br />
de<br />
en<br />
fr<br />
it<br />
nl<br />
es<br />
pt<br />
ru