Manual Jura incalzitor de cesti
Manual Jura incalzitor de cesti
Manual Jura incalzitor de cesti

Create successful ePaper yourself
Turn your PDF publications into a flip-book with our unique Google optimized e-Paper software.
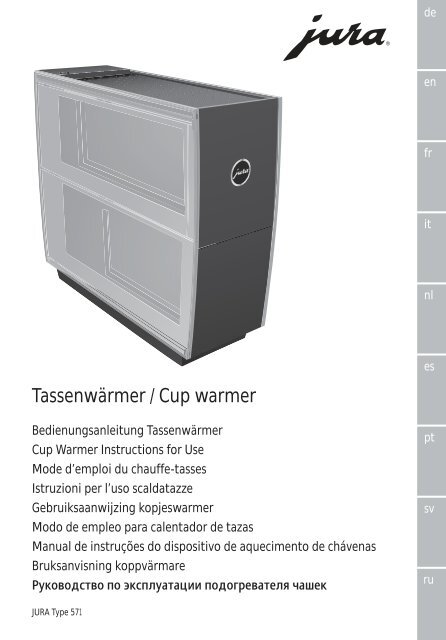
Tassenwärmer / Cup warmer<br />
Bedienungsanleitung Tassenwärmer<br />
Cup Warmer Instructions for Use<br />
Mo<strong>de</strong> d’emploi du chauffe-tasses<br />
Istruzioni per l’uso scaldatazze<br />
Gebruiksaanwijzing kopjeswarmer<br />
Modo <strong>de</strong> empleo para calentador <strong>de</strong> tazas<br />
<strong>Manual</strong> <strong>de</strong> instruções do dispositivo <strong>de</strong> aquecimento <strong>de</strong> chávenas<br />
Bruksanvisning koppvärmare<br />
Руководство по эксплуатации подогревателя чашек<br />
JURA Type 571<br />
<strong>de</strong><br />
en<br />
fr<br />
it<br />
nl<br />
es<br />
pt<br />
sv<br />
ru
JURA Tassenwärmer / Cup Warmer<br />
IMPORTANT SAFEGUARDS Always attach plug to appliance first, then<br />
Follow the basic safety precautions<br />
When using electrical appliances, basic safety<br />
precautions should always be followed, to reduce<br />
the risk of fire, electric shock, and/or injury to persons,<br />
including the following:<br />
Z<br />
Z<br />
Z<br />
Z<br />
Z<br />
Z<br />
Z<br />
Z<br />
Z<br />
Z<br />
Read all instructions.<br />
To protect against fire, electric shock and<br />
injury to persons, do not immerse cord,<br />
plugs, or body of machine in water or other<br />
liquid.<br />
Do not touch hot surfaces. Use handles or<br />
knobs.<br />
Close supervision is necessary when any<br />
appliance is used by or near children.<br />
Unplug from outlet when not in use and<br />
before cleaning. Allow to cool before<br />
putting on or taking off parts.<br />
Do not operate any appliance with a damaged<br />
cord or plug or after the appliance<br />
malfunctions, or has been damaged in any<br />
manner. Return appliance to the nearest<br />
authorized service facility for examination,<br />
repair or adjustment.<br />
The use of accessory attachement not recommen<strong>de</strong>d<br />
by the appliance manufacturer<br />
may result in fire, electric shock, or injury<br />
to persons.<br />
Do not use outdoors.<br />
Do not let the cord hang over the edge of<br />
a table or counter, or touch hot surfaces.<br />
Do not place on or near a hot gas or electric<br />
burner, or in a heated oven.<br />
SAVE THESE INSTRUCTIONS<br />
2<br />
Z<br />
Z<br />
Z<br />
plug cord into the wall outlet. To disconnect,<br />
turn any control to »off«, then remove<br />
plug from wall outlet.<br />
Do not use appliance for other than intented<br />
use.<br />
For household use only.<br />
Special cord set instructions<br />
a. A short power supply cord is provi<strong>de</strong>d to<br />
reduce the risk resulting from becoming<br />
entangled in or tripping over a long cord.<br />
b. Longer extension cords are available and<br />
may be used if care is exercised in their<br />
use.<br />
c. If an extension cord is used,<br />
1. the marked electrical rating of the extension<br />
cord should be at least as great as<br />
the electrical rating of the appliance, and<br />
2. if the appliance is of the groun<strong>de</strong>d type,<br />
the extension cord should be a grounding<br />
type 3-wire cord, and<br />
3. the longer cord shall be arranged so that<br />
it will not drape over the counter top or<br />
tabletop where it can be pulled on by<br />
children of tripped over.<br />
Warning<br />
To reduce the risk of fire or electric shock, do not<br />
remove any service covers. No user serviceable<br />
parts insi<strong>de</strong>. Repair should be done by authorized<br />
personnel only.
Caution<br />
This appliance is for household use only. Any<br />
servicing other than cleaning and user maintenance<br />
should be performed by an authorized<br />
service representative:<br />
Z Do not immerse base in water or try to disassemble.<br />
Z To reduce the risk of fire or electric shock,<br />
do not remove the base. No user serviceable<br />
parts insi<strong>de</strong>. Repair should be done by<br />
authorized service personnel only.<br />
Z Keep the cord away from hot parts of the<br />
appliance during operation.<br />
Z Never clean with scouring pow<strong>de</strong>rs or hard<br />
implements.<br />
NEVER DO (or you will void your<br />
warranty protection):<br />
Z Never do anything with the appliance<br />
which is not <strong>de</strong>scribed in the User‘s<br />
<strong>Manual</strong>. In case of doubt, call your <strong>de</strong>aler.<br />
JURA Tassenwärmer / Cup Warmer<br />
3
JURA Tassenwärmer / Cup Warmer<br />
4
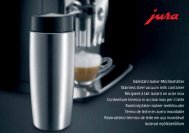
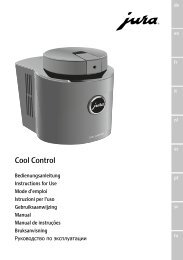
Your JURA cup warmer<br />
JURA Cup Warmer<br />
Symbol <strong>de</strong>scription ...............................................................................................................................................11<br />
Control elements ..................................................................................................................................................12<br />
Important information 13<br />
Proper use .............................................................................................................................................................. 13<br />
For your safety ...................................................................................................................................................... 13<br />
1 Preparation 14<br />
Supplied as standard............................................................................................................................................14<br />
Set-up and connection ........................................................................................................................................14<br />
2 Warming cups (manual switch-on) 14<br />
3 Automatic switch-on / switch-off 14<br />
Setting the time ....................................................................................................................................................14<br />
Automatic switch-on ............................................................................................................................................15<br />
Automatic switch-off ............................................................................................................................................15<br />
Deactivating automatic switch-on / switch-off ...............................................................................................15<br />
4 Displays 15<br />
5 Maintenance 16<br />
6 Environmentally neutral disposal 16<br />
7 Technical data 16<br />
Symbol <strong>de</strong>scription<br />
Warning:<br />
CAUTION<br />
Always take note of any information<br />
marked with the CAUTION or WARNING<br />
symbol. The signal word WARNING<br />
points out potential risk of serious<br />
injury, and the signal word CAUTION<br />
potential risk of slight injury.<br />
Symbols used:<br />
E Information and tips to make use of<br />
your cup warmer even easier.<br />
T Prompt to take action. This symbol<br />
means that you are being prompted to<br />
perform some action.<br />
11<br />
<strong>de</strong><br />
en
JURA Cup Warmer<br />
Control elements<br />
1<br />
2<br />
3<br />
4<br />
5<br />
12<br />
1 JURA Cup Warmer<br />
2 Cup drawer<br />
3 Cover<br />
4 Display<br />
5 On/off button Q with operation<br />
indicator lamp<br />
6 Arrow button<br />
7 Clock button<br />
6<br />
7
Important information<br />
Proper use<br />
The machine was <strong>de</strong>signed and built for domestic<br />
use. The machine should only be used to heat cups<br />
placed in the pull-out cup drawers. Use for any<br />
other purpose will be <strong>de</strong>emed improper. JURA<br />
Elektroapparate AG cannot accept any responsibility<br />
for the consequences of improper use.<br />
Before using the machine always read these<br />
instructions for use thoroughly and completely<br />
and comply with the instructions they contain.<br />
Keep these instructions for use close to the<br />
machine and pass them on to the next user if<br />
applicable.<br />
For your safety<br />
Please read and note carefully the following<br />
important safety information.<br />
To avoid the life-threatening danger of electric<br />
shock:<br />
Z Only use the original mains cable supplied by<br />
JURA.<br />
Z Never use a machine which has been damaged<br />
or with a <strong>de</strong>fective mains cable.<br />
Z Never use the machine when you have wet<br />
hands.<br />
Z Make sure the mains cable is dry before firsttime<br />
use.<br />
Z Only connect the machine to the AC mains<br />
power with the mains cable supplied with the<br />
machine.<br />
Z In the event of signs of damage, for example if<br />
there is a smell of burning, unplug the<br />
machine immediately from the mains supply<br />
and contact JURA service.<br />
Z Make sure that the machine and the mains<br />
cable are not located close to hot surfaces or<br />
naked flames.<br />
Z Be careful to ensure that the mains cable does<br />
not get caught and does not rub against sharp<br />
edges.<br />
Z Never open and repair the machine yourself.<br />
Do not modify the machine in any way that is<br />
not <strong>de</strong>scribed in the instructions for use. The<br />
machine contains live parts.<br />
JURA Cup Warmer<br />
A <strong>de</strong>fective machine is not safe and could cause<br />
injury or fire. To avoid damage and any associated<br />
risk of injury or fire:<br />
Z Never allow the mains cable to loosely hang<br />
down. The mains cable can be tripped over or<br />
damaged.<br />
Z Protect the machine from environmental<br />
influences such as rain, frost and direct<br />
sunlight.<br />
Z Do not use the machine to store or heat up<br />
drinks or other foods.<br />
Z Do not place heavy loads on the exten<strong>de</strong>d cup<br />
drawers.<br />
Z Do not place damp or wet cups in the cup<br />
drawers.<br />
Z Do not put the machine, mains cable or<br />
connectors in water.<br />
Z Do not put the machine or any individual<br />
parts in the dishwasher.<br />
Z Turn the machine off and disconnect the<br />
mains plug before starting any cleaning<br />
operation. Always wipe the machine with a<br />
damp cloth rather than a wet one, and protect<br />
it from prolonged water splash. Do not clean<br />
the inner si<strong>de</strong> panels.<br />
Z Only connect the machine to the mains<br />
voltage in accordance with the information on<br />
the rating plate. The rating plate is located on<br />
the un<strong>de</strong>rsi<strong>de</strong> of the machine. Further<br />
technical data is given in Chapter 7, ‘Technical<br />
data’.<br />
Z Turn the machine off and disconnect the<br />
mains plug if you will be away for any length<br />
of time.<br />
Z Do not leave the machine unatten<strong>de</strong>d when it<br />
is in operation.<br />
The machine is only allowed to be used by people<br />
who can use it safely. People, including children,<br />
who do not have the<br />
Z physical, sensory or mental capabilities or<br />
Z experience or knowledge<br />
to use the machine safely must be supervised by a<br />
responsible person when using it, or be instructed<br />
in how to use it correctly.<br />
13<br />
<strong>de</strong><br />
en
JURA Cup Warmer<br />
1 Preparation<br />
Supplied as standard<br />
The following items are supplied as standard:<br />
Z JURA Cup Warmer<br />
Z Instructions for use<br />
Z Mains cable<br />
Set-up and connection<br />
When setting up your cup warmer, observe the<br />
following:<br />
Z<br />
Z<br />
J<br />
14<br />
Set the machine down on a horizontal surface.<br />
Choose a spot for the machine which is<br />
protected against overheating.<br />
WARNING<br />
If the machine is operated with a <strong>de</strong>fective mains<br />
cable, there is a danger of electric shock.<br />
T Never use a machine which has a <strong>de</strong>fective<br />
mains cable.<br />
E<br />
T<br />
T<br />
T<br />
T<br />
Carefully turn the machine upsi<strong>de</strong> down and<br />
set it down.<br />
Connect the mains cable to the machine.<br />
Spare cable can be stored on the un<strong>de</strong>rsi<strong>de</strong><br />
of the cup warmer <strong>de</strong>pending on the length<br />
of cable required.<br />
Set the machine down the right way up<br />
again.<br />
Insert the mains plug into a power socket.<br />
OFF is displayed below the cover.<br />
2 Warming cups (manual switch-on)<br />
J<br />
Risk of burns. The storage surfaces in the<br />
cup drawers can get hot during operation.<br />
Do not touch the storage surfaces in the cup<br />
drawers.<br />
T Open a cup drawer.<br />
T Place the cups in the cup drawer and close it.<br />
Q T Switch the machine on with the on/off<br />
button.<br />
The operation indicator lamp lights up and<br />
the machine starts to warm the cups. ON is<br />
displayed below the cover.<br />
E<br />
T<br />
When you want to switch off the machine,<br />
press the on/off button Q. The operation<br />
indicator lamp goes out and OFF is<br />
displayed.<br />
3 Automatic switch-on / switch-off<br />
E<br />
If the machine is disconnected from the<br />
mains, all settings are reset.<br />
Setting the time<br />
For the ‘automatic switch-on / switch-off’ function,<br />
you must first set the time:<br />
T<br />
T<br />
T<br />
T<br />
T<br />
T<br />
T<br />
T<br />
Open the cover.<br />
Press the Clock button.<br />
AM 12:00 appears on the display.<br />
Press one of the arrow buttons to change<br />
the time format (AM/PM or 24h).<br />
Press the Clock button to confirm the time<br />
format.<br />
00:00 (example), the hours flash.<br />
Use the arrow buttons to set the hours.<br />
Press the Clock button to confirm the hours<br />
setting.<br />
10:00 (example), the minutes flash.<br />
Use the arrow buttons to set the minutes.<br />
10:30 (example)<br />
Press the Clock button to confirm the<br />
minutes setting.
E<br />
ON or OFF appears in the display <strong>de</strong>pending<br />
on whether the machine is switched on or<br />
off.<br />
You can change the time setting at any time.<br />
To do this, press the Clock button twice and<br />
make the necessary changes.<br />
Automatic switch-on<br />
T Open the cover.<br />
T Press the Clock button.<br />
The time set by the user is displayed.<br />
T Press one of the arrow buttons.<br />
ON --:--<br />
T Press the Clock button.<br />
--:-- , the hours flash.<br />
T Use the arrow buttons to set the hours.<br />
AUTO ON 07:00 (example)<br />
T Press the Clock button to confirm the hours<br />
setting.<br />
AUTO ON 07:00 (example), the minutes<br />
flash.<br />
T Use the arrow buttons to set the minutes.<br />
AUTO ON 07:30 (example)<br />
T Press the Clock button to confirm the<br />
minutes setting.<br />
AUTO ON or AUTO OFF appears in the<br />
display (<strong>de</strong>pending on whether the machine<br />
is switched on or off).<br />
Automatic switch-off<br />
T Open the cover.<br />
T Press the Clock button.<br />
The time set by the user is displayed.<br />
T Press one of the arrow buttons twice.<br />
AUTO OFF --:-- (example)<br />
T Press the Clock button.<br />
AUTO OFF --:-- (example), the hours flash.<br />
T Use the arrow buttons to set the hours.<br />
AUTO OFF 18:00 (example)<br />
T Press the Clock button to confirm the hours<br />
setting.<br />
AUTO OFF 18:00 (example), the minutes<br />
flash.<br />
T<br />
T<br />
JURA Cup Warmer<br />
Use the arrow buttons to set the minutes.<br />
AUTO OFF 18:30 (example)<br />
Press the Clock button to confirm the<br />
minutes setting.<br />
AUTO ON or AUTO OFF appears in the<br />
display (<strong>de</strong>pending on whether the machine<br />
is switched on or off).<br />
Deactivating automatic switch-on / switch-off<br />
To <strong>de</strong>activate automatic switch-on or switch-off,<br />
you must set the relevant time to ‘--:--’.<br />
Example: Here is how to <strong>de</strong>activate automatic<br />
switch-off.<br />
T Open the cover.<br />
T Press the Clock button.<br />
T Press one of the arrow buttons twice.<br />
AUTO OFF 18:30 (example)<br />
T Press the Clock button.<br />
AUTO OFF 18:30 (example), the hours flash.<br />
T Set the hours to ‘00’.<br />
T Press the Clock button.<br />
AUTO OFF 00:30 (example), the minutes<br />
flash.<br />
T Press the arrow buttons until ‘--:--’ is<br />
displayed.<br />
T Press the Clock button to confirm the<br />
setting.<br />
Automatic switch-off is <strong>de</strong>activated.<br />
4 Displays<br />
Z<br />
Z<br />
Z<br />
Z<br />
ON: Machine is switched on manually<br />
OFF: Machine is switched off manually<br />
AUTO ON: Machine is switched on automatically<br />
AUTO OFF: Machine is switched off automatically<br />
15<br />
<strong>de</strong><br />
en
JURA Cup Warmer<br />
5 Maintenance<br />
E<br />
E<br />
16<br />
T<br />
T<br />
Do not use any sharp, corrosive or abrasive<br />
cleaning agents or hard objects for<br />
maintenance. This may damage the<br />
machine.<br />
Before cleaning the machine disconnect the<br />
mains plug from the power socket.<br />
Clean the outsi<strong>de</strong> of the machine with a<br />
soft, damp cloth (e.g. a microfibre cloth).<br />
JURA microfibre cloths are available from<br />
stockists.<br />
6 Environmentally neutral disposal<br />
Please dispose of old machines in an environmentally<br />
neutral way.<br />
H<br />
Old machines contain valuable materials capable<br />
of being recycled which should be salvaged for<br />
recycling. Please therefore dispose of old machines<br />
via suitable collection systems.<br />
7 Technical data<br />
Voltage 120 V, 60 Hz<br />
(USA/Canada only)<br />
120–240 V, 50–60 Hz<br />
(Europe, other countries)<br />
Safety test UL 1026<br />
IEC/EN 60335-1<br />
IEC/EN 60335-2-12<br />
Power 40 W (USA/Canada only)<br />
60 W (max. 110 W) (Europe,<br />
Australia, New Zealand,<br />
other countries)<br />
Weight Approx. 3.8 kg<br />
Directives<br />
The machine complies with the following<br />
directives:<br />
Z<br />
Z<br />
Z<br />
Cable length Approx. 1.1 m<br />
Dimensions<br />
(W x H x D)<br />
2006/95/EC – Low Voltage Directive<br />
2004/108/EC – Electromagnetic Compatibility<br />
2005/32/EC – Eco<strong>de</strong>sign<br />
Technical changes<br />
We reserve the right to make technical changes.<br />
Feedback<br />
Your opinion is important to us!<br />
Use the contact link at www.jura.com.<br />
Copyright<br />
The instructions for use contain information which<br />
is protected by copyright. It is not permitted to<br />
photocopy or translate these instructions for use<br />
into another language without the express written<br />
consent of JURA Elektroapparate AG.<br />
JURA Elektroapparate AG<br />
Kaffeeweltstrasse 10<br />
CH-4626 Nie<strong>de</strong>rbuchsiten<br />
www.jura.com<br />
12.2 x 30.6 x 34.9 cm