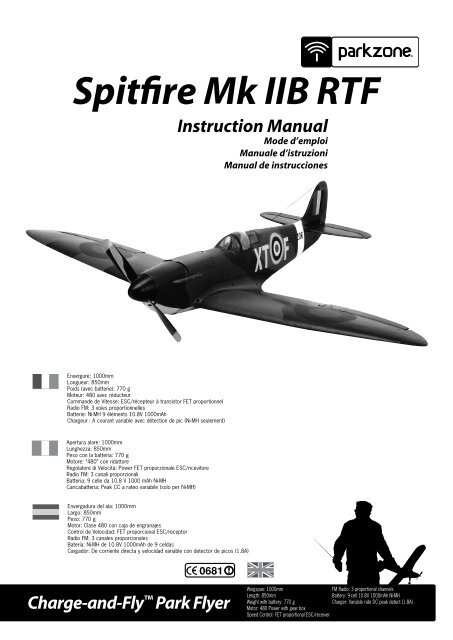
Spitfire Mk IIB RTF - Horizon Hobby
Spitfire Mk IIB RTF - Horizon Hobby
Spitfire Mk IIB RTF - Horizon Hobby

You also want an ePaper? Increase the reach of your titles
YUMPU automatically turns print PDFs into web optimized ePapers that Google loves.
<strong>Spitfire</strong> <strong>Mk</strong> <strong>IIB</strong> <strong>RTF</strong><br />
Instruction Manual<br />
Mode d’emploi<br />
Manuale d’istruzioni<br />
Manual de instrucciones<br />
Envergure: 1000mm<br />
Longueur: 850mm<br />
Poids (avec batterie): 770 g<br />
Moteur: 480 avec réducteur<br />
Commande de Vitesse: ESC/récepteur à transistor FET proportionnel<br />
Radio FM: 3 voies proportionnelles<br />
Batterie: Ni-MH 9 éléments 10.8V 1000mAh<br />
Chargeur : A courant variable avec détection de pic (Ni-MH seulement)<br />
Apertura alare: 1000mm<br />
Lunghezza: 850mm<br />
Peso con la batteria: 770 g<br />
Motore: “480” con riduttore<br />
Regolatore di Velocità: Power FET proporzionale ESC/ricevitore<br />
Radio FM: 3 canali proporzionali<br />
Batteria: 9 celle da 10.8 V 1000 mAh Ni-MH<br />
Caricabatteria: Peak CC a rateo variabile (solo per Ni-MH)<br />
Envergadura del ala: 1000mm<br />
Largo: 850mm<br />
Peso: 770 g<br />
Motor: Clase 480 con caja de engranajes<br />
Control de Velocidad: FET proporcional ESC/receptor<br />
Radio FM: 3 canales proporcionales<br />
Batería: Ni-MH de 10.8V 1000mAh de 9 celdas<br />
Cargador: De corriente directa y velocidad variable con detector de picos (1.8A)<br />
Charge-and-Fly Park Flyer<br />
Wingspan: 1000mm<br />
FM Radio: 3 proportional channels<br />
Length: 850mm<br />
Battery: 9-cell 10.8V 1000mAh Ni-MH<br />
Weight with battery: 770 g<br />
Charger: Variable rate DC peak detect (1.8A)<br />
Motor: 480 Power with gear box<br />
Speed Control: FET proportional ESC/receiver
Congratulations on your purchase of the ParkZone ® <strong>Spitfire</strong> <strong>Mk</strong> <strong>IIB</strong>. The<br />
<strong>Spitfire</strong> was heralded throughout the world during WWII for its fantastic<br />
flying characteristics and was the aircraft the British counted on most to<br />
defend against the Germans. Now you can take to the skies with your<br />
own <strong>Spitfire</strong> and envision yourself in an epic battle with the Luftwaffe.<br />
Your ParkZone <strong>Spitfire</strong> <strong>Mk</strong> <strong>IIB</strong> <strong>RTF</strong> purchase includes everything needed<br />
to get you in the air—all in one box! You will only need to attach the<br />
wing and horizontal tail and charge the battery pack prior to taking<br />
to the air. Everyone at ParkZone is committed to giving you the most<br />
enjoyable flight experience possible. In order for your first flight to be<br />
safe and successful, we ask that you do not fly until you have read<br />
these instructions thoroughly.<br />
The ParkZone <strong>Spitfire</strong> <strong>Mk</strong> <strong>IIB</strong> comes with a fully proportional 3-channel<br />
FM radio system, with full control of throttle, ailerons, and elevator.<br />
If you are not experienced at flying one of <strong>Hobby</strong>Zone’s 3-<br />
channel aircraft, or any other 3-channel radio controlled<br />
aircraft, we recommend that you do not fly this aircraft. If<br />
<strong>Spitfire</strong> <strong>Mk</strong> <strong>IIB</strong> Instruction Manual<br />
you still choose to fly, you will need to seek the help of an<br />
experienced radio control pilot during your first several flights.<br />
This is especially important if you have not flown a 3-channel<br />
airplane with aileron control as one of the channels. Crash<br />
damage is not covered under the warranty!<br />
Your ParkZone <strong>Spitfire</strong> <strong>Mk</strong> <strong>IIB</strong> is equipped with the exclusive ZX10<br />
radio system which utilizes 10-bit, 1024-step processing for highfidelity<br />
control. It uses a 6-channel FM receiver with industry standard<br />
3-wire servos, along with X-Port capability for maximum<br />
expandability and reusability.<br />
The ZX10 system also features dual rates, allowing you to fly how you<br />
feel most comfortable. Mode A limits the travel of the control surfaces<br />
and offers smooth and relaxing flight. Mode B allows for full control at<br />
all times for those craving the maximum performance of their aircraft.<br />
Italiano<br />
Manuale di Istruzioni <strong>Spitfire</strong> <strong>Mk</strong> <strong>IIB</strong><br />
Congratulazioni per aver acquistato lo <strong>Spitfire</strong> <strong>Mk</strong> <strong>IIB</strong> della ParkZone ® .<br />
Lo <strong>Spitfire</strong> è stato famoso durante tutta la II GM per le sue eccezioali<br />
doti di volo e la spina dorsale dell’aviazione inglese contro la Germania.<br />
Ora è possibile far volare uno <strong>Spitfire</strong> ed emulare la epica Battaglia di<br />
Inghilterra contro la Luftwaffe.<br />
Acquistando uno <strong>Spitfire</strong> <strong>Mk</strong> <strong>IIB</strong> <strong>RTF</strong> ParkZone si riceve tutto quello<br />
che serve per farlo volare- tutto nella scatola! Basta attaccare le ali e<br />
gli impennaggi e caricare la batterai prima di volare. Tutti alla ParkZone<br />
cercano di fare il proprio meglio per offrirvi una esperienza soddisfacente<br />
in modo che il primo volo sia soddisfacente e sicuro. Si prega solo di non<br />
far volare il modello prima di aver letto tutto questo manuale.<br />
Lo <strong>Spitfire</strong> <strong>Mk</strong> <strong>IIB</strong> della ParkZone è dotatao di un radiocomando FM a 3<br />
canali per il comando proporzionale del gas, alettoni ed elevatore. Se non<br />
avete pilotato in precedenza un modello <strong>Hobby</strong>Zone ® o di altra marca<br />
a tre canali vi consigliamo di non farlo volare. Se decidete comunque<br />
Español<br />
<strong>Spitfire</strong> <strong>Mk</strong> <strong>IIB</strong> - Manual de Instrucciones<br />
di farlo fatevi almeno assistere nei primi voli da un pilota esperto. Ciò<br />
è valido in particolare se non avete mai fatto volare un modello con gli<br />
alettoni. I danni derivanti da scassature non sono coperti dalla garanzia!<br />
Lo <strong>Spitfire</strong> <strong>Mk</strong> <strong>IIB</strong> della ParkZone è dotato di un radiocomando ZX10 che<br />
utilizza software a 10 bit e 1024 step ad alta precisione di pilotaggio.<br />
Dispone di una ricevente a 6 canali FM e servi con 3 fili oltre alla presa<br />
X-port che può essere usata anche sul altri modelli.<br />
La ZX10 dispone di una trasmittente che permette 2 modi di pilotaggio<br />
selezionabili.Il Mode A limita l’escursione delle parti mobili e permette<br />
un pilotaggio più rilassato. Il Mode B consente il pieno controllo delle<br />
superfici mobili a coloro che desiderano sfruttare al massimo le doti del<br />
modello.<br />
Français<br />
Notice d’utilisation du <strong>Spitfire</strong> <strong>Mk</strong> <strong>IIB</strong><br />
Félicitations pour votre achat du <strong>Spitfire</strong> <strong>Mk</strong> <strong>IIB</strong> de ParkZone ® . Le <strong>Spitfire</strong><br />
est reconnu dans le monde entier pour ses caractéristiques de vol<br />
fantastiques et comme l’avion qui a permis aux Anglais de se défendre<br />
contre les Allemands durant la Deuxième Guerre Mondiale. Maintenant<br />
vous pouvez prendre l’air avec votre propre <strong>Spitfire</strong> et engager une<br />
bataille épique avec la Luftwaffe.<br />
La boite de votre <strong>Spitfire</strong> <strong>Mk</strong> <strong>IIB</strong> de ParkZone RTR contient tout le<br />
matériel nécessaire pour mettre votre modèle en vol. Vous devez<br />
simplement fixer l’aile ainsi que l’empennage arrière et charger la batterie<br />
avant de pouvoir voler. Chez ParkZone, nous faisons tout pour vous<br />
rendre la pratique de l’aéromodélisme le plus agréable possible. Pour une<br />
utilisation correcte de votre modèle, veuillez lire entièrement cette notice<br />
avant de voler.<br />
Votre <strong>Spitfire</strong> <strong>Mk</strong> <strong>IIB</strong> de ParkZone est livré avec un ensemble radio 3<br />
voies avec contrôle complet des gaz, ailerons et profondeur. Si c’est votre<br />
premier modèle 3 voies, nous vous conseillons de vous faire assister par<br />
un pilote expérimenté pour les premiers vols. Les dommages causés par<br />
un crash ne sont par couverts par la garantie.<br />
Votre <strong>Spitfire</strong> <strong>Mk</strong> <strong>IIB</strong> est équipé de l’ensemble radio ZX10 qui utilise<br />
une programmation 1024 bits pour un contrôle sécurisé. Il comporte un<br />
récepteur 6 voies FM et des servos standards ainsi que la fonction<br />
X-port pour augmenter le plaisir de l’utilisation.<br />
L’ensemble radio ZX10 incorpore une fonction de double débattement<br />
pour les servos. Deux modes de vol sont sélectionnables sur l’émetteur. Le<br />
mode A limite le débattement des gouvernes pour les pilotes débutants.<br />
Le mode B permet d’utiliser le débattement complet des gouvernes pour<br />
accomplir des figures acrobatiques.<br />
Deseamos felicitarlo por adquirir el <strong>Spitfire</strong> <strong>Mk</strong> <strong>IIB</strong> de ParkZone ® .<br />
Durante la Segunda Guerra Mundial, el <strong>Spitfire</strong> fue vitoreado alrededor<br />
del mundo por sus fantásticas características de vuelo, y fue la<br />
aeronave más confiable que tenían los británicos para defenderse<br />
de los alemanes. Ahora usted puede dominar los aires con su propio<br />
<strong>Spitfire</strong> y verse envuelto en una batalla épica contra la Luftwaffe.<br />
Su <strong>Spitfire</strong> <strong>Mk</strong> <strong>IIB</strong> <strong>RTF</strong> de ParkZone cuenta con todo lo necesario<br />
para que se ponga a volar: ¡Todo dentro de la misma caja! Solamente<br />
requiere montar las alas, la cola horizontal y cargar la batería antes<br />
de iniciar el vuelo. Todos en ParkZone estamos comprometidos a<br />
brindarle la más agradable experiencia de vuelo posible. Para que su<br />
primer vuelo sea seguro y todo un éxito, le pedimos que por favor lea<br />
el presente instructivo a detalle antes de iniciar a volar.<br />
El <strong>Spitfire</strong> <strong>Mk</strong> <strong>IIB</strong> de ParkZone viene con un sistema de radio FM<br />
de 3 canales proporcionales, con control total del acelerador, de los<br />
alerones y del elevador. Si no tiene experiencia volando un avión<br />
de 3 canales de <strong>Hobby</strong>Zone ® , o cualquier otro tipo de avión de<br />
radiocontrol de 3 canales, nuestra recomendación es que no vuele<br />
este avión. Si de todas maneras quiere hacerlo, necesitará la ayuda<br />
de un piloto con experiencia en aviones de radiocontrol durante sus<br />
primeros vuelos. Esto es de vital importancia si no ha volado un<br />
avión de 3 canales, con uno de ellos designado para el control de los<br />
alerones. ¡La garantía no cubre daños por choques!<br />
Su <strong>Spitfire</strong> <strong>Mk</strong> <strong>IIB</strong> <strong>RTF</strong> de ParkZone está equipado con el exclusivo<br />
sistema de radio ZX10, el cual utiliza el procesamiento escalonado<br />
1024 de 10 bits para lograr un alto control de fidelidad. Usa también<br />
un receptor FM de 6 canales con un servomecanismo estándar de 3<br />
hilos, y cuenta asimismo con la tecnología X-Port para obtener la<br />
máxima expansibilidad y reusabilidad.<br />
El sistema ZX10 cuenta también con velocidad dual, lo que le<br />
permite volar como se sienta usted más cómodo. El Modo A limita el<br />
desplazamiento de la superficie de mando y le ofrece un vuelo suave<br />
y relajado. El Modo B le permite tener el control total durante todo el<br />
vuelo para aquellos que desean experimentar el máximo desempeño<br />
de su avión.<br />
2
ELEV<br />
REV<br />
AIL<br />
T/V<br />
SYSTEM<br />
ELEV<br />
REV<br />
AIL<br />
T/V<br />
SYSTEM<br />
Step 1<br />
Italiano<br />
Passo 1. Trasmettitore<br />
Setting Up the Transmitter<br />
1. Insert 8 new “AA” batteries (supplied) into the<br />
transmitter, observing proper polarity.<br />
2. Turn the switch on and check to make sure the LED<br />
is illuminated, which indicates that the batteries have<br />
been installed correctly. Once this is confirmed, turn<br />
the radio off.<br />
3. You’ll need to replace the transmitter “AA” batteries<br />
whenever you hear the low-battery alarm (beeping<br />
sound) being emitted from the transmitter. To extend<br />
the life of your “AA” batteries, remove them from your<br />
transmitter when you are not using it.<br />
Français<br />
Stade 1. Préparation de l’émetteur<br />
1. Installa le 8 pile “AA” (in dotazione) nella trasmittente facendo<br />
attenzione alla corretta polarità.<br />
2. Accendi l’interruttore della trasmittente per verificare che il<br />
LED si illumini a conferma che le pile sono state installate<br />
correttamente. Spegnere poi la trasmittente.<br />
3. Quando si ode il cicalino che segnala che le pile sono scariche<br />
bisogna sostituirle. Per aumentare la vita delle pile “AA”<br />
toglierle datta trasmittente quando non si usa.<br />
Español<br />
Paso 1. Transmisor<br />
1. Introduzca 8 pilas “AA” nuevas (suministradas) en el transmisor,<br />
observando la polaridad correcta.<br />
2. Encienda el transmisor (ON) y verifique que se ilumine el LED,<br />
lo cual indica que instaló las baterías correctamente. Una vez<br />
confirmado, apague el radio (OFF).<br />
3. Deberá reemplazar las pilas “AA” del transmisor cada vez que<br />
escuche que éste emite la alarma de batería baja (pitido). Para<br />
alargar la vida de sus baterías “AA”, retírelas del transmisor<br />
cuando no lo utilice.<br />
1. Insérer 8 piles neuves AA (fournies) dans l’émetteur en<br />
respectant la polarité.<br />
2. Mettre l’interrupteur sur marche (On) et vérifierque la Led<br />
s’éclaire brillamment, ce qui indique que les piles sont<br />
correctement installées. Mettre ensuite l’émetteur hors tension.<br />
3. Remplacer les piles par des piles neuves quand vous entendez<br />
l’alarme batterie (bip sonore) émise par l’émetteur. Pour<br />
prolonger la vie de vos piles, les retirer du logement quand<br />
l’émetteur est inutilisé.
Step 2<br />
Français<br />
Stade 2. Charge de la Batterie de Propulsion<br />
Charging the Aircraft Battery<br />
The ParkZone ® variable rate DC peak charger uses<br />
unique peak detection circuitry that ensures an accurate<br />
charge every time and protects your Ni-Cd and<br />
Ni-MH batteries from the dangers of over-charging.<br />
This charger continually monitors the battery’s charge<br />
curve and automatically stops charging when the peak<br />
charge is detected. The peak detection charger will<br />
help avoid damage to your Ni-Cd and Ni-MH cells.<br />
Important: The battery should be charged shortly<br />
before flying. If you charge the battery 12 to 24<br />
hours prior to flying, you will need to “re-peak” the<br />
battery before you fly.<br />
WARNING! You cannot charge optional Li-Po battery<br />
packs with the ParkZone variable rate DC peak<br />
charger included with this kit. You must use use a<br />
battery charger that is made specifically for Li-Po<br />
batteries, such as the PKZ1040. Failure to<br />
follow this warning could result in a fire.<br />
WARNING! Do not leave the charger or battery<br />
unattended during the charge process. While<br />
charging, place the battery on a heat resistant<br />
surface and constantly monitor the temperature of<br />
the battery pack. If the battery becomes hot at any<br />
time during the charge process, discontinue charging<br />
immediately. It should only be warm to the touch, and<br />
should not feel warm until it is almost done charging.<br />
Do not allow children to charge battery packs without<br />
adult supervision.<br />
Using Your Variable Rate DC Peak Charger<br />
1. Using the dial on the side of the charger, set the<br />
charge rate at 1.4 amps.<br />
2. Connect the battery pack to the charger using the<br />
included adapter.<br />
3. Connect the charger to the 12V power outlet in<br />
your automobile. The LED will continually blink while<br />
the battery charges.<br />
4. Charging is finished when the LED indicator glows<br />
steadily (40 minutes or less).<br />
Note: The charge time is only an estimate of a fully<br />
discharged battery pack. Actual charge times may<br />
vary. Damage to the charger and battery will occur if<br />
you exceed the maximum charge rate recommended.<br />
Variable Rate DC Peak<br />
Detection Charger Features<br />
• Variable charge rate from 0.5–1.8 amps<br />
• Uses automobile 12V power outlet<br />
• Charges 5- to 10-cell Ni-Cd and Ni-MH battery packs<br />
• Trickle charge<br />
• LED charge indicator<br />
Le chargeur possède un système de détection de pic<br />
qui assure une charge précise et protège les batteries<br />
Ni-Cd et Ni-MH contre les dangers d’une surcharge.<br />
Pendant le cycle de charge, il surveille continuellement<br />
la courbe de la charge de la batterie et cesse<br />
automatiquement de charger rapidement quand la<br />
charge maximale est détectée. Cette fonction évite<br />
d’endommager votre batterie.<br />
Important: La batterie doit être un peu chargée<br />
avant chaque vol. Si vous chargez la batterie 12<br />
à 24 heures avant de voler, il sera nécessaire de<br />
compléter la charge juste avant le vol.<br />
ATTENTION! Ce chargeur ne permet pas de charger<br />
les batteries Li-Po disponibles en option. Vous devez<br />
utiliser un chargeur spécifique pour ces batteries<br />
comme le PKZ1040. Ne pas respecter cette consigne<br />
peut causer un incendie.<br />
ATTENTION! Ne pas laisser le chargeur ou la batterie<br />
sans surveillance durant la phase de charge. Placer la<br />
batterie sur une surface thermo-résistante et surveiller<br />
constamment la température de la batterie pendant<br />
la charge. Si la batterie devient très chaude, stopper<br />
immédiatement la charge. Elle doit être seulement<br />
tiède au toucher. Ne pas permettre à un enfant de<br />
charger la batterie sans la présence d’un adulte.<br />
Utilisation du Chargeur à Courant Variable<br />
1. Utiliser le bouton sur le chargeur pour régler le<br />
courant de charge à 1,4 A,<br />
2. Connecter la batterie au chargeur avec l’adaptateur<br />
fourni.<br />
3. Connecter le chargeur à une alimentation 12 V de<br />
votre véhicule. La Led doit clignoter durant toute<br />
la charge.<br />
4. La charge est terminée quand la Led reste<br />
constamment allumée (40 minutes ou moins).<br />
Note: Le temps de charge est une estimation pour<br />
une batterie entièrement déchargée. La durée de<br />
charge peut varier. Vous pouvez endommager la batterie<br />
et le chargeur si vous dépassez le courant de<br />
charge recommandé.<br />
Caractéristiques du Chargeur<br />
à Courant Variable<br />
• Courant variable de 0,5 à 1,8 A<br />
• Alimentation batterie 12 V automobile<br />
• Charge des batteries Ni-Cd et Ni-MH de 5 à 10<br />
éléments<br />
• Charge de maintien<br />
• LED de charge
Italiano Passo 2. Carica della Batteria del Modello Español Paso 2. Cargando la Bateria del Avion<br />
Il caricabatterie ParkZone ® CC con picco a rateo variabiledispone<br />
di un circuito speciale per garantire una<br />
carica ottimale e protegge le batterie Ni-Cd e Ni-MH<br />
dal rischio di sovraccarica. Il caricabatterie controlla<br />
in continuazione la curva di carica della batteria e si<br />
arresta automaticamente quando rileva il picco di carica.<br />
Questo tipo di caricabatteria aiuta a proteggere le<br />
celle Ni-Cd e Ni-MH dalla sovraccarica.<br />
Importante: La batteria deve essere caricata appena<br />
prima del volo. Se si carica la batteria da 12 a 24<br />
ore prima del volo, bisogna “ricaricare al massimo”<br />
la batteria prima del volo ripetendo la procedura di<br />
carica.<br />
ATTENZIONE! Non si possono caricare le batterie<br />
opzionali Li-Po con il caricabatterie CC ParkZone a<br />
rilevamento di picco. Bisogna usare un caricabatterie<br />
specifico per le batterie Li-Po come per esempio il<br />
PKZ1040. Ignorare questa raccomandazione può<br />
significare l’incendio della batteria.<br />
ATTENZIONE! Non lasciare il caricabatterie e la<br />
batteria incustoditi durante la carica. Durante la carica<br />
mettere la batteria su una superficie resistente al<br />
calore e controllare la temperatura della batteria. Se<br />
scotta interrompere immediatamente la carica. La<br />
batteria dovrebbe riscaldarsi solo durante l’ultima fase<br />
di carica. Non permettere ai bambini di caricare le<br />
batterie senza la supervisione di un adulto.<br />
Come Usare il Caricabaatterie CC<br />
a Rateo Variabile.<br />
1. Per mezzo del selettore del caricabatterie,<br />
selezionare la corrente di carica di 1,4A.<br />
2. Collegare la batteria al caricabatteria utilizzando<br />
l’adattatore incluso.<br />
3. Collegare il caricabatterie alla presa d 12V<br />
dell’auto. Il LED continuerà a lampeggiare durante<br />
la carica.<br />
4. La carica è terminata quando il LED smette di<br />
lampeggiare e rimane acceso (40 minuti o meno).<br />
Nota: Il tempo stimato di carica vale per una batteria<br />
completamente scarica. Il tempo effettivo può essere<br />
diverso. Superando la corrente di carica consigliata si<br />
può danneggiare sia il caricabatterie che la batteria.<br />
Peak CC a Rateo Variabile<br />
Caratteristiche del Caricabatterie<br />
• Rateo varoabile di carica 0,5-1,8 A<br />
• Alimentato dalla presa dell’accendino dell’auto da<br />
12V<br />
• Adatto per la carica di 5-10 celle Ni-Cd e Ni-MH<br />
• Carica di mantenimento<br />
• Indicatore di carica a LED<br />
El cargador de corriente directa de velocidad variable<br />
con detección de picos de ParkZone ® cuenta con un<br />
sistema único de circuitos para detectar picos, el cual<br />
siempre garantiza una carga adecuada y protege a las<br />
baterías Ni-Cd y Ni-MH del peligro de una sobrecarga.<br />
Este cargador monitorea continuamente la curva de la<br />
carga de la batería y deja de cargar automáticamente<br />
cuando detecta un pico. El cargador de detección de<br />
picos le ayudará a evitar daños a las celdas Ni-Cd y<br />
Ni-MH.<br />
Importante: La batería debe cargarse poco antes<br />
de volar. Si carga la batería de 12 a 24 horas antes<br />
de volar, necesitará “restablecer el pico” de la batería<br />
antes de iniciar el vuelo.<br />
¡ADVERTENCIA! No puede cargar las baterías Li-Po<br />
opcionales con el cargador de corriente directa de<br />
velocidad variable con detección de picos de<br />
ParkZone que viene incluido con este avión. Debe<br />
utilizar un cargador de baterías especial para las<br />
baterías Li-Po, como el PKZ1040, ya que de lo<br />
contrario puede prenderse fuego.<br />
¡ADVERTENCIA! No deje el cargador o la batería<br />
sin supervisión durante el proceso de carga. Cuando<br />
vaya a cargar la batería, colóquela en una superficie<br />
resistente al calor y monitoree constantemente la<br />
temperatura de ésta. Si la batería se calienta en<br />
cualquier momento cuando la esté cargando, deje de<br />
hacerlo de inmediato. Debe sentirse solamente tibia<br />
al tocarla, y solamente hasta que casi haya terminado<br />
de cargarse. No permita que los niños carguen las<br />
baterías sin la supervisión de un adulto.<br />
Uso del Cargador de Corriente Directa de<br />
Velocidad Variable con Detección de Picos<br />
1. Con el selector ubicado al costado del cargador,<br />
ajuste la velocidad de carga a 1.4 amps.<br />
2. Conecte el grupo de baterías al cargador usando el<br />
adaptador incluido.<br />
3. Conecete el cargador a la toma de energía de 12V<br />
de su automóvil. El LED parpadeará continuamente<br />
mientras la batería se esté cargando.<br />
4. La batería habrá terminado de cargarse cuando el<br />
indicador LED brille de forma continua (40 minutos<br />
o menos).<br />
Características del Cargador de Corriente<br />
Directa de Velocidad Variable con Detección<br />
de Picos<br />
• Velocidad de carga variable desde 0.5 a 1.8 amp<br />
• Usa una toma de alimentación de 12V de automóvil<br />
• Carga baterías Ni-Cd y Ni-MH de 5 a 10 celdas<br />
• Carga lenta<br />
• Indicador LED de carga<br />
Nota: El tiempo de carga es sólo un estimado de<br />
una batería completamente descargada. Los tiempos<br />
de carga pueden variar. El cargador y la batería<br />
pueden dañarse si excede la máxima velocidad de<br />
carga recomendada.
Step 3<br />
Step 4<br />
Attaching the Wing<br />
Attaching the <strong>Horizon</strong>tal Stabilizer<br />
In order to attach the wing of your <strong>Spitfire</strong> <strong>Mk</strong> <strong>IIB</strong>, please<br />
follow these simple instructions:<br />
1. Locate the included wing screws (in clear plastic bag).<br />
2. Plug in the aileron servo lead from the wing into the<br />
aileron extension. This is very important, as the ailerons<br />
will be reversed if this is not done.<br />
3. Carefully attach the wing to the fuselage. Use 3 screws<br />
to secure the wing as shown.<br />
Français<br />
Stade 3. Fixation de l’aile<br />
Pour fixer l’aile de votre <strong>Spitfire</strong> <strong>Mk</strong> <strong>IIB</strong>, suivre les instructions ci-dessous :<br />
1. Préparer les 3 vis de fixation de l’aile (plastique clair).<br />
2. Connecter le câble du servo aileron venant de l’aile sur la rallonge. Ceci est très important pour un fonctionnement<br />
correct des ailerons.<br />
3. Placer l’aile sur le fuselage et la fixer à l’aide des 3 vis comme indiqué.<br />
Italiano<br />
Passo 3. Fissaggio dell’ala<br />
Per fissare l’ala dello <strong>Spitfire</strong> <strong>Mk</strong> <strong>IIB</strong> basta seguire queste semplici istruzioni:<br />
1. Reperire le viti dell’ala (nel sacchetto trasparente).<br />
2. Collegare il cavo del servo degli alettoni dell’ala nella prolunga. Questo è molto importante altrimenti, se non si<br />
collega, il movimento risulta invertito.<br />
3. Fissare l’ala alla fusoliera con attenzione. Usare le 3 viti di fissaggio come illustrato.<br />
<br />
1. Locate the horizontal stab of the tail.<br />
2. Slide the horizontal tail stab through the allotted space<br />
in the fuselage, making sure the control horn attached<br />
to the horizontal tail stab will properly align with pushrod<br />
and clevis exiting the back of the fuselage.<br />
3. When you are certain the tail is centered correctly, use<br />
the provided clear tape to properly secure the tail to the<br />
fuselage, as shown. Use the tape on the top and bottom<br />
of each side of the tail (total of 4 applications).<br />
4. Make sure that the throttle slider is all the way down, in<br />
the “off” position. Turn on the transmitter and plug in the<br />
flight battery. Make sure the trim levers and control<br />
stick are centered.<br />
5. Locate where the clevis and rod exit the fuselage, and<br />
attach the clevis to control surface as shown.<br />
6. Make necessary trim adjustments prior to flight. See<br />
step 5 for instructions on how to do this.<br />
Center of Gravity Information<br />
The CG locations for the <strong>Spitfire</strong> will be the following:<br />
The center of gravity (CG) of the ParkZone <strong>Spitfire</strong> <strong>Mk</strong> <strong>IIB</strong><br />
is approximately +/– 67mm behind the leading edge of the<br />
wing for the stock 10.8V Ni-MH battery and +/– 70mm for<br />
an optional 11.1V 3S Li-Po battery.<br />
You can confirm the CG by placing your fingers on the<br />
bottom of the wing and balancing it while it is inverted.<br />
tape<br />
adhésif<br />
tape<br />
adhésif<br />
Español<br />
Paso 3. Montaje del Ala<br />
Siga por favor las sencillas instrucciones a continuación para montar el ala de su <strong>Spitfire</strong> <strong>Mk</strong> <strong>IIB</strong>:<br />
1. Encuentre los tornillos de las alas que vienen incluidos (bolsa de plástico transparente).<br />
2. Conecte el conductor del servo del alerón del ala en la extensión del alerón. Esto es muy importante, ya que los<br />
alerones se irán hacia atrás si no lo conecta de esta forma.<br />
3. Monte el ala al fuselaje con cuidado. Utilice los 3 tornillos proporcionados para asegurar el ala como se muestra.<br />
Français<br />
Stade 4. Fixation du Stabilisateur <strong>Horizon</strong>tal<br />
1. Préparer le stabilisateur horizontal.<br />
2. Glisser le stabilisateur dans son logement sur le fuselage et vérifier que le guignol de la gouverne est correctement<br />
aligné avec la commande de profondeur provenant du fuselage.<br />
3. Quand le stabilisateur est correctement installé, le fixer avec le ruban adhésif fourni. Placer un morceau de chaque<br />
côté du fuselage et sur chaque face du stabilisateur (soit 4 morceaux au total).<br />
4. Vérifier que le levier des gaz est vers le bas avant de mettre l’émetteur sous tension et de connecter la batterie de<br />
propulsion. Vérifier que les leviers de commande et de trim sont au neutre.<br />
5. Connecter la chape de la commande de profondeur sur le guignol de la gouverne comme indiqué.<br />
6. Si nécessaire, parfaire le réglage à l’aide du trim avant de voler (voir stade 5).<br />
Information sur le Centre de Gravité<br />
La position du centre de gravité du <strong>Spitfire</strong> est la suivante:<br />
Il doit se trouver environ 67 mm derrière le bord d’attaque de l’aile avec une batterie de propulsion Ni-Cd de 10,8V ou 70<br />
mm pour une batterie Li-Po 3S de 11,1V.<br />
Vous pouvez vérifier la position du CG en tenant le modèle par-dessous avec deux doigts pour confirmer son équilibre.<br />
10 11
Italiano<br />
Passo 4. Fissaggio del Piano Orizzontale<br />
Step 5<br />
1. Prendere il piano orizzontale.<br />
2. Far passare il piano orizzontale attraverso la fessura della fusoliera, facendo attenzione che la squadretta del piano<br />
orizzontale sia ben allineata con il rinvio e la forcella che escono dalla fusoliera.<br />
3. Quando si è sicuri che la coda è certrata con precisione, fissare la coda col nastro trasparente alla fusoliera come<br />
illustrato. Usare il nastro sopra e sotto da entrambi le parti (4 nastri in totale).<br />
4. Assicuratevi che il cursore del gas sia completamente abbassato nella posizione “off”. Accendere la trasmittente e<br />
collegare quindi la batteria di volo. Assiurarsi che le levette dei trim siano centrate.<br />
5. Individuare dove il rinvio esce dalla fusoliera e fissare la forcella alla superficie mobile come illustrato.<br />
6. Effettuare le regolazioni del trim richiesta prima del volo. Andare al Passo 5 per vedere come fare.<br />
Informazioni sul Centro di Gravità<br />
La posizione del CG dello Siptfire è il seguente:<br />
Il Centro di Gravità (CG) si trova all’incirca a 67 mm dietro al bordo di entrata dell’ala per la batteria standard 10,8V Ni-MH<br />
e circa a 70 mm per la batteria opzionale Li-Po 11,1V 3S.<br />
Making Trim Adjustments to the <strong>Horizon</strong>tal Stabilizer<br />
1. Turn on the transmitter.<br />
2. Install a fully charged battery into the battery compartment and secure it with the included<br />
hook and loop strap.<br />
3. Set the elevator trim lever to center.<br />
4. Make certain the elevator is set to neutral with the horizontal stabilizer. Do this by removing<br />
the clevis from the control horn and turning it on the pushrod as needed. Once the adjustment<br />
is made, reattach the clevis.<br />
5. If you feel more adjustments are necessary while in flight, move the trim lever on the<br />
transmitter a few “clicks” up or down as needed.<br />
Si può verificare il CG mettendo due dita al di sotto dell’ala e guardando se è in equilibrio.<br />
Español<br />
Paso 4. Montaje del Estabilizador <strong>Horizon</strong>tal<br />
1. Coloque la barra horizontal de la cola.<br />
2. Deslice la barra horizontal de la cola por el espacio para ello en el fuselaje, asegurándose que el balancín de control sujetado<br />
al establilizador horizontal de la cola se alinee correctamente con la varilla de empuje y de la abrazadera que salen de la parte<br />
trasera del fuselaje.<br />
3. Cuando esté seguro que la cola se encuentre centrada correctamente, utilice la cinta transparente proporcionada para fijar la<br />
cola con firmeza al fuselaje, como se muestra en la imagen. Use la cinta en la parte superior e inferior de cada lado de la cola<br />
(un total de 4 tiras).<br />
4. Asegúrese que el mando deslizante del acelerador se encuentre totalmente hacia abajo, en la posición “off” (apagado).<br />
Encienda el transmisor y conecte la batería de vuelo. Asegúrese que las aletas de compensación y el bastón estén centrados.<br />
5. Encuentre el sitio de donde salen la abrazadera y la barra impulsora del fuselaje y fije la abrazadera al alerón, como se muestra.<br />
6. Realice los ajustes necesarios a las aletas de compensación antes de volar. Consulte las indicaciones para dichos ajustes en<br />
el paso 5.<br />
Información del Centro de Gravedad<br />
Los puntos del centro de gravedad del <strong>Spitfire</strong> son los siguientes:<br />
El centro de gravedad (CG) del <strong>Spitfire</strong> <strong>Mk</strong> <strong>IIB</strong> de ParkZone es de aproximadamente +/-67mm detrás del borde de ataque<br />
del ala para el almacenamiento de la batería Ni-MH de 10.8V y de +/-70mm para una batería opcional como la 3S Li-Po<br />
de 11.1V.<br />
Puede confirmar el CG colocando sus dedos en la parte inferior del ala y hacerla balancear mientras esté invertida.<br />
nastro<br />
cinta<br />
Français<br />
Stade 5. Réglage du Neutre du Stabilisateur <strong>Horizon</strong>tal<br />
1. Mettre l’émetteur sous tension.<br />
2. Installer une batterie entièrement chargée dans le compartiment et la fixer avec la bande velcro.<br />
3. Mettre le levier de trim de profondeur au neutre.<br />
4. Vérifier que la gouverne de profondeur est au neutre. Si nécessaire, détacher la chape et modifier la longueur de la<br />
commande en vissant ou dévissant la chape. Refixer ensuite la chape sur le guignol.<br />
5. Si de légers réglages sont nécessaires durant le vol, utiliser le levier de trim sur l’émetteur en le déplaçant légèrement de<br />
quelques clics.<br />
Italiano<br />
Passo 5. Regolazione del trim del Piano Orizzontale<br />
1. Accendere la trasmittente.<br />
2. Installare la batteria di volo ben carica e fissarla con la fascetta ed il velcro di dotazione.<br />
3. Mettere al centro la leva ed il trim del profondità.<br />
4. Controllare che la parte mobile sia allineata con quella fissa. Per fare ciò staccare la forcella dalla squadretta della siuperficie<br />
mobile e girarla quanto necessario. Eseguita la messa a punto, fissare di nuovo la forcella.<br />
5. Se durante il volo si avverte che è necessaria una ulteriore regolazione, agire sulla levetta del trim spostandola di alcune<br />
“tacche” in avanti o dietro.<br />
Español<br />
Passo 5. Realización de Ajustes del Estabilizador <strong>Horizon</strong>tal<br />
nastro<br />
cinta<br />
1. Encienda el transmisor.<br />
2. Coloque una batería completamente cargada en el compartimento para la batería y asegúrela con el gancho y la tira incluidos.<br />
3. Coloque la palanca de posición del elevador en el centro.<br />
4. Asegúrese que el elevador se encuentre en neutral con el estabilizador horizontal. Puede hacer esto retirando la abrazadera<br />
del balancín de control y dando vuelta a la varilla de empuje conforme sea necesario. Una vez que haya realizado el ajuste,<br />
vuelva a fijar la abrazadera.<br />
5. Si cree que es necesario hacer más ajustes cuando esté volando, mueva la palanca de posición en el transmisor haciendo<br />
12 unos cuantos “clics” hacia arriba o hacia abajo.<br />
13
ELEV<br />
REV<br />
AIL<br />
T/V<br />
SYSTEM<br />
ELEV<br />
REV<br />
AIL<br />
T/V<br />
SYSTEM<br />
Step 6<br />
Italiano<br />
Passo 6. Prova del motore<br />
Motor Test<br />
WARNING: Keep everything clear of the propeller before<br />
starting the motor test so you do not damage any property<br />
or harm anyone.<br />
1. Make sure the throttle slider is in the “off” position.<br />
2. Turn on the transmitter.<br />
3. Plug the flight battery into the white lead inside<br />
the fuselage.<br />
4. Secure the battery inside the fuselage cavity by looping<br />
the hook and loop straps around the battery, and replace<br />
the battery cap.<br />
5. Your ParkZone ® <strong>Spitfire</strong> has a built-in throttle-arming<br />
feature that must sense the throttle slider in the “off”<br />
position before it will spin the propeller. Advance the<br />
throttle forward and the propeller should spin at a high<br />
speed. The throttle slider needs to be in the “off”<br />
position each time the battery is plugged into the airplane.<br />
6. When finished with the motor test, be sure to disconnect<br />
the battery first, and then turn off the transmitter. Follow<br />
this step each time you need to turn the airplane off.<br />
Additionally, each time you use your airplane you<br />
should always place the throttle in the “off” position,<br />
and then turn on the transmitter and plug the battery<br />
pack into the lead from the fuselage.<br />
7. Make any trim adjustments, as necessary, prior to<br />
flight (see steps 5 and 8).<br />
Throttle Lever<br />
Commande des Gaz<br />
OFF ON<br />
Elevator Trim Lever<br />
Trim de Profondeur<br />
Aileron Trim Lever<br />
Trim de Ailerons<br />
Attenzione: Durante la prova del motore fare attenzione che<br />
niente venga a contatto con l’elica per evitare danni o ferite.<br />
1. Assicurarsi che il cursore del gas si trovi sulla<br />
posizione “Off”.<br />
2. Accendere la trasmittente.<br />
3. Collegare la batteria del modello alla spinetta bianca.<br />
4. Fissare la batteria nel vano della fusoliera avvolgendo la<br />
batteria con il velcro e rimettere il coperchio.<br />
5. Il ParkZone ® <strong>Spitfire</strong> ha un dispositivo di “armo” in<br />
grado di localizzare la leva del gas nella posizione<br />
“spento” prima di fare girare l’elica. Spingere la leva in<br />
avanti e l’elica comincia a girare in fretta. La leva del gas<br />
si deve trovare nella posizione “spento” ogni volta che si<br />
collega la batteria al modello.<br />
6. Finita la prova del motore, assicurarsi di scollegare<br />
per prima la batteria del modello e quindi spegnere la<br />
trasmittente. Seguire questa procedura ogni volta che<br />
che si desidera spegnere la radio. Inoltre bisogna<br />
ricordarsi di mettere il gas al minimo sempre prima di<br />
accendere la trasmittente e solo dopo si può collegare la<br />
batteria al modello.<br />
7. Prima del volo regolare sempre i trim come è neccessario<br />
(vedere i passi 5 ed 8).<br />
Español<br />
Paso 6. Prueba del motor<br />
Cursore<br />
Throttle<br />
del Gas<br />
Lever<br />
Palanca del Acelerador<br />
OFF ON<br />
Elevator Trim Lever<br />
Cursore del Trim dell’elevatore<br />
Palanca de Compensación del Elevador<br />
Cursore del Trim Degli Alettoni<br />
Palanca de Compensación<br />
del Alerón<br />
Aileron Trim Lever<br />
Advertencia: Mantenga la hélice libre de todo obstáculo antes de iniciar la prueba de motor para evitar daños o heridas.<br />
Français<br />
Stade 6. Test du moteur<br />
ATTENTION : Vérifier que la zone de rotation de l’hélice est libre de tout obstacle et prendre garde à vos vêtements et<br />
vos cheveux.<br />
1. Vérifier que la commande des gaz est sur ‘Off’.<br />
2. Mettre l’émetteur sous tension.<br />
3. Brancher la batterie à la prise blanche dans le fuselage.<br />
4. Fixer la batterie dans son logement à l’aide de la bande velcro et replacer le couvercle de la batterie.<br />
5. Votre <strong>Spitfire</strong> est équipé d’une sécurité qui permet d’activer le moteur seulement si la commande des gaz est sur<br />
Off à la mise sous tension. Avancer la commande des gaz, l’hélice doit commencer à tourner à grande vitesse. La<br />
sécurité des gaz est activée à chaque changement de la batterie de l’avion.<br />
6. A la fin du test moteur, débrancher la batterie de l’avion en premier, avant de mettre l’émetteur hors tension.<br />
Respecter cet ordre d’opération chaque fois que vous retirez la batterie de l’avion. De plus, vérifier que le levier<br />
des gaz est en position “Off” avant chaque mise sous tension de l’émetteur et brancher ensuite la batterie<br />
de propulsion.<br />
7. Si nécessaire, effectuer les réglages des trims avant de voler (voir stades 5 et 8).<br />
1. Compruebe que el mando deslizante del acelerador se encuentre en la posición “Off” (apagado).<br />
2. Encienda el transmisor.<br />
3. Enchufe la batería de vuelo en el cable blanco que se encuentra dentro del fuselaje.<br />
4. Asegure la batería dentro de la cavidad del fuselaje poniendo juntos el gancho y las tiras alrededor de la batería, y<br />
coloque nuevamente la tapa de la batería.<br />
5. Su <strong>Spitfire</strong> de ParkZone ® tiene la ventaja de contar con un acelarador de activación integrado que debe detectar que el<br />
mando deslizante del acelerador se encuentre en la posición “off” antes de poner a funcionar a la hélice. Al mover el<br />
acelerador hacia adelante la hélice deberá girar a alta velocidad. El mando deslizante del acelerador deberá estar en la<br />
posición “off” cada vez que conecte la batería al avión.<br />
6. Cuando termine la prueba del motor, asegúrese de desconectar la batería primero y después apagar el transmisor.<br />
Siga este paso cada vez que necesite apagar el avión. Además, cada vez que quiera usar su avión deberá poner<br />
siempre el aceleador en la posición “off”, y después encender el transmisor y conectar la batería al cable del fuselaje.<br />
7. Realice ajustes a las aletas de compensación conforme sea necesario antes de volar (consulte los pasos 5 y 8).<br />
14 15
REV<br />
ELEV AIL T/V<br />
REV<br />
ELEV AIL T/V<br />
REV<br />
ELEV AIL T/V<br />
REV<br />
ELEV AIL T/V<br />
SYSTEM<br />
SYSTEM<br />
SYSTEM<br />
SYSTEM<br />
REV<br />
ELEV AIL T/V<br />
REV<br />
ELEV AIL T/V<br />
REV<br />
ELEV AIL T/V<br />
REV<br />
ELEV AIL T/V<br />
SYSTEM<br />
SYSTEM<br />
SYSTEM<br />
SYSTEM<br />
Step 7<br />
Italiano<br />
Passo 6. Controllo Generale<br />
Control Test<br />
Warning: Keep everything clear of the propeller before<br />
starting the control test in the event that you accidentally<br />
turn on the motor.<br />
1. Be certain that the throttle slider is in the “off” position<br />
and that both trim levers are centered.<br />
2. Switch on the transmitter and check to make sure the<br />
LED is lit, indicating the transmitter has power.<br />
3. Install the flight battery into the fuselage and plug it into<br />
the battery connector.<br />
4. Move the stick from side to side. The ailerons on<br />
the trailing edge of the wings should move per your<br />
transmitter input. When the stick is pushed to the right,<br />
the right aileron should deflect upward and the left<br />
aileron downward, and vice versa.<br />
5. Pull the stick back and the elevator control surface<br />
should move upward (as shown).<br />
6. Move the stick full forward. When this is done, the<br />
elevator control surface should move down (as shown).<br />
7. When the test is complete, be sure to disconnect the<br />
flight battery first, and then turn off the transmitter.<br />
This should be done each time you turn off the airplane.<br />
Attenzione: Tenere sgombra la zona vicina all’elica prima di<br />
effettuare il controllo che potrebbe avviare accidentalmente<br />
il motore.<br />
1. Assicurarsi che il cursore del gas sia nella posizione di<br />
minimo (off) e che entrambi le leve dei trim siano centrate.<br />
2. Accendere la trasmittente e controllare che il LED sia<br />
acceso indicando che la trasmittente funziona.<br />
3. Mettere la batteria nel modello e collegarla alla apposita<br />
spinetta<br />
4. Spostare la leva della trasmittente da un lato e dall’altro.<br />
Gli alettoni situati sul bordo d’uscita dell’ala dovrebbero<br />
spostarsi come la leva della trasmittente (quando la leva<br />
è spinta a destra l’alettone destro dovrebbe muoversi<br />
verso l’alto e quello sinistro verso il basso e viceversa).<br />
5. Tirando all’indietro la leva della trasmittente la parte<br />
mobile dell’elevatore dovrebbe spostarsi verso l’alto<br />
(come illustrato).<br />
6. Spingendo la leva tutta in avanti la superficie dell’elevatore<br />
dovrebbe abbassarsi (come illustrato).<br />
7. Eseguito il controllo, assicurarsi di staccare per prima<br />
cosa la batteria di volo e quindi spegnere la trasmittente.<br />
Ciò va fatto ogni volta che si spegne il modello.<br />
Note: It is very important to make sure that the<br />
control surfaces are at 0 degrees when the transmitter control<br />
stick and trim levers are centered. (See Steps 5 and 8<br />
for making needed adjustments to control surfaces.)<br />
Nota: É molto importante assicurarsi che le superfici mobili<br />
siano al centro quando lo sticke della trasmittente ed i<br />
trim sono centrati (Vedere i passi 5 ed 8 per le regolazioni<br />
neccessare delle parti mobili).<br />
If your airplane is not responding correctly to the transmitter<br />
input, do not fly! Some correction is needed. Contact your<br />
country’s authorized distributor found in this manual.<br />
Se il modello non risponde correttamente alla trasmittente,<br />
non volare! E’ neccessario contattare il distributore per<br />
vedere cosa fare.<br />
Français<br />
Stade 7. Test de Contrôle<br />
ATTENTION : Toujours vérifier que la zone de rotation de l’hélice est libre avant de commencer le test au cas ou le<br />
moteur serait mis en route accidentellement.<br />
1. Vérifier que le levier des gaz et en position Off et que les trims sont au neutre.<br />
2. Mettre l’émetteur sous tension et vérifier l’allumage de la led qui confirme le bon fonctionnement de l’émetteur.<br />
3. Placer la batterie de propulsion dans le fuselage et la connecter à la prise.<br />
4. Bouger le manche d’un côté à l’autre. Les ailerons doivent suivre le mouvement du manche (quand le manche est<br />
vers la droite, l’aileron droit se lever et le gauche se baiser et inversement avec le manche à gauche).<br />
5. Tirer le manche vers l’arrière et vérifier que la gouverne de profondeur se lève (voir dessin).<br />
6. Pousser le manche vers l’avant. La gouverne de profondeur soit se baisser (voir dessin).<br />
7. Quand le test est terminé, débrancher la batterie de l’avion en premier, avant de mettre l’émetteur hors tension.<br />
Note : Il est très important de vérifier que les gouvernes (ailerons et profondeur) soient au neutre quand le manche et<br />
les leviers de trim sont centrés. (Voir les stades 5 et 8 pour le réglage des gouvernes.)<br />
Si le modèle ne réponds pas correctement aux ordes de l’émetteur, ne pas voler! Si vous avez des problèmes pour<br />
effectuer ces réglages, vous pouvez contacter votre détaillant.<br />
Español<br />
Paso 6. Prueba de Control<br />
Advertencia: Mantenga cualquier objeto apartado de la hélice antes de iniciar la prueba de control en caso que se conecte el<br />
motor accidentalmente.<br />
1. Asegúrese que el mando deslizante del acelerador se encuentre en la posición “off” (apagado) y que las dos palancas<br />
de compensación estén centradas.<br />
2. Encienda el transmisor y verifique que el LED esté encendido, ya que indica que el transmisor tiene batería.<br />
3. Coloque la batería de vuelo dentro del fuselaje y enchúfela en el conector de la batería<br />
4. Mueva el bastón de lado a lado. Los alerones del borde posterior de las alas deben moverse según las órdenes de su<br />
transmisor (cuando el bastón se empuja a la derecha, el alerón derecho debe moverse hacia arriba y el izquierdo hacia<br />
abajo y viceversa).<br />
5. Tire hacia atrás del bastón y la superficie de mando del elevador se moverá hacia arriba (como se muestra).<br />
6. Mueva el bastón completamente hacia adelante. Cuando lo haga, la superficie de mando del elevador debe moverse<br />
hacia abajo (como se muestra).<br />
7. Cuando haya finalizado la prueba, asegúrese de desconectar primero la batería de vuelo, después apague el transmisor.<br />
Esto debe realizarse cada vez que desconecte el avión.<br />
Nota: Es muy importante que se asegure que las superficies de mando estén a 0 grados cuando el bastón de control y las<br />
palancas de compensación del transmisor estén centradas (consulte los pasos 5 y 8 para realizar los ajustes necesarios a las<br />
superficies de mando).<br />
Si su avión no responde adecuadamente a las órdenes del transmisor, ¡no vuele! Se debe realizar algun tipo de compostura.<br />
Contacte al distribuidor autorizado de su país cuyos datos se encuentran en el presente instructivo.<br />
16 17
Step 8<br />
Italiano<br />
Passo 8. Regolazione degli Alettoni<br />
Making Adjustments to the Ailerons<br />
Warning: Keep everything clear of the propeller before<br />
adjusting the ailerons in the event that you accidentally<br />
turn on the motor.<br />
You may find some adjustment is needed to properly trim<br />
the ailerons. The ailerons are properly trimmed when each<br />
aileron is level with the stationary wing surface. To do this,<br />
follow these simple instructions:<br />
1. Make sure the throttle slider is in the “off” position and<br />
then turn on the transmitter.<br />
2. Install the flight battery and plug it into the lead from<br />
the fuselage.<br />
3. Most trim adjustments to the ailerons can be made<br />
with the aileron trim levers on the transmitter. Make<br />
sure the gimbal (stick) is at neutral prior to making any<br />
trim changes.<br />
4. If trimming the ailerons with the trim levers is not<br />
sufficient, and the ailerons need to be trimmed<br />
mechanically, you’ll need to do the following:<br />
a. With the radio system on, return the trim levers and<br />
gimbal to their neutral positions.<br />
b. Locate the small thumbscrew on each aileron (bottom<br />
Français<br />
Stade 8. Réglage des Ailerons<br />
of the control surface).<br />
c. Loosen the thumbscrew until the pushrod is free from<br />
the control horn and move the aileron control surface to<br />
the neutral position.<br />
d. Hold the aileron at neutral with one hand while<br />
retightening the thumbscrew on the control horn, so<br />
that the control surface will then be held at neutral when<br />
the trim levers and gimbal are in the neutral position.<br />
If you have any questions about making these<br />
adjustments, please contact your country’s authorized<br />
distributor found in this manual.<br />
Attention : Toujours vérifier que la zone de rotation de l’hélice est libre avant de commencer le test au cas ou le moteur<br />
serait mis en route accidentellement.<br />
Les ailerons sont au neutre quand ils sont parfaitement alignés avec la surface de l’aile. Pour les régler si nécessaire,<br />
appliquer la procédure suivante :<br />
1. Vérifier que le levier des gaz et en position Off et mettre l’émetteur sous tension.<br />
2. Installer la batterie de propulsionet la connecter à la prise dans le fuselage.<br />
3. De légers ajustements des ailerons peuvent être fait avec le levier de trim de l’émetteur. Vérifier que le levier de<br />
commande est au neutre avant de faire ces ajustements.<br />
4. Si le réglage n’est pas possible avec le trim de l’émetteur, il faut agir sur la commande mécanique en procédant comme<br />
indiqué ci-dessous :<br />
a. Avec l’émetteur sous tension, vérifier que le manche et le levier de trim sont au neutre.<br />
b. Repérer la molette placée sur chaque aileron (sous la gouverne).<br />
c. Desserrer la molette jusqu’à ce que la commande soit libre et placer la gouverne au neutre.<br />
d. Maintenir l’aileron au neutre et resserrer la molette. Vérifier que la gouverne est au neutre avec le manche et le levier de<br />
trim également au neutre.<br />
Si vous avez des problèmes pour effectuer ces réglages, vous pouvez contacter votre détaillant.<br />
Attenzione: Tenere sgombra la zona vicina all’elica prima di<br />
effettuare il controllo che potrebbe avviare accidentalmente<br />
il motore.<br />
Può succedere che sia neccessario effettuare una<br />
regolazione del trim degli alettoni. Gli alettoni sono<br />
correttamente trimmati quando sono allineati con l’ala.<br />
Per ottenere ciò, seguire queste semplici istruzioni:<br />
1. Controllare che il cursore del gas si trovi al minimo e<br />
quindi accendere la trasmittente.<br />
2. Installare la batteria del modello e collegarla al cavo che<br />
esce dalla fusoliera.<br />
3. Le correzioni più importanti agli alettoni si possono fare<br />
con le leve dei trim. Assicurarsi che la leva di comando<br />
sia al centro prima di agire sui trim.<br />
4. Se le correzioni con i trim non sono sufficienti e gli<br />
alettoni necessitano di una regolazione meccanica<br />
bisogna fare in questo modo:<br />
a. Con la radio accesa, rimettere le levette dei trim al<br />
centrro così come lo stick.<br />
b. Individuare li piccoli registri che si trovano su ogni<br />
alettone (al di sotto della superficie mobile).<br />
Español<br />
c. Allentare il registro finchè il rinvio è libero dalla<br />
squadretta di comando e spostare l’alettone finchè si<br />
trova allineato al centro.<br />
d. Con una mano tenere fermo l’alettone e con l’altra<br />
fissare il piccolo registro alla squadretta in modo che<br />
l’alettone si trovi allineato al centro quando lo stick e la<br />
leva del trim si trovano al cenro.<br />
Se ci sono problemi nella messa a punto chiamare il<br />
servizio assisnza della Scorpio allo 0461 823099.<br />
Paso 8. Realización de Ajustes en los Alerones<br />
Advertencia: Mantenga cualquier objeto apartado de la hélice antes de iniciar la prueba de control en caso que se<br />
conecte el motor accidentalmente.<br />
Es posible que sea necesario realizar algunos ajustes para compensar adecuadamente los alerones. Los alerones estarán<br />
correctamente compensados cuando cada alerón esté nivelado con el ala. Para llevarlo a cabo, siga estas simples<br />
instrucciones:<br />
1. Asegúrese que el mando deslizante del acelerador se encuentre en la posición “off” (apagado) y después encienda<br />
el transmisor.<br />
2. Instale la batería de vuelo y conéctela en el cable del fuselaje.<br />
3. La mayoría de los ajustes a las aletas de compensación a los alerones se pueden hacer con las palancas de compensación<br />
de los alerones del transmisor. Asegúrese que el bastón esté en neutral antes de realizar cualquier ajuste.<br />
4. Si no es suficiente hacer los ajustes con las palancas de compensación, y es necesario compensar los alerones de<br />
manera mecánica, necesitará hacer lo siguiente:<br />
a. Con el sistema de radio encendido, ponga las palancas de compensación y el bastón en posición neutral.<br />
b. Encuentre los pequeños tornillos en cada alerón (parte inferior de la superficie de mando).<br />
c. Afloje los tornillos hasta que la varilla de empuje se desprenda del balancín de control y mueva la superficie de mando<br />
del alerón a la posición neutral.<br />
d. Mantenga el alerón en neutral con una mano mientras vuelve a apretar el tornillo del balancín de control con la otra para<br />
que la superficie de mando permanezca en neutral cuando las palancas de compensación y el bastón estén en neutral.<br />
Si tiene alguna duda para realizar estos ajustes, por favor contacte al equipo local de apoyo de <strong>Horizon</strong>.<br />
18 19
Step 9<br />
Step 10<br />
Choosing a Flying Field<br />
• A large, open grassy field is required to fly your<br />
ParkZone ® <strong>Spitfire</strong> <strong>Mk</strong> <strong>IIB</strong>. Your <strong>Spitfire</strong> can achieve<br />
speeds greater than 60 km/h, so it covers ground fast.<br />
The choice of a large field will ensure greater success<br />
for your flight.<br />
• It is essential to have a minimum of 100 meters of<br />
clear space in all directions from the pilot.<br />
• Make certain that you do not fly near trees, buildings,<br />
or other areas that can restrict your view or interfere<br />
with your flying. NEVER fly near streets, parking lots,<br />
or people.<br />
200m<br />
WIND<br />
VENT<br />
VIENTO<br />
Optimal Flying Conditions<br />
You want to fly! However, you need to make sure that you<br />
fly in the conditions that will allow you to have the best<br />
success. This is when there is little to no wind (less than<br />
13 km/h).<br />
To check wind conditions:<br />
1. Tie the included red ribbon to the transmitter antenna.<br />
2. Hold the transmitter antenna so it is parallel to the<br />
ground and note how much the ribbon moves in the<br />
wind. If the ribbon hangs down, conditions are perfect<br />
to fly. There is some variance in the amount of wind<br />
that you can fly in, but if the angle between the antenna<br />
and the ribbon, when the antenna is parallel to the<br />
ground, is less than 20 degrees, it is too windy to fly.<br />
<br />
Français<br />
Stade 10. Conditions Optimales de Volr<br />
Français<br />
Stade 9. Choix du Terrain<br />
Vous voulez voler ! Si vous attendez que les conditions météo soient correctes, vous prendrez plus de plaisir. Pour vos<br />
premiers vols, un vent nul est conseillé.<br />
• Un grand champ recouvert d’herbe est le meilleur choix. Votre <strong>Spitfire</strong> <strong>Mk</strong> <strong>IIB</strong> vole à environ 60 km/h et parcourt donc une<br />
grande distance rapidement. Le champ doit être le plus grand possible.<br />
• Il est primordial d’avoir au minimum 100 mètres d’espace libre dans toutes les directions autour du pilote.<br />
• Ne pas voler à proximité d’arbres, d’édifices et de tout obstacle qui pourraient vous cacher le modèle ou interférer avec le<br />
vol. NE JAMAIS voler prés des rues, des parkings ou du public.<br />
Pour vérifier la vitesse du vent:<br />
1. Attacher le drapeau fourni à l’extrémité de l’antenne de l’émetteur.<br />
2. Tenir l’émetteur pour que l’antenne soit parallèle au sol et noter comment le drapeau flotte avec le vent. Si le drapeau<br />
pend vers le bas, les conditions de vol sont excellentes. Si l’angle entre l’antenne et le drapeau est inférieur à 20<br />
degrés, il y a trop de vent pour un pilote peu expérimenté.<br />
Italiano<br />
Passo 9. Scelta del Campo di Volo<br />
Italiano<br />
Passo 10. Condizioni di Volo Ottimali<br />
• Per volare serve un grande prato spazioso. Il <strong>Spitfire</strong> <strong>Mk</strong> <strong>IIB</strong> vola a più di 60 km/h e quindi si sposta velocemente. Più grande è il<br />
campo, meglio è. Scegliere un ampio spiazzo erboso.<br />
• E’ essenziale disporre di almeno 100 metri di spazio libero in ogni direzione.<br />
• Non volare sopra o vicino alle persone, linee elettriche, strade, ferrovie, veicoli, alberi, ghiaia, superfici dure o oggetti sui quali non si<br />
desidera entrare in collisione. MAI VOLARE in prossimità delle persone, strade o parcheggi.<br />
Español<br />
Paso 9. Selección de un Campo de Vuelo<br />
• Para volar su <strong>Spitfire</strong> <strong>Mk</strong> <strong>IIB</strong> de ParkZone ® es necesario hacerlo en un campo de hierba amplio y despejado. Su <strong>Spitfire</strong> puede alcanzar<br />
velocidades superiores a 60 km/h, por lo que recorre distancias rápidamente. Cuanto más grande sea el campo mejor.<br />
• Es importante contar por lo menos con 100m de espacio abierto en todas direcciones desde el punto del piloto.<br />
• Asegúrese de no volar cerca de árboles, edificios u otras áreas que pueden limitar su visión o interferir con el vuelo.<br />
NUNCA vuele cerca de calles, estacionamientos o personas.<br />
Vuoi volare! Sii paziente, hai bisogno che ci siano le condizioni che ti permettano di avere il migliore successo. Ciò si<br />
verifica quando c’è poco vento (meno di 13 km/h).<br />
Per misurare l’intensità del vento:<br />
1. Annoda il nastro rosso in cima all’antenna della trasmittente.<br />
2. Tenere la trasmittente in modo che l’antenna sia parallela al terreno e notare come si sposta il nastro a causa del<br />
vento. Se il nastro pende verticalmente le condizioni per volare sono perfette. Se invece l’angolo tra l’antenna ed<br />
il nastro è meno di 20° significa che c’è troppo vento per volare.<br />
Español<br />
Paso 10. Condiciones de Vuelo Óptimas<br />
Usted quiere volar. Sin embargo, debe comprobar que vuela en las condiciones que le permitirán tener el mayor éxito.<br />
Esto sucederá cuando haya muy poco o nada de viento (menos de 13 km/h).<br />
Para comprobar las condiciones de viento:<br />
1. Ate la cinta roja suministrada a la antena del transmisor.<br />
2. Ponga la antena del transmisor en posición paralela al suelo y observe cómo se mueve la cinta con el viento. Si la<br />
cinta queda inerte, las condiciones del tiempo son buenas para volar. Existe una variante en cuanto la potencia de<br />
viento con la que puede volar, pero si el ángulo entre la antena y la cinta es inferior a 20°, el viento es demasiado<br />
fuerte para volar.<br />
20 21
Step 11<br />
Italiano<br />
Passo 11. Prova della Portata<br />
Range Test<br />
You will need two people to perform the range test—one<br />
to hold the plane and the other to give the transmitter<br />
input.<br />
Warning: The person holding the plane should hold it in<br />
such a way that the propeller does not come into contact<br />
with any part of their clothing or body.<br />
1. One person should hold the transmitter, while the other<br />
person walks 100 paces away from the transmitter,<br />
with the airplane in hand.<br />
2. Be sure the throttle slider is in the “off” position.<br />
3. Extend the transmitter antenna completely and turn the<br />
transmitter on.<br />
4. Slide the battery into the fuselage, attach it to the lead<br />
from the fuselage and close the canopy.<br />
100 paces<br />
100 pas<br />
5. Advance the throttle. When the throttle slider is<br />
advanced, the propeller should spin quickly.<br />
6. As the first person moves the transmitter controls, the<br />
other person watches to be sure the airplane’s motor<br />
and tail controls operate smoothly. Make sure you<br />
check all parts of the controls—throttle, as well as<br />
moving the gimbal up and down, and side to side.<br />
Per eseguire questo test servono due persone: una per<br />
tenere il modello e l’altra per azionare la trasmittente.<br />
Attenzione: La persona che tiene il modello dovrebbe tenerlo<br />
in modo che l’elica non urti le parti del corpo o si impigli<br />
nei vestiti.<br />
1. Una persona tiene la trasmittente mentre l’altra si<br />
allontana di 100 passi dalla trasmittente tenendo in mano<br />
il modello.<br />
2. Assicurati che il cursore del gas si trovi sulla<br />
posizione “Off”.<br />
3. Estendere l’antenna della trasmittente e accenderla.<br />
4. Inserire la batteria nella fusoliera, collegarla al cavo<br />
che esce dalla fusoliera e chiudere la cappottina.<br />
5. Dare gas. Quando si muove la leva del gas l’elica<br />
dovrebbe iniziare a girare.<br />
100 passi<br />
100 pasos<br />
6. Mentre la prima persona muove entrambe le leve di<br />
comando della trasmittente, l’altra persona guarda se i<br />
servi sul modello funzionano correttamente. Assicurarsi<br />
di controllare tutti i comandi muovendo tutte le leve in<br />
ogni direzione.<br />
Français<br />
Stade 11. Test de Portée<br />
Español<br />
Paso 11. Prueba de Alcance<br />
Vous devez être deux pour effectuer le test de portée radio- un qui tient le modèle et l’autre qui actionne les leviers<br />
de l’émetteur.<br />
ATTENTION! La personne portant l’avion doit prendre garde de ne mettre aucune partie de son corps dans la zone de<br />
rotation de l’hélice.<br />
1. Une personne tient l’émetteur; l’autre personne s’éloigne de 100 pas avec le modèle.<br />
2. Vérifier que la commande des gaz est sur ‘Off’.<br />
3. Déployer entièrement l’antenne de l’émetteur et mettre ce dernier sous tension.<br />
4. Connecter la batterie de propulsion et fermer le capot.<br />
5. Dés que la commande des gaz est avancée, l’hélice doit tourner rapidement.<br />
6. Pendant que la première personne agit sur les commandes de l’émetteur, la seconde personne vérifie le bon<br />
fonctionnement des commandes. Vérifier le fonctionnement des différentes commandes en déplaçant le manche vers<br />
le haut et le bas et de chaque côté.<br />
Se requieren a dos personas para realizar la prueba de alcance: una para detener el avión y la otra para dar las órdendes<br />
desde el transmisor.<br />
Advertencia: La persona que sujeta el avión debe hacerlo de forma que la hélice no entre en contacto con ninguna parte<br />
de su ropa o de su cuerpo.<br />
1. Una persona deberá sostener el transmisor, mientras que la otra camina 100 pasos de distancia alejándose del<br />
transmisor, con el avión en mano.<br />
2. Compruebe que el mando deslizante del acelerador se encuentre en la posición “off” (apagado).<br />
3. Extienda completamente la antena del transmisor y enciéndalo.<br />
4. Deslice la batería en el fuselaje, conéctela al cable de éste y cierre la compuerta.<br />
5. Mueva el acelerador hacia delante. Cuando se hace el mando deslizante del acelerador hacia delante, la hélice debe<br />
girar rápidamente.<br />
6. Cuando la primera persona mueva los controles del transmisor, la otra persona deberá observar para comprobar que<br />
el motor y los controles de cola del avión funcionen suavemente. Verifique el funcionamiento de todos los controles, la<br />
aceleración, así como mover el bastón de arriba abajo y de lado a lado.<br />
22 23
REV<br />
ELEV AIL T/V<br />
SYSTEM<br />
Step 12<br />
First Flights<br />
The ParkZone ® 3-channel control system is designed for<br />
the experienced radio control pilot and is not intended for<br />
the inexperienced flyer. If you have successfully flown 3-<br />
channel <strong>Hobby</strong>Zone ® airplanes, then you should be ready<br />
for the ParkZone <strong>Spitfire</strong> <strong>Mk</strong> <strong>IIB</strong>. However, first-time pilots<br />
of the ParkZone <strong>Spitfire</strong> should seek the assistance of an<br />
experienced RC flyer until the additional third channel, pitch<br />
control, has been competently mastered. If you do not have<br />
experience with controlling the ailerons, it will be very helpful<br />
to have an experienced pilot with you when you first start to<br />
fly. Crash damage is not covered under the warranty.<br />
Français<br />
Stade 12. Premiers Vols<br />
Important: Initial flights should always be done with the<br />
airplane in Low Rate (Mode A). In this mode, there is some<br />
limitation to the travel of the control surfaces, helping to<br />
prevent you from over-control. After you have had several<br />
safe flights in Mode A, you can move on to Mode B, which<br />
will no longer limit the travel of the control surfaces.<br />
Note: It is possible to change flight modes while the plane<br />
is in flight. However, it is important that you have enough<br />
altitude while in flight before changing the flight mode.<br />
Le système de radiocommande 3 voies est destiné aux pilotes non débutants. Si vous avez déjà piloté des modèles<br />
comme les Firebird Outlaw, XL ou Commander, vous devez être capable de piloter ce modèle. Cependant, il est préférable<br />
de demander l’assistance d’un pilote expérimenté pour s’initier à l’utilisation de la troisième voie. Les dommages de crash<br />
et la perte de l’avion ne sont pas couverts par la garantie.<br />
Important : Les réglages du <strong>Spitfire</strong> <strong>Mk</strong> <strong>IIB</strong> ne doivent pas être modifiés pendant les premiers vols. Après quelques vols<br />
vous pourrez modifier les caractéristiques de vol en déplaçant la fixation des commandes sur les guignols ou en agissant<br />
sur les gouvernes.<br />
Note : Il est possible de modifier le mode pendant le vol mais attendre d’avoir atteint une altitude de sécurité avant de<br />
procéder au changement.<br />
Italiano<br />
Passo 12. Primi voli<br />
La radio a 3 canali ParkZone ® è concepita per il pilota con esperienza e non per i principianti. Se avete pilotato un modello<br />
ParkZone a 3 canali potete anche passare allo <strong>Spitfire</strong> MK <strong>IIB</strong>. Se non avete una grande esperienza è consigliabile farsi<br />
assistere da un pilota RC esperto finchè non avete preso confidenza col comando di cabra e picchia. Lo stesso se non si<br />
possiede esperienza di volo con gli alettoni. I danni dovuti a scassature non sono coperti da garanzia.<br />
Importante: I primi voli dovrebbero sempre avvenire con il modello regolato nel Low Rate (Modo A). In questo modo, ci<br />
sono delle limitazioni all’escursione dei comandi per evitare I comandi eccessivi. Dopo che avrai fatto diversi voli nel Modo<br />
A, potrai passare al Mode B che non limita più le escursioni delle parti mobili.<br />
Nota: É possibile cambiare il modo di pilotaggio in volo. Tuttavia è importante avere una quota sufficiente prima di<br />
cambiare il modo di volo.<br />
Step 13<br />
Mode Change Flight Control System<br />
Your <strong>Spitfire</strong> <strong>Mk</strong> <strong>IIB</strong> comes with the ability to change flight<br />
modes as you gain more experience and become more<br />
familiar with it. There are two modes, selectable from the<br />
transmitter, from which you can choose:<br />
Mode A (Low Rate) - Mode A is recommended for all<br />
first flights. The travel of both ailerons, as well as the<br />
elevator, will be limited in this mode, allowing you to<br />
become more familiar with your plane. The switch on top<br />
of the transmitter will be back when you are in this mode.<br />
Mode B (High Rate) - Mode B does not limit your<br />
control surface travel, allowing more aggressive flying<br />
Français<br />
and aerobatics. However, your <strong>Spitfire</strong> will also be more<br />
prone to crashes due to over-control if you are not<br />
careful. The switch on the transmitter will be toward the<br />
pilot when in this mode.<br />
Stade 13. Changement du Mode de Contrôle de Vol<br />
Votre <strong>Spitfire</strong> <strong>Mk</strong> <strong>IIB</strong> vous permet de changer de mode de vol après avoir acquis de l’expérience avec ce modèle. Les deux<br />
modes de contrôle de vol, sélectionnables à l’aide de l’interrupteur situé sur l’émetteur, sont :<br />
Mode A (Petit Débattement) - Ce mode est recommandé pour les premiers vols. La course des gouvernes est limitée<br />
pour vous permettre de vous familiariser avec votre avion. Dans ce mode, l’interrupteur doit être basculé vers l’arrière de<br />
l’émetteur.<br />
Mode B (Grand Débattement) - Ce mode ne limite pas la course des gouvernes et permet d’effectuer des figures acrobatiques.<br />
Une certaine expérience est donc nécessaire pour voler avec ce mode de contrôle. Dans ce mode, l’interrupteur<br />
doit être basculé vers l’avant de l’émetteur.<br />
Italiano<br />
Passo 13. Dispositivo di Cambio di Mode di Volo<br />
Low Rate = A<br />
High Rate = B<br />
Petits Débattements = A<br />
Grand Débattement = B<br />
Bassa Manovrabilità = A<br />
Alta Manovrabilità = B<br />
Velocidad Baja = A<br />
Velocidad Alta = B<br />
<strong>Spitfire</strong> <strong>Mk</strong> <strong>IIB</strong> possiede un dispositivo in grado di cambiare il modo di pilotaggio quando si acquista una certa esperienza.<br />
Questi due modi si possono selezionare direttamente dall’interruttore sulla trasmittente che permette di scegliere:<br />
Modo A (Bassa Manovrabilità) - Il Modo A è raccomandato per I primi voli. L’escursione delle superfici mobili è limitato<br />
permettendoti di familiarizzarti con il modello. In questo modo l’interruttore sul dorso della fusoliera è spostato all’indietro.<br />
Modo B (Alta Manovrabilità) - Modo B non limita più l’escursione delle parti mobili e permette un pilotaggio più<br />
aggressivo. D’altra parte sarà più facile rompere il P-51D Mustang per un eccesso di comando se non si sta attenti. In<br />
questo modo l’interruttore sul dorso della fusoliera è spostato in avanti verso il pilota.<br />
Español<br />
Paso 12. Vuelos Iniciales<br />
El sistema de control de 3 canales de ParkZone ® está diseñado para los pilotos con experiencia en radiocontrol, y no para<br />
aquéllos sin experiencia. Si ya ha volado con éxito aviones de 3 canales de <strong>Hobby</strong>Zone ® , entonces podrá volar el <strong>Spitfire</strong><br />
<strong>Mk</strong> <strong>IIB</strong> de ParkZone. Sin embargo, los pilotos con poca experiencia deberán pedirle ayuda a pilotos con experiencia en<br />
radiocontrol hasta que haya dominado el tercer canal adicional y el control de grado de inclinación. Si no tiene experiencia<br />
controlando alerones, será de gran utilidad que un piloto con experiencia vuele con usted en sus primeros vuelos. La<br />
garantía no cubre daños por choques.<br />
Importante: Los vuelos iniciales deben realizarse siempre a baja velocidad (Modo A). En este modo, existen algunas limitaciones<br />
en el desplazamiento permitido, lo que le evitará realizar sobrevirajes. Cuando haya realizado varios vuelos seguros en el<br />
Modo A, puede cambiar al Modo B y dejará de tener limitaciones en el desplazamiento de las superficies de control.<br />
Nota: Es posible cambiar modos de vuelo mientras el avión está volando. Sin embargo, es importante que tenga la<br />
suficiente altitud mientras esté volando antes de cambiar el modo de vuelo.<br />
Español<br />
Paso 13. Sistema de Control de Vuelo de Cambio de Modo<br />
Su <strong>Spitfire</strong> <strong>Mk</strong> <strong>IIB</strong> puede cambiar los modos de vuelo cuando adquiera más experiencia y se familiarice con ellos. Existen<br />
dos modos seleccionables con el transmisor que puede seleccionar:<br />
Modo A (Velocidad Baja) - El Modo A se recomienda para todos los primeros vuelos. El desplazamiento tanto de los<br />
alerones como del elevador se verá limitado en este modo, permitiéndole familiarizarse con su avión. El interruptor de la parte<br />
posterior del transmisor estará hacia atrás cuando esté en este modo.<br />
Modo B (Velocidad Alta) - El Modo B suprime los límites de desplazamiento de las superficies de control, permitiendo un<br />
vuelo más agresivo y acrobacias aéreas. Sin embargo, si no tiene cuidado, su <strong>Spitfire</strong> tendrá mayor riesgo de chocar por<br />
sobrevirajes. El interruptor del transmisor estará hacia el piloto cuando esté en este modo.<br />
24 25
Step 14<br />
Français Stade 14<br />
For your convenience, the ZX10 radio included with your<br />
<strong>Spitfire</strong> <strong>Mk</strong> <strong>IIB</strong> has been pre-programmed for use with the<br />
included battery (9-cell 10.8V Ni-MH). If you plan on only flying<br />
with the included battery pack, no changes will need to<br />
be made. Simply proceed through the Boot-Up process and<br />
you’re ready to fly. Proceed to the Teach-In process only if<br />
you plan to use an optional battery, such as an (2000mAh<br />
+) 11.1V Li-Po. The voltage cutoff must be changed to prevent<br />
damage to your Li-Po battery.<br />
Boot-Up<br />
1. With the battery disconnected from the receiver, and the<br />
transmitter turned on, move the throttle slide to the idle<br />
position. Leave it in this position and then connect the<br />
battery to the receiver.<br />
2. Wait for 2 seconds, and the motor will give one long tone<br />
to indicate the receiver is connected.<br />
3. After the long tone, you will hear a series of short tones<br />
to indicate the current cutoff setting.<br />
1 beep = 5.6V (7-cell Ni-MH)<br />
2 beep = 6.0V (2-cell Li-Po)<br />
3 beep = 9.0V (3-cell Li-Po)<br />
7 beep = 70% Smart Cut soft cutoff<br />
4. The receiver has now armed the motor, and when you<br />
move the slide upward, the motor will run.<br />
Teach-In from the Tx:<br />
1. With the battery disconnected from the receiver, and the<br />
transmitter turned on, move the throttle slide to full throttle<br />
position. Leave it in this position and then connect the<br />
battery to the receiver.<br />
2. Wait for 2 seconds, and you will hear one long tone to<br />
indicate the receiver is connected.<br />
3. You will next hear a series of short tones to indicate the<br />
current cutoff setting.<br />
1 beep = 5.6V (6–7-cell Ni-MH)<br />
2 beep = 6.0V (8–9-cell Ni-MH, 2-cell Li-Po)<br />
3 beep = 9.0V (3-cell Li-Po)<br />
7 beep = 70% Smart Cut soft cutoff<br />
4. Next, after indicating the current cutoff setting, wait 6<br />
seconds. There will be a long beep indicating you have<br />
successfully entered the programming mode.<br />
5. Once you have entered the programming mode, the programming<br />
menu will give the following selections:<br />
1 beep = menu item1 = 5.6V (6–7-cell Ni-MH)<br />
2 beep = menu item2 = 6.0V (8–9-cell Ni-MH, 2-cell Li-Po)<br />
3 beep = menu item3 = 9.0V (3-cell Li-Po)<br />
7 beep = menu item4 = 70% Smart Cut soft cutoff<br />
There will be a 4-second pause between each selection. To<br />
confirm a selection, move the throttle slider to the center<br />
position during the pause. You will then hear 4 short beeps<br />
indicating that a successful selection has been made.<br />
Note: If the slider is left in the full throttle position and upon<br />
reaching selection 4, no selection has been made, the programming<br />
menu will repeat. You may also scroll through the<br />
menu in reverse by moving the throttle slide to the full down<br />
position during any 4-second pause.<br />
6. Move the throttle slide to idle. The receiver has now<br />
armed the motor, and when you move the slide upward,<br />
the motor will run.<br />
This Rx/ESC will only have one jumper installed. With jumper<br />
installed, dual rates are activated. Removing the jumper (not<br />
recommended) will deactivate dual rates.<br />
Pour votre convenance, l’émetteur ZX10 livré avec votre<br />
<strong>Spitfire</strong> <strong>Mk</strong> <strong>IIB</strong> a été préprogrammé pour être utilisé avec<br />
la batterie incluse (9 élémentsl 10.8V Ni-MH). Si vous volez<br />
seulement avec cette batterie, aucun changement ne doit<br />
être fait. Procédez simplement à l’initialisation et vous êtes<br />
prêt à voler. Procédez à la programmation de l’émetteur<br />
seulement si vous utilisez une batterie en option, telle que<br />
la batterie Li-Po 11.1V 200mAh. La tension de coupure doit<br />
être changée pour empêcher des dommages à votre batterie<br />
Li-Po.<br />
Initialisation<br />
1. Avec la batterie de propulsion déconnectée et l’émetteur<br />
sous tension, placer le levier des gaz en position ralenti.<br />
Le laisser dans cette position et connecter la batterie de<br />
propulsion.<br />
2. Attendre 2 secondes et le moteur doit émettre un<br />
long signal sonore pour indiquer que le récepteur<br />
est connecté.<br />
3. Après ce signal sonore, vous devez entendre un série de<br />
courts signaux sonores qui indiquent le réglage de la tension<br />
de coupure.<br />
1 bip = 5,6V (Ni-MH 7 éléments)<br />
2 bip = 6,0V (Li-Po 2 éléments)<br />
3 bip = 9,0V (Li-Po 3 éléments)<br />
7 bip = 70% Tension de coupure courte<br />
4. Le récepteur active ensuite le moteur et quand vous<br />
poussez le levier des gaz, le moteur doit tourner.<br />
Programmation de l’émetteur :<br />
1. Avec la batterie de propulsion déconnectée et l’émetteur<br />
sous tension, placer le levier des gaz en position maximum.<br />
Le laisser dans cette position et connecter la batterie<br />
de propulsion.<br />
2. Attendre 2 secondes et le moteur doit émettre un<br />
long signal sonore pour indiquer que le récepteur<br />
est connecté.<br />
3. Vous devez entendre un série de courts signaux sonores<br />
qui indiquent le réglage de la tension de coupure.<br />
1 bip = 5,6V (Ni-MH 6-7 éléments)<br />
2 bip = 6,0V (Ni-MH 8-9 éléments / LiPo 2 éléments)<br />
3 bip = 9,0V (Li-Po 3 éléments)<br />
7 bip = 70% Tension de coupure courte<br />
4. Après émission de ces signaux sonores, attendre 6<br />
secondes. Un long signal sonore indique que vous etes<br />
en mode programmation.<br />
5. Dés que vous êtes en mode programmation, le menu<br />
vous propose les sélections suivantes :<br />
1 bip = menu 1=5,6V (Ni-MH 6-7 éléments)<br />
2 bip = menu 2=6,0V (Ni-MH 8-9 éléments/Li-Po 2 éléments)<br />
3 bip = menu 3=9,0V (Li-Po 3 éléments)<br />
7 bip = menu 4=70% Tension de coupure courte<br />
Il y a une pause de 4 secondes entre chaque sélection.<br />
Pour confirmer une sélection, déplacer le levier des gaz en<br />
position centrale pendant la pause. Vous devez entendre 4<br />
bips courts indiquant que la sélection est faite avec succès.<br />
Note : Si le levier des gaz reste en position maximum<br />
après la sélection 4, aucune sélection n’est faite et le menu<br />
de programmation recommence. Vous pouvez également<br />
repartir en arrière dans le menu en plaçant le levier des gaz<br />
vers le bas pendant la pause de 4 secondes.<br />
6. Placer le levier des gaz sur ralenti. Le récepteur active<br />
ensuite le moteur et quand vous poussez le levier des<br />
gaz, le moteur doit tourner.<br />
Le module récepteur/variateur a seulement un cavalier<br />
d’installé. Avec ce cavalier installé, le double débattement<br />
des gouvernes est activé. Retirer le cavalier (non recommandé)<br />
pour désactiver cette fonction.<br />
26 27
Italiano Passo 14 Español Paso 14<br />
Per comodità, la radio ZX10 dello <strong>Spitfire</strong> <strong>Mk</strong> <strong>IIB</strong> è già programmata<br />
per l’uso con la batteria di dotazione (9 celle<br />
10,8V Ni-MH). Se si usa questa batteria non occorre fare<br />
nulla. Basta avviare la procedura di avviamento e si è pronti<br />
per volare. Usare la procedura Teach-In solo se si desidera<br />
usare una batteria opzionale Li-Po da 11,1V e 2000 mAh<br />
o più. In tale caso bisogna variare la tensione di taglio per<br />
evitare danni alla batteria Li-Po.<br />
Accensione<br />
1. Con la batteria sconnessa dlla ricevente e la trasmittente<br />
accesa, spostare il cursore del gas sul minimo.<br />
Lasciandoin cursore n tale posizione collegare la batteria<br />
alla ricevente.<br />
2. Attendere 2 secondi ed il motore emetterà un beep prolungato<br />
per indicare che la ricevente è collegata.<br />
3. Dopo il beep prolungato si udiranno diversi beep brevi<br />
che indicano il settaggio della tensione di taglio.<br />
1 beep = 5.6V (7-celle Ni-MH)<br />
2 beep = 6.0V (2-celle Li-Po)<br />
3 beep = 9.0V (3-celle Li-Po)<br />
7 beep = 70% Smart Cut programma per il taglio graduale<br />
4. La ricevente adesso ha armato il motore e dando gas<br />
inizierà a funzionare.<br />
Informazioni dalla Trasmittente:<br />
1. Con la batteria sconnessa dalla Ricevente e la<br />
Trasmittente accesa, mettere il cursore del gas al massimo.<br />
Lasciare il gas al massimo e collegare la batteriaalla<br />
Ricevente.<br />
2. Attendere 2 secondi, si udrà un beep prolungato che<br />
indica che la Ricevente è collegata.<br />
3. Si odono poi brevi beep che indicano la attivazione della<br />
tensione di taglio.<br />
1 beep = 5.6V (6–7-celle Ni-MH)<br />
2 beep = 6.0V (8–9-celle Ni-MH, 2-cell Li-Po)<br />
3 beep = 9.0V (3-celle Li-Po)<br />
7 beep = 70% Smart Cut programma per il taglio graduale<br />
4. Dopo le indicazioni relative al taglio della batteria attendere<br />
6 secondi. Si udirà un lungo beep che indica che è<br />
iniziato il modo programmazione.<br />
5. Il menu di programmazione permette queste scelte:<br />
1 beep = scelta1 = 5.6V (6–7-celle Ni-MH)<br />
2 beep = scelta 2 = 6.0V (8–9-celle Ni-MH, 2-cell Li-Po)<br />
3 beep = scelta 3 = 9.0V (3-celle Li-Po)<br />
7 beep = scelta4 = Smart Cut programma per<br />
il taglio graduale<br />
Tra ogni scelta c’è una pausa di 4 secondi. Per confermare<br />
la selezione basta spostare il cursore dl gas durante la<br />
pausa. Quattro beep confermeranno che la scelta è stata<br />
eseguita con successo.<br />
Nota: Se il cursore del gas è lasciato al massimo e la programmazione<br />
4. non è stata fatta con successo il programma<br />
si ripete. Si può anche scorrere il menu al contrario<br />
mettendo il cursore al minimo durante una delle pause da 4<br />
secondi.<br />
6. mettere il cursore del gas al minimo. La ricevente ha<br />
armato il motore e dando gas il motore inizierà a girarre.<br />
La Ricevente/Regolatore dispone di un jumper. Con il jumper<br />
installato è attivato il Dual-Rate. Togliendo il jumper (non<br />
consigliato) si disattiva il Dual-Rate.<br />
Para su conveniencia, el radio ZX10 incluido con su <strong>Spitfire</strong><br />
<strong>Mk</strong> <strong>IIB</strong> ha sido programado para usarse con la batería que<br />
viene incluida (Ni-MH de 10.8V de 9 celdas). Si sólo planea<br />
volar con la batería que viene incluida, no necesitará hacer<br />
ningún cambio. Simplemente continúe con el proceso de<br />
arranque y estará listo para volar. Continúe con el proceso<br />
de Programación sólo si planea utilizar una batería opcional,<br />
como la Li-Po de 11.1V (2000mAh+). El corte de voltaje se<br />
debe cambiar para evitar daños a su batería Li-Po.<br />
Arranque<br />
1. Con la batería desconectada del receptor, y con el transmisor<br />
encendido, mueva el mando deslizante del acelerador<br />
a la posición inerte. Manténgalo en esta posición<br />
y después conecte la batería al receptor.<br />
2. Espere 2 segundos, y el motor emitirá un tono largo, el<br />
cual indica que el receptor está conectado.<br />
3. Después del tono largo, escuchará una serie de tonos<br />
cortos, los cuales le indicarán el modo de corte de<br />
corriente.<br />
1 pitido = 5.6V (Ni-MH de 7 celdas)<br />
2 pitidos = 6.0V (Li-Po de 2 celdas)<br />
3 pitidos = 9.0V (Li-Po de 3 celdas)<br />
7 pitidos = 70% corte de corriente inteligente<br />
4. El receptor ha armado ahora al motor, y cuando mueva<br />
el mando deslizante hacia arriba, el motor funcionará.<br />
Programación desde el transmisor:<br />
1. Con la batería desconectada del receptor, y con el transmisor<br />
encendido, mueva el mando deslizante del acelerador<br />
a la posición de máxima potencia. Manténgalo en<br />
esta posición y después conecte la batería al receptor.<br />
2. Espere 2 segundos, y el motor emitirá un tono largo, el<br />
cual indica que el receptor está conectado.<br />
3. Después escuchará una serie de tonos cortos, los cuales<br />
le indicarán el modo de corte de corriente.<br />
1 pitido = 5.6V (Ni-MH de 6 a 7 celdas)<br />
2 pitidos = 6.0V (Ni-MH de 8 a 9 celdas, Li-Po de 2 celdas)<br />
3 pitidos = 9.0V (Li-Po de 3 celdas)<br />
7 pitidos = 70% corte de corriente inteligente<br />
4. A continuación, después de que se indique el modo de<br />
corte de corriente, espere 6 segundos. Se escuchará un<br />
pitido largo el cual indica que ha logrado entrar adecuadamente<br />
en el modo de programación.<br />
5. Una vez que haya entrado al modo de programación, el<br />
menú de programación le dará las siguientes opciones:<br />
1 pitido = selección 1 del menú =<br />
5.6V (Ni-MH de 6 a 7 celdas)<br />
2 pitidos = selección 2 del menú =<br />
6.0V (Ni-MH de 8 a 9 celdas, Li-Po de 2 celdas)<br />
3 pitidos = selección 3 del menú =<br />
9.0V (Li-Po de 3 celdas)<br />
7 pitidos = selección 4 del menú =<br />
70% corte de corriente inteligente<br />
Habrá una pausa de 4 segundos entre cada selección.<br />
Para confirmar una selección, mueva el mando deslizante<br />
del acelerador a la posición central durantre la pausa.<br />
Escuchará entonces 4 pitidos cortos, los cuales indican que<br />
la selección se ha realizado adecuadamente.<br />
Nota: Si deja el mando deslizante en la posición de máxima<br />
potencia, y al llegar a la selección 4 no ha elegido ninguna<br />
de las opciones, se repetirá el menú de programación.<br />
También puede escuchar el menú al revés si mueve el<br />
mando deslizante del acelerador hasta abajo durante<br />
cualquiera de las pausas de 4 segundos.<br />
6. Mueva el mando del acelerador a la posición inerte. El<br />
recpetor ha armado ahora al motor, y cuando mueva el<br />
mando deslizante hacia arriba, el motor comenzará a<br />
funcionar.<br />
El Receptor/ESC tiene instalado un solo puente. Con este<br />
puente conductor se activan las velocidades duales. Si<br />
retira el puente conductor (no lo recomendamos) se desactivarán<br />
las velocidades duales.<br />
28 29
Step 15<br />
Italiano<br />
Passo 15. Lancio a Mano del <strong>Spitfire</strong><br />
Hand Launching the <strong>Spitfire</strong><br />
Your ParkZone ® <strong>Spitfire</strong> <strong>Mk</strong> <strong>IIB</strong> will need to be hand<br />
launched. To do this, follow these instructions:<br />
1. Make certain that the aircraft battery is fully charged.<br />
If it has been longer than 12 hours since you fully<br />
charged your Ni-MH battery, you’ll want to peak it<br />
again with your variable rate DC peak charger. See<br />
Step 2 for battery charging. If you’re using a Li-Po battery,<br />
please follow the charging directions for your<br />
Li-Po compatible charger.<br />
2. Turn on the transmitter, making certain you are in<br />
Mode A (Low Rate).<br />
3. Insert the battery into the fuselage and plug the battery<br />
lead into the lead coming from the fuselage.<br />
Secure the battery with the hook and loop straps.<br />
4. While holding the transmitter in one hand, push throttle<br />
slider to full on (up) with thumb.<br />
5. Take a couple of steps and FIRMLY launch directly into<br />
the wind while keeping the wings level. Do not throw it<br />
up or down. Point it level (parallel) with the ground<br />
when releasing.<br />
WIND<br />
VENT<br />
6. Keep steering into the wind and hold at full throttle<br />
in a slight climb until you have reached an altitude of<br />
at least 15 to 20 meters.<br />
7. When you have reached this altitude, it is safe to steer<br />
in the desired direction, as well as adjust the throttle<br />
input, to help control altitude and speed.<br />
Il ParkZone ® <strong>Spitfire</strong> <strong>Mk</strong> <strong>IIB</strong> deve venire lanciato a mano.<br />
Segui queste istruzioni:<br />
1. Aaicurarsi che la batteria del modello sia ben carica.<br />
Se sono trascorse più di 12 ore dalla ricarica completa<br />
conviene caricarla ancora un po’ con il caricabatterie a<br />
rateo variabile CC. Vedere il passo 2 per quanto riguarda<br />
la carica. Se si usano batterie Li-Po seguire le istruzioni<br />
del caricabatterie Li-Po.<br />
2. Accendere la trasmittente, assicurandosi che la trasmittente<br />
sia nel modo A (Low Rate).<br />
3. inserire la batteria nel modello collegandola al cavo che<br />
esce dalla fusoliera. Fissare la batteria col velcro.<br />
4. Tenendo la trasmittente con una mano, sposta il cursore<br />
del gas al massimo (in su) con il pollice.<br />
5. Fare un paio di passi e lanciare il modello CON<br />
DECISIONE controvento tenendo le ali parallele al terreno.<br />
Non lanciarlo verso l’alto o verso il basso. Lanciarlo<br />
parallelo al terreno.<br />
Español<br />
Paso 15. Lanzamiento Manual del <strong>Spitfire</strong><br />
VENTO<br />
VIENTO<br />
6. Tienilo puntato controvento e con il motore al massimo<br />
fallo salire moderatamente fino a raggiungere una quota<br />
di almeno 15-20 metri.<br />
7. Raggiunta tale quota puoi virare nella direzione voluta ed<br />
anche regolare il gas per mantenere la quota e la velocità.<br />
Français<br />
Stade 15. Lancement du <strong>Spitfire</strong><br />
Votre ParkZone ® <strong>Spitfire</strong> <strong>Mk</strong> <strong>IIB</strong> doit être lancé à la main, suivre la procédure suivante :<br />
1. Vérifier que la batterie de propulsion est entièrement chargée. Si votre batterie Ni-MH a été chargée depuis plus de 12<br />
heures, vous devez compléter sa charge avec le chargeur à courant variable. Se reporter au stade 2. Si vous utilisez<br />
une batterie Li-Po, suivre les instructions fournies avec le chargeur spécifique.<br />
2. Mettre l’émetteur sous tension en vérifiant que le Mode A est activé (faible débattement).<br />
3. Insérer la batterie de propulsion dans le fuselage et connecter sa prise. Fixer la batetrie avec la bande velcro.<br />
4. Tenir l’émetteur d’une main, pousser la commande des gaz à fond (vers le haut) et la maintenir avec le pouce.<br />
5. Prendre de l’élan sur deux pas et lancer directement le modèle contre le vent. Garder les ailes de niveau. Lancer avec<br />
une force modérée de préférence parallèlement au sol et ni trop haut, ni trop bas.<br />
6. Maintenir l’avion face au vent et laisser les gaz au maximum jusqu’à atteindre une altitude de 15-20 mètres environ.<br />
7. Quand cette altitude est atteinte, il est possible de changer de direction tout en utilisant la commande des gaz pour<br />
maintenir l’altitude et la vitesse.<br />
Su ParkZone ® <strong>Spitfire</strong> <strong>Mk</strong> <strong>IIB</strong> tendrá que lanzarse manualmente. Para hacerlo, siga estas instrucciones:<br />
1. Asegúrese que la batería del avión esté totalmente cargada. Si no han pasado más de 12 horas desde que cargó<br />
completamente su batería Ni-MH, querrá recargarla nuevamente con su cargador de corriente directa de velocidad<br />
variable con detección de picos. Consulte el Paso 2, Cargar la Batería. Si va a utilizar una batería Li-Po, por favor siga<br />
las instrucciones de su cargador compatible para batería Li-Po.<br />
2. Encienda el transmisor, asegurándose que se encuentra en el Modo A (velocidad baja).<br />
3. Inserte la batería en el fuselaje y conecte el cable de la batería con el cable que sale del fuselaje. Asegure la batería con<br />
el gancho y las tiras.<br />
4. Mientras sujeta el transmisor con una mano, empuje el mando deslizante del acelerador a máxima potencia (hacia<br />
arriba) con el pulgar.<br />
5. Tome unos cuantos pasos y lance FIRMEMENTE el avión contra el viento, manteniendo las alas niveladas. No lo lance<br />
hacia arriba o hacia abajo. Deberá estar en posición horizontal (paralelamente) con el suelo cuando lo suelte.<br />
6. Mantenga la dirección contra el viento y mantenga el avión en máxima potencia en una ligera ascensión hasta que haya<br />
alcanzado una altitud mínima de 15 a 21 m aproximadamente.<br />
7. Cuando haya alcanzado esta altitud, podrá maniobrar en la dirección deseada con seguridad, además de ajustar las<br />
órdenes del acelerador para ayudar a controlar la altitud y la velocidad.<br />
30 31
Step 16<br />
Italiano<br />
Passo 16. Consigli Utili per il Volo<br />
Helpful Hints for Flight:<br />
Your ParkZone ® <strong>Spitfire</strong> <strong>Mk</strong> <strong>IIB</strong> will need to be hand<br />
launched. To do this, follow these instructions:<br />
1. After launching, your <strong>Spitfire</strong> <strong>Mk</strong> <strong>IIB</strong> will climb at full<br />
throttle. Keep the throttle full on until you have reached<br />
an altitude of at least 15 meters. At the same time,<br />
make sure that you continue to keep the airplane flying<br />
directly into the wind.<br />
2. Make right and left adjustments, as necessary, to keep<br />
the plane headed directly into the wind. After you have<br />
reached approximately 30 meters of altitude, you can<br />
begin to make directional changes that you desire.<br />
3. Remember—control range is 760 meters. Do not allow<br />
the plane to get too far away from you. When the plane<br />
is farther away it is harder to see, and the higher you<br />
fly, the more the airplane will be affected by wind.<br />
4. Always keep the plane upwind from you. This way, it<br />
will not be carried away from you by the wind.<br />
5. Flying in winds that are too strong is by far the number<br />
one reason for those who are less experienced to crash<br />
or have fly-aways.<br />
6. Avoid holding the stick full right or left for more than<br />
two seconds, as this will cause the plane to enter a<br />
spiral dive that could cause you to crash your plane.<br />
7. Do not try to climb too fast by pulling all the way back<br />
on the stick (up elevator), or your plane may stall.<br />
Instead, climb by giving small amounts of elevator.<br />
8. Damage/bends to the wings or tail can greatly affect<br />
flight control. Replace damaged parts immediately.<br />
9. Once you have become more experienced and familiar<br />
with the <strong>Spitfire</strong>, you can switch from Mode A to Mode B.<br />
Mode B no longer limits the travel of the control surfaces.<br />
1. Dopo il decollo il <strong>Spitfire</strong> <strong>Mk</strong> <strong>IIB</strong> cabrerà a tutto motore.<br />
Dai tutto gas fino a che il modello ha raggiunto circa 15<br />
metri. Contemporaneamente cerca di mantenere il modello<br />
con il muso puntato contro vento.<br />
2. Esegui le opportune correzioni per mantenere il modello<br />
controvento. Raggiunti i 30 metri di quota potrai virare<br />
come preferisci.<br />
3. Ricorda—la portata della radio è 760 metri. Non permettere<br />
al modello di allontanarsi troppo. Quando il modello<br />
è lontano è difficile da vedere ed il vento è maggiore.<br />
4. Tieni sempre il modello sopra vento e davanti a te. In<br />
questo modo il modello non viene trascinato lontano<br />
dal vento.<br />
5. Volare col vento troppo forte è di gran lunga la causa<br />
principale di scassatura o di perdita del modello per chi<br />
ha poca esperienza di pilotaggio.<br />
6. Non mantenere lo stick tutto a destra o sinistra per più<br />
di un paio di secondi poichè il modello potrebbe entrare<br />
in spirale e cadere.<br />
7. Non cabrare troppo tirando tutta la leva indietro (cabra)<br />
poichè il modello potrebbe stallare. Invece fallo salire con<br />
una picola dose di elevatore.<br />
Español<br />
Paso 16. Consejos Útiles para Volar:<br />
8. Danni/pieghe dell’ala o della coda possono influire sulle<br />
caratteristiche di volo. Sostituisci sempre le parti<br />
danneggiate.<br />
9. Quando avrai familiarizzato con <strong>Spitfire</strong>, potrai passare<br />
dal Mode A al Mode B che non limita più ò’escursione<br />
delle parti mobili.<br />
Français<br />
Stade 16. Conseils Pour le Vol<br />
1. Après décollage, votre <strong>Spitfire</strong> doit continuer de monter à plein gaz pour atteindre une altitude de 15 mètres environ.<br />
Durant tout ce temps vous devez maintenir le modèle face au vent.<br />
2. Faire les ajustements nécessaires pour maintenir le modèle face au vent. Dès que vous avez atteint une altitude de 30<br />
mètres, vous pouvez changer de direction comme vous le souhaitez.<br />
3. Se rappeler que la portée radio est de 760 mètres. Eviter que l’avion dépasse cette distance. Au plus l’avion s’éloigne,<br />
au plus il est difficile de le voir et le vent a tendance à augmenter en altitude.<br />
4. Garder au maximum l’avion face au vent. Ceci évitera qu’il s’éloigne de vous trop rapidement.<br />
5. Voler par grand vent est la première cause de crash ou perte de modèle.<br />
6. Maintenir le manche vers la droite ou vers la gauche pendant plus de 2 secondes peut entraîner le modèle dans une<br />
spirale et causer sa perte.<br />
7. Ne pas essayer de grimper trop rapidement avec la commande de profondeur sous peine de décrochage de l’avion.<br />
8. Des dommages aux ailes ou à l’empennage peuvent affecter le contrôle du modèle.<br />
Remplacer les pièces endommagées.<br />
9. Avec un peu d’expérience, vous pourrez passer du mode A au mode B. Le mode B ne limite pas le débattement<br />
des gouvernes.<br />
1. Después del lanzamiento, su <strong>Spitfire</strong> <strong>Mk</strong> <strong>IIB</strong> ascenderá a máxima potencia. Mantenga la máxima potencia hasta que<br />
haya alcanzado una altitud aproximada de 15 m. Al mismo tiempo compruebe que sigue manteniendo el avión volando<br />
directamente contra el viento.<br />
2. Realice ajustes a derecha e izquierda según sea necesario para mantener el avión directamente contra el viento.<br />
Después de alcanzar 30 m. de altitud, puede empezar a realizar cambios direccionales según desee.<br />
3. Recuerde: el alcance de control es de 760 m. No permita que el avión se aleje demasiado de Ud. Si el avión se aleja<br />
demasiado resultará difícil verlo y si vuela muy alto los vientos son más fuertes.<br />
4. Mantenga siempre el avión contra el viento respecto a Ud. De este modo, el viento no lo arrastrará ni lo alejará.<br />
5. Volar con vientos muy fuertes es sin duda la razón número uno por la cual aquéllos con poca experiencia chocan o<br />
pierden sus aviones al ser arrastrados por el viento.<br />
6. Evite mantener el bastón totalmente a la derecha o a la izquierda durante más de dos segundos, ya que hará que el<br />
avión entre en espiral y puede estrellarse.<br />
7. No intente ascender demasiado rápido tirando completamente hacia atrás del bastón (elevador arriba) ya que el avión<br />
puede perder sustentación. En lugar de ello, ascienda accionando poco a poco el elevador.<br />
8. Los daños/ deformaciones de las alas o la cola pueden afectar enormemente al control de vuelo.<br />
Cambie inmediatamente las piezas dañadas.<br />
9. Cuando tenga más experiencia y esté familiarizado con el <strong>Spitfire</strong>, puede cambiar del Modo A al Modo B.<br />
El Modo B no limita el recorrido de las superficies de control.<br />
32 33
Step 17<br />
Throttle Adjustment:<br />
1. Climb to a minimum altitude of 15 to 20 meters at full throttle.<br />
2. To achieve and maintain a level “cruising” altitude, reduce the power by moving the throttle slider down to<br />
approximately 70% of full on. The throttle slider is proportional, so you can add or reduce throttle in small increments,<br />
as needed, to maintain the altitude that you desire.<br />
3. To reduce altitude, reduce the throttle, and to increase altitude, increase the throttle.<br />
Step 18<br />
Using Elevator:<br />
Your ParkZone ® <strong>Spitfire</strong> <strong>Mk</strong> <strong>IIB</strong> is equipped with a third channel for elevator (pitch control). Pulling back on the stick provides<br />
up elevator. Pulling too far back on the elevator to climb too quickly will cause the airplane to enter a stall (make<br />
the nose of the plane come down). To avoid crashing from a stall, always maintain enough altitude to recover. Just after<br />
a stall has occurred, the nose of the airplane will fall and the plane will look like it is diving. To pull out of a stall, simply<br />
pull back slowly on the stick (partial up elevator) once your <strong>Spitfire</strong> has built up airspeed as it decreases in altitude.<br />
Remember, pulling back too quickly or for too long will once again cause the airplane to enter a stall. Effectively avoiding<br />
and recovering from stalls requires experience. Always seek the help of an experienced radio control pilot if you are not<br />
familiar with pitch control. Failure to do this could result in a crash and significant damage to your airplane.<br />
Français<br />
Full Throttle<br />
Plein gaz<br />
Tutto gas<br />
Plena potencia<br />
Approx. 70% Throttle<br />
Environ 70% des gaz<br />
Circa il 70% del motore<br />
Aproximadamente<br />
70% de potencia<br />
Stade 17. Réglage des Gaz<br />
Reduced Throttle<br />
Gaz réduit<br />
Gas ridotto<br />
Potencia reducida<br />
Full Throttle<br />
Plein gaz<br />
Tutto gas<br />
Plena potencia<br />
1. Faire monter le modèle à une altitude de 15-20 mètres ou plus en plein gaz.<br />
2. Pour atteindre et maintenir une altitude de croisière, réduire les gaz à 70% de la course. La commande des gaz est<br />
proportionnelle ce qui permet de maintenir l’altitude par de petits mouvements de la commande.<br />
3. Pour descendre en altitude, réduire les gaz. Pour augmenter l’altitude, augmenter les gaz.<br />
Italiano<br />
Español<br />
Passo 17. Regolazione del Gas<br />
1. Salire a 15-20 metri o più di quota a tutto gas.<br />
2. Per ottenere la velocità “di crociera” riduci il gas muovendo il cursore del gas a circa il 70%. Il cursore è proporzionale<br />
così potrai dare o togliere un po’ di gas fino ad ottenere quanto desiderato.<br />
3. Per perdere quota, ridurre il gas. Per salire, aumenta il motore.<br />
Paso 17. Ajuste del acelerador<br />
1. Ascienda a una altitud de 15-20 m o más con el acelerador a máxima potencia.<br />
2. Para alcanzar y mantener una altitud “de crucero” nivelada, reduzca la potencia moviendo el mando deslizante del a<br />
celerador hacia abajo aproximadamente al 70% de la máxima potencia. El mando deslizante del acelerador es proporcional,<br />
por lo que puede aumentar o reducir el acelerador en pequeños incrementos, según sea necesario, para mantener<br />
la altitud que desee.<br />
3. Para reducir la altitud, reduzca la potencia del acelerador. Para aumentar altitud, aumente el acelerador.<br />
Français<br />
Stade 18. Utilisation de la Profondeur:<br />
Votre <strong>Spitfire</strong> <strong>Mk</strong> <strong>IIB</strong> est équipé d’une troisième voie pour la profondeur. Le fait de tirer sur le levier de commande fait<br />
monter la gouverne vers le haut. Ceci est nécessaire pour raccourcir les décollages, arrondir les atterrissages, augmenter<br />
le taux de montée, etc. Toutefois, un trop grand mouvement peut entraîner un décrochage. Pour éviter le crash après un<br />
décrochage, toujours maintenir l’avion à une altitude de sécurité. Juste après qu’un décrochage se soit produit, le nez de<br />
l’avion piquera et l’avion plongera. Pour sortir d’un décrochage, tirez lentement sur le levier de profondeur pendant que<br />
votre <strong>Spitfire</strong> prend de la vitesse. Ne pas tirer trop rapidement sur le levier sous peine de causer un nouveau décrochage.<br />
Se faire assister par un pilote expérimenté est de loin la meilleure solution pour éviter un crash et la perte du modèle.<br />
Italiano<br />
Passo 18. Uso dell’elevatore:<br />
Lo <strong>Spitfire</strong> <strong>Mk</strong> <strong>IIB</strong> ParkZone ® dispone di un terzo canale per il comando dell’elevatore. Muovendo lo stick verso il pilota si<br />
da un comando a cabrare. Tirando troppo si provoca lo stallo del modello (che fa cadere i muso del modello). Per evitare<br />
cadute dovute allo stallo tenere sempre una quota di sicurezza. Quando il modello stalla il muso del modello si abbassa<br />
bruscamente ed il modello sembra fare una picchiata. Per uscire dallo stallo basta semplicemente dare un po’ di comando<br />
a cabrare (elevatore) quando il modello ha guadagnato una velocità sufficiente. Ricordarsi che dando troppo elevatore si<br />
provoca una nuova entrata in stallo. In partica l’uscita dallo stallo richiede un po’ di esperienza. Si consiglia di cercare l’aiuto<br />
di di un pilota con esperienza per i primi voli con il comando di profondità. Facendo da soli si rischia di scassare il modello<br />
anche in modo definitivo.<br />
Español<br />
Paso 18. Uso del Elevador:<br />
Su <strong>Spitfire</strong> <strong>Mk</strong> <strong>IIB</strong> de ParkZone ® está equipado con un tercer canal para el elevador (control de grado de inclinación). Al<br />
hacer hacia atrás el bastón, hace que el elevador vaya hacia arriba. Pero si mueve demasiado el elevador hacia atrás para<br />
subir rápidamente, hará que el avión pierda sustentación (la nariz del avión se irá hacia abajo). Para evitar estrellarse cuando<br />
pierde velocidad, mantenga siempre suficiente altitud para poderse recuperar. En cuanto pierde velocidad, la nariz del<br />
avión se va hacia abajo y parece que el avión está cayendo en picada. Para elevar nuevamente al avión, mueva lentamente<br />
el bastón hacia atrás (elevador parcialemente hacia arriba) una vez que su <strong>Spitfire</strong> tiene mayor velocidad aérea y menos<br />
altitud. Recuerde que si mueve el bastón demasiado rápido o por demasiado tiempo hará que el avión pierda nuevamente<br />
velocidad. Para evitar y recuperarse de las pérdidas bruscas de velocidad requiere experiencia. Pida siempre ayuda a un<br />
piloto experimentado en radiocontrol si no está familiarizado con el control de grado de inclinación. De no hacerlo, podrá<br />
estrellar su avión o causarle graves daños.<br />
34 35
Step 19<br />
Italiano<br />
Passo 19. Atterraggio del <strong>Spitfire</strong><br />
Landing Your <strong>Spitfire</strong><br />
When you begin to notice that your <strong>Spitfire</strong> <strong>Mk</strong> <strong>IIB</strong> no<br />
longer climbs well under full power (normally after approximately<br />
10–12 minutes), the battery is getting low and it<br />
is time to land. Bring your aircraft directly into the wind<br />
and toward the desired landing spot. Gradually reduce<br />
throttle (and give a small amount of down elevator if you<br />
choose) to reach an altitude of approximately 3 meters. At<br />
this point, reduce the throttle even more until it is eventually<br />
at no throttle and your <strong>Spitfire</strong> should glide in softly<br />
for a landing. To avoid damage to your aircraft, land on a<br />
smooth soft surface, such as grass.<br />
Expert Tip: As you get better and more experienced at<br />
flying, try adding a bit of “up” elevator just prior to landing<br />
to “flare” the plane. With some practice, your landings<br />
should become smooth and on target.<br />
WARNING: Do not attempt to catch the airplane or injury<br />
may occur. Remember, there is a spinning propeller on the<br />
front of the plane that can cause injury! Also, remember<br />
to cut power to the motor right before landing to prevent<br />
damage to the propeller.<br />
Quando si inizia a notare che il <strong>Spitfire</strong> <strong>Mk</strong> <strong>IIB</strong> non sale più<br />
bene a tutta potenza (normalmente dopo circa 12–15<br />
minuti), significa che la batteria si sta scaricando e che è<br />
ora di atterrare. Fai scendere il <strong>Spitfire</strong> <strong>Mk</strong> <strong>IIB</strong> , direttamente<br />
controvento verso il punto di atterraggio desiderato. (Riduci<br />
gradualmente il “gas” fino alla quota di circa 3 metri). A<br />
quel punto, riduci ancora di più il motore e fai planare dolcemente<br />
il <strong>Spitfire</strong> <strong>Mk</strong> <strong>IIB</strong> all’atterraggio. Per evitare danni al<br />
modello scegli una zona erbosa o morbida.<br />
Suggerimento dell’esperto: Man mano che si migliora<br />
e si diventa più esperti nel volo, provare a dare un po’ di<br />
elevatore in più appena prima di atterrare per “richiamare”<br />
l’aeroplano. Con un po’ di pratica, gli atterraggi diventeranno<br />
dolci e nel punto desiderato.<br />
AVVERTENZA: Non tentare di afferrare l’aeroplano in volo,<br />
c’è il pericolo di ferirsi. Ricordarsi che sull’aeroplano c’è<br />
un’elica che gira che può provocare lesioni! Inoltre, accertati<br />
di togliere la potenza al motore immediatamente prima<br />
dell’atterraggio per evitare i danni all’elica.<br />
Français<br />
Stade 19. Atterrissage du <strong>Spitfire</strong><br />
Español<br />
Paso 19. Aterrizaje del <strong>Spitfire</strong><br />
Quand votre modèle grimpe moins vite en plein gaz (normalement après 10 à 12 minutes de vol environ), cela indique<br />
que votre batterie devient faible et il est temps d’atterrir. Aligner le modèle face au vent et en direction de la zone<br />
d’atterrissage. A une altitude de 3 mètres, ramener progressivement la commande des gaz jusqu’à arrêt du moteur. Votre<br />
<strong>Spitfire</strong> <strong>Mk</strong> <strong>IIB</strong> planera jusqu’à l’atterrissage. Pour ne pas abîmer votre modèle, vous devez atterrir sur de l’herbe rase. De<br />
l’herbe trop haute peut freiner brusquement l’avion et endommager l’hélice et son axe.<br />
Conseil d’expert : Avec un peu d’expérience de vol, vous pourrez remettre un peu de profondeur juste avant<br />
l’atterrissage. Cela vous donnera plus de précision dans la zone d’atterrissage.<br />
ATTENTION : Ne pas essayer d’attraper l’avion sous peine de vous blesser. S’assurer que le moteur est arrêté avant que<br />
le modèle touche le sol pour éviter d’endommager l’hélice.<br />
Cuando empiece a notar que su <strong>Spitfire</strong> <strong>Mk</strong> <strong>IIB</strong> ya no asciende bien a máxima potencia (normalmente después de 10-12<br />
minutos aproximadamente), la batería está baja y es el momento de aterrizar. Lleve el <strong>Spitfire</strong> <strong>Mk</strong> <strong>IIB</strong> directamente contra<br />
el viento y hacia el punto de aterrizaje deseado. Reduzca gradualmente la potencia (además de aplicar una pequeña cantidad<br />
de elevador hacia abajo, si lo desea) para alcanzar una altitud de aproximadamente 3 m. En este punto, reduzca más<br />
todavía más la potencia casi a cero y el <strong>Spitfire</strong> <strong>Mk</strong> <strong>IIB</strong> planeará suavemente para aterrizar. Para evitar daños en su avión,<br />
aterrice en una superficie suave y lisa como la hierba.<br />
Consejo experto: Cuando adquiera más experiencia de vuelo, pruebe añadir un poco de elevador hacia “arriba” justo<br />
antes del aterrizaje para “enderezar” el avión. Con un poco de práctica, sus aterrizajes serán más suaves y precisos.<br />
ADVERTENCIA: No intente atrapar el avión, ya que puede sufrir heridas. Recuerde que delante del avión se encuentra la<br />
hélice en rotación y puede causar heridas. No olvide además desconectar la potencia del motor justo antes de aterrizar<br />
para evitar daños a la hélice.<br />
36 37
Step 20<br />
Aerobatic Flight<br />
Your <strong>Spitfire</strong> <strong>Mk</strong> <strong>IIB</strong> comes out of the box with the controls set for softer responses and with the clevis attached to the<br />
outer holes of the control horns on the control surfaces. However, once you get used to the flight characteristics and<br />
want to perform more aerobatic maneuvers, you can change the amount of throw that is permitted by moving the clevises<br />
to the inner holes of the control horns and switching to Mode B. After making any adjustments, always turn on the<br />
transmitter and center the transmitter trim levers, making sure the control surfaces are adjusted evenly. If they are not<br />
even, refer to Steps 5 and 8 for trimming the control surfaces.<br />
Note: By making these changes, the controls will be much more responsive. This makes the airplane much less forgiving<br />
and easier to stall. Remember, crash damage is not covered under the warranty.<br />
Français<br />
Stade 20. Vol Acrobatique<br />
Votre <strong>Spitfire</strong> est livré avec les commandes connectées sur les trous extérieurs des guignols des gouvernes. Pour pouvoir<br />
effectuer des vols acrobatiques, il faudra déplacer les commandes vers le trou intérieur des guignols et passer en Mode<br />
B. Après avoir fait ces ajustements, mettre l’émetteur sous tension, centrer les leviers de trim et vérifier la position des<br />
gouvernes. Si nécessaire, se reporter aux Stades 5 et 8 pour corriger la position des gouvernes.<br />
NOTE : En rendant les contrôles plus sensibles, le Super Cub deviendra aussi moins indulgent et cela augmentera les<br />
risques de crash. Les dégâts causés par un crash ne sont pas couverts par la garantie.<br />
Italiano<br />
Passo 20. Volo Acrobatico<br />
Lo <strong>Spitfire</strong> <strong>Mk</strong>. <strong>IIB</strong> arriva già settato per un pilotaggio dolce e con i rinvii fissati al foro più esterno delle squadrette delle superfici<br />
mobili. Fatta pratica di pilotaggio è possibile l’escursione delle superfici mobili per eseguire le figure acrobatiche. Si<br />
può passare al Modo b e spostare i rinvii nei fori delle squadrette più interni. Dopo aver fatto queste regolazioni accendere<br />
sempre la trasmittente e centrare gli stick ed i trim in modo che le parti mobili siano livellate alle parti fisse. Se così non<br />
fosse andare ai passi 5 ed 8 per vedere come fare.<br />
Step 21<br />
Repairing Minor Damage<br />
If you happen to crash, and part of the tail or wing breaks, you can repair the damage by using packing tape to cover the<br />
missing pieces. However, if the damage is severe, or if the wings and/or tail are bent, replace the damaged parts prior to<br />
flying again. See the last few pages of the manual for a complete list of replacement parts for your <strong>Spitfire</strong> <strong>Mk</strong> <strong>IIB</strong>.<br />
Français<br />
Stade 21. Réparation de Dommages Mineurs<br />
En cas de crash, il est possible de réparer de petits dommages à l’empennage ou à l’aile avec du ruban adhésif. Cependant,<br />
si les dommages sont trop importants, le remplacement des pièces est vivement conseillé. Voir la liste des pièces<br />
détachées.<br />
Italiano<br />
Passo 21. Riparazione dei Piccoli Danni<br />
Se capita un incidente e si rovina una parte di ala o di coda si può riparare il danno con nastro da pacco per ricoprire le<br />
parti danneggiate. Tuttavia se il danno è grosso o se l’ala o la coda è piegata, sotituire la parte prima di volare di nuovo.<br />
Alla fine del manuale si trova l’elenco delle parti di ricambio dello <strong>Spitfire</strong> <strong>Mk</strong> <strong>IIB</strong>.<br />
Español<br />
Paso 21. Reparación de Daños Menores<br />
Si choca su avión, y parte de la cola o del ala se rompen, puede reparar el daño utilizando cinta de empaque para cubrir<br />
las partes faltantes. Sin embargo, si el daño es severo, o si las alas y/o la cola están dobladas, reemplace las partes dañadas<br />
antes de volver a volar. Consulte las últimas páginas de este manual las cuales contienen una lista completa de partes<br />
de repuesto para su <strong>Spitfire</strong> <strong>Mk</strong> <strong>IIB</strong>.<br />
Nota: dopo aver effettuato le modifiche per il volo acrobatico il modello diventa molto più sensibile e meno tollerante agli<br />
errori di pilotaggio. Anche più facile allo stallo. Ricordarsi che i danni derivanti da incidenti di volo non sono coperti dalla<br />
garanzia.<br />
Español<br />
Paso 20. Vuelo Acrobático<br />
Su <strong>Spitfire</strong> <strong>Mk</strong> <strong>IIB</strong> viene de fábrica con los controles ajustados para respuestas más suaves y con la abrazadera colocada<br />
en los orificios externos de los balancines de control en las superficies de mando. Sin embargo, una vez que se acostumbre<br />
a las características de vuelo y desee realizar maniobras acrobáticas, puede cambiar la cantidad de fuerza permitida<br />
al mover las abrazaderas a los orificios internos de los balancines de control y cambiando al Modo B. Después de hacer<br />
los ajustes, encienda siempre el transmisor y coloque las palancas de compensación del transmisor en la posición central,<br />
asegurándose que las superficies de mando estén ajustadas uniformemente. Si no lo están, consulte los Pasos 5 y 8 para<br />
compensar las superficies de mando.<br />
Nota: Al realizar estos cambios los controles tendrán mas movimiento. Sin embargo esto hace que el avión sea menos<br />
estable y podrá desplomarse fácilmente. Recuerde que daños por causa de un accidente no están cubiertos dentro de la<br />
garantía.<br />
38 39
1. Read and follow this manual completely, observing all<br />
instructions and safety directions. Otherwise, serious<br />
injury and damage can occur. Think about your safety,<br />
and the safety of others, first.<br />
2. Keep the propeller away from body parts and clothing,<br />
even when it isn’t spinning, as it could be turned on by<br />
accident. Beware of hair becoming entangled in the propeller,<br />
especially while launching your plane.<br />
3. Do not fly when it’s too windy or you may lose control<br />
and crash, causing injury or damage. Never fly near<br />
people, vehicles, train tracks, buildings, power lines,<br />
water, hard surfaces or trees. Never allow anyone to<br />
attempt to catch the airplane while it’s in flight or serious<br />
injury may result.<br />
4. Adult supervision for flying and battery charging is recommended<br />
for pilots age 14 and younger.<br />
5. Only use a battery charger that is Ni-MH compatible<br />
to charge the flight battery. Never leave the charger<br />
unattended while charging. This will help prevent overcharging<br />
and make sure damage does not occur to the<br />
battery, charger or any other property. While charging,<br />
1. Don’t fly in winds over 15 km/h! If you are a less experienced<br />
pilot, this is especially important.<br />
2. A pilot who has never flown a 3-channel plane with pitch<br />
control should get help from an experienced radio control<br />
pilot during first flights. Pilots who have not flown<br />
a 3-channel plane at all should not fly unless an experienced<br />
RC pilot is present to guide them.<br />
3. Choose your flying field carefully—grass and soft<br />
ground with a 180-meter diameter of open space is<br />
optimal for flying and will lengthen the life of your airplane.<br />
Make sure there are no obstacles that will get in<br />
your way when flying, such as trees or buildings. Make<br />
sure you do not fly where there are pedestrians who<br />
could be hurt by the airplane.<br />
4. Remember that holding the stick full over for too long<br />
can cause the airplane to spiral dive and crash. At the<br />
very first sign of the plane beginning to spiral down,<br />
immediately release the stick and give the opposite turn<br />
control to the spiral, then pull back on the elevator gently<br />
to level flight and level the wings.<br />
Warnings and Safety<br />
Success Tips<br />
place the battery on a heat-resistant surface. Do not lay<br />
it on carpet or upholstery while charging. If you are using<br />
a Li-Po battery to fly your <strong>Spitfire</strong> <strong>Mk</strong> <strong>IIB</strong>, you will need to<br />
use a Li-Po compatible charger for that battery pack.<br />
6. Never cut into the battery, charger, or airplane wires or<br />
serious injury may occur. Causing the battery to “short<br />
out” (crossing negative and positive bare wires) can<br />
cause fire, serious injury and damage.<br />
7. Hold the plane securely when the flight battery is<br />
plugged in, and keep all body parts away from the<br />
propeller. When you finish flying your airplane, always<br />
unplug the battery before you turn off the transmitter.<br />
8. Never fly on the same frequency as another RC vehicle<br />
in your area. The frequency of the airplane is shown<br />
on stickers on the back of the transmitter and on the<br />
airplane.<br />
9. If you decide to power your <strong>Spitfire</strong> <strong>Mk</strong> <strong>IIB</strong> with a Li-Po<br />
battery, follow the instructions and warnings included<br />
with the battery and charger. ALWAYS unplug and<br />
remove your battery after flying.<br />
5. Don’t attempt to fly or do maneuvers beyond your flying<br />
abilities. Seek the assistance of an experienced pilot<br />
when trying new maneuvers that are more extreme and<br />
involve fast flight.<br />
6. If you’re gliding with the motor off, allow your plane<br />
more area for turns.<br />
7. Position yourself at your flying field so that you keep the<br />
sun at your back and out of your eyes. Wear sunglasses<br />
on bright days.<br />
8. Keep the aircraft upwind, especially on windier days, to<br />
prevent it from “flying away.” The wind is normally stronger<br />
at higher altitudes than it is on the ground.<br />
9. Keep your plane in front of you so you don’t have to<br />
turn in circles as you fly. Try to avoid flying directly<br />
overhead.<br />
1. Lire et suivre entièrement ce manuel, en observant<br />
toutes les règles et conseils de sécurité. Dans le cas<br />
contraire, des blessures ou des dommages peuvent<br />
survenir. Pensez tout d’abord à votre sécurité.<br />
2. Toujours garder l’hélice loin de toute partie de votre<br />
corps, même quand elle ne tourne pas car vous ou une<br />
autre personne peut mettre le moteur en route par accident.<br />
Se méfier de ne pas se prendre les cheveux dans<br />
l’hélice surtout par jour venteux.<br />
3. Ne pas voler quand il y a trop de vent sous peine de<br />
perdre le contrôle de votre modèle et causer un accident<br />
avec des blessures et des dommages. Ne jamais<br />
faire voler le modèle à proximité d’autres personnes, de<br />
véhicules, de routes, de voies ferrées, de bâtiments, de<br />
ligne électriques, de l’eau, de surface dure ou d’arbres.<br />
Ne jamais permettre à quelqu’un d’essayer d’attraper le<br />
modèle en vol sous peine de blessures sérieuses.<br />
4. La présence d’un adulte est obligatoire pour les pilotes<br />
âgés 14 ans ou moins<br />
5. Utiliser seulement un chargeur prévu pour la batterie du<br />
modèle. Ne jamais laisser le chargeur sans surveillance<br />
pendant la charge. Cela permet d’éviter les surcharges<br />
1. La règle pour les débutants : ne pas voler avec un vent<br />
de plus de 15 km/h.<br />
2. Les pilotes n’ayant jamais utilisé un modèle 3 voies<br />
avec contrôle des ailerons doivent se faire assister par<br />
un pilote expérimenté pour les premiers vols.<br />
3. Choisir un champ recouvert d’herbe, en terre meuble et<br />
d’un diamètre de 180 mètres minimum pour voler dans<br />
des conditions optimales et allonger la vie de votre<br />
Modèle.<br />
3. Tenir le manche trop longtemps d’un côté ou de l’autre<br />
peut entraîner le <strong>Spitfire</strong> dans une vrille et causer un<br />
crash. Au premier signe de basculement ou de départ<br />
de vrille, relâcher immédiatement le manche droit ou le<br />
passer dans le côté opposé pour redresser l’aile.<br />
5. Ne pas voler au delà de vos capacités sans l’assistance<br />
d’un pilote expérimenté.<br />
Règles de Sécurité<br />
Conseils<br />
et d’endommager la batterie, le chargeur ou d’autres<br />
éléments. Pendant la charge, placer la batterie sur une<br />
surface thermorésistante. Ne jamais poser la batterie<br />
sur de la moquette pendant la charge. Avec une batterie<br />
LiPo, vous devez utiliser exclusivement un chargeur<br />
spécifique pour ce type de batterie.<br />
6. Ne pas couper ou dénuder les câbles de la batterie,<br />
du chargeur ou de l’avion pour éviter de provoquer un<br />
court-circuit et causer un feu, des blessures sérieuses<br />
et des dégâts<br />
7. Tenir le modèle fermement et garder constamment<br />
la zone de rotation de l’hélice libre de tout obstacle.<br />
Après le vol, toujours débrancher la batterie de propulsion<br />
avant de mettre l’émetteur hors tension.<br />
8. Ne jamais voler sur la même fréquence qu’un autre<br />
pilote. La fréquence de votre modèle est indiquée sur<br />
les autocollants au dos de l’émetteur et sur le côté du<br />
fuselage.<br />
9. Si vous utilisez une batterie Li-Po, suivre attentivement<br />
les instructions fournies avec la batterie et le chargeur<br />
pour éviter tout incident. TOUJOURS sortir et débrancher<br />
votre batterie après le vol.<br />
6. Quand le moteur est coupé, le modèle a besoin de plus<br />
d’espace pour tourner.<br />
7. Se positionner pour avoir le soleil dans le dos et le<br />
modèle fac à vous.<br />
8. Toujours garder le modèle face au vent, surtout quand<br />
ce dernier est important. Se souvenir que le vent est<br />
toujours plus fort en altitude par rapport au sol.<br />
9. Faire évoluer votre modèle devant vous pour éviter de<br />
vous retourner pour le suivre. Essayez d’éviter de voler<br />
directement au-dessus de vous.<br />
40 41
1. Leggi e segui quanto c’è scritto in questo manuale e nel<br />
video. Segui tutte le istruzioni, i consigli sulla sicurezza.<br />
Non facendo questo c’è il rischio di danni o di ferite<br />
anche serie. La sicurezza deve venire innanzitutto.<br />
2. Tenere l’elica distante dal corpo e dai vestiti, anche<br />
quando è ferma, dato che potrebbe partire accidentalmente.<br />
Attenzione ai capelli che potrebbero impigliarsi<br />
nell’elica specie durante il lancio del modello.<br />
3. Non volare se c’è troppo vento, potresti perdere il controllo<br />
ed il modello potrebbe cadere provocando danni<br />
ed anche ferite. Non fare volare vicino alle persone,<br />
veicoli, rotaie del treno, edifici, linee elettriche, acqua,<br />
superfici dure od alberi. Non permettere a nessuno di<br />
prendere il modello al volo, potrebbe ferirsi anche<br />
seriamente.<br />
4. Ai piloti di 14 anni o meno è consigliata la supervisione<br />
di un adulto.<br />
5. Usare solo un caricabatterie compatibile quando si<br />
carica la batteria al Ni-MH. Non lasciare la batteria<br />
incustodita durante la ricarica per evitare sovraccariche<br />
e danni alla batteria, caricabatteria e alle cose. Non<br />
1. Non volare con un vento superiore ai 15 km/h! Questo<br />
è molto importante se non si ha molta esperienza.<br />
2. Un pilota che non ha mai fatto volare un modello con<br />
radio a 3 canali ed il comando sull’elevatore dovrebbe<br />
farsi assistere da un pilota esperto durante i primi voli.<br />
Coloro che non hanno mai pilotato un modello a 3<br />
canali non dovrebbero provarlo finchè non è disponibile<br />
un pilota esperto per aiutarli.<br />
3. Scegli con cura il campo di volo –possibilmente un terreno<br />
erboso e morbido del diametro di 180 metri che<br />
rappresenta la scelta migliore per volare ed allunga la<br />
vita del <strong>Spitfire</strong>. Guarda bene che non ci siano ostacoli,<br />
come edifici od alberi. Mai volare sopra le persone che<br />
potrebbero venire colpite dal modello.<br />
3. Ricordarsi di non tenere la leva della radio in una<br />
posizione estrema per un tempo troppo lungo per non<br />
provocare la caduta in spirale del modello. Se il modello<br />
inizia a scendere in spirale stretta rilasciare la leva<br />
immediatamente e dare comando nella direzione opposta<br />
per contrastare la spirale e quindi dare un po’ di<br />
elevatore per per rimettere il modello in volo orizzontale.<br />
Sicurezza e Precauzioni<br />
Consigli Importanti<br />
appoggiare la batteria sul moquette o tapezzerie ma su<br />
superfici resistenti al calore. se si usa una batteria Li-Po<br />
è indispensabile usare un caricabatterie apposito compatibile<br />
per Li-Po.<br />
6. Mai tagliare il fili della batteria, del caricaabatteria o<br />
del modello: è molto pericoloso. Mettendo in “corto” la<br />
batteria (invertendo il positivo col negativo) si può provocare<br />
un incendio, ferite o danni gravi.<br />
7. Quando si inserisce la batteria nel modello bisogna tenerlo<br />
in modo sicuro in modo che non ci siano oggetti<br />
vicino all’elica. Finito di volare, staccare sempre la batteria<br />
prima di spegnere la trasmittente.<br />
8. Non volare se qualcun altro usa la stessa frequenza<br />
del modello. La frequenza è indicata sul modello e<br />
sull’adesivo della trasmittente.<br />
9. Se si decide di usare una batteria Li-Po seguire le istruzioni<br />
e le avvertenze allegate alle batterie ed al caricabatteria.<br />
Dopo il volo staccare SEMPRE la batteria dal<br />
modello.<br />
5. Non cercare mai di fare manovre al di la della vostra<br />
capacità. Cercare l’aiuto di un pilota esperto per provare<br />
nuove figure acrobatiche che richiedono velocità<br />
maggiori.<br />
6. Ricordati che planando senza motore, il <strong>Spitfire</strong> richiede<br />
più spazio per le virate.<br />
7. Al campo bisogna metersi col sole alle spalle per evitarlo<br />
di averlo negli occhi. Indossare occhiali da sole se<br />
la giornata è luminosa.<br />
8. Tieni il <strong>Spitfire</strong> sopra vento specialmente se il vento è<br />
forte per impedire che “voli via”. Il vento è di solito più<br />
forte in quota che al suolo.<br />
9. Mantenere il modello davanti a se stessi in modo da<br />
non dovere girarsi durante il pilotaggio. Non volare<br />
sopra la propria testa.<br />
Advertencias y Seguridad<br />
1. Lea y siga detalladamente este manual, observando<br />
todas las instrucciones y normas de seguridad. De lo<br />
contrario, pueden producirse heridas y daños materiales<br />
graves. Piense que la seguridad es lo primero.<br />
2. Mantenga la hélice lejos de usted y de su ropa, incluso<br />
cuando no esté girando, ya que se puede encender accidentalmente.<br />
Tenga cuidado que no se enrede el cabello<br />
en la hélice, sobre todo cuando esté lanzando su avión.<br />
3. No vuele con viento demasiado fuerte ya que puede<br />
perder el control y chocar, provocando heridas o daños<br />
materiales. No vuele nunca cerca de personas, vehículos,<br />
vías de tren, edificios, líneas eléctricas, agua, superficies<br />
duras o árboles. No permita nunca que nadie<br />
intente atrapar el avión durante el vuelo, ya que puede<br />
causar heridas graves.<br />
4. Se requiere la supervisión de un adulto cuando menores<br />
de 14 años vayan a cargar la batería o volar el avión.<br />
5. Utilice solamente el cargador compatible para la batería<br />
Ni-MH para cargar la batería de vuelo. Nunca deje el<br />
cargador sin supervisión cuando esté cargando. Esto<br />
evitará sobre cargas y se asegurará que no ocurran<br />
daños a la batería, al cargador o a cualquier otro objeto.<br />
Mientras esté cargando, coloque la batería en una<br />
1. No vuele con vientos de más de 15 km/h, especialmente<br />
si no es Ud. un piloto experimentado.<br />
2. Un piloto que nunca ha volado un avión de 3 canales<br />
con control del grado de inclinación debe ser asistido<br />
durante los primeros vuelos por un piloto experimentado<br />
en radiocontol. Los pilotos que nunca han volado<br />
un avión de 3 canales no deberán volar a menos que<br />
un piloto con experiencia esté presente para guiarlos.<br />
3. Escoja su campo de vuelo cuidadosamente – la hierba<br />
y un terreno blando con un diámetro de 180m de<br />
espacio abierto son óptimos para volar y permitirá que<br />
el <strong>Spitfire</strong> dure más tiempo. Compruebe que no haya<br />
obstáculos que impidan el vuelo, como árboles o edificios.<br />
Asegúrese de no volar cuando haya personas que<br />
puedan resultar heridas por el avión.<br />
4. Recuerde que el sostener el bastón de su radiocontrol<br />
totalmente hacia cualquier lado puede causar que el<br />
avión entre en una caída en espiral y se estrelle. A la<br />
primera señal de su <strong>Spitfire</strong> entrando en una caída en<br />
espiral, suelte el bastón y muévalo en la posición contraria<br />
a donde lo estaba haciendo. Después jale hacia<br />
usted el bastón del elevador suavemente hasta alcanzar<br />
un vuelo recto y nivele sus alas.<br />
Consejos Útiles<br />
superficie resistente al calor. No lo coloque en una alfombra<br />
o mueble tapizado mientras vaya a cargar.Si utiliza<br />
una batería Li-Po para volar su <strong>Spitfire</strong> <strong>Mk</strong> <strong>IIB</strong>, necesitará<br />
un cargador compatible para este tipo de pila.<br />
6. Nunca corte la batería, el cargador o los cables del<br />
avión ya que puede ocasionar heridas graves. Si hace<br />
que la batería tenga un corto (cruzar los cables pelados,<br />
el negativo con el positivo) puede incendiarse y causar<br />
heridas y daños graves.<br />
7. Sostenga el avión firmemente cuando conecte la batería<br />
de vuelo, y siempre mantenga la hélice lejos de usted o<br />
de otra persona. Cuando termine de volar el avión, siempre<br />
desconecte la batería antes de apagar el transmisor.<br />
8. Nunca vuele a la misma frecuencia de otro vehículo de<br />
radiocontrol cerca de usted. La frecuencia del avión se<br />
muestra en el engomado en el reverso del transmisor y<br />
en el avión.<br />
9. Si decide cargar su <strong>Spitfire</strong> <strong>Mk</strong> <strong>IIB</strong> con una batería Li-<br />
Po, siga las instrucciones y advertencias de la batería<br />
y del cargador. SIEMPRE desconecte y retire la batería<br />
después de volar.<br />
5. No intente volar o realizar maniobras más allá de sus<br />
propias habilidades. Pídale ayuda a un piloto experimentado<br />
cuando desee realizar maniobras nuevas que sean<br />
más extremas y a altas velocidades.<br />
6. Si planea con el motor desconectado, deje más espacio<br />
a su avión para los virajes.<br />
7. Colóquese en el área donde vaya a volar de tal manera<br />
que el sol se encuentre a sus espaldas y no le dé en<br />
los ojos. Póngase lentes oscuros en días brillantes.<br />
8. Mantenga el <strong>Spitfire</strong> contra el viento, especialmente los<br />
días de viento fuerte, para evitar que sea arrastrado y<br />
se pierda. El viento es normalmente más fuerte a altitudes<br />
mayores que al nivel del suelo.<br />
9. Mantenga el avión frente a usted para que no tenga<br />
que dar vueltas cuando esté volando. Evite que el avión<br />
vuele directamente sobre usted.<br />
42 43
Troubleshooting<br />
PROBLEM POSSIBLE CAUSE SOLUTION<br />
Ricerca dei Guasti<br />
PROBLEMA CAUSA POSSIBiLE SOLUZIONE<br />
Unit does not operate<br />
1. Transmitter “AA” batteries are depleted<br />
or installed incorrectly, indicated by a<br />
dim or unlit LED on transmitter or the<br />
low battery alarm.<br />
2. No electrical connection.<br />
3. Flight battery not charged.<br />
4. Crash has damaged the radio inside.<br />
1. Check polarity installation or replace<br />
with fresh “AA” batteries.<br />
2. Push connectors together until<br />
they “click.”<br />
3. Charge battery fully.<br />
4. Replace the fuselage or receiver.<br />
Il modello non funziona<br />
1. Le pile “AA” della trasmittente sono<br />
scariche o non installate bene. Ciò è<br />
indicato dal LED che non si accende o<br />
dal cicalino della batteria scarica.<br />
2. Manca la connessione elettrica.<br />
3. La batteria del modello non è carica.<br />
4. Una caduta ha danneggiato la radio.<br />
1. Controlla l’installazione delle pile oppure<br />
cambia le pile “AA”.<br />
2. Schiaccia I connettori tra loro fino a<br />
sentire “click.”<br />
3. Carica completamente la batteria.<br />
4. Sostituisci la fusoliera o la ricevente.<br />
Aircraft keeps turning in<br />
one direction<br />
1. Aileron or aileron trim is not<br />
adjusted correctly.<br />
2. Damage to fixed rudder (vertical stab).<br />
1. Adjust aileron and/or aileron trim.<br />
2. Make sure fixed rudder (vertical stab) is<br />
at 90 degrees from elevator.<br />
Il modello continua a<br />
virare in una direzione<br />
1. Gli alettoni o il trim degli alettoni è mal<br />
regolato.<br />
2. Il direzionale fisso è danneggiato.<br />
1. Regola gli alettoni ed il trim degli<br />
alettoni.<br />
2. Assicurati che il direzionale (timone<br />
verticale) sia a 90° con il piano di quota.<br />
Aircraft is difficult<br />
to control<br />
1. Wing or tail is damaged.<br />
1. Replace damaged part.<br />
Il modello è difficile da<br />
controllare<br />
1. L’ala o la coda sono danneggiate.<br />
1. Sostituisci le parti danneggiate.<br />
Aircraft will not climb<br />
Aircraft keeps pitching<br />
up steeply<br />
1. Battery is not fully charged.<br />
2. Elevator trim may be incorrect.<br />
1. Wind is too gusty or strong.<br />
2. Elevator trim may have raised<br />
too much.<br />
1. Charge battery fully shortly before flying.<br />
2. Adjust elevator trim.<br />
1. Postpone flying until the wind<br />
calms down.<br />
2. Trim elevator down with the transmitter<br />
trim or threaded linkage.<br />
Il modello non sale<br />
Il modello sale troppo<br />
1. La batteria non è stata caricata bene,<br />
2. Il trim del timone di profondità non è<br />
regolato bene.<br />
1. Il vento è a raffiche o troppo forte.<br />
2. Il trim del piano di quota è troppo<br />
cabrato.<br />
1. Carica completamente la batteria prima<br />
di volare.<br />
2. Regola il trim del piano di quota.<br />
1. Rimanda il volo a quando smette il vento.<br />
2. Sposta il trim a picchiare oppure regola<br />
I rinvii.<br />
Dépannage<br />
PROBLEME CAUSE POSSIBLE SOLUTION<br />
Solución de Problemas<br />
PROBLEME CAUSA POSIBLE SOLUCIÓN<br />
L’ensemble ne<br />
fonctionne pas<br />
L’avion tourne toujours<br />
dans la même direction<br />
L’avion est difficile à<br />
contrôler<br />
L’avion ne veut pas<br />
monter<br />
L’avion monte toujours<br />
en pente trop raide<br />
1. Les piles de l’émetteur sont vides ou<br />
mal installées, cela est indiqué par la<br />
LED de l’émetteur qui est soit faible,<br />
éteinte ou clignotante.<br />
2. Pas de connections électriques.<br />
3. Batterie de l’avion déchargée.<br />
4. La réception radio a été endommagée<br />
dans un crash.<br />
1. Les ailerons ou le trim sont mal réglés.<br />
2. L’aile n’est pas centrée sur le fuselage.<br />
1. L’aile ou l’empennage sont<br />
endommagés.<br />
1. La batterie n’est pas assez chargée.<br />
2. Le trim de profondeur est mal réglé.<br />
1. Le vent est trop fort ou il y a des<br />
rafales.<br />
2. Le trim de profondeur est mal réglé.<br />
1. Vérifier la polarité des piles ou les<br />
remplacer par des piles neuves.<br />
2. Connecter les prises ensemble jusqu’à<br />
entendre le clic.<br />
3. Charger la batterie entièrement.<br />
4. Remplacer le fuselage ou le module.<br />
1. Ajuster les ailerons et/ou le trim.<br />
2. Vérifier le centrage de l’aile avant de voler.<br />
1. Remplacer la pièce défectueuse.<br />
1. Charger la batterie entièrement avant<br />
chaque vol.<br />
2. Ajuster le trim de profondeur.<br />
1. Attendre que le vent faiblisse.<br />
2. Ajuster le trim de profondeur.<br />
El aparato no funciona<br />
El avión gira en una<br />
dirección<br />
Cuesta trabajo controlar<br />
el avión<br />
El avión no asciende<br />
El avión cabecea hacia<br />
arriba pronunciadamente<br />
1. Las pilas “AA” del transmisor están gastadas<br />
o mal colocadas, lo que se indica porque el<br />
LED del transmisor está atenuado o apagado<br />
o por la alarma de batería baja.<br />
2. No hay conexión eléctrica.<br />
3. Batería de vuelo no cargada.<br />
4. Un choque ha dañado el radio interno.<br />
1. El alerón o el compensador del alerón no<br />
está ajustado correctamente.<br />
2. Daños en el timón fijo (estabilizador vertical).<br />
1. El ala o la cola está dañada.<br />
1. La batería no está totalmente cargada.<br />
2. La compensación del elevador puede ser<br />
incorrecta.<br />
1. El viento es demasiado borrascoso o fuerte.<br />
2. Quizá se ha elevado demasiado la<br />
compensación del elevador<br />
1. Compruebe la polaridad o cambie las pilas<br />
“AA” por otras nuevas.<br />
2. Presione los conectores juntos hasta que<br />
hagan “clic”.<br />
3. Cargue totalmente la batería.<br />
4. Cambie el fuselaje o receptor.<br />
1. Ajuste el alerón y/o la compensación del<br />
alerón.<br />
2. Asegúrese de que el timón fijo (estabilizador<br />
vertical) esté a 90º del elevador.<br />
1. Cambie la pieza dañada.<br />
1. Cargue la batería totalmente poco antes de<br />
volar.<br />
2. Ajuste la compensación del elevador.<br />
1. Posponga el vuelo hasta que se calme el<br />
viento.<br />
2. Compense el elevador abajo con la<br />
compensación del transmisor o el varillaje<br />
roscado.<br />
44 45
Warranty and Follow-Up Procedures<br />
Français Conditions de Garantie<br />
Warranty Period<br />
Exclusive Warranty- <strong>Horizon</strong> <strong>Hobby</strong>, Inc., (<strong>Horizon</strong>) warranties that the<br />
Products purchased (the “Product”) will be free from defects in materials<br />
and workmanship at the date of purchase by the Purchaser.<br />
Limited Warranty<br />
(a) This warranty is limited to the original Purchaser (“Purchaser”) and<br />
is not transferable. REPAIR OR REPLACEMENT AS PROVIDED UNDER<br />
THIS WARRANTY IS THE EXCLUSIVE REMEDY OF THE PURCHASER.<br />
This warranty covers only those Products purchased from an authorized<br />
<strong>Horizon</strong> dealer. Third party transactions are not covered by this<br />
warranty. Proof of purchase is required for warranty claims. Further,<br />
<strong>Horizon</strong> reserves the right to change or modify this warranty without<br />
notice and disclaims all other warranties, express or implied.<br />
(b) Limitations- HORIZON MAKES NO WARRANTY OR REPRESENTATION,<br />
EXPRESS OR IMPLIED, ABOUT NON-INFRINGEMENT,<br />
MERCHANTABILITY OR FITNESS FOR A PARTICULAR PURPOSE OF THE<br />
PRODUCT. THE PURCHASER ACKNOWLEDGES THAT THEY ALONE<br />
HAVE DETERMINED THAT THE PRODUCT WILL SUITABLY MEET THE<br />
REQUIREMENTS OF THE PURCHASER’S INTENDED USE.<br />
(c) Purchaser Remedy- <strong>Horizon</strong>’s sole obligation hereunder shall be<br />
that <strong>Horizon</strong> or one of its authorized distributors, will, at its option, (i)<br />
repair or (ii) replace, any Product determined by <strong>Horizon</strong> or an authorized<br />
distributor to be defective. In the event of a defect, these are the<br />
Purchaser’s exclusive remedies. <strong>Horizon</strong> and its authorized distributors<br />
reserves the right to inspect any and all equipment involved in a warranty<br />
claim. Repair or replacement decisions are at the sole discretion<br />
of <strong>Horizon</strong> and its authorized distributors. This warranty does not cover<br />
cosmetic damage or damage due to acts of God, accident, misuse,<br />
abuse, negligence, commercial use, or modification of or to any part<br />
of the Product. This warranty does not cover damage due to improper<br />
installation, operation, maintenance, or attempted repair by anyone<br />
other than <strong>Horizon</strong> and its authorized distributors. Return of any goods<br />
by Purchaser must be approved in writing by <strong>Horizon</strong> or its authorized<br />
distributors before shipment.<br />
Damage Limits<br />
HORIZON AND ITS DISTRIBUTORS SHALL NOT BE LIABLE FOR SPECIAL,<br />
INDIRECT OR CONSEQUENTIAL DAMAGES, LOSS OF PROFITS OR<br />
PRODUCTION OR COMMERCIAL LOSS IN ANY WAY CONNECTED WITH<br />
THE PRODUCT, WHETHER SUCH CLAIM IS BASED IN CONTRACT,<br />
WARRANTY, NEGLIGENCE, OR STRICT LIABILITY. Further, in no event<br />
shall the liability of <strong>Horizon</strong> and its authorized distributors exceed the<br />
individual price of the Product on which liability is asserted. As <strong>Horizon</strong><br />
and its authorized distributors have no control over use, setup, final<br />
assembly, modification or misuse, no liability shall be assumed nor<br />
accepted for any resulting damage or injury. By the act of use, setup or<br />
assembly, the user accepts all resulting liability.<br />
If you as the Purchaser or user are not prepared to accept the liability<br />
associated with the use of this Product, you are advised to return this<br />
Product immediately in new and unused condition to the place of purchase.<br />
Law: These Terms are governed by Illinois law (without regard to conflict<br />
of law principals).<br />
Safety Precautions<br />
This is a sophisticated hobby Product and not a toy. It must be<br />
operated with caution and common sense and requires some basic<br />
mechanical ability. Failure to operate this Product in a safe and responsible<br />
manner could result in injury or damage to the Product or other<br />
property. This Product is not intended for use by children without direct<br />
adult supervision. The Product manual contains instructions for safety,<br />
operation and maintenance. It is essential to read and follow all the<br />
instructions and warnings in the manual, prior to assembly, setup or<br />
use, in order to operate correctly and avoid damage or injury.<br />
Questions, Assistance, and Repairs<br />
Your local hobby store and/or place of purchase cannot provide warranty<br />
support or repair. Once assembly, setup or use of the Product<br />
has been started, you must contact <strong>Horizon</strong> directly. This will enable<br />
<strong>Horizon</strong> to better answer your questions and service you in the event<br />
that you may need any assistance. For questions or assistance,<br />
please direct your email to productsupport@horizonhobby.com, or call<br />
877.504.0233 toll free to speak to a service technician.<br />
Inspection or Repairs<br />
If this Product needs to be inspected or repaired, please contact the<br />
<strong>Horizon</strong> authorized distributor in your country for a Return Merchandise<br />
Authorization (RMA). Pack the Product securely using a shipping<br />
carton. Please note that original boxes may be included, but are not<br />
designed to withstand the rigors of shipping without additional protection.<br />
Ship via a carrier that provides tracking and insurance for lost or<br />
damaged parcels, as <strong>Horizon</strong>’s authorized distributors are not responsible<br />
for merchandise until it arrives and is accepted at their facility.<br />
Please include a letter with your complete name, street address, email<br />
address and phone number where you can be reached during business<br />
days, your RMA number, a list of the included items, method of<br />
payment for any non-warranty expenses and a brief summary of the<br />
problem. Your original sales receipt must also be included for warranty<br />
consideration. Be sure your name, address, and RMA number are<br />
clearly written on the outside of the shipping carton.<br />
Warranty Inspection and Repairs<br />
To receive warranty service, you must include your original sales<br />
receipt verifying the proof-of-purchase date. Provided warranty conditions<br />
have been met, your Product will be repaired or replaced free of<br />
charge. Repair or replacement decisions are at the sole discretion of<br />
<strong>Horizon</strong>’s authorized distributors in your country.<br />
Non-Warranty Repairs<br />
Should your repair not be covered by warranty the repair will be completed<br />
and payment will be required without notification or estimate of<br />
the expense unless the expense exceeds 50% of the retail purchase<br />
cost. By submitting the item for repair you are agreeing to payment<br />
of the repair without notification. Repair estimates are available upon<br />
request. You must include this request with your repair. Non-warranty<br />
repair estimates will be billed a minimum of ½ hour of labor. In addition<br />
you will be billed for return freight. Please advise us of your preferred<br />
method of payment. If you choose to pay by credit card, please include<br />
your credit card number and expiration date. Any repair left unpaid or<br />
unclaimed after 90 days will be considered abandoned and will be disposed<br />
of accordingly. Please note: non-warranty repair is only available<br />
on electronics and model engines.<br />
Products requiring warranty inspection or repair should be shipped to<br />
the following address:<br />
Helger Distribution<br />
Units 2-4, Ployters Road<br />
Staple Tye-Southern Way<br />
Harlow, Essex CM187NS<br />
Garantie Exclusive - <strong>Horizon</strong> <strong>Hobby</strong>, Inc., (<strong>Horizon</strong>) garantit que le<br />
produit acheté (le “Produit”) ne comporte aucun défaut et vices de<br />
fabrication à la date d’achat par le client.<br />
Garantie Limitée<br />
(a) Cette garantie est limitée à l’acheteur d’origine (“Client”) et n’est pas<br />
transférable. LA REPARATION OU LE REMPLACEMENT PREVUS PAR LA<br />
GARANTIE SONT AU BENEFICE EXCLUSIF DU CLIENT. Cette garantie<br />
s’applique seulement aux produits achetés chez un revendeur officiel de<br />
la marque <strong>Horizon</strong>. Les transactions effectuées avec des tiers ne sont<br />
pas couvertes par la garantie. Une preuve d’achat est obligatoire pour<br />
l’application de la garantie. D’autre part, <strong>Horizon</strong> se réserve le droit de<br />
changer ou modifier cette garantie sans communication préalable et<br />
dément toutes autres garanties, explicite ou implicite.<br />
(b) Limitations - HORIZON NE DONNE AUCUNE GARANTIE, EXPLICITE<br />
OU IMPLICITE, ET N’ASSUME AUCUNE RESPONSABILITE RELATIVE A<br />
L’UTILISATION DE CE PRODUIT. LE CLIENT RECONNAÎT QU’IL EST LE<br />
SEUL A AVOIR DETERMINE QUE LE PRODUIT REPOND CONVENABLE-<br />
MENT AUX EXIGENCES DE L’UTILISATION QU’IL EN A PREVUE.<br />
“(c) Bénéfice du Client - La seule obligation de <strong>Horizon</strong> sera que <strong>Horizon</strong><br />
ou un de ses distributeurs autorisés choisisse en toute liberté de (i)<br />
réparer ou (ii) remplacer le produit considéré comme défectueux.<br />
En cas de défaut, ce sera l’unique bénéfice du client. <strong>Horizon</strong> et ses<br />
distributeurs autorisés se réservent le droit d’inspecter le ou les<br />
équipement(s) impliqués dans une demande de garantie. La réparation<br />
ou le remplacement sont à la seule discrétion de <strong>Horizon</strong> et de ses<br />
distributeurs autorisés. Cette garantie ne couvre pas les dommages<br />
cosmétiques ou les dommages dus à des forces majeures, accident,<br />
utilisation incorrecte, négligence, utilisation commerciale ou modification<br />
de n’importe laquelle des parties du produit. Cette garantie ne<br />
couvre pas les dommages dus à une installation incorrecte, un démontage<br />
ou une réparation effectuée par une autre personne que <strong>Horizon</strong><br />
ou un distributeur autorisé. Le retour de toute marchandise par le client<br />
doit être approuvé par écrit, par <strong>Horizon</strong> ou ses distributeurs autorisés,<br />
avant expédition.<br />
Limites des Dommages<br />
HORIZON ET SES DISTRIBUTEURS NE POURRONT ETRE TENUS<br />
RESPONSABLES DES DOMMAGES SPÉCIAUX, INDIRECTS OU CON-<br />
SÉCUTIFS, DU MANQUE À GAGNER OU DES PERTES DE PRODUCTION<br />
OU COMMERCIALE DE QUELQUE FAÇON LIÉE AU PRODUIT, SI UNE<br />
TELLE RÉCLAMATION EST BASÉE SUR LE CONTRAT, LA GARANTIE,<br />
LA NÉGLIGENCE OU LA STRICTE RESPONSABILITÉ. De plus, en aucun<br />
cas la responsabilité de <strong>Horizon</strong> et de ses distributeurs autorisés ne<br />
pourra excéder le prix unitaire du produit sur lequel la responsabilité<br />
est affirmée. <strong>Horizon</strong> et ses distributeurs autorisés n’ayant aucun<br />
contrôle d’utilisation, d’installation, d’assemblage final, de modification<br />
ou d’abus, aucune responsabilité ne sera assumée ni sera acceptée<br />
pour n’importe quels dommages ou blessures en résultant. Par l’acte<br />
de l’utilisation, de l’installation ou de l’assemblage, l’utilisateur accepte<br />
toute la responsabilité résultante.<br />
Si vous n’êtes pas, en tant que Client ou utilisateur, préparé à accepter<br />
l’entière responsabilité de l’utilisation de ce Produit, vous devez<br />
retourner immédiatement ce Produit à l’état neuf et inutilisé au lieu de<br />
votre achat.<br />
Loi : Ces termes sont régis par les lois de l’Illinois (sans soucis de<br />
conflit avec les lois principales).<br />
Précautions de Sécurité<br />
“Ceci est une produit de loisir sophistiqué et non un jouet. Il doit être<br />
utilisé avec précaution et bon sens et nécessite des connaissances<br />
mécaniques de base. Le fait de ne pas utiliser ce produit d’une façon<br />
sûre et responsable peut avoir causer des blessures ou des dommages<br />
au Produit ou à tout autre élément. Ce Produit n’est pas prévu<br />
à l’usage des enfants sans surveillance directe d’un adulte. Le manuel<br />
de ce Produit contient des instructions pour la sécurité, l’utilisation<br />
et la maintenance. Il est essentiel de lire et suivre toutes les instructions<br />
et avertissements du manuel, avant l’assemblage, l’installation<br />
ou l’utilisation, afin d’obtenir un fonctionnement correct et d’éviter des<br />
dommages ou des blessures.<br />
“<br />
Questions, Assistance et Réparations<br />
Votre revendeur local et/ou le vendeur ne sont pas habilité à appliquer<br />
la garantie ou à réparer le Produit. Une fois que l’assemblage,<br />
le réglage ou l’utilisation du produit a été commencé, vous devez<br />
entrer en contact directement avec <strong>Horizon</strong>. Ceci permettra à <strong>Horizon</strong><br />
d’améliorer la réponse à vos questions et de vous aider au cas où vous<br />
auriez besoin d’assistance. Des questions ou une assistance, envoyez<br />
votre email à productsupport@horizonhobby.com ou réclamez de parler<br />
gratuitement à un technicien de service au 877.504.0233.<br />
Inspection et Réparations<br />
Si ce Produit doit être inspecté ou réparé, entrez en contact avec le<br />
distributeur autorisé par <strong>Horizon</strong> dans votre pays pour demander une<br />
autorisation de retour de marchandises (RMA). Emballez le Produit dans<br />
un carton d’expédition en le protégeant correctement. L’emballage<br />
d’origine peut être inclus mais il n’est pas conçu pour subir de nombreuses<br />
manipulations sans protection additionnelle. Faire transporter<br />
le colis par un prestataire fournissant un suivi et une assurance en cas<br />
de perte ou de dommages car les distributeurs autorisés ne sont pas<br />
responsables des marchandises jusqu’à ce qu’elles arrivent et soient<br />
acceptées. Inclure une lettre avec vos coordonnées complètes avec<br />
une adresse email, un numéro de téléphone pour vous joindre pendant<br />
la journée, le numéro de RMA, une liste des pièces jointes, une méthode<br />
de paiement pour les dépenses non couvertes par la garantie et<br />
une description du problème. Vérifier que vos nom, adresse et numéro<br />
de RMA sont lisiblement indiqué sur le colis d’expédition.<br />
Inspection de Garantie et Réparations<br />
Pour bénéficier de la garantie, vous devez inclure l’original de votre<br />
facture d’achat avec mention de la date de cet achat. Si les conditions<br />
de garantie sont réunies, votre Produit sera réparé ou remplacer<br />
gratuitement. La décision de réparation ou remplacement est à la seule<br />
discrétion du distributeur autorisé de <strong>Horizon</strong> de votre pays.<br />
Réparations non Couvertes par la Garantie<br />
“Si la garantie ne peut pas être appliquée, la réparation sera accomplie<br />
et le paiement sera exigé sans avis ou évaluation des dépenses à<br />
moins qu’elles excèdent 50% du coût d’achat au détail. En expédiant<br />
le produit pour la réparation, vous acceptez, de ce fait, le paiement de<br />
la réparation sans avis. Les devis de réparation sont disponibles sur<br />
demande. Vous devez inclure cette demande dans votre colis. Un minimum<br />
de 1/2 heure de main d’oeuvre sera facturé pour les réparations<br />
non couvertes par la garantie. En outre vous devrez régler les frais de<br />
retour. Veuillez nous indiquer vos modalités de paiement préférées.<br />
Si vous choisissez de payer avec une carte de crédit, incluez votre<br />
son numéro, sa date d’échéance et les 3 derniers chiffres du code<br />
indiqué au dos de la carte. N’importe quelle réparation impayée ou non<br />
réclamée après 90 jours sera considérée comme abandonnée et par<br />
conséquence débarrassée. Notez Svp: la réparation non couverte par<br />
la garantie est seulement disponible sur l’électronique et les moteurs<br />
des modèle.<br />
“<br />
Ecrire à l’adresse suivante:<br />
Avio & Tiger<br />
Service Après Vente<br />
Boite Postale 27<br />
84101 ORANGE Cedex<br />
46 47
Italiano<br />
Garanzia ed Assistenza<br />
Español<br />
Procedimientos de Garantía y Seguimiento<br />
Durata della garanzia<br />
La Scorpio s.r.l. garantisce che i prodotti acquistati (il “Prodotto”)<br />
sono esenti da difetti dovuti ai materiali ed alla mano d’opera alla data<br />
dell’acquisto da parte dell’ Acquirente.<br />
Garanzia limitata<br />
(a) Questa garanzia è limitata all’acquirente iniziale (“Acquirente”) e non<br />
è trasferibile. LA RIPARAZIONE O LA SOSTITUZIONE IN BASE A QUESTA<br />
GARANZIA E’ VALIDA SOLO PER L’ACQUIRENTE. Essa garantisce solo i<br />
prodotti acquistati con garanzia Scorpio originale. Acquisti privi di garanzia<br />
Scorpio non sono coperti dalla garanzia e la garanzia è valida solo se<br />
il certificato di garanzia è accompagnato dallo scontrino fiscale. Inoltre la<br />
Scorpio si riserva di cambiare questa garanzia senza preavviso e rifiuta<br />
ogni altra forma di garanzia implicita od esplicita.<br />
b) LA SCORPIO S.R.L. NON SI ASSUME NESSUNA RESPONSABILITÀ,<br />
ESPLICITA O IMPLICITA, PER LA CORRISPONDENZA E LA ADEGUATEZZA<br />
DEL PRODOTTO PER UNO SCOPO PARTICOLARE. L’ACQUIRENTE È IL<br />
SOLO SOGGETTO CHE HA STABILITO CHE L’ACQUISTO DI QUESTO<br />
PRODOTTO È IN GRADO DI SODDISFARE LE SUE NECESSITÀ ED I SUOI<br />
DESIDERI.<br />
(c) L’unica garanzia che la Scorpio s.r.l. dichiara di assumere a sua scelta<br />
è quella di (i) riparare o di (ii) sostituire l’articolo che risultasse difettoso.<br />
Questa è l’unica garanzia offerta all’acquirente. La Scorpio s.r.l. si riserva<br />
il diritto di verificare l’oggetto della garanzia e di decidere se ripararlo<br />
o di sostituirlo. La garanzia non copre danni estetici o danni accidentali<br />
dovuti a scassature, uso improprio, negligenza, utilizzo commerciale o<br />
modifiche in qualsiasi parte dell’articolo. La garanzia non copre neppure i<br />
danni derivanti da un montaggio errato, dalla manutenzione e da tentativi<br />
di riparazione effettuati non dalla Scorpio s.r.l. La spedizione dei prodotti<br />
da riparare o in garanzia deve essere preventivamente autorizzata dalla<br />
Scorpio s.r.l.<br />
Limite dei Danni.<br />
LA SCORPIO NON E’ RESPONSABILE PER DANNI DIRETTI OD INDIRETTI,<br />
PERDITA DI PROFITTI O DI PRODUZIONE O COMMERCIALI IN QUALSIASI<br />
MODO COLLEGATI ALL’USO DI QUESTO PRODOTTO, ANCHE SE ESISTE<br />
UN CONTRATTO, UNA GARANZIA O IL DANNO DERIVA DA NEGLIGENZA<br />
O DA RESPONSABILITA’ DIRETTA. Inoltre in nessun caso la responsabilità<br />
della Scorpio sarà superiore al valore del prodotto che ha causato il<br />
danno. Dal momento che la Scorpio non ha nessun controllo sull’uso, la<br />
messa a punto, la manutenzione o l’uso non corretto del prodotto, non<br />
potrà mai venire considerata responsabile di danni alle cose od alle persone.<br />
Nel momento in cui il consumatore accetta di utilizzare il prodotto,<br />
egli si assume ogni responsabilità.<br />
Se l’acquirente non è disposto ad assumersi tutte le responsabilità dericanti<br />
dall’uso del prodotto deve restituire immediatamente il prodotto in<br />
condizioni perfette e senza averso usato al punto di vendita dove è stato<br />
acquistato.<br />
Domande, Assistenza e Riparazioni<br />
Il punto vendita non è in grado di offrire assistenza in garanzia o riparazioni.<br />
Dopo aver effettuato il montaggio e la regolazione del modello è quindi<br />
necessario contattare il servizio assistenza Scorpio s.r.l. Per informazioni<br />
circa la assistenza , contattare il servizio assistenza Scorpio via e-mail<br />
[sales@scorpio.it] oppure telefonando allo 0461 823099 dalle 8:30 alle<br />
10:30 e dalle 14:00 alle 16:00 dei giorni feriali.<br />
Assistenza o Riparazioni<br />
Se il modello deve venire controllato o riparato è necessario chiamare la<br />
Scorpio per avere la autorizzazione ed il Numero di Rientro. Ricordarsi di<br />
imballare il modello accuratamente. Si può usare la confezione originale<br />
anche se bisogna imballarca con un secondo imballo dal momento che<br />
non è sufficientemente robusta. La Scorpio s.r.l. non è responsabile del<br />
modello fino al suo arrivo. Includere un foglio con il proprio nome, indirizzo,<br />
telefono, numero di rientro ed una breve descrizione del problema.<br />
Nome, indirizzo e numero di rientro devono inoltre comparire in forma ben<br />
leggibile anche all’esterno. Va indicato anche il modo di pagamento per<br />
i costi delle riparzioni non in garanzia. la garanzia è valida se accompagnata<br />
dallo scontrino fiscale che costituisce la prova dell’acquisto.<br />
Assistenza o Riparazioni in Garanzia<br />
Per godere della garanzia bisogna includere sia la garanzia Scorpio che<br />
lo scontrino fiscale. Se le condizioni per la garanzia si sono verificate il<br />
prodotto verrà riparato o sostituito gratuitamente. La riparazione o la<br />
sostituzione è una scelta esclusiva della Scorpio s.r.l.<br />
Riparazioni non in Garanzia<br />
Qualora venga richiesta una riparazione non in garanzia, la riparazione<br />
verrà eseguita e non verranno fatti preventivi a mano che il costo non<br />
superi il 50% del prodotto. Inviando il prodotto per la riparazione si accetta<br />
automaticamente di pagare la riparazione a semplice richiesta e<br />
comunque verrà addebitato un minimo di 1/2 ora di valoro oltre al costo<br />
del trasporto. Se si desidera pagare a mezzo carta di credito (Visa o<br />
Mastercard) bisogna inserire nel pacco il numero della carta e la data di<br />
scadenza. Ogni riparazione non reclamata o non pagata dopo 90 giorni<br />
verrà considerata abbandonata e verrà eliminata. Attenzione: le riparazioni<br />
non in garanzia si effettuano solo sull’elettronica e sul motore del<br />
modello.<br />
Spedire al seguente indirizzo:<br />
Scorpio Service Center<br />
Via Brennero 169/15<br />
38100 Trento<br />
Plazo de la Garantía<br />
Garantía exclusiva - <strong>Horizon</strong> <strong>Hobby</strong>, Inc., (<strong>Horizon</strong>) garantiza que los Productos<br />
adquiridos (el “Producto”) no presentarán defectos en los materiales ni<br />
en la mano de obra en la fecha de compra realizada por el Comprador.<br />
Garantía Limitada<br />
(a) La presente garantía está limitada al Comprador (“Comprador”) original,<br />
y no es transferible. LA REPARACIÓN O EL REEMPLAZO AMPARADO BAJO<br />
ESTA GARANTÍA ES EL RECURSO EXCLUSIVO DEL COMPRADOR. Esta<br />
garantía cubre solamente aquellos Productos adquiridos a un agente autorizado<br />
de <strong>Horizon</strong>. Las transacciones llevadas a cabo por terceras personas<br />
no entran dentro de la cobertura de esta garantía. Se requiere del comprobante<br />
de compra para cualquier reclamación bajo garantía. <strong>Horizon</strong> se<br />
reserva además el derecho de cambiar o modificar la presente garantía sin<br />
previo aviso, y no reconoce todas las demás garantías, ya sean explícitas o<br />
implícitas.<br />
(b) Limitaciones: HORIZON NO GARANTIZA NI DECLARA, EXPLÍCITA O IM-<br />
PLÍCITAMENTE, LA NO VIOLACIÓN, COMERCIABILIDAD O APTITUD PARA UN<br />
PROPÓSITO PARTICULAR DEL PRODUCTO. EL COMPRADOR RECONOCE<br />
QUE ELLOS MISMOS HAN DETERMINADO QUE EL PRODUCTO CUMPLIRÁ<br />
CON LOS REQUISITOS DE CONFORMIDAD CON DEL USO INTENCIONADO<br />
DEL COMPRADOR.<br />
(c) Recurso del Comprador: la única obligación de <strong>Horizon</strong> o de uno de sus<br />
distribuidores autorizados establecida en la presente garantía es la de elegir<br />
entre (i) reparar, o (ii) reemplazar cualquier Producto que tanto <strong>Horizon</strong> o<br />
uno de sus distribuidores autorizados considere se encuentre defectuoso.<br />
En el caso de algún defecto, los anteriores son los recursos exclusivos del<br />
Comprador. <strong>Horizon</strong> y sus distribuidores autorizados se reservan el derecho<br />
de inspeccionar ya sea una parte o todo el equipo en una reclamación de<br />
garantía. Tanto la reparación como el reemplazo de partes se encuentran<br />
bajo la exclusiva discreción de <strong>Horizon</strong> y sus distribuidores autorizados. La<br />
presente garantía no cubre daños superficiales o daños por casos fortuitos,<br />
accidentes, uso indebido, abuso, negligencia, uso comercial o modificación<br />
hecha a cualquier parte del Producto. Esta garantía no cubre daños por la<br />
inadecuada instalación, operación, mantenimiento o intento de reparación<br />
por alguien más que no sea <strong>Horizon</strong> o sus distribuidores autorizados. La<br />
devolución de cualquier parte por el comprador debe ser autorizada por<br />
escrito por <strong>Horizon</strong> o sus distribuidores autorizados antes del envío.<br />
Reparaciones no Cubiertas por la Garantía<br />
Límites de Daños<br />
Si su reparación no es cubierta por la garantía, se le hará dicha reparación<br />
NI HORIZON NI SUS DISTRIBUIDORES SERÁN RESPONSABLES POR DAÑOS y deberá cubrir el costo de ésta. No se le notificará del costo ni se le hará<br />
INDIRECTOS O POR CONSECUENCIA DE UNA POSIBLE CONDUCTA, un estimado a menos que el costo sea mayor al 50% del costo de venta al<br />
POR PÉRDIDA DE UTILIDADES O POR PÉRDIDAS COMERCIALES O POR menudeo. Al enviar su artículo para reparación, usted acepta pagar dicha<br />
PRODUCCIÓN, SIN IMPORTAR QUE DICHA DEMANDA SE REALICE CON reparación sin previa notificación. Los estimados de las reparaciones se<br />
FUNDAMENTO EN UN CONTRATO, EN LA GARANTÍA, EN NEGLIGENCIA O deberán solicitar. Deberá indicarlo al momento de la reparación. Los estimados<br />
EN RESPONSABILIDAD OBJETIVA. Además, en ningún caso excederá la<br />
de reparaciones que no cubre la garantía se les cobrará un mínimo<br />
responsabilidad de <strong>Horizon</strong> y de sus distribuidores autorizados el precio de media hora de mano de obra. Se le cobrará además los gastos de envío<br />
individual del Producto en el cual se basa la responsabilidad. Ya que ni <strong>Horizon</strong><br />
de vuelta a su domicilio. Por favor indique cuál será su forma de pago. Si<br />
ni sus distribuidores autorizados tienen control sobre el uso, armado, va a utilizar su tarjeta de crédito, por favor incluya el número de su tarjeta<br />
Norme di Sicurezza<br />
ensamble final, modificación o uso indebido, no se podrá asumir o aceptar y la fecha de vencimiento. Cualquier reparacipon que no se pague o que<br />
Questo è un sofisticato prodotto per l’uso hobbystico e non un giocattolo.<br />
responsabilidad alguna a consecuencia de daños o perjuicios. Por el simple no se reclame después de 90 días se le considerará abandonada y será<br />
Deve venire utilizzato con prudenza e buon senso e richiede alcune<br />
acto de uso, armado o ensamble, el usuario acepta toda responsabilidad desechada. Nota: las reparaciones disponibles que no cubre la garantía son<br />
capacità meccaniche elementari. Il mancato utilizzo in modo sicuro<br />
resultante.<br />
en electrónica y en motores.<br />
e responsabile può provocare danni alle persone ed alle cose oltre al<br />
Si usted es un Comprador o usuario que no desee aceptar las obligaciones Envíe la carta a la dirección siguiente:<br />
prodotto stesso. Non deve venire usato da ragazzi sotto i 14 anni senza<br />
asosciadas con el uso de este Producto, se le aconseja que regrese de<br />
Modelimport<br />
la supervisione di un adulto Il manuale del prodotto contiene istruzioni<br />
inmediato el Producto sin usar al sitio de compra.<br />
c/Primavera 48<br />
riguardanti la sicurezza, luso e la manutenzione. È indispensabile leggere<br />
Juridisprudencia: los términos de la presente garantía se rigen por las leyes<br />
Pol. Ind. Las Monjas<br />
questo manuale e quindi seguire le istruzioni e le raccomandazioni<br />
de Illinois (sin tener en cuenta conflictos por principios de leyes).<br />
22850 Torrejon de Ardoz<br />
contenute in esso prima di assemblare, mettere a punto od utilizzare il<br />
Precauciones de seguridad<br />
Madrid<br />
prodotto in modo da poterlo usare e metterlo a punto correttamente e<br />
El presente es un Producto sofisticado para pasatiempos y no es un<br />
quindi evitare danni alle persone ed alle cose.<br />
juguete. Deberá ser manejado con precaución y sentido común, y requiere<br />
Mundo <strong>Hobby</strong><br />
habilidad mecánica básica. Si no se opera este Producto de manera segura<br />
Av. Prologacion Marianna Otero #1620<br />
y responsable puede causar heridas o daños al Producto u otra propiedad.<br />
Guadalajara, Jalisco<br />
Este producto no está hecho para el uso de niños sin la supervisión directa<br />
Mexico CP 451000<br />
de un adulto. El manual del Producto contiene instrucciones de seguridad,<br />
operación y mantenimiento. Es importante leer y seguir todas las instruc-<br />
48 49<br />
ciones y advertencias del manual antes de armar el avión, ajustarlo o usarlo<br />
para operarlo correctamente y evitar daños o perjuicios.<br />
Preguntas, Asistencia y Reparaciones<br />
Su tienda de hobbies local y/o lugar de compra no puede brindarle apoyo<br />
para hacer valer su garantía o realizar reparaciones. Una vez que ha<br />
iniciado el armado, ensamble o ha utilizado el Producto, deberá contactar<br />
directamente a <strong>Horizon</strong>. Esto permitirá a <strong>Horizon</strong> a responder eficientemente<br />
a sus preguntas, así como brindarle servicio en caso que usted<br />
requiera asistencia. Si tiene dudas o requiere asistencia, por favor envíe un<br />
correo electrónico a: productsupport@horizonhobby.com<br />
Inspección o Reparaciones<br />
Si este producto requiere ser inspeccionado o reparado, por favor<br />
contacte al distribuidor autorizado de <strong>Horizon</strong> en su país para obtener una<br />
Autorización de Devolución de Mercancía (ADM). Empaquete el Producto<br />
de forma segura en una caja para envíos. Tenga en cuenta por favor que<br />
aunque tenga la caja original, ésta no está diseñada para aguantar los<br />
rigores de un envío sin una protección adicional. Mándela por medio de una<br />
compañía de envíos que proporcione servicio de rastreo y seguro en caso<br />
de pérdida o daños al paquete, ya que los distribuidoes autorizados de<br />
<strong>Horizon</strong> no son responsables por la mercancía hasta que ésta es entregada<br />
e ingresada en sus oficinas. Por favor incluya una carta que contenga su<br />
nombre completo, dirección, correo electrónico y número telefónioco a<br />
donde se le pueda llamar en días hábiles, así como su número de ADM, una<br />
lista de los artúculos que haya enviado, su forma de pago por gastos no<br />
cubiertos por la garantía y un breve resumen del problema. También deberá<br />
incluir su nota de compra original para validar la garantía. Asegúrese que<br />
su nombre, dirección y número de ADM estén escritos claramente en el<br />
exterior de la caja.<br />
Garantía por Inspección o Reparaciones<br />
Para recibir el servicio de garantía, deberá incluir su nota de compra<br />
original para verificar la fecha de compra. Si se cumple con las condiciones<br />
para validar la garantía, su Producto será reparado o reemplazado sin<br />
cargo alguno. La decisión de reparar o reemplazar el Producto es bajo la<br />
exclusiva discreción de los distribuidores de <strong>Horizon</strong> en su país.
Replacement Parts<br />
Make sure that you keep your <strong>Spitfire</strong> <strong>Mk</strong> <strong>IIB</strong> in the air. Replacement parts are available at your local hobby shop or from<br />
<strong>Horizon</strong> <strong>Hobby</strong> (www.horizonhobby.com). Please try your local retailer first. By supporting your local hobby shop, they will be<br />
there when you need them!!<br />
Item #:<br />
PKZ1005<br />
PKZ1027<br />
PKZ1060<br />
PKZ1062<br />
PKZ1132<br />
PKZ1503<br />
PKZ1504<br />
PKZ1509<br />
PKZ1519<br />
PKZ1521<br />
PKZ1529<br />
PKZ1534<br />
PKZ1535<br />
PKZ1536<br />
PKZ1628<br />
PKZ1700<br />
PKZ1702<br />
PKZ1707<br />
PKZ1712<br />
PKZ1713<br />
PKZ1714<br />
PKZ1715<br />
PKZ1720<br />
PKZ1722<br />
PKZ1724<br />
PKZ1726<br />
PKZ1751<br />
PKZ1752<br />
PKZ1753<br />
PKZ1754<br />
PKZ1755<br />
PKZ1756<br />
PKZ1761<br />
PKZ1762<br />
PKZ1763<br />
PKZ1764<br />
PKZ1765<br />
PKZ1766<br />
PKZ1767<br />
PKZ1770<br />
PKZ1771<br />
PKZ1772<br />
PKZ1773<br />
PKZ1774<br />
PKZ1775<br />
PKZ1776<br />
Description:<br />
Propeller: FW-190, <strong>Spitfire</strong><br />
10.8V 1000mAh Ni-MH Battery: P-51, FW, 3D, <strong>Spitfire</strong><br />
12g Mini Servo (3W) w/Arms, <strong>Spitfire</strong><br />
Servo Gear Set (3W & 5W), <strong>Spitfire</strong><br />
Servo Arm Assortment(3W & 5W), <strong>Spitfire</strong><br />
Painted Pilot: P-51D, <strong>Spitfire</strong><br />
Prop Shaft w/Hardware: P-51D, FW190, <strong>Spitfire</strong><br />
X-port Extension: P-51D, FW, <strong>Spitfire</strong><br />
5-10 Cell DC Peak Charger (1.8amp)<br />
Control Horns(3)/Skids: P-51, FW190, <strong>Spitfire</strong><br />
Aileron Extension (Reversing): P-51D, FW, <strong>Spitfire</strong><br />
Motor w/Pinion: P-51D, FW190, <strong>Spitfire</strong><br />
Pinion (2): P-51D, FW, <strong>Spitfire</strong><br />
Screws (2): P-51D (M2.5x6), <strong>Spitfire</strong><br />
Complete Gearbox: FW-190, <strong>Spitfire</strong><br />
<strong>Spitfire</strong> <strong>RTF</strong> Electric<br />
Decal Sheet: <strong>Spitfire</strong><br />
Spinner: <strong>Spitfire</strong><br />
Battery Hatch: <strong>Spitfire</strong><br />
Clear Canopy: <strong>Spitfire</strong><br />
Firewall w/Screws: <strong>Spitfire</strong><br />
Instruction Manual: <strong>Spitfire</strong><br />
Painted Wing (No Servo): <strong>Spitfire</strong><br />
Pushrods w/Clevis: <strong>Spitfire</strong><br />
<strong>Horizon</strong>tal Stabilizer: <strong>Spitfire</strong><br />
Painted Cowl: <strong>Spitfire</strong><br />
ESC/Rx, Channel 1: <strong>Spitfire</strong><br />
Rx, Channel 2: <strong>Spitfire</strong><br />
ESC/Rx, Channel 3: <strong>Spitfire</strong><br />
Rx, Channel 4: <strong>Spitfire</strong><br />
ESC/Rx, Channel 5: <strong>Spitfire</strong><br />
Rx, Channel 6: <strong>Spitfire</strong><br />
Fuselage w/Electr: CH1: <strong>Spitfire</strong><br />
Fuselage w/CH2: <strong>Spitfire</strong><br />
Fuselage w/CH3: <strong>Spitfire</strong><br />
Fuselage w/CH4: <strong>Spitfire</strong><br />
Fuselage w/Electr: CH5: <strong>Spitfire</strong><br />
Fuselage w/CH6: <strong>Spitfire</strong><br />
Painted Bare Fuselage: <strong>Spitfire</strong><br />
Replacement Airframe: <strong>Spitfire</strong><br />
Transmitter (ZX10): CH 1, 26.995, <strong>Spitfire</strong><br />
Transmitter (ZX10): CH 2, 27.045, <strong>Spitfire</strong><br />
Transmitter (ZX10): CH 3, 27.095, <strong>Spitfire</strong><br />
Transmitter (ZX10): CH 4, 27.145, <strong>Spitfire</strong><br />
Transmitter (ZX10): CH 5, 27.195, <strong>Spitfire</strong><br />
Transmitter (ZX10): CH 6, 27.255, <strong>Spitfire</strong><br />
OPTIONAL PARTS AND ACCESSORIES<br />
HBZ4020 Sonic Combat Module: All X-Port Planes<br />
PKZ1030 11.1V 2200mAh Li-Po Battery Pack<br />
PKZ1040 DC 2–3-Cell Balancing Li-Po Charger<br />
PKZ1050 11.1V and Balancing Charger Combo<br />
PKZ1054 Adapter: Lg HBZ to EC3<br />
Pièces Détachées<br />
Pour garder votre modèle en état de vol ! Les pièces détachées peuvent être commandées chez votre détaillant habituel.<br />
REFERENCES DESIGNATION<br />
PKZ1005 Hélice: FW-190, <strong>Spitfire</strong><br />
PKZ1027 Batterie 10,8V 1000mAh Ni-MH<br />
PKZ1060 12g Mini Servo (3W) w/Arms, <strong>Spitfire</strong><br />
PKZ1062 Engrenage servo (3W & 5W) <strong>Spitfire</strong><br />
PKZ1132 Palonniers servo (3W & 5W) <strong>Spitfire</strong><br />
PKZ1503 Pilote peint<br />
PKZ1504 Axe hélice et accessoires<br />
PKZ1509 Câble X-Port<br />
PKZ1519 Chargeur DC Peak 5-10 éléments (1,8 A)<br />
PKZ1521 Guignols (3)<br />
PKZ1529 Câble servos ailerons<br />
PKZ1534 Moteur + pignon<br />
PKZ1535 Pignon (S2) P51D, FW, <strong>Spitfire</strong><br />
PKZ1536 Vis moteur (2): M 2.5 x 6<br />
PKZ1628 Réducteur complet FW-190, <strong>Spitfire</strong><br />
PKZ1700 <strong>Spitfire</strong> <strong>RTF</strong> Electric<br />
PKZ1702 Décoration<br />
PKZ1707 Cône d’hélice<br />
PKZ1712 Couvercle batterie<br />
PKZ1713 Cockpit<br />
PKZ1714 Cloison pare-feu<br />
PKZ1715 Notice<br />
PKZ1720 Aile peinte (sans servo)<br />
PKZ1722 Commande + chape (2)<br />
PKZ1724 Stabilisateur peint et accessoires<br />
PKZ1726 Capot moteur et échappements<br />
PKZ1751 Module recepteur/variateur CH1 <strong>Spitfire</strong><br />
PKZ1752 Module recepteur/variateur CH2 <strong>Spitfire</strong><br />
PKZ1753 Module recepteur/variateur CH3 <strong>Spitfire</strong><br />
PKZ1754 Module recepteur/variateur CH4 <strong>Spitfire</strong><br />
PKZ1755 Module recepteur/variateur CH5 <strong>Spitfire</strong><br />
PKZ1756 Module recepteur/variateur CH6 <strong>Spitfire</strong><br />
PKZ1761 Fuselage + electronique CH1 <strong>Spitfire</strong><br />
PKZ1762 Fuselage + electronique CH2 <strong>Spitfire</strong><br />
PKZ1763 Fuselage + electronique CH3 <strong>Spitfire</strong><br />
PKZ1764 Fuselage + electronique CH4 <strong>Spitfire</strong><br />
PKZ1765 Fuselage + electronique CH5 <strong>Spitfire</strong><br />
PKZ1766 Fuselage + electronique CH6 <strong>Spitfire</strong><br />
PKZ1767 Fuselage peint <strong>Spitfire</strong><br />
PKZ1770 Cockpit <strong>Spitfire</strong><br />
PKZ1771 Emetteur (ZX10) : CH. 1, 26.995<br />
PKZ1772 Emetteur (ZX10) : CH. 2, 27.045<br />
PKZ1773 Emetteur (ZX10) : CH. 3, 27.095<br />
PKZ1774 Emetteur (ZX10) : CH. 4, 27.145<br />
PKZ1775 Emetteur (ZX10) : CH. 5, 27.195<br />
PKZ1776 Emetteur (ZX10) : CH. 6, 27.255<br />
Pièces détachées et Options<br />
HBZ4020 Module combat sonore<br />
PKZ1030 Batterie Li-Po 3 éléments 11,1V / 2200 mAh<br />
PKZ1040 Chargeur équilibreur LiPo 2-3 éléments<br />
PKZ1050 Chargeur équilibreur + batterie Li-Po 11,1V<br />
PKZ1054 Adaptateur: Lg HBZ vers EC3<br />
50 51
Parti di Ricambio<br />
Mantenete in efficienza il vostro ParkZone ® <strong>Spitfire</strong> <strong>Mk</strong> <strong>IIB</strong> Le parti di ricambio si possono acuistare presso il vostro negozio di fiducia<br />
o direttamente da www.scorpio.it Vi consigliamo di consultare sempre per primo il vostro rivenditore che è anche in grado di darvi<br />
preziosi consigli. Per la lista dei rivenditori consultate la sezione relativa sul sito della Scorpio.<br />
Codice DESCRIZIONE<br />
PKZ1005 Elica: FW-190, <strong>Spitfire</strong><br />
PKZ1027 Batteria 9 celle 1000mAh NiMH: P-51D<br />
PKZ1060 12g Mini Servo (3W) w/Arms, <strong>Spitfire</strong><br />
PKZ1062 Set Imgranaggi servo (3W & 5W), <strong>Spitfire</strong><br />
PKZ1132 Sete ancorine servo (3W & 5W), <strong>Spitfire</strong><br />
PKZ1503 Pilota dipinto: P-51D<br />
PKZ1504 Albero elica con access.: P-51D<br />
PKZ1509 Estenzione X-Port<br />
PKZ1519 Caricabatterie 5-10 Cell CC (1.8 A)<br />
PKZ1521 Squadrette (3) & e pattini ala<br />
PKZ1529 Prolunga alettoni (inversione) P-51D, FW, <strong>Spitfire</strong><br />
PKZ1534 Motore con pignone: P-51D<br />
PKZ1535 Pignone (2): P-51D, FW, <strong>Spitfire</strong><br />
PKZ1536 Viti motore (2): M 2.5 x 6<br />
PKZ1628 Riduttore completo FW-190, <strong>Spitfire</strong><br />
PKZ1700 <strong>Spitfire</strong> <strong>RTF</strong> Electric<br />
PKZ1702 Foglio Decal: P-51D<br />
PKZ1707 Ogiva: P-51D<br />
PKZ1712 Copri batteria: P-51D<br />
PKZ1713 Cappottina: P-51D<br />
PKZ1714 Ordinata con viti fiss.: P-51D<br />
PKZ1715 Manuale di istruzioni: P51D<br />
PKZ1720 Ala dipinta (senza servi): P-51D<br />
PKZ1722 Rinvii con forcelle (2): P-51D<br />
PKZ1724 Piano orizzontale con accessori: P-51D<br />
PKZ1726 Cappottatura motore con scarichi: P-51D<br />
PKZ1751 Regol/Rx, Canale 1: <strong>Spitfire</strong><br />
PKZ1752 Regol/Rx, Canale 2: <strong>Spitfire</strong><br />
PKZ1753 Regol/Rx, Canale 3: <strong>Spitfire</strong><br />
PKZ1754 Regol/Rx, Canale 4: <strong>Spitfire</strong><br />
PKZ1755 Regol/Rx, Canale 5: <strong>Spitfire</strong><br />
PKZ1756 Regol/Rx, Canale 6: <strong>Spitfire</strong><br />
PKZ1761 Fusoliera con elettronica: CH1: <strong>Spitfire</strong><br />
PKZ1762 Fusoliera con elettronica: CH2: <strong>Spitfire</strong><br />
PKZ1763 Fusoliera con elettronica: CH3: <strong>Spitfire</strong><br />
PKZ1764 Fusoliera con elettronica: CH4: <strong>Spitfire</strong><br />
PKZ1765 Fusoliera con elettronica: CH5: <strong>Spitfire</strong><br />
PKZ1766 Fusoliera con elettronica: CH6: <strong>Spitfire</strong><br />
PKZ1767 Fusoliera nuda: <strong>Spitfire</strong><br />
PKZ1770 Cellula ricambio: <strong>Spitfire</strong><br />
PKZ1771 Trasmittente (ZX10): CH. 1, 26.995<br />
PKZ1772 Trasmittente (ZX10): CH. 2, 27.045<br />
PKZ1773 Trasmittente (ZX10): CH. 3, 27.095<br />
PKZ1774 Trasmittente (ZX10): CH. 4, 27.145<br />
PKZ1775 Trasmittente (ZX10): CH. 5, 27.195<br />
PKZ1776 Trasmittente (ZX10): CH. 6, 27.255<br />
Parti opzionali<br />
HBZ4020 Modulo Sonoro di Combattimento<br />
PKZ1030 Batteria Li-Po da 3-celle 11.1V 2200mAh<br />
PKZ1040 Caricabatt/Bilanciatore CC 2–3-Celle Li-Po<br />
PKZ1050 Combo Caricabatt/Bilanciatore11.1V<br />
PKZ1054 Adattatore: Lg HBZ to EC3<br />
Recambios<br />
Asegúrese de mantener su <strong>Spitfire</strong> <strong>Mk</strong> <strong>IIB</strong> siempre en condición de volar. Los recambios están disponibles en su tienda de ocio<br />
local o directamente a través de <strong>Horizon</strong> <strong>Hobby</strong> (www.horizonhobby.com). Pruebe primero en su distribuidor local. Su distribuidor<br />
le ayudará y le conseguirá todo lo que lo necesite.<br />
Nº PIEZA DESCRIPCIÓN<br />
PKZ1005 Hélice: FW-190, <strong>Spitfire</strong><br />
PKZ1027 Baterías 1000mAh NiMH de 9 acumuladores: P-51D<br />
PKZ1060 12g Mini Servo (3W) w/Arms, <strong>Spitfire</strong><br />
PKZ1062 Conjunto del servomecanismo (3W & 5W) <strong>Spitfire</strong><br />
PKZ1132 Brazo del servomecanismo (3W & 5W), <strong>Spitfire</strong><br />
PKZ1503 Piloto pintado: P-51D<br />
PKZ1504 Eje de la hélice con herrajes: P-51D<br />
PKZ1509 Extensión de puerto X<br />
PKZ1519 Cargador de pico de CC de 5-10 acumuladores (1,8 A)<br />
PKZ1521 Balancines de control (3) y patines del ala<br />
PKZ1529 Extensión de alerón<br />
PKZ1534 Motor con piñón: P-51D<br />
PKZ1535 Piñón (2): P-51D, FW, <strong>Spitfire</strong><br />
PKZ1536 Tornillos del motor (2): M 2.5 x 6<br />
PKZ1628 Caja de cambios íntegra: FW-190, <strong>Spitfire</strong><br />
PKZ1700 <strong>Spitfire</strong> <strong>RTF</strong> Electric<br />
PKZ1702 Lámina de calcomanías: P-51D<br />
PKZ1707 Cono de la hélice: P-51D<br />
PKZ1712 Tapa de la batería: P-51D<br />
PKZ1713 Cabina cerrada transparente: P-51D<br />
PKZ1714 Cortafuegos con tornillos: P-51D<br />
PKZ1715 Manual de instrucciones: P51D<br />
PKZ1720 Ala pintada (no servo): P-51D<br />
PKZ1722 Varillas de empuje con abrazadera (2): P-51D<br />
PKZ1724 Estabilizador horizontal pintado con accesorios: P-51D<br />
PKZ1726 Capó con chimeneas de escape: P-51D<br />
PKZ1751 ESC/Receptor, Canal 1: <strong>Spitfire</strong><br />
PKZ1752 Receptor, Canal 2: <strong>Spitfire</strong><br />
PKZ1753 ESC/Receptor, Canal 3: <strong>Spitfire</strong><br />
PKZ1754 Receptor, Canal 4 : <strong>Spitfire</strong><br />
PKZ1755 ESC/Receptor, Canal 5: <strong>Spitfire</strong><br />
PKZ1756 Receptor, Canal 6: <strong>Spitfire</strong><br />
PKZ1761 Fuselaje con Electr: CH1: <strong>Spitfire</strong><br />
PKZ1762 Fuselaje con CH2: <strong>Spitfire</strong><br />
PKZ1763 Fuselaje con CH3: <strong>Spitfire</strong><br />
PKZ1764 Fuselaje con CH4: <strong>Spitfire</strong><br />
PKZ1765 Fuselaje con Electr: CH5: <strong>Spitfire</strong><br />
PKZ1766 Fuselaje con CH6: <strong>Spitfire</strong><br />
PKZ1767 Fuselaje pintado sin revestimiento: <strong>Spitfire</strong><br />
PKZ1770 Estructura de reemplazo del avión: <strong>Spitfire</strong><br />
PKZ1771 Transmisor (ZX10): CH. 1, 26.995<br />
PKZ1772 Transmisor (ZX10): CH. 2, 27.045<br />
PKZ1773 Transmisor (ZX10): CH. 3, 27.095<br />
PKZ1774 Transmisor (ZX10): CH. 4, 27.145<br />
PKZ1775 Transmisor (ZX10): CH. 5, 27.195<br />
PKZ1776 Transmisor (ZX10): CH. 6, 27.255<br />
Accesorios opcionales<br />
HBZ4020 Sonic Combat Module<br />
PKZ1030 Pack de batería 3 celulas 11,1 v. 2200 mAh Li-Po<br />
PKZ1040 Cargador de batería compensadora Li-Pode corriente directa de 2 a 3 celdas<br />
PKZ1050 Conjunto de cargador de batería compensadora de 11.1V<br />
PKZ1054 Adaptador: Lg HBZ a EC3<br />
52 53
Your <strong>Spitfire</strong> <strong>Mk</strong> <strong>IIB</strong> comes equipped with the ability to add<br />
to the excitement of flying. X-Port technology, exclusive to<br />
<strong>Hobby</strong>Zone ® and ParkZone ® planes, allows for such things<br />
as air-to-air combat, dropping bombs and even night flight<br />
for select aircraft. These items (sold separately) instantly<br />
add fun and challenge to your flights.<br />
For the <strong>Spitfire</strong>, we recommend you use the Sonic Combat<br />
Module (HBZ4020). You can take on other X-Port equipped<br />
aircraft by attaching this module to your plane and shooting<br />
down your buddy’s airplane.<br />
We hope you enjoy flying your new <strong>Spitfire</strong> <strong>Mk</strong> <strong>IIB</strong>, and<br />
thank you for supporting ParkZone. Please continue to<br />
watch ParkZone.com for the most up-to-date information.<br />
This is the official website of the creators and distributors<br />
of all ParkZone products. There are many other planes<br />
available from ParkZone in a variety of models, from scale<br />
civilian aircraft to warbirds to planes that can be flown<br />
indoors and out, and we’re always working on new and<br />
exciting products for you.<br />
X-Port Accessories<br />
Future RC Flight<br />
When you “hit” another airplane, a high-pitched sound can<br />
be heard that signals you have hit that plane, leaving the<br />
motor of the “hit” plane disabled for about 8 seconds. The<br />
pilot will still maintain the ability to steer for a safe landing<br />
or reposition their plane for a counterattack.<br />
We do not recommend you use the Aerial Drop Module <br />
(HBZ6023) or Night Flight Module (HBZ3510) with your<br />
<strong>Spitfire</strong> <strong>Mk</strong> <strong>IIB</strong>. Please visit www.parkzone.com for information<br />
about new X-Port modules.<br />
For more advanced electric products beyond ParkZone,<br />
we recommend that you research the items developed and<br />
distributed under the E-flite ® brand.<br />
Visit www.horizonhobby.com for more information.<br />
Sincerely,<br />
The ParkZone Team<br />
Lo <strong>Spitfire</strong> <strong>Mk</strong> <strong>IIB</strong> è dotato della possibilità di aggiungere<br />
alla possibilità di farlo volare anche quella di utilizzare la<br />
tecnologia X-Port una esclusiva della <strong>Hobby</strong>Zone ® e della<br />
ParkZone ® che permette di effettuare combattimenti aerei,<br />
sganciare bombe e perfino il volo notturno con alcuni modelli.<br />
Questi accessori (venduti separatamente) aggiungono<br />
divertimento ed emozioni al volo.<br />
Per lo <strong>Spitfire</strong> si consiglia il modulo Sonic Combat Module <br />
(HBZ4020). Con esso si può sparare ad altri modelli dotati<br />
dello stesso modulo.<br />
Ci auguriamo che vi possiate divertire a far volare lo<br />
<strong>Spitfire</strong> <strong>Mk</strong> <strong>IIB</strong> e rimanere contenti di ParkZone. Teneteci<br />
d’occhio sarete aggiornati sulle novità. Si ricorda che esistono<br />
molti altri modelli ParkZone di tanti tipi diversi e non<br />
dimenticate che stiamo continuamente cercando di mettere<br />
a punto nuovi prodotti sia indoor che ourdoor.<br />
Accessori X-Port<br />
I Prossimi Modelli RC<br />
Quando si “colpisce” l’aereo dell’avversario si può udire<br />
un suono acuto che indica che si è colpito il modello ed<br />
il motore dell’aereo colpito si arresta per 8 secondi. In<br />
questo tempo il pilota può cercare di atterrare in sicurezza<br />
o riposizionare l’aereo per un contrattacco.<br />
Non consigliamo di usare il Aerial Drop Module <br />
(HBZ6023) oppure il Night Flight Module (HBZ3510) con lo<br />
<strong>Spitfire</strong> <strong>Mk</strong> <strong>IIB</strong>. Visitate il sito www.scorpio.it per maggiori<br />
informazioni sui moduli X-Port.<br />
Se cercate modelli elettrici ancora più evoluti di quelli<br />
ParkZone vi consigliamo di dare un’occhiata alla linea<br />
E-flite ® visitando www.scorpio.it<br />
Cordialmente,<br />
The ParkZone Team<br />
Votre <strong>Spitfire</strong> <strong>Mk</strong> <strong>IIB</strong>t est équipé de la prise exclusive<br />
X-Port qui permet d’ajouter des options. Les modules<br />
(vendus séparément) peuvent être connectés sur<br />
cette prise. L’acquisition d’un module de combat sonore<br />
(HBZ4020) vous transformera en pilote de chasse. Ce<br />
module permet de s’engager dans des combats aériens<br />
avec d’autres modèles équipés du même module.<br />
“Nous espérons que vous prendrez beaucoup de plaisir<br />
à voler votre nouveau <strong>Spitfire</strong> <strong>Mk</strong> <strong>IIB</strong> et nous vous remercions<br />
de soutenir ParkZone ® . Continuez de consulter notre<br />
site ParkZone.com pour obtenir les informations les plus<br />
récentes. C’est le site Web officiel des créateurs et des<br />
distributeurs de tous les produits de ParkZone. Il y a beaucoup<br />
d’autres avions fournis par ParkZone dans une large<br />
gamme de modèles, des avions civils aux avions de la<br />
guerre qui peuvent voler à l’intérieur et à l’extérieur. Nous<br />
Accessoires X-Port<br />
Vos Prochains Modèles RC<br />
Si votre tir atteint un autre avion équipé du module, vous<br />
désactiver son moteur pour une durée de 8 secondes ce<br />
qui le limite à un vol plané pendant cette période.<br />
Nous vous recommandons également le module de largage<br />
aérien (HBZ6023) et celui de vol de nuit (HBZ3510)<br />
pour équiper votre <strong>Spitfire</strong>.<br />
continuons de travailler pour vous proposer de nouveaux<br />
et passionnants produits.<br />
Pour des produits électriques plus évolués que ceux de<br />
ParkZone, nous recommandons de rechercher parmi les<br />
articles développés et distribués sous la marque d’E-flite ® .<br />
Visitez www.horizonhobby.com pour plus d’informations.<br />
Sincèrement votre,<br />
Le team ParkZone<br />
Accesorios de Tecnología X-Port<br />
Su <strong>Spitfire</strong> <strong>Mk</strong> <strong>IIB</strong> cuenta con la característica de agregar<br />
emoción sus vuelos. La tecnología X-Port exclusiva de los<br />
aviones <strong>Hobby</strong>Zone ® y ParkZone ® , permite realizar combate<br />
en el aire, dejar caer bombas e incluso vuelos nocturnos<br />
en ciertas aeronaves. Estos artículos (se venden por<br />
separado) agregan retos y diversión inmediata al momento<br />
de volar. Para el <strong>Spitfire</strong> recomendamos que utilice el<br />
Módulo de Combate Sónico (HBZ4020). Puede desafiar<br />
otras aeronaves equipadas con la tecnología X-Port al<br />
agregar este módulo a su avión y derribar el avión de un<br />
oponente.<br />
Al “impactar” otro avión, podrá escuchar un pitido agudo<br />
el cual indica el acierto, dejando el motor del avión de su<br />
oponente desconectado por unos 8 segundos. El piloto<br />
todavía podrá gobernar para un aterrizaje seguro o bien<br />
posicionarse para un contraataque<br />
No recomendamos que utilice el Módulo de Caída Aérea <br />
(HBZ6023) o el Módulo de Vuelo Nocturno (HBZ3510) con<br />
su <strong>Spitfire</strong> <strong>Mk</strong> <strong>IIB</strong>. Por favor visite la página www.parkzone.<br />
com para mayor información sobre los nuevos módulos de<br />
tecnología X-Port.<br />
Futuros Vuelos de Radiocontrol<br />
Esperamos que disfrute volar su nuevo <strong>Spitfire</strong> <strong>Mk</strong> <strong>IIB</strong>, y<br />
le agradecemos el apoyo brindado a ParkZone. Por favor<br />
continúe visitando la página www.parkzone.com para consultar<br />
información más actualizada. Este es el sitio oficial<br />
de los creadores y distribuidores de todos los productos<br />
ParkZone. Existe una variedad de modelos de aviones de<br />
ParkZone, desde aeronaves civiles a escala hasta aviones<br />
de guerra, y otros que incluso se pueden volar tanto en un<br />
lugar cerrado como abierto, además que siempre estamos<br />
trabajando en nuevos y emocionantes productos.<br />
Para información sobre productos eléctricos más avanzados,<br />
le recomendamos ver aquéllos creados y distribuidos<br />
por la marca E-flite ® .<br />
Visite el sitio www.horizonhobby.com para más detalles.<br />
Atentamente,<br />
El Equipo de ParkZone<br />
54 55
ParkZone products are distributed<br />
in the United Kingdom exclusively by:<br />
Helger Distribution<br />
Units 2-4, Ployters Road<br />
Staple Tye - Southern Way<br />
Harlow, Essex CM187NS<br />
©2006 <strong>Horizon</strong> <strong>Hobby</strong>, Inc.<br />
www.parkzone.com<br />
ParkZone Produkte werden exklusiv in Françaisland vertrieben von:<br />
JSB Marketing & Vertriebs GmbH<br />
Otto Hahn Str. 9a<br />
25337 Elmshorn<br />
©2006 <strong>Horizon</strong> <strong>Hobby</strong>, Inc.<br />
www.parkzone.com<br />
I prodotti ParkZone sono distribuiti in esclusiva per l’Italia da:<br />
Scorpio.s.r.l.<br />
CP 750<br />
38100 Trento<br />
©2006 <strong>Horizon</strong> <strong>Hobby</strong>, Inc.<br />
www.parkzone.com<br />
Visitate www.scorpio.it per maggiori informazioni sui prodotti<br />
ParkZone: troverete altri aerei, scafi ed auto!<br />
Los productos ParkZone están distribuidos en exclusiva en Espana por:<br />
Modelimport<br />
c/Primavera 48<br />
Pol. Ind. Las Monjas<br />
22850 Torrejon de Ardoz<br />
Madrid<br />
©2006 <strong>Horizon</strong> <strong>Hobby</strong>, Inc.<br />
www.parkzone.com<br />
Mundo <strong>Hobby</strong><br />
Av. Prologacion Mariana Otero #1620<br />
Guadulajara, Jalisco<br />
Mexico C.P. 45100<br />
©2006 <strong>Horizon</strong> <strong>Hobby</strong>, Inc.<br />
www.mundohobby.com.mx<br />
9652<br />
®