Spitfire Mk IIB RTF - Horizon Hobby
Spitfire Mk IIB RTF - Horizon Hobby
Spitfire Mk IIB RTF - Horizon Hobby

You also want an ePaper? Increase the reach of your titles
YUMPU automatically turns print PDFs into web optimized ePapers that Google loves.
Step 15<br />
Italiano<br />
Passo 15. Lancio a Mano del <strong>Spitfire</strong><br />
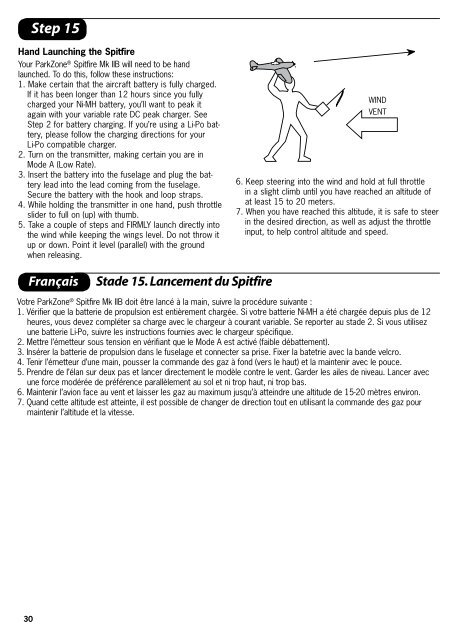
Hand Launching the <strong>Spitfire</strong><br />
Your ParkZone ® <strong>Spitfire</strong> <strong>Mk</strong> <strong>IIB</strong> will need to be hand<br />
launched. To do this, follow these instructions:<br />
1. Make certain that the aircraft battery is fully charged.<br />
If it has been longer than 12 hours since you fully<br />
charged your Ni-MH battery, you’ll want to peak it<br />
again with your variable rate DC peak charger. See<br />
Step 2 for battery charging. If you’re using a Li-Po battery,<br />
please follow the charging directions for your<br />
Li-Po compatible charger.<br />
2. Turn on the transmitter, making certain you are in<br />
Mode A (Low Rate).<br />
3. Insert the battery into the fuselage and plug the battery<br />
lead into the lead coming from the fuselage.<br />
Secure the battery with the hook and loop straps.<br />
4. While holding the transmitter in one hand, push throttle<br />
slider to full on (up) with thumb.<br />
5. Take a couple of steps and FIRMLY launch directly into<br />
the wind while keeping the wings level. Do not throw it<br />
up or down. Point it level (parallel) with the ground<br />
when releasing.<br />
WIND<br />
VENT<br />
6. Keep steering into the wind and hold at full throttle<br />
in a slight climb until you have reached an altitude of<br />
at least 15 to 20 meters.<br />
7. When you have reached this altitude, it is safe to steer<br />
in the desired direction, as well as adjust the throttle<br />
input, to help control altitude and speed.<br />
Il ParkZone ® <strong>Spitfire</strong> <strong>Mk</strong> <strong>IIB</strong> deve venire lanciato a mano.<br />
Segui queste istruzioni:<br />
1. Aaicurarsi che la batteria del modello sia ben carica.<br />
Se sono trascorse più di 12 ore dalla ricarica completa<br />
conviene caricarla ancora un po’ con il caricabatterie a<br />
rateo variabile CC. Vedere il passo 2 per quanto riguarda<br />
la carica. Se si usano batterie Li-Po seguire le istruzioni<br />
del caricabatterie Li-Po.<br />
2. Accendere la trasmittente, assicurandosi che la trasmittente<br />
sia nel modo A (Low Rate).<br />
3. inserire la batteria nel modello collegandola al cavo che<br />
esce dalla fusoliera. Fissare la batteria col velcro.<br />
4. Tenendo la trasmittente con una mano, sposta il cursore<br />
del gas al massimo (in su) con il pollice.<br />
5. Fare un paio di passi e lanciare il modello CON<br />
DECISIONE controvento tenendo le ali parallele al terreno.<br />
Non lanciarlo verso l’alto o verso il basso. Lanciarlo<br />
parallelo al terreno.<br />
Español<br />
Paso 15. Lanzamiento Manual del <strong>Spitfire</strong><br />
VENTO<br />
VIENTO<br />
6. Tienilo puntato controvento e con il motore al massimo<br />
fallo salire moderatamente fino a raggiungere una quota<br />
di almeno 15-20 metri.<br />
7. Raggiunta tale quota puoi virare nella direzione voluta ed<br />
anche regolare il gas per mantenere la quota e la velocità.<br />
Français<br />
Stade 15. Lancement du <strong>Spitfire</strong><br />
Votre ParkZone ® <strong>Spitfire</strong> <strong>Mk</strong> <strong>IIB</strong> doit être lancé à la main, suivre la procédure suivante :<br />
1. Vérifier que la batterie de propulsion est entièrement chargée. Si votre batterie Ni-MH a été chargée depuis plus de 12<br />
heures, vous devez compléter sa charge avec le chargeur à courant variable. Se reporter au stade 2. Si vous utilisez<br />
une batterie Li-Po, suivre les instructions fournies avec le chargeur spécifique.<br />
2. Mettre l’émetteur sous tension en vérifiant que le Mode A est activé (faible débattement).<br />
3. Insérer la batterie de propulsion dans le fuselage et connecter sa prise. Fixer la batetrie avec la bande velcro.<br />
4. Tenir l’émetteur d’une main, pousser la commande des gaz à fond (vers le haut) et la maintenir avec le pouce.<br />
5. Prendre de l’élan sur deux pas et lancer directement le modèle contre le vent. Garder les ailes de niveau. Lancer avec<br />
une force modérée de préférence parallèlement au sol et ni trop haut, ni trop bas.<br />
6. Maintenir l’avion face au vent et laisser les gaz au maximum jusqu’à atteindre une altitude de 15-20 mètres environ.<br />
7. Quand cette altitude est atteinte, il est possible de changer de direction tout en utilisant la commande des gaz pour<br />
maintenir l’altitude et la vitesse.<br />
Su ParkZone ® <strong>Spitfire</strong> <strong>Mk</strong> <strong>IIB</strong> tendrá que lanzarse manualmente. Para hacerlo, siga estas instrucciones:<br />
1. Asegúrese que la batería del avión esté totalmente cargada. Si no han pasado más de 12 horas desde que cargó<br />
completamente su batería Ni-MH, querrá recargarla nuevamente con su cargador de corriente directa de velocidad<br />
variable con detección de picos. Consulte el Paso 2, Cargar la Batería. Si va a utilizar una batería Li-Po, por favor siga<br />
las instrucciones de su cargador compatible para batería Li-Po.<br />
2. Encienda el transmisor, asegurándose que se encuentra en el Modo A (velocidad baja).<br />
3. Inserte la batería en el fuselaje y conecte el cable de la batería con el cable que sale del fuselaje. Asegure la batería con<br />
el gancho y las tiras.<br />
4. Mientras sujeta el transmisor con una mano, empuje el mando deslizante del acelerador a máxima potencia (hacia<br />
arriba) con el pulgar.<br />
5. Tome unos cuantos pasos y lance FIRMEMENTE el avión contra el viento, manteniendo las alas niveladas. No lo lance<br />
hacia arriba o hacia abajo. Deberá estar en posición horizontal (paralelamente) con el suelo cuando lo suelte.<br />
6. Mantenga la dirección contra el viento y mantenga el avión en máxima potencia en una ligera ascensión hasta que haya<br />
alcanzado una altitud mínima de 15 a 21 m aproximadamente.<br />
7. Cuando haya alcanzado esta altitud, podrá maniobrar en la dirección deseada con seguridad, además de ajustar las<br />
órdenes del acelerador para ayudar a controlar la altitud y la velocidad.<br />
30 31