You also want an ePaper? Increase the reach of your titles
YUMPU automatically turns print PDFs into web optimized ePapers that Google loves.
EN<br />
<br />
<br />
the chuck (4).<br />
Turn the auxiliary grip (7) to the required<br />
position.<br />
Tighten the auxiliary grip (7) by turning it<br />
clockwise.<br />
Removing<br />
Loosen the auxiliary grip (7) by turning it<br />
counterclockwise.<br />
Remove the auxiliary grip (7).<br />
Tighten the auxiliary grip (7) by turning it<br />
clockwise.<br />
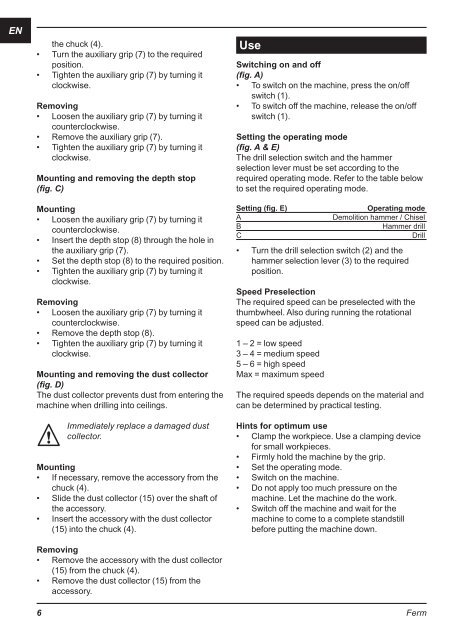
Mounting and removing the depth stop<br />
(fig. C)<br />
Mounting<br />
Loosen the auxiliary grip (7) by turning it<br />
counterclockwise.<br />
Insert the depth stop (8) through the hole in<br />
the auxiliary grip (7).<br />
Set the depth stop (8) to the required position.<br />
Tighten the auxiliary grip (7) by turning it<br />
clockwise.<br />
Removing<br />
Loosen the auxiliary grip (7) by turning it<br />
counterclockwise.<br />
Remove the depth stop (8).<br />
Tighten the auxiliary grip (7) by turning it<br />
clockwise.<br />
Mounting and removing the dust collector<br />
(fig. D)<br />
The dust collector prevents dust from entering the<br />
machine when drilling into ceilings.<br />
Mounting<br />
<br />
Immediately replace a damaged dust<br />
collector.<br />
If necessary, remove the accessory from the<br />
chuck (4).<br />
Slide the dust collector (15) over the shaft of<br />
the accessory.<br />
Insert the accessory with the dust collector<br />
(15) into the chuck (4).<br />
Removing<br />
Remove the accessory with the dust collector<br />
(15) from the chuck (4).<br />
Remove the dust collector (15) from the<br />
accessory.<br />
Use<br />
Switching on and off<br />
(fig. A)<br />
To switch on the machine, press the on/off<br />
switch (1).<br />
To switch off the machine, release the on/off<br />
switch (1).<br />
Setting the operating mode<br />
(fig. A & E)<br />
The drill selection switch and the hammer<br />
selection lever must be set according to the<br />
required operating mode. Refer to the table below<br />
to set the required operating mode.<br />
<br />
A<br />
B<br />
C<br />
<br />
<br />
Demolition hammer / Chisel<br />
Hammer drill<br />
Drill<br />
Turn the drill selection switch (2) and the<br />
hammer selection lever (3) to the required<br />
position.<br />
Speed Preselection<br />
The required speed can be preselected with the<br />
thumbwheel. Also during running the rotational<br />
speed can be adjusted.<br />
1 – 2 = low speed<br />
3 – 4 = medium speed<br />
5 – 6 = high speed<br />
Max = maximum speed<br />
The required speeds depends on the material and<br />
can be determined by practical testing.<br />
Hints for optimum use<br />
Clamp the workpiece. Use a clamping device<br />
for small workpieces.<br />
Firmly hold the machine by the grip.<br />
Set the operating mode.<br />
Switch on the machine.<br />
Do not apply too much pressure on the<br />
machine. Let the machine do the work.<br />
Switch off the machine and wait for the<br />
machine to come to a complete standstill<br />
before putting the machine down.<br />
6 Ferm


