Achtung! - OPUS Schalter
Achtung! - OPUS Schalter
Achtung! - OPUS Schalter

Create successful ePaper yourself
Turn your PDF publications into a flip-book with our unique Google optimized e-Paper software.
D<br />
561.166<br />
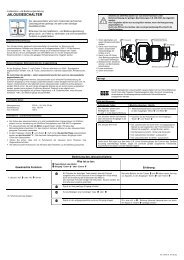
Funkaktor<br />
Multifunktions-Stromstoßschalter<br />
GN-A-U230V-SM-2<br />
1+1 Schließer nicht potenzialfrei 10A/250V AC,<br />
Glühlampen 2000 Watt. Stand-by-Verlust nur<br />
0,9 Watt.<br />
Für Einbau- und AP-Montage. 45mm lang,<br />
55mm breit, 33mm tief.<br />
Schalt- und Steuerspannung örtlich 230V.<br />
Dieser Funkaktor als Multifunktions-<br />
Stromstoßschalter verfügt über die modernste<br />
Hybrid-Technologie: Die verschleißfreie<br />
Empfangs- und Auswerte-Elektronik ist<br />
mit zwei im Nulldurchgang schaltenden<br />
bistabilen Relais kombiniert.<br />
Dadurch gibt es auch im eingeschalteten<br />
Zustand keine Spulen-Verlustleistung und keine<br />
Erwärmung hierdurch. Nach der Installation<br />
die automatische kurze Synchronisation<br />
abwarten, bevor der geschaltete Verbraucher<br />
an das Netz gelegt wird.<br />
Zusätzlich zu dem Funk-Steuereingang über<br />
eine innenliegende Antenne kann dieser Multifunktions-Stromstoßschalter<br />
auch mit einem<br />
eventuell davor montierten konventionellen<br />
230V-Steuertaster örtlich gesteuert werden.<br />
In der Funktion 2xS nur der Kontakt 1.<br />
Drehschalter<br />
Mit dem oberen Drehschalter werden in der<br />
Stellung LRN bis zu 35 Funktaster zugeordnet,<br />
davon ein oder mehrere Zentralsteuerungs-<br />
Taster. Danach wird damit die gewünschte<br />
Funktion dieses Multifunktions-Stromstoßschalters<br />
gewählt:<br />
2xS = 2-fach-Stromstoßschalter mit je<br />
1 Schließer<br />
2S = Stromstoßschalter mit 2 Schließern<br />
WS = Stromstoßschalter mit 1 Schließer und<br />
1 Öffner<br />
SS1 = Serienschalter 1 + 1 Schließer mit<br />
Schaltfolge 1<br />
SS2 = Serienschalter 1 + 1 Schließer mit<br />
Schaltfolge 2<br />
Schaltfolge 2<br />
Schaltfolge SS1:<br />
0 - Kontakt 1 - Kontakt 2 - Kontakte 1+2<br />
Schaltfolge SS2:<br />
0 - Kontakt 1 - Kontakte 1+2 - Kontakt 2<br />
Im Modus 2xS steuert EA1 den Kontakt 1, und<br />
EA2 den Kontakt 2. In allen anderen Modi<br />
werden die Kontakte über den Universaltaster<br />
gesteuert.<br />
Der untere Drehschalter wird nur für das<br />
Einlernen der Sender benötigt.<br />
Die LED begleitet den Einlernvorgang gemäß<br />
Bedienungsanleitung und zeigt im Betrieb<br />
Funk-Steuerbefehle durch kurzes Aufblinken an.<br />
Anschlussbeispiel<br />
Technische Daten<br />
Glühlampenlast und<br />
2000W<br />
Halogenlampenlast 1)<br />
230V<br />
Steuerstrom 230V-<br />
3,5mA<br />
Steuereingang örtlich<br />
Max. Parallelkapazität<br />
0,01F<br />
(ca. Länge) der örtlichen<br />
(30m)<br />
Steuerleitung bei 230V AC<br />
Stand-by-Verlust (Wirkleistung) 0,9W<br />
1)<br />
Bei Lampen mit max. 150W.<br />
Einlernen der Funksensoren in Funkaktoren<br />
Alle Sensoren, wie Funktaster, Funk-Handsender,<br />
Funk-Sendemodule, Funk-Fenster-<br />
Türkontakte, Funk-Schaltuhren und Funk-<br />
Bewegungs-Helligkeitssensoren, müssen in<br />
Aktoren (Empfänger mit Dimmern, <strong>Schalter</strong>n<br />
und Relais) eingelernt werden, damit diese<br />
deren Befehle erkennen und ausführen können.<br />
Aktor GN-A-U230V-SM-2 einlernen<br />
Bei der Lieferung ab Werk ist der Lernspeicher<br />
leer. Sollten Sie nicht sicher sein, ob bereits<br />
etwas eingelernt wurde, dann müssen Sie<br />
den Speicherinhalt komplett leeren:<br />
Stellen Sie den oberen Drehschalter auf CLR.<br />
Die LED blinkt aufgeregt. Nun innerhalb von<br />
10 Sekunden den unteren Drehschalter 3-mal<br />
zu dem Rechtsanschlag (Drehen im Uhrzeiger<br />
10 Sekunden den unteren Drehschalter 3-mal<br />
zu dem Rechtsanschlag (Drehen im Uhrzeigersinn)<br />
und wieder davon weg drehen. Die<br />
LED hört auf zu blinken und erlischt nach<br />
2 Sekunden. Alle eingelernten Sensoren sind<br />
gelöscht.<br />
Einzelne eingelernte Sensoren löschen<br />
wie bei dem Einlernen, nur den oberen<br />
Drehschalter auf CLR anstatt LRN stellen und<br />
den Sensor betätigen. Die zuvor aufgeregt<br />
blinkende LED erlischt.<br />
Sensoren einlernen<br />
1. Den unteren Drehschalter auf die<br />
gewünschte Einlernfunktion stellen:<br />
ZA = 'zentral aus' einlernen;<br />
EA1 = Taster 1 'ein/aus' einlernen;<br />
EA2 = Taster 2 'ein/aus' einlernen;<br />
Taster = Taster für Serienschalter einlernen;<br />
ZE = 'zentral ein' einlernen<br />
Richtungstaster werden beim Tasten oben<br />
oder unten automatisch komplett eingelernt.<br />
Sonst muss oben und unten gleich eingelernt<br />
werden, wenn der Taster oben und<br />
unten die selbe Funktion haben soll.<br />
2. Den oberen Drehschalter auf LRN stellen.<br />
Die LED blinkt ruhig.<br />
3. Den einzulernenden Sensor betätigen.<br />
Die LED erlischt.<br />
Sollen weitere Sensoren eingelernt werden,<br />
den oberen Drehschalter kurz von der Position<br />
LRN wegdrehen und bei 1. aufsetzen.<br />
Nach dem Einlernen die Drehschalter auf die<br />
gewünschte Funktion einstellen.<br />
!<br />
Ist ein Aktor lernbereit (die LED<br />
blinkt ruhig), dann wird das<br />
nächste ankommende Signal<br />
eingelernt. Daher unbedingt darauf<br />
achten, dass während der Einlernphase<br />
keine anderen Sensoren<br />
aktiviert werden.<br />
<strong>Achtung</strong>!<br />
Diese Geräte dürfen nur durch eine<br />
Elektrofachkraft installiert werden,<br />
andernfalls besteht Brandgefahr oder<br />
Gefahr eines elektrischen Schlages!<br />
03/2009 Änderungen vorbehalten.<br />
JÄGER DIREKT ® GmbH & Co.KG<br />
Hochstr. 6, D-64385 Reichelsheim<br />
Kontakt<br />
Technische Beratung: 06164 9300-549<br />
E-Mail: info@jaeger-direkt.com
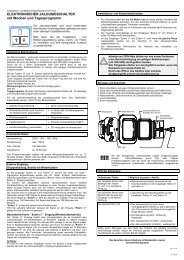
I<br />
561.166<br />
Attuatore wireless<br />
Relè passo-passo multifunzione<br />
GN-A-U230V-SM-2<br />
Contatti 1+1 NA non potenzialmente libero<br />
10A/250V AC, lampade ad incandescenza<br />
2000Watt. Dispersione in stand-by solo<br />
0,9 Watt.<br />
Per montaggio in scatola da incasso o a<br />
parete. Lunghezza 45mm, larghezza 55mm,<br />
profondità 35mm.<br />
Tensione di commutazione e di comando<br />
locale 230V.<br />
Questo attuatore wireless come relè<br />
passo-passo multifunzione dispone della più<br />
moderna tecnologia Hybrid da noi sviluppata:<br />
l'elettronica di ricezione ed elaborazione dati<br />
senza logoramento è combinata con un relè<br />
bistabile che commuta al passaggio zero<br />
della curva sinusoidale.<br />
Di conseguenza, anche nello stato acceso non<br />
vi è alcuna potenza dissipata dalla bobina e<br />
pertanto nessun calore. Dopo l'installazione<br />
attendere la breve sincronizzazione automatica<br />
prima di allacciare il carico alla rete.<br />
In aggiunta all'ingresso di comando wireless<br />
tramite un'antenna interna, questo relè<br />
passo-passo multifunzione può essere<br />
comandato localmente anche da comuni<br />
pulsanti 230V già esistenti.<br />
Nella funzione 2xS solo il contatto 1.<br />
Selettori funzioni<br />
Con il selettore in alto nella posizione LRN<br />
possono essere assegnati fino a 35 pulsanti<br />
wireless, di cui uno o più per il comando<br />
centrale. Dopo di che si sceglie relè passopasso<br />
multifunzione la funzione desiderata:<br />
2xS = 2 Relè passo-passo indipendenti con<br />
contatto 1 NA<br />
2S = Relè passo-passo bipolare con<br />
contatti 2 NA<br />
WS = Relè passo passo con contatti<br />
1NA+1NC<br />
SS1 = Commutatore con contatti 1+1 NA e<br />
sequenza SS1<br />
SS2 = Commutatore con contatti 1+1 NA e<br />
sequenza SS2<br />
Sequenza SS1:<br />
sequenza SS2<br />
Sequenza SS1:<br />
0 - Contatto 1 - Contatto 2 - Contatto 1+2<br />
Sequenza SS2:<br />
0 - Contatto 1 - Contatto 1+2 - Contatto 2<br />
Nella funzione 2xS comanda EA1 il contatto 1<br />
e EA2 il contatto 2. In tutte le altre funzioni i<br />
contatti possono essere comandati da un<br />
pulsante universale.<br />
Il selettore in basso va utilizzato solo per<br />
l'autoapprendimento.<br />
La LED accompagna l'autoapprendimento<br />
come indicato nelle istruzioni e durante il<br />
funzionamento rende visibile i comandi<br />
wireless con brevi lampeggi.<br />
Schema di collegamento<br />
Dati tecnici<br />
Lampade ad incandescenza<br />
e alogene 1) 230V<br />
Corrente di comando 230V<br />
Ingresso di comando locale<br />
Lunghezza cavo di comando max.<br />
con 230V AC<br />
(Capacitanza parallela)<br />
2000W<br />
3,5mA<br />
0,01F<br />
(30m)<br />
Dispersione in stand-by 0,9W<br />
1)<br />
Lampade di max. 150W<br />
Apprendimento dei sensori wireless<br />
Tutti i sensori, come pulsanti wireless,<br />
telecomandi wireless, moduli trasmettitori<br />
wireless, contatti porte/finestre wireless,<br />
orologi wireless e rivelatori di presenza e<br />
luminosità wireless devono essere appresi<br />
dagli attuatori (ricevitori con dimmer,<br />
interruttori e relè) per poter riconoscere<br />
ed eseguire i relativi comandi.<br />
Procedura autoapprendimento attuatore<br />
GN-A-U230V-SM-2<br />
Come impostazione fabbrica la memoria<br />
interna è vuota. Se non si è certi di aver già<br />
fatto apprendere qualche cosa, bisogna<br />
cancellare tutto il contenuto nella memoria:<br />
Impostare il selettore in alto a CLR. Il LED<br />
lampeggia lestamente Ora entro 10 secondi<br />
Impostare il selettore in alto a CLR. Il LED<br />
lampeggia lestamente. Ora entro 10 secondi<br />
girare il selettore in basso per 3 volte fino al<br />
finale destra e tornare brevemente indietro. Il<br />
LED smette di lampeggiare e si spegne dopo<br />
2 secondi. Tutti i sensori appresi sono stati<br />
cancellati.<br />
Cancellare un singolo sensore<br />
Come nella procedura autoapprendimento,<br />
ma impostare Il selettore in alto a CLR<br />
invece di LRN. Utilizzando il sensore, il<br />
LED lampeggiante lestamente si spegne.<br />
Autoapprendimento sensore<br />
1. Impostare il selettore in basso nella funzione<br />
di apprendimento desiderata:<br />
ZA = 'Centrale OFF';<br />
EA1 = Pulsante 1 'ON/OFF';<br />
EA2 = Pulsante 2 'ON/OFF';<br />
Taster = Pulsante per commutatore;<br />
ZE = 'Centrale ON'<br />
I pulsanti direzionali vanno autoappresi<br />
automaticamente premendo SU o GIÙ.<br />
Altrimenti si devono autoapprendere<br />
entrambi se si desidera avere la stessa<br />
funzione per SU e GIÙ.<br />
2. Impostare il selettore in alto a LRN.<br />
Il LED lampeggia adagio.<br />
3. Utilizzare il sensore da far autoapprendere.<br />
Il LED smette di lampeggiare.<br />
Se si desidera far apprendere ulteriori sensori,<br />
allora spostare brevemente il selettore in alto<br />
dalla posizione LRN e ripetere la procedura<br />
dal punto 1.<br />
Una volta terminato l'autoapprendimento<br />
posizionare il selettore nella funzione<br />
desiderata.<br />
!<br />
Se l'attuatore è pronto per l'autoapprendimento<br />
(la LED lampeggia<br />
adagio), allora il prossimo segnale<br />
veniente va autoappreso. Per cui,<br />
fare attenzione che durante la fase<br />
di autoapprendimento non vengano<br />
attivati altri sensori.<br />
Attenzione!<br />
L'installazione di queste apparecchiature<br />
elettriche deve essere eseguita soltanto<br />
da personale qualificato, altrimenti si<br />
può verificare il pericolo d'incendio o<br />
di una scossa elettrica!<br />
07/2009 Salvo modifiche.<br />
JÄGER DIREKT ® GmbH & Co.KG<br />
Hochstr. 6, D-64385 Reichelsheim<br />
Contatto<br />
Consiglio tecnico: +49 6164 9300-549<br />
E-Mail: info@jaeger-direkt.com
GB<br />
561.166<br />
Wireless actuator<br />
Multifunction impulse switch<br />
GN-A-U230V-SM-2<br />
1+1 NO contacts not potential free<br />
10A/250V AC, incandescent lamps up to<br />
2000 watts. Only 0.9 watt standby loss.<br />
For installation and surface mounting.<br />
45mm long, 55mm wide, 33mm deep.<br />
Switching voltage and control voltage local<br />
230V.<br />
This wireless actuator is a multifunction<br />
impulse switch and features state-of-the-art<br />
hybrid technology: the wear-free receiver and<br />
evaluation electronics and two bistable relays<br />
are combined with zero passage switching.<br />
By using a bistable relay coil power loss and<br />
heating is avoided even in the on mode.<br />
After installation, wait for short automatic<br />
synchronisation before the switched consumer<br />
is connected to the mains.<br />
In addition to the wireless control input via an<br />
internal antenna, this multifunction impulse<br />
switch can also be controlled locally by a<br />
conventional 230V control switch previously<br />
mounted (in the 2xS function only contact 1).<br />
Function rotary switches<br />
With the top rotary switch in the setting LRN<br />
up to 35 wireless pushbuttons can be assigned<br />
therefrom one ore more central control pushbuttons.<br />
The required function of this multifunction<br />
impulse switch can then be selected:<br />
2xS = 2fold impulse switch each with<br />
1 NO contactl<br />
2S = impulse switch with 2 NO contacts<br />
WS = impulse switch with 1 NO contact and<br />
1 NC contact<br />
SS1 = impulse multicircuit switch<br />
1+1 NO contact with switching sequence 1<br />
SS2 = impulse multicircuit switch<br />
1+1 NO contact with switching sequence 2<br />
Switching sequence SS1:<br />
0 - contact 1 - contact 2 - contacts 1+2<br />
S it hi<br />
SS2<br />
0 contact 1 contact 2 contacts 1+2<br />
Switching sequence SS2:<br />
0 - contact 1 - contacts 1+2 - contact 2<br />
In 2xS mode, EA1 controls Contact 1 and EA2<br />
controls Contact 2. In all other modes the<br />
contacts are controlled by the universal pushbutton.<br />
The bottom rotary switch is only required to<br />
teach-in the transmitters.<br />
The LED performs during the teach-in process<br />
according to the operation manual. It shows<br />
wireless control commands by short flickering<br />
during operation.<br />
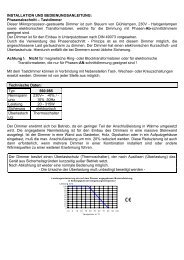
Typical connection<br />
Technical data<br />
Incandescent lamp and<br />
2000W<br />
halogen lamp load 1)<br />
230V<br />
Local control current at<br />
3,5mA<br />
230V control input<br />
Max. parallel capacitance 0,01F<br />
(approx. length) of<br />
(30m)<br />
local control lead at 230V AC<br />
Standby loss (active power) 0,9W<br />
1)<br />
Applies to lamps of max. 150W.<br />
Teaching-in Wireless Sensors in Wireless<br />
Actuators<br />
All sensors such as wireless pushbuttons,<br />
wireless hand-held transmitters, wireless<br />
transmitter modules, wireless window/door<br />
contacts, wireless timers and wireless motion<br />
detector and brightness sensors must be<br />
taught-in in the actuators (receivers with<br />
dimmers, switches and relays) so that they<br />
can detect and execute commands.<br />
Teaching-in actuator GN-A-U230V-SM-2<br />
The teach-in memory is empty on delivery<br />
from the factory. If you are unsure whether the<br />
teach-in memory contains something or not,<br />
you must first clear the memory contents<br />
completely:<br />
Set the upper rotary switch to CLR.<br />
The LED flashes at a high rate. Within the<br />
next 10 seconds turn the lower rotary switch<br />
The LED flashes at a high rate. Within the<br />
next 10 seconds, turn the lower rotary switch<br />
three times to the right stop (turn clockwise)<br />
and then turn back away from the stop.<br />
The LED stops flashing and goes out after<br />
2 seconds. All taught-in sensors are cleared.<br />
Clear individual taught-in sensors in the<br />
same way as in the teach-in procedure,<br />
except that you set the upper rotary switch to<br />
CLR instead of LRN, and operate the sensor.<br />
The LED previously flashing at a high rate<br />
goes out.<br />
Teaching-in sensors<br />
1. Setting of the lower rotary switch to the<br />
desired teaching-in function:<br />
ZA = teach-in 'central OFF';<br />
EA1 = teach-in switch 1 'ON/OFF';<br />
EA2 = teach-in switch 2 'ON/OFF';<br />
Pushbutton = teach-in pushbutton for<br />
multicircuit switch;<br />
ZE = teach-in 'central ON';<br />
Direction switches are completely taught-in<br />
automatically when operating the top or<br />
bottom pushbutton. Otherwise top and<br />
bottom must be taught-in in the same way<br />
if the top and bottom pushbutton are to<br />
have the same function.<br />
2. Set the upper rotary switch to LRN.<br />
The LED flashes at a low rate.<br />
3. Operate the sensor which should be<br />
taught-in. The LED goes out.<br />
To teach-in further sensors, turn the upper<br />
rotary switch briefly away from position LRN.<br />
Continue the procedure from pos 1.<br />
After teach-in, set the rotary switches of the<br />
actuators to the required function.<br />
!<br />
When an actuator is ready for<br />
teach-in (the LED flashes at a low<br />
rate), the very next incoming signal<br />
is taught-in. Therefore, make<br />
absolutely sure that you do not<br />
activate any other sensors during<br />
the teach-in phase.<br />
Important reminder!<br />
This electrical equipment may only be<br />
installed by skilled electricians otherwise<br />
fire hazard or danger of electric shock<br />
exists!<br />
03/2009 Subject to change without notice<br />
JÄGER DIREKT ® GmbH & Co.KG<br />
Hochstr. 6, D-64385 Reichelsheim<br />
Contact<br />
Technical advice: +49 6164 9300-549<br />
E-Mail: info@jaeger-direkt.com