
Create successful ePaper yourself
Turn your PDF publications into a flip-book with our unique Google optimized e-Paper software.
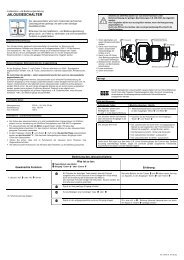
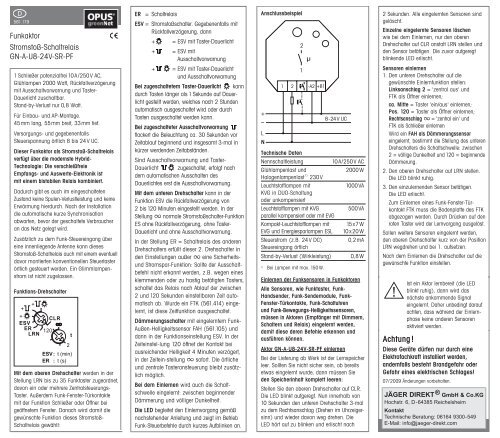
D561.179FunkaktorStromstoß-SchaltrelaisGN-A-U8-24V-SR-PF1 Schließer potenzialfrei 10A/250V AC,Glühlampen 2000 Watt, Rückfallverzögerungmit Ausschaltvorwarnung und Taster-Dauerlicht zuschaltbar.Stand-by-Verlust nur 0,8 Watt.Für Einbau- und AP-Montage.45mm lang, 55mm breit, 33mm tief.Versorgungs- und gegebenenfallsSteuerspannung örtlich 8 bis 24V UC.Dieser Funkaktor als Stromstoß-Schaltrelaisverfügt über die modernste Hybrid-Technologie: Die verschleißfreieEmpfangs- und Auswerte-Elektronik istmit einem bistabilen Relais kombiniert.Dadurch gibt es auch im eingeschaltetenZustand keine Spulen-Verlustleistung und keineErwärmung hierdurch. Nach der Installationdie automatische kurze Synchronisationabwarten, bevor der geschaltete Verbraucheran das Netz gelegt wird.Zusätzlich zu dem Funk-Steuereingang übereine innenliegende Antenne kann diesesStromstoß-Schaltrelais auch mit einem eventuelldavor montierten konventionellen Steuertasterörtlich gesteuert werden. Ein Glimmlampenstromist nicht zugelassen.Funktions-DrehschalterMit dem oberen Drehschalter werden in derStellung LRN bis zu 35 Funktaster zugeordnet,davon ein oder mehrere Zentralsteuerungs-Taster. Außerdem Funk-Fenster-Türkontaktemit der Funktion Schließer oder Öffner beigeöffnetem Fenster. Danach wird damit diegewünschte Funktion dieses Stromstoß-Schaltrelais gewählt:Schaltrelais gewählt:ER = SchaltrelaisESV = Stromstoßschalter. Gegebenenfalls mitRückfallverzögerung, dann+ = ESV mit Taster-Dauerlicht+ = ESV mitAusschaltvorwarnung+ = ESV mit Taster-Dauerlichtund AusschaltvorwarnungBei zugeschaltetem Taster-Dauerlicht kanndurch Tasten länger als 1 Sekunde auf Dauerlichtgestellt werden, welches nach 2 Stundenautomatisch ausgeschaltet wird oder durchTasten ausgeschaltet werden kann.Bei zugeschalteter Ausschaltvorwarnungflackert die Beleuchtung ca. 30 Sekunden vorZeitablauf beginnend und insgesamt 3-mal inkürzer werdenden Zeitabständen.Sind Ausschaltvorwarnung und Taster-Dauerlicht zugeschaltet, erfolgt nachdem automatischen Ausschalten desDauerlichtes erst die Ausschaltvorwarnung.Mit dem unteren Drehschalter kann in derFunktion ESV die Rückfallverzögerung von2 bis 120 Minuten eingestellt werden. In derStellung normale Stromstoßschalter-FunktionES ohne Rückfallverzögerung, ohne Taster-Dauerlicht und ohne Ausschaltvorwarnung.In der Stellung ER = Schaltrelais des anderenDrehschalters erfüllt dieser 2. Drehschalter inden Einstellungen außer eine SicherheitsundStromspar-Funktion: Sollte der Ausschaltbefehlnicht erkannt werden, z.B. wegen einesklemmenden oder zu hastig betätigten Tasters,schaltet das Relais nach Ablauf der zwischen2 und 120 Sekunden einstellbaren Zeit automatischab. Wurde ein FTK (561.414) eingelernt,ist diese Zeitfunktion ausgeschaltet.Dämmerungsschalter mit eingelerntem Funk-Außen-Helligkeitssensor FAH (561.105) unddann in der Funktionseinstellung ESV. In derZeiteinstel-lung 120 öffnet der Kontakt beiausreichender Helligkeit 4 Minuten verzögert,in der Zeitein-stellung sofort. Die örtlicheund zentrale Tasteransteuerung bleibt zusätzlichmöglich.Bei dem Einlernen wird auch die Schaltschwelleeingelernt: zwischen beginnenderDämmerung und völliger Dunkelheit.Die LED begleitet den Einlernvorgang gemäßnachstehender Anleitung und zeigt im BetriebFunk-Steuerbefehle durch kurzes Aufblinken an.AnschlussbeispielTechnische DatenNennschaltleistung10A/250V ACGlühlampenlast und2000WHalogenlampenlast 1)230VLeuchtstofflampen mit1000VAKVG in DUO-Schaltungoder unkompensiertLeuchtstofflampen mit KVG500VAparallel kompensiert oder mit EVGKompakt-Leuchtstofflampen mit 15x7WEVG und Energiesparlampen ESL 10x20WSteuerstrom (z.B. 24V DC) 0,2mASteuereingang örtlichStand-by-Verlust (Wirkleistung) 0,8W1)Bei Lampen mit max. 150W.Einlernen der Funksensoren in FunkaktorenAlle Sensoren, wie Funktaster, Funk-Handsender, Funk-Sendemodule, Funk-Fenster-Türkontakte, Funk-Schaltuhrenund Funk-Bewegungs-Helligkeitssensoren,müssen in Aktoren (Empfänger mit Dimmern,<strong>Schalter</strong>n und Relais) eingelernt werden,damit diese deren Befehle erkennen undausführen können.Aktor GN-A-U8-24V-SR-PF einlernenBei der Lieferung ab Werk ist der Lernspeicherleer. Sollten Sie nicht sicher sein, ob bereitsetwas eingelernt wurde, dann müssen Sieden Speicherinhalt komplett leeren:Stellen Sie den oberen Drehschalter auf CLR.Die LED blinkt aufgeregt. Nun innerhalb von10 Sekunden den unteren Drehschalter 3-malzu dem Rechtsanschlag (Drehen im Uhrzeigersinn)und wieder davon weg drehen. DieLED hört auf zu blinken und erlischt nach2 Sekunden Alle eingelernten Sensoren sindLED hört auf zu blinken und erlischt nach2 Sekunden. Alle eingelernten Sensoren sindgelöscht.Einzelne eingelernte Sensoren löschenwie bei dem Einlernen, nur den oberenDrehschalter auf CLR anstatt LRN stellen undden Sensor betätigen. Die zuvor aufgeregtblinkende LED erlischt.Sensoren einlernen1. Den unteren Drehschalter auf diegewünschte Einlernfunktion stellen:Linksanschlag 2 = 'zentral aus' undFTK als Öffner einlernen;ca. Mitte = Taster 'ein/aus' einlernen;Pos. 120 = Taster als Öffner einlernen;Rechtsanschlag = 'zentral ein' undFTK als Schließer einlernenWird ein FAH als Dämmerungssensoreingelernt, bestimmt die Stellung des unterenDrehschalters die Schaltschwelle: zwischen2 = völlige Dunkelheit und 120 = beginnendeDämmerung.2. Den oberen Drehschalter auf LRN stellen.Die LED blinkt ruhig.3. Den einzulernenden Sensor betätigen.Die LED erlischt.Zum Einlernen eines Funk-Fenster-TürkontaktFTK muss die Bodenplatte des FTKabgezogen werden. Durch Drücken auf denroten Taster wird der Lernvorgang ausgelöst.Sollen weitere Sensoren eingelernt werden,den oberen Drehschalter kurz von der PositionLRN wegdrehen und bei 1. aufsetzen.Nach dem Einlernen die Drehschalter auf diegewünschte Funktion einstellen.Ist ein Aktor lernbereit (die LEDIst ein Aktor lernbereit (die LEDblinkt ruhig), dann wird das!nächste ankommende Signaleingelernt. Daher unbedingt daraufachten, dass während der Einlernphasekeine anderen Sensorenaktiviert werden.<strong>Achtung</strong>!Diese Geräte dürfen nur durch eineElektrofachkraft installiert werden,andernfalls besteht Brandgefahr oderGefahr eines elektrischen Schlages!07/2009 Änderungen vorbehalten.JÄGER DIREKT ® GmbH & Co.KGHochstr. 6, D-64385 ReichelsheimKontaktTechnische Beratung: 06164 9300-549E-Mail: info@jaeger-direkt.com
GB561.179Wireless actuatorImpulse switch with integratedrelay function GN-A-U8-24V-SR-PF1 NO contact potential free 10A/250V AC,incandescent lamps 2000 watts, off delaywith switch-off early warning and switchablepushbutton permanent light.Only 0.8 watt standby loss.For installation and surface mounting.45mm long, 55mm wide, 33mm deep.Supply voltage and if necessary controlvoltage locally 8 to 24V UC.This wireless actuator is an impulse switchwith integrated relay function and featuresstate-of-the-art hybrid technology:the wear-free receiver and evaluationelectronics are combined with a bistable relay.By using a bistable relay coil power loss andheating is avoided even in the on mode.After installation, wait for short automaticsynchronisation before the switched consumeris connected to the mains.In addition to the wireless control input via aninternal antenna, this impulse switch withintegrated relay function can also be controlledlocally by a conventional control switch if fittedpreviously. Glow lamp current is not permitted.Function rotary switchesWith the top rotary switch in the setting LRNup to 35 wireless pushbuttons can be assignedtherefrom one ore more central controlpushbuttons. In addition wireless window/doorcontacts with the function N/O contact or N/Cconatct while the window is open. The requiredfunction of the impulse switch with integratedrelay function can then be selected:yER = switching relayESV = impulse switch.Possibly with off delay, then:+ = ESV with pushbuttonpermanent light+ = ESV with switch-off earlywarning+ = ESV with pushbuttonpermanent light andswitch-off early warningIf the permanent light function is switchedon, the function can be activated by pressingthe pushbutton for longer than 1 second.This function switches off automatically after2 hours or by pressing the pushbutton.If the switch-off early warning is switchedon, the light starts to flicker approx. 30 secondsbefore time-out. This is repeated three timesat decreasing time intervals.If both switch-off early warning and pushbuttonpermanent light are switched on,switch-off early warning is activated beforeautomatic switch-off of the permanent light.The function ESV on the bottom rotary switchsets the off delay from 2 to 120 minutes. Insetting normal impulse switch function ESwithout off delay, without pushbutton permanentlight and without switch-off early warning.In setting ER = switching relay of the otherrotary switch, this 2nd rotary switch fulfils asafety and power saving function in the settingsexcept . If the switch-off command is notrecognised, e.g. since the pushbutton is jammedor it was pressed too quickly, the relay switchesoff automatically on expiry of a time adjustablebetween 2 and 120 seconds. When a FTK(561.414) is taught-in, this time function isturned off.Twilight switch with taught-in wirelessoutdoor brightness sensor FAH (561.105) andthen in function setting ESV. In time setting120 the contact opens with a delay of 4minutes if the brightness level is sufficient. Intime setting the contact opens instantly.The local and central pushbutton control isstill possible.When teaching-in, the switching threshold isalso taught-in: between break of twilight andcomplete darkness.The LED performs during the teach-in processaccording to the operation manual. It showswireless control commands by short flickeringduring operation.during operation.Typical connectionTechnical dataRated switching capacity 10A/250V ACIncandescent lamp and2000Whalogen lamp load 1)230VFluorescent lamp load with 1000VAKVG* in lead-lag circuit ornon compensatedFluorescent lamp load with KVG* 500VAshunt-compensated or with EVG*Compact fluorescent lamps with 15x7WEVG* and energy saving lamps 10x20WControl current (e. g. 24V DC), 0.2mAlocal control inputStandby loss (active power) 0.8W1)Applies to lamps of max. 150W.* EVG = electronic ballast units;KVG = conventional ballast unitsTeaching-in wireless sensors in wirelessactuatorsAll sensors such as wireless pushbuttons,wireless hand-held transmitters, wirelesstransmitter modules, wireless window/doorcontacts, wireless timers and wireless motiondetector and brightness sensors must betaught-in in the actuators (receivers withdimmers, switches and relays) so that theycan detect and execute commands.Teaching-in actuator GN-A-U8-24V-SR-PFThe teach-in memory is empty on deliveryfrom the factory. If you are unsure whether theteach-in memory contains something or not,you must first clear the memory contentscompletely:Set the upper rotary switch to CLR.The LED flashes at a high rate. Within thenext 10 seconds, turn the lower rotary switchthree times to the right stop (turn clockwise)and then turn back away from the stop.The LED stops flashing and goes out afterand then turn back away from the stop.The LED stops flashing and goes out after2 seconds. All taught-in sensors are cleared.Clear individual taught-in sensors in thesame way as in the teach-in procedure,except that you set the upper rotary switch toCLR instead of LRN, and operate the sensor.The LED previously flashing at a high rategoes out.Teaching-in sensors1. Setting of the lower rotary switch to thedesired teaching-in function:Left stop 2 = teach-in 'central OFF' andFTK as NC contact;Approx. middle = teach-in pushbutton'ON/OFF';Pos. 120 = teach-in pushbutton asNC contact;Right stop = teach-in 'central ON' andFTK as NO contactWhen a FAH is taught-in as twilight sensor,the position of the bottom rotary switchdefines the threshold: 2 = complete darknessand 120 = break of twilight.2. Set the upper rotary switch to LRN.The LED flashes at a low rate.3. Operate the sensor which should betaught-in. The LED goes out.The base plate of the wireless window/doorcontact must be removed in order toconduct a teach-in. Press the red button toinitiate a teach-in.To teach-in further sensors, turn the upperrotary switch briefly away from position LRN.Continue the procedure from pos 1.After teach-in, set the rotary switches of theactuators to the required function.After teach in, set the rotary switches of theactuators to the required function.!When an actuator is ready forteach-in (the LED flashes at a lowrate), the very next incoming signalis taught-in. Therefore, makeabsolutely sure that you do notactivate any other sensors duringthe teach-in phase.the teach-in phase.Important reminder!This electrical equipment may only beinstalled by skilled electricians otherwisefire hazard or danger of electric shockexists!07/2009 Subject to change without noticeJÄGER DIREKT ® GmbH & Co.KGHochstr. 6, D-64385 ReichelsheimContactTechnical advice: +49 6164 9300-549E-Mail: info@jaeger-direkt.com
I561.179Attuatore wirelessRelè passo-passo e monostabileGN-A-U8-24V-SR-PFContatto 1 NA potenzialmente libero10A/250V AC, lampade ad incandescenza2000Watt, funzioni ritardato alla diseccitazione,preavviso di spegnimento e luce prolungatadal pulsante da aggiungere a scelta.Dispersione in stand-by solo 0,8 Watt.Per montaggio in scatola da incasso o aparete. Lunghezza 45mm, larghezza 55mm,profondità 33mm.Tensione di alimentazione ed event. comandolocale da 8 a 24V UC.Questo attuatore wireless come relèpasso-passo e monostabile dispone dellapiù moderna tecnologia Hybrid: l'elettronicadi ricezione ed elaborazione dati senzalogoramento è combinata con un relèbistabile.Di conseguenza, anche nello stato acceso nonvi è alcuna potenza dissipata dalla bobina epertanto nessun calore. Dopo l'installazioneattendere la breve sincronizzazione automaticaprima di allacciare il carico alla rete.In aggiunta all'ingresso di comando wirelesstramite un'antenna interna, questo relèpasso-passo e monostabile può esserecomandato localmente anche da comunipulsanti già esistenti. Non sono ammessipulsanti luminosi.Selettori funzioniCon il selettore in alto nella posizione LRNpossono essere assegnati fino a 35 pulsantiwireless, di cui uno o più per il comandocentrale. Inoltre contatti porte/finestre wirelesscon la funzione NA opp. NC a finestra aperta.Dopo di che si sceglie la funzione desiderata:ER = Relè monostabileESV Relè passo passo aggiungendoERRelè monostabileESV = Relè passo-passo; aggiungendoil tempo diventa passo-passotemporizzato, allora si possonoinserire le funzioni:+ = ESV con luce prolungatadal pulsante+ = ESV con preavviso dispegnimento+ = ESV con luce prolungatadal pulsante e preavvisodi spegnimentoCon la funzione luce prolungata dal pulsanteinserita si può passare alla luce prolungatatenendo premuto il pulsante più di un secondo.Questa si spegne automaticamente dopo 2ore o manualmente premendo un pulsante.Con la funzione preavviso di spegnimentoinserita, ca. 30 secondi prima dello scaderedel tempo impostato l'illuminazione sfarfallaper 3 volte ad intervalli sempre più brevi.Se sono inserite entrambe le funzioni ,allora prima dello spegnimento automaticodella luce prolungata avviene il preavvisodi spegnimento.Con il selettore in basso si può impostare iltempo di ritardo alla diseccitazione da 2 a120 minuti per la funzione ESV. Nella posizione è un relè passo-passo ES esclusetemporizzazione, luce prolungata dalpulsante e preavviso di spegnimento.Per la funzione ER = relè monostabile,questo selettore in basso esclusa la posizione assolve una funzione di risparmio e disicurezza: se viene a mancare il segnare dispegnimento, p.es. a causa di un pulsantebloccato o utilizzato troppo affrettatamente,allora il relè dopo il tempo impostato da 2a 120 secondi si spegne automaticamente.Questa temporizzazione è disattivata nel casoaver appreso un FTK (561.414) (contattoporte/finestre).Utilizzabile come crepuscolare con un sensoredi luminosità wireless per l'esterno FAH(561.105) autoappreso nella funzione ESV.Con l'impostazione tempo 120 il contatto siapre alla luminosità raggiunta con un ritardodi 4 minuti. Con l'impostazione tempo immediatamente. È possibile aggiungere ilcomando locale e centrale.Durante l'autoapprendimento va appresoanche la soglia di commutazione: fra iniziocrepuscolo e piena oscurità.La LED accompagna l'autoapprendimentocome indicato nelle istruzioni d'uso e duranteil funzionamento rende visibile i comandiwireless con brevi lampeggi.Schema di collegamentoDati tecniciPotenza di interruzione 10A/250V ACnominaleLampade ad incandescenza 2000We alogene 1) 230 VIlluminazione fluorescente 1000VAcon KVG* a doppia lampadao non rifasataIlluminazione fluorescente con KVG* 500VArifasata in parallelo o con EVG*Lampade fluorescenti compatte 15x7Wcon EVG* e lampade a risparmio 10x20Wenergetico ESLCorrente di comando (a.e. 24V DC) 0,2mAIngresso di comando localeDispersione in stand-by 0,8W1)Lampade di max. 150W* EVG = reattore elettronicoKVG = reattore elettromeccanicoApprendimento dei sensori wirelessTutti i sensori, come pulsanti wireless,telecomandi wireless, moduli trasmettitoriwireless, contatti porte/finestre wireless,orologi wireless e rivelatori di presenza eluminosità wireless devono essere appresidagli attuatori (ricevitori con dimmer,interruttori e relè) per poter riconoscereed eseguire i relativi comandi.Procedura autoapprendimento attuatoreGN-A-U8-24V-SR-PFCome impostazione fabbrica la memoriainterna è vuota. Se non si è certi di aver giàfatto apprendere qualche sensore, bisognacancellare tutto il contenuto nella memoria:Impostare il selettore in alto a CLR. Il LEDlampeggia lestamente. Ora entro 10 secondigirare il selettore in basso per 3 volte fino alfinale destra e tornare brevemente indietro. IlLED smette di lampeggiare e si spegne dopo2 secondi. Tutti i sensori appresi sono staticancellati2 secondi. Tutti i sensori appresi sono staticancellati.Cancellare un singolo sensoreCome nella procedura autoapprendimento,ma impostare Il selettore in alto a CLRinvece di LRN. Utilizzando il sensore, ilLED lampeggiante lestamente si spegne.Autoapprendimento sensore1. Impostare il selettore in basso nellafunzione di apprendimento desiderata:Finale sinistra 2 = apprendimento'centrale OFF' e FTK contatto NC;Centrale = apprendimento pulsante'ON/OFF';Posizione 120 = apprendimento pulsantecontatto NC;Finale destra = apprendimento 'centraleON' e FTK contatto NAUtilizzando un FAH come sensorecrepuscolare, stabilisce il selettore inbasso la soglia di commutazione: fra 2 =piena oscurità e 120 = inizio crepuscolo.2. Impostare il selettore in alto a LRN.Il LED lampeggia adagio.3. Utilizzare il sensore da far autoapprendere.Il LED smette di lampeggiare.Per l'apprendimento del sensore FTK(contatto porte/finestre) è necessariolevare la piastra inferiore. Premendoil pulsante rosso si attiva il processodell'autoapprendimento.Se si desidera far apprendere ulteriori sensori,allora spostare brevemente il selettore in altodalla posizione LRN e ripetere la proceduradal punto 1.Una volta terminato l'autoapprendimentoposizionare il selettore nella funzionedesiderata.Se l'attuatore è pronto per l'autoapprendimento(la LED lampeggia!adagio), allora il prossimo segnaleveniente va autoappreso. Per cui,fare attenzione che durante la fasedi autoapprendimento non venganoattivati altri sensori.Attenzione!Attenzione!L'installazione di queste apparecchiatureelettriche deve essere eseguita soltanto dapersonale qualificato, altrimenti si puòverificare il pericolo d'incendio o di unascossa elettrica!07/2009 Salvo modifiche.JÄGER DIREKT ® GmbH & Co.KGHochstr. 6, D-64385 ReichelsheimContattoConsiglio tecnico: +49 6164 9300-549E-Mail: info@jaeger-direkt.com