P 122 - P 125 - Zibro
P 122 - P 125 - Zibro
P 122 - P 125 - Zibro

Create successful ePaper yourself
Turn your PDF publications into a flip-book with our unique Google optimized e-Paper software.
P <strong>122</strong> - P <strong>125</strong><br />
2<br />
6<br />
5<br />
3<br />
4<br />
><br />
1<br />
:<br />
BEDIENUNGSANLEITUNG<br />
BRUGSANVISNING<br />
INSTRUCCIONES DE USO<br />
MANUEL D'UTILISATION<br />
OPERATING MANUAL<br />
ISTRUZIONI D’USO<br />
GEBRUIKSAANWIJZING<br />
INSTRUKCJA OBSŁUGI<br />
4<br />
16<br />
28<br />
40<br />
52<br />
64<br />
76<br />
88
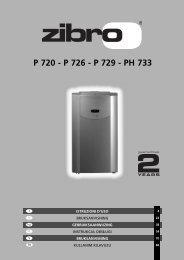
2 ALLGEMEINE SICHERHEIT<br />
Aus Sicherheitsgründen bitten wir Sie, die Bedienungsanleitung vor Inbetriebnahme<br />
sorgfältig zu lesen! Personen, die mit der Bedienungsanleitung nicht vertraut sind, dürfen<br />
das Gerät nicht bedienen.<br />
A. Kein beschädigtes Kabel verwenden.<br />
B. Kabel nicht zusammendrücken oder knicken.<br />
C. Unbedingt waagerecht aufstellen.<br />
D. Nicht vor geöffneten Fenstern aufstellen.<br />
E. Nicht mit Chemikalien in Kontakt bringen.<br />
F. Nicht bei Wärmequellen aufstellen.<br />
G. Nicht in Wasser eintauchen.<br />
H. Kein Flüssigkeiten verschütten.<br />
I. Keine Gegenstände in das Gerät stecken.<br />
J. Kein Verlängerungskabel verwenden.<br />
K. Außer Reichweite von Kindern halten.<br />
L. Nicht selbst reparieren.<br />
A<br />
6 SIKKERHED GENERELT<br />
Læs denne brugsanvisning grundigt igennem af hensyn til sikkerheden! Personer, som<br />
ikke er fortrolige med brugsanvisningens indhold, må ikke anvende dette klimaanlæg.<br />
Vi anbefaler, at De gemmer denne brugsanvisning et sikkert sted med henblik på senere<br />
brug.<br />
B<br />
A. Brug ikke beskadigede kabler.<br />
B. Kabel må ikke sættes i klemme eller knækkes.<br />
C. Anbringes på et plant gulv.<br />
D. Må ikke anbringes ved et åbent vindue.<br />
E. Må ikke komme i kontakt med kemikalier.<br />
F. Må ikke anbringes ved en varmekilde.<br />
G. Må ikke sænkes ned i vand.<br />
H. Pas på med at spilde.<br />
I. Der må ikke stikkes noget ind i apparatet.<br />
J. Der må ikke bruges kabeltrommel.<br />
K. Bruges uden for børns rækkevidde.<br />
L. De må ikke selv reparere apparatet.<br />
C<br />
5 MEDIDAS DE SEGURIDAD<br />
¡Consulte atentamente el modo de empleo y preste atención a las medidas de seguridad!<br />
Aquellos que no estén familiarizados con estas medidas de seguridad, no deben<br />
utilizar este acondicionador de aire. Aconsejamos guardar en sitio seguro este manual<br />
para poder consultar en caso necesario.<br />
A. No utilizar un cable deteriorado.<br />
B. No averiar o doblar el cable.<br />
C. Colocar en superficie llana<br />
D. No colocar delante de ventana abierta.<br />
E. No poner en contacto con productos químicos.<br />
F. No poner en contacto con fuente de calor.<br />
G. No sumergir en líquidos.<br />
H. No verter líquidos.<br />
I. No introducir objetos en el aparato.<br />
J. No utilizar cable de extensión.<br />
K. Poner fuera del alcance de los niños.<br />
L. No hacer reparaciones.<br />
D<br />
3 SÉCURITÉ GÉNÉRALE<br />
Par mesure de sécurité, consulter attentivement ce manuel d’instructions! Les personnes<br />
qui ne sont pas familiarisées avec ce manuel d’instructions, ne doivent pas utiliser<br />
ce climatiseur. Nous vous conseillons de ranger ce manuel d’instructions à un endroit<br />
sûr pour pouvoir le consulter ultérieurement.<br />
E<br />
A. Ne pas utiliser de câble endommagé.<br />
B. Ne pas serrer ou plier le câble.<br />
C. Placer sur une surface plane.<br />
D. Ne pas placer devant une fenêtre ouverte.<br />
E. Ne pas mettre en contact avec des produits chimiques.<br />
F. Ne pas placer auprès d’une source de chaleur.<br />
G. Ne pas immerger.<br />
H. Ne pas renverser.<br />
I. Ne rien introduire dans l’appareil.<br />
J. Ne pas utiliser de câble de rallonge.<br />
K. A tenir hors de portée des enfants.<br />
L. Ne pas réparer soi-même.<br />
F<br />
2
4 GENERAL SAFETY<br />
For safety reasons, please read this manual carefully before operating. Persons who are<br />
not familiar with this manual must not use this air conditioner. We strongly recommend<br />
keeping this manual in a safe place for future reference.<br />
G<br />
A. Do not use a damaged cable.<br />
B. Do not clamp or bend the cable.<br />
C. Do not place unevenly.<br />
D. Do not place in front of an open window.<br />
E. Do not bring in contact with chemicals.<br />
F. Do not place near a heat source.<br />
G. Do not immerse in water.<br />
H. Do not spill.<br />
I. Do not insert anything.<br />
J. Do not use an extension cord.<br />
K. Keep out of the reach of children.<br />
L. Do not repair.<br />
H<br />
> SICUREZZA<br />
Per motivi di sicurezza, si raccomanda di leggere attentamente il manuale prima di utilizzare<br />
l’apparecchio. Le persone che non conoscono il funzionamento del climatizzatore<br />
non devono usarlo. Si raccomanda di riporre il manuale in un luogo sicuro per<br />
future referenze.<br />
I<br />
A. Non usare il cavo, se danneggiato.<br />
B. Non bloccare o piegare il cavo.<br />
C. Collocare l’apparecchio su una superficie piana.<br />
D. Non collocare l’apparecchio davanti alla finestra<br />
aperta.<br />
E. Non porlo a contatto con prodotti chimici.<br />
F. Non posizionarlo vicino ad una fonte di calore.<br />
G. Non immergerlo nell’acqua.<br />
H. Non versare liquidi sull’apparecchio.<br />
I. Non inserire alcun oggetto nell’apparecchio.<br />
J. Non usare prolunghe.<br />
K. Tenere l’apparecchio lontano dalla portata dei<br />
bambini.<br />
L. Non cercare di riparare l’apparecchio.<br />
1 VEILIGHEID ALGEMEEN<br />
Bestudeer voor de veiligheid deze gebruiksaanwijzing zorgvuldig! Personen, die met<br />
de gebruiksaanwijzing niet vertrouwd zijn, mogen deze airconditioner niet gebruiken.<br />
Wij raden u aan deze gebruiksaanwijzing op een veilige plaats te bewaren voor latere<br />
raadpleging.<br />
J<br />
A. Gebruik geen beschadigde kabel.<br />
B. Kabel niet afklemmen of knikken.<br />
C. Plaats op een vlakke ondergrond.<br />
D. Niet voor een open raam plaatsen.<br />
E. Niet met chemicaliën in contact brengen.<br />
F. Niet bij een warmtebron plaatsen.<br />
G. Niet onderdompelen.<br />
H. Niets morsen.<br />
I. Niets in het apparaat steken.<br />
J. Geen verlengkabel gebruiken.<br />
K. Buiten bereik van kinderen houden.<br />
L. Niet zelf repareren.<br />
K<br />
: OGóLNE ZASADY BEZPIECZEńTWA<br />
Dla własnego bezpieczeństwa przeczytaj dokładnie treść instrukcji obsługi klimatyzatora!<br />
Osobom, które nie zapoznały się z instrukcją obsługi niniejszego urządzenia, zabrania się z<br />
niego korzystać. Radzimy przechowywać instrukcję obsługi w bezpiecznym miejscu, aby w<br />
razie potrzeby móc skorzystać z niej w przyszłości.<br />
L<br />
A. Nie używać uszkodzonego przewodu zasilającego.<br />
B. Nie uciskać ani nie zginać przewodu.<br />
C. Urządzenie umieścić na płaskim podłożu.<br />
D. Nie umieszczać urządzenia przed otwartym oknem.<br />
E. Nie stosować żadnych środków chemicznych.<br />
F. Nie umieszczać w bezpośrednim sąsiedztwie źródeł<br />
ciepła.<br />
G. Nie zanurzać w wodzie.<br />
H. Nie rozlewać cieczy.<br />
I. Nie wtykać obcych przedmiotów do aparatu.<br />
J. Nie używać przedłużacza.<br />
K. Trzymać z daleka od dzieci.<br />
L. Nie próbować naprawiać klimatyzatora samodzielnie.<br />
3
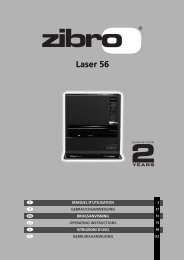
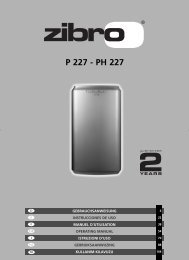
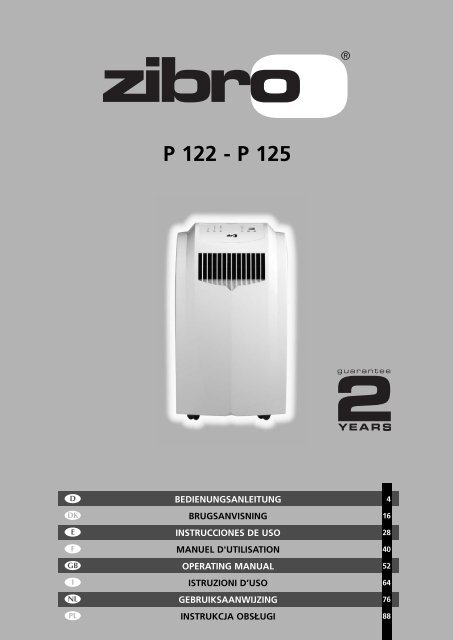
IMPORTANT<br />
COMPONENTS<br />
<br />
<br />
Control panel<br />
<br />
<br />
<br />
Air outlet<br />
<br />
Handle<br />
<br />
Casters<br />
<br />
Filter set<br />
<br />
Air inlet<br />
3M TM Filtrete TM Filter<br />
<br />
Exhaust air outlet<br />
<br />
<br />
Rubber plug<br />
Active Carbon Filter<br />
<br />
Hose adapter<br />
<br />
Exhaust hose<br />
<br />
Window air outlet<br />
<br />
Remote control<br />
(P<strong>125</strong>)<br />
<br />
<br />
Power cord<br />
<br />
<br />
<br />
<br />
<br />
1. READ THE DIRECTIONS FOR USE FIRST.<br />
2. IN CASE OF ANY DOUBT, CONTACT YOUR DEALER.<br />
4<br />
52
Dear Sir, Madam,<br />
Congratulations on the purchase of your air conditioner. This air conditioner has three<br />
functions in addition to cooling the air, namely, air dehumidification, circulation and<br />
filtration. The mobile air conditioner is extremely easy to operate and move. You have<br />
acquired a high quality product that will provide you with many years of pleasure, on<br />
condition<br />
that you use it responsibly. Reading these instructions for use before operating your<br />
air conditioner will optimise its life span. We wish you coolness and comfort with your<br />
air conditioner.<br />
Yours sincerely,<br />
PVG International B.V.<br />
Customer service department<br />
4<br />
53
A SAFETY INSTRUCTIONS<br />
Install the device only when it complies with local regulations, by-laws and<br />
standards. The unit is only suitable for use in dry locations, indoors. Check the<br />
mains voltage and frequency. This unit is only suitable for earthed sockets,<br />
connection voltage 220-240 V. / 50 Hz.<br />
<br />
IMPORTANT<br />
The device MUST always have an earthed connection. If the power<br />
supply is not earthed, you may not connect the unit. The plug must<br />
always be easily accessible when the unit is connected. Read these<br />
instructions carefully and follow the instructions.<br />
Before connecting the unit, check the following:<br />
• The voltage supply must correspond with the mains voltage stated on the<br />
rating label.<br />
• The socket and power supply must be suitable for the current stated on the<br />
rating label.<br />
• The plug on the cable of the device must fit into the wall socket.<br />
• The device must be placed on a flat and stable surface.<br />
The electricity supply to the device must be checked by a recognised professional<br />
if you have any doubts regarding the compatibility.<br />
• This device is manufactured according to CE safety standards. Nevertheless,<br />
you must take care, as with any other electrical device.<br />
• Do not cover the air inlet and outlet grill.<br />
• Empty the water reservoir before moving the unit.<br />
• Never allow the device to come into contact with chemicals.<br />
• Never spray the unit with or submerge in water<br />
• Do not insert objects into the openings of the unit.<br />
• Always remove the plug from the electric power supply before cleaning or<br />
replacing the unit or components of the unit.<br />
• Never use an extension cable to connect the device to the electric power<br />
supply. If there is no suitable, earthed wall socket available, have one<br />
installed by a recognised electrician.<br />
• For safety reasons take care when children are in the surrounding of the<br />
device, as with any other electrical device.<br />
• Have any repairs only carried out by a recognised service engineer or your<br />
supplier. Follow the instructions for use and maintenance as indicated in the<br />
user manual of this device.<br />
• Always remove the plug of the unit from the wall socket when it is not in use.<br />
• A damaged power cord or plug must always be replaced by a recognised<br />
electrician or your supplier.<br />
4<br />
54
ATTENTION!<br />
• Never use the device with a damaged power cord, plug, cabinet or<br />
control panel. Never trap the power cord or allow it to come into<br />
contact with sharp edges.<br />
• Never seal the room - where this device will be used - completely<br />
airtight. This will prevent under pressure in this room. Under<br />
pressure can disrupt the safe operation of geysers, ventilation<br />
systems, ovens, etc.<br />
• Failing to follow the instructions may lead to nullification of the<br />
guarantee on this device.<br />
B<br />
INSTALLATION<br />
<br />
WARNING<br />
Before using the air conditioner it should be left in an upright position<br />
for at least 2 hours.<br />
This unit is portable and can easily be moved from one room to another. In doing<br />
so keep this in mind:<br />
1<br />
Ensure that the unit is positioned upright and on a level surface.<br />
2<br />
Place the loose filters in the filter holder.<br />
• Take the filter holder out of the air conditioner<br />
• Open the filter holder and place the active carbon filter (black) and 3M TM<br />
Filtrete TM filter (white) in the filter holder .<br />
• Place the filter fixing component back in the holder.<br />
• Place the filter holder back in the air conditioner.<br />
3<br />
Do not operate the unit inside the bathroom, shower, or in any other very<br />
humid environment.<br />
4<br />
Please keep a distance of 50 cm between the unit and the wall or other<br />
objects to ensure proper air circulation.<br />
5<br />
Insert both ends of the air exhaust hose in the round connectors . Fasten<br />
the connectors by turning them clockwise onto the hose.<br />
6<br />
Insert one round connector in the backside of the unit . Fasten the other<br />
connector to the window air outlet .<br />
7<br />
Ensure that the window air outlet has a free flow outside. Close the<br />
window or door as much as possible to prevent outside air from entering the<br />
room.<br />
4<br />
55
IMPORTANT<br />
The flexible exhaust hose can be extended from 600 to 1500 mm for<br />
mounting. This length has been designed especially according to the<br />
specifications of the air conditioner. Do not use an extension or<br />
exchange for a different hose as that may lead to malfunctioning. The<br />
exhaust air must flow freely, any blockage can lead to overheating of<br />
the air conditioner. Take care to prevent any bow or bend in the exhaust<br />
hose.<br />
C<br />
OPERATION<br />
1<br />
Insert the plug into the wall outlet.<br />
2<br />
Press the<br />
-button to switch on the air conditioner.<br />
3<br />
With -button you can change the operating mode of the unit.<br />
By pressing the -button the following modes appear:<br />
Cooling, the green light lits.<br />
Dehumidifying, the orange light lits.<br />
Air circulation, the yellow light lits.<br />
COOLING<br />
When the unit is in the cooling mode, the following functions apply:<br />
• The fan speed can be adjusted by pressing the -button<br />
Maximum setting.<br />
Medium setting.<br />
Lowest setting.<br />
• The temperature can be set by pressing the and buttons, anywhere<br />
between 16°C en 32°C. The display will show the set temperature for 15<br />
seconds and the “set temp” will light up. Fifteen seconds after setting the<br />
required temperature, the display will show the room temperature.<br />
<br />
It<br />
depends on the environment whether the required temperature will<br />
be reached. It is not a malfunction of the air conditioner if the room<br />
temperature remains above the “set temp”.<br />
4<br />
56
DEHUMIDIFYING<br />
When the unit is primarily used as a dehumidifier, then please follow these<br />
instructions: Do not connect the air exhaust hose and let the warm air go<br />
back into the room. Connect a drainage hose onto the permanent drain<br />
connector on the back of the unit (refer to Chapter G). You must connect a<br />
drain tube to the water outlet (refer to Chapter G).<br />
When the unit is in the dehumidifying mode, the fan speed cannot be<br />
adjusted. The fanspeed will be automatically set on ‘Medium setting’. The<br />
buttons and can also not be adjusted.<br />
AIR CIRCULATION<br />
In this mode the unit only circulates air; the unit will not cool or dehumidify.<br />
The air entering the unit is not cooled or dehumidified, but is filtered.<br />
When the unit is in this mode, the following functions apply:<br />
• The fan speed can be adjusted by pressing the -button<br />
Maximum setting.<br />
Medium setting.<br />
Lowest setting.<br />
4<br />
When the unit is switched off the most recent setting will be stored in<br />
memory.<br />
5<br />
The timer function allows you to switch the unit on or off at a certain time.<br />
TO SWITCH ON THE UNIT AT A CERTAIN TIME<br />
• Ensure that the unit is set in the required operating mode , of .<br />
• Switch off the unit by pressing the -button. Ensure that the plug is<br />
properly inserted into the wall outlet.<br />
• Press the -button. The light “Timer set” will flash.<br />
• Use the and buttons to set a time between 1 and 12 hours.<br />
• When the set time has expired the unit will switch on.<br />
TO SWITCH OFF THE UNIT AT A CERTAIN TIME<br />
• When the unit is operating in the required mode press the -button.<br />
The light "Timer set” will flash.<br />
• Use the and buttons to set a time between 1 and 12 hours.<br />
• When the set time has expired the unit will switch off.<br />
<br />
NOTE!<br />
The compressor has been set so that it starts functioning three minutes<br />
after the (re)start of the air conditioner.<br />
The cooling will switch off when the room temperature is lower than<br />
the set one. Air circulation will however continue to work on the set<br />
level. When the room temperature rises above the selected value, the<br />
cooling will work again.<br />
4<br />
57
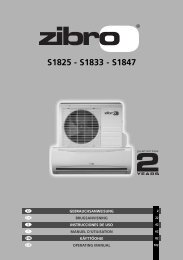
REMOTE CONTROL (ONLY FOR TYPE P<strong>125</strong>)<br />
a. LCD Screen<br />
b. Power on/off button<br />
c<br />
e<br />
a<br />
b<br />
d<br />
g<br />
c<br />
f<br />
c. Timer and thermostat setting buttons<br />
d. Mode button (select A/C, Fan or Dehumidifier)<br />
e. A/C Fan Speed button (High, Medium, Low)<br />
f. Timer ON / OFF button<br />
g. Celsius / Fahrenheit selector<br />
The remote control works in combination with the control panel. Aim the front<br />
end of the remote control at the red window. The maximum operating distance<br />
from the air conditioner is approximately 5 metres. Place AAA Batteries before<br />
use.<br />
TIMER PROGRAMMING<br />
1<br />
Press the button on the remote or the “Timer Setting” button on the<br />
control panel to turn on the Timer Function.<br />
2<br />
Press the or buttons on the remote or the or buttons on the<br />
control panel to set the desired shut-off period.<br />
3<br />
The unit will shut off when the set time elapses.<br />
DEHUMIDIFACATION OPERATION<br />
Press the button on the remote or the MODE button on the control panel to<br />
select the dehumidifier mode. When the dehumidifier mode is on, the temperature<br />
buttons and the fan speed buttons do not function and the fan will operate<br />
on medium speed.<br />
The dehumidifier indicator light will illuminate and stay solid while the unit is<br />
dehumidifying. When the humidity in the room is 50% or lower, the compressor<br />
will not run, the unit will not dehumidify, and the dehumidifier light will blink.<br />
Remember, the exhaust hose does not need to be used in dehumidifier mode.<br />
4<br />
58
D AIR FILTER<br />
The P<strong>122</strong> and P<strong>125</strong> air conditioners are equipped with a 3-layer filter package to<br />
clean the circulated room air. The filters are delivered with a separately packed<br />
3M TM Filtrete TM filter and an active carbon filter. These filters must be placed<br />
according to instructions before operating the air conditioners.<br />
1. Screen filter; to remove bigger dust particles.<br />
2. 3M TM Filtrete TM filter; to remove unhealthy particles from the air such as<br />
pollen, bacteria, animal dander and dust.<br />
3. Active carbon filter sheet; to remove odours.<br />
The filter holder on the backside of the unit can be opened. Active carbon filter<br />
and 3M TM Filtrete TM filter can be removed. Screen filter is part of the filter holder.<br />
1. The screen filter has to be cleaned regularly with a vacuum cleaner to avoid<br />
blocking of the air flow.<br />
2. The positive/negative electro statically charged 3M TM Filtrete TM filter is<br />
recommended to be changed every 3 months. Unusual dirt, construction<br />
work, pets, the presence of smokers and running the air-conditioning unit<br />
continuously can shorten the life time of the 3M TM Filtrete TM filter.<br />
New filter<br />
Recommended change of filter<br />
3. The active carbon sheet can be cleaned with a vacuum cleaner when dusty<br />
but has to be changed at the same time as the 3M TM Filtrete TM filter.<br />
<br />
NOTE!<br />
• Never use the air conditioner without the screen mesh filter!<br />
• To run the unit without active carbon sheet and/or 3M TM Filtrete TM<br />
filter package does not bring any harm to the air-conditioner. In that<br />
case unhealthy dust is not removed.<br />
• Replacement filter packages are available at your dealer.<br />
4<br />
59
E<br />
AIR FLOW<br />
Move the air vent directly to adjust the air flow direction of the horizontal<br />
louvres.<br />
F<br />
EMPTY INTERNAL WATER CONTAINER<br />
Under extreme (environmental) circumstances it may be necessary to empty the<br />
internal water container regularly. When the internal water container is full the<br />
light will flash and the unit will beep continously. The unit will switch off<br />
automatically. To empty the water container do the following:<br />
1<br />
Do not move the unit. Drastic movements can cause water leakage.<br />
2<br />
Switch off the unit and remove the plug from the wall outlet.<br />
3<br />
Place a pan or appropriate tray on the floor underneath the permanent drain<br />
tube.<br />
4<br />
Remove the rubber plug from the drain tube and let the water run out. (±<br />
0.5 litres).<br />
5<br />
Replace the rubber plug , put the plug into the wall outlet, and switch on<br />
the unit. The warning light should be off.<br />
<br />
NOTE!<br />
When the air conditioner is in use, under normal circumstances the<br />
condensed water will be drained through the air outlet-tube.<br />
G CONTINUOUS DRAINAGE<br />
1<br />
Switch off the unit and remove the plug from the mains.<br />
Place a pan or appropriate tray on the floor underneath the permanent drain<br />
tube to collect any water draining away.<br />
3<br />
Remove the rubber plug .<br />
4<br />
Connect a drain tube (ø 15 mm) into the water outlet and extend with extra<br />
water tube as needed.<br />
5<br />
Place the other end of the drain tube at a location suitable for the purpose (a<br />
drain hole, for instance). In doing so, take care to ensure that the tube is not<br />
twisted and is free of kinks. The tube must be placed so as to be declining<br />
along its entire length.<br />
4<br />
60
DEHUMIDIFICATION<br />
If the unit will be used mainly as dehumidifier, do not connect the exhaust hose<br />
and let the warm air return in the room. Continuous drainage is then necessary<br />
and more efficient. You must, however, use a water drain tube (ø 0.5 inch internal<br />
diameter), placing its discharge end at a suitable drainage point.<br />
H CLEANING<br />
<br />
WARNING!<br />
Switch off the unit and remove the plug from the mains before cleaning<br />
the appliance or filter, or before replacing the filters.<br />
Clean the housing with a soft, damp cloth. Never use aggressive chemicals, petrol,<br />
detergents or other cleansing solutions. For maintenance of the filters, refer to<br />
Chapter D “Air Filter”.<br />
<br />
NOTE!<br />
Never use the air conditioner without screenfilter.<br />
I<br />
STORAGE<br />
1<br />
Empty the internal water container (refer to Chapter F)<br />
2<br />
Clean and replace the mesh filter (see also chapter D).<br />
· Remove the active carbon filter and the 3M TM Filtrete TM filter at the end of<br />
the season and only place new filters at the beginning of the new season.<br />
The old filters do not constitute chemical waste and may be disposed of<br />
as regular waste (not organic waste).<br />
- New filters are available at your dealer.<br />
3<br />
Put the unit in air circulation mode for a couple of hours to ensure that the<br />
inside becomes completely dry.<br />
4<br />
Store cable as shown, protect the unit against dust and store in a dry place<br />
not accessible to children.<br />
4<br />
61
J<br />
TROUBLE SHOOTING<br />
Problem Cause Solution<br />
The unit does<br />
not function<br />
The unit does<br />
not seem to<br />
perform<br />
The unit is noisy<br />
The compressor<br />
does not work<br />
Remote control<br />
does not<br />
function<br />
No power supply<br />
Water tank indicator is on<br />
In direct sunlight<br />
Windows or doors open, many<br />
people or heat source in room<br />
Dirty filter<br />
Air inlet or air outlet blocked<br />
Room temperature lower than<br />
selected value<br />
Unit stands uneven<br />
Overheat protection probably<br />
activated<br />
Distance too great<br />
Remote control signal not<br />
detected by control panel<br />
Batteries empty<br />
Connect to a functioning outlet<br />
and switch on<br />
Empty the internal water<br />
container (refer to Chapter F)<br />
Close curtains<br />
Close doors and windows, or<br />
place an extra air conditioner<br />
Clean or replace filter<br />
Remove blockage<br />
Change temperature selection<br />
Place on even surface (less<br />
vibrations)<br />
Wait 3 minutes until the<br />
temperature has decreased, and<br />
turn on the unit again<br />
Make sure the remote control is<br />
correctly aimed at the control<br />
panel<br />
Replace the batteries<br />
Never try to repair or dismantle the air conditioner yourself. Incompetent repairs<br />
result in loss of warranty and can endanger the user.<br />
K<br />
GUARANTEE CONDITIONS<br />
The air conditioner is supplied with a 24-month guarantee, commencing on the<br />
date of purchase. All material and manufacturing defects will be repaired or<br />
replaced free of charge within this period. The following rules apply:<br />
1. We expressly refuse all further damage claims, including claims for collateral<br />
damage.<br />
2. Repairs to or replacement of components within the guarantee period will<br />
not result in an extension of the guarantee.<br />
3. The guarantee is invalidated if any modifications have been made, non<br />
genuine parts are fitted or repairs are carried out by third parties.<br />
4. Components subject to normal wear, such as the filter, are not covered by the<br />
guarantee.<br />
5. The guarantee is valid only when you present the original, dated purchase<br />
invoice and if no modifications have been made.<br />
6. The guarantee is invalid for damage caused by neglect or by actions that<br />
deviate from those in this instruction booklet.<br />
4<br />
62
7. Transportation costs and the risks involved during the transportation of the<br />
air conditioner or air conditioner components shall always be for the account<br />
of the purchaser.<br />
To prevent unnecessary expense, we recommend that you always first carefully<br />
consult the instructions for use. Take the air conditioner to your dealer for repairs<br />
if these instructions do not provide a solution.<br />
L<br />
TECHNICAL DATA<br />
To be used as indication, subject to modifications<br />
Model P <strong>122</strong> P <strong>125</strong><br />
Cooling capacity* W 2,200 2,500<br />
EE Class*<br />
B<br />
B<br />
EER*<br />
2.4 2.6<br />
Power consumption W 900 950<br />
Current nom. A 3.9 3.9<br />
Mains<br />
V/Hz/PH<br />
220 - 240 / 50 / 1<br />
Air delivery max. m 3 /h 360 360<br />
Dehumidification max. ** L/24h 25 28<br />
Room size m 3 75 85<br />
Compressor type<br />
rotary<br />
Refrigerant<br />
type/gr<br />
R-407c / 500<br />
Thermostat range °C<br />
16 - 32<br />
Fan speeds<br />
3<br />
Noise level<br />
dB<br />
52<br />
Dimensions (w x h x d)<br />
mm<br />
435 x 760 x 420<br />
Weight<br />
kg<br />
30<br />
Unit protection IP 20<br />
Remote control<br />
no<br />
yes<br />
3M TM Filtrete TM filter<br />
yes<br />
yes<br />
Active carbon filter<br />
yes<br />
yes<br />
* Conform EN 14511<br />
** Moisture removal at 32°C, 80% RH<br />
Waste electrical products should not be disposed with household waste. Please<br />
recycle where facilities exist. Check with your local authority or retailer for<br />
recycling advice.<br />
4<br />
63
COMPONENTI<br />
PRINCIPALI<br />
<br />
<br />
Pannello di controllo<br />
<br />
<br />
<br />
Bocchetta dell’aria<br />
<br />
Impugnatura<br />
<br />
Rotelle girevoli<br />
<br />
Filterset<br />
<br />
Presa d’aria<br />
3M TM Filtrete TM Filter<br />
<br />
Uscita aria di scarico<br />
<br />
<br />
Tappo di gomma<br />
Active Carbon Filter<br />
<br />
Adattatori per il tubo<br />
<br />
Tubo di scarico<br />
<br />
Raccordo per finestre<br />
<br />
Telecomando (P<strong>125</strong>)<br />
<br />
<br />
Cavo<br />
d’alimentazione<br />
<br />
<br />
<br />
<br />
<br />
1. LEGGERE DAPPRIMA LE ISTRUZIONI D'USO.<br />
2. IN CASO DI DUBBIO, RIVOLGERSI AL RIVENDITORE.<br />
><br />
64
Gentile Signore, Signora,<br />
Congratulazioni per l’acquisto del condizionatore d’aria, <strong>Zibro</strong>. Oltre a raffreddare l'aria, il<br />
climatizzatore ha una triplice funzione, ovvero deumidificazione, ricircolo e filtraggio<br />
dell'aria. Il condizionatore portatile è estremamente facile da usare e da spostare. Lei ha<br />
acquistato un prodotto di qualità, che Le offrirà molti anni di comfort, a condizione che<br />
venga usato in modo responsabile. Per una durata ottimale del condizionatore d’aria, La<br />
invitiamo a leggere le istruzioni d’uso.<br />
Le auguriamo molta freschezza e comfort con il Suo <strong>Zibro</strong>.<br />
Cordiali saluti,<br />
PVG International B.V.<br />
Reparto Assistenza Clienti<br />
><br />
65
A ISTRUZIONI PER LA SICUREZZA<br />
L’impianto deve essere completamente rispondente alle prescrizioni, disposizioni e<br />
norme localmente vigenti. L’apparecchio è indicato solo per l’utilizzo negli interni<br />
ed in luoghi non umidi. Verificare la rispondenza della tensione di alimentazione.<br />
L’apparecchio deve essere collegato solo ad una presa di corrente equipaggiata con<br />
messa a terra ed erogante una tensione di allacciamento pari a 220-240 V./ 50 Hz.<br />
<br />
IMPORTANTE<br />
L’apparecchio DEVE essere collegato ad un impianto elettrico dotato di<br />
messa a terra. Se tale tipo di collegamento non è disponibile, è vietato<br />
collegare l‘apparecchio alla rete di alimentazione. E’ inoltre opportuno<br />
assicurare un agevole accesso alla spina elettrica. Si consiglia di leggere<br />
accuratamente le presenti istruzioni e di attenersi alle indicazioni fornite;<br />
Prima di procedere al collegamento dell’apparecchio alla rete elettrica controllare la<br />
rispondenza dei seguenti punti:<br />
• la tensione di allacciamento dell’impianto elettrico corrisponde a quella<br />
indicata nella targhetta dell’apparecchio;<br />
• la presa di corrente e la rete elettrica sono idonee all’utilizzo dell’apparecchio;<br />
• la spina del cordone elettrico è adatta alla presa di corrente;<br />
• L’apparecchio è collocato su una superficie piana e stabile.<br />
Nell’eventualità di dubbi sull’efficienza o rispondenza di uno dei componenti, si<br />
consiglia di chiedere l’intervento di un installatore qualificato per fare effettuare le<br />
verifiche del caso.<br />
><br />
• Questo apparecchio è stato prodotto in conformità alla normativa CE sulla<br />
sicurezza. Ciò nonostante è necessaria la massima cautela nell’uso, come è<br />
d’obbligo per tutte le apparecchiature elettriche<br />
• Le griglie di ingresso e uscita dell’aria non vanno mai coperte.<br />
• Svuotare il serbatoio dell’acqua prima di spostare l’apparecchio.<br />
• Evitare il contatto fra l’apparecchio e le sostanze chimiche.<br />
• L’apparecchio va tenuto al riparo dall’acqua, evitare gli spruzzi e non<br />
immergerlo in acqua.<br />
• Non introdurre nessun oggetto nelle aperture o nelle fessure dell’apparecchio.<br />
• Prima di interventi di pulitura o sostituzione di parti dell’apparecchio o delle<br />
sue componenti è sempre necessario staccare la spina elettrica dalla presa di<br />
corrente.<br />
• L’allacciamento dell’apparecchio all’impianto elettrico NON deve essere<br />
effettuato in nessun caso mediante cavi di prolunga. Se non è disponibile una<br />
presa di corrente dotata di messa a terra, fare installare una presa a norma da<br />
un impiantista qualificato.<br />
• Per motivi di sicurezza, si consiglia di rimanere sempre vigili e di usare la<br />
massima prudenza in presenza di bambini nelle vicinanze dell’apparecchio. Ciò<br />
vale per qualsiasi apparecchiatura elettrica.<br />
• Eventuali interventi di riparazione vanno sempre effettuati da un installatore<br />
manutentore qualificato o dal fornitore dell’apparecchio. Rispettare le<br />
istruzioni di manutenzione.<br />
66
• Quando l’apparecchio è posto fuori servizio o si tiene inutilizzato, staccare<br />
sempre la spina dalla presa di corrente.<br />
• La sostituzione di un cordone elettrico danneggiato è un intervento riservata a<br />
persone qualificate o al centro di assistenza.<br />
<br />
ATTENZIONE!<br />
• Non usare mai l’apparecchio se il cordone elettrico o la spina sono<br />
danneggiati. Il cordone non deve essere schiacciato e evitare che entri<br />
a contatto con oggetti taglienti o acuminati.<br />
• Il vano/locale in cui si utilizza l’apparecchio non va mai chiuso<br />
ermeticamente per evitare che si crei una depressione all’interno del<br />
vano. Il fenomeno può infatti pregiudicare e sregolare il<br />
funzionamento di altri apparecchi quali bruciatori a gas, cappe<br />
aspiranti, forni, ecc.<br />
• La mancata osservanza delle istruzioni può causare la perdita della<br />
garanzia concessa sull’apparecchio.<br />
B<br />
INSTALLAZIONE DEL CLIMATIZZATORE<br />
<br />
AVVERTENZA<br />
Prima di usare il climatizzatore, lasciarlo in posizione verticale per<br />
almeno due ore.<br />
Questo climatizzatore è un apparecchio portatile che può essere spostato<br />
facilmente da una stanza all’altra. A questo proposito seguire le istruzioni qui di<br />
seguito illustrate:<br />
1<br />
L’apparecchio deve essere collocato in posizione verticale su una superficie<br />
perfettamente piana.<br />
2<br />
Inserire i filtri sfusi nel porta-filtri.<br />
• Estrarre il porta-filtri dal climatizzatore<br />
• Aprire il porta-filtri e inserire il filtro a carboni attivi (nero) e il filtro 3M TM<br />
Filtrete TM (bianco) nel porta-filtri .<br />
• Rimettere il fissatore dei filtri nel porta-filtri.<br />
• Rimettere il porta-filtri al suo posto.<br />
3<br />
Non utilizzare l’apparecchio nelle stanze molto umide dell’abitazione, per<br />
esempio in bagno o nel locale destinato alla doccia.<br />
4<br />
Per assicurare una sufficiente circolazione dell’aria intorno al climatizzatore,<br />
rispettare una distanza minima di 50 cm. fra l’apparecchio e le pareti o gli<br />
oggetti circostanti.<br />
5<br />
Inserire entrambe le estremità del tubo di scarico dell'aria negli adattatori<br />
circolari . Fissare gli adattatori al tubo ruotandoli in senso orario.<br />
><br />
67
6<br />
Fissare uno degli adattatori circolari sul retro dell'apparecchio .<br />
Il secondo adattatore circolare andrà fissato al raccordo della finestra .<br />
7<br />
Assicurarsi che non vi siano ostacoli che impediscono lo scarico dell'aria<br />
all'esterno attraverso il raccordo fissato alle finestre . Si consiglia inoltre di<br />
tenere chiuse, il più possibile, porte e finestre.<br />
<br />
IMPORTANTE<br />
Durante il montaggio è possibile allungare il tubo di scarico flessibile da<br />
600 a 1500 mm. Questa lunghezza è stata appositamente ideata in base<br />
alle caratteristiche specifiche del climatizzatore. Non usare prolunghe o<br />
tubi di ricambio diversi per evitare un malfunzionamento. L’aria di<br />
scarico deve fuoriuscire liberamente, un qualsiasi impedimento potrebbe<br />
provocare un surriscaldamento dell’apparecchio. Evitare di piegare o<br />
inarcare il tubo di scarico.<br />
C<br />
FUNZIONAMENTO DEL CLIMATIZZATORE<br />
1<br />
Inserire la spina nella presa della corrente.<br />
2<br />
Premere il pulsante<br />
per accendere il climatizzatore.<br />
3<br />
Utilizzare il pulsante per impostare la funzione desiderata. Premendo di<br />
volta in volta il pulsante saranno attivate in successione le seguenti<br />
modalità operative :<br />
Raffreddamento, si accende l'indicatore luminoso verde.<br />
Deumidificazione, si accende l'indicatore luminoso arancione<br />
Ricircolo dell’aria, si accende l'indicatore luminoso giallo.<br />
RAFFREDDAMENTO<br />
Se l'apparecchio è stato predisposto in questa modalità operativa,<br />
l'utilizzatore potrà disporre delle seguenti funzioni:<br />
• Mediante il pulsante è possibile variare la velocità del ventilatore<br />
adattandola al regime preferito. Azionando progressivamente il pulsante<br />
si selezionano una dopo l’altra le seguenti velocità:<br />
Velocità alta.<br />
Velocità media<br />
Velocità bassa<br />
><br />
68
• I pulsanti e consentono di impostare la temperatura al valore<br />
desiderato (in un campo variabile fra 16°C e 32°C). Il display visualizza il valore<br />
prescelto. Durante l'impostazione della temperatura l'indicatore luminoso<br />
“set temp” si accende. Dopo 15 secondi compare la lettura della temperatura<br />
misurata nell'ambiente (temperatura ambiente). La visualizzazione è<br />
segnalata dall'accensione dell'indicatore luminoso “Room temp”.<br />
<br />
Le<br />
condizioni dell’ambiente di utilizzo dell’apparecchio determinano l’effettivo<br />
raggiungimento della temperatura richiesta. E’ normale che la temperatura<br />
ambiente si mantenga al di sopra del valore impostato (“set temp”).<br />
DEUMIDIFICAZIONE<br />
Se l’apparecchio è usato, quasi esclusivamente, come deumidificatore, non si<br />
dovrà utilizzare il tubo di scarico dell’aria, in modo tale che il flusso di aria<br />
calda possa esser mantenuto in circolazione nel vano interessato. E’ tuttavia<br />
necessario applicare un tubo per lo scarico dell’acqua da collegare ad uno<br />
scarico idrico fisso dell’abitazione (rif. capitolo G). Applicare un tubo di<br />
scarico dell'acqua sullo scarico (cfr. capitolo G).<br />
Durante il funzionamento dell'apparecchio come deumidificatore non è<br />
possibile attivare il pulsante : “Velocità ventilatore”. La funzione è regolata<br />
automaticamente su ‘velocità media’. Inoltre sarà disabilitata anche la funzione<br />
di regolazione manuale della temperatura mediante i pulsanti e .<br />
RICIRCOLO DELL'ARIA<br />
In questa modalità l'apparecchio esegue solo lo spostamento dell'aria<br />
nell'ambiente interessato. L'aria in entrata non viene né raffreddata né<br />
deumidificata, ma comunque filtrata.<br />
Dopo aver predisposto l'apparecchio alla modalità di cui sopra, l'utilizzatore<br />
potrà effettuare le seguenti regolazioni:<br />
• Con il pulsante si imposta la velocità del ventilatore al regime di<br />
desiderato. Il progressivo azionamento del pulsante permette di<br />
selezionare una dopo l’altra le seguenti velocità:<br />
Velocità alta.<br />
Velocità media<br />
Velocità bassa<br />
4<br />
Una volta spento l’apparecchio, viene mantenuta in memoria l’ultima<br />
funzione attivata.<br />
5<br />
Se richiesto, l'utilizzatore può attivare la modalità di programmazione timer.<br />
La funzione consente di accendere e spegnere l'apparecchio ad orari<br />
programmati in precedenza. Procedere come di seguito esposto:<br />
ATTIVAZIONE<br />
• Verificare che l'apparecchio sia stato predisposto nella modalità operativa<br />
richiesta , of .<br />
><br />
69
• Disattivare l'apparecchio premendo il pulsante , ed assicurarsi che la<br />
spina sia correttamente inserita nella presa.<br />
• Premere il tasto . L'indicatore luminoso “Timer set” inizia a<br />
lampeggiare.<br />
• A questo punto impostare con i pulsanti e l'ora prescelta per<br />
l'accensione selezionando un valore orario compreso fra 1 e 12.<br />
• Appena raggiunta l’ora impostata, l’apparecchio entra in funzione.<br />
DISATTIVAZIONE<br />
• Con l'apparecchio in funzione premere il pulsante . L'indicatore<br />
luminoso “Timer set” inizia a lampeggiare.<br />
• Impostare l’ora di spegnimento con i pulsanti e selezionando un<br />
valore orario compreso fra 1 e 12.<br />
• Una volta raggiunto l’orario impostato, l’apparecchio viene disattivato.<br />
<br />
AVVERTENZA<br />
Il compressore è stato impostato in modo tale da entrare in funzione tre<br />
minuti dopo l’avvio del climatizzatore. La funzione di raffreddamento si<br />
disattiva quando la temperatura ambiente è inferiore a quella impostata.<br />
La ventilazione tuttavia continua a funzionare al livello impostato.<br />
Quando la temperatura ambiente è superiore a quella selezionata, si<br />
attiva nuovamente la funzione di raffreddamento.<br />
TELECOMANDO (SOLO PER P<strong>125</strong>)<br />
a. Schermo LCD ai cristalli liquidi<br />
b. Tasto accensione /spegnimento<br />
c<br />
e<br />
a<br />
b<br />
d<br />
g<br />
c<br />
f<br />
c. Tasti impostazione timer e termostato<br />
d. Tasto modalità operativa (selezionare A/C, Ventilatore o deumidificatore)<br />
e. Tasto regolazione velocità ventilatore A/C (Alta, Media, Bassa)<br />
f. Tasto Timer ON / OFF<br />
g. Selettore di lettura Celsius / Fahrenheit<br />
Il telecomando funziona in combinazione con il pannello di comando. Dirigere la<br />
parte anteriore del telecomando sulla finestra rossa. La distanza massima fino al<br />
climatizzatore è di circa 5 m. Utilizzare batterie AAA.<br />
PROGRAMMAZIONE DEL TIMER<br />
1<br />
Premere il tasto sul telecomando o il tasto “Timer Setting” sul pannello di<br />
controllo per attivare le funzionalità del timer (Timer Function).<br />
2<br />
Premere i tasti o sul telecomando oppure i tasti o sul pannello<br />
di controllo per impostare l'intervallo di funzionamento richiesto.<br />
3<br />
L'apparecchi si spegne automaticamente non appena trascorso il tempo<br />
impostato.<br />
><br />
70
MODALITÀ DEUMIDIFICAZIONE<br />
Premere il tasto del telecomando oppure il tasto MODE (modalità operativa)<br />
del pannello di controllo per attivare la modalità di deumidificazione. Se è stata<br />
prescelta la modalità di deumidificazione, i tasti di temperatura e di gestione<br />
velocità del ventilatore non sono attivi ed il ventilatore funziona alla velocità<br />
intermedia.<br />
La spia luminosa di segnalazione deumidificazione si accende e rimane accesa<br />
sintantoché l'apparecchio rimane in suddetta modalità operativa. Non dimenticare<br />
che nella modalità deumidificazione non è necessario utilizzare il tubo di scarico.<br />
D FILTRO DELL’ARIA<br />
I climatizzatori P<strong>122</strong> e P<strong>125</strong> sono dotati di un filtro a tre strati che consente di<br />
depurare l'aria in circolazione nell'ambiente. I climatizzatori vengono forniti con<br />
un filtro 3M TM Filtrete TM sfuso e un filtro a carboni attivi. Questi filtri devono essere<br />
inseriti seguendo le istruzioni prima di utilizzare i climatizzatori.<br />
1. Filtro a schermo: per rimuovere le particelle di polvere più grandi.<br />
2. Filtro 3M TM Filtrete TM : per rimuovere le particelle dell’aria dannose, quali:<br />
polline, batteri, acari, polvere ecc.<br />
3. Filtro a carboni attivi: per rimuovere gli odori.<br />
Il porta-filtri, posto sulla parte posteriore dell’unità, può essere aperto. Il filtro a<br />
carboni attivi ed il filtro 3M TM Filtrete TM possono essere rimossi, mentre il filtro a<br />
schermo, parte integrante del porta-filtro, non può esser tolto.<br />
1. Il filtro a schermo deve esser pulito regolarmente con un’aspirapolvere per<br />
evitare l’ostruzione del passaggio dell’aria.<br />
3. Nel caso in cui si utilizzi il condizionatore in ambienti particolarmente<br />
sporchi, in ambienti dove sono in corso opere di ristrutturazione, o in<br />
ambienti dove sono presenti animali e/o fumatori, si consiglia di sostituire<br />
ogni tre mesi il filtro 3M TM Filtrete TM insieme al filtro a carboni attivi.<br />
Nuovo filtro<br />
Sostituzione del filtro consigliata<br />
2. Quando il filtro a carboni attivi è polveroso, lo si può pulire con<br />
un’aspirapolvere. In caso di sostituzione del filtro a carboni attivi, si consiglia<br />
di sotituire anche quello filtro 3M TM Filtrete TM .<br />
<br />
AVVERTENZA<br />
• Non utilizzare mai l'apparecchio senza il filtro di garza!<br />
• Far funionare il condizionatore senza l’apparato di filtri a carboni<br />
attivi e/o il filtro 3M TM Filtrete TM , non comporta danni all’unità stessa:<br />
in tal caso le polveri nocive non vengono semplicemente rimosse.<br />
• I kit di filtri da sostuire sono disponibili presso il rivenditore.<br />
><br />
71
E<br />
FLUSSO DELL'ARIA<br />
Per regolare la direzione del flusso d’aria delle feritoie di ventilazione orizzontali,<br />
orientare direttamente la presa di ventilazione.<br />
F<br />
SVUOTAMENTO DEL SERBATOIO DELL'ACQUA<br />
In condizioni estreme potrebbe essere necessario effettuare lo svuotamento del<br />
serbatoio interno. Se il serbatoio dell'acqua è pieno l'indicatore luminoso si<br />
accende ed è udibile un segnale acustico (beep) ininterrotto. Il climatizzatore si<br />
spegne automaticamente. Procedere allo svuotamento del serbatoio secondo le<br />
istruzioni che seguono:<br />
1<br />
Non spostare l'unità. Movimenti bruschi possono provocare perdite d'acqua.<br />
2<br />
Prima di iniziare l'operazione disattivare l'apparecchio e staccare la spina<br />
dalla presa della corrente.<br />
3<br />
Sistemare un pentolino o un recipiente adatto a terra sotto il foro di scarico.<br />
4<br />
Togliere il tappo di gomma dal foro di scarico e far defluire l'acqua dal<br />
serbatoio (± 0,5 L).<br />
5<br />
Richiudere il foro con il tappo , inserire la spina nella presa e accendere<br />
l'apparecchio. A questo punto l'indicatore deve essere spento.<br />
<br />
AVVERTENZA<br />
In condizioni normali il condizionatore scarica l’acqua condensata<br />
attraverso il tubo di scarico dell’aria.<br />
G SCARICO CONTINUO<br />
1<br />
Spegnere l’apparecchio ed estrarre la spina dalla presa.<br />
2<br />
Sistemare un pentolino o un recipiente adatto sotto lo scarico dell'acqua per<br />
raccogliere eventuali fuoriuscite d'acqua.<br />
3<br />
Estrarre il tappo di gomma .<br />
4<br />
Connettere il tubo (ø 15 mm) allo scarico dell’acqua e, se necessario,<br />
allungarlo.<br />
><br />
72
5<br />
Fare passare l'altra estremità del tubo di scarico dell'acqua in un punto<br />
adatto allo scopo (pozzetto di scarico). Evitare di ruotare o piegare il tubo di<br />
scarico. Il tubo deve essere posizionato in pendenza per l'intera lunghezza.<br />
DEUMIDIFICARE<br />
Nel caso in cui adoperiate soltanto la funzione "deumidificatore", non dovrete<br />
collegare il tubo di scarico dell’aria, in modo che l’aria calda rimanga<br />
nell’ambiente da deumidificare. Il tubo per lo scarico dell’acqua deve essere<br />
collegato ad uno scarico fisso. È necessario collegare un tubo di scarico dell'acqua<br />
(0 0,5 pollici all'interno) ad un punto adatto allo scopo.<br />
H PULIZIA<br />
<br />
IMPORTANTE<br />
Spegnere l'unità ed estrarre la spina dalla presa prima di pulire<br />
l'apparecchio o i filtri o prima di sostituire i filtri.<br />
Pulire la superficie esterna del climatizzatore con un panno morbido ed umido.<br />
Non usare agenti chimici aggressivi, benzina, detergenti o alter soluzioni per la<br />
pulizia. Per la manutenzione dei filtri, cfr. capitolo D "Filtro dell'aria".<br />
<br />
AVVERTENZA<br />
Non usare mai il condizionatore senza il filtro di garza.<br />
I<br />
SISTEMAZIONE DELL'APPARECCHIO DOPO L'USO<br />
1<br />
Svuotare il serbatoio dell'acqua (fare riferimento al capitolo F).<br />
2<br />
Pulire (o sostituire) il filtro di garza (leggere anche il capitolo D).<br />
· Eliminare il filtro a carboni attivi e il filtro 3M TM Filtrete TM alla fine della<br />
stagione e inserire nuovi filtri solo all'inizio della nuova stagione. I filtri<br />
vecchi non costituiscono rifiuti chimici e possono essere gettati nei<br />
contenitori per rifiuti (non rifiuti biologici).<br />
- E' possibile acquistare i filtri nuovi presso il suo rivenditore.<br />
3<br />
Impostare l’apparecchio nella modalità ventola per un paio d’ore per<br />
assicurarsi che l’interno del climatizzatore si asciughi completamente.<br />
4<br />
Proteggere l’apparecchio dalla polvere e sistemarlo in un luogo asciutto<br />
lontano dalla portata dei bambini.<br />
><br />
73
J<br />
GUIDA ALLA RICERCA GUASTI<br />
Guasto Causa Soluzione<br />
L’apparecchio<br />
non funziona<br />
L’apparecchio<br />
non sembra in<br />
grado di<br />
eseguire le sue<br />
funzioni<br />
Senza alimentazione elettrica<br />
IL LED del serbatoio dell’acqua è<br />
acceso<br />
Esposto alla luce diretta del sole<br />
Finestre o porte aperte,<br />
sovraffollamento di persone,<br />
presenza di una fonte di calore<br />
nella stanza<br />
Filtro sporco<br />
Presa o uscita dell’aria ostruita<br />
Temperatura ambiente inferiore<br />
al valore impostato<br />
Collegarlo ad una presa<br />
funzionante ed accenderlo<br />
Svuotare il serbatoio dell'acqua<br />
(fare riferimento al capitolo F)<br />
Chiudere le tende<br />
Chiudere le porte e/o le finestre<br />
o mettere in funzione un<br />
climatizzatore supplementare<br />
Pulirlo o sostituirlo<br />
Rimuovere la causa<br />
dell’ostruzione<br />
Modificare il valore della<br />
temperatura selezionato<br />
L’apparecchio fa<br />
rumore<br />
Non si trova su una superficie<br />
piana<br />
Collocarlo su una superficie<br />
piana (minori vibrazioni)<br />
Il compressore<br />
non funziona<br />
Il telecomando<br />
non reagisce<br />
Probabilmente è attiva la<br />
funzione di protezione<br />
antisurriscaldamento<br />
Distanza eccessiva<br />
Il telecomando non viene visto<br />
dal pannello di controllo<br />
Batterie scariche<br />
Attendere 3 minuti, fino a<br />
quando la temperatura si è<br />
abbassata, e riaccendere<br />
l'apparecchio<br />
Controllare che il telecomando<br />
sia rivolto verso il pannello di<br />
comando<br />
Cambiare le batterie<br />
Non provare mai a riparare o smontare da soli il climatizzatore. Le riparazioni<br />
eseguite da persone incompetenti possono invalidare la garanzia e possono<br />
causare lesioni alla persona.<br />
K<br />
GARANZIA<br />
Il condizionatore d’aria ha una garanzia di 24 mesi dalla data d’acquisto. Entro<br />
questo periodo vengono riparati gratuitamente tutti i difetti di fabbricazione o<br />
vizi del materiale. Qui di seguito sono riportate le condizioni della garanzia:<br />
><br />
1. Rifiutiamo esplicitamente tutte le altre richieste di risarcimento, compresi<br />
danni derivanti.<br />
2. La riparazione o la sostituzione di parti entro il termine di garanzia non<br />
comporta la proroga della garanzia stessa.<br />
3. La garanzia non è valida qualora siano state apportate modifiche<br />
all’apparecchio, qualora siano state montate componenti non originali o<br />
qualora siano state effettuate riparazioni da terzi.<br />
4. Nella garanzia non sono comprese le parti soggette a normale usura, quali il<br />
filtro.<br />
74
5. La garanzia vale unicamente dietro presentazione della ricevuta d’acquisto<br />
originale datata e qualora l’apparecchio non sia stato modificato.<br />
6. La garanzia non è valida in caso di danno sorto in seguito ad operazioni che<br />
non sono descritte in questo manuale o in seguito a negligenza.<br />
7. Le spese di spedizione ed i rischi che la spedizione del apparecchio o delle<br />
parti comporta sono sempre a carico dell'acquirente.<br />
Per prevenire costi inutili, si consiglia di consultare dapprima le istruzioni d’uso.<br />
Qualora nelle istruzioni non vi sia alcun suggerimento in merito, rivolgersi al<br />
rivenditore di fiducia per la riparazione del condizionatore d’aria.<br />
L<br />
DATI TECNICI<br />
I valori riportati sono indicativi, dati soggetti a modifiche<br />
Modello<br />
P <strong>122</strong> P <strong>125</strong><br />
Cap. di raffreddamento* W 2200 2500<br />
EE Class*<br />
B<br />
B<br />
EER*<br />
2,4 2,6<br />
Consumo energia W 900 950<br />
Corrente nom. A 3,9 3,9<br />
Alimentazione<br />
V/Hz/PH<br />
220 - 240 / 50 / 1<br />
Flusso aria max. m 3 /h 360 360<br />
Deumidificazione max. ** L/24h 25 28<br />
Ideale per ambienti fino a m 3 75 85<br />
Tipo di compressore<br />
rotante<br />
Refrigerante<br />
tipo/gr<br />
R-407c / 500<br />
Termostato °C<br />
16 - 32<br />
Velocità ventola<br />
3<br />
Livello di rumore<br />
dB<br />
52<br />
Dimensioni (b x h x p)<br />
mm<br />
435 x 760 x 420<br />
Peso netto<br />
kg<br />
30<br />
Protezione unità IP 20<br />
Telecomando<br />
no<br />
sì<br />
Filtro 3M TM Filtrete TM<br />
sì<br />
sì<br />
Filtro a carboni attivi<br />
sì<br />
sì<br />
* conforme a EN14511<br />
** Tasso di umidità relativa pari al 80% ad una temperatura di 32°C<br />
Gli elettrodomestici e gli apparecchi elettrici fuori uso non devono essere smaltiti<br />
come rifiuti domestici. Utilizzare gli appositi centri di consegna e riciclaggio, se<br />
disponibili. Rivolgersi alle autorità locali o ai punti di vendita per le informazioni<br />
del caso.<br />
><br />
75
DISTRIBUTED IN EUROPE BY PVG INTERNATIONAL B.V.<br />
i ÖSTERREICH<br />
PVG Austria VertriebsgmbH<br />
Salaberg 49<br />
3350 HAAG<br />
tel: +43 7434/44867<br />
fax: +43 7434/44868<br />
email: pvgaustria@zibro.com<br />
e BELGIË<br />
PVG Belgium NV/SA<br />
Industrielaan 55<br />
2900 SCHOTEN<br />
tel: +32 3 326 39 39<br />
fax: +32 3 326 26 39<br />
email: pvgbelgium@zibro.com<br />
q SCHWEIZ<br />
PVG Schweiz AG<br />
Genuastrasse 15<br />
4142 MÜNCHENSTEIN<br />
tel: +41 61 337 26 51<br />
fax: +41 61 337 26 78<br />
email: pvgint@zibro.com<br />
2 DEUTSCHLAND<br />
PVG Deutschland GmbH<br />
Beiersdorfstraße 4<br />
46446 EMMERICH<br />
tel: +49 2821 76713<br />
fax: +31 412 648385<br />
email: pvgdeutschland@zibro.com<br />
6 DANMARK<br />
PVG Scandinavia A/S<br />
Niels Bohrsvej 10<br />
6100 HADERSLEV<br />
tel: +45 73 53 02 02<br />
fax: +45 73 53 02 04<br />
email: pvgdenmark@zibro.com<br />
5 ESPAÑA<br />
PVG España S.A.<br />
Pol. Ind. San José de Valderas II<br />
Comunidad ”La Alameda”<br />
C / Aurora Boreal, 19<br />
28918 LEGANÉS (Madrid)<br />
tel: +34 91 611 31 13<br />
fax: +34 91 612 73 04<br />
email: pvgspain@zibro.com<br />
3 FRANCE<br />
PVG France SARL<br />
4, Rue Jean Sibélius<br />
B.P. 185 - 76410<br />
SOTTEVILLE SOUS LE VAL<br />
tel: +33 2 32 96 07 47<br />
fax: +33 2 32 96 07 77<br />
email: pvgfrance@zibro.com<br />
4 UNITED KINGDOM<br />
Lister Gases<br />
Bridge Street<br />
Holloway Bank, Wednesbury<br />
West Midlands WS10 OAW<br />
Tel.: +44 121 506 1818<br />
Fax: +44 121 505 1744<br />
email: gases@lister.co.uk<br />
> ITALIA<br />
PVG Italy SRL<br />
Via Niccolò Copernico 5<br />
50051 CASTELFIORENTINO (FI)<br />
tel: +39 571 628500<br />
fax: +39 571 628504<br />
email: pvgitaly@zibro.com<br />
u NORGE<br />
Sunwind - Gylling A/S<br />
Rudsletta 71-75 / P.O. Box 64<br />
N-1309 RUD<br />
tel: +47 67 17 13 70<br />
fax: +47 67 17 13 80<br />
email: pvgint@zibro.com<br />
1 NEDERLAND<br />
PVG International B.V.<br />
P.O.Box 96<br />
5340 AB OSS<br />
tel: +31 412 694694<br />
fax: +31 412 622893<br />
email: pvgnl@zibro.com<br />
9 PORTUGAL<br />
Gardena, Lda<br />
Recta da Granja do Marquês<br />
ALGUEIRÃO<br />
2725-596 MEM MARTINS<br />
tel: + 35 21 92 28 530<br />
fax: + 35 21 92 28 536<br />
email: pvgint@zibro.com<br />
: POLSKA<br />
PVG Polska Sp. z. o. o.<br />
Kolonia Promna 58<br />
26-803 PROMNA<br />
tel: +48 48 615 16 33<br />
fax: +48 48 615 16 33<br />
email: pvgpoland@zibro.com<br />
PVG Traffic gsc©050329 man_P<strong>122</strong>-<strong>125</strong>