sollevatore elettroidraulico a 2 colonne 2-post electro-hydraulic lift
sollevatore elettroidraulico a 2 colonne 2-post electro-hydraulic lift
sollevatore elettroidraulico a 2 colonne 2-post electro-hydraulic lift

You also want an ePaper? Increase the reach of your titles
YUMPU automatically turns print PDFs into web optimized ePapers that Google loves.
COMPLETAMENTO DEL SISTEMA DI AZIONAMENTO DELLE<br />
SICUREZZE.<br />
1 - Controllare che i martelletti montati sulle <strong>colonne</strong> per l’ arresto<br />
dei carrelli (Vedere Fig.18 Rif.1), siano in ordine e non abbiano subito<br />
danneggiamenti durante il trasporto.<br />
2 - Verificare il loro regolare movimento e l’ efficienza della relativa<br />
molla (Rif.3 Fig.18)<br />
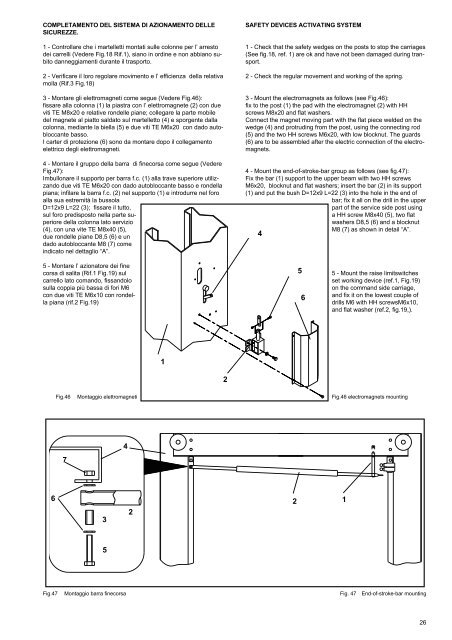
3 - Montare gli elettromagneti come segue (Vedere Fig.46):<br />
fissare alla colonna (1) la piastra con l’ elettromagnete (2) con due<br />
viti TE M8x20 e relative rondelle piane; collegare la parte mobile<br />
del magnete al piatto saldato sul martelletto (4) e sporgente dalla<br />
colonna, mediante la biella (5) e due viti TE M6x20 con dado autobloccante<br />
basso.<br />
I carter di protezione (6) sono da montare dopo il collegamento<br />
elettrico degli elettromagneti.<br />
4 - Montare il gruppo della barra di finecorsa come segue (Vedere<br />
Fig.47):<br />
Imbullonare il supporto per barra f.c. (1) alla trave superiore utilizzando<br />
due viti TE M6x20 con dado autobloccante basso e rondella<br />
piana; infilare la barra f.c. (2) nel supporto (1) e introdurre nel foro<br />
alla sua estremità la bussola<br />
D=12x9 L=22 (3); fissare il tutto,<br />
sul foro predis<strong>post</strong>o nella parte superiore<br />
della colonna lato servizio<br />
(4), con una vite TE M8x40 (5),<br />
due rondelle piane D8,5 (6) e un<br />
dado autobloccante M8 (7) come<br />
indicato nel dettaglio “A”.<br />
SAFETY DEVICES ACTIVATING SYSTEM<br />
1 - Check that the safety wedges on the <strong>post</strong>s to stop the carriages<br />
(See fig.18, ref. 1) are ok and have not been damaged during transport.<br />
2 - Check the regular movement and working of the spring.<br />
3 - Mount the <strong>electro</strong>magnets as follows (see Fig.46):<br />
fix to the <strong>post</strong> (1) the pad with the <strong>electro</strong>magnet (2) with HH<br />
screws M8x20 and flat washers.<br />
Connect the magnet moving part with the flat piece welded on the<br />
wedge (4) and protruding from the <strong>post</strong>, using the connecting rod<br />
(5) and the two HH screws M6x20, with low blocknut. The guards<br />
(6) are to be assembled after the electric connection of the <strong>electro</strong>magnets.<br />
4 - Mount the end-of-stroke-bar group as follows (see fig.47):<br />
Fix the bar (1) support to the upper beam with two HH screws<br />
M6x20, blocknut and flat washers; insert the bar (2) in its support<br />
(1) and put the bush D=12x9 L=22 (3) into the hole in the end of<br />
bar; fix it all on the drill in the upper<br />
part of the service side <strong>post</strong> using<br />
a HH screw M8x40 (5), two flat<br />
washers D8,5 (6) and a blocknut<br />
M8 (7) as shown in detail “A”.<br />
4<br />
5 - Montare l’ azionatore dei fine<br />
corsa di salita (Rif.1 Fig.19) sul<br />
carrello lato comando, fissandolo<br />
sulla coppia più bassa di fori M6<br />
con due viti TE M6x10 con rondella<br />
piana (rif.2 Fig.19)<br />
5<br />
6<br />
5 - Mount the raise limitswitches<br />
set working device (ref.1, Fig.19)<br />
on the command side carriage,<br />
and fix it on the lowest couple of<br />
drills M6 with HH screwsM6x10,<br />
and flat washer (ref.2, fig.19,).<br />
1<br />
2<br />
Fig.46<br />
Montaggio elettromagneti<br />
Fig.46 <strong>electro</strong>magnets mounting<br />
7<br />
4<br />
6<br />
3<br />
2<br />
2 1<br />
5<br />
Fig.47<br />
Montaggio barra finecorsa<br />
Fig. 47<br />
End-of-stroke-bar mounting<br />
26