DLE 50 Professional
DLE 50 Professional
DLE 50 Professional

You also want an ePaper? Increase the reach of your titles
YUMPU automatically turns print PDFs into web optimized ePapers that Google loves.
OBJ_BUCH-135-003.book Page 17 Monday, November 26, 2007 2:42 PM<br />
In this setting, the laser beam also remains switched<br />
on between measurements; for measuring, it is only<br />
required to push the measuring button 9 once.<br />
To switch off the continuous laser beam, push button<br />
12 again or switch the measuring tool off. When<br />
switching on again, the measuring tool is in the standard<br />
operation mode and the laser beam appears only<br />
after pushing the measuring button 9.<br />
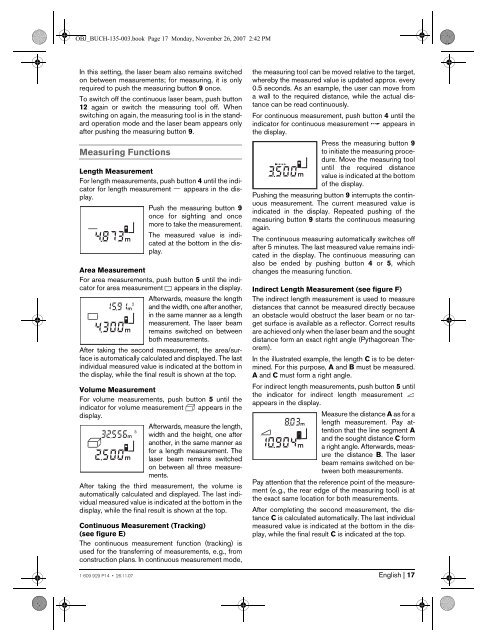
Measuring Functions<br />
Length Measurement<br />
For length measurements, push button 4 until the indicator<br />
for length measurement appears in the display.<br />
Push the measuring button 9<br />
once for sighting and once<br />
more to take the measurement.<br />
The measured value is indicated<br />
at the bottom in the display.<br />
Area Measurement<br />
For area measurements, push button 5 until the indicator<br />
for area measurement appears in the display.<br />
Afterwards, measure the length<br />
and the width, one after another,<br />
in the same manner as a length<br />
measurement. The laser beam<br />
remains switched on between<br />
both measurements.<br />
After taking the second measurement, the area/surface<br />
is automatically calculated and displayed. The last<br />
individual measured value is indicated at the bottom in<br />
the display, while the final result is shown at the top.<br />
Volume Measurement<br />
For volume measurements, push button 5 until the<br />
indicator for volume measurement appears in the<br />
display.<br />
Afterwards, measure the length,<br />
width and the height, one after<br />
another, in the same manner as<br />
for a length measurement. The<br />
laser beam remains switched<br />
on between all three measurements.<br />
After taking the third measurement, the volume is<br />
automatically calculated and displayed. The last individual<br />
measured value is indicated at the bottom in the<br />
display, while the final result is shown at the top.<br />
Continuous Measurement (Tracking)<br />
(see figure E)<br />
The continuous measurement function (tracking) is<br />
used for the transferring of measurements, e.g., from<br />
construction plans. In continuous measurement mode,<br />
1 609 929 P14 • 26.11.07<br />
the measuring tool can be moved relative to the target,<br />
whereby the measured value is updated approx. every<br />
0.5 seconds. As an example, the user can move from<br />
a wall to the required distance, while the actual distance<br />
can be read continuously.<br />
For continuous measurement, push button 4 until the<br />
indicator for continuous measurement appears in<br />
the display.<br />
Press the measuring button 9<br />
to initiate the measuring procedure.<br />
Move the measuring tool<br />
until the required distance<br />
value is indicated at the bottom<br />
of the display.<br />
Pushing the measuring button 9 interrupts the continuous<br />
measurement. The current measured value is<br />
indicated in the display. Repeated pushing of the<br />
measuring button 9 starts the continuous measuring<br />
again.<br />
The continuous measuring automatically switches off<br />
after 5 minutes. The last measured value remains indicated<br />
in the display. The continuous measuring can<br />
also be ended by pushing button 4 or 5, which<br />
changes the measuring function.<br />
Indirect Length Measurement (see figure F)<br />
The indirect length measurement is used to measure<br />
distances that cannot be measured directly because<br />
an obstacle would obstruct the laser beam or no target<br />
surface is available as a reflector. Correct results<br />
are achieved only when the laser beam and the sought<br />
distance form an exact right angle (Pythagorean Theorem).<br />
In the illustrated example, the length C is to be determined.<br />
For this purpose, A and B must be measured.<br />
A and C must form a right angle.<br />
For indirect length measurements, push button 5 until<br />
the indicator for indirect length measurement<br />
appears in the display.<br />
Measure the distance A as for a<br />
length measurement. Pay attention<br />
that the line segment A<br />
and the sought distance C form<br />
a right angle. Afterwards, measure<br />
the distance B. The laser<br />
beam remains switched on between<br />
both measurements.<br />
Pay attention that the reference point of the measurement<br />
(e.g., the rear edge of the measuring tool) is at<br />
the exact same location for both measurements.<br />
After completing the second measurement, the distance<br />
C is calculated automatically. The last individual<br />
measured value is indicated at the bottom in the display,<br />
while the final result C is indicated at the top.<br />
English | 17