- Page 1 and 2: GTB/GSB GTB 13 #55120 GTB 16 #55190
- Page 3 and 4: Allgemeine Sicherheitsvorschriften
- Page 5 and 6: Informationen zum elektrischen Teil
- Page 7 and 8: Montage Montieren und Reinigen Pack
- Page 9 and 10: Bohrmaschinenkopf an Säule 1. Hebe
- Page 11 and 12: 3. Einstellungen Änderung der Spin
- Page 13 and 14: Vorschub Ziehen Sie den Vorschubhan
- Page 15 and 16: Verpackungsliste GTB 13 Nr. Bezeich
- Page 17 and 18: List of Contents ARTICLE Page 1. Te
- Page 19 and 20: 4. Drills-Specific Safety Precautio
- Page 21: 6. Meet Your Drill 1 - Rotation spe
- Page 25 and 26: Shaft and Chuck Assembling (Fig. 12
- Page 27 and 28: Fig. 16 Fig. 17 Drilling Depth (Fig
- Page 29 and 30: 11. Drilling Specifications Table 2
- Page 31 and 32: 13. List of Spare Parts for GTB 13
- Page 33 and 34: 15. Pack Sheet GTB 13 No. Descripti
- Page 35 and 36: Table des matières Désignation Pa
- Page 37 and 38: 18. ATTENTION: La poussière, produ
- Page 39 and 40: 7. Connaissez votre perceuse 1 - Ta
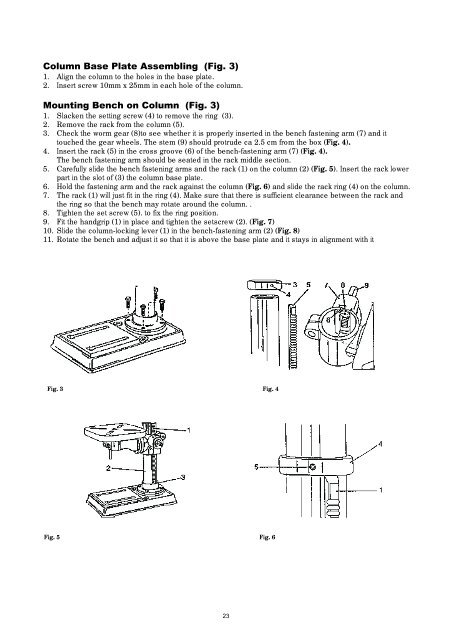
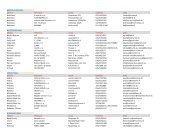
- Page 41 and 42: Plaque de base et la colonne (Fig.
- Page 43 and 44: 3. Abb. Installation de l´arbre de
- Page 45 and 46: Fig. 16 Fig. 17 Profondeur de perç
- Page 47 and 48: 12. Table de perçage 47
- Page 49 and 50: 14. Liste de pièces détachées po
- Page 51 and 52: 16. Lettre d´emballage pour GTB 13
- Page 53 and 54: Obsah ČLÁNEK STRANA 1. Technické
- Page 55 and 56: Tyto bezpečnostní předpisy dodr
- Page 57 and 58: 7. Seznamte se se svou vrtačkou 1
- Page 59 and 60: Montáž základové desky na sloup
- Page 61 and 62: Montáž hřídele a sklíčidla (o
- Page 63 and 64: Obr. 16 Obr. 17 Hloubka vrtání (o
- Page 65 and 66: 12. Tabulka pro vrtání 65
- Page 67 and 68: 14. Seznam náhradních dílů pro
- Page 69 and 70: 16. Balicí list GTB 13 Č. Označe
- Page 71 and 72: Obsah ČLÁNOK STRANA 1. Technické
- Page 73 and 74:
Tieto bezpečnostné predpisy dodr
- Page 75 and 76:
7. Oboznámte sa so svojou vŕtačk
- Page 77 and 78:
Montáž základovej dosky na stĺp
- Page 79 and 80:
Montáž hriadeľa a skľučovadla
- Page 81 and 82:
Vreteno je vybavené automatickým
- Page 83 and 84:
12. Tabuľka pre vŕtanie 83
- Page 85 and 86:
14. Zoznam náhradných dielcov pre
- Page 87 and 88:
16. Baliaci list GTB 13 Č. Označe
- Page 89 and 90:
Inhoud HOOFDSTUK PAGINA 1. T echnis
- Page 91 and 92:
18. WAARSCHUWING: Stof, die door be
- Page 93 and 94:
7. Leer de boormachine kennen 1 - T
- Page 95 and 96:
Machinevoet en kolom (Afbeelding 3)
- Page 97 and 98:
3. Afb. Montage van de spil en de b
- Page 99 and 100:
Afb. 18 Afb. 19 BELANGRIJK: De moer
- Page 101 and 102:
12. Boortabel 101
- Page 103 and 104:
14. Onderdelenlijst van de GTB 13 D
- Page 105 and 106:
16. Verpakkingslijst GTB 13 Nr. Ben
- Page 107 and 108:
Indice Capitolo Pagina 1. Dati e ca
- Page 109 and 110:
4. Ulteriori norme di sicurezza 13.
- Page 111 and 112:
7. Conoscete bene la Vostra macchin
- Page 113 and 114:
Montaggio della lastra di base sull
- Page 115 and 116:
Montaggio dell’albero e del mandr
- Page 117 and 118:
Molla di ritorno (fig. 19) Alberell
- Page 119 and 120:
12. Tabella indicatrice per vari ti
- Page 121 and 122:
14. Elenco dei pezzi di ricambio pe
- Page 123 and 124:
16. Lista d’imballaggio GTB 13 Nu
- Page 125 and 126:
Tartalomjegyzék Jelölés Oldal 1.
- Page 127 and 128:
15. A SÉRÜLT GÉPALKATRÉSZEKET E
- Page 129 and 130:
7. Ismerkedjen meg fúrógépjével
- Page 131 and 132:
A talp szerelése az oszlopra (3.sz
- Page 133 and 134:
3. 13. A tengely és tokmány szere
- Page 135 and 136:
16. sz.kép 17 . sz.kép Fúratmél
- Page 137 and 138:
12. Fordulatszámtáblázat fúrás
- Page 139 and 140:
14. Pótalkatrészek listája a GTB
- Page 141 and 142:
16. Csomagoló-lap GTB 13 Sz. Jelö
- Page 143 and 144:
Vsebina ODSTAVEK STRAN 1. Tehnični
- Page 145 and 146:
18. OPOZORILO: Prah iz določenih m
- Page 147 and 148:
7. Spoznajte svoj vrtalnik 1 - Tabe
- Page 149 and 150:
Montaža osnovne plošče na steber
- Page 151 and 152:
3. Slika Montaža osi in pritezalni
- Page 153 and 154:
Globina vrtanja (slika 18) Za vrtan
- Page 155 and 156:
11. Tabela za vrtanje 155
- Page 157 and 158:
13. Seznam nadomestnih delov za GTB
- Page 159 and 160:
15. Embalažni list za GTB 13 Št.
- Page 161 and 162:
Sadržaj ČLANAK STRANA 1. Tehničk
- Page 163 and 164:
18. OPREZ: Prašina od nekih materi
- Page 165 and 166:
7. Upoznajte svoju bušilicu 1 - Ta
- Page 167 and 168:
Montaža osnovne ploče na stup (sl
- Page 169 and 170:
3. Slika Montaža vratila i glave z
- Page 171 and 172:
Slika 16 Slika 17 Dubina bušenja (
- Page 173 and 174:
Tablica za bušenje 173
- Page 175 and 176:
13. Popis rezervnih dijelova za GTB
- Page 177 and 178:
15. Popis sadržaja pakiranja GTB 1
- Page 179 and 180:
Sadržaj ČLANAK STRANA 1. Tehničk
- Page 181 and 182:
18. OPREZ: Prašina od nekih materi
- Page 183 and 184:
7. Upoznajte svoju bušilicu 1 - Ta
- Page 185 and 186:
Montaža osnovne ploče na stup (sl
- Page 187 and 188:
3. Slika Montaža vratila i glave z
- Page 189 and 190:
Slika 16 Slika 17 Dubina bušenja (
- Page 191 and 192:
Tablica za bušenje 191
- Page 193 and 194:
13. Popis rezervnih dijelova za GTB
- Page 195 and 196:
15. Popis sadržaja pakiranja GTB 1
- Page 197 and 198:
Cuprins CAPITOL PAGINA 1. Date tehn
- Page 199 and 200:
5. Reglementări de securitate spec
- Page 201 and 202:
7. Faceţi cunoştinţă cu maşina
- Page 203 and 204:
Montarea batiului pe montant (fig.
- Page 205 and 206:
Montarea arborelui şi mandrinei (f
- Page 207 and 208:
Fig. 18 Fig. 19 IMPORTANT: Nu strâ
- Page 209 and 210:
12. Tabel pentru burghiere 209
- Page 211 and 212:
14. Lista de piese de schimb pentru
- Page 213 and 214:
16. Listă de ambalare GTB 13 Nr Ma
- Page 215 and 216:
Съдържание РАЗДЕЛ
- Page 217 and 218:
14. ПОДЪРЖАЙТЕ ДОБРЕ
- Page 219 and 220:
7. Запознайте се със
- Page 221 and 222:
1. Носещия стълб наг
- Page 223 and 224:
Монтаж на вала и па
- Page 225 and 226:
Кар. 16 Кар. 17 Дълбоч
- Page 227 and 228:
12. Таблица за проби
- Page 229 and 230:
15. Списък на резерв
- Page 231:
Декларация за сход