âminiâ rgb led light for swimming pool projecteur ... - Partnerline AS
âminiâ rgb led light for swimming pool projecteur ... - Partnerline AS
âminiâ rgb led light for swimming pool projecteur ... - Partnerline AS

Create successful ePaper yourself
Turn your PDF publications into a flip-book with our unique Google optimized e-Paper software.
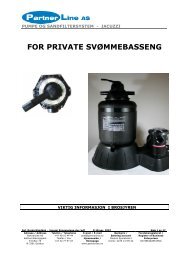
ENGLISHIMPORTANT: The instruction manual you are holding includes essential in<strong>for</strong>mation on the safety measures to beimplemented <strong>for</strong> installation and start-up. There<strong>for</strong>e, the installer as well as the user must read the instructions be<strong>for</strong>ebeginning installation and start-up.Keep this manual <strong>for</strong> future reference.To achieve optimum per<strong>for</strong>mance of the Mini <strong>light</strong> <strong>for</strong> <strong>swimming</strong> <strong>pool</strong>, follow the instructions provided below:1. VERIFY THE CONTENTS OF THE PACKING:The following accessories are included inside the box:Concrete <strong>pool</strong> floodlamp, model 32382 / 36655 Prefabricated <strong>pool</strong> floodlamp, model 32383 / 36657Housing body Housing bodyFloodlamp unit 2 watertight jointsBag of screws: Floodlamp unit1 DIN 912 A4 M-4x12 screw Bag of screws6 DIN 966 A4 M-6x24 Punt. Screws 2 DIN 7981 A4 4,8x16 screws2 gland seal adapter 1 DIN 912 A4 M-4x12 screw6 DIN 966 A4 M-6x24 Punt. Screws2 gland seal adapterPanel<strong>led</strong> <strong>pool</strong> with Liner floodlamp, model 34185 / 36659Housing body2 watertight jointsFloodlamp unitBag of screws2. GENERAL CHARACTERISTICS:This floodlamp has been designed to be used fully submerged underwater in fresh water. It is a Class III electric apparatuswith very low safety voltage.The floodlamp complies with IPX8 degree of protection (resistance to penetration of dust, solid bodies and humidity) at anominal immersion depth of 2 m.This floodlamp complies with international safety standards <strong>for</strong> <strong>light</strong>s, especially the EN 60598-2-18 standard: LIGHTSPART 2: SPECIFIC REQUIREMENTS SECTION 18 LIGHTS FOR SWIMMING POOLS AND SIMILAR APPLICATIONS.The manufacturer is not responsible in any circumstances <strong>for</strong> assembly, installation or start-up of any electric componentswhich have been inserted or hand<strong>led</strong> at locations other than its own premises.3. INSTALLATION: In order to clearly <strong>light</strong> a <strong>pool</strong> it is recommended to install a floodlamp every 5 m 2 of water surface. In <strong>swimming</strong> <strong>pool</strong>swhich are especially deep, a floodlamp is required <strong>for</strong> every 10 m 3 of water volume. In order to prevent glare, the floodlamps should be instal<strong>led</strong> so that they face away from the residence or usual view ofthe <strong>swimming</strong> <strong>pool</strong>. In the event that <strong>light</strong>ing is used in training or competition <strong>pool</strong>s, the floodlamps should be instal<strong>led</strong> on the sides toprevent glare on the swimmers. To avoid emptying the <strong>pool</strong> if the projector has to be hand<strong>led</strong>, it is recommended to install it in places which areaccessible from the upper edge of the <strong>pool</strong>.Prior to installation verify that the gland seal has been fully tightened.The floodlamp should be placed on the wall of the <strong>pool</strong> at approximately 400-700 mm from the water surface (Fig. 1). Thecrosshead and the clamp must be placed so that that the word "TOP" is located on the upper partThe method of fastening the crosshead mount to the <strong>pool</strong> wall varies depending on whether it is a floodlamp <strong>for</strong> concrete<strong>pool</strong>s (model 32382) or prefabricated <strong>pool</strong>s (model 32383)Concrete <strong>swimming</strong> <strong>pool</strong> (Model 32382 / 36655)To install a floodlamp in a concrete <strong>pool</strong> the housing (no. 11) should be fixed in the wall of the <strong>swimming</strong> <strong>pool</strong> (Fig. 1). Useeight M6x24 (n21) screws to secure the housing clamp to the <strong>pool</strong>.Prefabricated <strong>swimming</strong> <strong>pool</strong> (Model 32383 / 36657)To install a floodlamp in prefabricated <strong>swimming</strong> <strong>pool</strong> make a circular hole with a diameter of 110 mm (Fig. 2).Install the housing and one of the joints on the outer side of the <strong>pool</strong>. Install the other joint (no. 3) on the inner side anduse two cylindrical screws (no. 21) to secure the three components (Fig. 3). Make sure that the cable outlet of the housingremains on the upper part.To install the housing clamp (no. 2) on the inner side of the <strong>swimming</strong> <strong>pool</strong>, make sure that the cylindrical heads of thescrews (no. 21) which have been instal<strong>led</strong> previously coincide with the area reserved <strong>for</strong> them on the back part of the clamp(Fig 4).Use eight 6 x 24 screws (no. 21) to secure the clamp to the wall of the <strong>pool</strong> (Fig 5). Make sure that the word "TOP" islocated on the upper part.-2-