- Page 3: 1 See Page 15.25BDEC3ABBA6CAB4A3
- Page 6 and 7: 2125 ACABCB22B26A23ABFullA2724AA6
- Page 8 and 9: 3438BA“A”C35EDCF39AAB1/32”(0.
- Page 10 and 11: OPERATOR SAFETYDANGER - Amputation
- Page 12 and 13: OPERATOR SAFETYOperation and Equipm
- Page 14 and 15: OPERATOR SAFETYEngine Safety (Conti
- Page 17 and 18: FEATURES AND CONTROLSAFDCE1 2BIJHGS
- Page 19 and 20: OPERATIONBEFORE OPERATING SNOWTHROW
- Page 21 and 22: OPERATIONFILL THE FUEL TANKThis eng
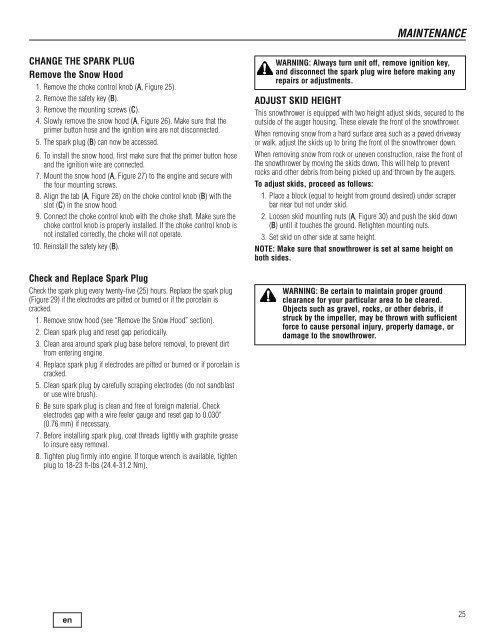
- Page 23: MAINTENANCESERVICE RECOMMENDATIONSP
- Page 27 and 28: MAINTENANCETraction Control Cable A
- Page 29 and 30: TROUBLESHOOTINGPROBLEM LOOK FOR REM
- Page 31 and 32: SPECIFICATIONSENGINE:BrandModel Ser
- Page 33 and 34: OBSAHIlustrace.....................
- Page 35 and 36: BEZPEČNOST OBSLUHYKontrolní znač
- Page 37 and 38: BEZPEČNOST OBSLUHYPohyblivé čás
- Page 39 and 40: BEZPEČNOST OBSLUHYTento symbol uka
- Page 41 and 42: FUNKCE A OVLADAČEAFDCE1 2BIJHGOvla
- Page 43 and 44: OVLÁDÁNÍPŘED POUŽITÍM SNĚHOV
- Page 45 and 46: OVLÁDÁNÍPLNĚNÍ NÁDRŽETento m
- Page 47 and 48: ÚDRŽBABEZPEČNOSTPOSTUPPřekontro
- Page 49 and 50: ÚDRŽBAVÝMĚNA SVÍČKYSundejte s
- Page 51 and 52: ÚDRŽBAÚprava kabelu řízení tr
- Page 53 and 54: ŘEŠENÍ PROBLÉMŮPROBLÉM ZKONTR
- Page 55 and 56: TECHNICKÉ ÚDAJEMOTOR:ZnačkaSéri
- Page 57 and 58: INHALTAbbildungen..................
- Page 59 and 60: ARBEITSSCHUTZSteuerungssymbole auf
- Page 61 and 62: ARBEITSSCHUTZBewegliche TeileSchleu
- Page 63 and 64: ARBEITSSCHUTZBeachten Sie dieses Sy
- Page 65 and 66: FUNKTIONEN UND STEUERUNGENAFDCE1 2B
- Page 67 and 68: BETRIEBVOR INBETRIEBNAHME DER SCHNE
- Page 69 and 70: BETRIEBKRAFTSTOFFTANK AUFFÜLLENDer
- Page 71 and 72: WARTUNGWARTUNGSEMPFEHLUNGENSICHERHE
- Page 73 and 74: WARTUNGAUSTAUSCHEN DER ZÜNDKERZEEn
- Page 75 and 76:
WARTUNGAnpassung des Antriebsteueru
- Page 77 and 78:
FEHLERSUCHE UND -BEHEBUNGPROBLEM Ü
- Page 79 and 80:
TECHNISCHE DATENMOTOR:MarkeModell-S
- Page 81 and 82:
SISÄLLYSKuvat ....................
- Page 83 and 84:
KÄYTTÄJÄN TURVALLISUUSLaitteessa
- Page 85 and 86:
KÄYTTÄJÄN TURVALLISUUSLiikkuvat
- Page 87 and 88:
KÄYTTÄJÄN TURVALLISUUSPane merki
- Page 89 and 90:
TOIMINNOT JA HALLINTALAITTEETAFDCE1
- Page 91 and 92:
KÄYTTÖENNEN LUMILINGON KÄYTTÖÄ
- Page 93 and 94:
KÄYTTÖPOLTTOAINESÄILIÖN TÄYTT
- Page 95 and 96:
HUOLTOHUOLTOSUOSITUKSETTURVALLISUUS
- Page 97 and 98:
HUOLTOSYTYTYSTULPAN VAIHTOLumisuoja
- Page 99 and 100:
HUOLTOVedon ohjausvaijerin säätö
- Page 101 and 102:
VIANMÄÄRITYSONGELMA TARKISTA RATK
- Page 103 and 104:
TEKNISET TIEDOTMOOTTORI:MerkkiMalli
- Page 105 and 106:
CONTENUIllustrations ..............
- Page 107 and 108:
SÉCURITÉ DE L’OPÉRATEURSymbole
- Page 109 and 110:
SÉCURITÉ DE L’OPÉRATEURPièces
- Page 111 and 112:
SÉCURITÉ DE L’OPÉRATEURCe symb
- Page 113 and 114:
CARACTÉRISTIQUES ET COMMANDESAFDCE
- Page 115 and 116:
FONCTIONNEMENTAVANT DE FAIRE FONCTI
- Page 117 and 118:
FONCTIONNEMENTREMPLISSAGE DU RÉSER
- Page 119 and 120:
ENTRETIENRECOMMANDATIONS DE SERVICE
- Page 121 and 122:
ENTRETIENCHANGEMENT DE LA BOUGIE D
- Page 123 and 124:
ENTRETIENRéglage du câble de la t
- Page 125 and 126:
DÉPANNAGEPROBLÈME VÉRIFIEZ SOLUT
- Page 127 and 128:
SPÉCIFICATIONSMOTEUR :MarqueSérie
- Page 129 and 130:
TARTALOMIllusztrációk............
- Page 131 and 132:
A FELHASZNÁLÓ BIZTONSÁGAA kész
- Page 133 and 134:
A FELHASZNÁLÓ BIZTONSÁGAMozgó a
- Page 135 and 136:
A FELHASZNÁLÓ BIZTONSÁGAEz a jel
- Page 137 and 138:
A KÉSZÜLÉK KEZELŐSZERVEIAFDCE1
- Page 139 and 140:
ÜZEMELTETÉSA HÓKOTRÓ ÜZEMELTET
- Page 141 and 142:
ÜZEMELTETÉSAZ ÜZEMANYAGTARTÁLY
- Page 143 and 144:
KARBANTARTÁSBIZTONSÁGAZELJÁRÁSE
- Page 145 and 146:
KARBANTARTÁSA GYÚJTÓGYERTYA CSER
- Page 147 and 148:
KARBANTARTÁSA vonóerő szabályoz
- Page 149 and 150:
HIBÁK ÉS ELHÁRÍTÁSUKPROBLÉMAA
- Page 151 and 152:
MŰSZAKI ADATOKMOTOR:MárkaModell s
- Page 153 and 154:
INDICEIllustrazioni................
- Page 155 and 156:
SICUREZZA DELL’OPERATORESimboli d
- Page 157 and 158:
SICUREZZA DELL’OPERATOREParti in
- Page 159 and 160:
SICUREZZA DELL’OPERATORECercare q
- Page 161 and 162:
FUNZIONI E COMANDIAFDCE1 2BIJHGComa
- Page 163 and 164:
FUNZIONAMENTOPRIMA DI METTERE IN FU
- Page 165 and 166:
FUNZIONAMENTORIEMPIRE IL SERBATOIO
- Page 167 and 168:
MANUTENZIONESICUREZZAPROCEDURAContr
- Page 169 and 170:
MANUTENZIONECAMBIO DELLA CANDELARim
- Page 171 and 172:
MANUTENZIONERegolazione del cavo di
- Page 173 and 174:
INDIVIDUAZIONE E CORREZIONE DEI PRO
- Page 175 and 176:
DATI TECNICIMOTORE:MarchioModello s
- Page 177 and 178:
TURINYSPaveikslėliai .............
- Page 179 and 180:
OPERATORIAUS SAUGAAnt įrenginio es
- Page 181 and 182:
OPERATORIAUS SAUGAJudamosios dalysS
- Page 183 and 184:
OPERATORIAUS SAUGAIeškokite šio s
- Page 185 and 186:
FUNKCIJOS IR VALDIKLIAIAFDCE1 2BIJH
- Page 187 and 188:
NAUDOJIMASPRIEŠ PRADEDANT NAUDOTI
- Page 189 and 190:
NAUDOJIMASDEGALŲ BAKO PILDYMASŠis
- Page 191 and 192:
TECHNINĖ PRIEŽIŪRATECHNINĖS PRI
- Page 193 and 194:
TECHNINĖ PRIEŽIŪRAUŽDEGIMO ŽVA
- Page 195 and 196:
TECHNINĖ PRIEŽIŪRATraukos valdym
- Page 197 and 198:
TRIKČIŲ ŠALINIMASPROBLEMA GALIMA
- Page 199 and 200:
SPECIFIKACIJOSVARIKLIS:Prekės žen
- Page 201 and 202:
INNHOLDIllustrasjoner..............
- Page 203 and 204:
OPERATØRSIKKERHETKontrollsymboler
- Page 205 and 206:
OPERATØRSIKKERHETBevegelige delerK
- Page 207 and 208:
OPERATØRSIKKERHETSe etter dette sy
- Page 209 and 210:
FUNKSJONER OG STYREMEKANISMERAFDCE1
- Page 211 and 212:
BRUKFØR DU TAR SNØFRESEREN I BRUK
- Page 213 and 214:
BRUKSLIK FYLLER DU PÅ BRENNSTOFFDe
- Page 215 and 216:
VEDLIKEHOLDSERVICEANBEFALINGERPROSE
- Page 217 and 218:
VEDLIKEHOLDSKIFTE AV TENNPLUGGFjern
- Page 219 and 220:
VEDLIKEHOLDJustering av trekkraftst
- Page 221 and 222:
FEILSØKINGPROBLEM? SE ETTER BOTEMI
- Page 223 and 224:
SPESIFIKASJONERMOTOR:MerkeModellser
- Page 225 and 226:
ZAWARTOŚĆIlustracje..............
- Page 227 and 228:
BEZPIECZEŃSTWO OPERATORASymbole st
- Page 229 and 230:
BEZPIECZEŃSTWO OPERATORACzęści r
- Page 231 and 232:
BEZPIECZEŃSTWO OPERATORASymbol ten
- Page 233 and 234:
PRZYRZĄDY I FUNKCJEAFDCE1 2BIJGHKo
- Page 235 and 236:
OBSŁUGAPRZED EKSPLOATACJĄ DMUCHAW
- Page 237 and 238:
OBSŁUGANAPEŁNIANIE ZBIORNIKA PALI
- Page 239 and 240:
KONSERWACJAZALECENIA DOTYCZĄCE SER
- Page 241 and 242:
KONSERWACJAWYMIANA ŚWIECY ZAPŁONO
- Page 243 and 244:
KONSERWACJARegulacja kabla sterowan
- Page 245 and 246:
ROZWIĄZYWANIE PROBLEMÓWPROBLEM SZ
- Page 247 and 248:
SPECYFIKACJESILNIK:MarkaModel seria
- Page 249 and 250:
VSEBINAIlustracije.................
- Page 251 and 252:
VARNOST UPRAVLJAVCASimboli za kontr
- Page 253 and 254:
VARNOST UPRAVLJAVCAPremični deliOt
- Page 255 and 256:
VARNOST UPRAVLJAVCATa simbol vas bo
- Page 257 and 258:
FUNKCIJE IN KONTROLEAFDCE1 2BIJGHKo
- Page 259 and 260:
UPRAVLJANJEPREDEN PRIČNETE DELATI
- Page 261 and 262:
UPRAVLJANJENAPOLNITE REZERVOAR ZA G
- Page 263 and 264:
VZDRŽEVANJEPRIPOROČILA ZA SERVISI
- Page 265 and 266:
VZDRŽEVANJEZAMENJAJTE VŽIGALNO SV
- Page 267 and 268:
VZDRŽEVANJEPrilagajanje nadzornega
- Page 269 and 270:
ODPRAVLJANJE TEŽAVTEŽAVA PREVERIT
- Page 271 and 272:
TEHNIČNE LASTNOSTIMOTOR:ZnamkaSeri
- Page 273 and 274:
INNEHÅLLIllustrationer ...........
- Page 275 and 276:
ANVÄNDARENS SÄKERHETReglagesymbol
- Page 277 and 278:
ANVÄNDARENS SÄKERHETRörliga dela
- Page 279 and 280:
ANVÄNDARENS SÄKERHETLeta upp denn
- Page 281 and 282:
EGENSKAPER OCH REGLAGEAFDCE1 2BIJGH
- Page 283 and 284:
ANVÄNDNINGINNAN SNÖSLUNGAN ANVÄN
- Page 285 and 286:
ANVÄNDNINGFYLL BRÄNSLETANKENDenna
- Page 287 and 288:
UNDERHÅLLSERVICEREKOMMENDATIONERPR
- Page 289 and 290:
UNDERHÅLLBYT TÄNDSTIFTTa bort sn
- Page 291 and 292:
UNDERHÅLLJustera drivreglagets kab
- Page 293 and 294:
FELSÖKNINGPROBLEM HITTA EN ÅTGÄR
- Page 295 and 296:
SPECIFIKATIONERMOTOR:MärkeModell s


